seats Lexus GX460 2014 Using the air conditioning system and defogger / LEXUS 2014 GX460 (OM60K80U) Owner's Guide
[x] Cancel search | Manufacturer: LEXUS, Model Year: 2014, Model line: GX460, Model: Lexus GX460 2014Pages: 622, PDF Size: 8.61 MB
Page 128 of 622

128
GX460_OM_OM60K80U_(U)3-3. Adjusting the seats
Driving position memory
The seat and steering wheel are automatically adjusted to allow the driver to
enter and exit the vehicle easily.
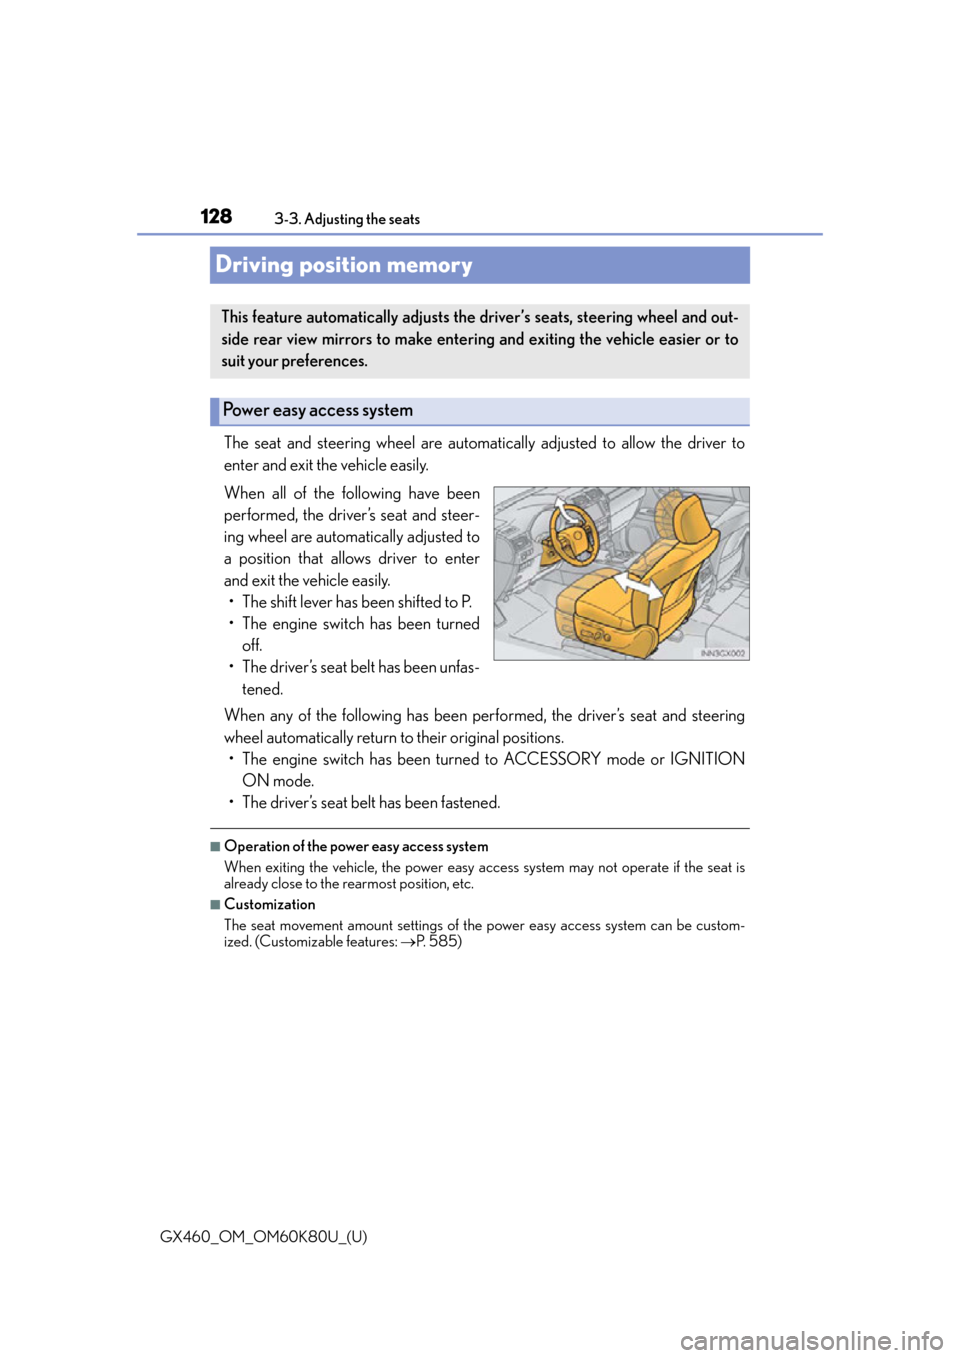
When all of the following have been
performed, the driver’s seat and steer-
ing wheel are automatically adjusted to
a position that allows driver to enter
and exit the vehicle easily.
• The shift lever has been shifted to P.
• The engine switch has been turned off.
• The driver’s seat belt has been unfas- tened.
When any of the following has been perf ormed, the driver’s seat and steering
wheel automatically return to their original positions. • The engine switch has been turn ed to ACCESSORY mode or IGNITION
ON mode.
• The driver’s seat belt has been fastened.
■Operation of the power easy access system
When exiting the vehicle, the power easy acc ess system may not operate if the seat is
already close to the rearmost position, etc.
■Customization
The seat movement amount settings of the power easy access system can be custom-
ized. (Customizable features: P. 585)
This feature automatically adjusts the dr iver’s seats, steering wheel and out-
side rear view mirrors to make enteri ng and exiting the vehicle easier or to
suit your preferences.
Power easy access system
Page 129 of 622

GX460_OM_OM60K80U_(U)
1293-3. Adjusting the seats
3
Operation of each component
Your preferred driving position (the position of the driver’s seat, steering wheel
and outside rear view mirrors) can be recorded and recalled by pressing a but-
ton.
Two different driving positions can be recorded into memory.
■Recording procedure
Check that the shift lever is in P.
Turn the engine switch to IGNITION ON mode.
Adjust the driver’s seat, steering wheel, and outside rear view mirrors to the
desired positions.
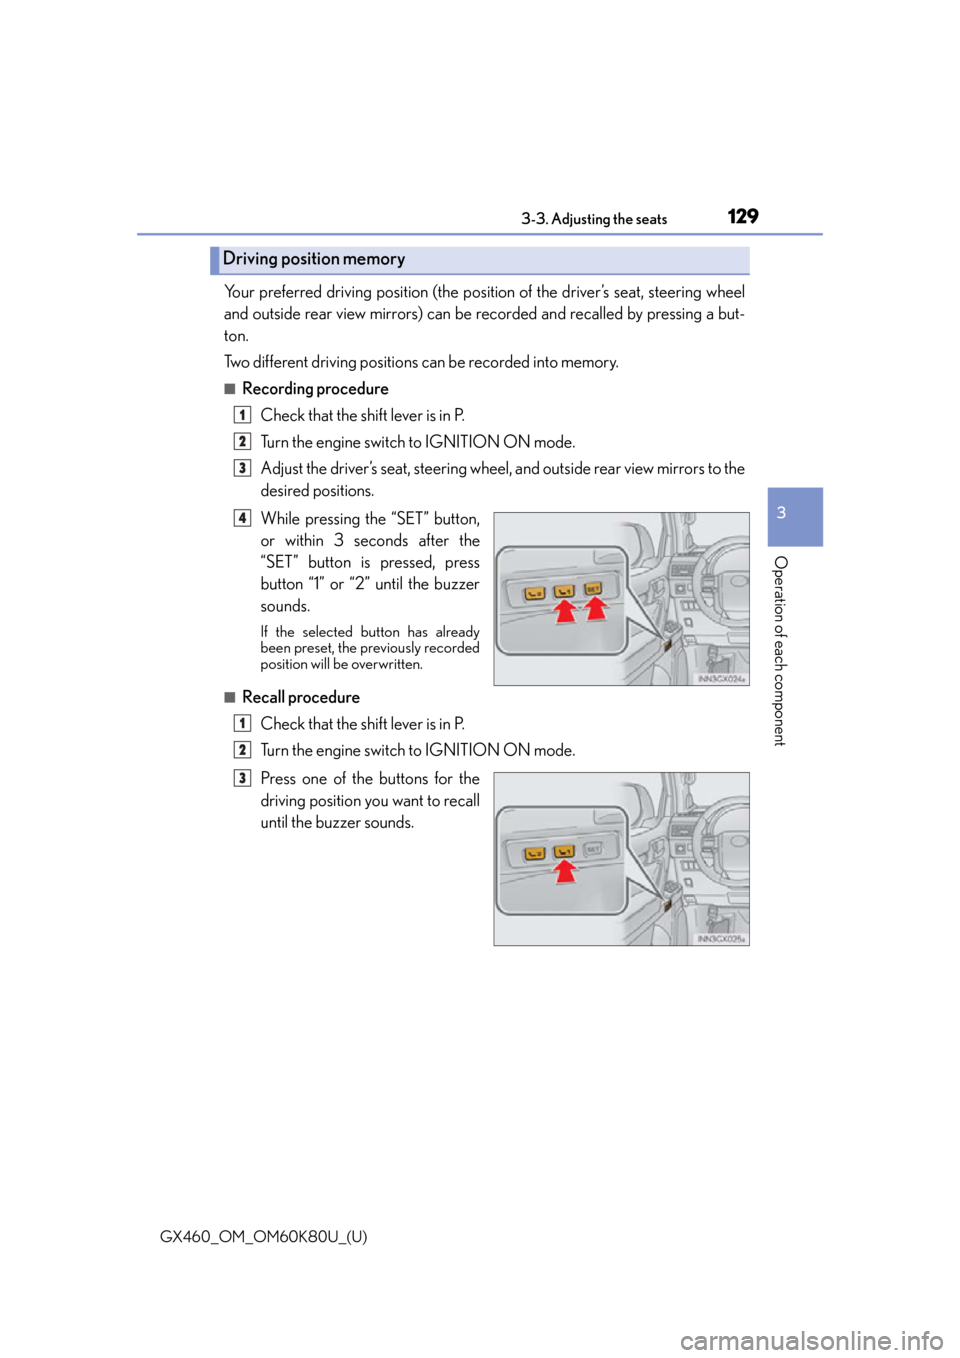
While pressing the “SET” button,
or within 3 seconds after the
“SET” button is pressed, press
button “1” or “2” until the buzzer
sounds.
If the selected button has already
been preset, the previously recorded
position will be overwritten.
■Recall procedure
Check that the shift lever is in P.
Turn the engine switch to IGNITION ON mode.
Press one of the buttons for the
driving position you want to recall
until the buzzer sounds.
Driving position memory
1
2
3
4
1
2
3
Page 130 of 622

130
GX460_OM_OM60K80U_(U)3-3. Adjusting the seats
■To stop the position recall operation part-way through
Perform any of the following:
●Press the “SET” button.
●Press button “1” or “2”.
●Operate any of the seat adjustment switch
es (only cancels seat position recall).
●Operate the tilt and telescopic steering co ntrol switch (only cancels steering wheel
position recall).
■Seat positions that can be memorized ( P. 115)
The adjusted positions other than the position adjusted by lumbar support switch can be
recorded.
■Operating the driving position memory after turning the engine switch off
Recorded seat positions can be activated up to 180 seconds after the driver’s door is
opened and another 60 seconds after it is closed again.
■In order to correctly use the dr iving position memory function
If a seat position is already in the furthest po ssible position and the seat is operated in the
same direction, the recorded position may be slightly different when it is recalled.
Each electronic key can be registered to recall your preferred driving position.
■Registering procedure
Record your driving position to button “1” or “2” before performing the follow-
ing:
Carry only the key you want to regist er, and then close the driver’s door.
If 2 or more keys are in the vehicle, the driving position cannot be recorded
properly.
Check that the shift lever is in P.
Turn the engine switch to IGNITION ON mode.
Recall the driving position that you want to record.
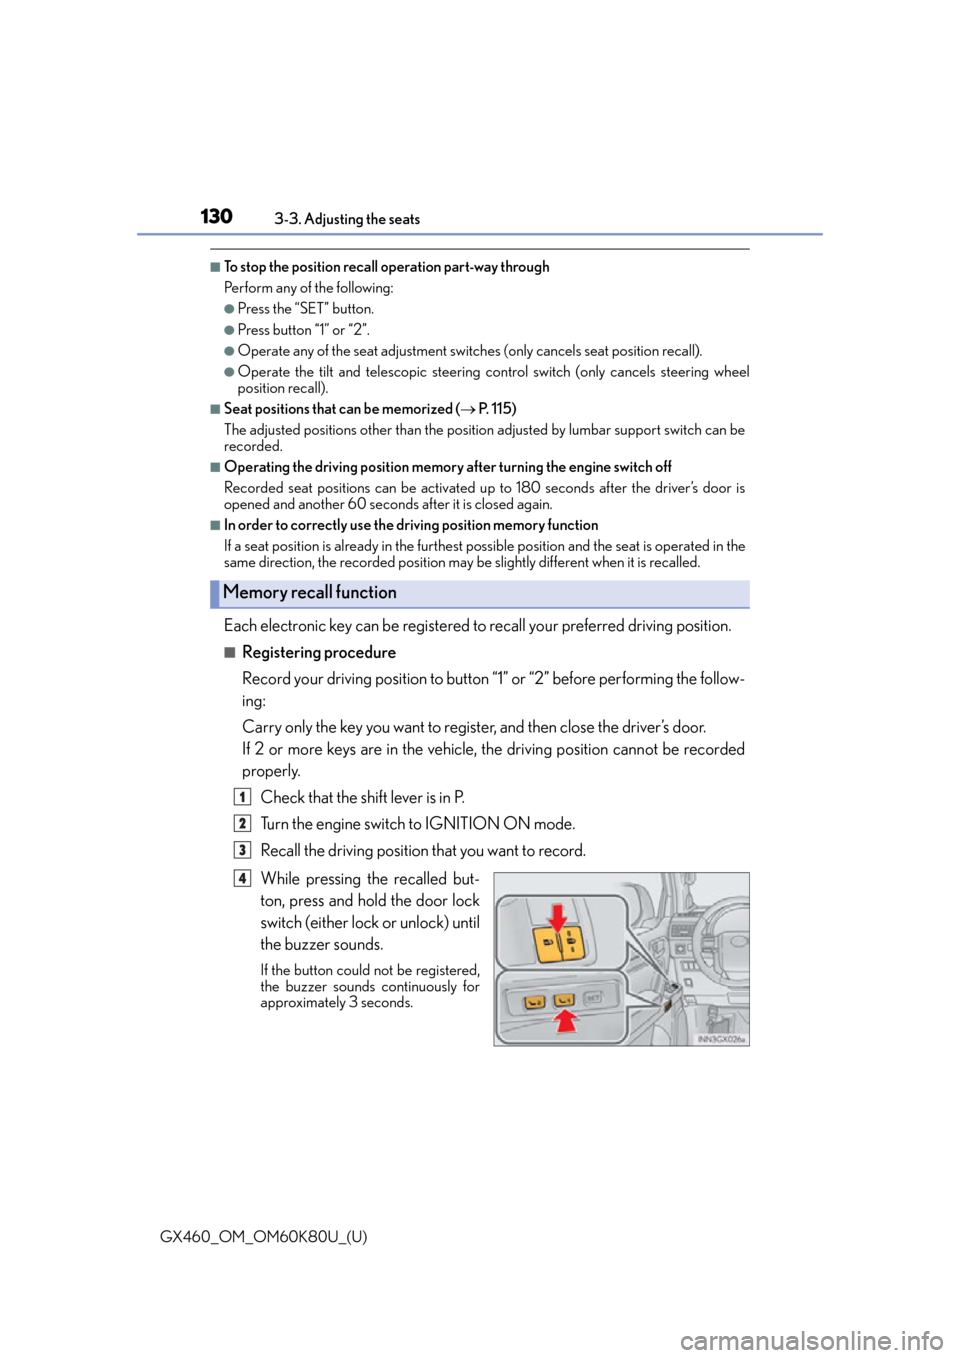
While pressing the recalled but-
ton, press and hold the door lock
switch (either lock or unlock) until
the buzzer sounds.
If the button could not be registered,
the buzzer sounds continuously for
approximately 3 seconds.
Memory recall function
1
2
3
4
Page 131 of 622

GX460_OM_OM60K80U_(U)
1313-3. Adjusting the seats
3
Operation of each component
■Recall procedureCarry the electronic key that has been registered to the driving position,
and then unlock and open the driver’s door using the smart access system
with push-button start or wireless remote control.
The driving position will move to the reco rded position (not including the steering
wheel). However, the seat will move to a po sition slightly behind the recorded posi-
tion in order to make entering the vehicle easier.
If the driving position is in a position th at has already been recorded, the seat and
outside rear view mirrors will not move.
Turn the engine switch to ACCESSORY mode or IGNITION ON mode,
or fasten a seat belt.
The seat and steering wheel will move to the recorded position.
■Cancelation procedure
Carry only the key you want to cancel and then close the driver’s door.
If 2 or more keys are in the vehicle, the driving position cannot be canceled
properly.
Turn the engine switch to IGNITION ON mode.
While pressing the “SET” button, press and hold the door lock switch
(either lock or unlock) unt il the buzzer sounds twice.
If the button could not be canceled, the buzzer sounds continuously for approxi-
mately 3 seconds.
■Recalling the driving position using the memory recall function
●Different driving positions can be registered for each electronic key. Therefore, the
driving position that is recalled may be different depending on the key being carried.
●If a door other than the driver’s door is unlocked with the smart access system with
push-button start, the driving position cannot be recalled. In this case, press the driving
position button which has been set.
■Customization
The unlock door settings of the memory recall function can be customized.
(Customizable features: P. 585)
CAUTION
■Seat adjustment caution
Take care during seat adjustment so that th e seat does not strike the rear passenger or
squeeze your body against the steering wheel.
1
2
1
2
Page 132 of 622

132
GX460_OM_OM60K80U_(U)3-3. Adjusting the seats
Head restraints
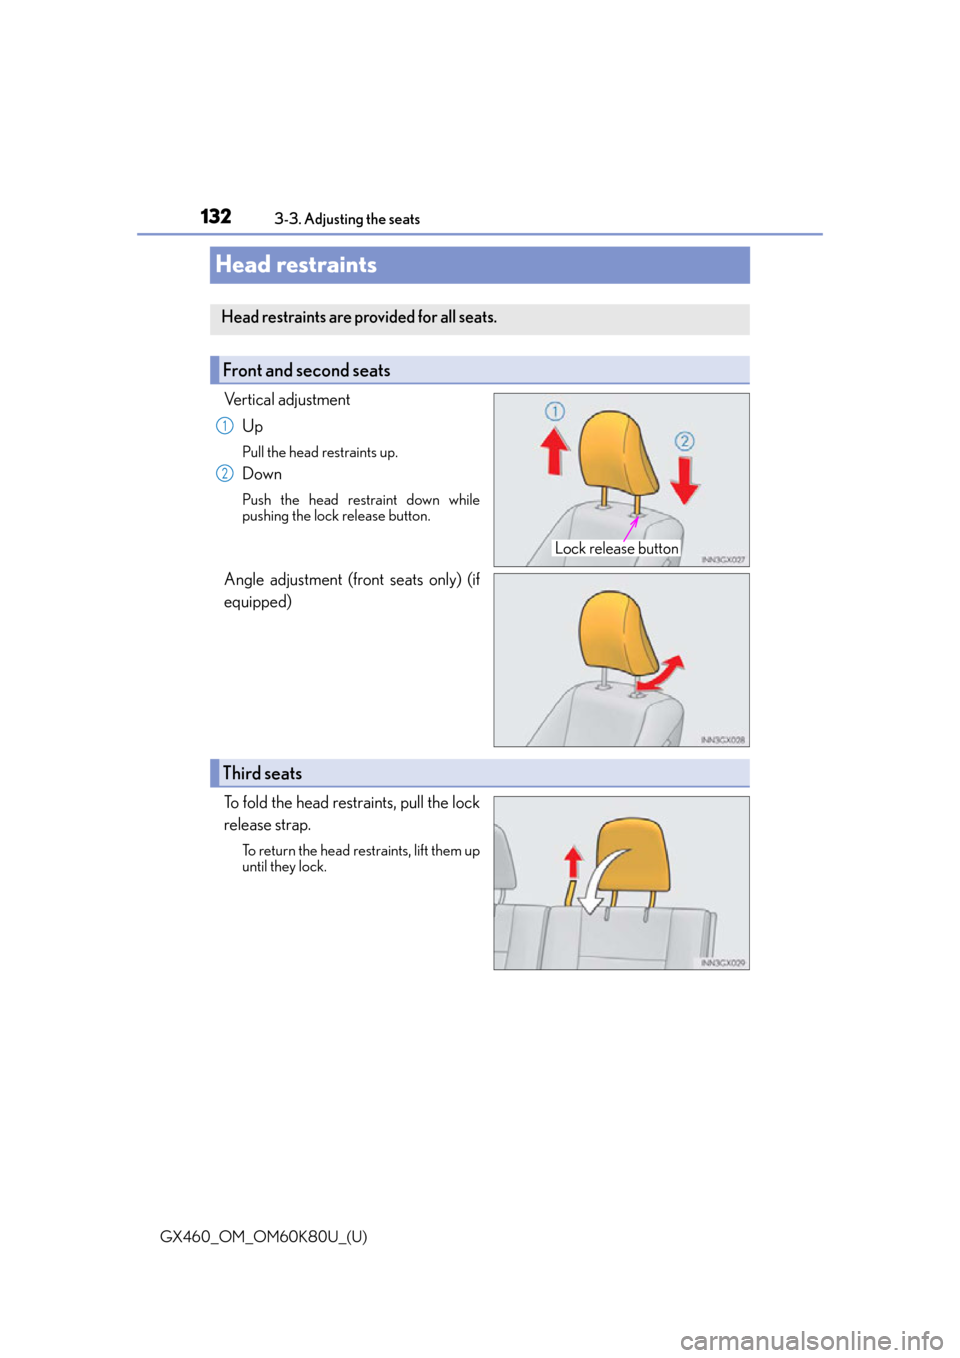
Vertical adjustment
Up
Pull the head restraints up.
Down
Push the head restraint down while
pushing the lock release button.
Angle adjustment (front seats only) (if
equipped)
To fold the head restraints, pull the lock
release strap.
To return the head restraints, lift them up
until they lock.
Head restraints are provided for all seats.
Front and second seats
Lock release button
1
2
Third seats
Page 133 of 622

GX460_OM_OM60K80U_(U)
1333-3. Adjusting the seats
3
Operation of each component
■Removing the head restraints
Front and second seats
Third seats
The head restraint cannot be removed.
■Installing the head restraints (front and second seats)
■Adjusting the height of the head re straints (front and second seats)
■Using the second center seat head restraint
■Using the third seats
Always lift the head restraints up until they lock when using.
Pull the head restraint up
while pressing the lock
release button.
Align the head restrain t with the installation
holes and push it down to the lock position.
Make sure that the head restraints are adjusted
so that the center of the head restraint is closest
to the top of your ears.
Always raise the head restraint one level from
the stowed position when using.
Lock release button
Page 134 of 622

134
GX460_OM_OM60K80U_(U)3-3. Adjusting the seats
CAUTION
■Head restraint precautions
Observe the following precautions regarding the head restraints. Failure to do so may
result in death or serious injury.
●Use the head restraints designed for each respective seat.
●Adjust the head restraints to the correct position at all times.
●After adjusting the head restraints, push down on them and make sure they are
locked in position.
●Do not drive with the head restraints removed.
Page 159 of 622

GX460_OM_OM60K80U_(U)
1594-1. Before driving
4
Driving
CAUTION
■Things that must not be carried in the luggage compartment
The following things may cause a fire if loaded in the luggage compartment:
●Receptacles containing gasoline
●Aerosol cans
■Storage precautions
Observe the following precautions.
Failure to do so may prevent the pedals from being depressed properly, may block the
driver’s vision, or may result in items hittin g the driver or passengers, possibly causing
an accident.
●Stow cargo and luggage in the luggage compartment whenever possible.
●Do not stack cargo and luggage in the luggage compartment higher than the seat-
backs.
●Do not place cargo or luggage in or on the following locations.
• At the feet of the driver
• On the front passenger or rear seats (when stacking items)
• On the luggage cover (if equipped)
• On the instrument panel
•On the dashboard
●Secure all items in th e occupant compartment.
●When you fold down the rear seats, long items should not be placed directly behind
the front seats.
●Never allow anyone to ride in the luggage compartment. It is not designed for pas-
sengers. They should ride in their seats wi th their seat belts properly fastened. Other-
wise, they are much more likely to suffer de ath or serious bodily injury, in the event of
sudden braking, sudden swerving or an accident.
Page 377 of 622

GX460_OM_OM60K80U_(U)
3775-1. Using the air conditioning system and defogger
5
Interior features
■Adjusting the temperature setting
Press to increase the temperature and to decrease the tempera-
ture.
■Adjusting the fan speed setting
Press to increase the fan speed and to decrease the fan speed.
Press the “OFF” button to turn the fan off.
■Changing the air flow mode
Select an air outlet switch.
■Option control screen
Touch on the climate screen to display the option control screen. The
functions can be switched on and off.
Select to set cooling and dehu-
midification function on/off
Adjust the temperature for driver
and passenger seats separately
(“DUAL” mode)/driver, passen-
ger and rear seats separately (“3-
ZO N E ” m o d e ) ( P. 3 7 8 )
Prevent ice from building up on
the windshield and wiper blades
(if equipped) ( P. 3 8 1 )
Remove pollen from the air ( P. 3 8 1 )
1
2
3
4
Page 378 of 622

3785-1. Using the air conditioning system and defogger
GX460_OM_OM60K80U_(U)
Press to operate the speech
command system. (Refer to the
“NAVIGATION SYSTEM OWNER’S
MANUAL”.)
■Using the automatic mode Press the “AUTO” button.
Press to switch to automatic air intake mode. (if equipped)
The air conditioning system automatically switches between outside air and recir-
culated air modes.
Adjust the temperature setting.
To stop the operation, press the “OFF” button.
■If the system is operated manually in automatic mode
If the fan speed setting or air flow modes are operated, the automatic mode
indicator goes off. However, automati c mode for functions other than that
operated are maintained.
■Adjusting the temperature for driver and passenger seats separately
(“DUAL” mode)/driver, passenger and rear seats separately (“3-ZONE”
mode)
To turn on the “DUAL”/“3-ZONE” mode, perform any of the following proce-
dures:
●Press the “DUAL”/“3-ZONE” button.
●Select “DUAL”/“3-ZONE” on the option control screen.
●Adjust the passenger’s side temperature setting.
The indicator comes on when the “DUAL”/“3-ZONE” mode is on.
While in “DUAL” mode, the temperature of the rear air outlets is set at the
passenger’s side temperature setting.
Using the speech command system
Air conditioning controls
1
2
3
4