display Lexus GX460 2015 Navigation Manual
[x] Cancel search | Manufacturer: LEXUS, Model Year: 2015, Model line: GX460, Model: Lexus GX460 2015Pages: 401, PDF Size: 14.2 MB
Page 134 of 401
133
4. MEMORY POINTS
GX460_Navi_OM60L77U_(U)14.06.02 10:48
3
NAVIGATION SYSTEM
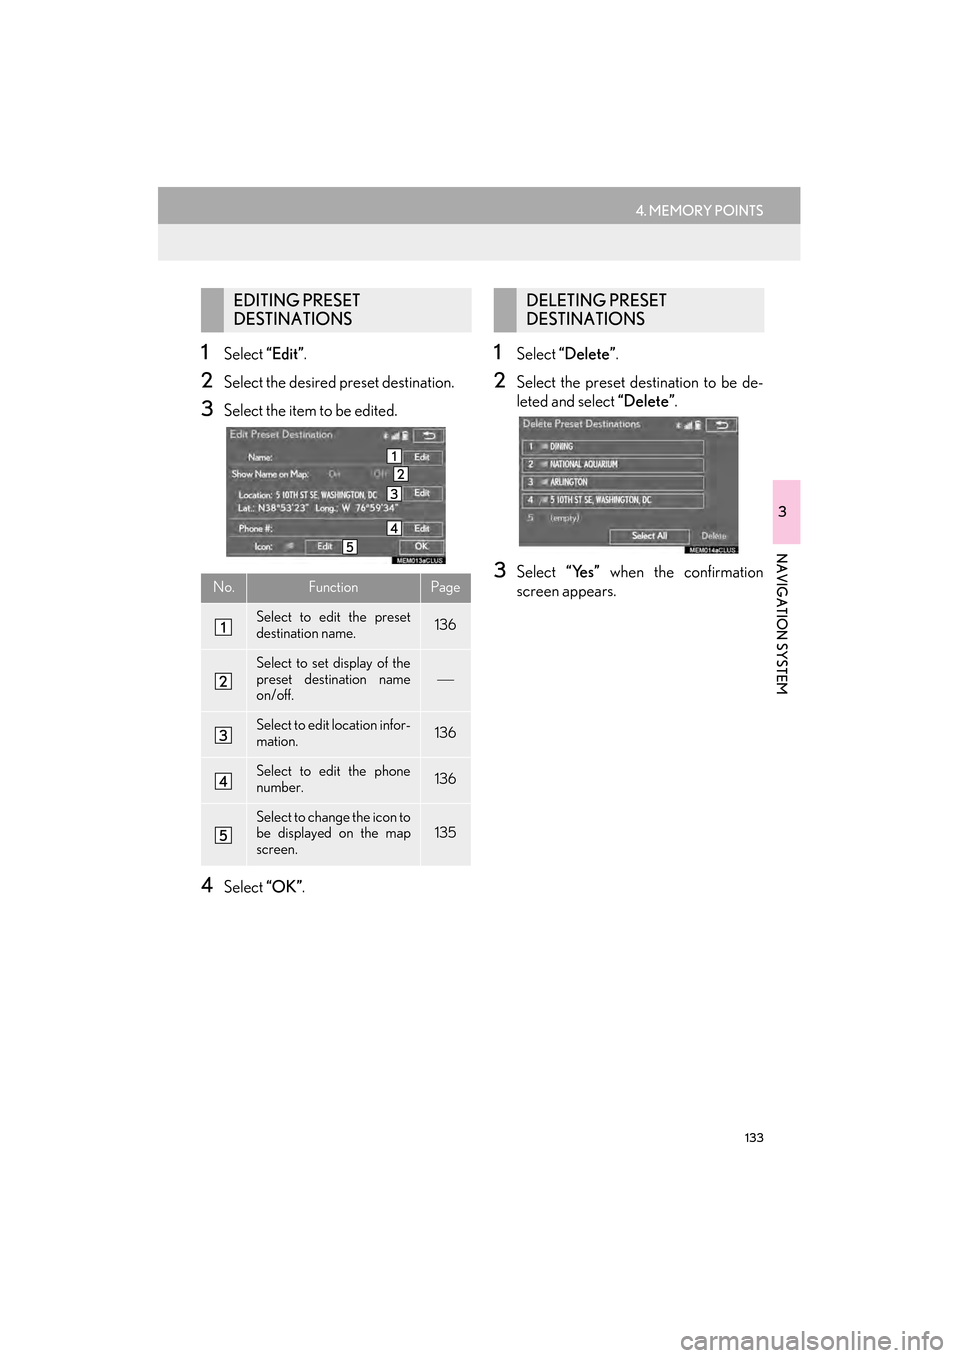
1Select “Edit”.
2Select the desired preset destination.
3Select the item to be edited.
4Select “OK”.
1Select “Delete” .
2Select the preset destination to be de-
leted and select “Delete”.
3Select “Yes” when the confirmation
screen appears.
EDITING PRESET
DESTINATIONS
No.FunctionPage
Select to edit the preset
destination name.136
Select to set display of the
preset destination name
on/off.
Select to edit location infor-
mation.136
Select to edit the phone
number.136
Select to change the icon to
be displayed on the map
screen.135
DELETING PRESET
DESTINATIONS
GX_Navi_OM60L77U_(U).book Page 133 Monday, June 2, 2014 10:49 AM
Page 135 of 401
134
4. MEMORY POINTS
GX460_Navi_OM60L77U_(U)14.06.02 10:48
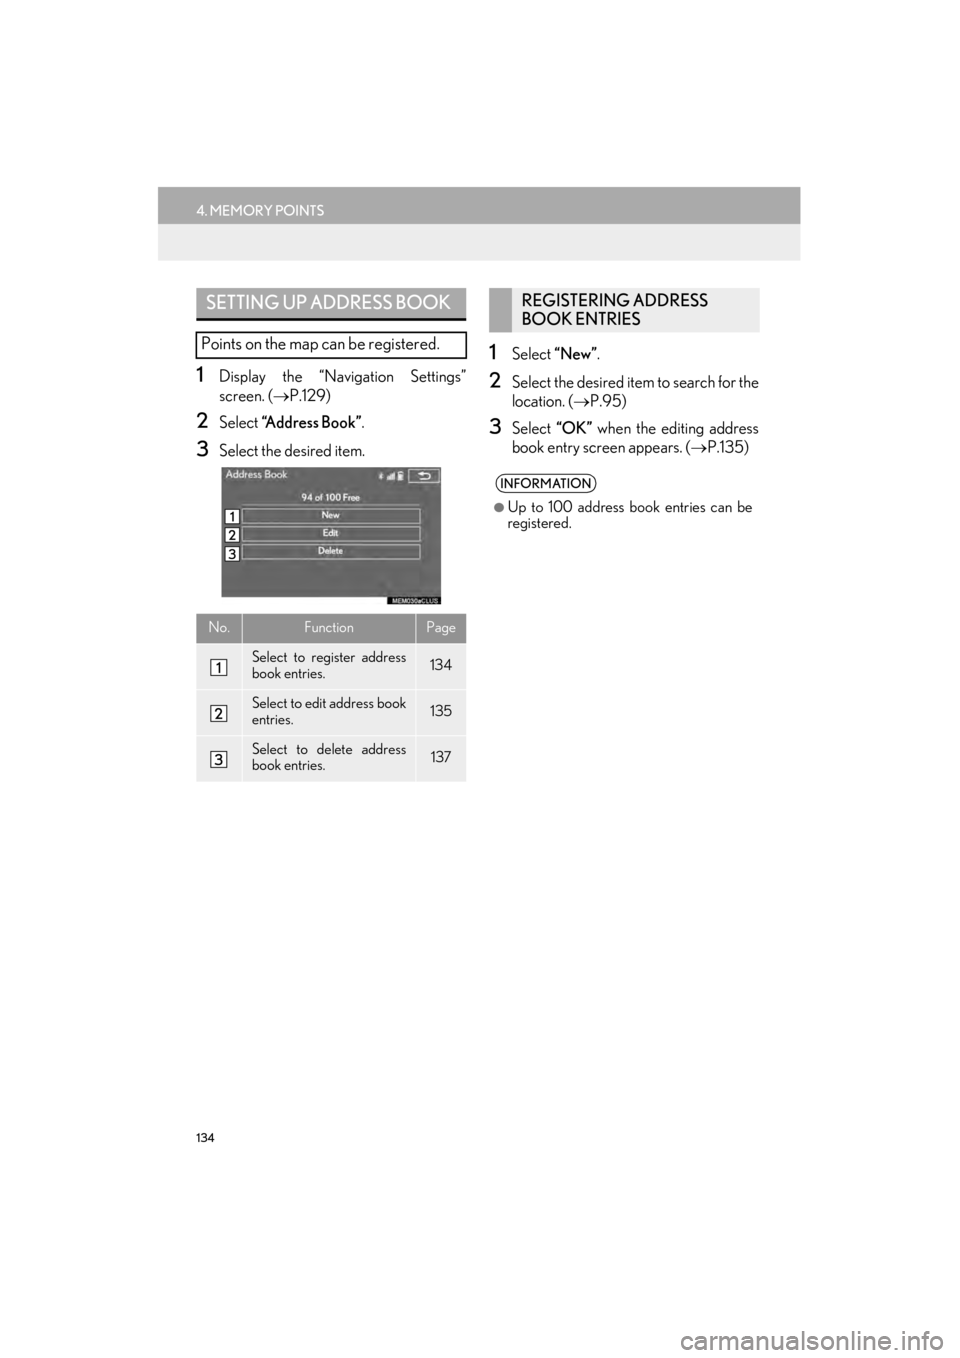
1Display the “Navigation Settings”
screen. (→P.129)
2Select “Address Book” .
3Select the desired item.
1Select “New” .
2Select the desired item to search for the
location. ( →P.95)
3Select “OK” when the editing address
book entry screen appears. ( →P.135)
SETTING UP ADDRESS BOOK
Points on the map can be registered.
No.FunctionPage
Select to register address
book entries.134
Select to edit address book
entries.135
Select to delete address
book entries.137
REGISTERING ADDRESS
BOOK ENTRIES
INFORMATION
●
Up to 100 address book entries can be
registered.
GX_Navi_OM60L77U_(U).book Page 134 Monday, June 2, 2014 10:49 AM
Page 136 of 401
135
4. MEMORY POINTS
GX460_Navi_OM60L77U_(U)14.06.02 10:48
3
NAVIGATION SYSTEM
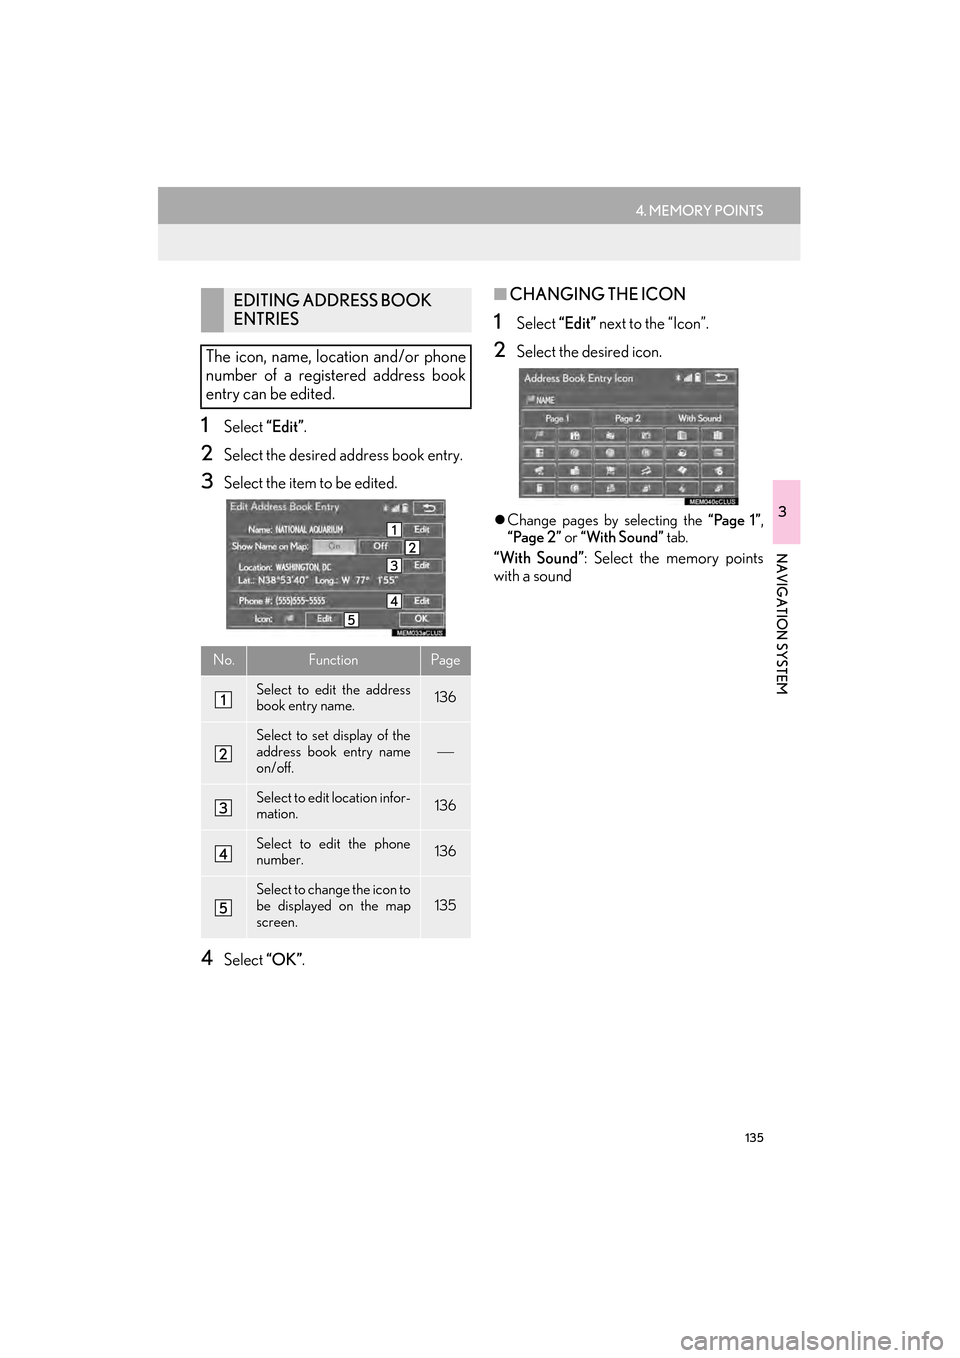
1Select “Edit”.
2Select the desired address book entry.
3Select the item to be edited.
4Select “OK”.
■CHANGING THE ICON
1Select “Edit” next to the “Icon”.
2Select the desired icon.
�zChange pages by selecting the “Page 1” ,
“Page 2” or “With Sound” tab.
“With Sound” : Select the memory points
with a sound
EDITING ADDRESS BOOK
ENTRIES
The icon, name, location and/or phone
number of a registered address book
entry can be edited.
No.FunctionPage
Select to edit the address
book entry name.136
Select to set display of the
address book entry name
on/off.
Select to edit location infor-
mation.136
Select to edit the phone
number.136
Select to change the icon to
be displayed on the map
screen.135
GX_Navi_OM60L77U_(U).book Page 135 Monday, June 2, 2014 10:49 AM
Page 138 of 401
137
4. MEMORY POINTS
GX460_Navi_OM60L77U_(U)14.06.02 10:48
3
NAVIGATION SYSTEM
1Select “Delete” .
2Select the item to be deleted and select
“Delete”.
3Select “Yes” when the confirmation
screen appears.
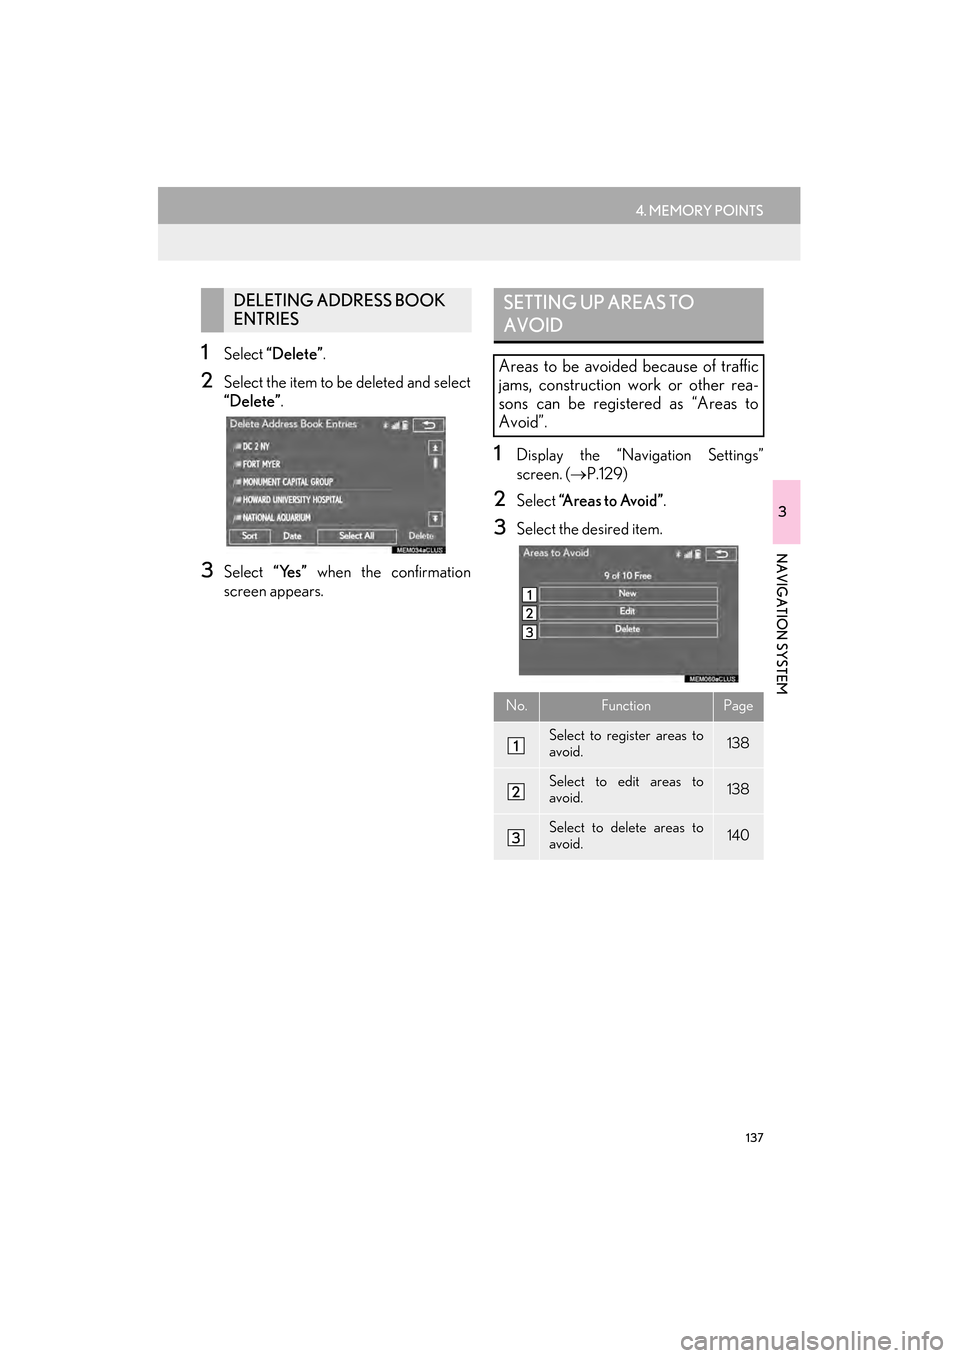
1Display the “Navigation Settings”
screen. ( →P.129)
2Select “A r e a s t o A v o i d ” .
3Select the desired item.
DELETING ADDRESS BOOK
ENTRIESSETTING UP AREAS TO
AVOID
Areas to be avoided because of traffic
jams, construction work or other rea-
sons can be registered as “Areas to
Avoid”.
No.FunctionPage
Select to register areas to
avoid.138
Select to edit areas to
avoid.138
Select to delete areas to
avoid.140
GX_Navi_OM60L77U_(U).book Page 137 Monday, June 2, 2014 10:49 AM
Page 140 of 401
139
4. MEMORY POINTS
GX460_Navi_OM60L77U_(U)14.06.02 10:48
3
NAVIGATION SYSTEM
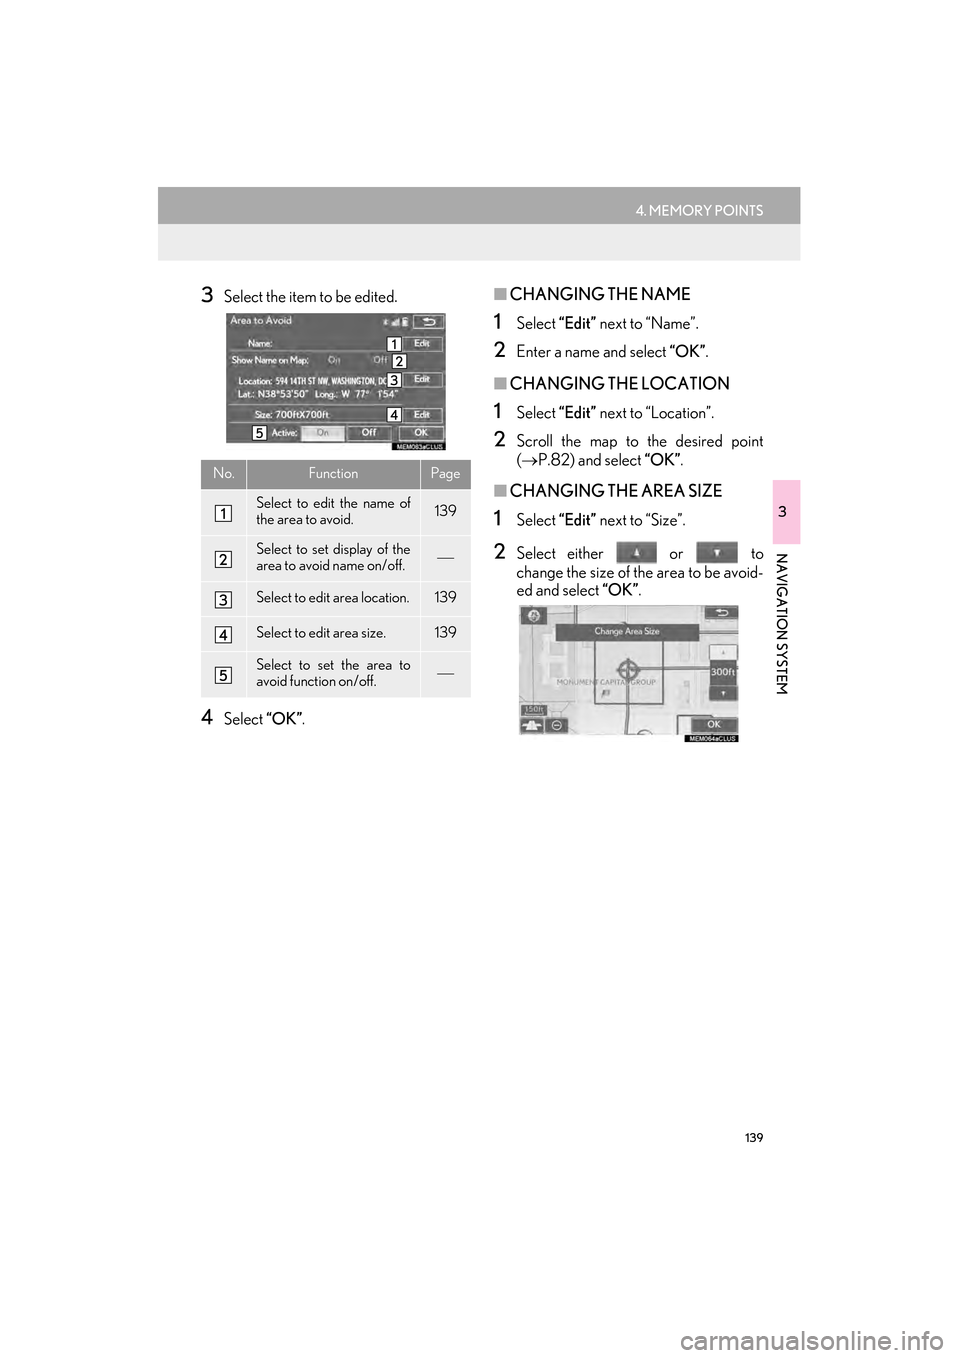
3Select the item to be edited.
4Select “OK”.
■CHANGING THE NAME
1Select “Edit” next to “Name”.
2Enter a name and select “OK”.
■CHANGING THE LOCATION
1Select “Edit” next to “Location”.
2Scroll the map to the desired point
(→ P.82) and select “OK” .
■CHANGING THE AREA SIZE
1Select “Edit” next to “Size”.
2Select either or to
change the size of the area to be avoid-
ed and select “OK”.
No.FunctionPage
Select to edit the name of
the area to avoid.139
Select to set display of the
area to avoid name on/off.
Select to edit area location.139
Select to edit area size.139
Select to set the area to
avoid function on/off.
GX_Navi_OM60L77U_(U).book Page 139 Monday, June 2, 2014 10:49 AM
Page 141 of 401
140
4. MEMORY POINTS
GX460_Navi_OM60L77U_(U)14.06.02 10:48
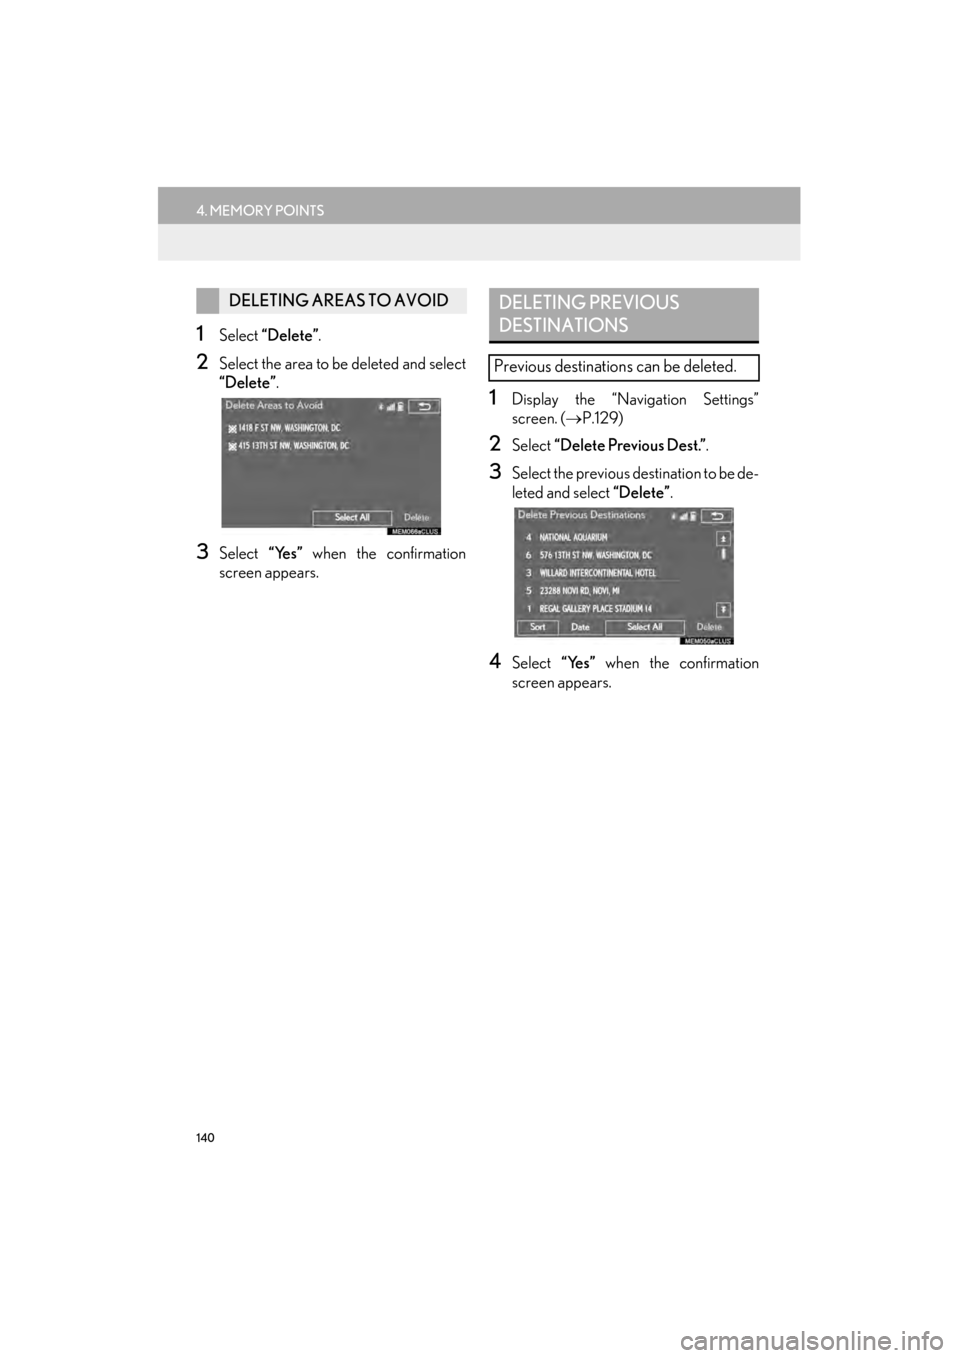
1Select “Delete” .
2Select the area to be deleted and select
“Delete” .
3Select “Yes” when the confirmation
screen appears.
1Display the “Navigation Settings”
screen. ( →P.129)
2Select “Delete Previous Dest.” .
3Select the previous destination to be de-
leted and select “Delete”.
4Select “Yes” when the confirmation
screen appears.
DELETING AREAS TO AVOIDDELETING PREVIOUS
DESTINATIONS
Previous destinations can be deleted.
GX_Navi_OM60L77U_(U).book Page 140 Monday, June 2, 2014 10:49 AM
Page 143 of 401
142
5. SETUP
GX460_Navi_OM60L77U_(U)14.06.02 10:48
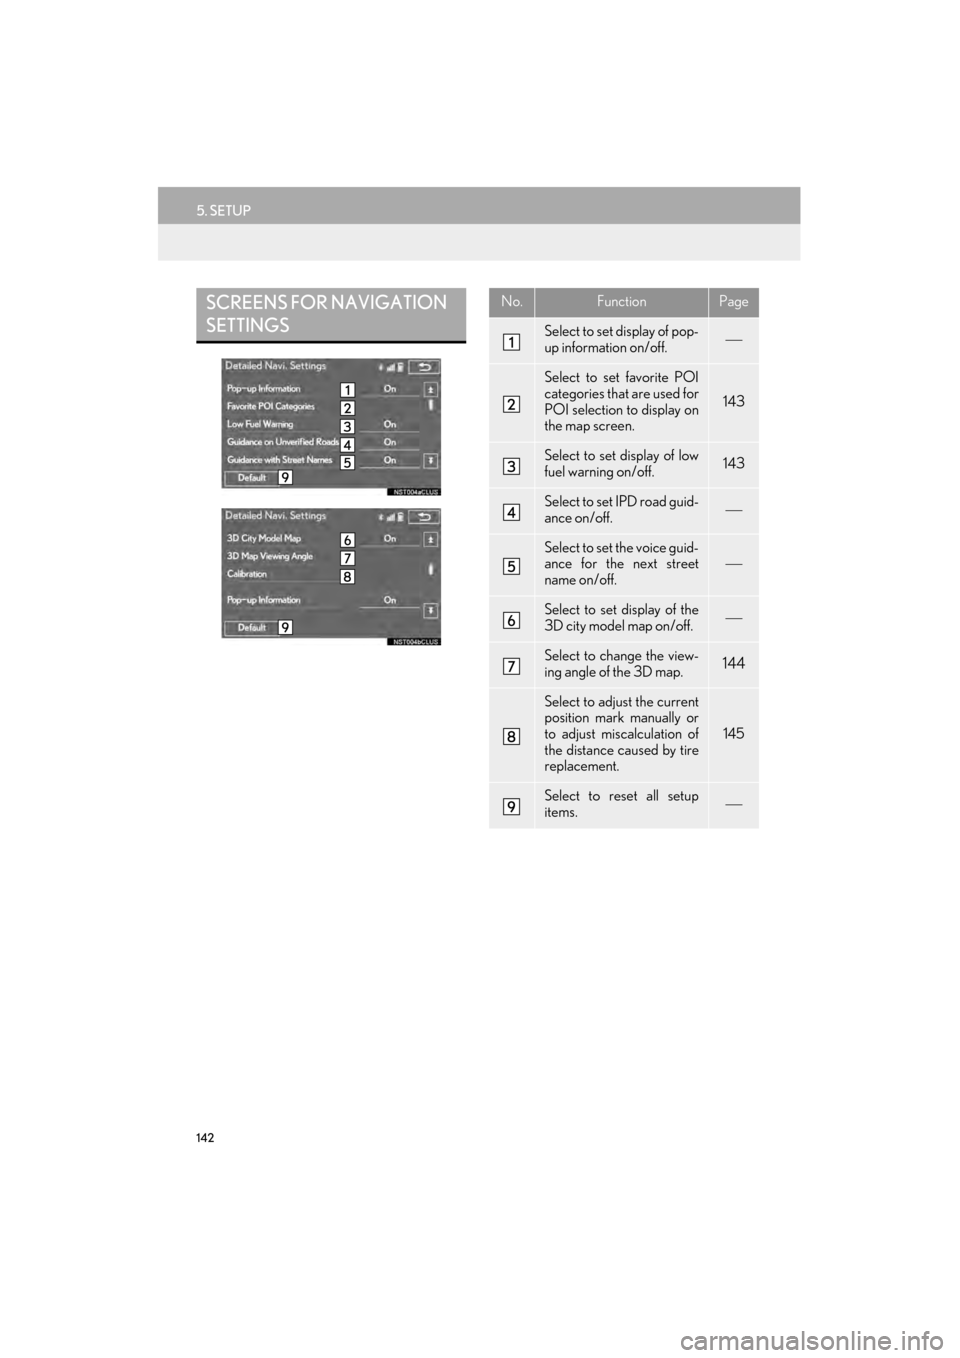
SCREENS FOR NAVIGATION
SETTINGSNo.FunctionPage
Select to set display of pop-
up information on/off.
Select to set favorite POI
categories that are used for
POI selection to display on
the map screen.
143
Select to set display of low
fuel warning on/off.143
Select to set IPD road guid-
ance on/off.
Select to set the voice guid-
ance for the next street
name on/off.
Select to set display of the
3D city model map on/off.
Select to change the view-
ing angle of the 3D map.144
Select to adjust the current
position mark manually or
to adjust miscalculation of
the distance caused by tire
replacement.
145
Select to reset all setup
items.
GX_Navi_OM60L77U_(U).book Page 142 Monday, June 2, 2014 10:49 AM
Page 144 of 401
143
5. SETUP
GX460_Navi_OM60L77U_(U)14.06.02 10:48
3
NAVIGATION SYSTEM
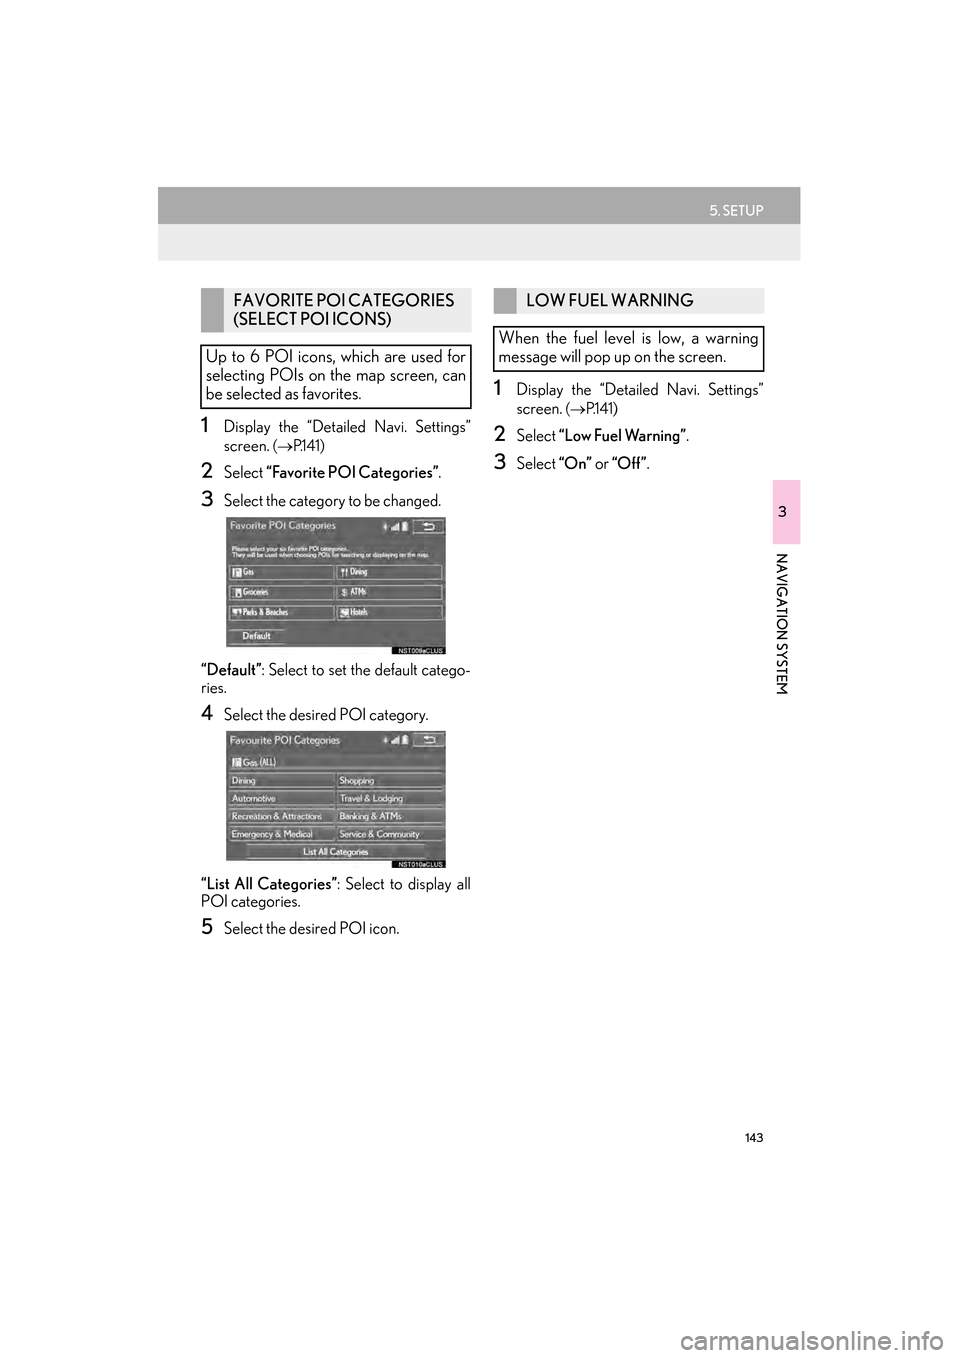
1Display the “Detailed Navi. Settings”
screen.
(→ P.141)
2Select “Favorite POI Categories” .
3Select the category to be changed.
“Default” : Select to set the default catego-
ries.
4Select the desired POI category.
“List All Categories” : Select to display all
POI categories.
5Select the desired POI icon.
1Display the “Detailed Navi. Settings”
screen.
( → P.141)
2Select “Low Fuel Warning” .
3Select “On” or “Off ” .
FAVORITE POI CATEGORIES
(SELECT POI ICONS)
Up to 6 POI icons, which are used for
selecting POIs on the map screen, can
be selected as favorites.LOW FUEL WARNING
When the fuel level is low, a warning
message will pop up on the screen.
GX_Navi_OM60L77U_(U).book Page 143 Monday, June 2, 2014 10:49 AM
Page 145 of 401
144
5. SETUP
GX460_Navi_OM60L77U_(U)14.06.02 10:48
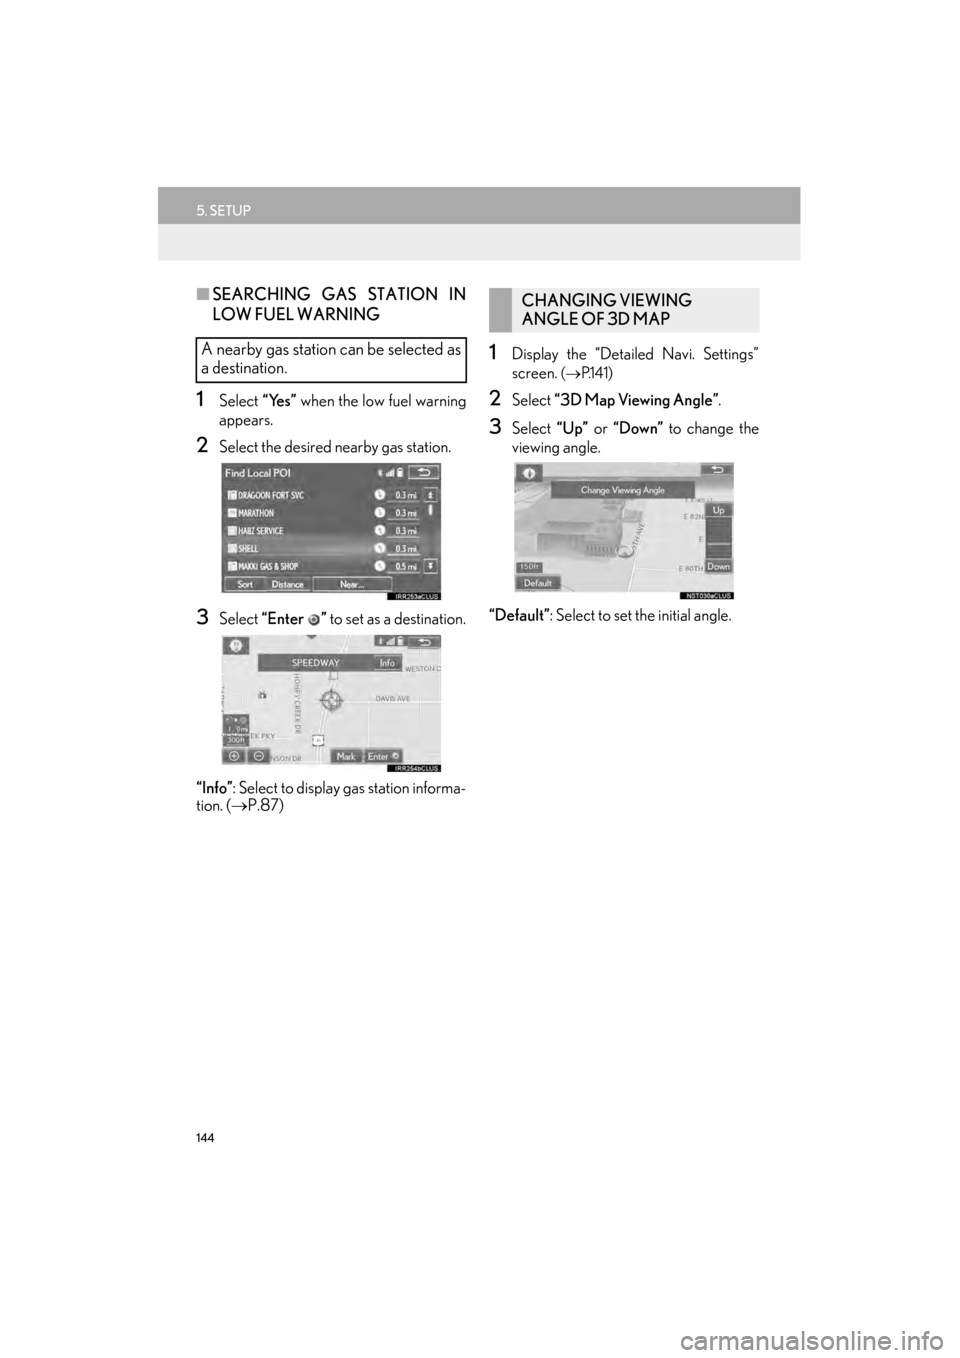
■SEARCHING GAS STATION IN
LOW FUEL WARNING
1Select “Yes” when the low fuel warning
appears.
2Select the desired nearby gas station.
3Select “Enter ” to set as a destination.
“Info” : Select to display gas station informa-
tion. ( →P.87)
1Display the “Detailed Navi. Settings”
screen.
(→ P.141)
2Select “3D Map Viewing Angle” .
3Select “Up” or “Down” to change the
viewing angle.
“Default” : Select to set the initial angle.
A nearby gas station can be selected as
a destination.
CHANGING VIEWING
ANGLE OF 3D MAP
GX_Navi_OM60L77U_(U).book Page 144 Monday, June 2, 2014 10:49 AM
Page 146 of 401
145
5. SETUP
GX460_Navi_OM60L77U_(U)14.06.02 10:48
3
NAVIGATION SYSTEM
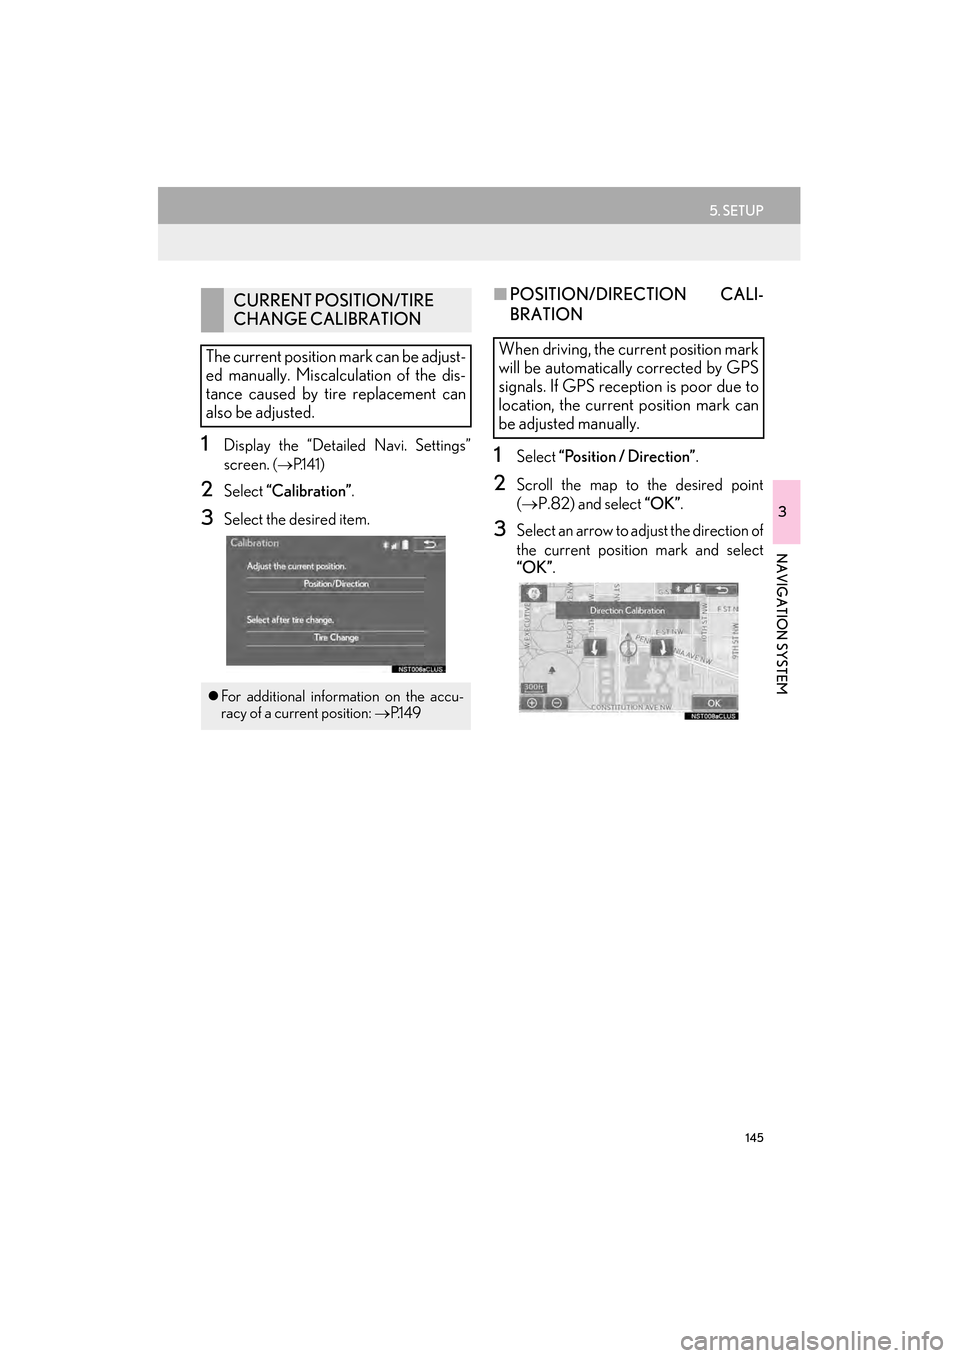
1Display the “Detailed Navi. Settings”
screen.
(→ P.141)
2Select “Calibration” .
3Select the desired item.
■POSITION/DIRECTION CALI-
BRATION
1Select “Position / Direction” .
2Scroll the map to the desired point
(→ P.82) and select “OK” .
3Select an arrow to adjust the direction of
the current position mark and select
“OK”.
CURRENT POSITION/TIRE
CHANGE CALIBRATION
The current position mark can be adjust-
ed manually. Miscalculation of the dis-
tance caused by tire replacement can
also be adjusted.
�z For additional information on the accu-
racy of a current position: →P.1 4 9
When driving, the current position mark
will be automatically corrected by GPS
signals. If GPS reception is poor due to
location, the current position mark can
be adjusted manually.
GX_Navi_OM60L77U_(U).book Page 145 Monday, June 2, 2014 10:49 AM