ESP Lexus GX460 2021 / LEXUS 2021 GX460 MULTIMEDIA (OM60T29U) User Guide
[x] Cancel search | Manufacturer: LEXUS, Model Year: 2021, Model line: GX460, Model: Lexus GX460 2021Pages: 186, PDF Size: 4.02 MB
Page 106 of 186

106
6. TIPS FOR OPERATING THE AUDIO/VISUAL SYSTEM
GX460_MM_OM60T29U_(U)20.03.27 13:49
Cargo loaded on the roof luggage carrier,
especially metal objects, may adversely
affect the reception of XM Satellite Radio.
Alternation or modifications carried out
without appropriate authorization may
invalidate the user’s right to operate the
equipment.
This CD player is intended for use with 4.7
in. (12 cm). discs only.
Extremely high temperatures can keep the
CD player from working. On hot days, use
the air conditioning system to cool the
inside of the vehicle before using the player.
Bumpy roads or other vibrations may make
the CD player skip.
If moisture gets into the CD player, the
discs may not be able to be played. Remove
the discs from the player and wait until it
dries.
Use only discs marked as shown above.
The following products may not be playable
on your player:
•SACD
•dts CD
• Copy-protected CD
•DVD video
•DVD-R/RW
•DVD audio
•Video CD
•DVD-RAM
XM
CD PLAYER AND DISC
WARNING
●CD players use an invisible laser beam
which could cause hazardous radiation
exposure if directed outside the unit. Be
sure to operate the player correctly.
Audio CDs
Page 107 of 186

107
6. TIPS FOR OPERATING THE AUDIO/VISUAL SYSTEM
GX460_MM_OM60T29U_(U)20.03.27 13:49
3
AUDIO/VISUAL SYSTEM
Special shaped discs
Transparent/translucent discs
Low quality discs
Labeled discs
Handle discs carefully, especially when
inserting them. Hold th em on the edge and
do not bend them. Avoid getting finger-
prints on them, particularly on the shiny
side.
Dirt, scratches, warping, pin holes or other
disc damage could cause the player to skip
or to repeat a sectio n of a track. (To see a
pin hole, hold the disc up to the light.)
Remove discs from the players when not in
use. Store them in their cases away from
moisture, heat and direct sunlight.
NOTICE
●Do not use special shaped, transparent/
translucent, low quality or labeled discs
such as those shown in the illustrations.
The use of such discs may damage the
player, or it may be impossible to eject the
disc.
●This system is not designed for use of
Dual Discs. Do not use Dual Discs
because they may cause damage to the
player.
●Do not use discs with a protection ring.
The use of such discs may damage the
player, or it may be impossible to eject the
disc.
●Do not use printable discs. The use of
such discs may damage the player, or it
may be impossible to eject the disc.
Correct Wrong
Page 108 of 186

108
6. TIPS FOR OPERATING THE AUDIO/VISUAL SYSTEM
GX460_MM_OM60T29U_(U)20.03.27 13:49
To clean a disc: Wipe it with a soft, lint-free
cloth that has been dampened with water.
Wipe in a straight line from the center to the
edge of the disc (not in circles). Dry it with
another soft, lint-free cloth. Do not use a
conventional record cleaner or anti-static
device.
CD-R/CD-RW discs th at have not been
subject to the “finalizing process” (a pro-
cess that allows discs to be played on a
conventional CD player) cannot be played.
It may not be possible to play CD-R/CD-
RW discs recorded on a music CD
recorder or a personal computer because
of disc characteristics, scratches or dirt on
the disc, or dirt, condensation, etc. on the
lens of the unit.
It may not be possible to play discs
recorded on a person al computer depend-
ing on the application settings and the envi-
ronment. Record with the correct format.
(For details, contact the appropriate appli-
cation manufacturers of the applications.)
CD-R/CD-RW discs may be damaged by
direct exposure to sunlight, high tempera-
tures or other storage conditions. The unit
may be unable to play some damaged
discs.
If you insert a CD-RW disc into the player,
playback will begin more slowly than with a
conventional CD or CD-R disc.
Recordings on CD-R/CD-RW cannot be
played using the DDCD (Double Density
CD) system.
Use of the Made for Apple badge means
that an accessory has been designed to
connect specifically to the Apple prod-
uct(s) identified in the badge, and has been
certified by the deve loper to meet Apple
performance standards.
Apple is not responsible for the operation
of this device or it s compliance with safety
and regulatory standard s. Please note that
the use of this acce ssory with an Apple
product may affect wireless performance.
iPhone, iPod, iPod classic, iPod nano, iPod
touch, and Lightning are trademarks of
Apple Inc., registered in the U.S. and other
countries.
The Lightning connector works with
iPhone 5, iPod touch (5th generation), and
iPod nano (7th generation).
The 30-pin connector works with iPhone
4S, iPhone 4, iPhone 3GS, iPhone 3G,
iPhone, iPod touch (1st through 4th genera-
tion), iPod classic, and iPod nano (1st
through 6th generation).
CD-R/RW DISCS
iPod
Page 109 of 186

109
6. TIPS FOR OPERATING THE AUDIO/VISUAL SYSTEM
GX460_MM_OM60T29U_(U)20.03.27 13:49
3
AUDIO/VISUAL SYSTEM
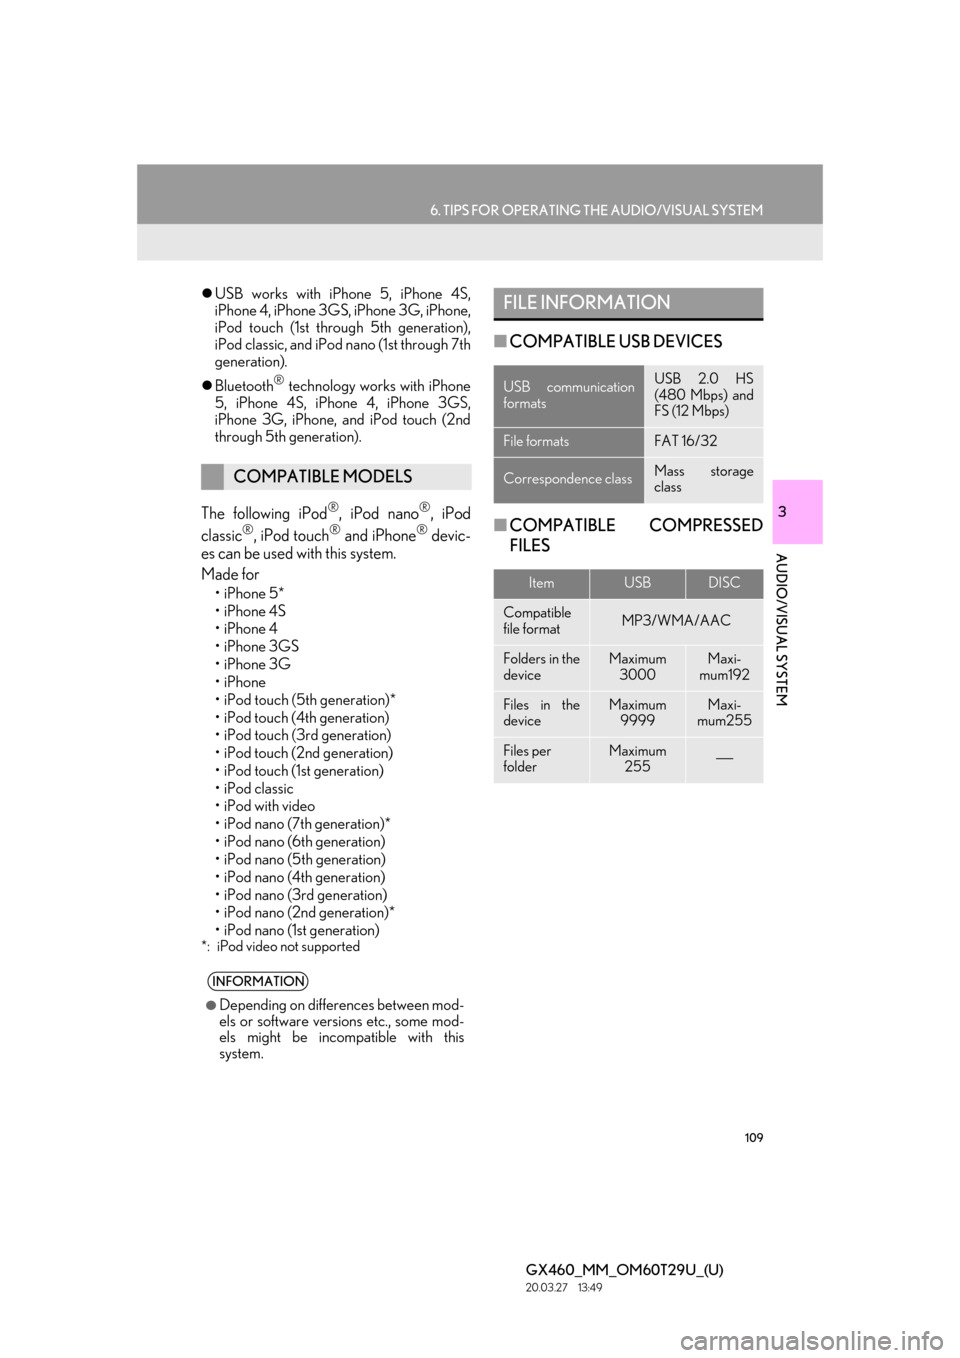
USB works with iPhone 5, iPhone 4S,
iPhone 4, iPhone 3GS, iPhone 3G, iPhone,
iPod touch (1st through 5th generation),
iPod classic, and iPod nano (1st through 7th
generation).
Bluetooth
® technology works with iPhone
5, iPhone 4S, iPhone 4, iPhone 3GS,
iPhone 3G, iPhone, and iPod touch (2nd
through 5th generation).
The following iPod®, iPod nano®, iPod
classic®, iPod touch® and iPhone® devic-
es can be used with this system.
Made for
•iPhone 5*
•iPhone 4S
•iPhone 4
•iPhone 3GS
•iPhone 3G
•iPhone
• iPod touch (5th generation)*
• iPod touch (4th generation)
• iPod touch (3rd generation)
• iPod touch (2nd generation)
•iPod touch (1st generation)
• iPod classic
• iPod with video
• iPod nano (7th generation)*
• iPod nano (6th generation)
• iPod nano (5th generation)
• iPod nano (4th generation)
• iPod nano (3rd generation)
• iPod nano (2nd generation)*
• iPod nano (1st generation)
*: iPod video not supported
■ COMPATIBLE USB DEVICES
■ COMPATIBLE COMPRESSED
FILES
COMPATIBLE MODELS
INFORMATION
●Depending on differences between mod-
els or software versions etc., some mod-
els might be incompatible with this
system.
FILE INFORMATION
USB communication
formatsUSB 2.0 HS
(480 Mbps) and
FS (12 Mbps)
File formatsFAT 16/32
Correspondence classMass storage
class
ItemUSBDISC
Compatible
file formatMP3/WMA/AAC
Folders in the
deviceMaximum
3000Maxi-
mum192
Files in the
deviceMaximum 9999Maxi-
mum255
Files per
folderMaximum 255
Page 110 of 186

110
6. TIPS FOR OPERATING THE AUDIO/VISUAL SYSTEM
GX460_MM_OM60T29U_(U)20.03.27 13:49
■CORRESPONDING SAMPLING
FREQUENCY
■ CORRESPONDING BIT RATES
(Variable Bit Rate (VBR) compatible)
MP3 (MPEG Audio Layer 3), WMA
(Windows Media Audio) and AAC
(Advanced Audio Coding) are audio com-
pression standards.
This system can play MP3/WMA/AAC
files on CD-R, CD-RW discs and USB
memory.
This system can play disc recordings com-
patible with ISO 9660 level 1 and level 2
and with the Romeo and Joliet file system.
When naming an MP3/WMA/AAC file,
add an appropriate file extension (.mp3/
.wma/.m4a).
This system plays back files with .mp3/
.wma/.m4a file extensions as MP3/WMA/
AAC files respectively. To prevent noise
and playback errors, use the appropriate
file extension.
This system can play only the first session
when using multi-session compatible CDs.
MP3 files are compatible with the ID3 Tag
Ver. 1.0, Ver. 1.1, Ver. 2.2 and Ver. 2.3 for-
mats. This system cannot display disc title,
track title and artist name in other formats.
WMA/AAC files can contain a WMA/
AAC tag that is used in the same way as an
ID3 tag. WMA/AAC tags carry informa-
tion such as track title and artist name.
The emphasis function is available only
when playing MP3/WMA files recorded at
32, 44.1 and 48 kHz.
This system can play back AAC files
encoded by iTunes.
The sound quality of MP3/WMA files gen-
erally improves with higher bit rates. In
order to achieve a reasonable level of
sound quality, discs recorded with a bit rate
of at least 128 kbps are recommended.
M3u playlists are not compatible with the
audio player.
File typeFrequency
(kHz)
MP3 files:
MPEG 1 LAYER 332/44.1/48
MP3 files:
MPEG 2 LSF LAYER 316/22.05/24
WMA files:
Ver. 7, 8, 9 (9.1/9.2)32/44.1/48
AAC files:
MPEG4/AAC-LC11.025/12/16/
22.05/24/32/
44.1/48
File typeBit rate (kbps)
MP3 files:
MPEG 1 LAYER 332 - 320
MP3 files:
MPEG 2 LSF LAYER 38 - 160
WMA files: Ver. 7, 8CBR 48 - 192
WMA files:
Ver. 9 (9.1/9.2)CBR 48 - 320
AAC files:
MPEG4/AAC-LC16 - 320
Page 117 of 186

117
1. VOICE COMMAND SYSTEM OPERATION
4
VOICE COMMAND SYSTEM
GX460_MM_OM60T29U_(U)20.03.27 13:49
1Press the talk switch.
2Say the tab selection command or se-
lect the desired tab.
Commands related with each function are
displayed on the screen of the each func-
tion tab. Some commonly used commands
are displayed on the sc reen of the Shortcut
tab.
3Say the desired command.
Registered POIs, registered names in the
contacts list etc., can be said in the place of
the “<>” next to the commands. ( P.122)
For example: Say “Call John Smith” etc.
If a desired outcome is not shown, or if no
selections are available, perform one of the
following to return to the previous screen:
•Say “Go back” .
• Select “Go Back” .
To cancel voice re cognition, select
“Cancel”, or press and hold the talk switch.VOICE COMMAND SYSTEM
OPERATION
The voice command system is operated
by selecting a tab corresponding to
each function. The tabs are found on the
upper part of the screen.
All commands that are not displayed on
the screen can be recognized on any
screens.
Voice guidance for the voice command
system can be skipped by pressing the
talk switch.
Saying “Help” prompts voice guidance to
offer examples of commands and opera-
tion methods.
INFORMATION
●If the multimedia system does not
respond or the confir mation screen does
not disappear, press the talk switch and
try again.
●“Voice Recognition Prompts” can be set
to on or off on the “Voice Settings”
screen. ( P.49)
●Voice guidance can be canceled by set-
ting voice prompts to off. Use this setting
when it is desirable to say a command
immediately after pressing the talk switch
and hearing a beep.
Page 124 of 186

124
GX460_MM_OM60T29U_(U)20.03.27 13:49
2. MOBILE ASSISTANT OPERATION
1. MOBILE ASSISTANT
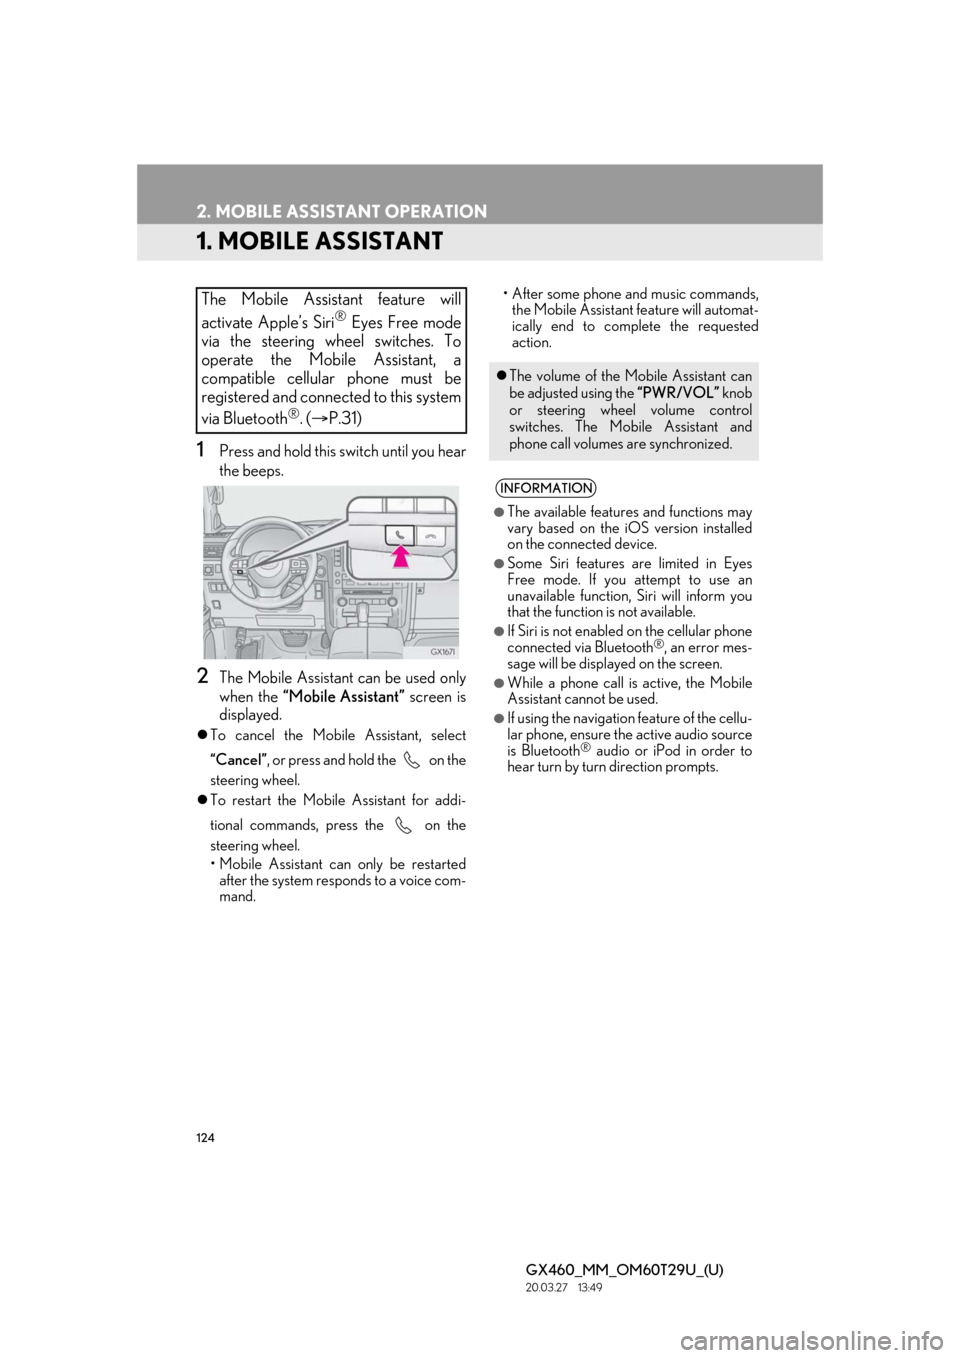
1Press and hold this switch until you hear
the beeps.
2The Mobile Assistant can be used only
when the “Mobile Assistant” screen is
displayed.
To cancel the Mobile Assistant, select
“Cancel”, or press and hold the on the
steering wheel.
To restart the Mobile Assistant for addi-
tional commands, press the on the
steering wheel.
• Mobile Assistant can only be restarted
after the system responds to a voice com-
mand. • After some phone and music commands,
the Mobile Assistant feature will automat-
ically end to complete the requested
action.
The Mobile Assistant feature will
activate Apple’s Siri
® Eyes Free mode
via the steering wheel switches. To
operate the Mobile Assistant, a
compatible cellular phone must be
registered and connected to this system
via Bluetooth
®. ( P.31)
The volume of the Mo bile Assistant can
be adjusted using the “PWR/VOL” knob
or steering wheel volume control
switches. The Mob ile Assistant and
phone call volumes are synchronized.
INFORMATION
●The available features and functions may
vary based on the iOS version installed
on the connected device.
●Some Siri features are limited in Eyes
Free mode. If you attempt to use an
unavailable function, Siri will inform you
that the function is not available.
●If Siri is not enabled on the cellular phone
connected via Bluetooth®, an error mes-
sage will be displayed on the screen.
●While a phone call is active, the Mobile
Assistant cannot be used.
●If using the navigation feature of the cellu-
lar phone, ensure the active audio source
is Bluetooth
® audio or iPod in order to
hear turn by turn direction prompts.
Page 149 of 186

149
1. PHONE OPERATION (HANDS-FREE SYSTEM FOR CELLULAR PHONES)
6
PHONE
GX460_MM_OM60T29U_(U)20.03.27 13:49
5Select “Send” .
While the message is being sent, a sending
message screen is displayed.
To cancel sending the message, select
“Cancel”.
6Check that a confirma tion screen is dis-
played when the operation is complete.
If an error message is displayed, follow the
guidance on the screen to try again.
■ EDITING QUICK REPLY MESSAG-
ES
1Select “Quick Message”.
2Select corresponding to the de-
sired message to edit.
3Select “OK” when editing is completed.
This operation cannot be performed
while driving.
INFORMATION
●To reset the editquick reply messages,
select “Default” .
Page 158 of 186

158
2. SETUP
GX460_MM_OM60T29U_(U)20.03.27 13:49
1Select “Edit Contacts”.
2Select the desired contact.
3Select corresponding to the de-
sired name or number.
For editing the name
4Follow the steps in “REGISTERING A
NEW CONTACT TO THE CON-
TACT LIST” from “STEP 2”. ( P.157)
For editing the number
4Follow the steps in “REGISTERING A
NEW CONTACT TO THE CON-
TACT LIST” from “STEP 3”. ( P.157)
■EDITING THE CONTACT IN A DIF-
FERENT WAY (FROM THE “Con-
tact Details” SCREEN)
1Display the phone top screen.
( P.136)
2Select the “Contacts” , “Call history”
tab or the “Favorites” tab and select the
desired contact.
3Select “Edit Contact” .
“E-mail Addresses” : Select to display all
registered e-mail addresses for the contact.
4Follow the steps in “EDITING THE
CONTACT DATA” from “STEP 4”.
( P.158)
EDITING THE CONTACT
DATA
For PBAP compatible Bluetooth
®
phones, this function is available when
“Automatic Contact/History Transfer”
is set to off. ( P.154)
Page 184 of 186

184
GX460_MM_OM60T29U_(U)20.03.27 13:49
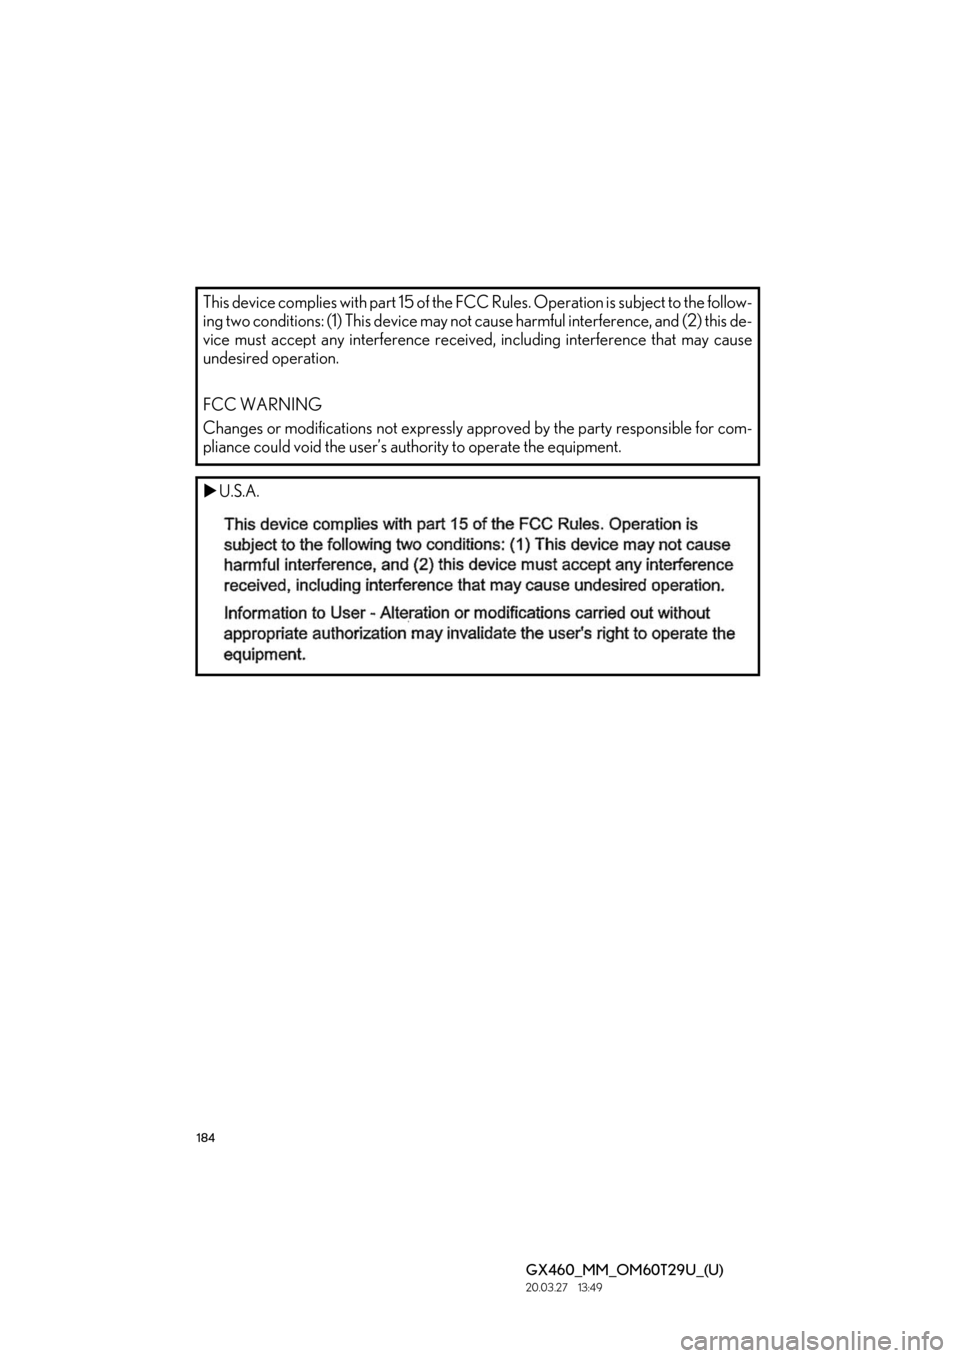
This device complies with part 15 of the FCC Rules. Operation is subject to the follow-
ing two conditions: (1) This device may not cause harmful interference, and (2) this de-
vice must accept any interference receiv ed, including interference that may cause
undesired operation.
FCC WARNING
Changes or modifications not expressly ap proved by the party responsible for com-
pliance could void the user’s authority to operate the equipment.
U.S.A.