light Lexus GX460 2021 / Workshop Manual
[x] Cancel search | Manufacturer: LEXUS, Model Year: 2021, Model line: GX460, Model: Lexus GX460 2021Pages: 628, PDF Size: 12.51 MB
Page 147 of 628

GX460_OM_OM60T19U_(U)
1473-3. Adjusting the seats
3
Operation of each component
■To stop the position recall operation part-way through
Perform any of the following:
●Press the “SET” button.
●Press button “1” or “2”.
●Operate any of the seat adjustment switches (only cancels seat position recall).
●Operate the tilt and telescopic steering control switch (only cancels steering wheel
position recall).
■Seat positions that can be memorized ( P. 132)
The adjusted positions other than the position adjusted by lumbar support switch can be
recorded.
■Operating the driving position memory after turning the engine switch off
Recorded seat positions can be activated up to 180 seconds after the driver’s door is
opened and another 60 seconds after it is closed again.
■In order to correctly use the driving position memory function
If a seat position is already in the furthest po ssible position and the seat is operated in the
same direction, the recorded position may be slightly different when it is recalled.
Each electronic key can be registered to recall your preferred driving position.
■Registering procedure
Record your driving position to button “1” or “2” before performing the follow-
ing:
Carry only the key you want to regist er, and then close the driver’s door.
If 2 or more keys are in the vehicle, the driving position cannot be recorded
properly.
Check that the shift lever is in P.
Turn the engine switch to IGNITION ON mode.
Recall the driving position that you want to record.
Memory recall function
1
2
3
Page 148 of 628
148
GX460_OM_OM60T19U_(U)3-3. Adjusting the seats
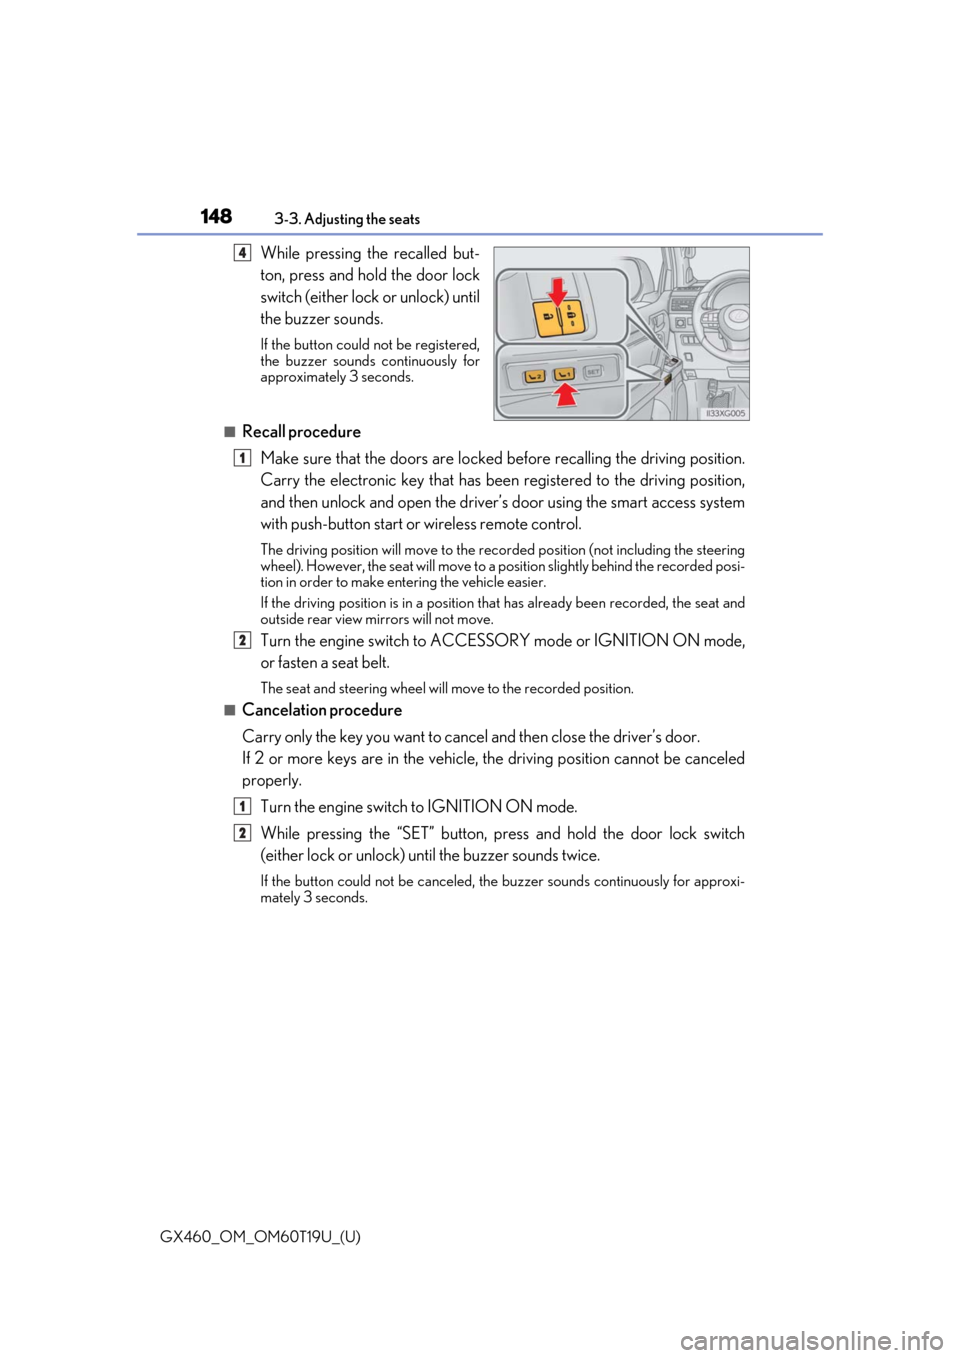
While pressing the recalled but-
ton, press and hold the door lock
switch (either lock or unlock) until
the buzzer sounds.
If the button could not be registered,
the buzzer sounds continuously for
approximately 3 seconds.
■Recall procedure
Make sure that the doors are locked before recalling the driving position.
Carry the electronic key that has been registered to the driving position,
and then unlock and open the driver’s door using the smart access system
with push-button start or wireless remote control.
The driving position will move to the recorded position (not including the steering
wheel). However, the seat will move to a position slightly behind the recorded posi-
tion in order to make entering the vehicle easier.
If the driving position is in a position th at has already been recorded, the seat and
outside rear view mirrors will not move.
Turn the engine switch to ACCESS ORY mode or IGNITION ON mode,
or fasten a seat belt.
The seat and steering wheel will move to the recorded position.
■Cancelation procedure
Carry only the key you want to cance l and then close the driver’s door.
If 2 or more keys are in the vehicle, the driving position cannot be canceled
properly.
Turn the engine switch to IGNITION ON mode.
While pressing the “SET” button, pr ess and hold the door lock switch
(either lock or unlock) un til the buzzer sounds twice.
If the button could not be canceled, the buzzer sounds continuously for approxi-
mately 3 seconds.
4
1
2
1
2
Page 155 of 628
1553-4. Adjusting the steering wheel and mirrors
3
Operation of each component
GX460_OM_OM60T19U_(U)
Inside rear view mirror
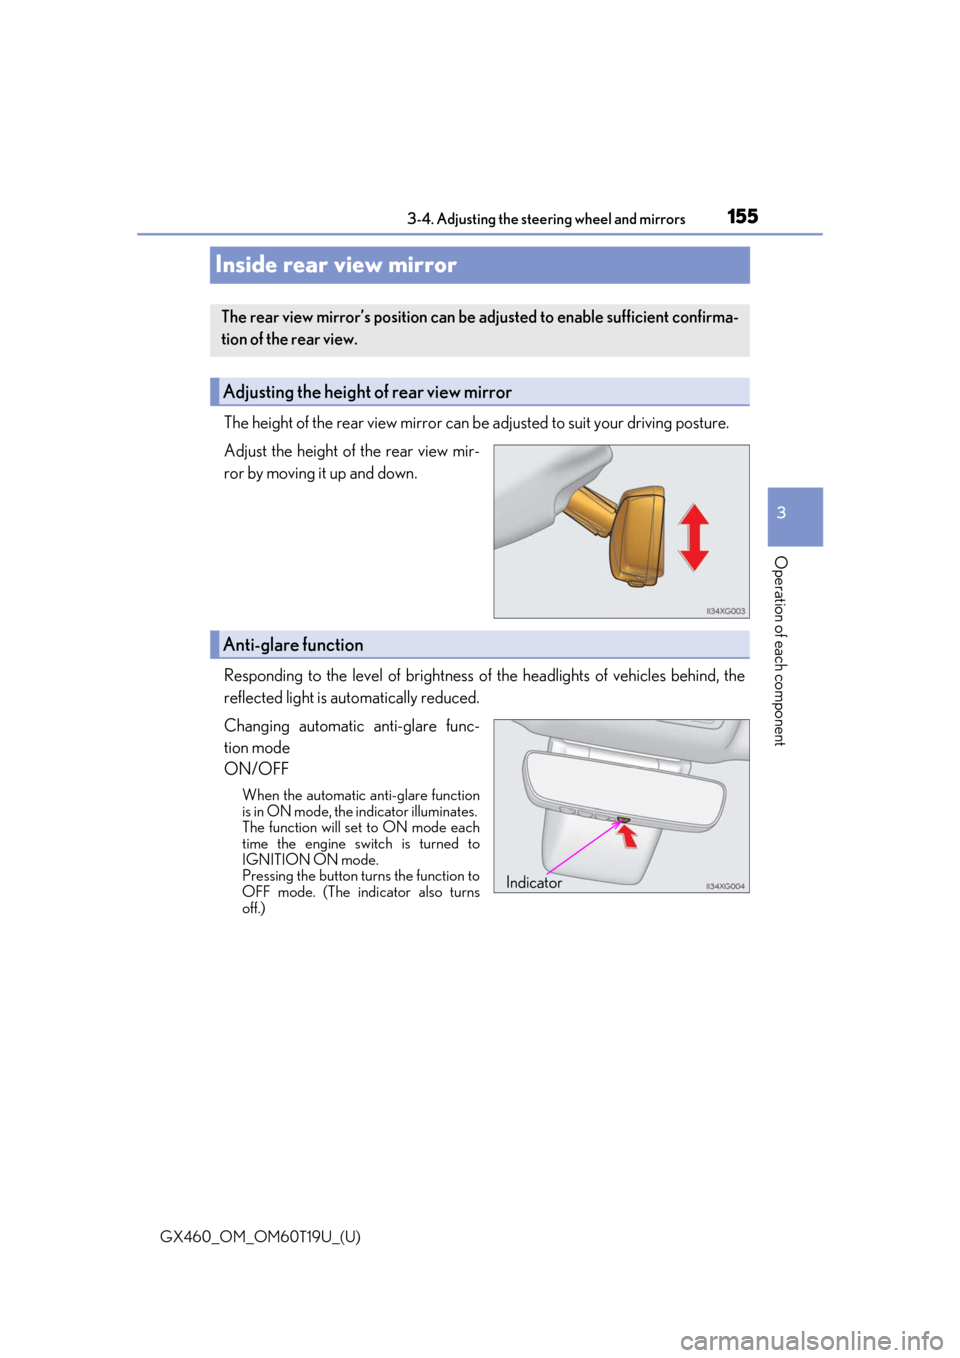
The height of the rear view mirror can be adjusted to suit your driving posture.
Adjust the height of the rear view mir-
ror by moving it up and down.
Responding to the level of brightness of the headlights of vehicles behind, the
reflected light is automatically reduced.
Changing automatic anti-glare func-
tion mode
ON/OFF
When the automatic anti-glare function
is in ON mode, the indicator illuminates.
The function will set to ON mode each
time the engine switch is turned to
IGNITION ON mode.
Pressing the button turns the function to
OFF mode. (The indicator also turns
off.)
The rear view mirror’s position can be adjusted to enable sufficient confirma-
tion of the rear view.
Adjusting the height of rear view mirror
Anti-glare function
Indicator
Page 158 of 628
1583-4. Adjusting the steering wheel and mirrors
GX460_OM_OM60T19U_(U)
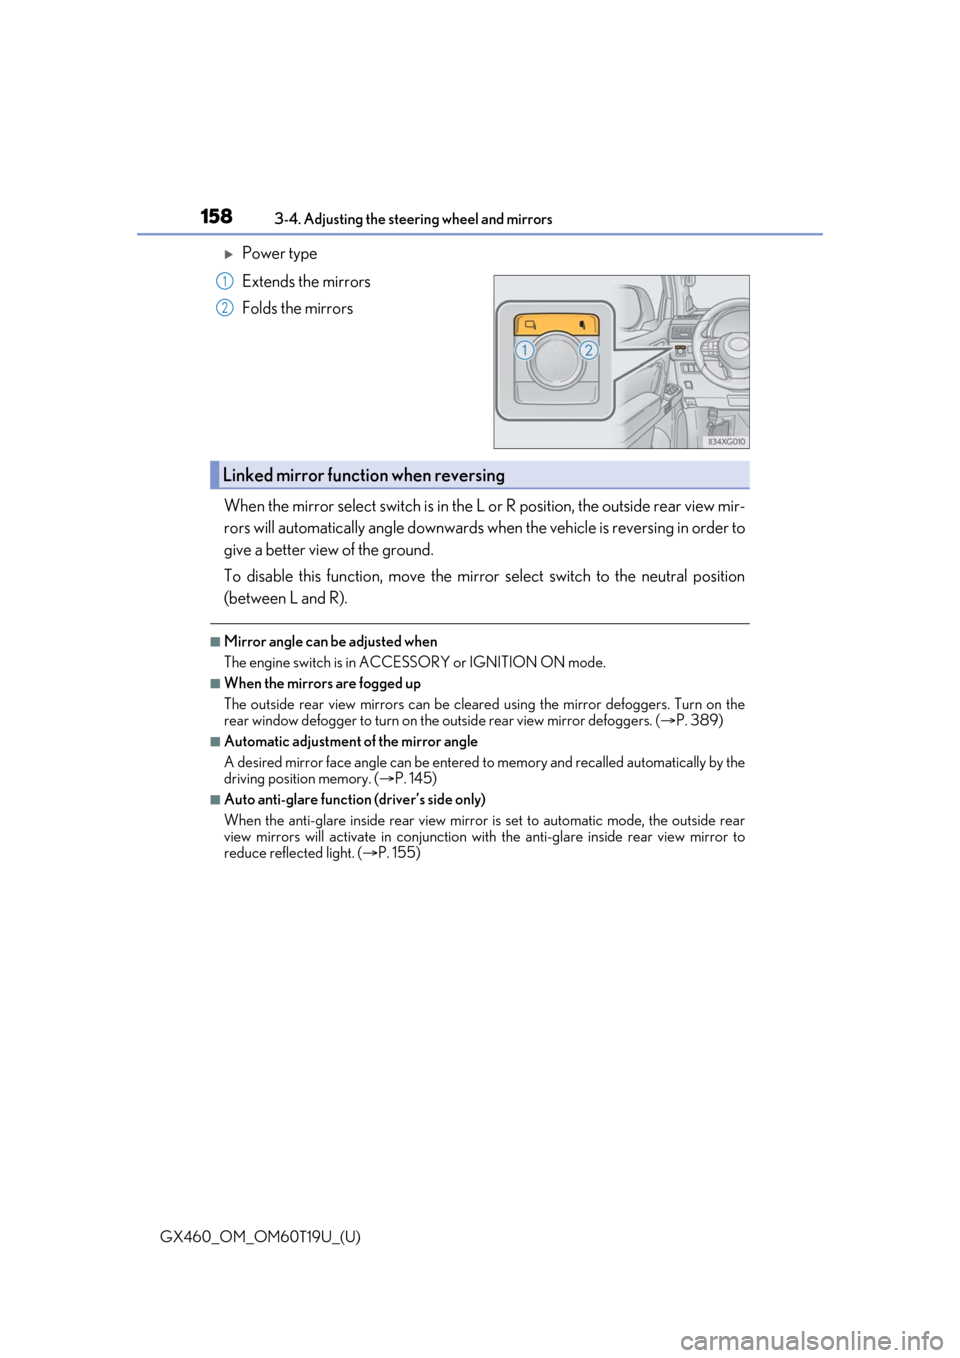
Power type
Extends the mirrors
Folds the mirrors
When the mirror select switch is in the L or R position, the outside rear view mir-
rors will automatically angle downwards wh en the vehicle is reversing in order to
give a better view of the ground.
To disable this function, move the mirror select switch to the neutral position
(between L and R).
■Mirror angle can be adjusted when
The engine switch is in ACCESSORY or IGNITION ON mode.
■When the mirrors are fogged up
The outside rear view mirrors can be cleare d using the mirror defoggers. Turn on the
rear window defogger to turn on the outside rear view mirror defoggers. ( P. 389)
■Automatic adjustment of the mirror angle
A desired mirror face angle can be entered to memory and recalled automatically by the
driving position memory. ( P. 145)
■Auto anti-glare function (driver’s side only)
When the anti-glare inside re ar view mirror is set to automatic mode, the outside rear
view mirrors will activate in conjunction with the anti-glare inside rear view mirror to
reduce reflected light. ( P. 155)
1
2
Linked mirror function when reversing
Page 161 of 628

GX460_OM_OM60T19U_(U)
1613-5. Opening, closing the windows and moon roof
3
Operation of each component
■The power windows can be operated when
The engine switch is in IGNITION ON mode.
■Operating the power windows after turning the engine off
The power windows can be operated for approximately 45 seconds even after the
engine switch is turned to ACCESSORY mode or turned off. They cannot, however, be
operated once either front door is opened.
■Jam protection function
If an object becomes jammed between the window and the window frame while the win-
dow is closing, window movement is stop ped and the window is opened slightly.
■Catch protection function
If an object becomes caught between the door and window while the window is opening,
window movement is stopped.
■When the window cannot be opened or closed
When the jam protection functi on or catch protection function operates unusually and
the door window cannot be opened and clos ed, perform the following operations with
the power window switch of that door.
●Stop the vehicle. With the engine switch in IGNITION ON mode, within 4 seconds of
the jam protection function or catch protecti on function activating, continuously oper-
ate the power window switch in the one-to uch closing direction or one-touch opening
direction so that the door wind ow can be opened and closed.
●If the door window can not be opened and closed even when performing the above
operations, perform the following procedure for function initialization.
Turn the engine switch to IGNITION ON mode.
Pull and hold the power window switch in the one-touch closing direction and com-
pletely close the door window.
Release the power window sw itch for a moment, resume pulling the switch in the
one-touch closing direction, and hold it there for approximately 6 seconds or more.
Press and hold the power window switch in the one-touch opening direction. After
the door window is completely opened, cont inue holding the switch for an additional
1 second or more.
Release the power window switch for a mo ment, resume pushing the switch in the
one-touch opening direction, and hold it there for approximately 4 seconds or
more.
Pull and hold the power window switch in the one-touch closing direction. After the
door window is completely closed, continue holding the switch for a further 1 second
or more.
If you release the switch while the window is moving, start again from the beginning.
If the window reverses and cannot be fully closed or opened, have the vehicle
inspected by your Lexus dealer.
■Door lock linked window operation
●The power windows can be opened an d closed using the mechanical key*. ( P. 547)
●The power windows can be opened using the wireless remote control*. ( P. 108)
*: These settings must be cust omized at your Lexus dealer.
1
2
3
4
5
6
Page 163 of 628
163
GX460_OM_OM60T19U_(U)3-5. Opening, closing the windows and moon roof
3
Operation of each component
Moon roof
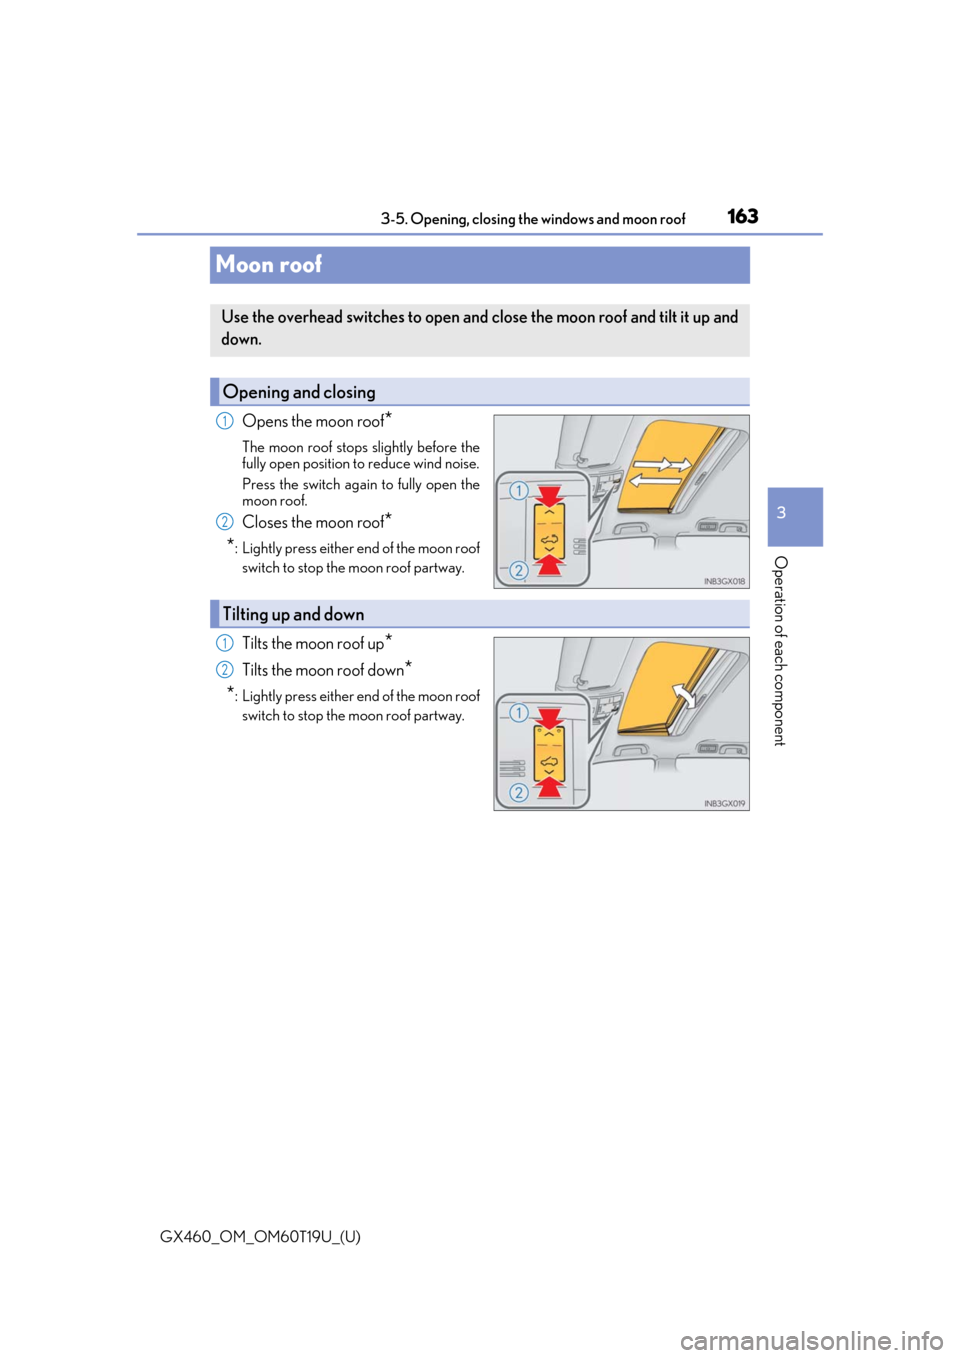
Opens the moon roof*
The moon roof stops slightly before the
fully open position to reduce wind noise.
Press the switch again to fully open the
moon roof.
Closes the moon roof*
*
: Lightly press either end of the moon roof switch to stop the moon roof partway.
Tilts the moon roof up*
Tilts the moon roof down*
*
: Lightly press either end of the moon roof switch to stop the moon roof partway.
Use the overhead switches to open and close the moon roof and tilt it up and
down.
Opening and closing
1
2
Tilting up and down
1
2
Page 164 of 628
164
GX460_OM_OM60T19U_(U)3-5. Opening, closing the windows and moon roof
■The moon roof can be operated when
The engine switch is in IGNITION ON mode.
■Operating the moon roof after turning the engine off
The moon roof can be operated for approximat
ely 45 seconds after the engine switch is
turned to ACCESSORY mode or turned off. It cannot, however, be operated once either
front door is opened.
■Jam protection function
If an object is detected between the moon r oof and the frame while the moon roof is clos-
ing or tilting down, travel is stopped and the moon roof opens slightly.
■Sunshade
The sunshade can be opened and closed manually. However, the sunshade will open
automatically when the moon roof is opened.
■Door lock linked moon roof operation
●The moon roof can be opened and closed using the mechanical key*. ( P. 547)
●The moon roof can be opened us ing the wireless remote control*. ( P. 108)
*: These settings must be cust omized at your Lexus dealer.
■Moon roof open reminder function
A buzzer sounds and a message is shown on the multi-information display in the instru-
ment cluster when the engine switch is turned off and the driver’s door is opened with the
moon roof open.
■When the moon roof does not close normally
Perform the following procedure:
●If the moon roof closes but then re-opens slightly
Stop the vehicle.
Press and hold “ ” on the .
*1
The moon roof will close, re-open an d pause for approximately 10 seconds.*2 Then
it will close again, tilt up and pause for appr oximately 1 second. Finally, it will tilt down,
open and close.
Check to make sure that the moon roof is completely closed and then release the
switch.
1
2
3
Page 165 of 628
GX460_OM_OM60T19U_(U)
1653-5. Opening, closing the windows and moon roof
3
Operation of each component
●If the moon roof tilts down but then tilts back upStop the vehicle.
Press and hold “ ” on the
*1 until the moon roof moves into the tilt up position
and stops.
Release “ ” on the once and then press and hold “ ” on the again.
*1
The moon roof will pause fo r approximately 10 seconds in the tilt up position.*2
Then it will adjust slightly and pause for approximately 1 second.
Finally, it will tilt down, open and close.
Check to make sure that the moon roof is completely closed and then release the
switch.
*1: If the switch is released at the incorrect time, the pr ocedure will have to be per-
formed again from the beginning.
*2: If the switch is released after the above mentioned 10 second pause, automatic
operation will be disabled. In that case, press and hold “” on the or “ ” on the
and the moon roof will tilt up and pause for approximately 1 second. Then it
will tilt down, open and close. Check to ma ke sure that the moon roof is completely
closed and then release the switch.
If the moon roof does not fully close even after performing the above procedure cor-
rectly, have the vehicle inspected by your Lexus dealer.
■Customization
Settings (e.g. linked door lock operation) can be changed.
(Customizable features: P. 584)
1
2
3
4
Page 167 of 628

167
GX460_OM_OM60T19U_(U)
4Driving
4-1. Before drivingDriving the vehicle ...................... 168
Cargo and luggage .................... 176
Vehicle load limits .......................180
Trailer towing (with towing hitch) .................... 181
Dinghy towing .............................. 199
4-2. Driving procedures Engine (ignition) switch .......... 200
Automatic transmission.......... 206
Turn signal lever.............................211
Parking brake ............................... 212
4-3. Operating the lights and wipers
Headlight switch .......................... 213
Automatic High Beam .............. 216
Fog light switch ............................ 221
Windshield wipers and washer.......................................... 222
Rear window wiper and washer.......................................... 226
Headlight cleaner switch ........228
4-4. Refueling Opening the fuel tank cap......229 4-5. Using the driving support
systems
Lexus Safety System + ............. 233
PCS (Pre-Collision System)........................................ 239
LDA (Lane Departure Alert) ............................................250
Dynamic radar cruise control .........................................258
Intuitive parking assist .............. 270
Rear view monitor system ...... 278
Multi-terrain Select .................. 288
Multi-terrain Monitor ............... 292
Rear height control air suspension ................................. 339
AVS (Adaptive Variable Suspension System)............... 343
Four-wheel drive system ........ 344
Crawl Control .............................348
Downhill assist control system .......................................... 352
Driving assist systems ..............355
BSM (Blind Spot Monitor) ...... 361 • The Blind Spot Monitor function .................................... 366
• The Rear Cross Traffic Alert function ......................... 369
4-6. Driving tips Winter driving tips ..................... 374
Off-road precautions ............... 377
Page 171 of 628

GX460_OM_OM60T19U_(U)
1714-1. Before driving
4
Driving
WARNING
Observe the following precautions.
Failure to do so may result in death or serious injury.
■When starting the vehicle
Always keep your foot on the brake pedal while stopped with the engine running. This
prevents the vehicle from creeping.
■When driving the vehicle
●Do not drive if you are unfamiliar with the location of the brake and accelerator ped-
als to avoid depressing the wrong pedal.
• Accidentally depressing the accelerator pedal instead of the brake pedal will
result in sudden acceleration that may lead to an accident.
• When backing up, you may twist your body around, leading to a difficulty in oper-
ating the pedals. Make sure to operate the pedals properly.
• Make sure to keep a correct driving po sture even when moving the vehicle only
slightly. This allows you to depress th e brake and accelerator pedals properly.
• Depress the brake pedal using your right foot. Depressing the brake pedal using your left foot may delay re sponse in an emergency, resulting in an accident.
●Do not drive the vehicle over or stop the vehicle near flammable materials.
The exhaust system and exhaust gases can be extremely hot. These hot parts may
cause a fire if there is any flammable material nearby.
●During normal driving, do not turn off the engine. Turning the engine off while driving
will not cause loss of steering or braking control, but the power assist to these systems
will be lost. This will make it more difficult to steer and brake, so you should pull over
and stop the vehicle as soon as it is safe to do so.
However, in the event of an emergency, such as if it becomes impossible to stop the
vehicle in the normal way: P. 509
●Use engine braking (downshift) to maintain a safe speed when driving down a steep
hill.
Using the brakes continuously may cause th e brakes to overheat and lose effective-
ness. ( P. 206)
●Do not adjust the positions of the steering wheel, the seat, or the inside or outside rear
view mirrors while driving.
Doing so may result in a loss of vehicle control.
●Always check that all passengers’ arms, heads or other parts of their body are not
outside the vehicle.
●Do not drive in excess of the speed limit. Even if the legal speed limit permits it, do not
drive over 85 mph (140 km/h) unless your vehicle has high-speed capability tires.
Driving over 85 mph (140 km/h ) may result in tire failure, loss of control and possible
injury. Be sure to consult a tire dealer to determine whether the tires on your vehicle
are high-speed capability tires or no t before driving at such speeds.