tow Lexus GX460 2021 / Workshop Manual
[x] Cancel search | Manufacturer: LEXUS, Model Year: 2021, Model line: GX460, Model: Lexus GX460 2021Pages: 628, PDF Size: 12.51 MB
Page 408 of 628
408
GX460_OM_OM60T19U_(U)5-3. Using the storage features
NOTICE
●To prevent damage, stow the rear cup holders before stowing the armrest. (second
seats for 7-passenger models)
●To prevent damage, do not fold down the second seatbacks when using a cup holder
on the second seats.
(6-passenger models)
●To prevent damage, do not rest your hands on the cup holders or kick them.
●Do not place open bottles or glass and paper cups containing liquid in the bottle hold-
ers. The contents may sp ill and glasses may break.
Auxiliary boxes
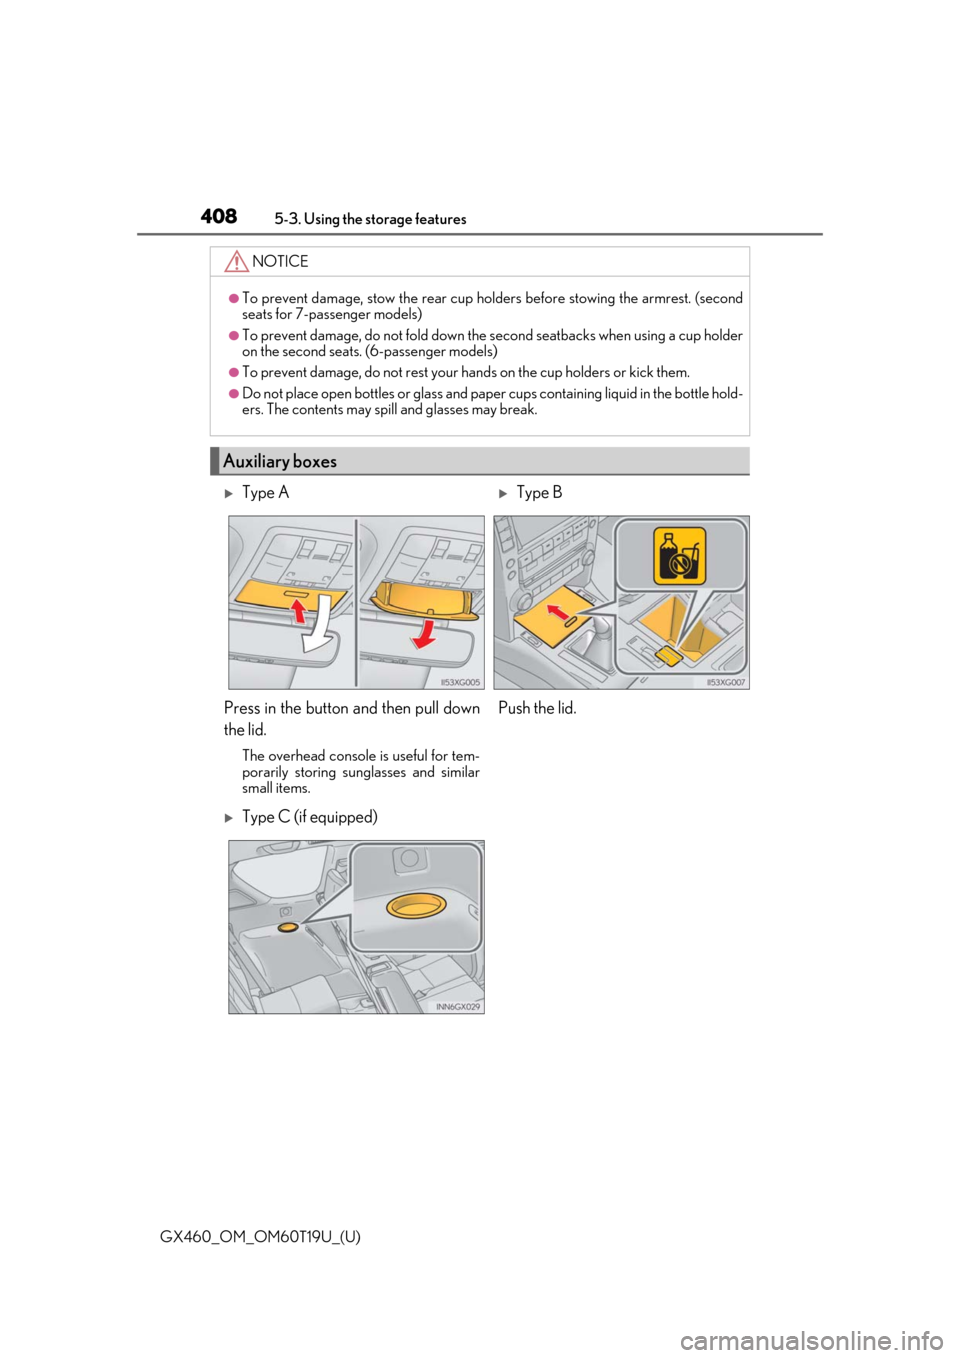
Type AType B
Press in the button and then pull down
the lid.
The overhead console is useful for tem-
porarily storing sung lasses and similar
small items.
Push the lid.
Type C (if equipped)
Page 413 of 628
GX460_OM_OM60T19U_(U)
4135-3. Using the storage features
5
Interior features
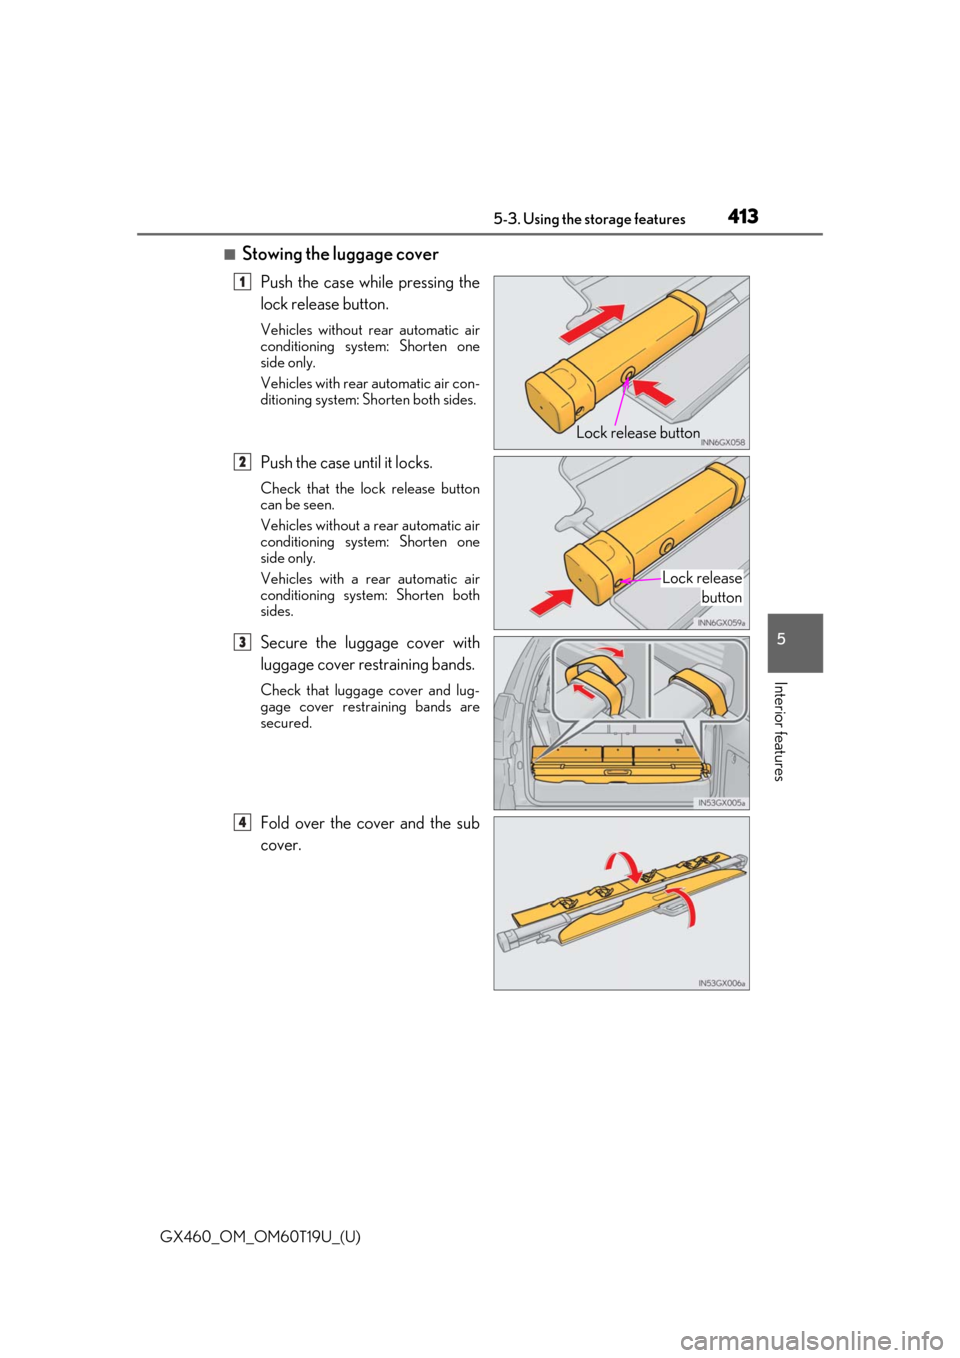
■Stowing the luggage cover
Push the case while pressing the
lock release button.
Vehicles without rear automatic air
conditioning system: Shorten one
side only.
Vehicles with rear automatic air con-
ditioning system: Shorten both sides.
Push the case until it locks.
Check that the lock release button
can be seen.
Vehicles without a rear automatic air
conditioning system: Shorten one
side only.
Vehicles with a rear automatic air
conditioning system: Shorten both
sides.
Secure the luggage cover with
luggage cover restraining bands.
Check that luggage cover and lug-
gage cover restraining bands are
secured.
Fold over the cover and the sub
cover.
Lock release button
1
Lock releasebutton
2
3
4
Page 414 of 628
414
GX460_OM_OM60T19U_(U)5-3. Using the storage features
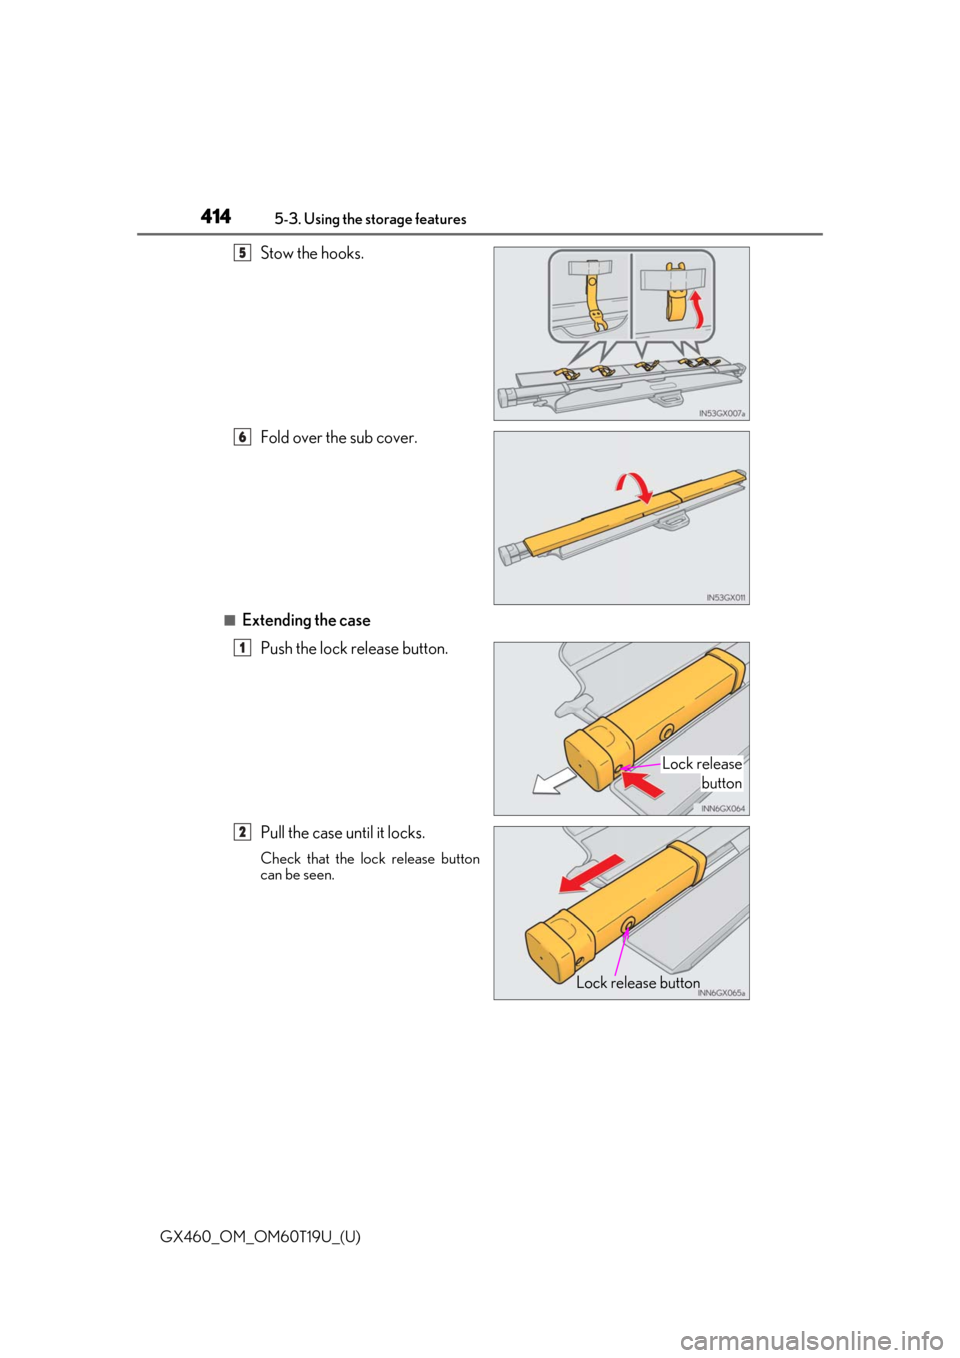
Stow the hooks.
Fold over the sub cover.
■Extending the case
Push the lock release button.
Pull the case until it locks.
Check that the lock release button
can be seen.
5
6
Lock release button
1
Lock release button
2
Page 415 of 628
GX460_OM_OM60T19U_(U)
4155-3. Using the storage features
5
Interior features
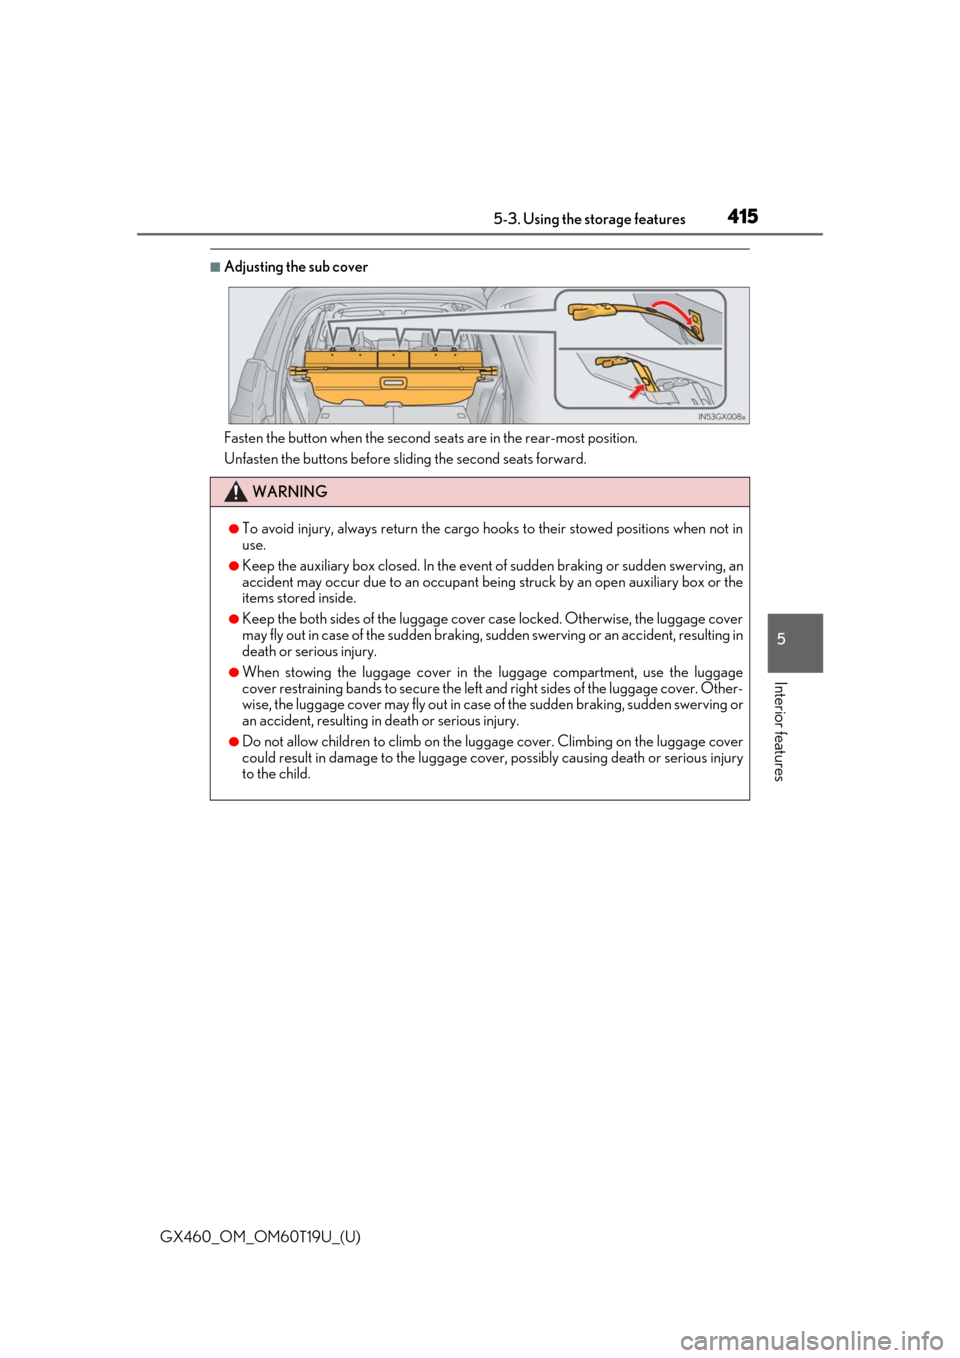
■Adjusting the sub cover
Fasten the button when the second seats are in the rear-most position.
Unfasten the buttons before sliding the second seats forward.
WARNING
●To avoid injury, always return the cargo hooks to their stowed positions when not in
use.
●Keep the auxiliary box closed. In the event of sudden braking or sudden swerving, an
accident may occur due to an occupant bein g struck by an open auxiliary box or the
items stored inside.
●Keep the both sides of the luggage cover case locked. Otherwise, the luggage cover
may fly out in case of the su dden braking, sudden swerving or an accident, resulting in
death or serious injury.
●When stowing the luggage cover in the luggage compartment, use the luggage
cover restraining bands to secure the left and right sides of the luggage cover. Other-
wise, the luggage cover may fly out in case of the sudden braking, sudden swerving or
an accident, resulting in death or serious injury.
●Do not allow children to climb on the lugg age cover. Climbing on the luggage cover
could result in damage to the luggage cove r, possibly causing death or serious injury
to the child.
Page 416 of 628
416
GX460_OM_OM60T19U_(U)5-3. Using the storage features
NOTICE
■To prevent damage to
the luggage cover
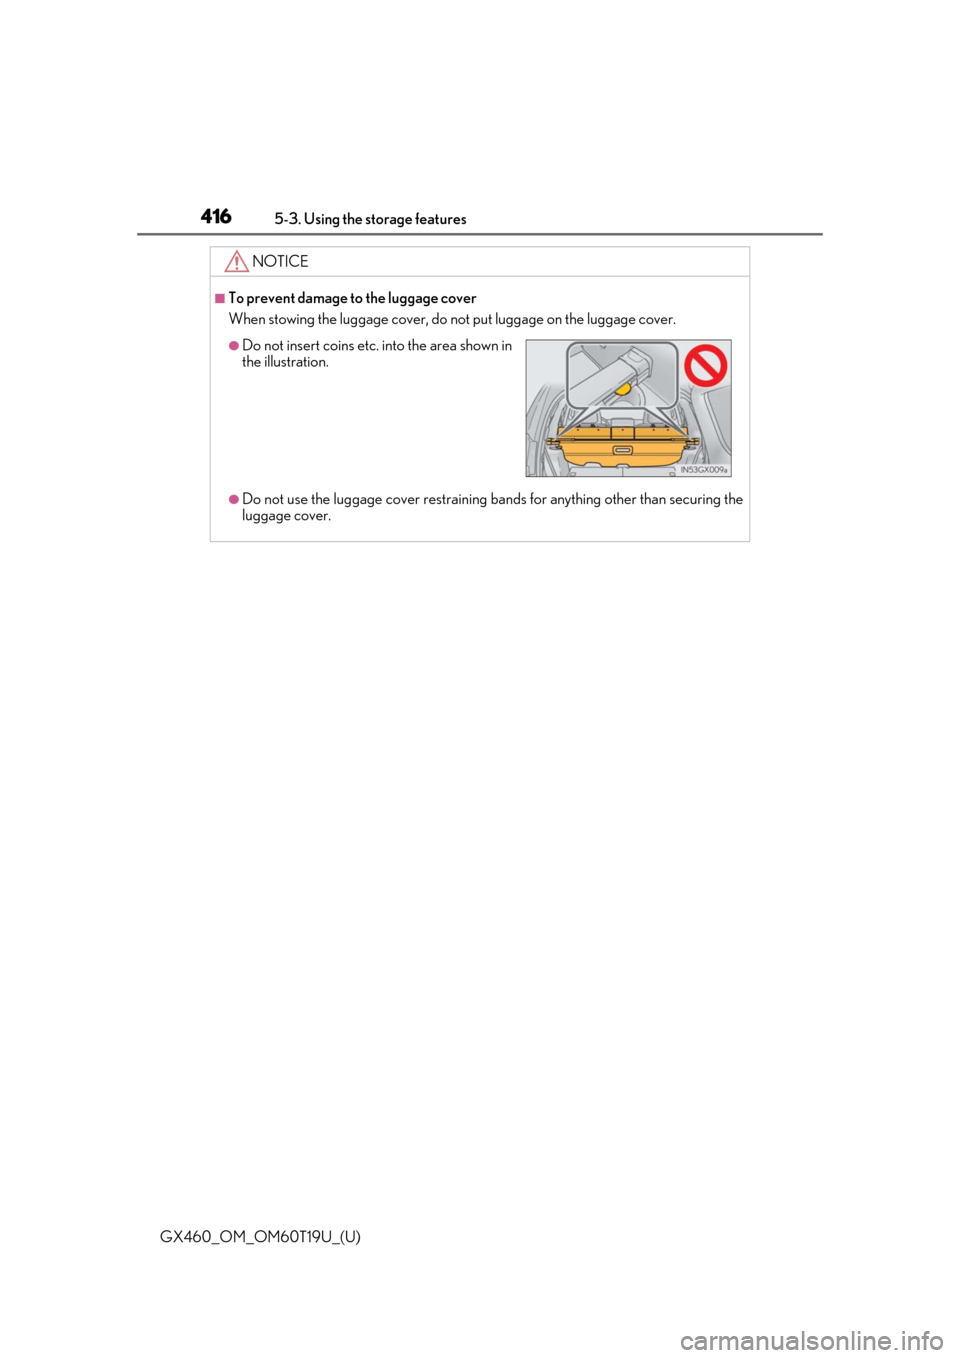
When stowing the luggage cover, do not put luggage on the luggage cover.
●Do not use the luggage cover restraining ba nds for anything other than securing the
luggage cover.
●Do not insert coins etc. into the area shown in
the illustration.
Page 432 of 628

432
GX460_OM_OM60T19U_(U)5-4. Using the other interior features
■Conditions unfavorable
to correct operation
The compass may not show the correct di rection in the following conditions:
●The vehicle is stopped immediately after turning.
●The vehicle is on an inclined surface.
●The vehicle is in a place where the earth’s magnetic field is subject to interference by
artificial magnetic fields (underground car park/parking lot, under a steel tower,
between buildings, roof car park/parking lot, near an intersection, near a large vehicle,
etc.).
●The vehicle has become magnetized.
(There is a magnet or metal object near the inside rear view mirror.)
●The battery has been disconnected.
●A door is open.
WARNING
■While driving the vehicle
Do not adjust the display. Adjust the di splay only when the vehicle is stopped.
■When doing the circling calibration
Secure a wide space, and watch out for people and vehicles in the vicinity. Do not vio-
late any local traffic rules while performing circling calibration.
NOTICE
■To avoid compass malfunctions
Do not place magnets or any metal objects near the inside rear view mirror.
Doing this may cause the compass sensor to malfunction.
■To ensure normal operation of the compass
●Do not perform circling calibration of the compass in a place where the earth’s mag-
netic field is subject to interferen ce by artificial magnetic fields.
●During calibration, do not operate electric systems (moon roof, power windows, etc.)
as they may interfere with the calibration.
Page 455 of 628
455
GX460_OM_OM60T19U_(U)6-3. Do-it-yourself maintenance
6
Maintenance and care
Do-it-yourself service precautions
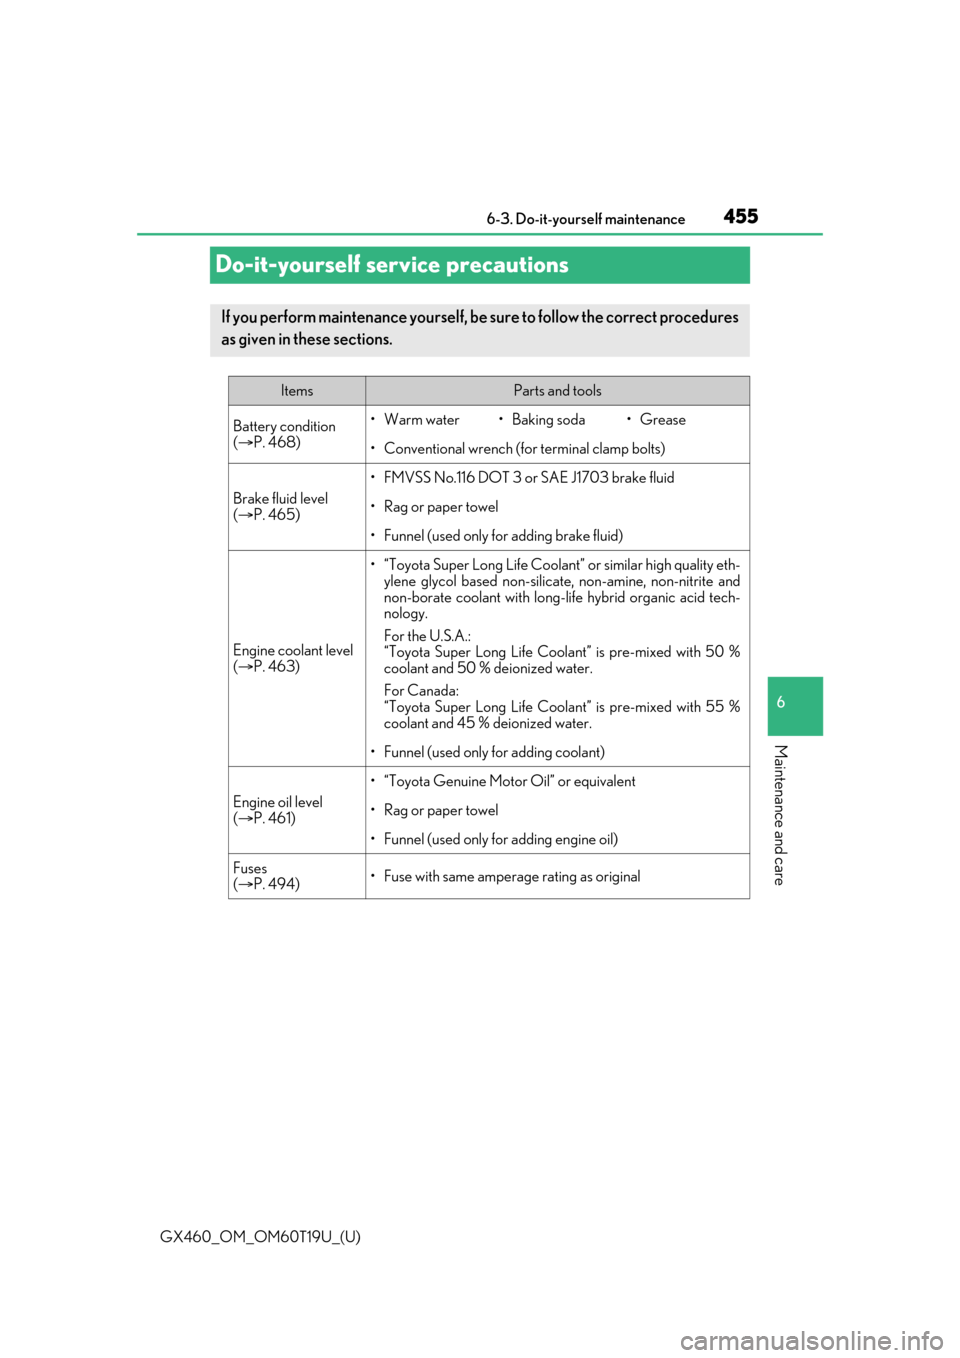
If you perform maintenance yourself, be sure to follow the correct procedures
as given in these sections.
ItemsParts and tools
Battery condition
(
P. 468)•Warm water• Baking soda•Grease
• Conventional wrench (for terminal clamp bolts)
Brake fluid level
( P. 465)
• FMVSS No.116 DOT 3 or SAE J1703 brake fluid
• Rag or paper towel
• Funnel (used only for adding brake fluid)
Engine coolant level
( P. 463)
• “Toyota Super Long Life Coolant” or similar high quality eth-
ylene glycol based non-silicate, non-amine, non-nitrite and
non-borate coolant with long-l ife hybrid organic acid tech-
nology.
For the U.S.A.:
“Toyota Super Long Life Coolan t” is pre-mixed with 50 %
coolant and 50 % deionized water.
For Canada:
“Toyota Super Long Life Coolant” is pre-mixed with 55 %
coolant and 45 % deionized water.
• Funnel (used only for adding coolant)
Engine oil level
( P. 461)
• “Toyota Genuine Motor Oil” or equivalent
• Rag or paper towel
• Funnel (used only for adding engine oil)
Fuses
( P. 494)• Fuse with same amperage rating as original
Page 456 of 628
456
GX460_OM_OM60T19U_(U)6-3. Do-it-yourself maintenance
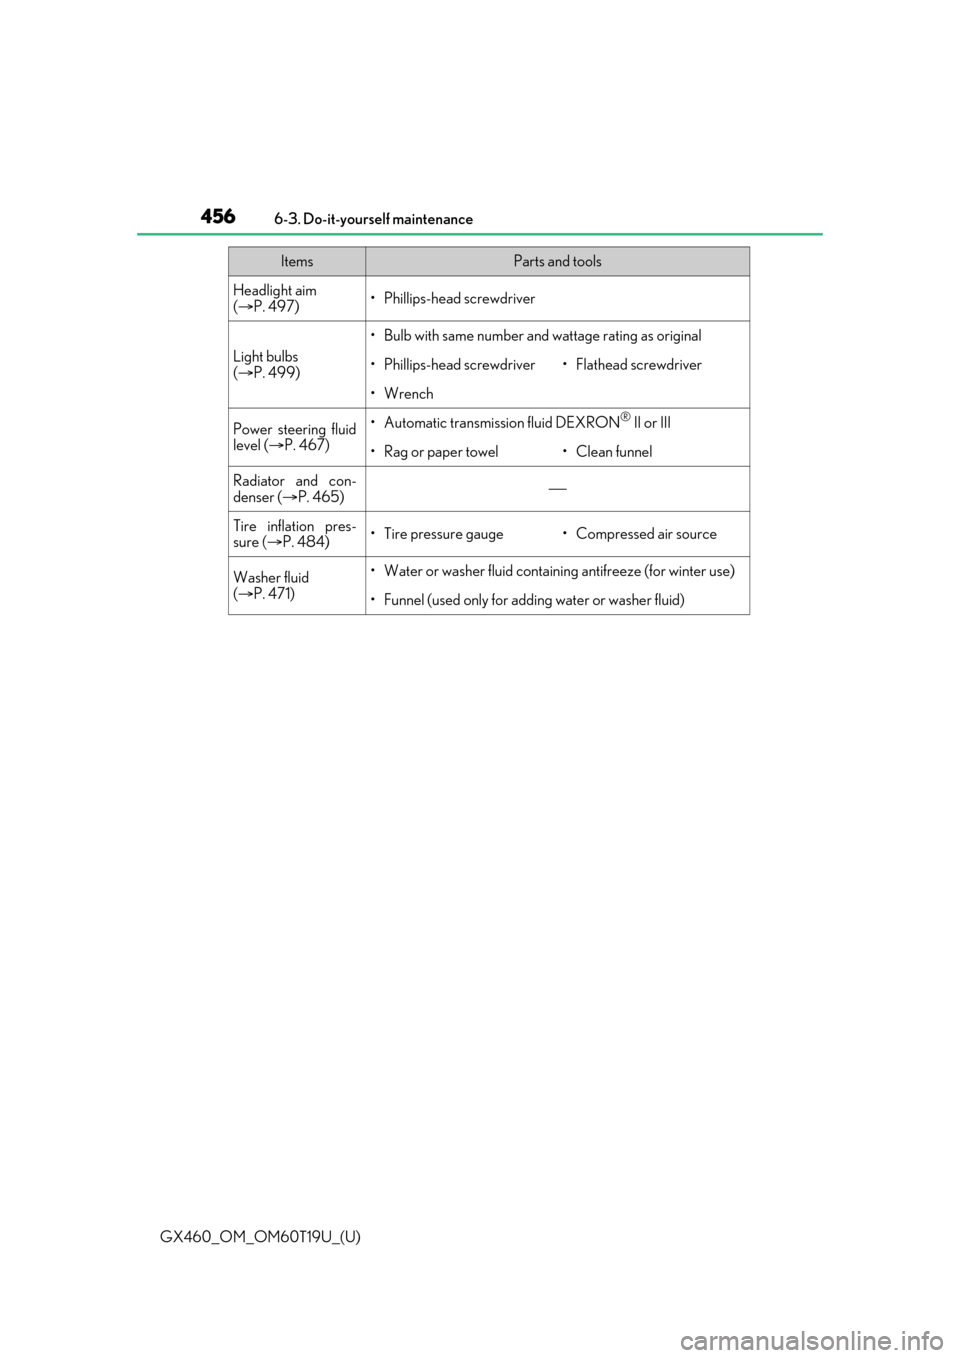
Headlight aim
(
P. 497)• Phillips-head screwdriver
Light bulbs
( P. 499)
• Bulb with same number and wattage rating as original
• Phillips-head screwdriver•Flathead sc rewdriver
•Wrench
Power steering fluid
level (P. 467)• Automatic transmission fluid DEXRON® II or III
• Rag or paper towel•Clean funnel
Radiator and con-
denser ( P. 465)
Tire inflation pres-
sure (P. 484)• Tire pressure gauge• Compressed air source
Washer fluid
( P. 471)• Water or washer fluid containing antifreeze (for winter use)
• Funnel (used only for adding water or washer fluid)
ItemsParts and tools
Page 462 of 628
462
GX460_OM_OM60T19U_(U)6-3. Do-it-yourself maintenance
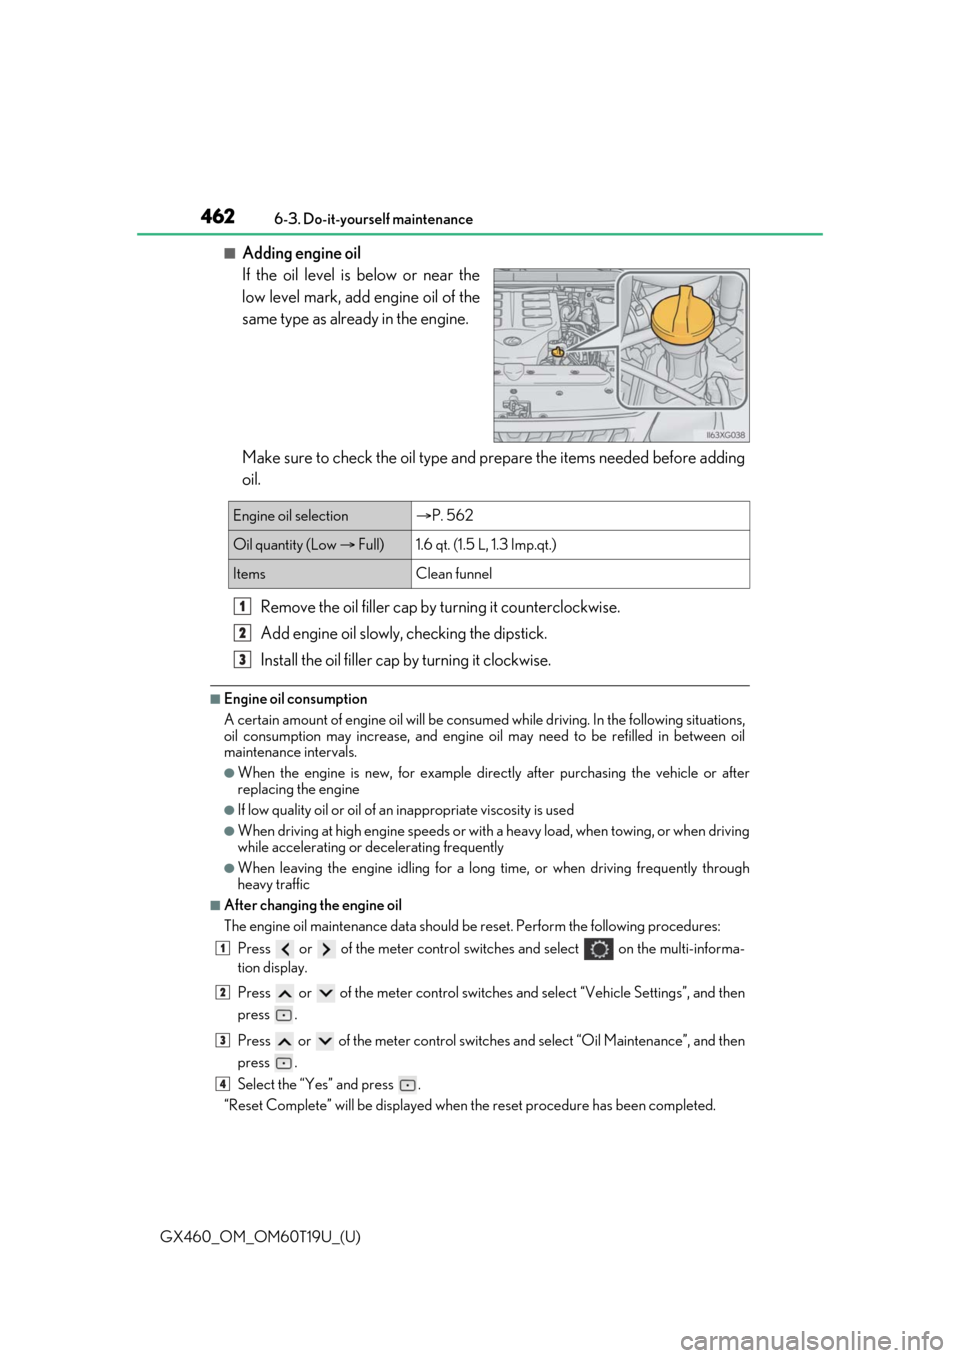
■Adding engine oil
If the oil level is below or near the
low level mark, add engine oil of the
same type as already in the engine.
Make sure to check the oil type and
prepare the items needed before adding
oil.
Remove the oil filler cap by turning it counterclockwise.
Add engine oil slowly, checking the dipstick.
Install the oil filler cap by turning it clockwise.
■Engine oil consumption
A certain amount of engine oil will be consumed while driving. In the following situations,
oil consumption may increase, and engine oil may need to be refilled in between oil
maintenance intervals.
●When the engine is new, for example directly after purchasing the vehicle or after
replacing the engine
●If low quality oil or oil of an inappropriate viscosity is used
●When driving at high engine speeds or with a heavy load, when towing, or when driving
while accelerating or decelerating frequently
●When leaving the engine idling for a long time, or when driving frequently through
heavy traffic
■After changing the engine oil
The engine oil maintenance data should be reset. Perform the following procedures:
Press or of the meter control switch es and select on the multi-informa-
tion display.
Press or of the meter control switches and select “Vehicle Settings”, and then
press .
Press or of the meter control switch es and select “Oil Maintenance”, and then
press .
Select the “Yes” and press .
“Reset Complete” will be displayed when the reset procedure has been completed.
Engine oil selection P. 562
Oil quantity (Low Full)1.6 qt. (1.5 L, 1.3 Imp.qt.)
ItemsClean funnel
1
2
3
1
2
3
4
Page 478 of 628

478
GX460_OM_OM60T19U_(U)6-3. Do-it-yourself maintenance
■If the tread on snow tires wears down below 0.16 in. (4 mm)
The effectiveness of the tire
s as snow tires is lost.
■Situations in which the tire pressure warning system may not operate properly
●In the following cases, the tire pressure warning system may not operate properly.
• If non-genuine Lexus wheels are used.
• A tire has been replaced with a tire that is not an OE (Original Equipment) tire.
• A tire has been replaced with a tire that is not of the specified size.
• Tire chains etc. are equipped.
• An auxiliary-supported run-flat tire is equipped.
• If a window tint that affects th e radio wave signals is installed.
• If there is a lot of snow or ice on the vehi cle, particularly around the wheels or wheel
housings.
• If the tire inflation pressure is extr emely higher than the specified level.
• If the spare tire is in a location subj ect to poor radio wave signal reception.
• If a large metallic object which can interfere with signal reception is put near the
spare tire.
• If tires not equipped with the tire pressure warning valves and transmitters are used.
• If the ID code on the tire pressure warning valves and transmitters is not registered
in the tire pressure warning computer.
●Performance may be affected in the following situations.
• Near a TV tower, electric power plant, gas station, radio station, large display, air-
port or other facility that generates st rong radio waves or electrical noise
• When carrying a portable radio, cellular phone, cordless phone or other wireless
communication device
If tire position information is not correctl y displayed due to the radio wave conditions,
the display may be corrected by driving and changing the radio wave conditions.
●When the vehicle is parked, the time taken for the warning to start or go off could be
extended.
●When tire inflation pressure declines rapidly for example when a tire has burst, the
warning may not function.