wheel Lexus GX470 2007 Using other driving systems /
[x] Cancel search | Manufacturer: LEXUS, Model Year: 2007, Model line: GX470, Model: Lexus GX470 2007Pages: 436, PDF Size: 11.52 MB
Page 381 of 436

5
When trouble arises
361
5-2. Steps to take in an emergency
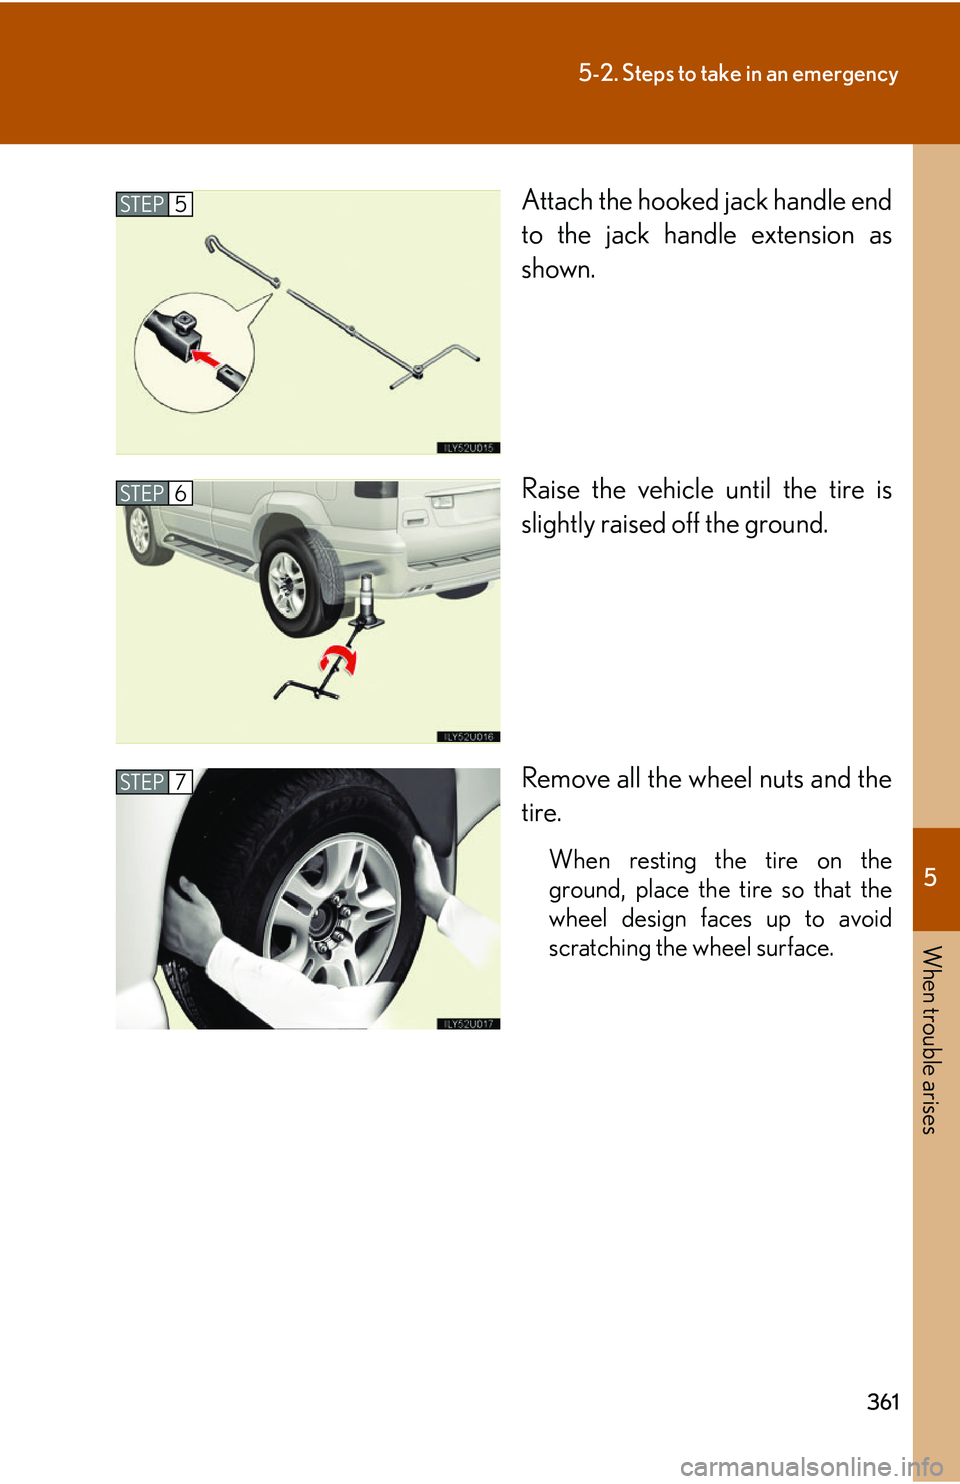
Attach the hooked jack handle end
to the jack handle extension as
shown.
Raise the vehicle until the tire is
slightly raised off the ground.
Remove all the wheel nuts and the
tire.
When resting the tire on the
ground, place the tire so that the
wheel design faces up to avoid
scratching the wheel surface.
STEP5
STEP6
STEP7
Page 382 of 436

362
5-2. Steps to take in an emergency
Installing the spare tireRemove any dirt or foreign matter
from the wheel contact surface.
If foreign matter is on the wheel
contact surface, the wheel nuts
may loosen while the vehicle is in
motion, and the tire may come off
the vehicle.
Install the spare tire and loosely
tighten each nut by hand to
approximately the same amount.
Tighten the wheel nuts until the
tapered portion comes into loose
contact with the disc wheel sheet.
Lower the vehicle.
STEP1
STEP2
Wheel nut
Wa s h e r
Disc wheel
STEP3
Page 383 of 436

5
When trouble arises
363
5-2. Steps to take in an emergency
Firmly tighten each nut two or
three times in the order shown in
the illustration.
Tightening torque:
83 ft•lbf (112 N•m, 11.5 kgf•m)
Reinstall the wheel ornament.
Stowing the flat/spare tire, jack and toolsLay down the tire with the outer
side facing up, and install the hold-
ing bracket.
Raise the tire.
Vehicles with kinetic dynamic su spension: Pull the tire towards
the rear of the vehicle when raising. After raising, visually check
that the tire is not interfering with suspension components.
Stow the tools and jack securely, and replace all covers.
STEP4
STEP5
STEP1
STEP5STEP2
STEP5STEP3
Page 385 of 436

5
When trouble arises
365
5-2. Steps to take in an emergency
CAUTION
■Replacing a flat tire
Observe the following precautions to reduce the risk of injury.
●Lower the spare tire completely to the ground before removing it from under the
vehicle.
●Do not try to remove the wheel ornament by hand. Take due care in handling the
ornament to avoid unexpected personal injury.
●Never use oil or grease on the wheel bolts or wheel nuts.
The oil or grease can cause the wheel nuts to loosen, causing a serious accident.
Remove any oil or grease on the wheel bolts or wheel nuts.
●Have the wheel nuts tightened with a torque wrench to 83 ft•lbf (112 N•m, 11.5
kgf•m) as soon as possible after changing wheels.
Failure to follow these precautions could cause the nuts to loosen and the wheels
may fall off, which could lead to an accident causing death or serious injury.
●Do not attach a heavily damaged wheel orna ment, as it may fly off the wheel while
the vehicle is moving.
Page 386 of 436

366
5-2. Steps to take in an emergency
NOTICE
■Do not drive the vehicle with a flat tire
Do not continue driving with a flat tire.
Driving even a short distance with a flat tire can damage the tire and the wheel
beyond repair.
■When stowing the flat tire
●Ensure that there is no object caught between the tire and the vehicle underbody.
●Vehicles with kinetic dynamic suspension: To avoid damaging the suspension sys-
tem, make sure that the spare tire does not interfere with the suspension compo-
nents when stowed.
■When replacing the tires
●When removing or fitting the wheels, tires or the tire pressure warning valve and
transmitter, contact your Lexus dealer as the tire pressure warning valve and
transmitter may be damaged if not handled correctly.
●Replace the grommets for the tire pressure warning valves and transmitters as
well.
■To avoid damaging the tire pressu re warning valves and transmitters
Do not use liquid sealants on flat tires.
Page 395 of 436

5
When trouble arises
375
5-2. Steps to take in an emergency
If the vehicle becomes stuck
CAUTION
■When attempting to free a stuck vehicle
If you choose to rock the vehicle back and forth to free it, make sure the surround-
ing area is clear, to avoid striking other vehicles, objects or persons. The vehicle
may also lunge forward or lunge back suddenly as it becomes free. Use extreme
caution.
■When shifting the shift lever
Be careful not to shift the shift lever with the accelerator pedal depressed.
This may lead to unexpected rapid acceleration of the vehicle that may cause an
accident and result in death or serious injury.
NOTICE
■To avoid damaging the transmission and other components
●Avoid spinning the wheels and racing the engine.
●If the vehicle remains stuck after trying these procedures, the vehicle may require
towing to be freed.
Carry out the following procedures if the tires spin or the vehicle becomes
stuck in mud, dirt, or snow.
Stop the engine. Set the parking brake and shift the shift lever
to “P”.
Remove the mud, snow, or sand from around the stuck tire.
Place wood, large stones or so me other material to help pro-
vide traction under the tires.
Restart the engine.
Lock the center differential to turn off the vehicle stability con-
trol system. ( P. 121)
Carefully apply the accelerator to free the vehicle.STEP1
STEP2
STEP3
STEP4
STEP5
STEP6
Page 398 of 436

378
6-1. Specifications
Maintenance data
Dimensions and weight
*1: Unladen vehicle
*2: Without roof luggage carrier
*3: With roof luggage carrier
Overall length188.2 in. (4780 mm)
Overall width74.0 in. (1880 mm)
Overall height *173.0 in. (1855 mm) *2
74.6 in. (1895 mm)*3
Wheelbase109.8 in. (2790 mm)
Tr e a dFront62.4 in. (1585 mm)
Rear62.4 in. (1585 mm)
Vehicle capacity weight
(Occupants + luggage)
With third seat
Without third seat1200 lb. (544 kg)
1000 lb. (454 kg)
Towing capacity6500 lb. (2948 kg)
Page 405 of 436

385
6-1. Specifications
6
Vehicle specifications
Chassis lubrication
Steering
Tires and wheels
Propeller shafts
Spiders
Slide yokeLithium base chassis grease, NLGI No.2
Molybdenum-disulfide lithium base chassis
grease,
NLGI No.2 or lithium base chassis grease,
NLGI No.2
Free playLess than 1.2 in. (30 mm)
Power steering fluidAutomatic transmission fluid DEXRON® II
or III
Ti r e s i z eP265/65R17 110S
Tire inflation pressure
(Recommended cold tire inflation
pressure)
Driving under normal conditions 32 psi (220 kPa, 2.2
kgf/cm2 or bar)
Driving at high speeds above 100 mph (160
km/h) (in countries where such speeds are per-
mitted by law) Add 9 psi (60 kPa, 0.6 kgf/cm
2 or bar) to the
front tires and rear tires. Never exceed the
maximum cold tire inflation pressure indicated
on the tire sidewall.
Wheel size17 7 1 /2 JJ
Wheel nut torque83 ft•lbf (112 N•m, 11.5 kgf•m)
Page 412 of 436

392
6-1. Specifications
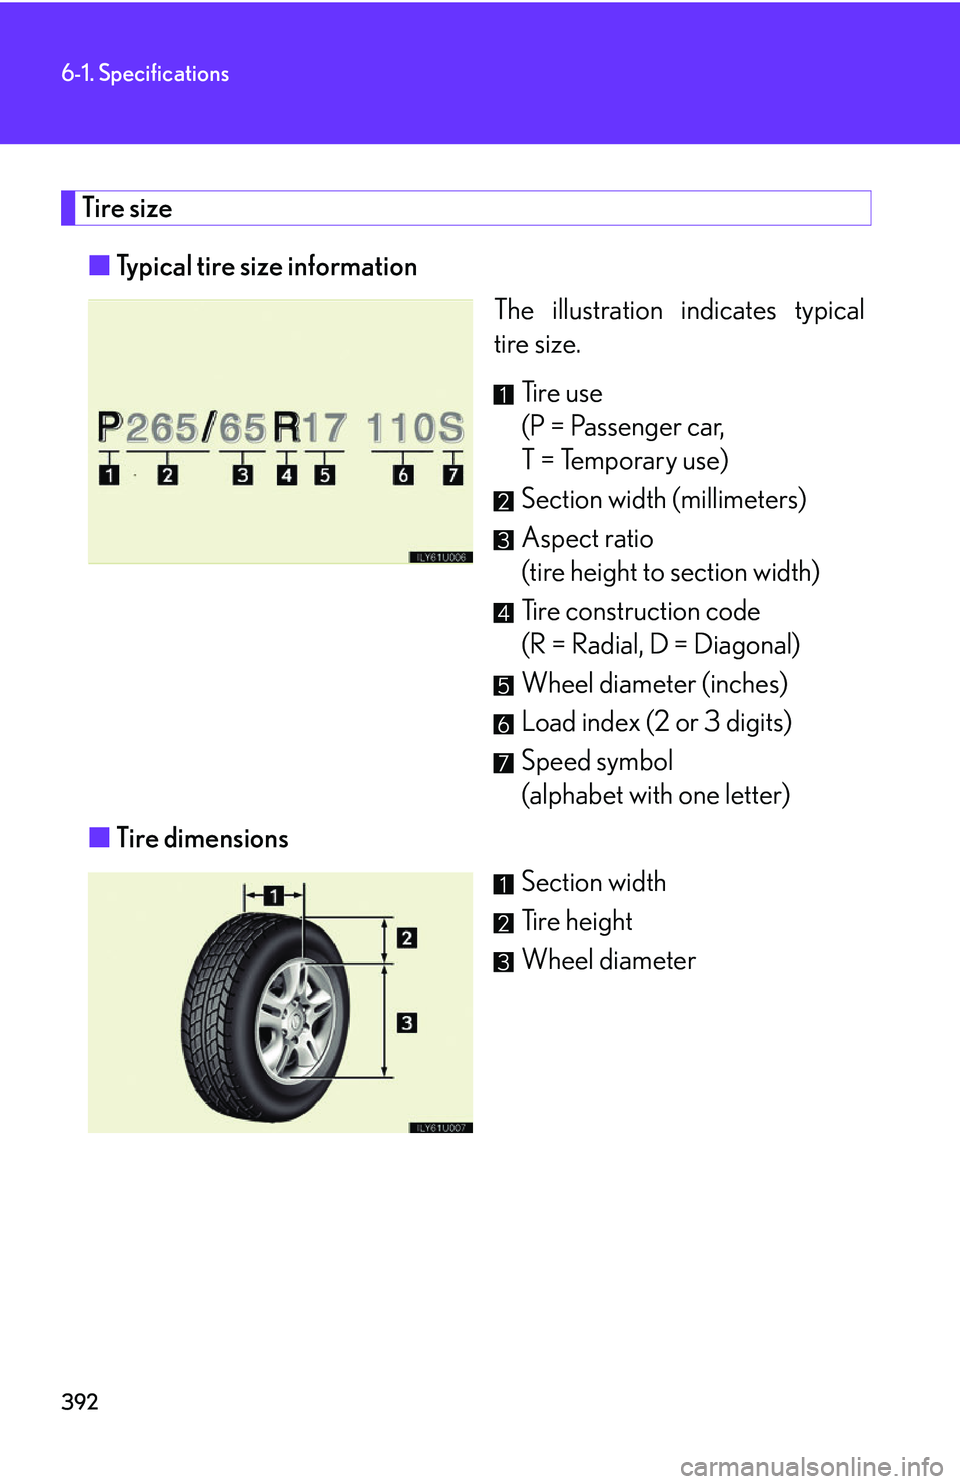
Tire size■ Typical tire size information
The illustration indicates typical
tire size.
Ti r e u s e
(P = Passenger car,
T = Temporary use)
Section width (millimeters)
Aspect ratio
(tire height to section width)
Tire construction code
(R = Radial, D = Diagonal)
Wheel diameter (inches)
Load index (2 or 3 digits)
Speed symbol
(alphabet with one letter)
■ Tire dimensions
Section width
Ti r e h e i g h t
Wheel diameter
Page 414 of 436

394
6-1. Specifications
■Treadwear
The treadwear grade is a comparative rating based on the wear rate of
the tire when tested under controll ed conditions on a specified gov-
ernment test course.
For example, a tire graded 150 would wear one and a half (1 - 1 /2) times as
well on the government course as a tire graded 100.
The relative performance of tires de pends upon the actual conditions of
their use, however, and may depart significantly from the norm due to varia-
tions in driving habits, service practices and differences in road characteris-
tics and climate.
■ Traction AA, A, B, C
The traction grades, from highest to lowest, are AA, A, B and C, and
they represent the tire's ability to stop on wet pavement as measured
under controlled condit ions on specified government test surfaces of
asphalt and concrete.
A tire marked C may have poor traction performance.
Warning: The traction grade assigned to this tire is based on braking
(straight ahead) traction tests and does not include cornering (turning) trac-
tion.
■ Temperature A, B, C
The temperature grades are A (the highest), B, and C, representing
the tire's resistance to the generation of heat and its ability to dissipate
heat when tested under controlled conditions on a specified indoor
laboratory test wheel.
Sustained high temperature can cause the material of the tire to degenerate
and reduce tire life, and excessive temperature can lead to sudden tire fail-
ure.
The grade C corresponds to a level of performance which all passenger car
tires must meet under the Federal Mo tor Vehicle Safety Standard No. 109.
Grades B and A represent higher levels of performance on the laboratory
test wheel than the minimum required by law.