Lexus GX470 2008 Navigation Manual
Manufacturer: LEXUS, Model Year: 2008, Model line: GX470, Model: Lexus GX470 2008Pages: 312, PDF Size: 4.02 MB
Page 261 of 312
AUDIO/VIDEO SYSTEM
260
Title:The largest unit of the video and au-
dio programs stored on DVD video discs.
Usually, one piece of movie, one album, or
one audio program is assigned as a title.
Chapter: The unit smaller than that of title.
A title comprises plural chapters.
Manufactured under license from
Dolby Laboratories. “Dolby”, “Pro Log-
ic”, and the double −D symbol are trade-
marks of Dolby Laboratories. Confi-
dential unpublished works.
E 1992 −1997 Dolby Laboratories. All
rights reserved.
“DTS” is a trademark of Digital Theater
Systems, Inc.
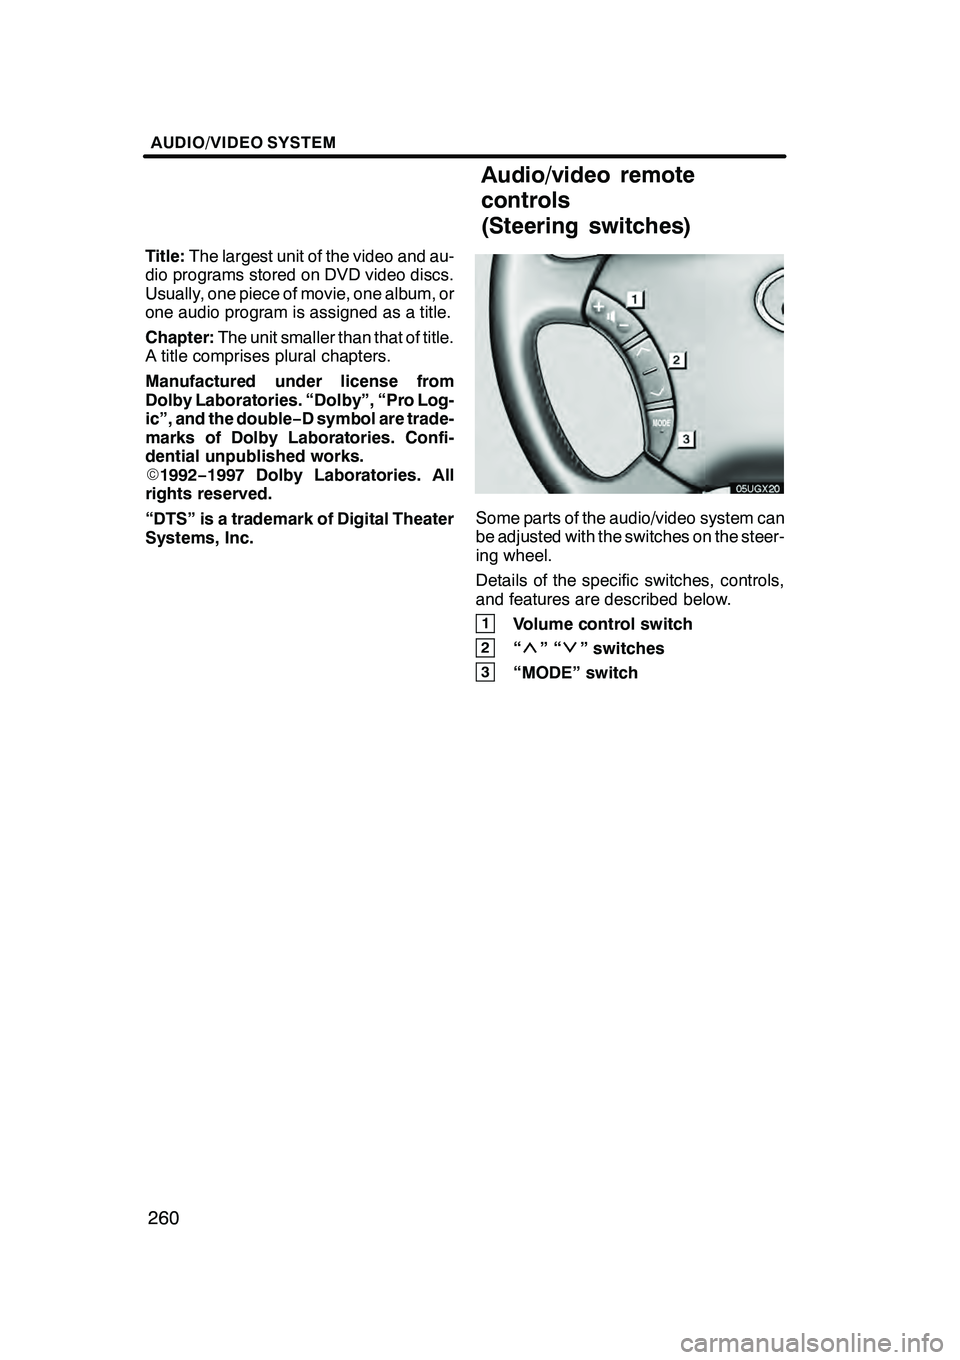
Some parts of the audio/video system can
be adjusted with the switches on the steer-
ing wheel.
Details of the specific switches, controls,
and features are described below.
1Volume control switch
2“”“” switches
3“MODE” switch
GX470_Navi_U (OM60D58U) 07/06/16
Audio/video remote
controls
(Steering switches)
Page 262 of 312
AUDIO/VIDEO SYSTEM
261
1Volume control switch
Push “+”side to increase the volume. The
volume continues to increase while the
switch is being pressed.
Push “−”side to decrease the volume.
The volume continues to decrease while
the switch is being pressed.
2“”“” switches (Seek, search
track)
Radio
To select a preset station:
Quickly push and release the “
”or “”
switch. Do this again to select the next pre-
set station.
To seek a station:
Push and hold the “
”or “”switch until
you hear a beep. Do this again to find the
next station. If you push either the “
”or
“” switch in seek mode, the seek mode
will cancel.
Cassette tape player
To skip to a different track in either direc-
tion:
Quickly push and release the “
”or “”
switch. “FF 1” or “REW 1” will appear on
the display.
Next, push the “
”or “”switch until the
track you want to listen to is set. If you
push the switch ten times, the skip function
will turn off. (You can skip up to nine tracks
at a time.)
When counting the number of the tracks
you want to rewind, remember to count the
current track as well. For example, if you
want to rewind to a song that is two before
the song you are listening to, push the “
”
button three times.
If you push the switch further than you
wanted to, push the other side of the
switch. The track number will be increased
or reduced. The track number you select is not valid if
it is higher than the number of the tracks re-
maining on the current side of the cassette.
DWhen the tape reaches to the begin-
ning, the player will automatically start
playing that side.
DAfter the tape reaches to the end, the
player will automatically reverse and
start playing the other side.
There must be at least 3 seconds of blank
space between tracks for the switch to
work correctly. In addition, the feature may
not work well with some spoken, live, or
classical recordings.
To fast −forward or rewind:
Push and hold the “
”switch to fast −for-
ward a cassette tape. “FF” will appear on
the display. Push and hold the “
”switch
to rewind a tape. “REW” will appear on the
display.
To stop the tape while it is fast −forwarding,
push the “
”switch . To stop the tape
while it is rewinding, push the “”switch.
If a tape rewinds completely, the cassette
tape player will stop and then play that
same side. If a tape fast− forwards com-
pletely, the cassette will play the other side
of the tape using the auto −reverse feature.
DVD changer, or DVD player
Use this button to skip up or down to a dif-
ferent track, file or chapter in either direc-
tion.
To select a desired track, file or chapter:
Quickly push and release the “
”or “”
switch until the track, file or chapter you
want to play is set. If you want to return to
the beginning of the current track, file or
chapter, push the “
”switch once, quick-
ly.
To select a desired disc:
Push and hold the “
”or “”switch until
you hear a beep to change to the next or
the previous disc. Repeat this operation
until you reach the disc you want to listen
to.
GX470_Navi_U (OM60D80U) 08/01/11
Page 263 of 312
AUDIO/VIDEO SYSTEM
262
Vehicles with rear seat entertainment sys-
tem —
While the DVD player is in operation, the
chapter or track can be changed by push-
ing the“
”or “”switch.
3“MODE” switch
Each time you push the “MODE”switch,
the system changes the audio mode.
The DVD player will be selectable if a rear
seat entertainment system is installed in
your vehicle.
To turn the audio/video system on, push
the “MODE” switch.
To turn the audio/video system off, push
and hold the “MODE”switch until you hear
a beep.
NOTICE
To ensure correct audio/video sys-
tem operations:
DBe careful not to spill beverages
over the audio/video system.
DDo not put anything other than a
cassette tape or appropriate discs
into the cassette tape slot or CD
changer or DVD changer slot.
DThe use of a cellular phone inside
or near the vehicle may cause a
noise from the speakers of the
audio/video system which you are
listening to. However, this does
not indicate a malfunction.
Radio reception
Usually, the problem with radio reception
does not mean there is a problem with your
radio −it is just the normal result of condi-
tions outside the vehicle.
For example, nearby buildings and terrain
can interfere with FM reception. Power
lines or telephone wires can interfere with
AM signals. And of course, radio signals
have a limited range, and the farther you
are from a station, the weaker its signal will
be. In addition, reception conditions
change constantly as your vehicle moves.
Here are some common reception prob-
lems that probably do not indicate a prob-
lem with your radio:
GX470_Navi_U (OM60D58U) 07/06/16
Audio/video system
operating hints
Page 264 of 312
AUDIO/VIDEO SYSTEM
263
FM
Fading and drifting stations— General-
ly, the effective range of FM is about 40 km
(25 miles). Once outside this range, you
may notice fading and drifting, which in-
crease with the distance from the radio
transmitter. They are often accompanied
by distortion.
Multi −path — FM signals are reflective,
making it possible for two signals to reach
your antenna at the same time. If this hap-
pens, the signals will cancel each other
out, causing a momentary flutter or loss of
reception.
Static and fluttering — These occur
when signals are blocked by buildings,
trees, or other large objects. Increasing
the bass level may reduce static and flut-
tering.
Station swapping — If the FM signal you
are listening to is interrupted or weakened,
and there is another strong station nearby
on the FM band, your radio may tune in the
second station until the original signal can
be picked up again.
AM
Fading — AM broadcasts are reflected by
the upper atmosphere — especially at
night. These reflected signals can inter-
fere with those received directly from the
radio station, causing the radio station to
sound alternately strong and weak.
Station interference — When a reflected
signal and a signal received directly from
a radio station are very nearly the same
frequency, they can interfere with each
other, making it difficult to hear the broad-
cast.
Static — AM is easily affected by external
sources of electrical noise, such as high
tension power lines, lightening, or electri-
cal motors. This results in static. CARING FOR YOUR CASSETTE TAPE
PLAYER AND TAPES
For high performance from your cassette
tape player and tapes:
Clean the tape head and other parts regu-
larly.
DA dirty tape head or tape path can de-
crease sound quality and tangle your
cassette tapes. The easiest way to
clean them is by using a cleaning tape.
(A wet type is recommended.)
Use high −quality cassettes:
DLow− quality cassette tapes can cause
many problems, including poor sound,
inconsistent playing speed, and
constant auto −reversing. They can
also get stuck or tangled in the cassette
tape player.
DDo not use a cassette if it has been
damaged or tangled or if its label is
peeling off.
DDo not leave a cassette in the player if
you are not listening to it, especially if
it is hot outside.
DStore cassettes in their cases and out
of direct sunlight.
DAvoid using cassettes with a total play-
ing time longer than 100 minutes (50
minutes per side). The tape used in
these cassettes is thin and could get
stuck or tangled in the cassette tape
player.
GX470_Navi_U (OM60D58U) 07/06/16
Page 265 of 312
AUDIO/VIDEO SYSTEM
264
MP3/WMA files
DMP3 (MPEG Audio Layer 3) and WMA
(Windows Media Audio) are audio
compression standards.
DThe MP3/WMA player can play MP3
and WMA files on CD−ROM, CD −R
and CD −RW discs.
The unit can play disc recordings com-
patible with ISO 9660 level 1 and level
2 and with the Romeo and Joliet file
system.
DWhen naming an MP3 or WMA file, add
the appropriate file extension (.mp3 or
.wma).
DThe MP3/WMA player plays back files
with .mp3 or .wma file extensions as
MP3 or WMA files. To prevent noise
and playback errors, use the appropri-
ate file extensions.
DThe player can play only the first ses-
sion using multi −session compatible
CDs.
DMP3 files are compatible with the ID3
Tag Ver. 1.0, Ver. 1.1, Ver. 2.2 (front au-
dio system only), and Ver. 2.3 formats.
The unit cannot display disc title, track
title and artist name in other formats.
DWMA files can contain a WMA tag that
is used in the same way as an ID3 tag.
WMA tags carry information such as
track title, artist name.
DThe emphasis function is available
only when playing MP3/WMA files re-
corded at 32, 44.1 and 48 kHz. (The
system can play MP3 files with sam-
pling frequencies of 16, 22.05, and 24
kHz. However, the emphasis function
is not available for files recorded at
these frequencies.)
DThe sound quality of MP3/WMA files
generally improves with higher bit rate-
s. In order to achieve a reasonable lev-
el of sound quality, discs recorded with
a bit rate of at least 128 kbps are rec-
ommended.
Playable bit rates
MP3 files:
MPEG1 LAYER3—64 to 320 kbps
MPEG2 LSF LAYER3—64 to 160 kbps
WMA files:
Ver. 7, 8 CBR—48 to 192 kbps
Ver. 9 CBR—48 to 320 kbps
DThe MP3/WMA player does not play
back MP3/WMA files from discs re-
corder using packet write data transfer
(UDF format). Discs should be re-
corded using “pre −mastering” software
rather than packet −write software.
DThe m3u playlists are not compatible
with the audio player.
DMP3i (MP3 interactive) and MP3PRO
formats are not compatible with the au-
dio player.
DThe MP3 player is compatible with
VBR (Variable Bit Rate).
DWhen playing back files recorded as
VBR (Variable Bit Rate) files, the play
time will not be correctly displayed if
fast− forward or reverse operations are
used.
DIt is not possible to check folders that
do not include MP3/WMA files.
DMP3/WMA files in folders up to 8 levels
deep can be played. However, the
start of playback may be delayed when
using discs containing numerous lev-
els of folders. For this reason, we rec-
ommend creating discs with no more
than two levels of folders.
DIt is possible to play up to 192 folders or
255 files on one disc.
GX470_Navi_U (OM60D58U) 07/06/16
Page 266 of 312
AUDIO/VIDEO SYSTEM
265
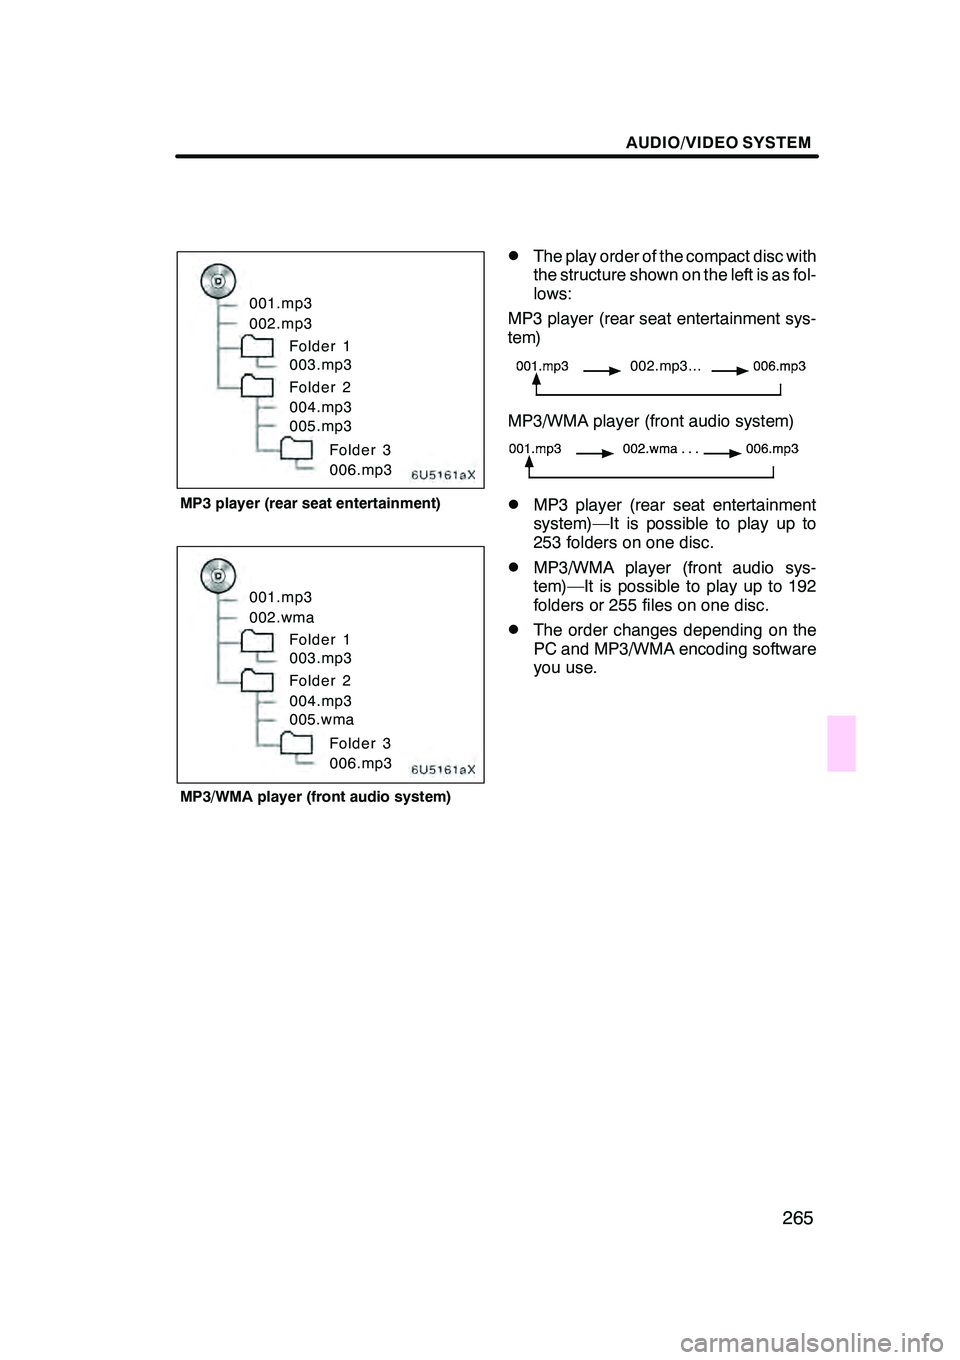
001.mp3
002.mp3Folder 1
003.mp3
Folder 2
004.mp3
005.mp3
Folder 3
006.mp3
MP3 player (rear seat entertainment)
001.mp3
002.wmaFolder 1
003.mp3
Folder 2
004.mp3
005.wma
Folder 3
006.mp3
MP3/WMA player (front audio system)
DThe play order of the compact disc with
the structure shown on the left is as fol-
lows:
MP3 player (rear seat entertainment sys-
tem)
002.mp3...
MP3/WMA player (front audio system)
DMP3 player (rear seat entertainment
system)—It is possible to play up to
253 folders on one disc.
DMP3/WMA player (front audio sys-
tem)—It is possible to play up to 192
folders or 255 files on one disc.
DThe order changes depending on the
PC and MP3/WMA encoding software
you use.
GX470_Navi_U (OM60D58U) 07/06/16
Page 267 of 312
AUDIO/VIDEO SYSTEM
266
CD−R AND CD −RW DISCS
DCD− R/CD− RW discs that have not
been subject to the “finalizing process”
(a process that allows discs to be
played on a conventional CD player)
cannot be played.
DIt may not be possible to play CD −
R/CD− RW discs recorded on a music
CD recorder or a personal computer
because of disc characteristics,
scratches or dirt on the disc, or dirt,
condensation, etc. on the lens of the
unit.
DIt may not be possible to play discs re-
corded on a personal computer de-
pending on the application settings and
the environment. Record with the cor-
rect format. (For details, contact the
appropriate application manufacturers
of the applications.)
DCD− R/CD− RW discs may be damaged
by direct exposure to sunlight, high
temperatures or other storage condi-
tions. The unit may be unable to play
some damaged discs.
DIf you insert a CD −RW disc into the
MP3/WMA player, playback will begin
more slowly than with a conventional
CD or CD −R disc.
DRecordings on CD −R/CD− RW cannot
be played using the DDCD (Double
Density CD) system. CARING FOR YOUR DVD CHANGER,
DVD PLAYER AND DISCS
DYour DVD changer is intended for use
with 12 cm (4.7 in.) discs only.
DExtremely high temperature can keep
your DVD changer and DVD player
from working. On hot days, use air
conditioning to cool the vehicle interior
before you listen to a disc.
DBumpy roads or other vibrations may
make your DVD changer and DVD
player skip.
DIf moisture gets into your CD changer,
DVD changer and DVD player, you
may not hear any sound even though
your DVD changer and DVD player ap-
pears to be working. Remove the discs
from the DVD changer and DVD player
and wait until it dries.
CAUTION
DVD changer and DVD player use an
invisible laser beam which could
cause hazardous radiation exposure
if directed outside the unit. Be sure to
operate the changer and player
correctly.
GX470_Navi_U (OM60D58U) 07/06/16
Page 268 of 312
AUDIO/VIDEO SYSTEM
267
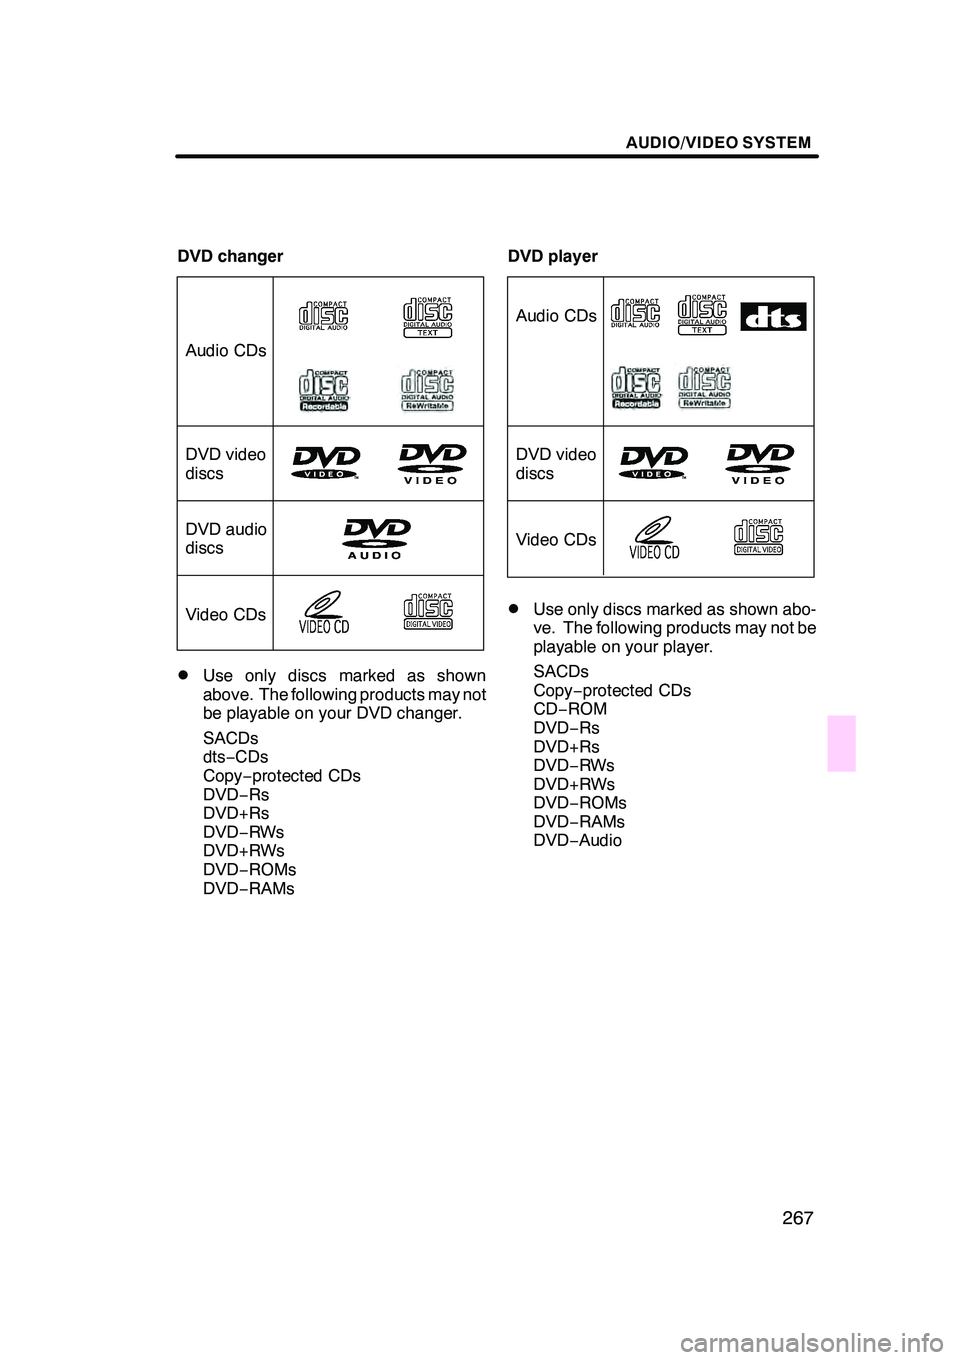
DVD changer
Audio CDs
DVD video
discs
Video CDs
DVD audio
discs
DUse only discs marked as shown
above. The following products may not
be playable on your DVD changer.
SACDs
dts−CDs
Copy −protected CDs
DVD− Rs
DVD+Rs
DVD− RWs
DVD+RWs
DVD− ROMs
DVD− RAMs DVD player
Audio CDs
DVD video
discs
Video CDs
DUse only discs marked as shown abo-
ve. The following products may not be
playable on your player.
SACDs
Copy−
protected CDs
CD− ROM
DVD− Rs
DVD+Rs
DVD− RWs
DVD+RWs
DVD− ROMs
DVD− RAMs
DVD− Audio
GX470_Navi_U (OM60D58U) 07/06/16
Page 269 of 312
AUDIO/VIDEO SYSTEM
268
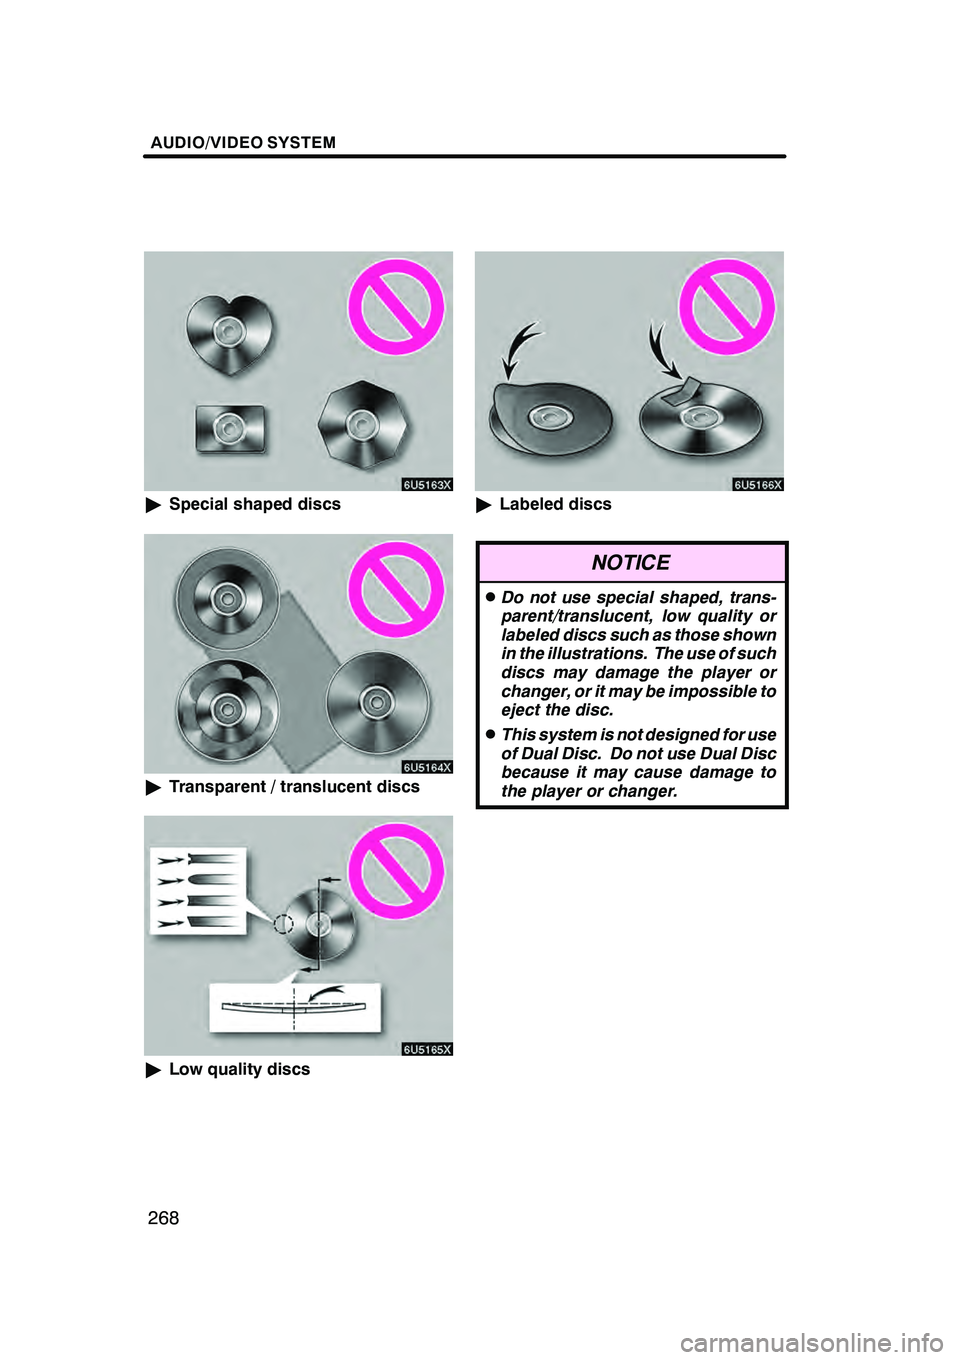
"Special shaped discs
"Transparent / translucent discs
"Low quality discs
"Labeled discs
NOTICE
DDo not use special shaped, trans-
parent/translucent, low quality or
labeled discs such as those shown
in the illustrations. The use of such
discs may damage the player or
changer, or it may be impossible to
eject the disc.
DThis system is not designed for use
of Dual Disc. Do not use Dual Disc
because it may cause damage to
the player or changer.
GX470_Navi_U (OM60D58U) 07/06/16
Page 270 of 312
AUDIO/VIDEO SYSTEM
269
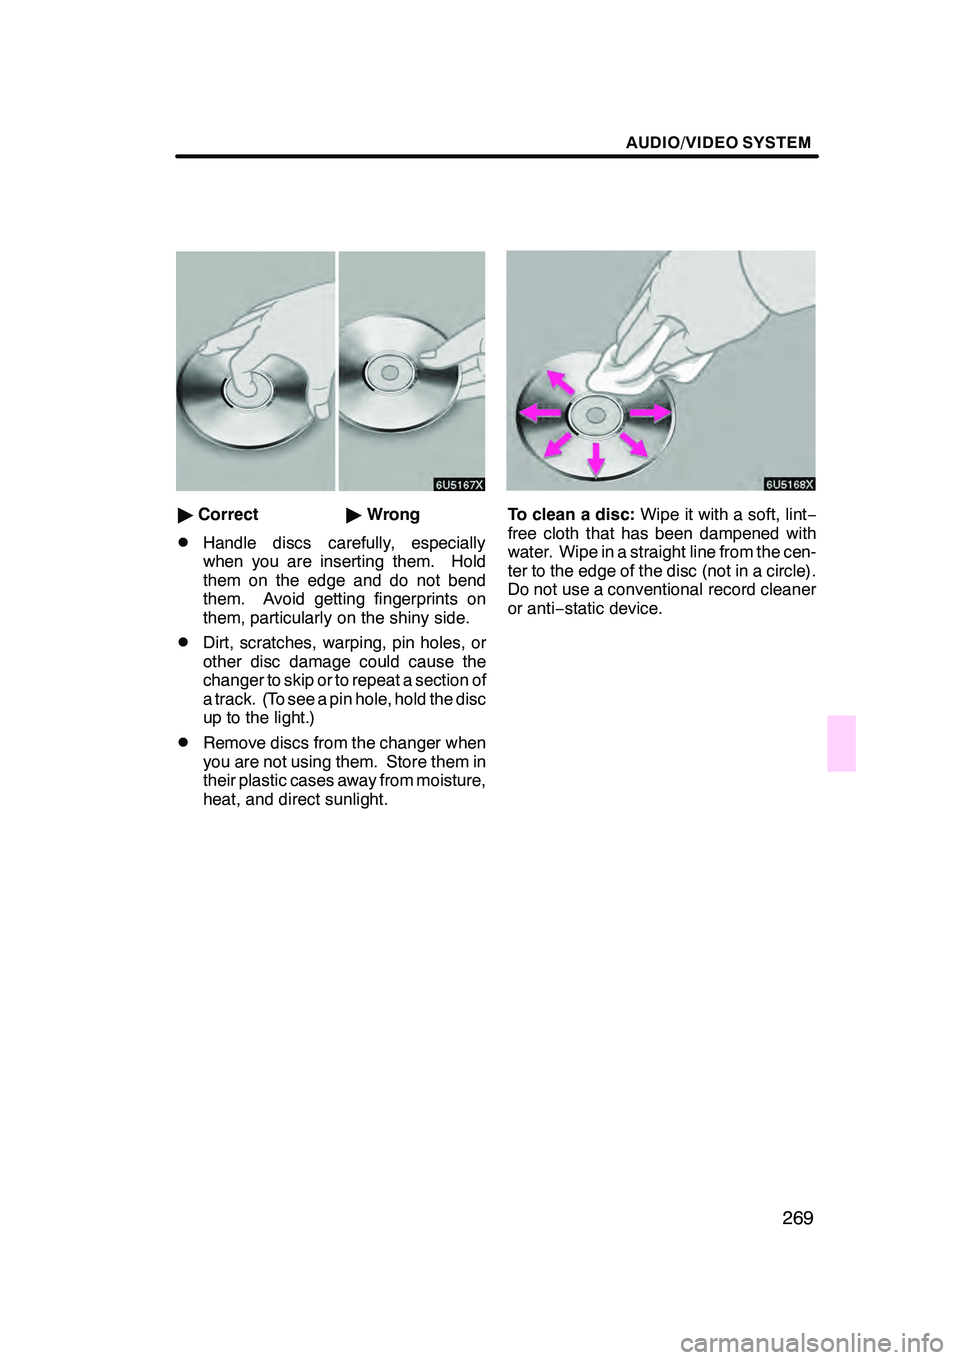
"Correct "Wrong
DHandle discs carefully, especially
when you are inserting them. Hold
them on the edge and do not bend
them. Avoid getting fingerprints on
them, particularly on the shiny side.
DDirt, scratches, warping, pin holes, or
other disc damage could cause the
changer to skip or to repeat a section of
a track. (To see a pin hole, hold the disc
up to the light.)
DRemove discs from the changer when
you are not using them. Store them in
their plastic cases away from moisture,
heat, and direct sunlight.
To clean a disc: Wipe it with a soft, lint −
free cloth that has been dampened with
water. Wipe in a straight line from the cen-
ter to the edge of the disc (not in a circle).
Do not use a conventional record cleaner
or anti −static device.
GX470_Navi_U (OM60D58U) 07/06/16