lock Lexus GX470 2008 Using other driving systems / LEXUS 2008 GX470 QUICK GUIDE OWNER'S MANUAL (OM60D81U)
[x] Cancel search | Manufacturer: LEXUS, Model Year: 2008, Model line: GX470, Model: Lexus GX470 2008Pages: 58, PDF Size: 2.25 MB
Page 1 of 58
1
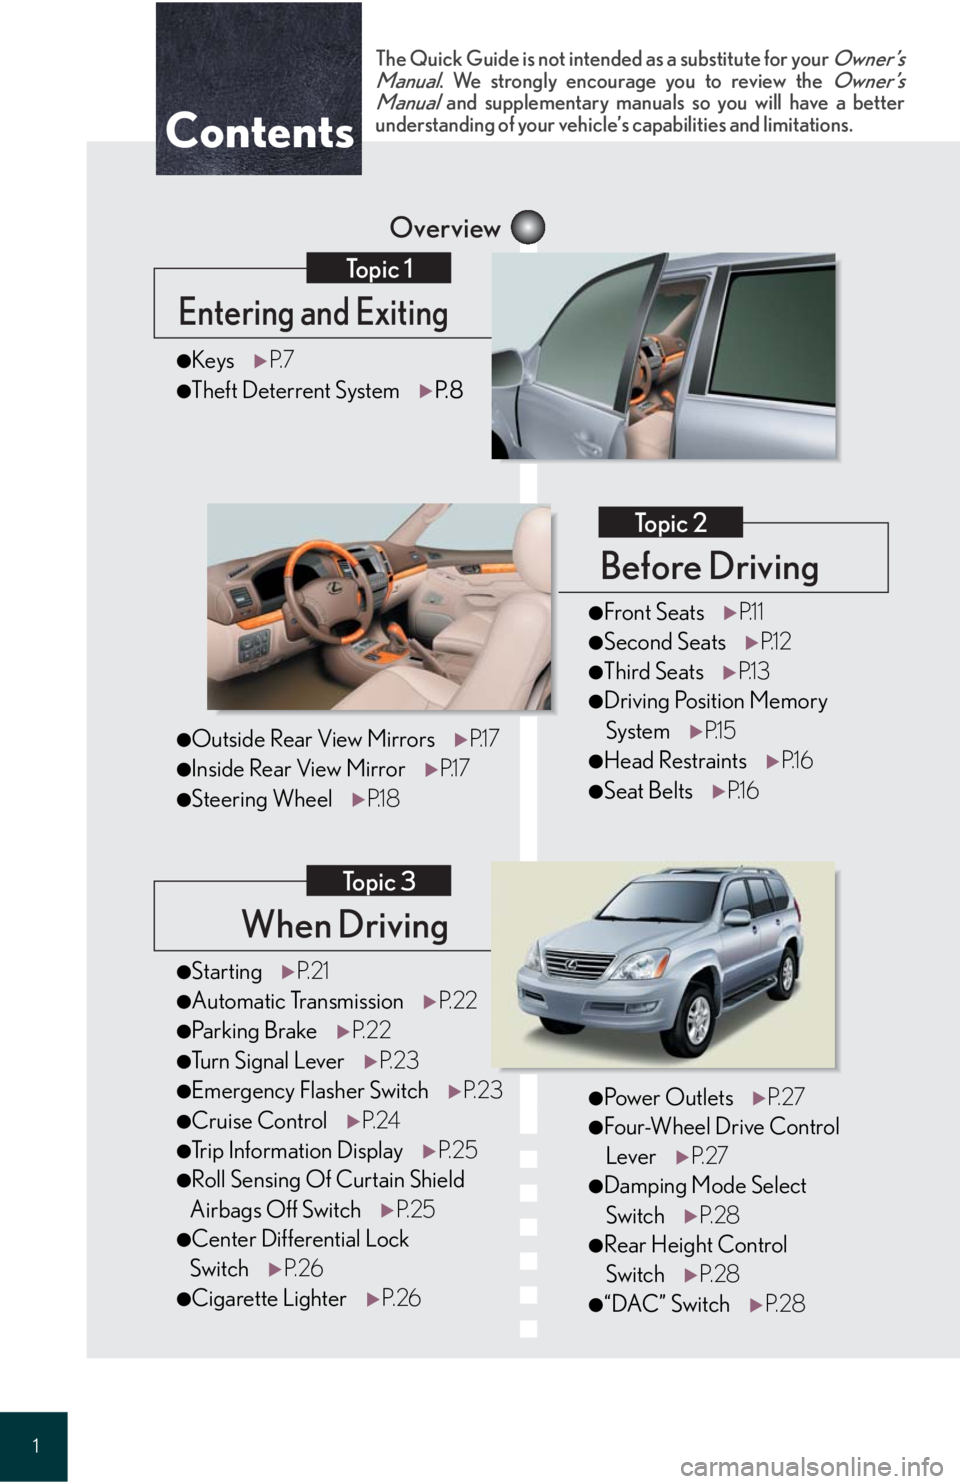
When Driving
Topic 3
Overview
Contents
Entering and Exiting
Topic 1
Before Driving
Topic 2
●StartingP. 2 1
●Automatic Transmission P. 2 2
●Parking BrakeP. 2 2
●Tu r n S i g n a l L e v e r P. 2 3
●Emergency Flasher Switch P. 2 3
●Cruise ControlP. 2 4
●Trip Information Display P. 2 5
●Roll Sensing Of Curtain Shield
Airbags Off Switch P. 2 5
●Center Differential Lock
Switch P. 2 6
●Cigarette Lighter P. 2 6
●KeysP. 7
●Theft Deterrent System P.8
The Quick Guide is not intended as a substitute for your Owner’s
Manual. We strongly encourage you to review the Owner’s
Manual and supplementary manuals so you will have a better
understanding of your vehicle’ s capabilities and limitations.
●Pow e r O u t l e t sP. 2 7
●Four-Wheel Drive Control
Lever P. 2 7
●Damping Mode Select
Switch P. 2 8
●Rear Height Control
Switch P. 2 8
●“DAC” Switch P. 2 8
●Front SeatsP.1 1
●Second Seats P.1 2
●Third SeatsP.1 3
●Driving Position Memory
System P.1 5
●Head Restraints P.1 6
●Seat BeltsP.1 6
●Outside Rear View Mirrors P.1 7
●Inside Rear View MirrorP.1 7
●Steering WheelP.1 8
Page 2 of 58
Entering and Exiting
Before Driving
When Driving
Rain and
Night Driving
Driving Comfort
Opening and Closing
What to do if ...
Customizing
Yo u r L e x u s
2
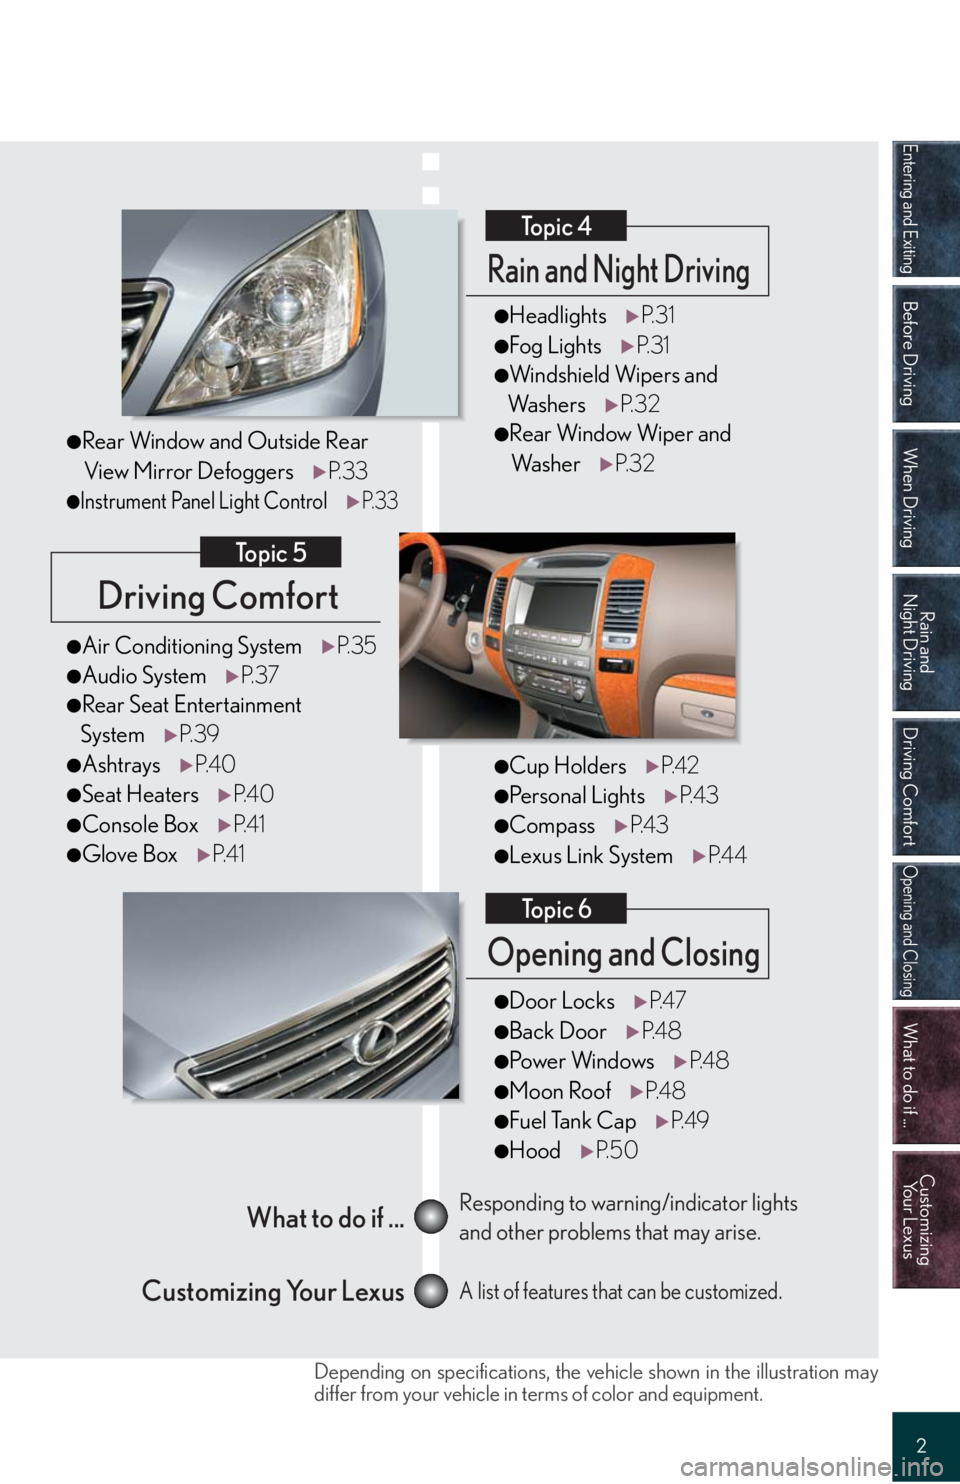
Driving Comfort
Topic 5
Opening and Closing
Topic 6
What to do if ...
Customizing Your LexusResponding to warning/indicator lights
and other problems that may arise.
A list of features that can be customized.
Rain and Night Driving
Topic 4
●HeadlightsP. 3 1
●Fog LightsP. 3 1
●Windshield Wipers and
Wa s h e r sP. 3 2
●Rear Window Wiper and
Wa s h e rP. 3 2
●Cup HoldersP. 4 2
●Pe r s o n a l L i g h t sP. 4 3
●CompassP. 4 3
●Lexus Link SystemP. 4 4
●Door LocksP. 4 7
●Back DoorP. 4 8
●Po w e r Wi n d o w sP. 4 8
●Moon RoofP. 4 8
●Fuel Tank CapP. 4 9
●HoodP. 5 0
●Air Conditioning SystemP. 3 5
●Audio SystemP. 3 7
●Rear Seat Entertainment
SystemP. 3 9
●AshtraysP. 4 0
●Seat HeatersP. 4 0
●Console BoxP. 4 1
●Glove BoxP. 4 1
●Rear Window and Outside Rear
View Mirror DefoggersP. 3 3
●Instrument Panel Light ControlP. 3 3
Depending on specifications, the vehicle shown in the illustration may
differ from your vehicle in terms of color and equipment.
Page 3 of 58
3
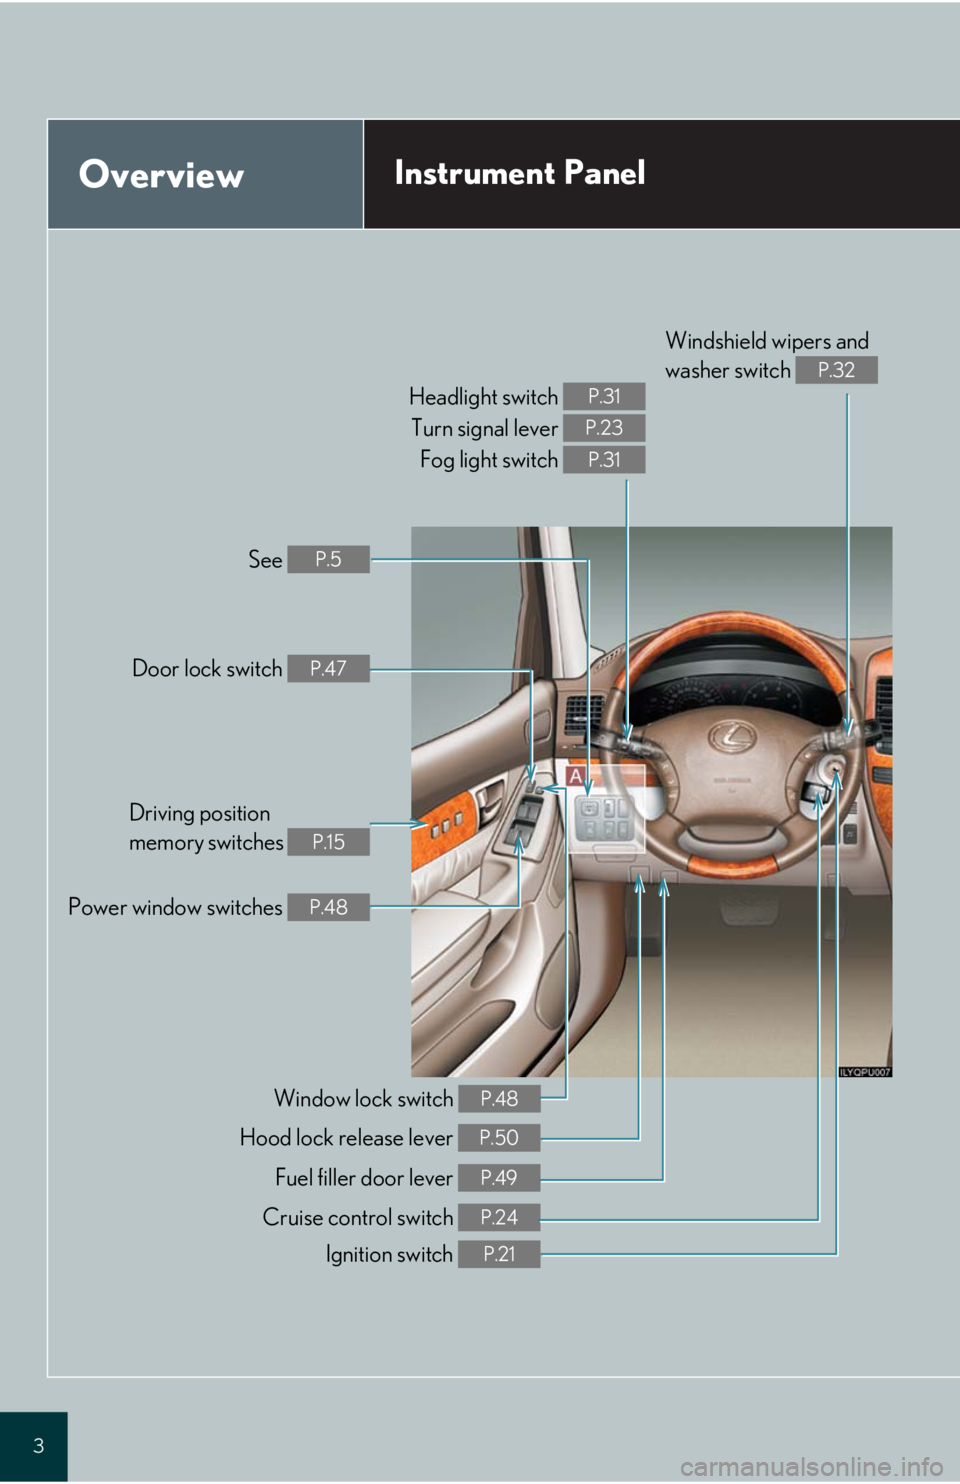
OverviewInstrument Panel
Windshield wipers and
washer switch
P.32
Headlight switch
Turn signal lever
Fog light switch P.31
P.23
P.31
See P.5
Hood lock release lever P.50
Door lock switch P.47
Power window switches P.48
Window lock switch P.48
Cruise control switch P.24
Driving position
memory switches
P.15
Fuel filler door lever P.49
Ignition switch P.21
Page 5 of 58
5
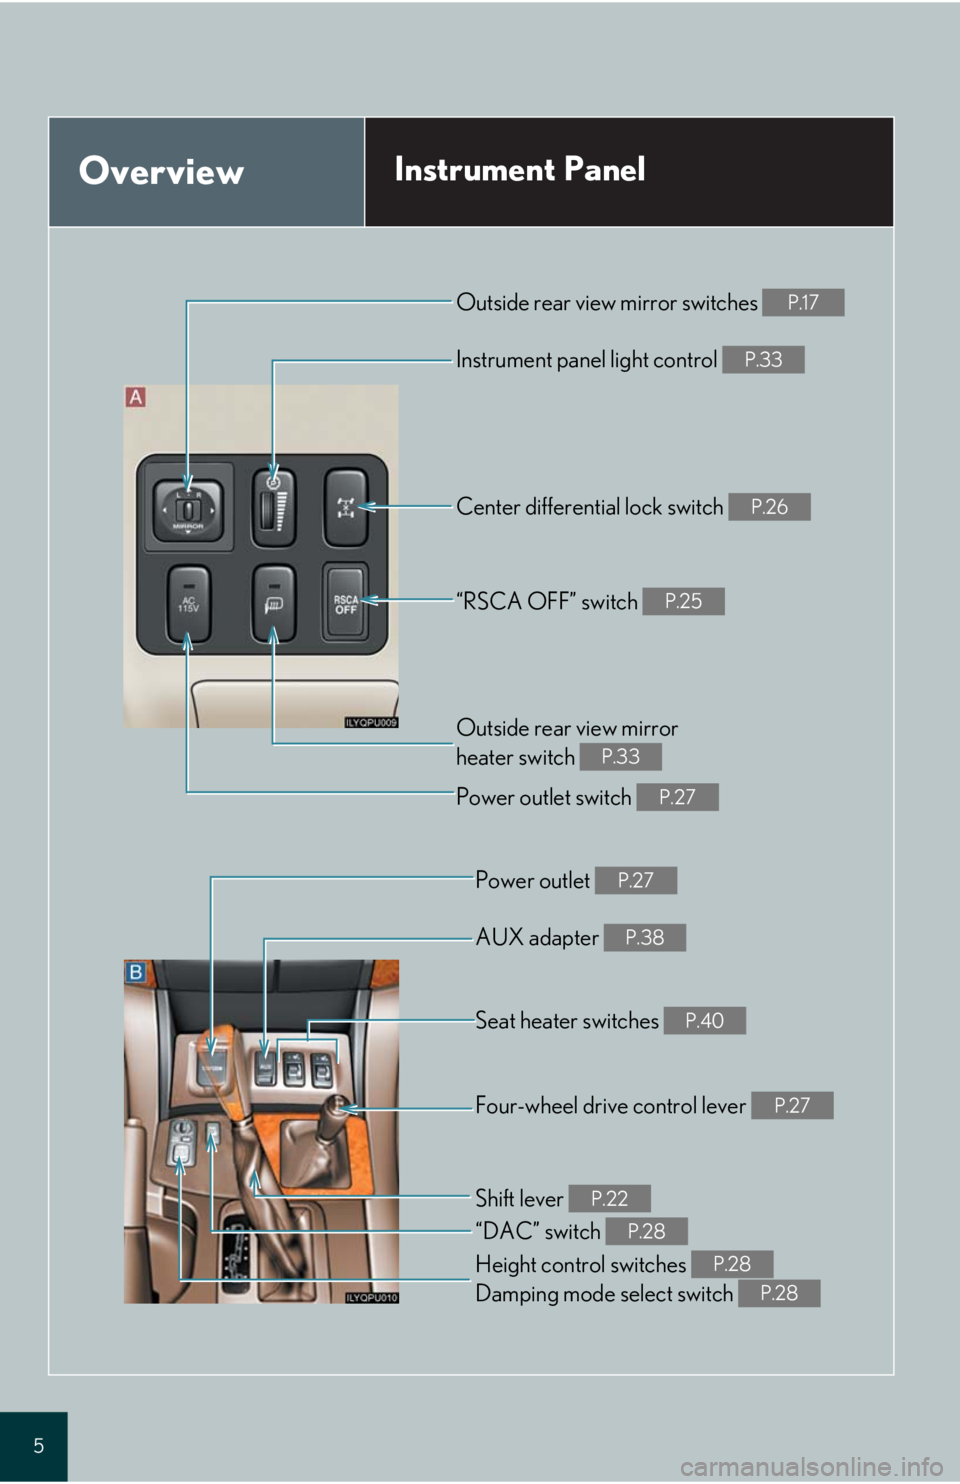
OverviewInstrument Panel
Instrument panel light control P.33
Outside rear view mirror
heater switch
P.33
Power outlet switch P.27
Outside rear view mirror switches P.17
“RSCA OFF” switch P.25
Center differential lock switch P.26
AUX adapter P.38
“DAC” switch P.28
Height control switches
Damping mode select switch P.28
P.28
Power outlet P.27
Four-wheel drive control lever P.27
Seat heater switches P.40
Shift lever P.22
Page 7 of 58
Topic 1
Entering and Exiting
7
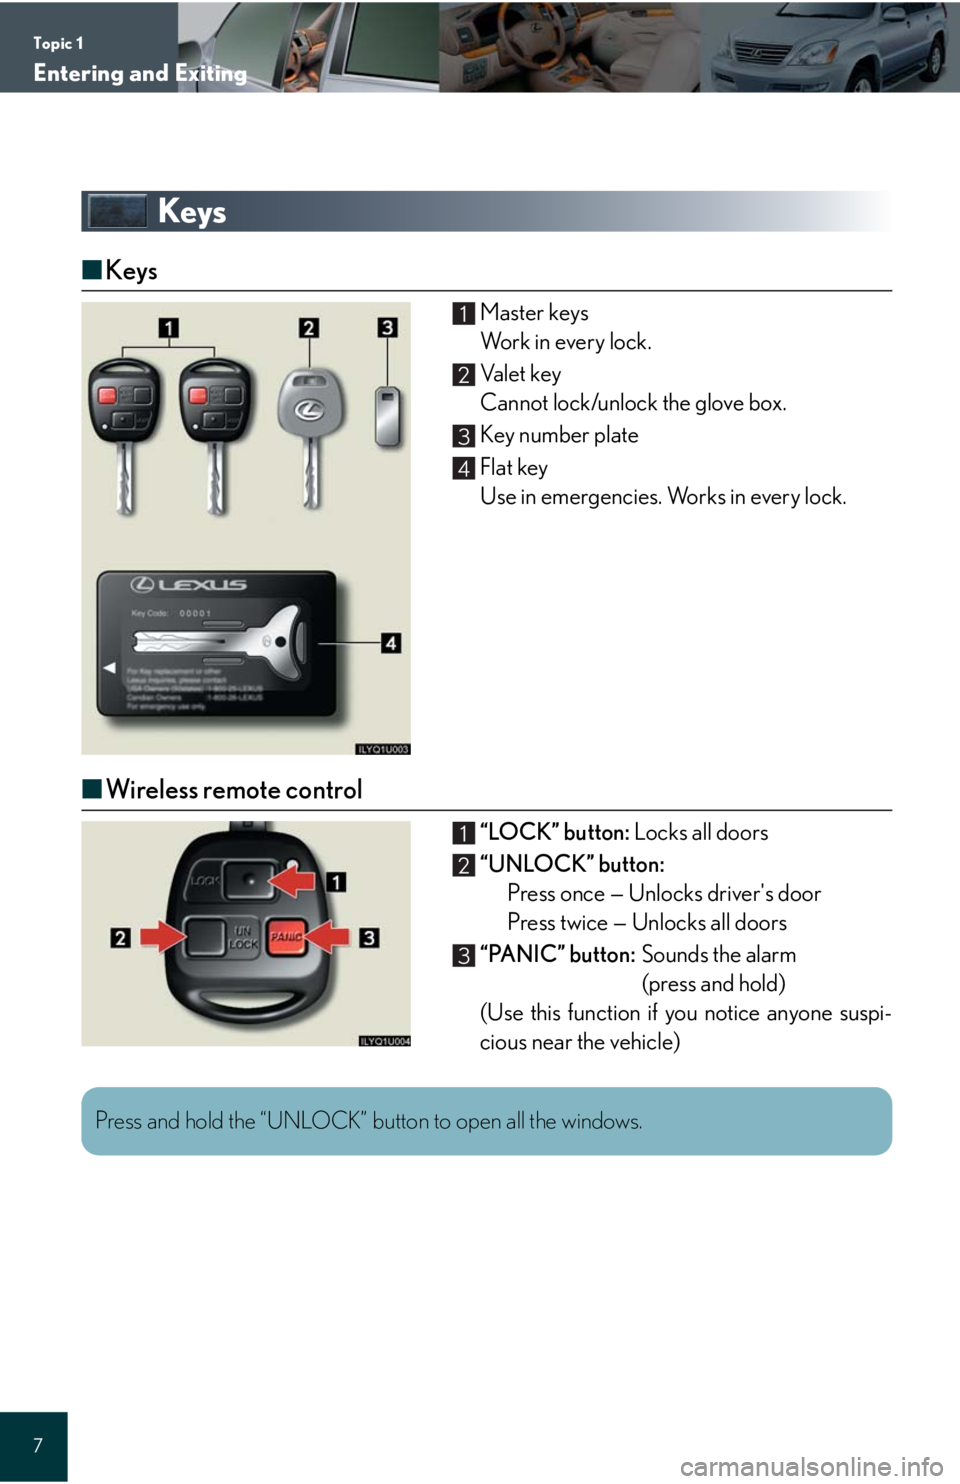
Keys
■Keys
Master keys
Wo r k i n e v e r y l o c k .
Va l e t k e y
Cannot lock/unlock the glove box.
Key number plate
Flat key
Use in emergencies. Works in every lock.
■Wireless remote control
“LOCK” button: Locks all doors
“UNLOCK” button:
Press once — Unlocks driver's door
Press twice — Unlocks all doors
“PANIC” button:Sounds the alarm
(press and hold)
(Use this function if you notice anyone suspi-
cious near the vehicle)
1
2
3
4
1
2
3
Press and hold the “UNLOCK” button to open all the windows.
Page 8 of 58
Topic 1
Entering and Exiting
8
Entering and Exiting
When Driving
Rain and
Night Driving
Driving Comfort
Opening and Closing
What to do if ...
Customizing
Yo u r L e x u s
Before DrivingBefore Driving
Theft Deterrent System
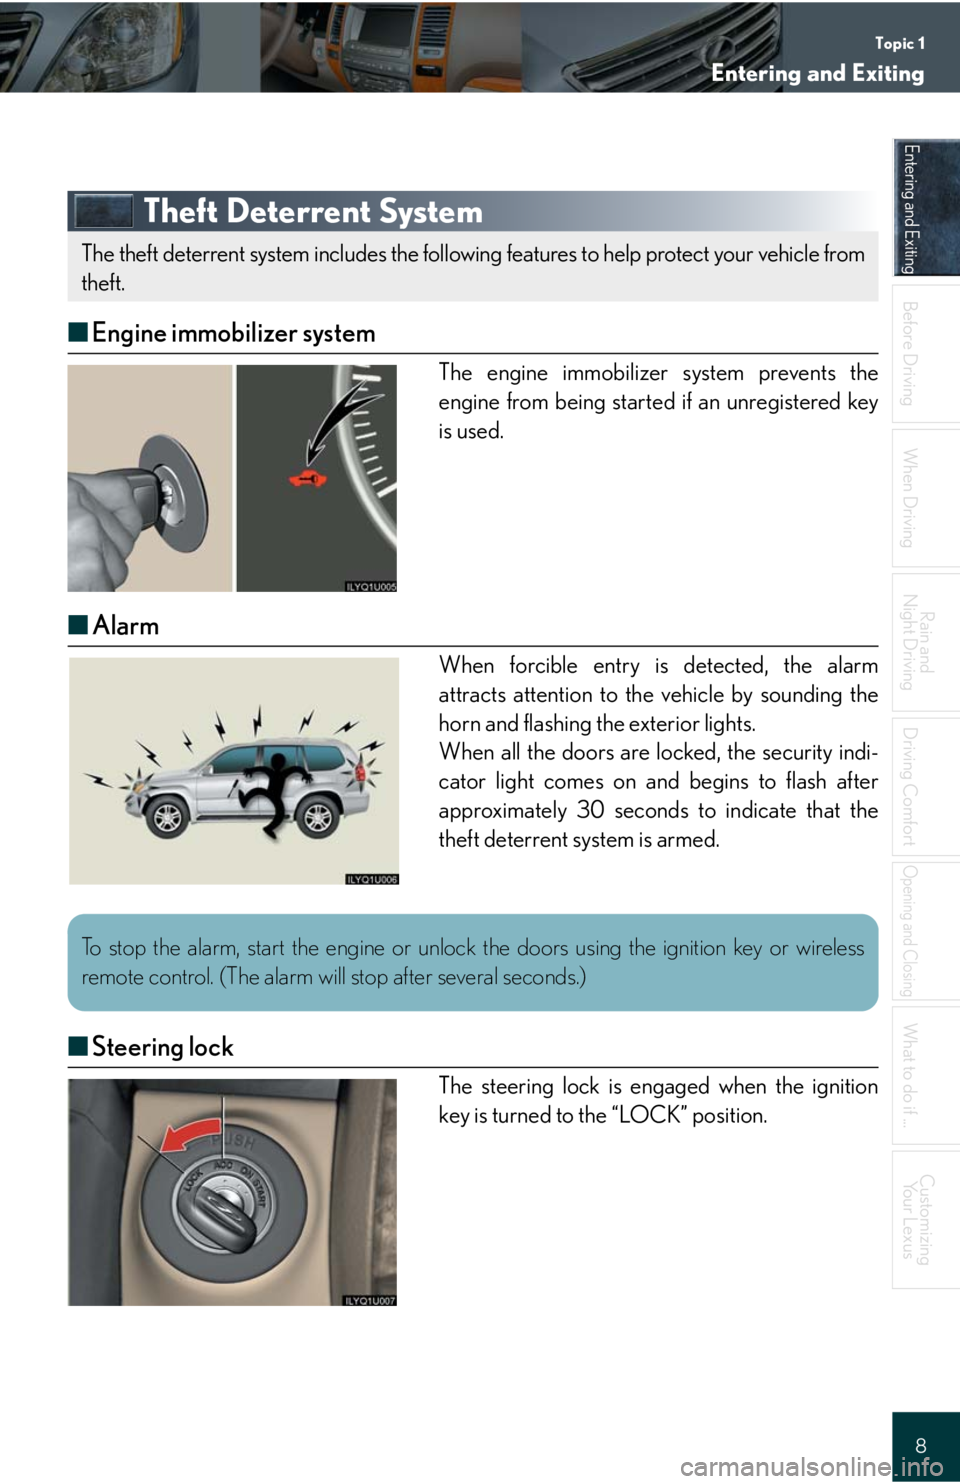
■Engine immobilizer system
The engine immobilizer system prevents the
engine from being started if an unregistered key
is used.
■Alarm
When forcible entry is detected, the alarm
attracts attention to the vehicle by sounding the
horn and flashing the exterior lights.
When all the doors are locked, the security indi-
cator light comes on and begins to flash after
approximately 30 seconds to indicate that the
theft deterrent system is armed.
■Steering lock
The steering lock is engaged when the ignition
key is turned to the “LOCK” position.
The theft deterrent system includes the following features to help protect your vehicle from
theft.
To stop the alarm, start the engine or unlock the doors using the ignition key or wireless
remote control. (The alarm will stop after several seconds.)
Page 12 of 58
Topic 2
Before Driving
12
Entering and Exiting
Before Driving
When Driving
Rain and
Night Driving
Driving Comfort
Opening and Closing
What to do if ...
Customizing
Yo u r L e x u s
Second Seats
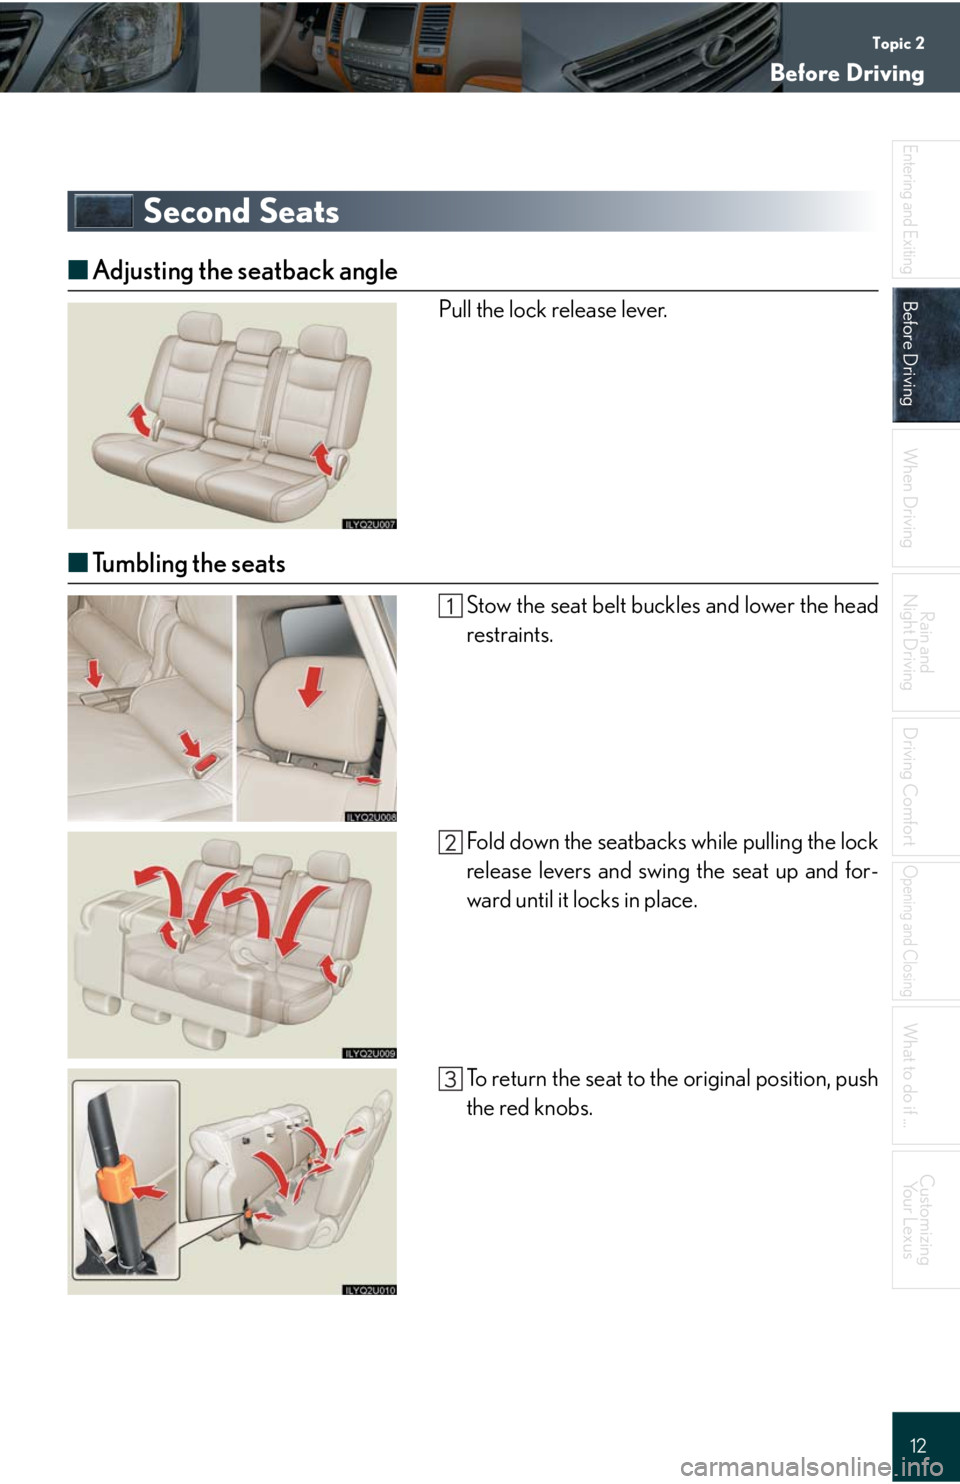
■Adjusting the seatback angle
Pull the lock release lever.
■Tumbling the seats
Stow the seat belt buckles and lower the head
restraints.
Fold down the seatbacks while pulling the lock
release levers and swing the seat up and for-
ward until it locks in place.
To return the seat to the original position, push
the red knobs.
Page 13 of 58
Topic 2
Before Driving
13
Third Seats (If Equipped)
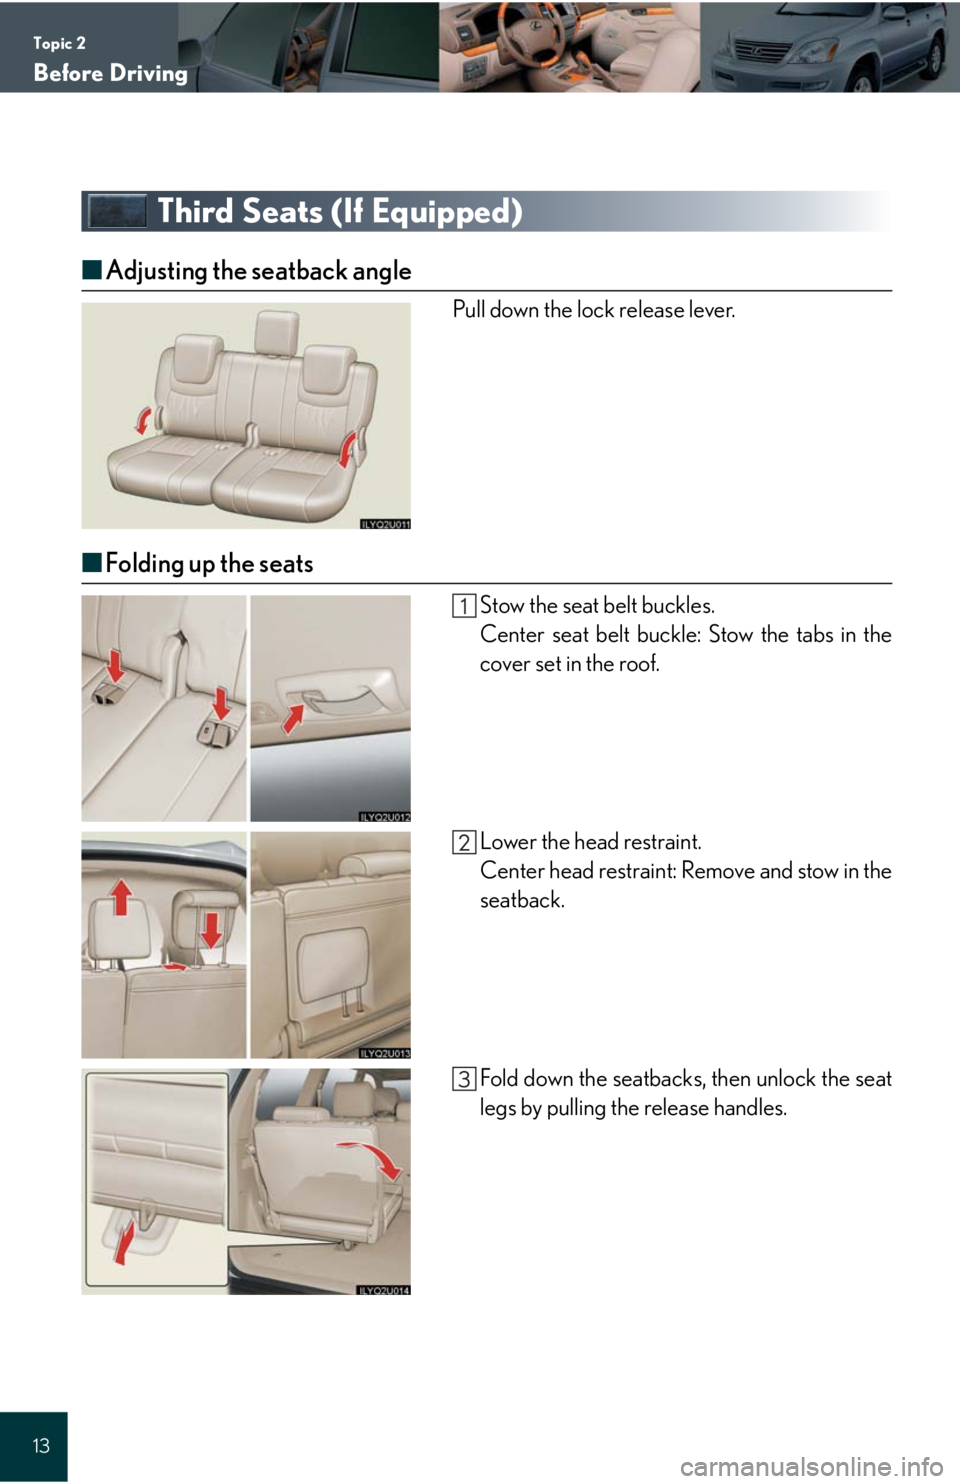
■Adjusting the seatback angle
Pull down the lock release lever.
■Folding up the seats
Stow the seat belt buckles.
Center seat belt buckle: Stow the tabs in the
cover set in the roof.
Lower the head restraint.
Center head restraint: Remove and stow in the
seatback.
Fold down the seatbacks, then unlock the seat
legs by pulling the release handles.
Page 14 of 58

Topic 2
Before Driving
14
Entering and Exiting
Before Driving
When Driving
Rain and
Night Driving
Driving Comfort
Opening and Closing
What to do if ...
Customizing
Yo u r L e x u s
Lift the seat sideward and retract the seat legs,
then attach the holding straps to the assist
grips to secure the seat.
When returning the seats, reverse the steps
listed.
■Removing the seats
Follow the procedure for “Folding up the seats” up to .
Retract the seat legs, then place the seats on
the floor.
Remove the seat lock covers and push the red
seat lock release knobs outward to remove the
seats.
When returning the seats, reverse the steps
listed.
Page 16 of 58

Topic 2
Before Driving
16
Entering and Exiting
Before Driving
When Driving
Rain and
Night Driving
Driving Comfort
Opening and Closing
What to do if ...
Customizing
Yo u r L e x u s
Head Restraints
■Vertical adjustment
To r a i s e : push upward.
To l o w e r :push down while pressing the lock
release button.
■Horizontal adjustment (front seat only)
Move forward and backward.
Seat Belts
■Adjusting shoulder belt height (front and second outboard seats only)
To r a i s e: pull the anchor upward.
To l o w e r: depress the button and push the anchor
down.