instrument panel Lexus HS250h 2011 Do-it-yourself maintenance / LEXUS 2011 HS250H OWNERS MANUAL (OM75037U)
[x] Cancel search | Manufacturer: LEXUS, Model Year: 2011, Model line: HS250h, Model: Lexus HS250h 2011Pages: 628, PDF Size: 10.69 MB
Page 14 of 628
14
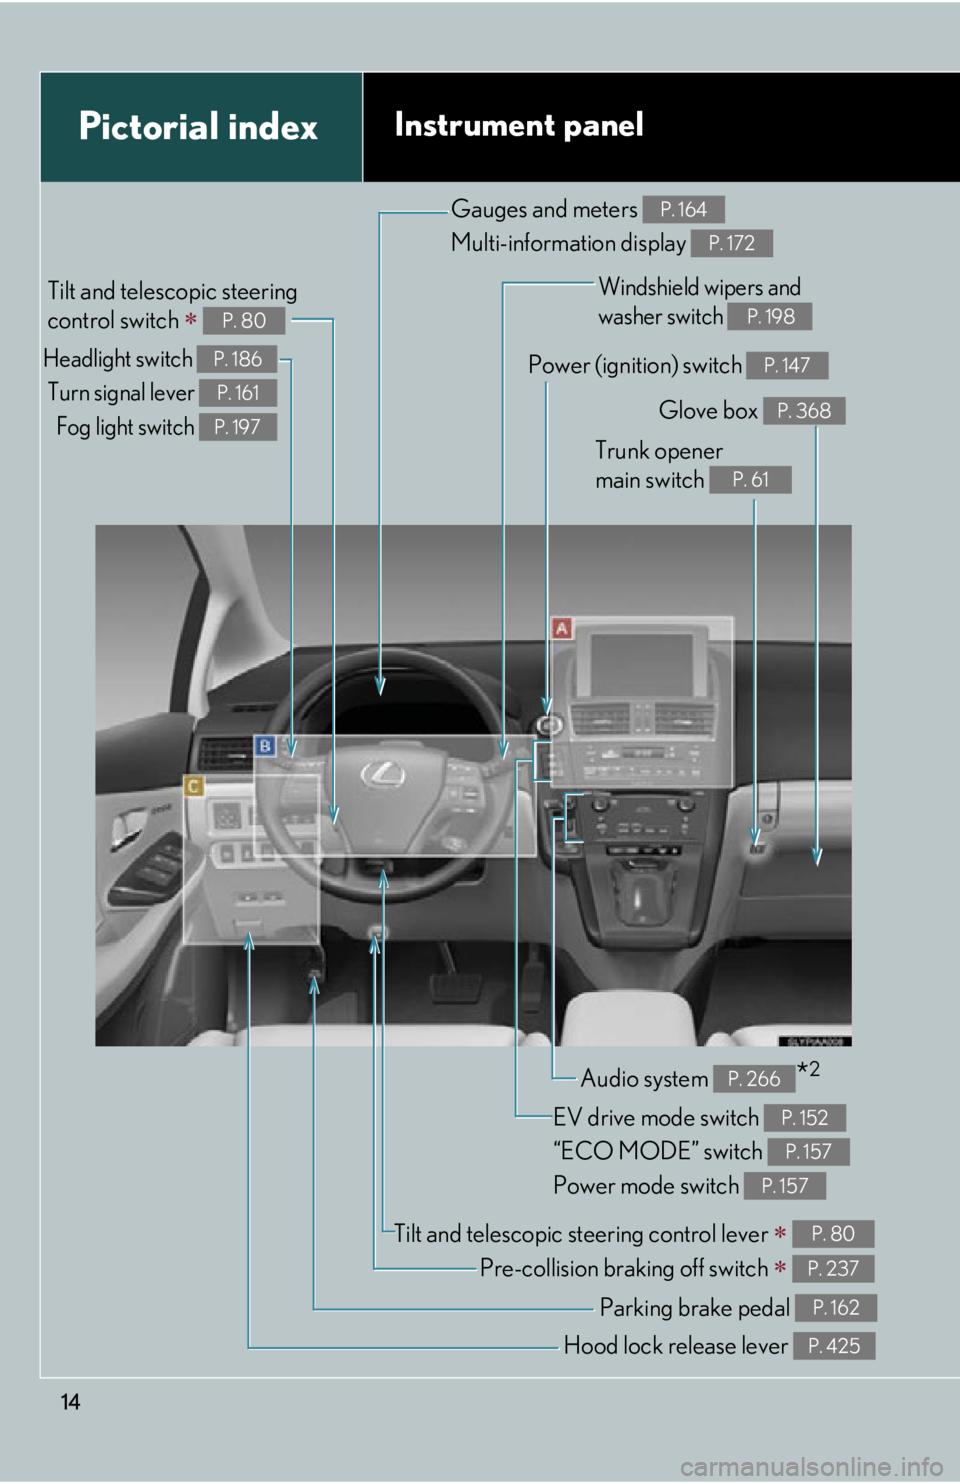
Pictorial indexInstrument panel
Headlight switch Turn signal lever Fog light switch P. 186
P. 161
P. 197
Tilt and telescopic steering
control switch
P. 80
Pre-collision braking off switch P. 237
Parking brake pedal P. 162
EV drive mode switch
“ECO MODE” switch
Power mode switch P. 152
P. 157
P. 157
Hood lock release lever P. 425
Tilt and telescopic steering control lever P. 80
Glove box P. 368
Trunk opener
main switch
P. 61
Power (ignition) switch P. 147
Windshield wipers and
washer switch
P. 198
Gauges and meters
Multi-information display P. 164
P. 172
Audio system *2P. 266
Page 16 of 628
16
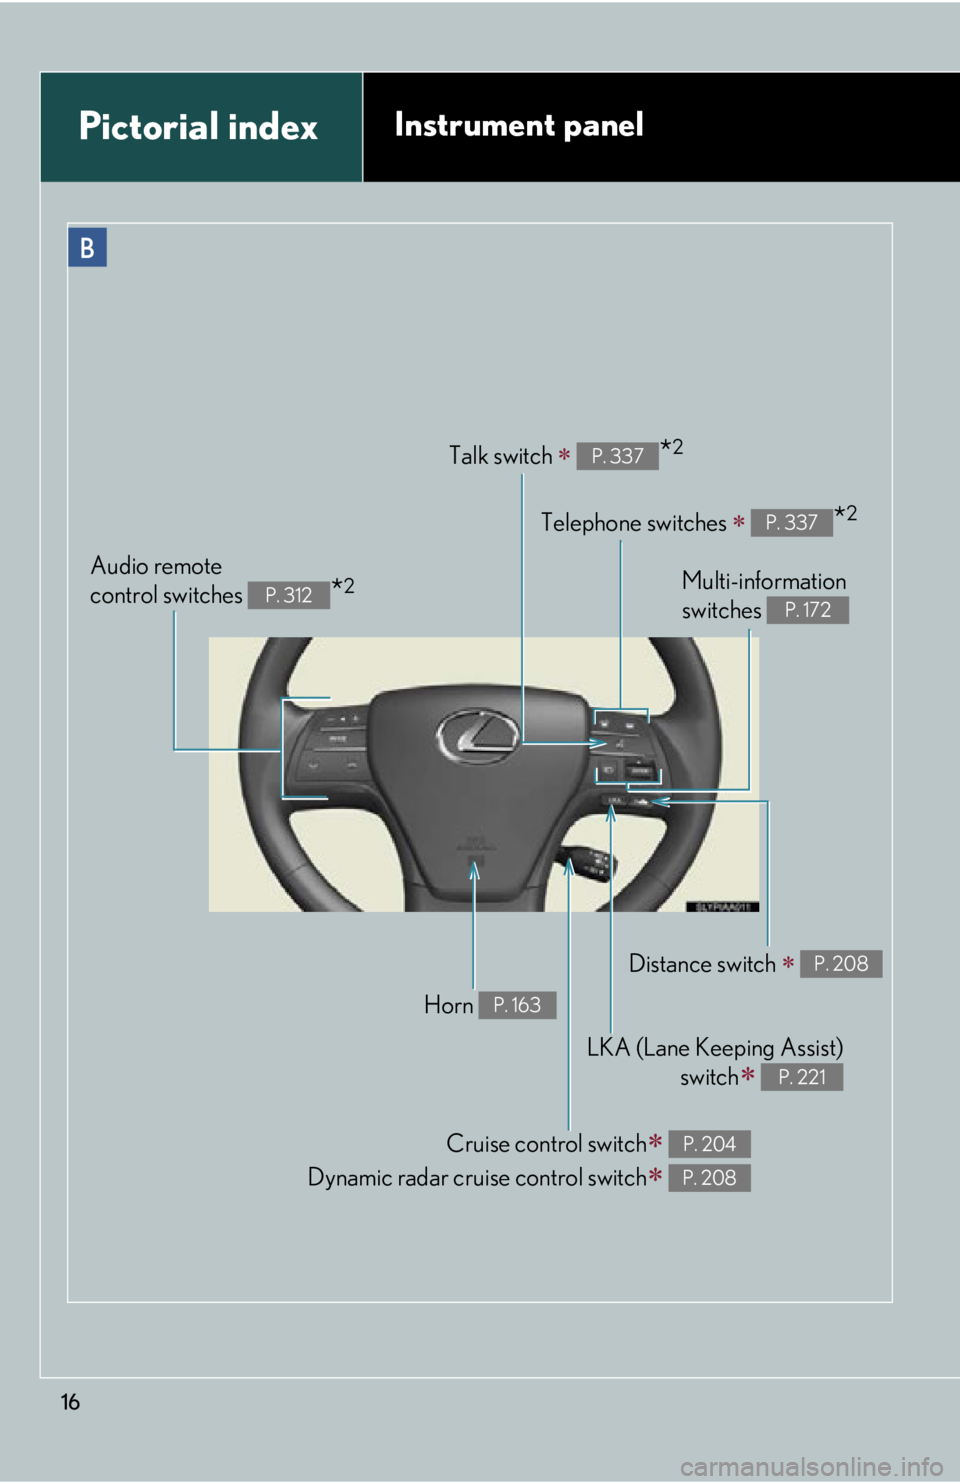
Pictorial indexInstrument panel
Telephone switches *2P. 337
Multi-information
switches
P. 172
Audio remote
control switches
*2P. 312
Cruise control switch
Dynamic radar cruise control switch
P. 204
P. 208
Distance switch P. 208
LKA (Lane Keeping Assist) switch
P. 221
Horn P. 163
Talk switch *2P. 337
Page 17 of 628
17
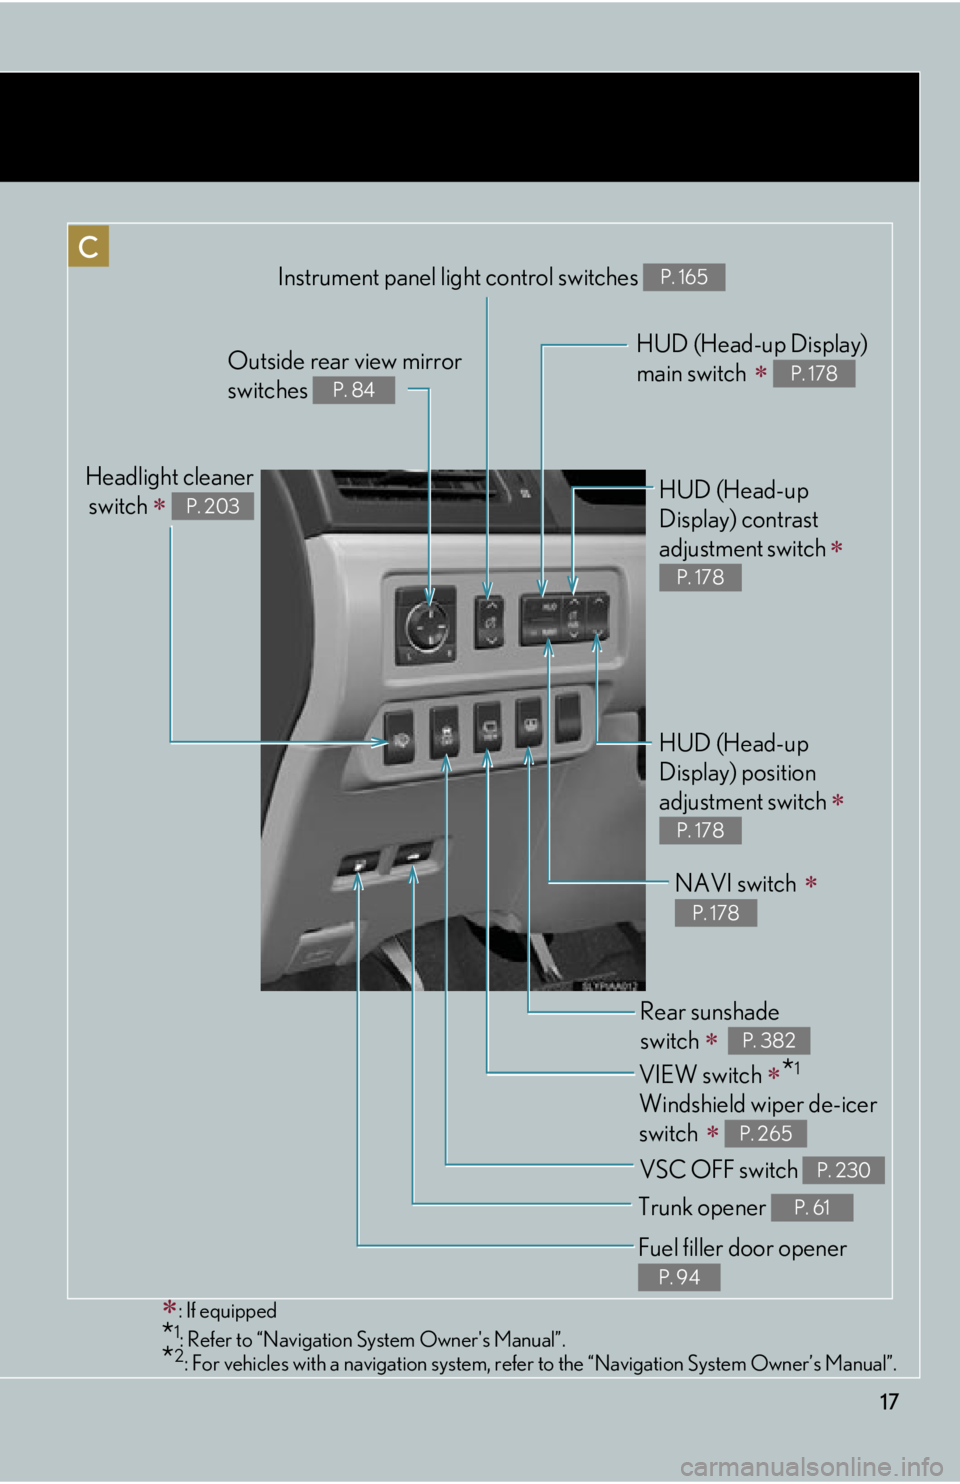
Instrument panel light control switches P. 165
Rear sunshade
switch
P. 382
Headlight cleanerswitch
P. 203
VIEW switch *1
Windshield wiper de-icer
switch
P. 265
Trunk opener P. 61
Fuel filler door opener
P. 94
HUD (Head-up Display)
main switch
P. 178Outside rear view mirror
switches
P. 84
HUD (Head-up
Display) contrast
adjustment switch
P. 178
HUD (Head-up
Display) position
adjustment switch
P. 178
VSC OFF switch P. 230
: If equipped
*1: Refer to “Navigation System Owner's Manual”.*2: For vehicles with a navigation system, ref er to the “Navigation System Owner’s Manual”.
NAVI switch
P. 178
Page 51 of 628

51
1-3. Opening, closing and locking the doors
1
Before driving
■Note for the entry function
●Even when the electronic key is within the effective range (detection areas), the
system may not operate properly in the following cases:
• The electronic key is too close to the window or outside door handle, near the
ground, or in a high place when the doors are locked or unlocked.
• The electronic key is near the ground or in a high place, or too close to the rear bumper center when the trunk is unlocked.
• The electronic key is on the instrument panel, rear package tray or floor, or in the door pockets or glove box when the hybrid system is started or
“POWER” switch modes are changed.
●As long as the electronic key is within the effective range, the doors may be
locked or unlocked by anyone.
●Even if the electronic key is not inside th e vehicle, it may be possible to start the
hybrid system if the electronic key is near the window.
●The doors may unlock if a large amount of water splashes on the door handle,
such as in the rain or in a car wash when the electronic key is within the effective
range. (The door will automatically be locked after approximately 60 seconds if
the doors are not opened and closed.)
●Gripping the door handle when wearing a glove may not unlock the door.
●If the wireless remote control is used to lock the doors when the electronic key
is near the vehicle, there is a possibility that the door may not be unlocked by the
entry function. (Use the wireless re mote control to unlock the doors.)
●A sudden approach to the effective range or door handle may prevent the
doors from being unlocked. In this case, return the door handle to the original
position and check that the doors unlock before pulling the door handle again.
■Notes for locking the doors
●Touching the door lock sensor while we aring gloves may delay or prevent lock
operation. Remove the gloves and touch the lock sensor again.
●When the lock operation is performed using the lock sensor, recognition signals
will be shown up to two consecutive times. After this, no recognition signals will
be given.
●If the door handle becomes wet while the electronic key is within the effective
range, the door may lock and unlock repeatedly. Place the key in a position 6 ft.
(2 m) or more separate from the vehicle while the vehicle is being washed. (Take
care to ensure that the key is not stolen.)
Page 112 of 628
112
1-8. Safety information
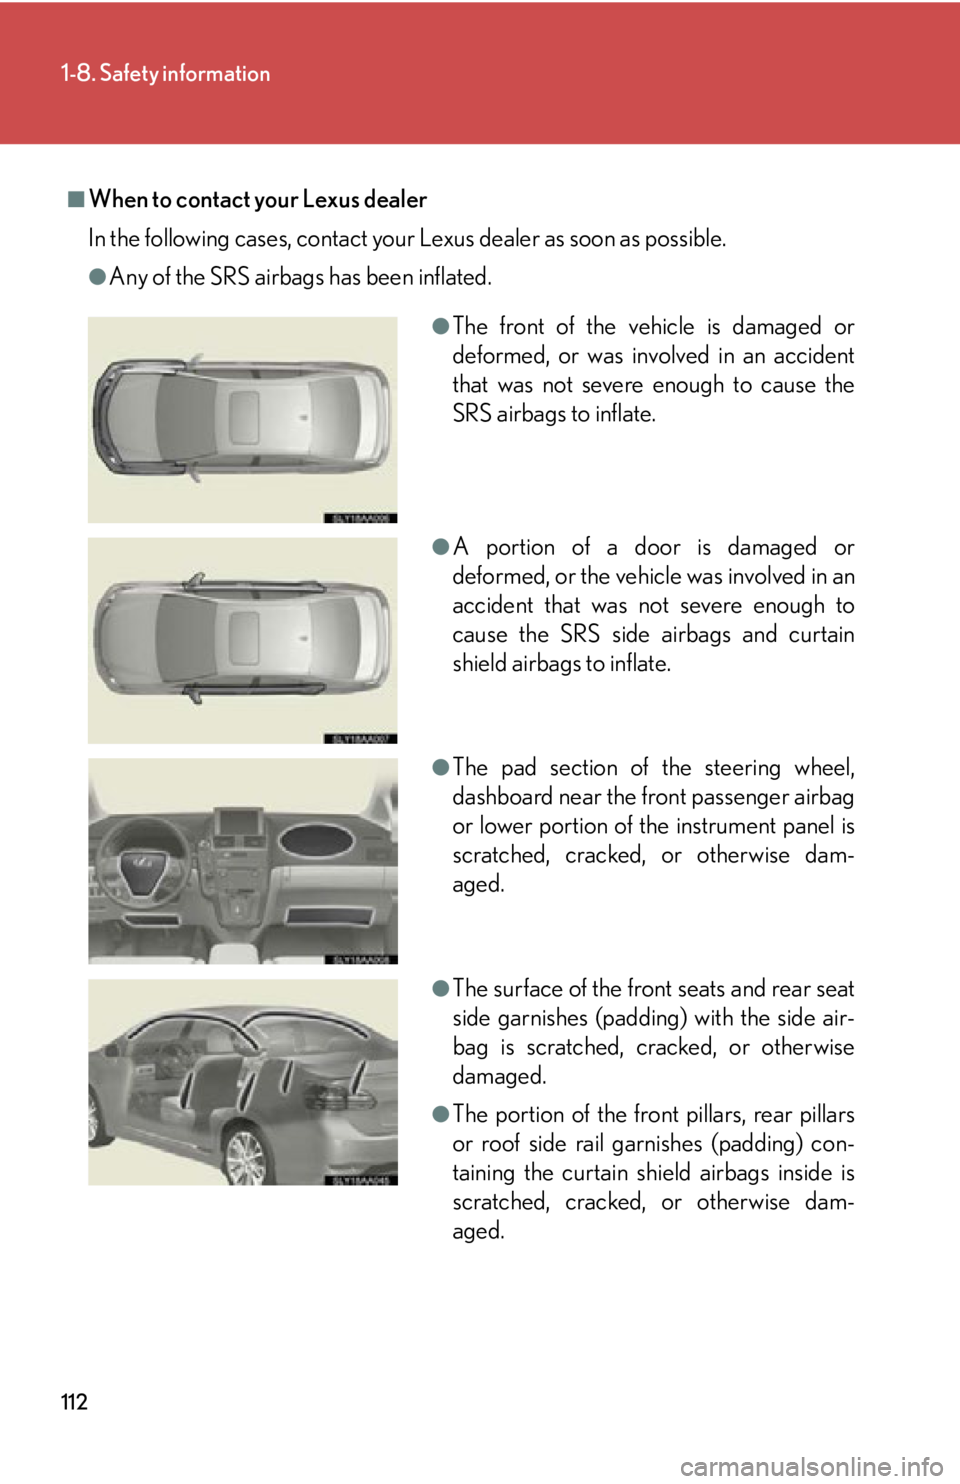
■When to contact your Lexus dealer
In the following cases, contact your Lexus dealer as soon as possible.
●Any of the SRS airbags has been inflated.
●The front of the vehicle is damaged or
deformed, or was involved in an accident
that was not severe enough to cause the
SRS airbags to inflate.
●A portion of a door is damaged or
deformed, or the vehicle was involved in an
accident that was not severe enough to
cause the SRS side airbags and curtain
shield airbags to inflate.
●The pad section of the steering wheel,
dashboard near the front passenger airbag
or lower portion of the instrument panel is
scratched, cracked, or otherwise dam-
aged.
●The surface of the front seats and rear seat
side garnishes (padding) with the side air-
bag is scratched, cracked, or otherwise
damaged.
●The portion of the front pillars, rear pillars
or roof side rail garnishes (padding) con-
taining the curtain shield airbags inside is
scratched, cracked, or otherwise dam-
aged.
Page 113 of 628

113
1-8. Safety information
1
Before driving
CAUTION
■SRS airbag precautions
Observe the following precautions regarding the SRS airbags.
Failure to do so may cause death or serious injury.
●The driver and all passengers in the vehicle must wear their seat belts properly.
The SRS airbags are supplemental devices to be used with the seat belts.
●The SRS driver airbag deploys with considerable force, and can cause death or
serious injury especially if the driver is very close to the airbag. The National
Highway Traffic Safety Administration (NHTSA) advises:
Since the risk zone for the driver’s airbag is the first 2 - 3 in. (50 - 75 mm) of infla-
tion, placing yourself 10 in. (250 mm) from your driver airbag provides you with a
clear margin of safety. This distance is measured from the center of the steering
wheel to your breastbone. If you sit less than 10 in. (250 mm) away now, you can
change your driving position in several ways:
• Move your seat to the rear as far as you can while still reaching the pedals
comfortably.
• Slightly recline the back of the seat. Although vehicle designs vary, many dr ivers can achieve the 10 in. (250 mm)
distance, even with the driver seat all the way forward, simply by reclining the
back of the seat somewhat. If reclining the back of your seat makes it hard to
see the road, raise yourself by using a firm, non-slippery cushion, or raise the
seat if your vehicle has that feature.
• If your steering wheel is adjustable, ti lt it downward. This points the airbag
toward your chest instead of your head and neck.
The seat should be adjusted as recommended by NHTSA above, while still main-
taining control of the foot pedals, steering wheel, and your view of the instrument
panel controls.
Page 116 of 628
116
1-8. Safety information
CAUTION
■SRS airbag precautions
●If a vinyl cover is put on the area where the SRS knee airbags will deploy, be sure
to remove it.
●Do not use seat accessories which cover the parts where the SRS side airbags
inflate as they may interfere with inflat ion of the airbags. Such accessories may
prevent the side airbags from activating co rrectly, disable the system or cause the
side airbags to inflate accidentally, resulting in death or serious injury.
●Do not strike or apply significant levels of force to the area of the SRS airbag
components.
Doing so can cause the SRS airbags to malfunction.
●Do not touch any of the component parts immediately after the SRS airbags have
deployed (inflated) as they may be hot.
●If breathing becomes difficult after the SRS airbags have deployed, open a door
or window to allow fresh air in, or leave the vehicle if it is safe to do so. Wash off
any residue as soon as possible to prevent skin irritation.
●If the areas where the SRS airbags are stored, such as the steering wheel pad and
front and rear pillar garnishes, are damaged or cracked, have them replaced by
your Lexus dealer.
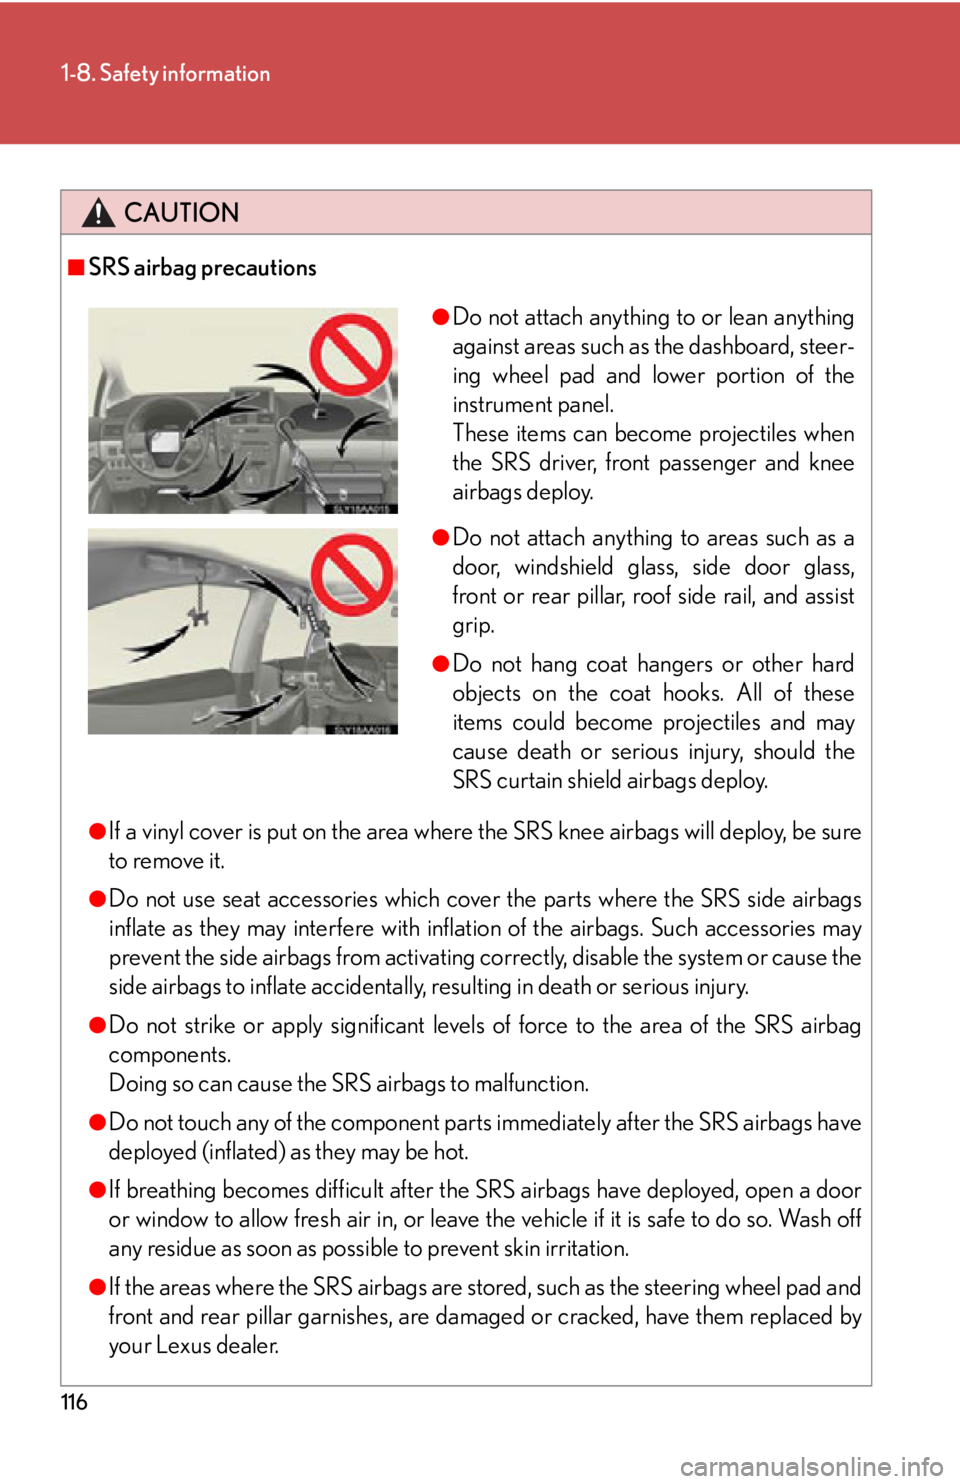
●Do not attach anything to or lean anything
against areas such as the dashboard, steer-
ing wheel pad and lower portion of the
instrument panel.
These items can become projectiles when
the SRS driver, front passenger and knee
airbags deploy.
●Do not attach anything to areas such as a
door, windshield glass, side door glass,
front or rear pillar, roof side rail, and assist
grip.
●Do not hang coat hangers or other hard
objects on the coat hooks. All of these
items could become projectiles and may
cause death or serious injury, should the
SRS curtain shield airbags deploy.
Page 117 of 628

117
1-8. Safety information
1
Before driving
CAUTION
■Modification and disposal of SRS airbag system components
Do not dispose of your vehicle or perform any of the following modifications with-
out consulting your Lexus dealer.
The SRS airbags may malfunction or deploy (inflate) accidentally, causing death or
serious injury.
●Installation, removal, disassembly and repair of the SRS airbags
●Repairs, modifications, removal or replace ment of the steering wheel, instrument
panel, dashboard, seats, se at upholstery or rear seat side garnishes (padding),
front, side and rear pill ars or roof side rails
●Repairs or modifications of the front fend er, front bumper, or side of the occupant
compartment
●Installation of snow plows, winches, etc. to the front grille (bull bars or kangaroo
bar etc.)
●Modifications to the vehi cle’s suspension system
●Installation of electronic devices such as mobile two-way radios and CD players
●Modifications to your vehicle for a person with a physical disability
Page 150 of 628

150
2-1. Driving procedures
■Operation of the “POWER” switch
●When operating the “POWER” switch, one short, firm press is enough. If the
switch is pressed improperly, the hybrid system may not start or the “POWER”
switch mode may not change. It is not necessary to press and hold the switch.
●If attempting to restart the hybrid system immediately after turning the
“POWER” switch off, the hybrid system may not start in some cases. After turn-
ing the “POWER” switch off, please wait a few seconds before restarting the
hybrid system.
■Automatic P position selection function
●When the shift position is in a positi on other than P, pressing the “POWER”
switch with the vehicle stopped comple tely will cause the shift position to
change to P automatically, and then the “POWER” switch will turn off.
●When turning the “POWER” switch off from a position other than P, firmly
depress the brake pedal and confirm that the shift position* has changed to P
before slowly releasing the brake pedal.
*: Even after the instrument panel display has been turned off, the shift position
indicator will continue to be displayed for several seconds.
●If the P position control system malfun ctions, the “POWER” switch will not be
able to be turned off. In such a case, the switch can be turned off by applying the
parking brake.
When the system malfunctions, immediately have your vehicle serviced by your
Lexus dealer.
CAUTION
■When starting the hybrid system
Always start the hybrid system while sitting in the driver’s seat. Do not depress the
accelerator pedal while starting the hybrid system under any circumstances.
Doing so may cause an accident resu lting in death or serious injury.
■Stopping the hybrid system in an emergency
If you want to stop the hybrid system in an emergency while driving the vehicle,
press and hold the “POWER” switch for more than 3 seconds.
However, do not touch the “POWER” switch while driving unless in an emergency.
If the hybrid system stops while driving, th is could lead to an unexpected accident.
Page 155 of 628
155
2-1. Driving procedures
2
When driving
Hybrid transmission
Select a shift position appropriate for the driving conditions.
■Shifting the shift lever
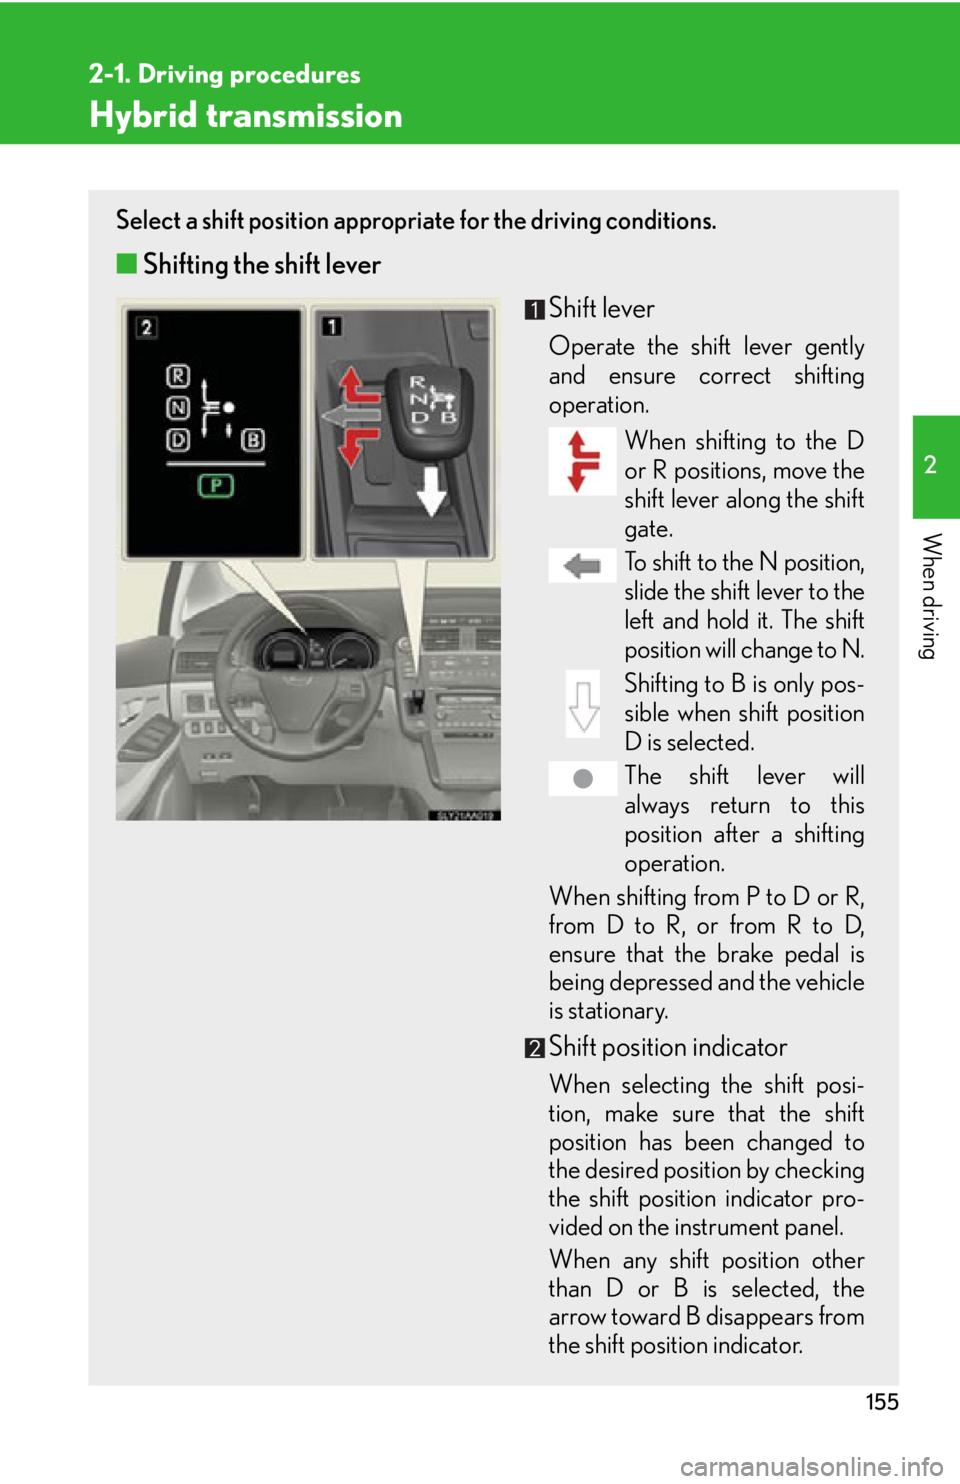
Shift lever
Operate the shift lever gently
and ensure correct shifting
operation.When shifting to the D
or R positions, move the
shift lever along the shift
gate.
To shift to the N position,
slide the shift lever to the
left and hold it. The shift
position will change to N.
Shifting to B is only pos-
sible when shift position
D is selected.
The shift lever will
always return to this
position after a shifting
operation.
When shifting from P to D or R,
from D to R, or from R to D,
ensure that the brake pedal is
being depressed and the vehicle
is stationary.
Shift position indicator
When selecting the shift posi-
tion, make sure that the shift
position has been changed to
the desired position by checking
the shift position indicator pro-
vided on the instrument panel.
When any shift position other
than D or B is selected, the
arrow toward B disappears from
the shift position indicator.