navigation system Lexus HS250h 2011 Hybrid system /
[x] Cancel search | Manufacturer: LEXUS, Model Year: 2011, Model line: HS250h, Model: Lexus HS250h 2011Pages: 94, PDF Size: 6.01 MB
Page 24 of 94

24
Display order may vary depending on vehicle condition.
Electronic features control contentsSetting electronic feature controls
AFS (if equipped)P. 3 7
Intuitive parking assist (if equipped)Refer to “Navigation System Owner’s
Manual”
Other contentsDetails
CustomizationSettings of functions such as the door lock
and light illumination time can be changed
Dynamic radar cruise control
(if equipped)Automatically displayed when using the
dynamic radar cruise control
LKA (Lane Keeping Assist) (if equipped)Automatically displayed when using the
lane keeping assist
PCS (Pre-Collision System) (if equipped)Automatically displayed if there is a possi-
bility of collision
Wa r n i n g m e s s a g eAutomatically displayed when a malfunc-
tion occurs in any of the vehicle’s systems
Page 33 of 94

33
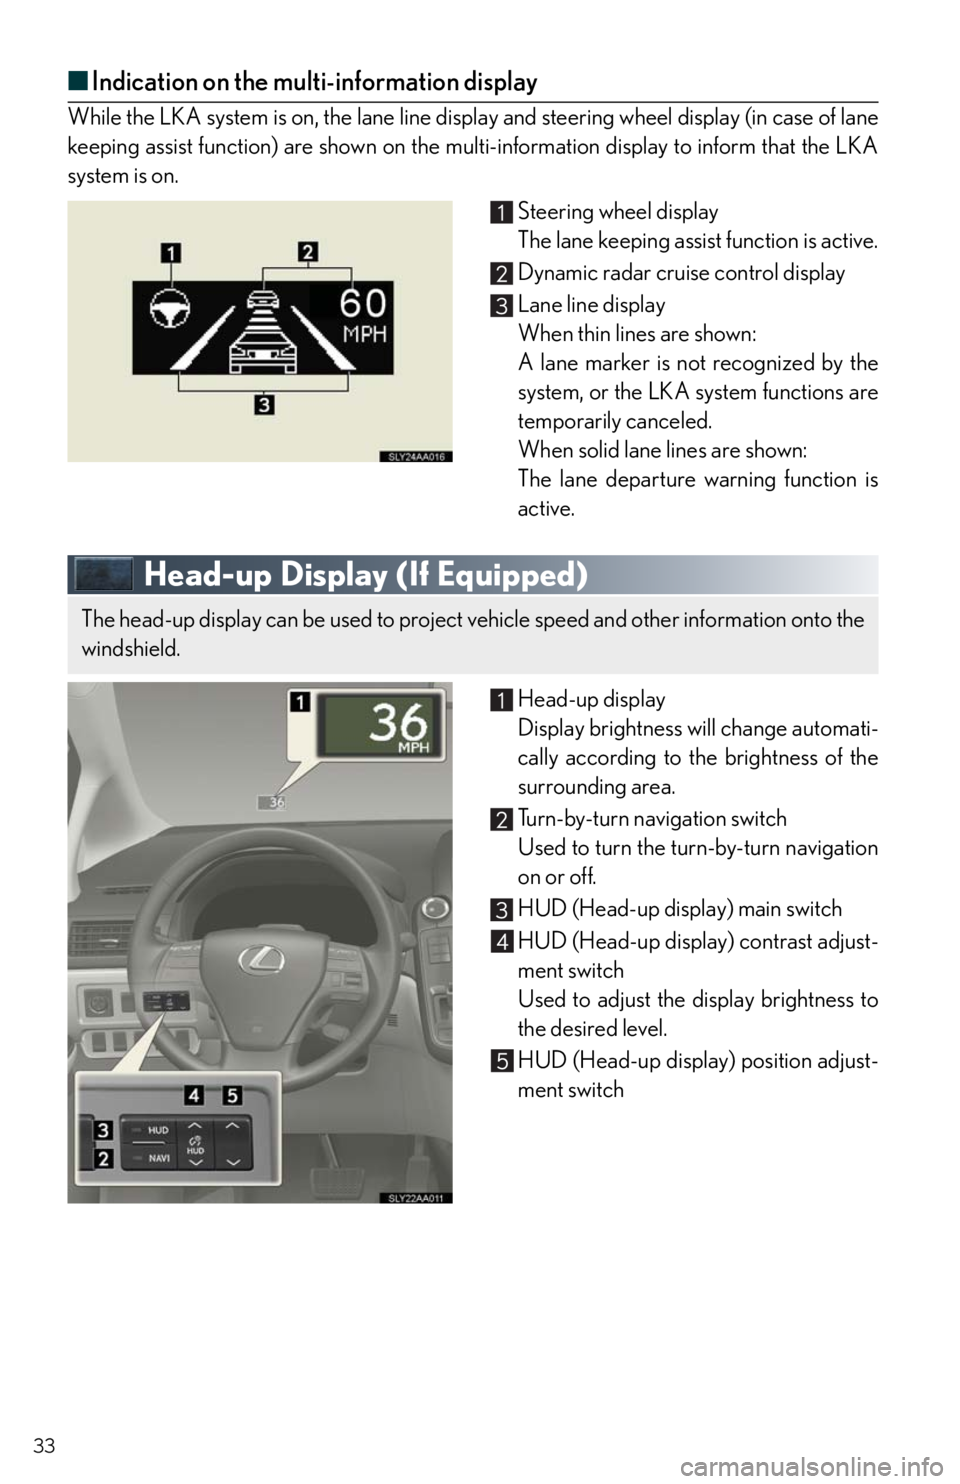
■Indication on the multi-information display
While the LKA system is on, the lane line display and steering wheel display (in case of lane
keeping assist function) are shown on the multi-information display to inform that the LKA
system is on.
Steering wheel display
The lane keeping assist function is active.
Dynamic radar cruise control display
Lane line display
When thin lines are shown:
A lane marker is not recognized by the
system, or the LKA system functions are
temporarily canceled.
When solid lane lines are shown:
The lane departure warning function is
active.
Head-up Display (If Equipped)
Head-up display
Display brightness will change automati-
cally according to the brightness of the
surrounding area.
Turn-by-turn navigation switch
Used to turn the turn-by-turn navigation
on or off.
HUD (Head-up display) main switch
HUD (Head-up display) contrast adjust-
ment switch
Used to adjust the display brightness to
the desired level.
HUD (Head-up display) position adjust-
ment switch
The head-up display can be used to project vehicle speed and other information onto the
windshield.
Page 34 of 94

34
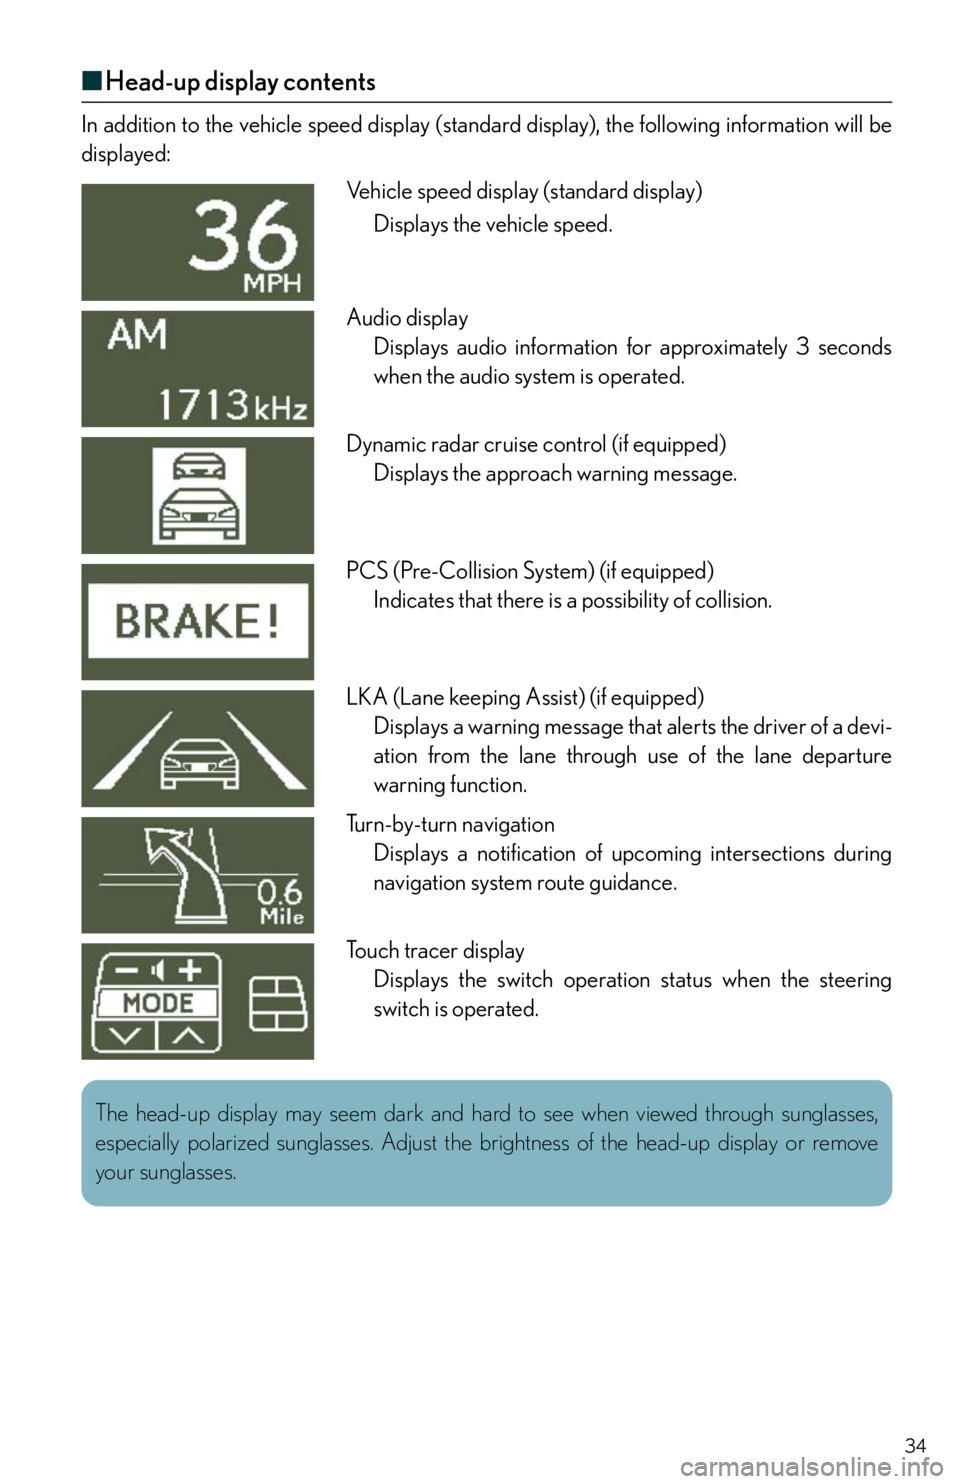
■Head-up display contents
In addition to the vehicle speed display (standard display), the following information will be
displayed:
Vehicle speed display (standard display)
Displays the vehicle speed.
Audio display
Displays audio information for approximately 3 seconds
when the audio system is operated.
Dynamic radar cruise control (if equipped)
Displays the approach warning message.
PCS (Pre-Collision System) (if equipped)
Indicates that there is a possibility of collision.
LKA (Lane keeping Assist) (if equipped)
Displays a warning message that alerts the driver of a devi-
ation from the lane through use of the lane departure
warning function.
Turn-by-turn navigation
Displays a notification of upcoming intersections during
navigation system route guidance.
Touch tracer display
Displays the switch operation status when the steering
switch is operated.
The head-up display may seem dark and hard to see when viewed through sunglasses,
especially polarized sunglasses. Adjust the brightness of the head-up display or remove
your sunglasses.
Page 35 of 94

35
Intuitive Parking Assist (If Equipped)
■Turning the system on and off
Press the menu switch
Press the “ENTER” switch upwards or
downwards until the intuitive parking
assist-sensor mark appears in the multi-
information display.
Press the “ENTER” switch to select
“ON”
Each pressing of the switch turns the
intuitive parking assist-sensor on and off.
Wide View Front Monitor (If Equipped)
ON/OFF
To display the front view, press the “VIEW”
switch with the “POWER” switch in ON
mode and vehicle speed at 7 mph (12 km/h)
or less.
For details, refer to the “Navigation System
Owner’s Manual”.
The distance to obstacles measured by the sensors is communicated via the display and
a buzzer when parallel parking or maneuvering into a garage. Always check the sur-
rounding area when using this system.
For details, refer to the “Navigation System Owner’s Manual”.
The wide view front monitor uses a super-wide angle lens to display on screen the areas
to the left and right of the vehicle and the blind spots to the front of the vehicle. This sys-
tem helps the driver check for approaching cars, bicycles and pedestrians when at inter-
sections with poor visibility.
Page 41 of 94

41
Remote Touch (If Equipped)
■Basic operation
Remote Touch knob
Use this knob to move the cursor and select items on the screen.
Feedback force, pointer shape, and on or off of selection sounds can be changed. Refer
to the “Navigation System Owner's Manual”.
“ENTER” button
Push this button to confirm a selection.
“MAP/VOICE” button
Push this button to display the vehicle's current position.
“
·” button
Push this button to change map scale and scroll through lists.
“MENU” button
Push this button to display the “Start” (menu) screen.
“DISP” button
Push this button to adjust picture quality.
The Remote Touch can be used to operate the navigation screens and configure settings.
Page 43 of 94

43
■Screen scroll operation
To scroll over the map, place the pointer in a
position near the desired destination and
then press and hold the “ENTER” button on
the Remote Touch.
Indicates the street name, city name, etc.
for the selected point
Displays various information for the
selected point (if available)
Indicates the distance from the current
position to the pointer
Switches the screens
Zooms in on the map
Zooms out on the map
■Setting a route
While route guidance is operating, you can change the route using the following method.
Select “Route”.
The following settings can be accessed
Detour setting
Route preferences
Route overview
Pause and resume route guidance
Some functions are unavailable while the vehicle is in motion. Refer to the “Navigation
System Owner's Manual”.
Page 44 of 94

44
Navigation System (If Equipped)
■Register home
Push the “MENU” button on the
Remote Touch.
Please refer to P.41 for the Remote
To u c h o p e r a t i o n .
Select “Setup”.
Select “Navi.”.
Select “Home”.
Select “Set Home”.
Select “Address”.
Page 52 of 94

52
Hands-free System For Cellular Phone
(with navigation system)
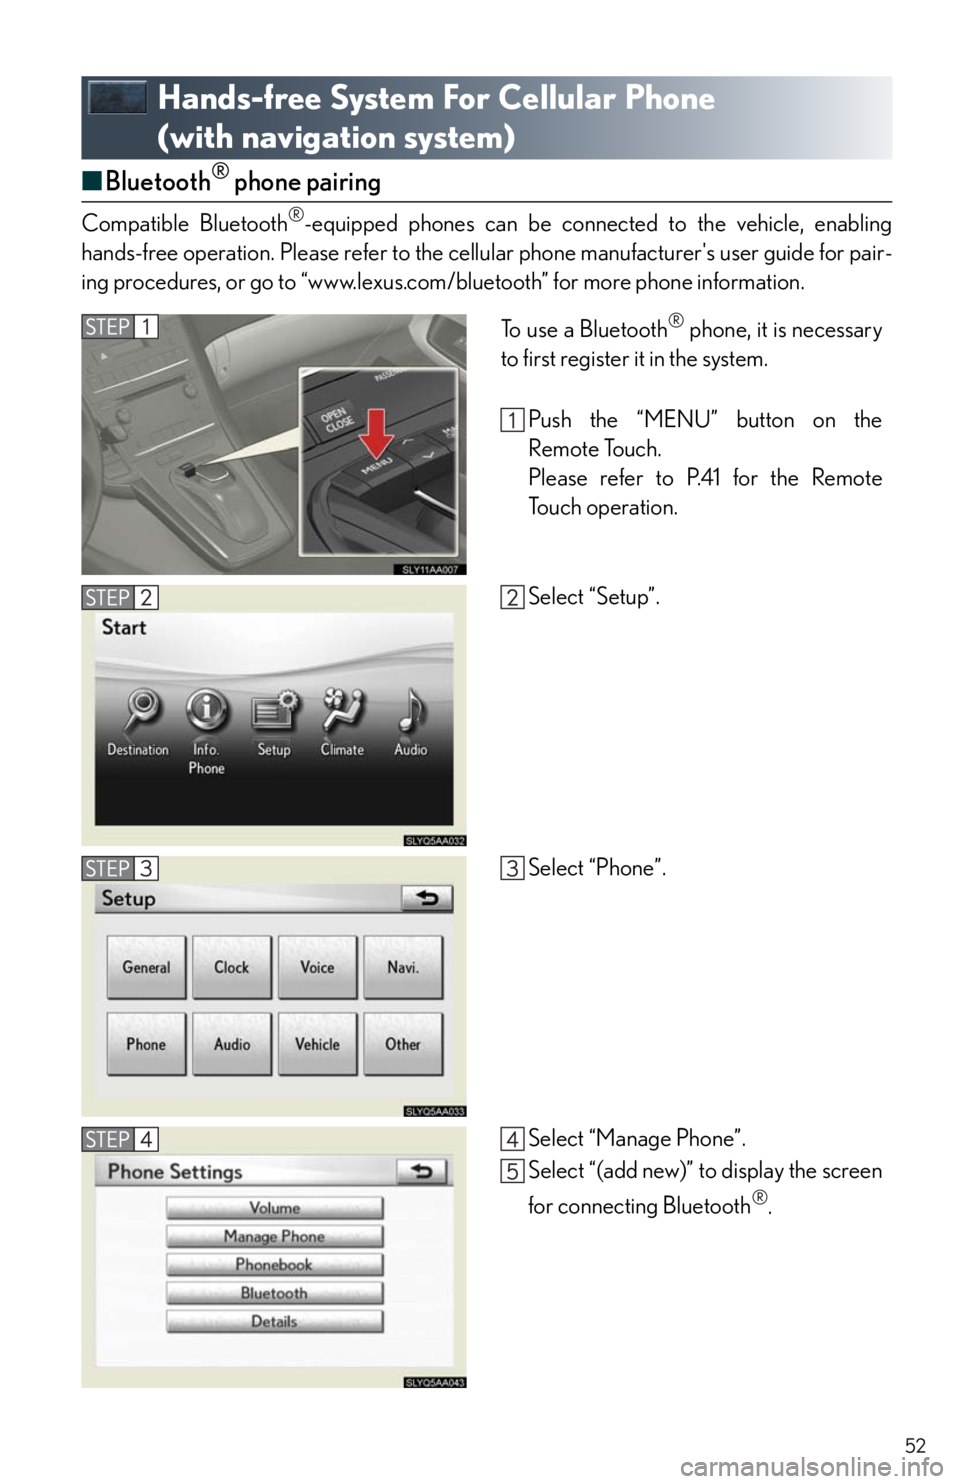
■Bluetooth® phone pairing
Compatible Bluetooth®-equipped phones can be connected to the vehicle, enabling
hands-free operation. Please refer to the cellular phone manufacturer's user guide for pair-
ing procedures, or go to “www.lexus.com/bluetooth” for more phone information.
To use a Bluetooth® phone, it is necessary
to first register it in the system.
Push the “MENU” button on the
Remote Touch.
Please refer to P.41 for the Remote
To u c h o p e r a t i o n .
Select “Setup”.
Select “Phone”.
Select “Manage Phone”.
Select “(add new)” to display the screen
for connecting Bluetooth
®.
Page 57 of 94

57
■Calling by name
You can call by saying a voice tag registered in the phonebook. For setting the voice recog-
nition, refer to the “Navigation System Owner's Manual”. Only when English is selected as
the system language can you call by saying a name registered in the phonebook without
registering any voice tags beforehand. (Names in the phonebook work as voice tags.)
Press .
Follow the voice guidance and say
“Phone”.
Follow the voice guidance and say “Dial
by name”.
Follow the voice guidance and say a
contact name.
Follow the voice guidance and say the
type of phone number (home, mobile,
work, other).
Follow the voice guidance and say
“Dial”
: Pressing this switch turns the voice command system on. Say a command
after the beep.
Page 60 of 94

60
Audio System (with navigation system)
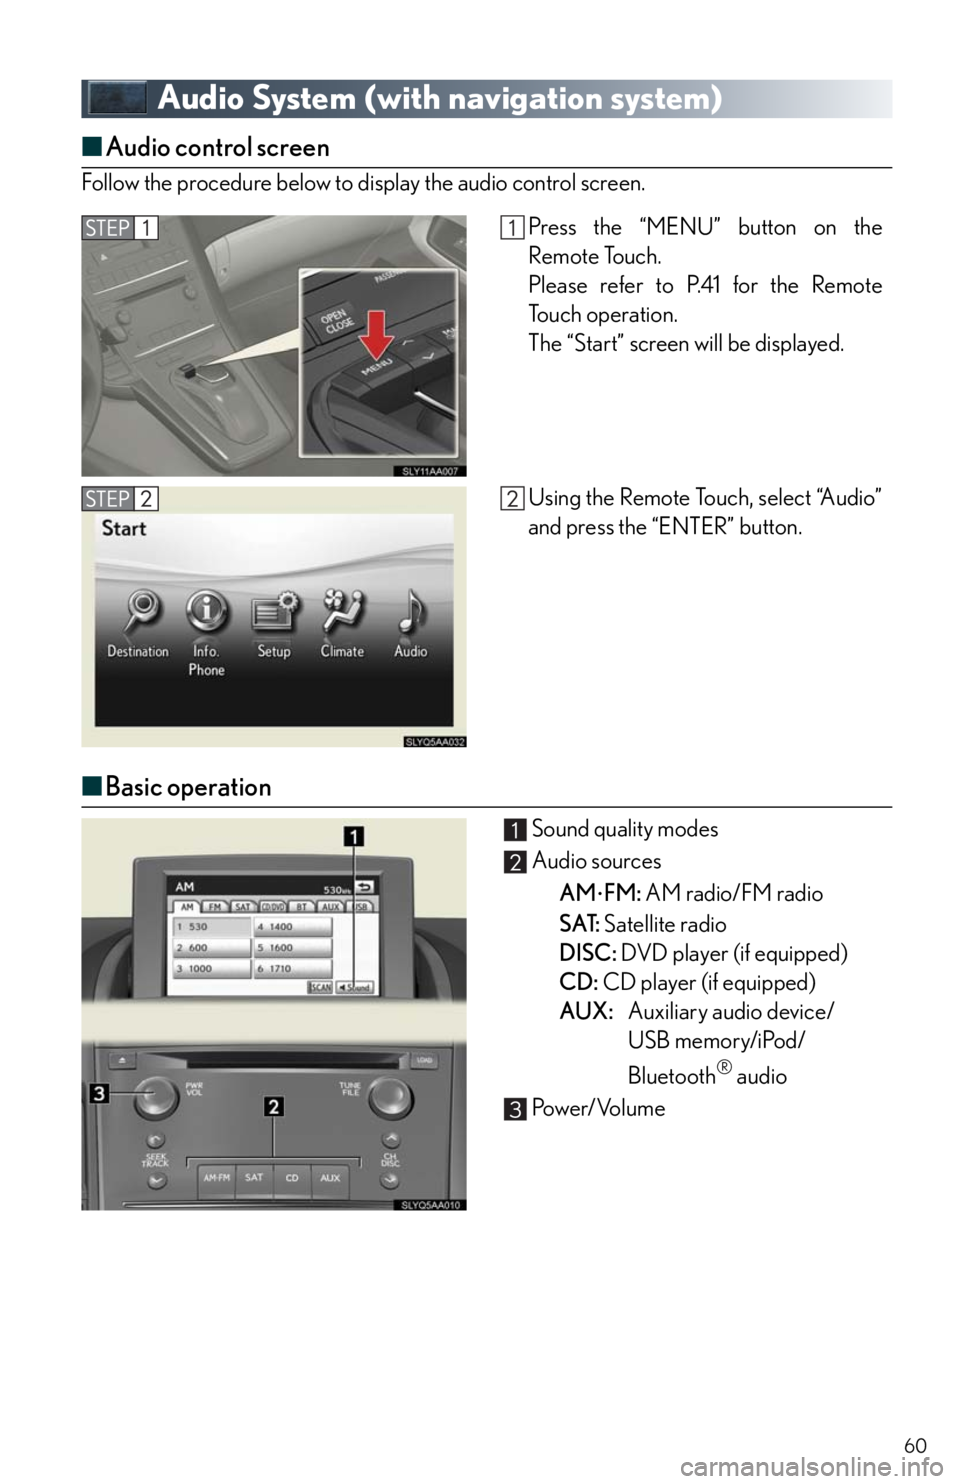
■Audio control screen
Follow the procedure below to display the audio control screen.
■Basic operation
Sound quality modes
Audio sources
AM
FM: AM radio/FM radio
SAT: Satellite radio
DISC: DVD player (if equipped)
CD: CD player (if equipped)
AUX:Auxiliary audio device/
USB memory/iPod/
Bluetooth
® audio
Pow e r/ Vo l u m e
Press the “MENU” button on the
Remote Touch.
Please refer to P.41 for the Remote
To u c h o p e r a t i o n .
The “Start” screen will be displayed.
Using the Remote Touch, select “Audio”
and press the “ENTER” button.