buttons Lexus HS250h 2012 Navigation Manual
[x] Cancel search | Manufacturer: LEXUS, Model Year: 2012, Model line: HS250h, Model: Lexus HS250h 2012Pages: 413, PDF Size: 5.29 MB
Page 70 of 413

NAVIGATION SYSTEM: DESTINATION SEARCH
69
U.S.A.
ButtonStates included in the search
region
“US1”
Idaho
Oregon
Washington
“US2”California
Nevada
“US3”
Arizona
Colorado
Montana
New Mexico
Utah
Wyoming
“US4”
Iowa
Kansas
Minnesota
Missouri
North Dakota
Nebraska
South Dakota
“US5”Oklahoma
Texas
“US6”
Illinois
Indiana
Kentucky
Michigan
Ohio
Wisconsin
“US7”
Arkansas
Alabama
Louisiana
Mississippi
Tennessee
“US8”
Connecticut
Massachusetts
Maine
New Hampshire
New Jersey
New York
Rhode Island
Vermont
“US9”
Washington, D.C.
Delaware
Maryland
New Jersey
Pennsylvania
Virginia
West Virginia
“US10”
Florida
Georgia
North Carolina
South Carolina
“HI”Hawaii
“AK”Alaska
“PR”Puerto Rico
“VI”US Virgin Islands
Canada
ButtonProvinces and regions in-
cluded in the search region
“CAN”All provinces and regions in
Canada included in this button.
11 08.03HS250h_NAVI_U
75051U
2
Page 71 of 413
NAVIGATION SYSTEM: DESTINATION SEARCH
70
1. Push the “MENU” button on the Re-
mote Touch. (See “—Remote Touch”
on page 10.)
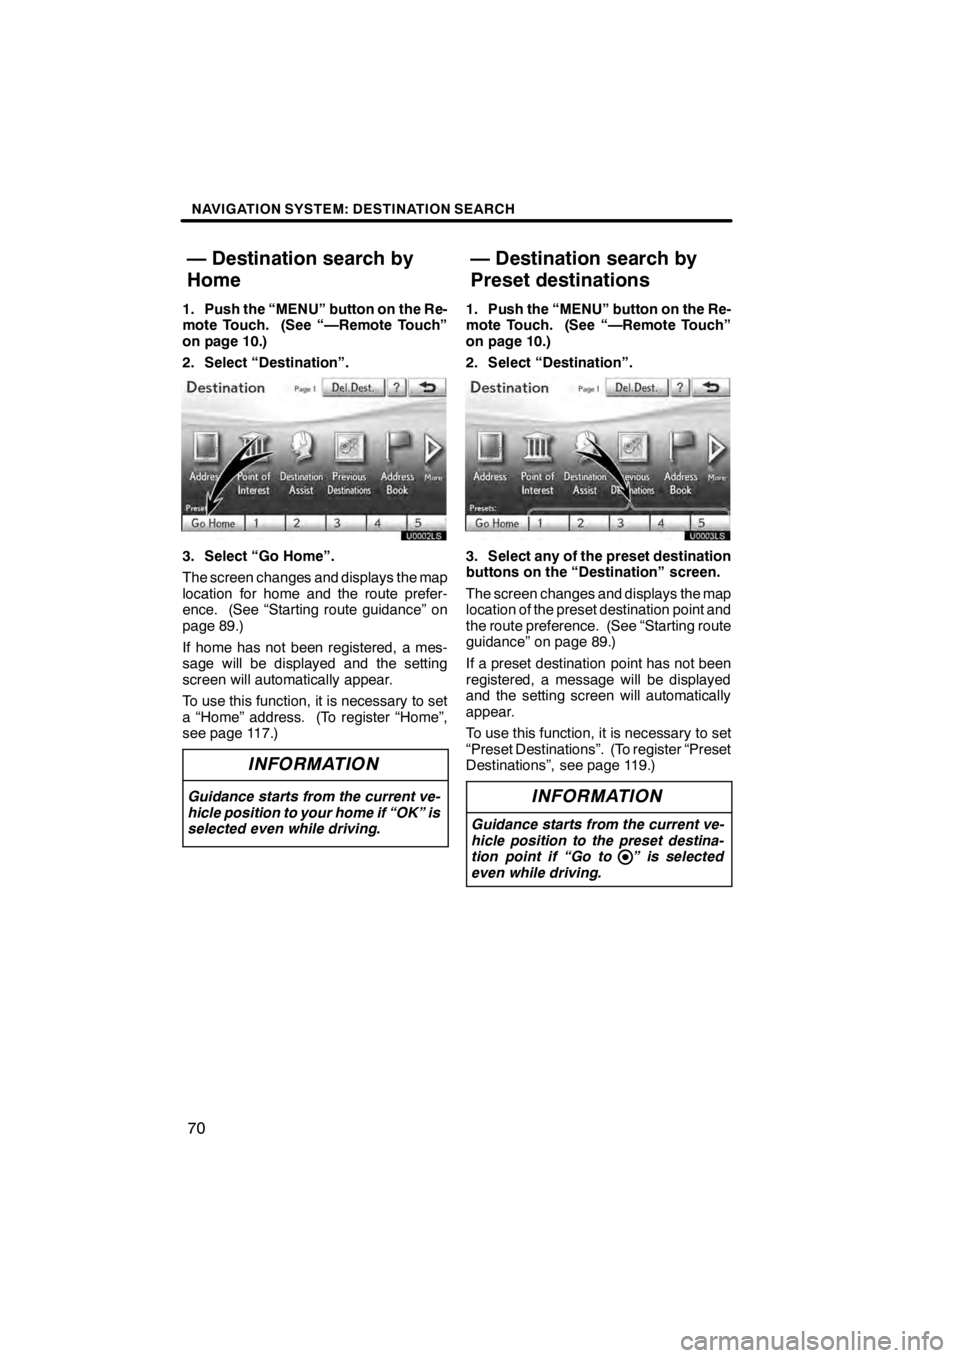
2. Select “Destination”.
U0002LS
3. Select “Go Home”.
The screen changes and displays the map
location for home and the route prefer-
ence. (See “Starting route guidance” on
page 89.)
If home has not been registered, a mes-
sage will be displayed and the setting
screen will automatically appear.
To use this function, it is necessary to set
a “Home” address. (To register “Home”,
see page 117.)
INFORMATION
Guidance starts from the current ve-
hicle position to your home if “OK” is
selected even while driving.
1. Push the “MENU” button on the Re-
mote Touch. (See “—Remote Touch”
on page 10.)
2. Select “Destination”.
3. Select any of the preset destination
buttons on the “Destination” screen.
The screen changes and displays the map
location of the preset destination point and
the route preference. (See “Starting route
guidance” on page 89.)
If a preset destination point has not been
registered, a message will be displayed
and the setting screen will automatically
appear.
To use this function, it is necessary to set
“Preset Destinations”. (To register “Preset
Destinations”, see page 119.)
INFORMATION
Guidance starts from the current ve-
hicle position to the preset destina-
tion point if “Go to ” is selected
even while driving.
11 08.03HS250h_NAVI_U
75051U
— Destination search by
Home — Destination search by
Preset destinations
Page 103 of 413
NAVIGATION SYSTEM: ROUTE GUIDANCE
102
While the route guidance is operating, you
can change the route to detour around a
section of the route where a delay is
caused by road repairs, or an accident,
etc.
U3011LC
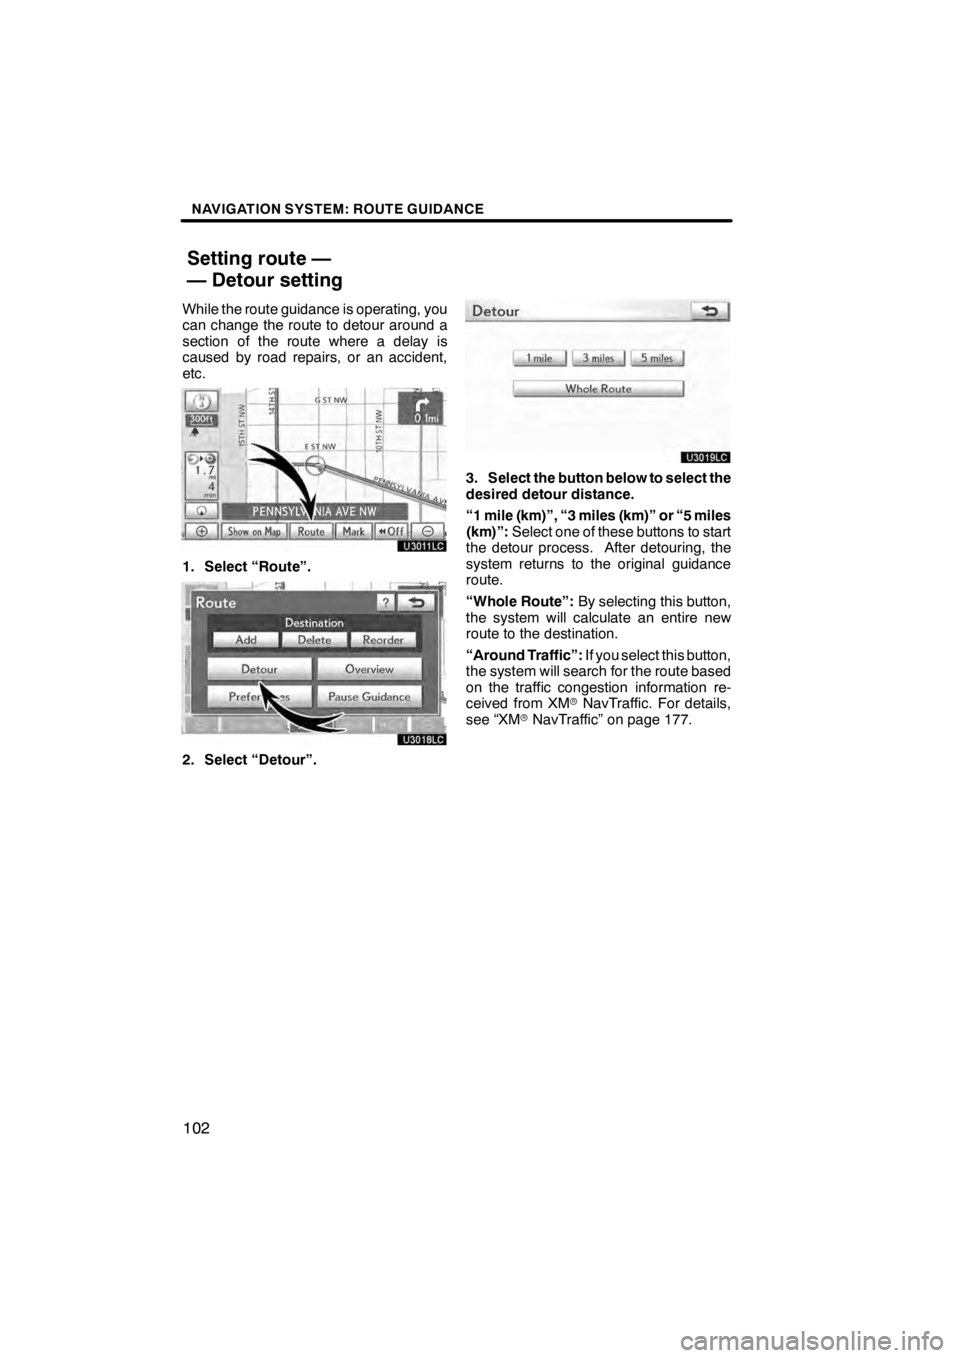
1. Select “Route”.
U3018LC
2. Select “Detour”.
U3019LC
3. Select the button below to select the
desired detour distance.
“1 mile (km)”, “3 miles (km)” or “5 miles
(km)”:Select one of these buttons to start
the detour process. After detouring, the
system returns to the original guidance
route.
“Whole Route”: By selecting this button,
the system will calculate an entire new
route to the destination.
“Around Traffic”: If you select this button,
the system will search for the route based
on the traffic congestion information re-
ceived from XM rNavTraffic. For details,
see “XM rNavTraffic” on page 177.
11 08.03HS250h_NAVI_U
75051U
Setting route —
— Detour setting
Page 187 of 413
AUDIO/VIDEO SYSTEM
186
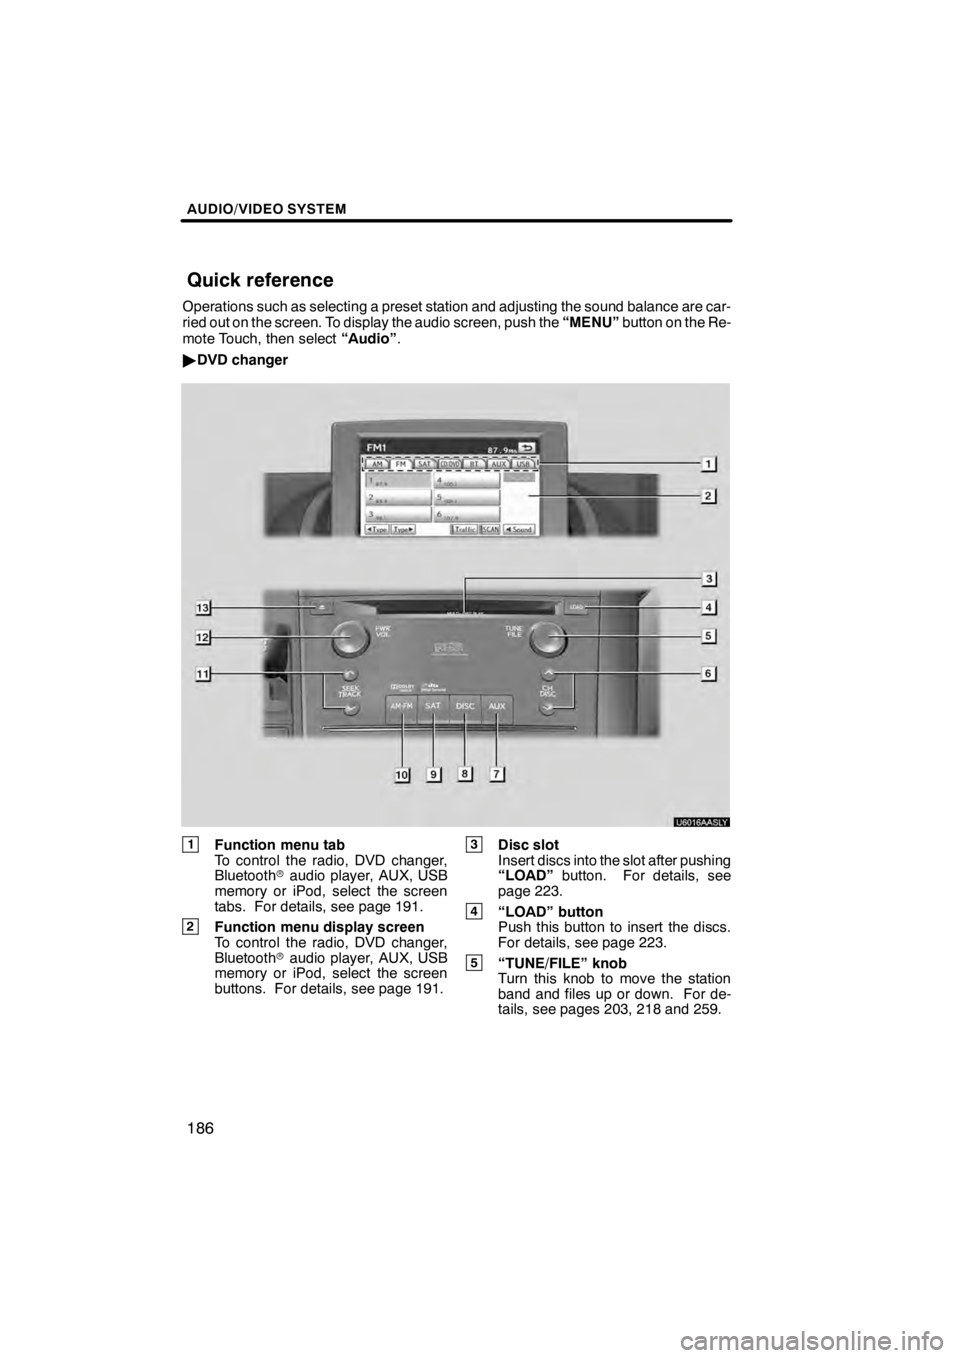
Operations such as selecting a preset station and adjusting the sound balance are car-
ried out on the screen. To display the audio screen, push the“MENU”button on the Re-
mote Touch, then select “Audio”.
" DVD changer
U6016AASLY
1Function menu tab
To control the radio, DVD changer,
Bluetooth raudio player, AUX, USB
memory or iPod, select the screen
tabs. For details, see page 191.
2Function menu display screen
To control the radio, DVD changer,
Bluetooth raudio player, AUX, USB
memory or iPod, select the screen
buttons. For details, see page 191.
3Disc slot
Insert discs into the slot after pushing
“LOAD” button. For details, see
page 223.
4“LOAD” button
Push this button to insert the discs.
For details, see page 223.
5“TUNE/FILE” knob
Turn this knob to move the station
band and files up or down. For de-
tails, see pages 203, 218 and 259.
11 08.03HS250h_NAVI_U
75051U
Quick reference
Page 189 of 413
AUDIO/VIDEO SYSTEM
188
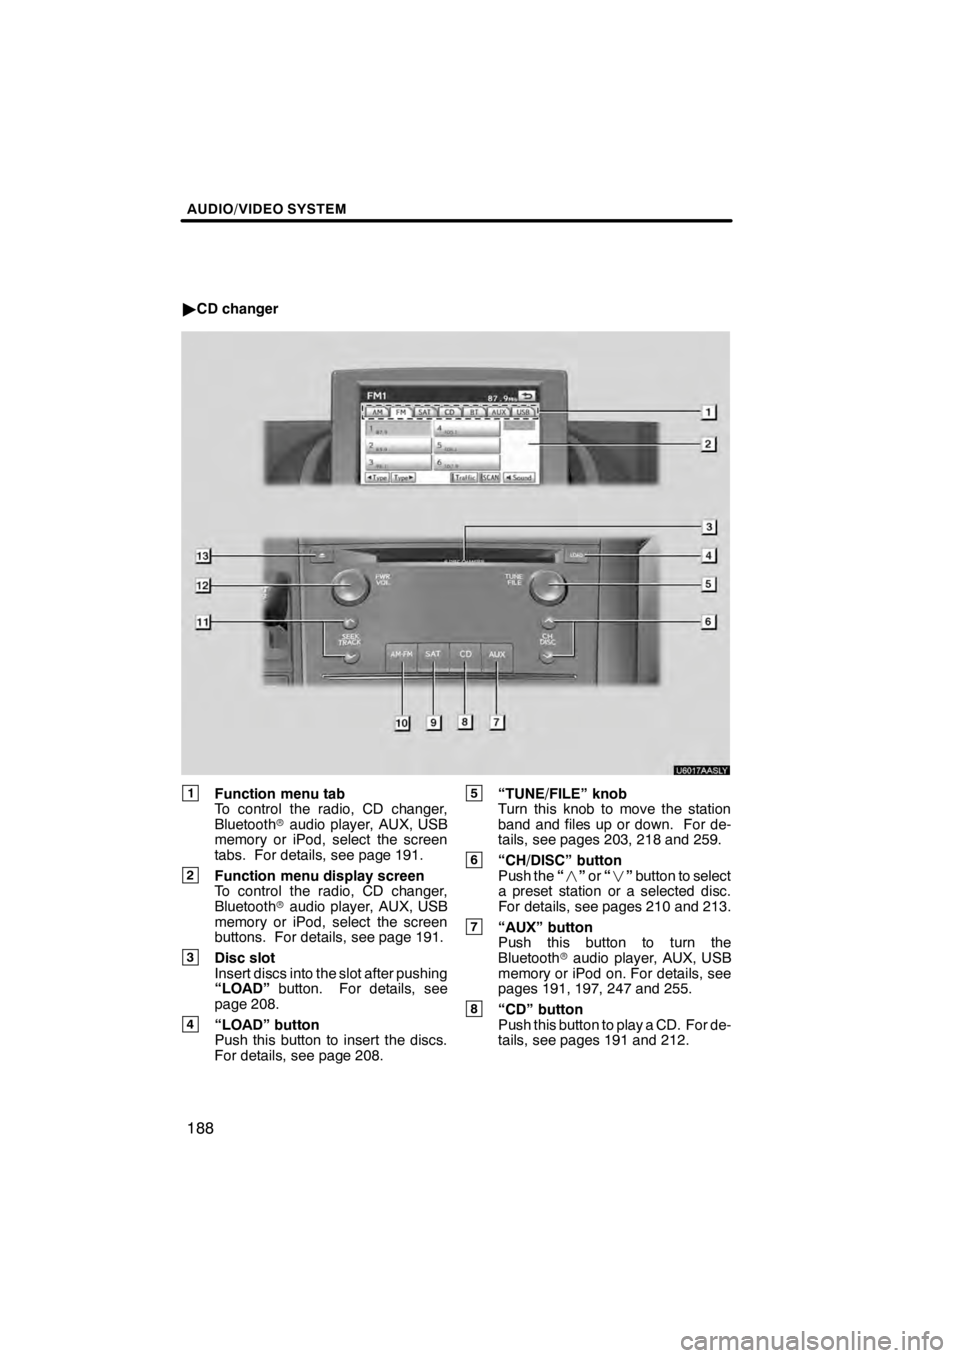
"CD changer
U6017AASLY
1Function menu tab
To control the radio, CD changer,
Bluetooth raudio player, AUX, USB
memory or iPod, select the screen
tabs. For details, see page 191.
2Function menu display screen
To control the radio, CD changer,
Bluetooth raudio player, AUX, USB
memory or iPod, select the screen
buttons. For details, see page 191.
3Disc slot
Insert discs into the slot after pushing
“LOAD” button. For details, see
page 208.
4“LOAD” button
Push this button to insert the discs.
For details, see page 208.
5“TUNE/FILE” knob
Turn this knob to move the station
band and files up or down. For de-
tails, see pages 203, 218 and 259.
6“CH/DISC” button
Push the “” or“” button to select
a preset station or a selected disc.
For details, see pages 210 and 213.
7“AUX” button
Push this button to turn the
Bluetooth raudio player, AUX, USB
memory or iPod on. For details, see
pages 191, 197, 247 and 255.
8“CD” button
Push this button to play a CD. For de-
tails, see pages 191 and 212.
11 08.03HS250h_NAVI_U
75051U
Page 193 of 413
AUDIO/VIDEO SYSTEM
192
U6003LC
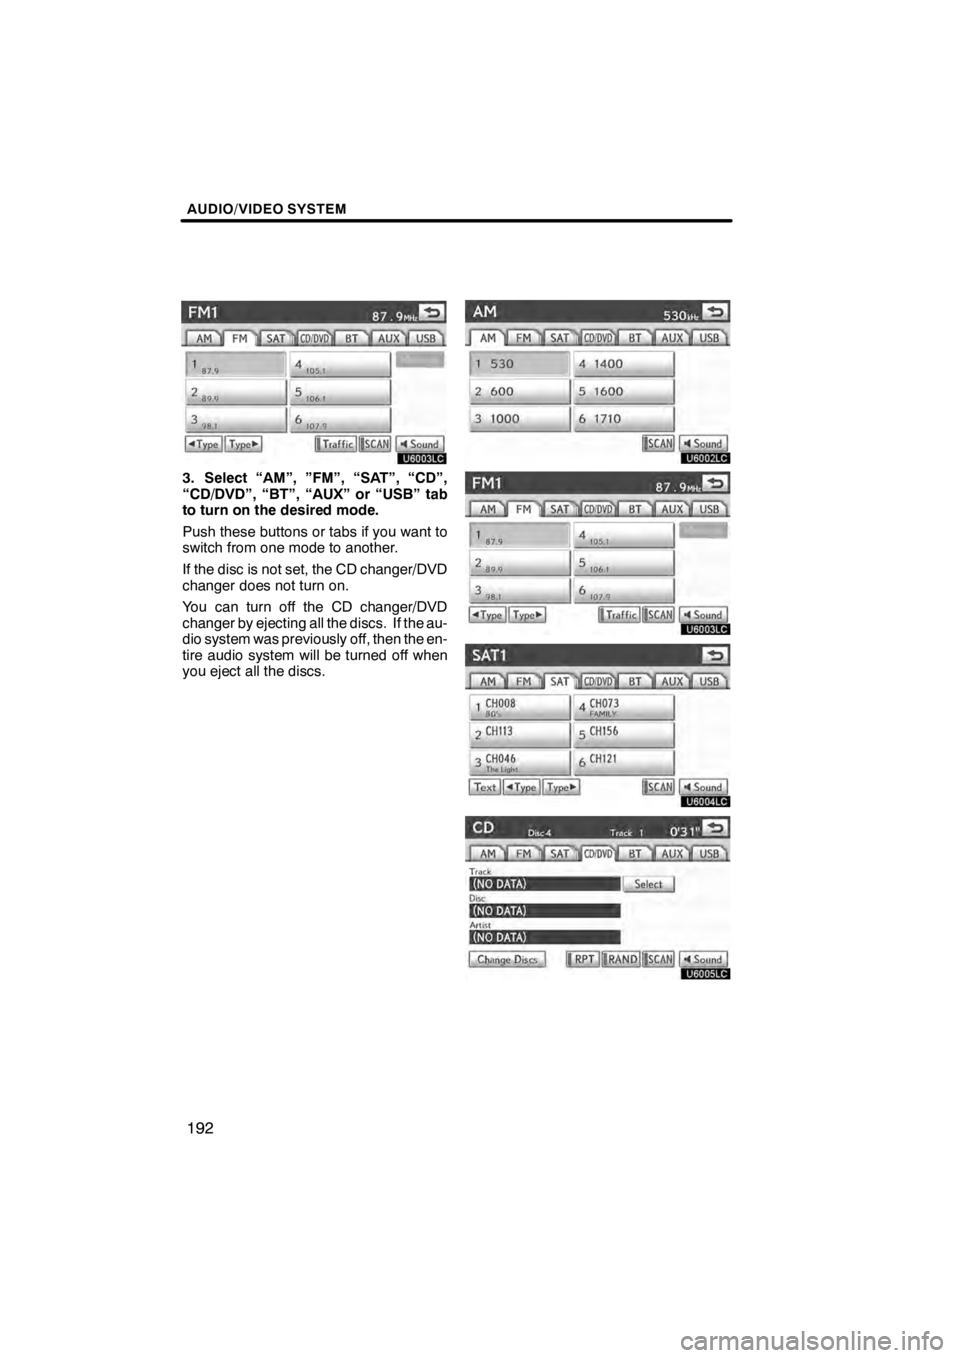
3. Select “AM”, ”FM”, “SAT”, “CD”,
“CD/DVD”, “BT”, “AUX” or “USB” tab
to turn on the desired mode.
Push these buttons or tabs if you want to
switch from one mode to another.
If the disc is not set, the CD changer/DVD
changer does not turn on.
You can turn off the CD changer/DVD
changer by ejecting all the discs. If the au-
dio system was previously off, then the en-
tire audio system will be turned off when
you eject all the discs.
U6002LC
U6003LC
U6004LC
U6005LC
11 08.03HS250h_NAVI_U
75051U
Page 194 of 413
AUDIO/VIDEO SYSTEM
193
U6008LC
U6145LC
U6082LC
U600ALC
U6151LC
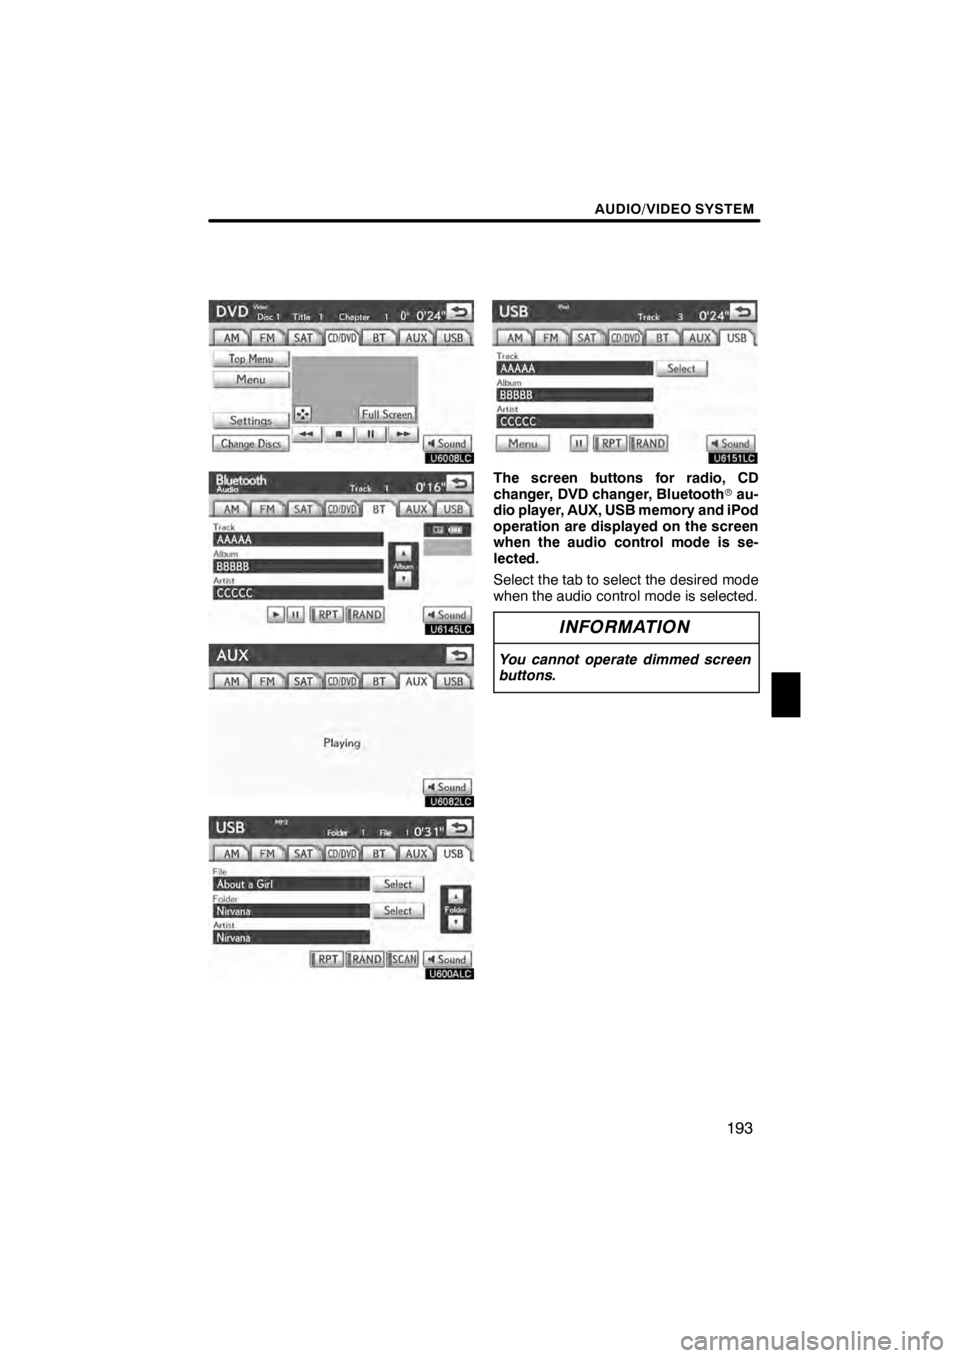
The screen buttons for radio, CD
changer, DVD changer, Bluetoothrau-
dio player, AUX, USB memory and iPod
operation are displayed on the screen
when the audio control mode is se-
lected.
Select the tab to select the desired mode
when the audio control mode is selected.
INFORMATION
You cannot operate dimmed screen
buttons.
11 08.03HS250h_NAVI_U
75051U
7
Page 199 of 413
AUDIO/VIDEO SYSTEM
198
U6005AASLY
Turn the knob clockwise to step up the
station band or counterclockwise to
step down.
Your radio automatically changes to stereo
reception when a stereo broadcast is re-
ceived. “ST” appears on the screen. If the
signal becomes weak, the radio reduces
the amount of channel separation to pre-
vent the weak signal from creating noise.
If the signal becomes extremely weak, the
radio switches from stereo to mono recep-
tion. In this case, “ST” disappears from the
screen.(b) Presetting a station
U6003LC
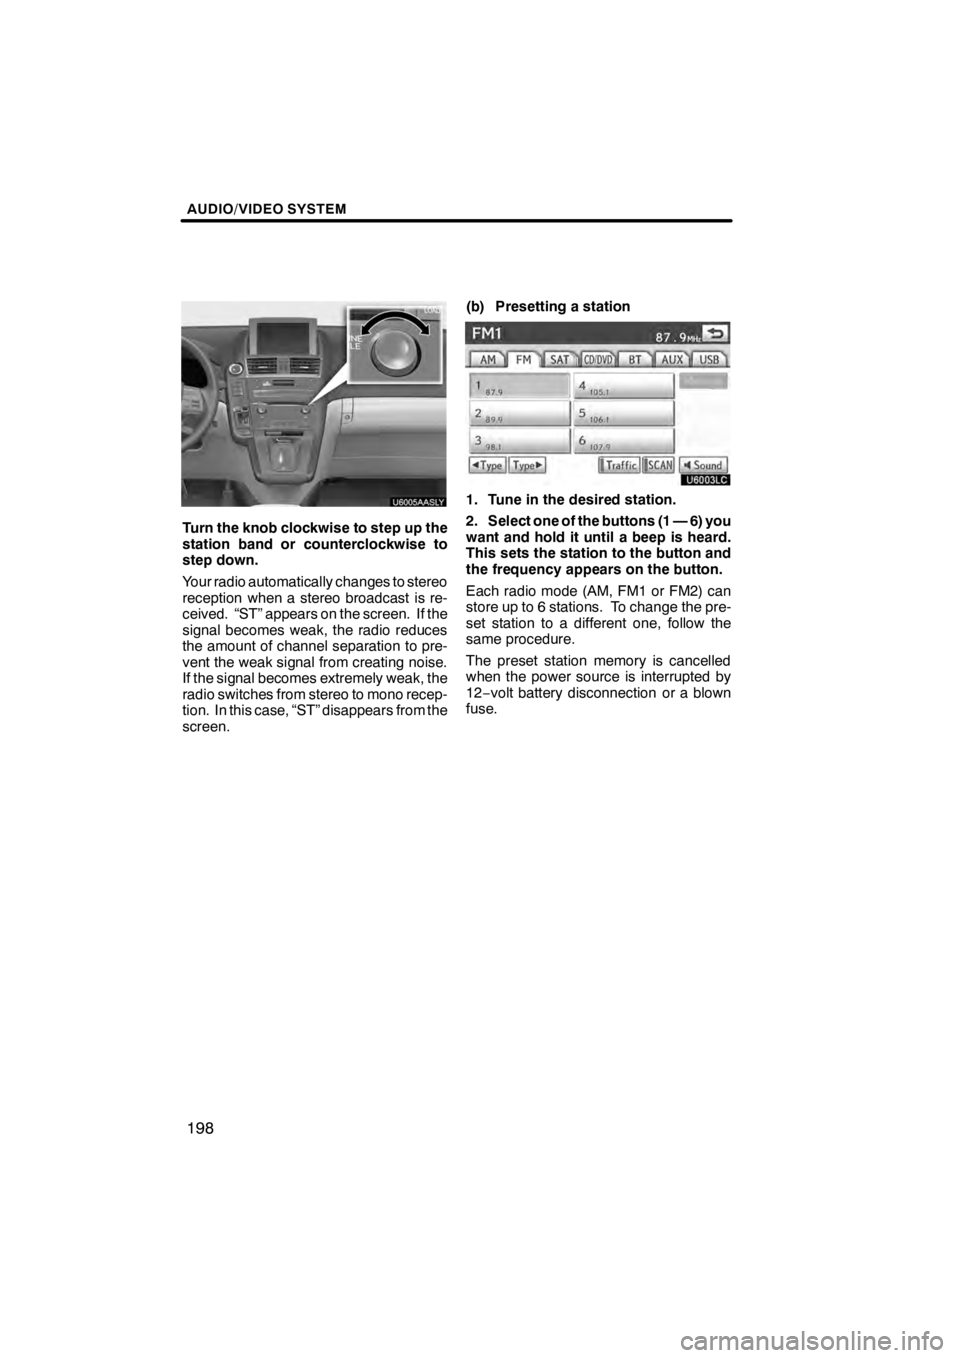
1. Tune in the desired station.
2. Select one of the buttons (1 — 6) you
want and hold it until a beep is heard.
This sets the station to the button and
the frequency appears on the button.
Each radio mode (AM, FM1 or FM2) can
store up to 6 stations. To change the pre-
set station to a different one, follow the
same procedure.
The preset station memory is cancelled
when the power source is interrupted by
12−
volt battery disconnection or a blown
fuse.
11 08.03HS250h_NAVI_U
75051U
Page 205 of 413
AUDIO/VIDEO SYSTEM
204
(e) Presetting a channel
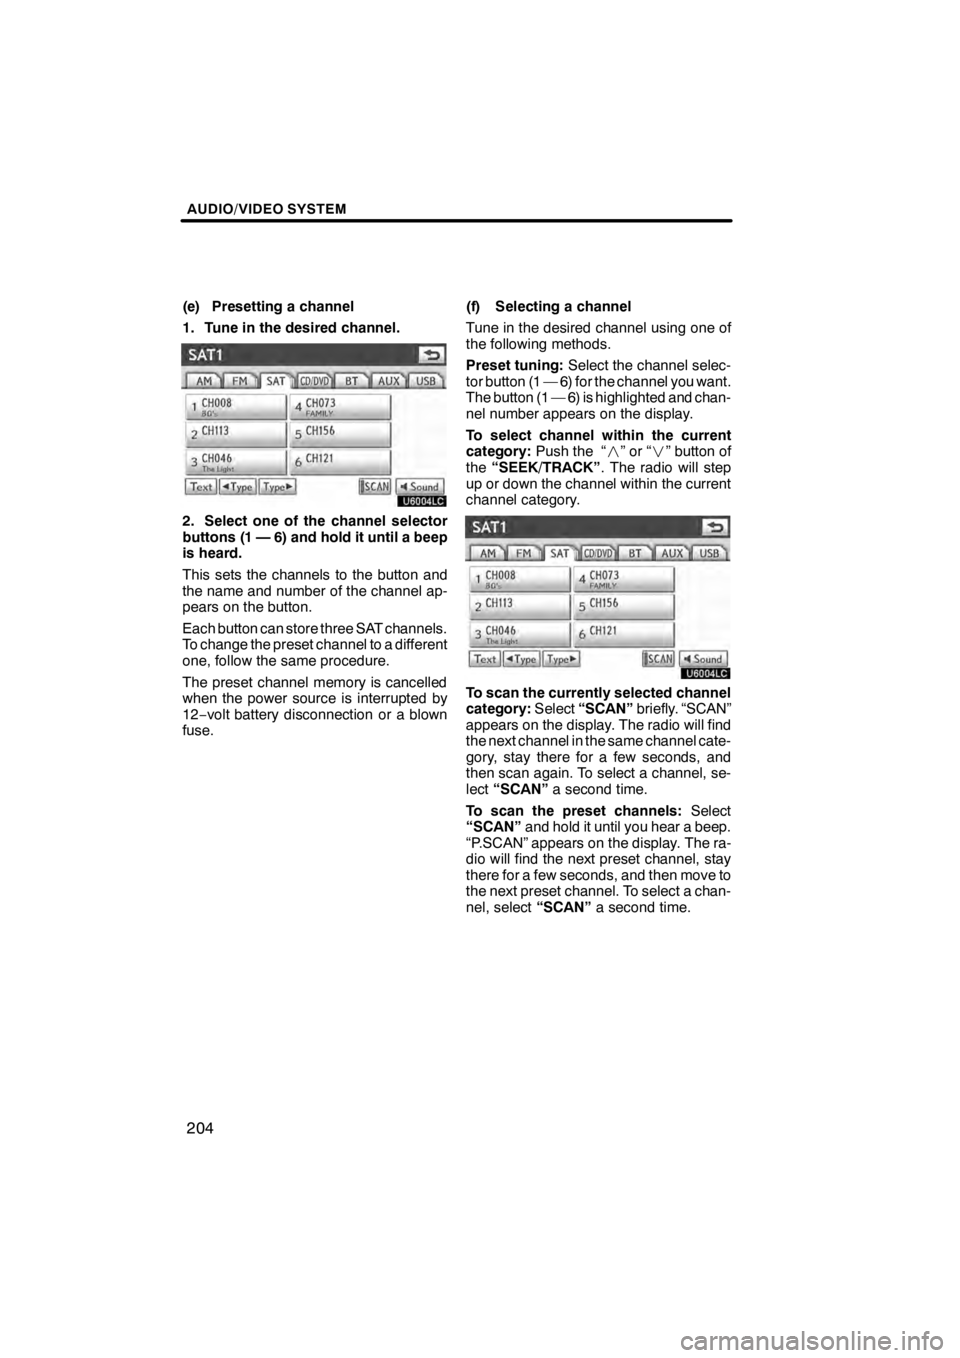
1. Tune in the desired channel.
U6004LC
2. Select one of the channel selector
buttons (1 — 6) and hold it until a beep
is heard.
This sets the channels to the button and
the name and number of the channel ap-
pears on the button.
Each button can store three SAT channels.
To change the preset channel to a different
one, follow the same procedure.
The preset channel memory is cancelled
when the power source is interrupted by
12−volt battery disconnection or a blown
fuse. (f) Selecting a channel
Tune in the desired channel using one of
the following methods.
Preset tuning:
Select the channel selec-
tor button (1 — 6) for the channel you want.
The button (1 — 6) is highlighted and chan-
nel number appears on the display.
To select channel within the current
category: Push the “ ”or“” button of
the “SEEK/TRACK” . The radio will step
up or down the channel within the current
channel category.
U6004LC
To scan the currently selected channel
category: Select“SCAN” briefly. “SCAN”
appears on the display. The radio will find
the next channel in the same channel cate-
gory, stay there for a few seconds, and
then scan again. To select a channel, se-
lect “SCAN” a second time.
To scan the preset channels: Select
“SCAN” and hold it until you hear a beep.
“P.SCAN” appears on the display. The ra-
dio will find the next preset channel, stay
there for a few seconds, and then move to
the next preset channel. To select a chan-
nel, select “SCAN”a second time.
11 08.03HS250h_NAVI_U
75051U
Page 239 of 413
AUDIO/VIDEO SYSTEM
238
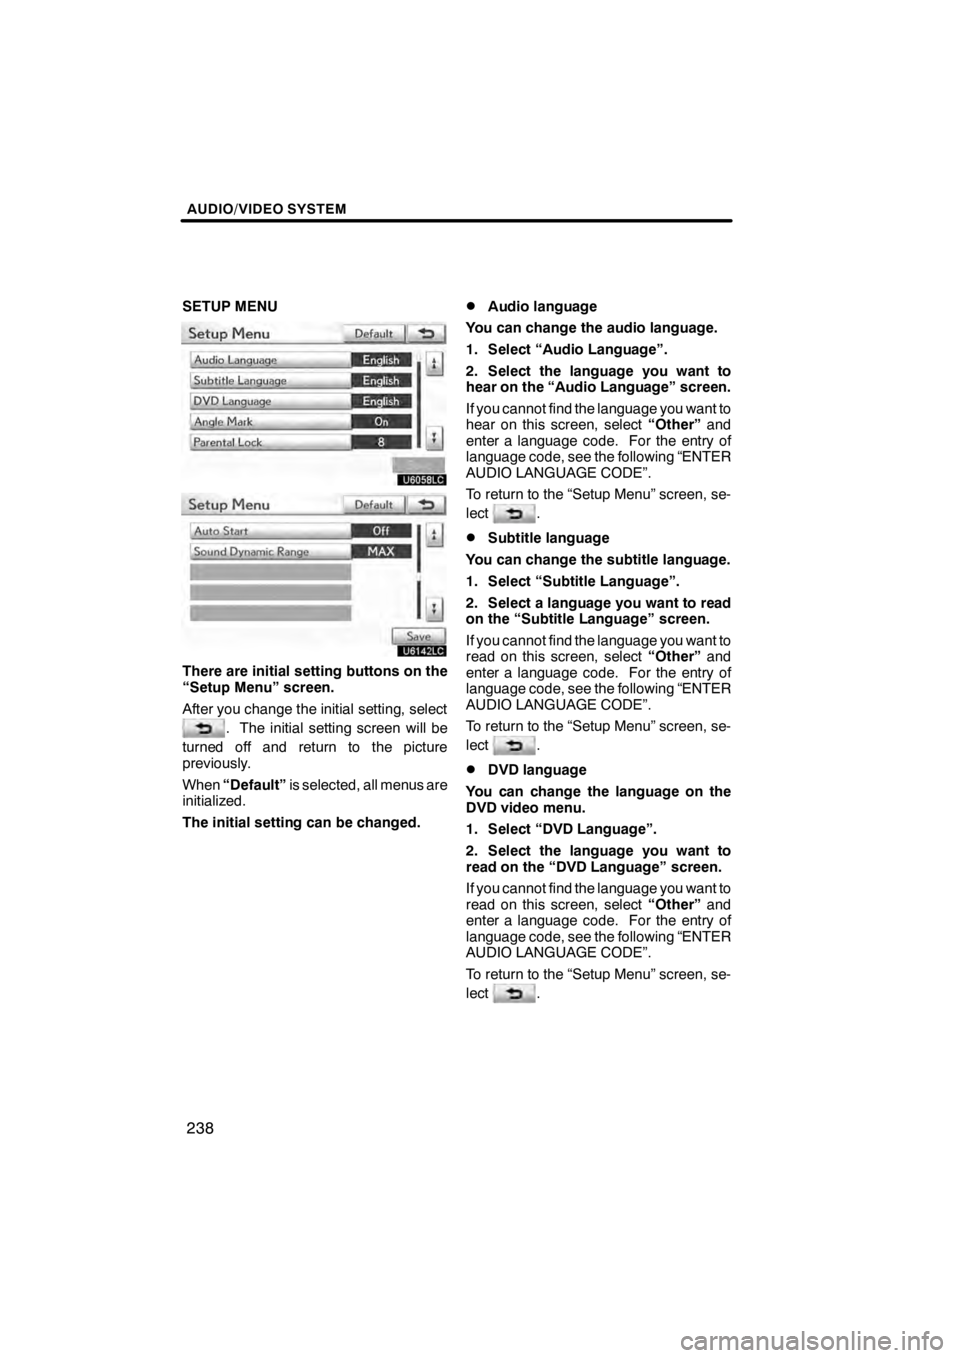
SETUP MENU
U6058LC
U6142LC
There are initial setting buttons on the
“Setup Menu” screen.
After you change the initial setting, select
. The initial setting screen will be
turned off and return to the picture
previously.
When “Default” is selected, all menus are
initialized.
The initial setting can be changed.
DAudio language
You can change the audio language.
1. Select “Audio Language”.
2. Select the language you want to
hear on the “Audio Language” screen.
If you cannot find the language you want to
hear on this screen, select “Other”and
enter a language code. For the entry of
language code, see the following “ENTER
AUDIO LANGUAGE CODE”.
To return to the “Setup Menu” screen, se-
lect
.
DSubtitle language
You can change the subtitle language.
1. Select “Subtitle Language”.
2. Select a language you want to read
on the “Subtitle Language” screen.
If you cannot find the language you want to
read on this screen, select “Other”and
enter a language code. For the entry of
language code, see the following “ENTER
AUDIO LANGUAGE CODE”.
To return to the “Setup Menu” screen, se-
lect
.
DDVD language
You can change the language on the
DVD video menu.
1. Select “DVD Language”.
2. Select the language you want to
read on the “DVD Language” screen.
If you cannot find the language you want to
read on this screen, select “Other”and
enter a language code. For the entry of
language code, see the following “ENTER
AUDIO LANGUAGE CODE”.
To return to the “Setup Menu” screen, se-
lect
.
11 08.03HS250h_NAVI_U
75051U