display Lexus HS250h 2012 Navigation Manual
[x] Cancel search | Manufacturer: LEXUS, Model Year: 2012, Model line: HS250h, Model: Lexus HS250h 2012Pages: 413, PDF Size: 5.29 MB
Page 386 of 413
SETUP
385
D
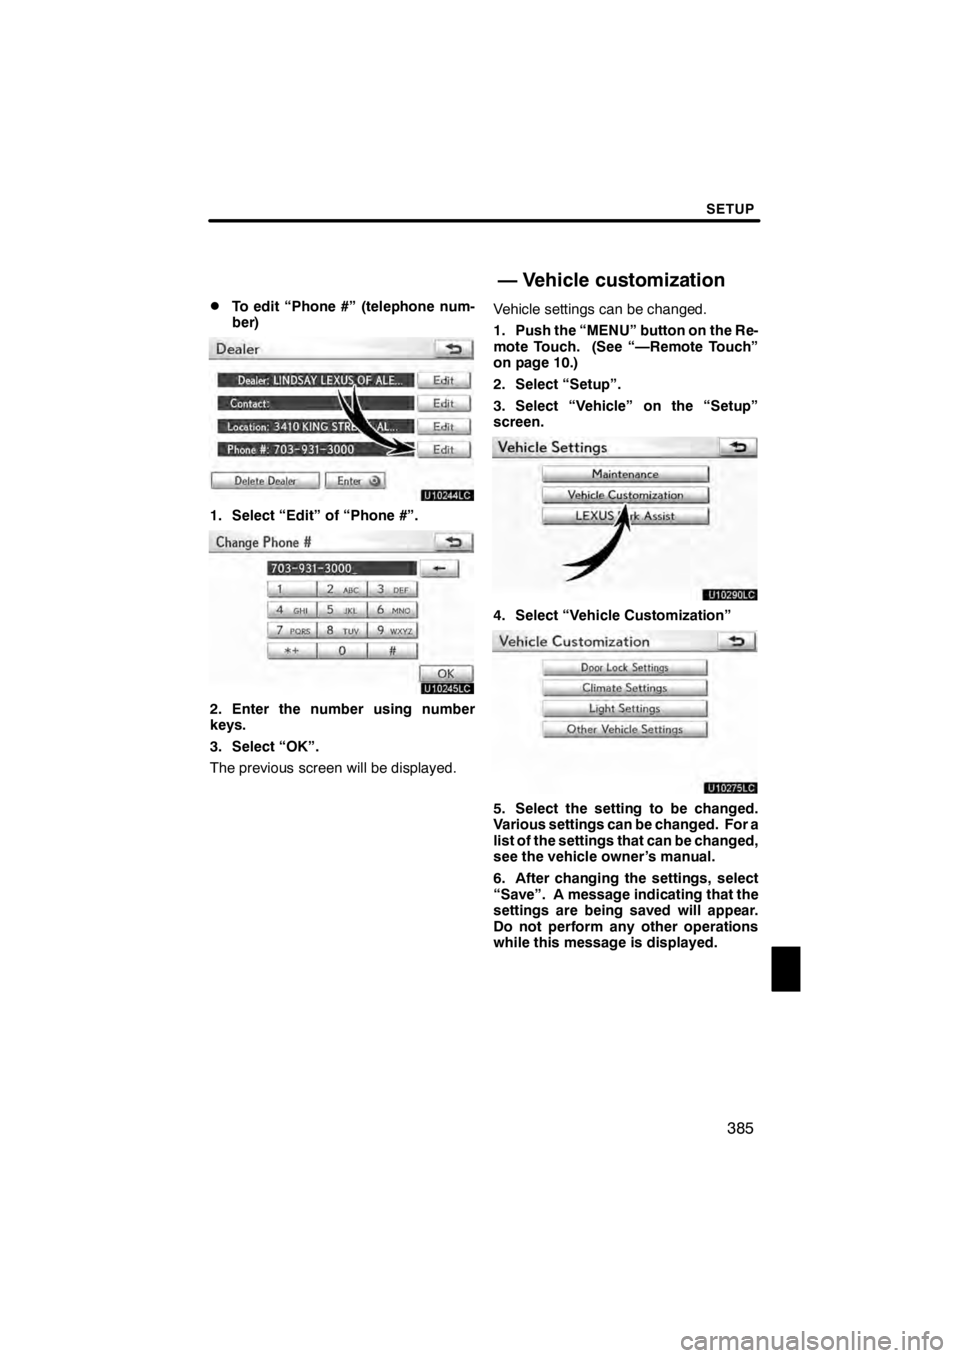
To edit “Phone #” (telephone num-
ber)
U10244LC
1. Select “Edit” of “Phone #”.
U10245LC
2. Enter the number using number
keys.
3. Select “OK”.
The previous screen will be displayed.
Vehicle settings can be changed.
1. Push the “MENU” button on the Re-
mote Touch. (See “—Remote Touch”
on page 10.)
2. Select “Setup”.
3. Select “Vehicle” on the “Setup”
screen.
U10290LC
4. Select “Vehicle Customization”
U10275LC
5. Select the setting to be changed.
Various settings can be changed. For a
list of the settings that can be changed,
see the vehicle owner’s manual.
6. After changing the settings, select
“Save”. A message indicating that the
settings are being saved will appear.
Do not perform any other operations
while this message is displayed.
11 08.03HS250h_NAVI_U
75051U
—
Vehicle customization
12
Page 387 of 413
SETUP
386
CAUTION
When performing the customization
procedure, ensure that there is suffi-
cient ventilation in the vehicle and
surrounding area. If there is insuffi-
cient ventilation, exhaust gases may
collect and enter the vehicle. Ex-
haust gases include harmful carbon
monoxide (CO) and inhaling them
may lead to death or a serious health
hazard.
INFORMATION
Stop the vehicle in a safe place, set
the parking brake and put the shift
position in “P”. To avoid discharging
the 12−volt battery, perform the
customization procedure with the hy-
brid system operating.
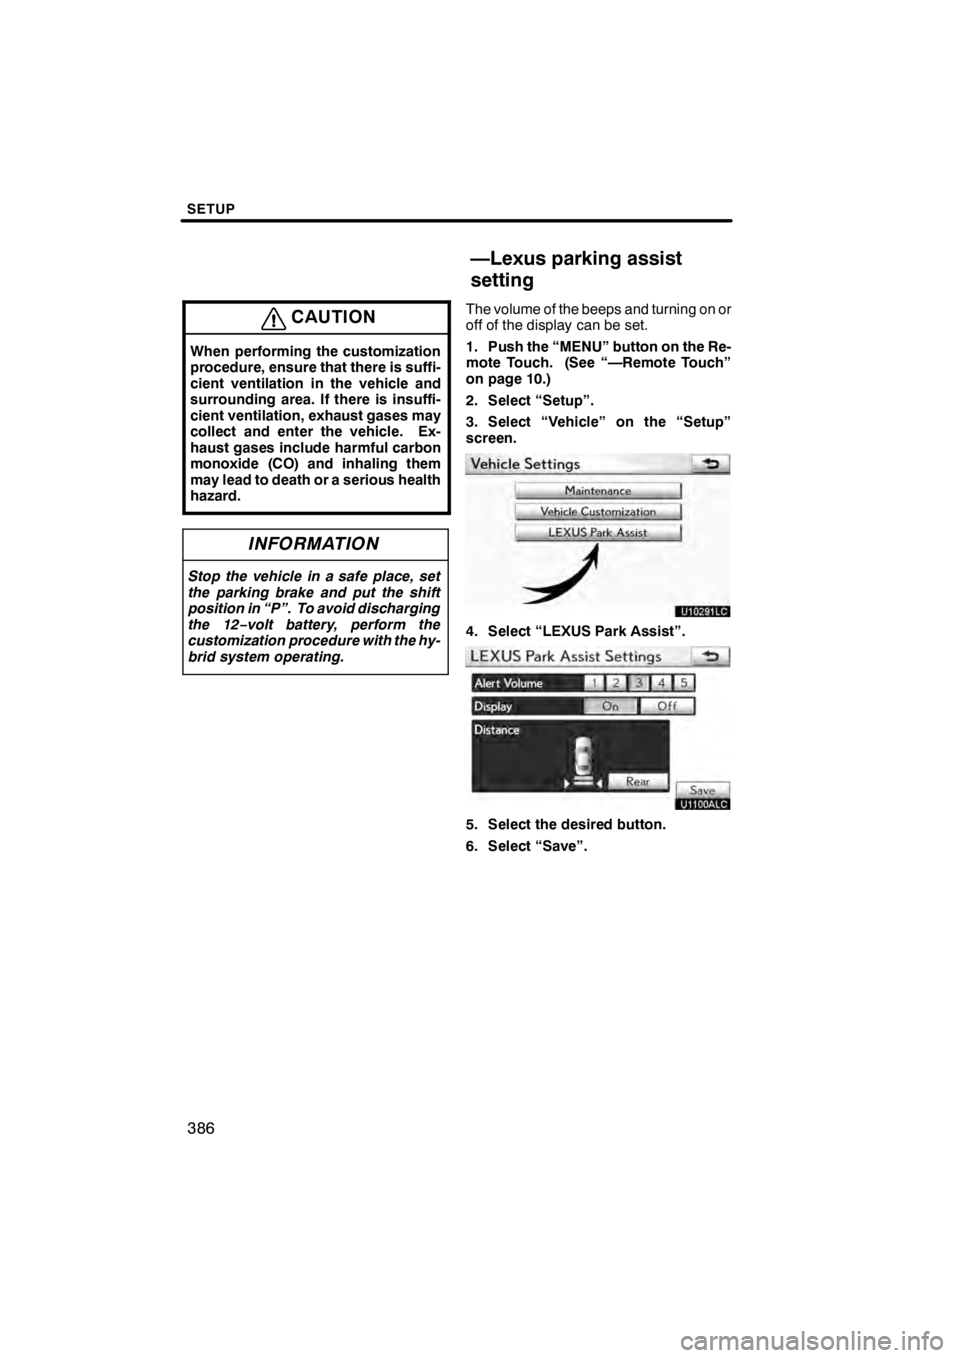
The volume of the beeps and turning on or
off of the display can be set.
1. Push the “MENU” button on the Re-
mote Touch. (See “—Remote Touch”
on page 10.)
2. Select “Setup”.
3. Select “Vehicle” on the “Setup”
screen.
U10291LC
4. Select “LEXUS Park Assist”.
U1100ALC
5. Select the desired button.
6. Select “Save”.
11 08.03HS250h_NAVI_U
75051U
—Lexus parking assist
setting
Page 388 of 413
SETUP
387
D
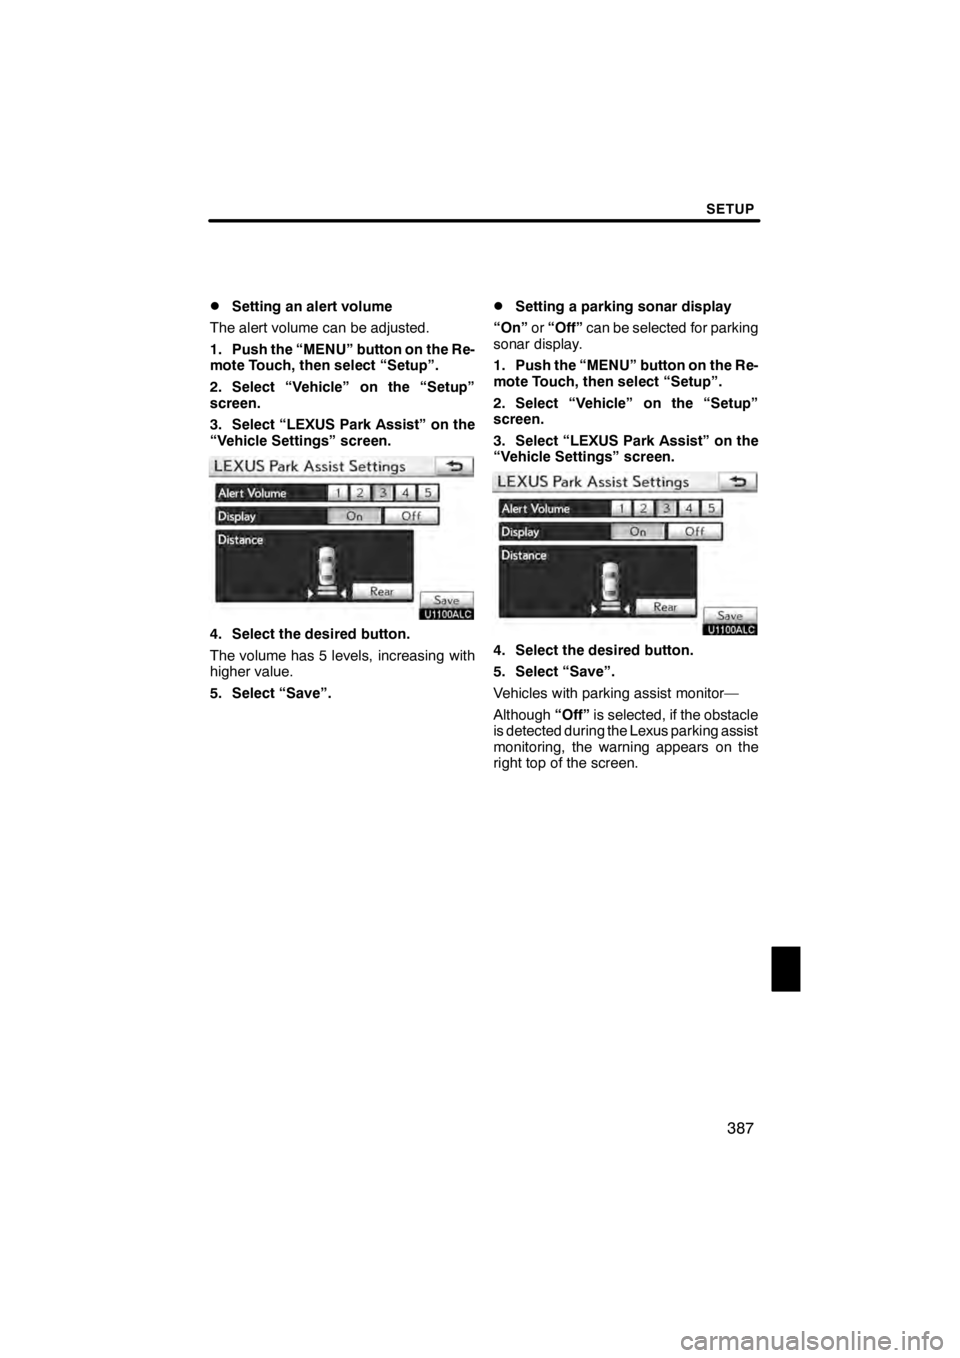
Setting an alert volume
The alert volume can be adjusted.
1. Push the “MENU” button on the Re-
mote Touch, then select “Setup”.
2. Select “Vehicle” on the “Setup”
screen.
3. Select “LEXUS Park Assist” on the
“Vehicle Settings” screen.
U1100ALC
4. Select the desired button.
The volume has 5 levels, increasing with
higher value.
5. Select “Save”.
DSetting a parking sonar display
“On” or“Off” can be selected for parking
sonar display.
1. Push the “MENU” button on the Re-
mote Touch, then select “Setup”.
2. Select “Vehicle” on the “Setup”
screen.
3. Select “LEXUS Park Assist” on the
“Vehicle Settings” screen.
U1100ALC
4. Select the desired button.
5. Select “Save”.
Vehicles with parking assist monitor—
Although “Off”is selected, if the obstacle
is detected during the Lexus parking assist
monitoring, the warning appears on the
right top of the screen.
11 08.03HS250h_NAVI_U
75051U
12
Page 389 of 413
SETUP
388
D
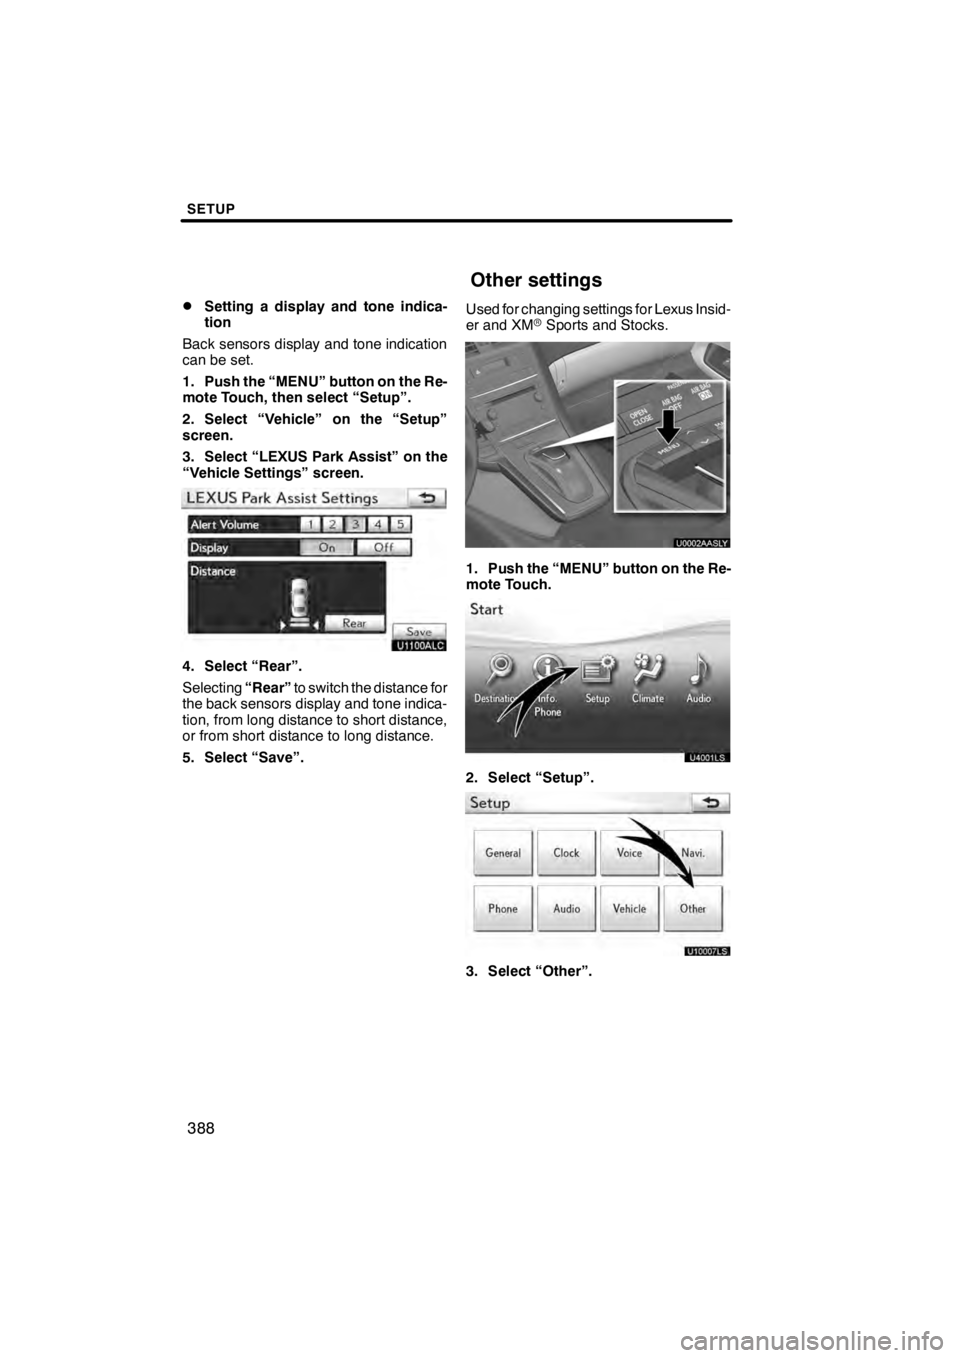
Setting a display and tone indica-
tion
Back sensors display and tone indication
can be set.
1. Push the “MENU” button on the Re-
mote Touch, then select “Setup”.
2. Select “Vehicle” on the “Setup”
screen.
3. Select “LEXUS Park Assist” on the
“Vehicle Settings” screen.
U1100ALC
4. Select “Rear”.
Selecting “Rear”to switch the distance for
the back sensors display and tone indica-
tion, from long distance to short distance,
or from short distance to long distance.
5. Select “Save”. Used for changing settings for Lexus Insid-
er and XM
rSports and Stocks.
U0002AASLY
1. Push the “MENU” button on the Re-
mote Touch.
2. Select “Setup”.
U10007LS
3. Select “Other”.
11 08.03HS250h_NAVI_U
75051U
Other settings
Page 393 of 413
APPENDIX
392
This navigation system calculates the
current vehicle position using satellite
signals, various vehicle signals, map
data, etc. However, the accurate posi-
tion may not be shown depending on
the satellite condition, road configura-
tion, vehicle condition or other circum-
stances.
The Global Positioning System (GPS) de-
veloped and operated by the U.S. Depart-
ment of Defense provides an accurate cur-
rent vehicle position, normally using 4 or
more satellites, and in some case 3 satel-
lites. The GPS system has a certain level
of inaccuracy. While the navigation sys-
tem will compensate for this most of the
time, occasional positioning errors of up to
300 feet (100 m) can and should be expec-
ted. Generally, position errors will be cor-
rected within a few seconds.
U11003LC
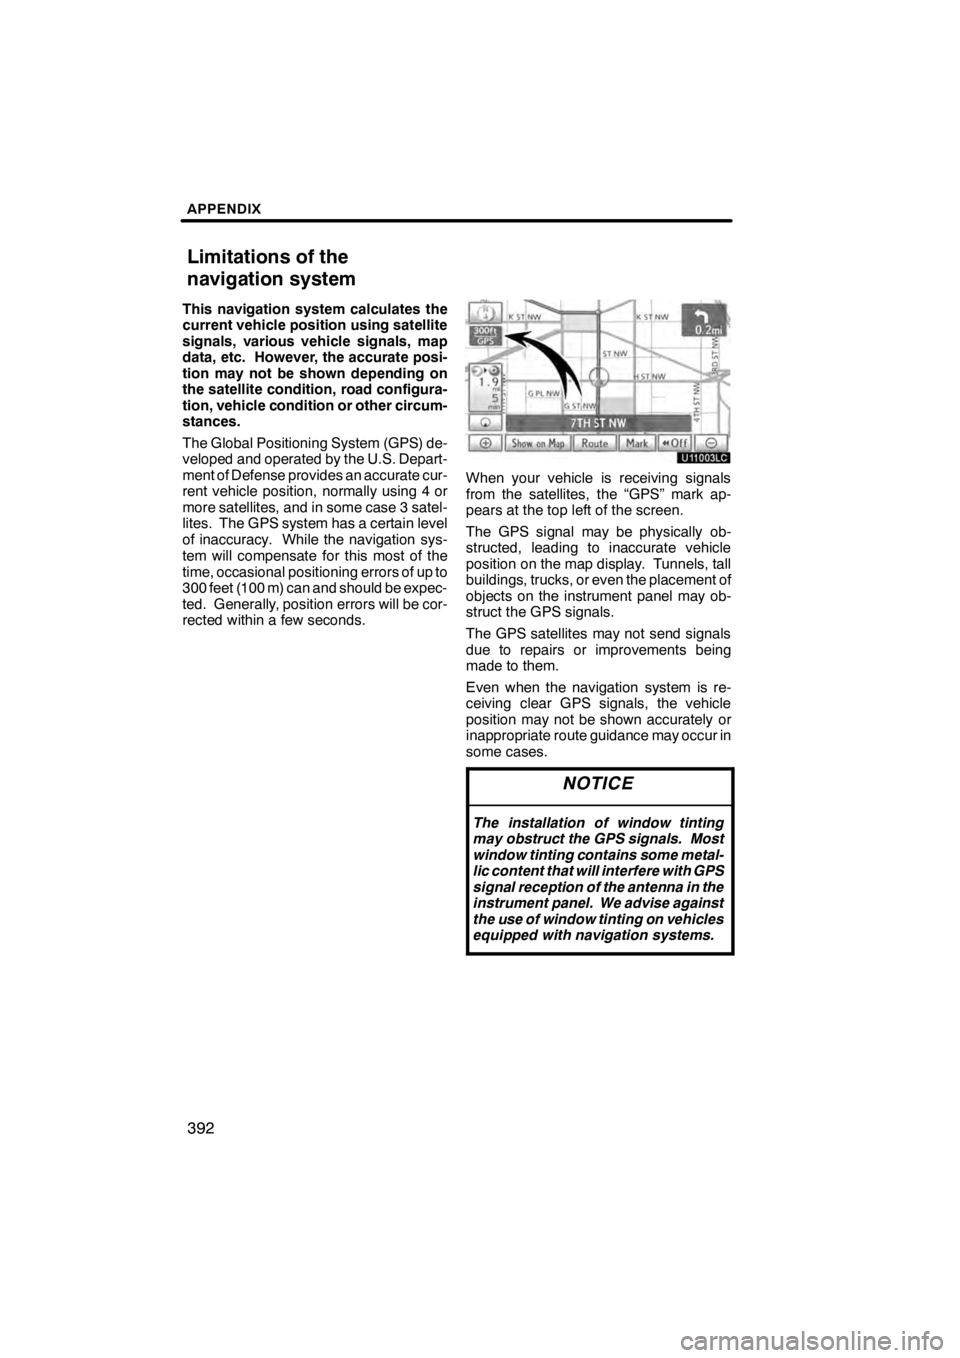
When your vehicle is receiving signals
from the satellites, the “GPS” mark ap-
pears at the top left of the screen.
The GPS signal may be physically ob-
structed, leading to inaccurate vehicle
position on the map display. Tunnels, tall
buildings, trucks, or even the placement of
objects on the instrument panel may ob-
struct the GPS signals.
The GPS satellites may not send signals
due to repairs or improvements being
made to them.
Even when the navigation system is re-
ceiving clear GPS signals, the vehicle
position may not be shown accurately or
inappropriate route guidance may occur in
some cases.
NOTICE
The installation of window tinting
may obstruct the GPS signals. Most
window tinting contains some metal-
lic content that will interfere with GPS
signal reception of the antenna in the
instrument panel. We advise against
the use of window tinting on vehicles
equipped with navigation systems.
11 08.03HS250h_NAVI_U
75051U
Limitations of the
navigation system
Page 395 of 413

APPENDIX
394
After replacing a tire, implement the op-
eration described in the “TIRE
CHANGE CALIBRATION”. (See page
332.)
This navigation system uses tire turning
data and is designed to work with factory−
specified tires for your vehicle. Installing
tires that are larger or smaller than the orig-
inally equipped diameter may cause inac-
curate display of the vehicle’s position.
The tire pressure also affects the diameter
of the tires so please make sure the tire
pressure of all four tires is correct. This system uses the maps of DENSO.
2011 DENSO CORPORATION
2010 NAVTEQ. All rights reserved.
2010 Tele Atlas North America, Inc.
All rights reserved. This material is
proprietary and the subject of copyright
protection and other intellectual
property rights owned by or licensed to
Tele Atlas North America, Inc. The use
of this material is subject to the terms
of a license agreement. You will be
held liable for any unauthorized
copying or disclosure of this material.
Data by infoUSA Copyright 2010, All
Rights Reserved.
2010 VISA Corporation
Copyright CoStar Realty
Information, Inc.
The Bullseye Design is a registered
trademark of Target Brands, Inc.
The building footprints and related
cartographic information in this
product comes with MAPMASTER
digital materials.
11 08.03HS250h_NAVI_U
75051U
Map database information
and updates
Page 400 of 413

APPENDIX
399
No Warranty. This information is
provided to you “as is,” and you agree
to use it at your own risk. DENSO and
its licensors (and their licensors and
suppliers, collectively “DENSO”) make
no guarantees, representations or
warranties of any kind, express or
implied, arising by law or otherwise,
including but not limited to, and
DENSO expressly disclaims any
warranties regarding content, quality,
accuracy, completeness,
effectiveness, reliability, fitness for a
particular purpose, non−infringement,
usefulness, use or results to be
obtained from this information, or that
the information or server will be
uninterrupted or error −free. Some
states, territories and countries do not
allow certain warranty exclusions, so
to that extent, the above exclusion may
not apply to you.
Disclaimer of Liability: DENSO SHALL
NOT BE LIABLE TO YOU FOR ANY
CLAIM, DEMAND OR ACTION,
IRRESPECTIVE OF ITS NATURE,
ALLEGING ANY LOSS, INJURY OR
DAMAGES, WHETHER DIRECT,
INDIRECT, INCIDENTAL, SPECIAL
OR CONSEQUENTIAL DAMAGES,
INCLUDING ANY LOSS OF PROFIT,
REVENUE OR CONTRACTS
ARISING OUT OF YOUR
POSSESSION, USE OF OR
INABILITY TO USE THIS
INFORMATION, ANY DEFECT IN
THE INFORMATION, OR THE
BREACH OF THESE TERMS OR
CONDITIONS, WHETHER IN AN
ACTION IN CONTRACT OR TORT
OR BASED ON A WARRANTY, EVEN
IF DENSO OR ITS LICENSORS
HAVE BEEN ADVISED OF THE
POSSIBILITY OF SUCH DAMAGES.
Some states, territories and countries
do not allow certain liability exclusions
or damages limitations, so to that
extent the above may not apply to you.Indemnity. You agree to indemnify,
defend and hold DENSO and its
licensors (including their respective
licensors, suppliers, assignees,
subsidiaries, affiliated companies, and
the respective officers, directors,
employees, shareholders, agents and
representatives of each of them) free
and harmless from and against any
liability, loss, injury (including injuries
resulting in death), demand, action,
cost, expense, or claim of any kind or
character, including but not limited to
attorney’s fees, arising out of or in
connection with any use or possession
by you of this information.
END USER NOTICE
The marks of companies displayed by
this product to indicate business
locations are the marks of their
respective owners. The use of such
marks in this product does not imply
any sponsorship, approval, or
endorsement by such companies of
this product.
11 08.03HS250h_NAVI_U
75051U
13
Page 404 of 413
APPENDIX
403
There are two types of areas available
for route guidance. In one type of area,
primarily around metropolitan centers,
detailed route guidance is available for
the entire area. In the other type of area,
all roads are displayed on the map but
route guidance is limited. The naviga-
tion route might lack precision because
the data (no right turns, one−way traf-
fic, etc.) is not complete. It is still pos-
sible to reach the destination by follow-
ing the arrow direction and distance as
shown on the bottom left of the screen.
The arrow points in the direction of the
destination. The distance shown is as
measured in a straight line from the cur-
rent vehicle position to the destination
area.
In order to provide you with as accurate
map information as possible, we are al-
ways gathering information such as on
road repairs and carrying out on −site in-
vestigations. However, the names of
roads, streets, facilities, and their locations
frequently change. In some places,
construction on roads may be in progress.
For that reason, information on some
areas in this system might be different from
the actual location.
The map database is normally updated
once a year. Contact your Lexus dealer for
information about the availability and pric-
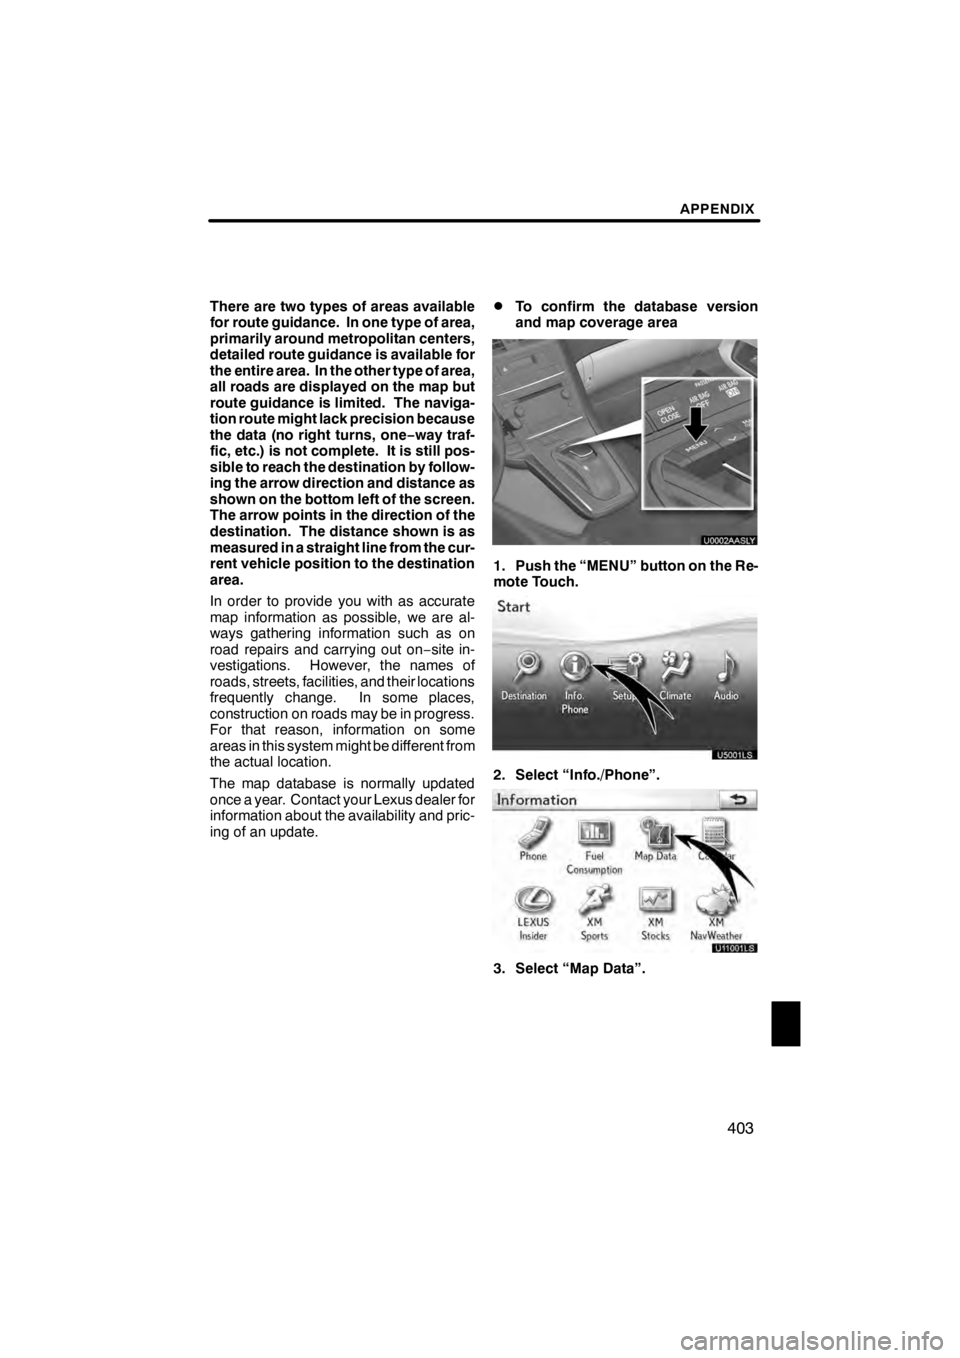
ing of an update.DTo confirm the database version
and map coverage area
U0002AASLY
1. Push the “MENU” button on the Re-
mote Touch.
2. Select “Info./Phone”.
3. Select “Map Data”.
11 08.03HS250h_NAVI_U
75051U
13
Page 405 of 413
APPENDIX
404
U11010LC
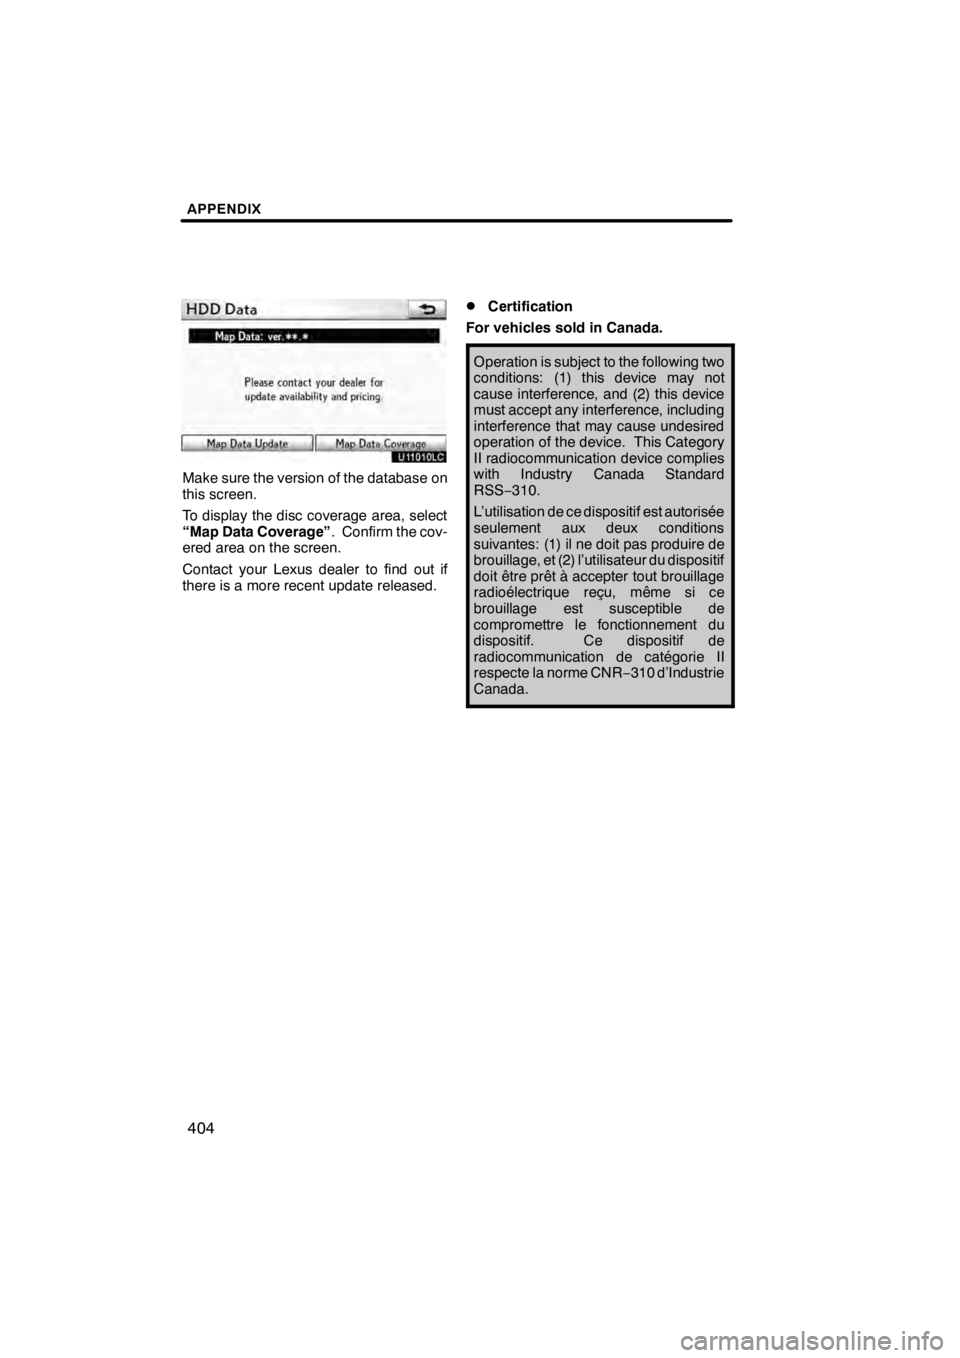
Make sure the version of the database on
this screen.
To display the disc coverage area, select
“Map Data Coverage”. Confirm the cov-
ered area on the screen.
Contact your Lexus dealer to find out if
there is a more recent update released.
DCertification
For vehicles sold in Canada.
Operation is subject to the following two
conditions: (1) this device may not
cause interference, and (2) this device
must accept any interference, including
interference that may cause undesired
operation of the device. This Category
II radiocommunication device complies
with Industry Canada Standard
RSS− 310.
L’utilisation de ce dispositif est autorisée
seulement aux deux conditions
suivantes: (1) il ne doit pas produire de
brouillage, et (2) l’utilisateur du dispositif
doit être prêt à accepter tout brouillage
radioélectrique reçu, même si ce
brouillage est susceptible de
compromettre le fonctionnement du
dispositif. Ce dispositif de
radiocommunication de catégorie II
respecte la norme CNR −310 d’Industrie
Canada.
11 08.03HS250h_NAVI_U
75051U
Page 407 of 413

INDEX
406
Numbers/Symbols
·
button 10 ........................
? button 25,39 .........................
3 routes selection 91 ...................
A
A/C button 276
........................
Activating the wide view front monitor 300
........................
Activation of service 159
...............
Adding destinations 100
................
Address book button 25,83
..............
Address book entries 123
...............
Address book entry information 44 .......
Address button 25,71
...................
Adjusting the air conditioning
system settings manually 280
.........
Adjusting the air outlets 283
.............
Air conditioning controls 276
............
Air flow control buttons 276,280
.........
Air intake control button 276,282
........
Air outlets 280
........................
Alphabet key 33
.......................
AM·FM button 186
.....................
Angle mark 238
.......................
Areas to avoid 129
....................
Arrow screen 46,96
....................
ASL 194
.............................
Audio button 24,27,186
.................
Audio language 238
...................
Audio settings 373
.....................
Audio/video remote controls 263
.........
Auto avoid traffic 177,328
..............
AUTO button 276
......................
Auto start 238
.........................
Automatic air conditioning system 279 ....
Automatic sound levelizer 194
...........
AUX button 186
.......................
AUX port 197
.........................
B
BASS 194
............................
Bluetooth r 136,334,365
.................
Bluetooth raudio operation 247
..........
Bluetooth rconnection status 370,371 ....
Brightness 36
.........................
Building information 49
.................
C
Calendar 156
.........................
Calendar button 28
....................
Call by call history 148
.................
Call by dial 145
.......................
Call by phonebook 146
.................
Call by POI 151
.......................
Call by speed dial 147
.................
Call by voice recognition 149,154 ........
Call on the Bluetooth rphone 145 ........
Categories 77
.........................
CAUTION screen 30
...................
CD button 186
........................
CD changer operation 208
..............
Cellular phone 136
....................
CH/DISC button 186
...................
Change icon 125
......................
Change location 127,132
...............
Change name 126,131
.................
Change phone # 127
...................
Change size 132
......................
Changing a portable player name 374 ....
Changing the angle 237
................
Changing the audio format 237
..........
Changing the audio language 236 .......
Changing the Bluetooth raudio
passcode 379
.......................
Changing the Bluetooth raudio
player name 379
....................
Changing the Bluetooth rsettings 366 ....
Changing the page 235
................
Changing the pointer size 317
...........
Changing the subtitle language 236
.......................
Channel category 203
..................
Chapter 246
..........................
City to search 71,76
....................
Climate button 24,276,277
..............
Clock button 27
.......................
Clock settings 318
.....................
Color 36
.............................
Command list 55,58
....................
Compass mode screen 46,48
............
Connecting a Bluetooth rphone 142 ......
Connecting a USB memory
or iPod 256
.........................
Connecting Bluetooth raudio 378 ........
Connecting Bluetooth r
audio player 250
....................
Consumption 155
.....................
Contrast 36
...........................
Coordinates button 25,88
...............
Current position calibration 331
..........
Current position display 39
.............
Cursor position as a destination 41 ......
11 08.03HS250h_NAVI_U
75051U