Rear Lexus HS250h 2012 Navigation Manual
[x] Cancel search | Manufacturer: LEXUS, Model Year: 2012, Model line: HS250h, Model: Lexus HS250h 2012Pages: 413, PDF Size: 5.29 MB
Page 9 of 413

8
9 Rear View Monitor System
Rear view monitor system290
.................................
10 Wide View Front Monitor System
Wide view front monitor system 296
............................
11 Intuitive Parking Assist
Intuitive parking assist 304
....................................
12 Setup
General settings 312
..........................................
Clock settings 318
............................................
Voice settings 321
............................................
Navigation settings 324
.......................................
Detailed navigation settings 325
................................
Telephone settings 334
......................................
Volume setting 335
........................................
Manage phone 336
........................................
Phonebook 344
...........................................
Setting the phonebook 345
.................................
Speed dials setting 353
....................................
Deleting call history 360
....................................
Setting the voice tag 361
...................................
Bluetooth r 365
............................................
Details 370
...............................................
Audio settings 373
..........................................
Select portable player 373
..................................
Settings Bluetooth raudio 375
...............................
Vehicle settings 380
.........................................
Maintenance 380
..........................................
Vehicle customization 385
..................................
Lexus parking assist setting 386
.............................
Other settings 388
............................................
13 Appendix
Limitations of the navigation system 392
.........................
Map database information and updates 394
......................
Index 405
.............................................
11 08.03HS250h_NAVI_U
75051U
Page 36 of 413
NAVIGATION SYSTEM: BASIC FUNCTIONS
35
D
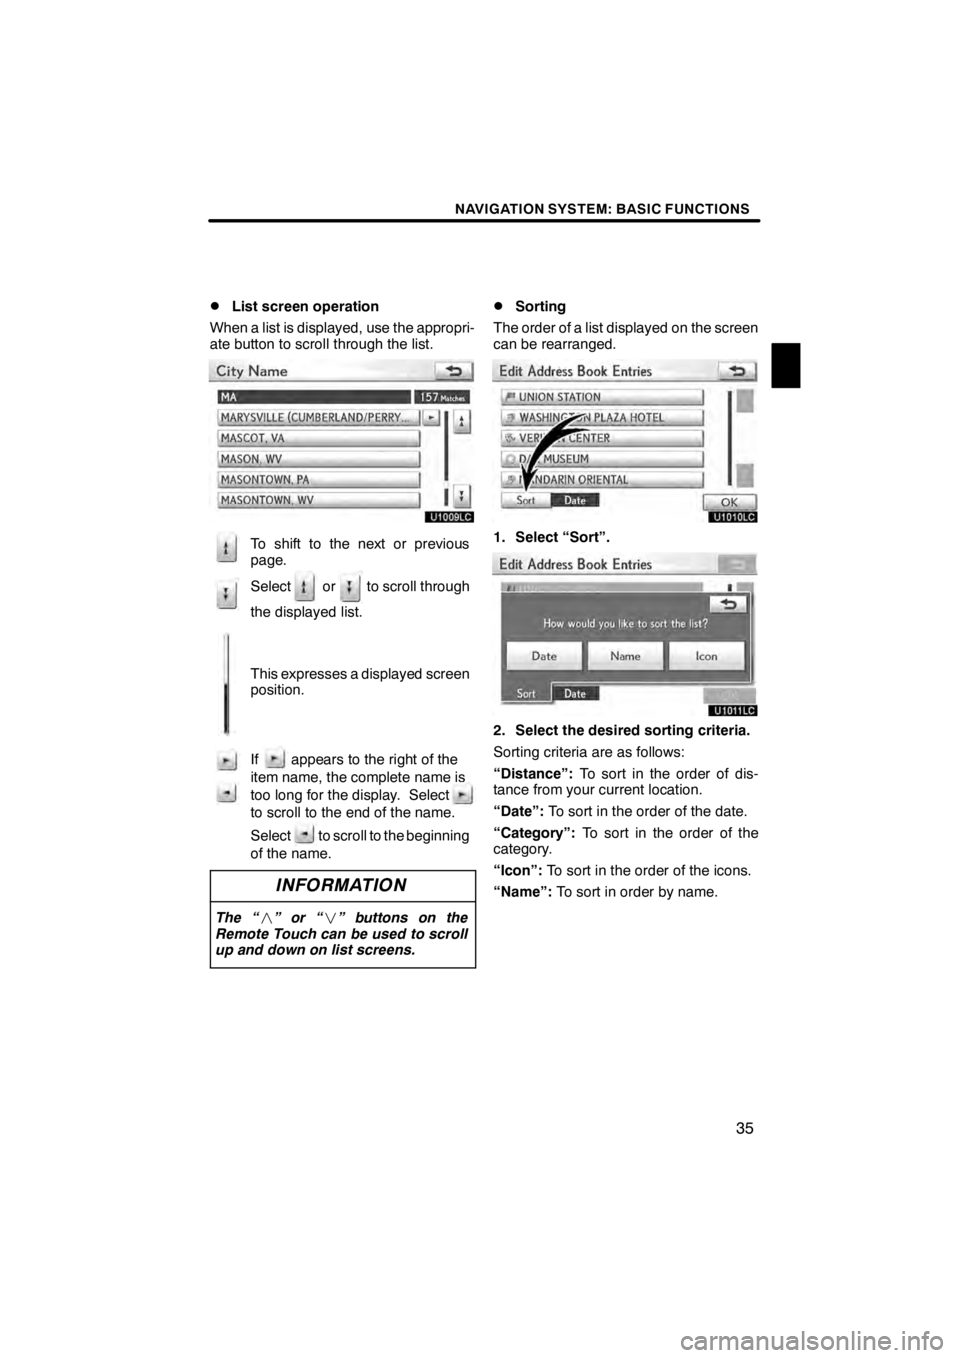
List screen operation
When a list is displayed, use the appropri-
ate button to scroll through the list.
U1009LC
To shift to the next or previous
page.
Select or to scroll through
the displayed list.
This expresses a displayed screen
position.
If appears to the right of the
item name, the complete name is
too long for the display. Select
to scroll to the end of the name.
Select to scroll to the beginning
of the name.
INFORMATION
The “ ”or“ ” buttons on the
Remote Touch can be used to scroll
up and down on list screens.
DSorting
The order of a list displayed on the screen
can be rearranged.
U1010LC
1. Select “Sort”.
U1011LC
2. Select the desired sorting criteria.
Sorting criteria are as follows:
“Distance”: To sort in the order of dis-
tance from your current location.
“Date”: To sort in the order of the date.
“Category”: To sort in the order of the
category.
“Icon”: To sort in the order of the icons.
“Name”: To sort in order by name.
11 08.03HS250h_NAVI_U
75051U
1
Page 195 of 413
AUDIO/VIDEO SYSTEM
194
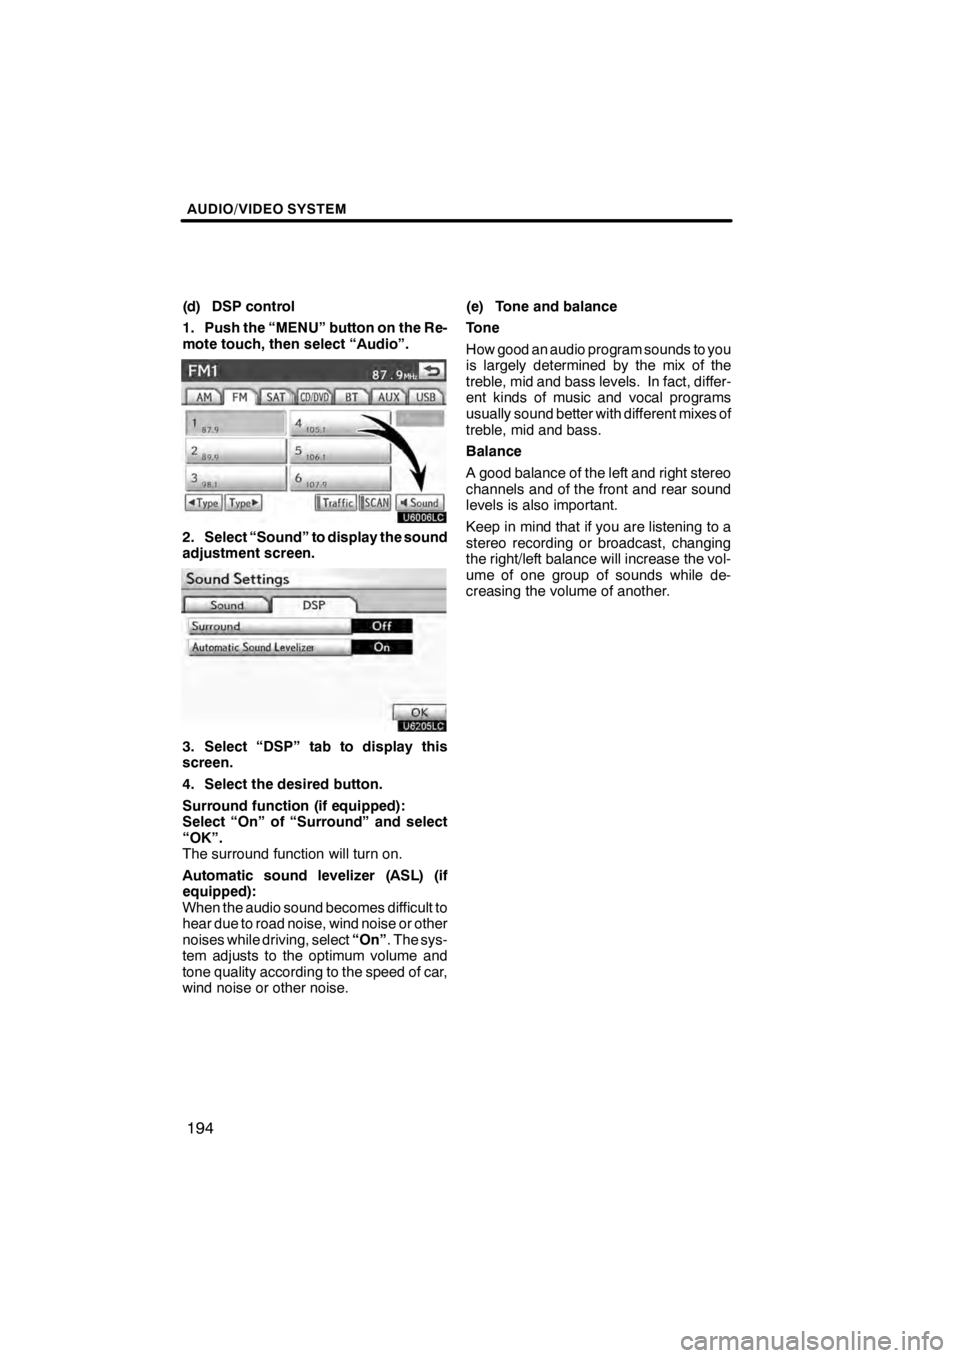
(d) DSP control
1. Push the “MENU” button on the Re-
mote touch, then select “Audio”.
U6006LC
2. Select “Sound” to display the sound
adjustment screen.
U6205LC
3. Select “DSP” tab to display this
screen.
4. Select the desired button.
Surround function (if equipped):
Select “On” of “Surround” and select
“OK”.
The surround function will turn on.
Automatic sound levelizer (ASL) (if
equipped):
When the audio sound becomes difficult to
hear due to road noise, wind noise or other
noises while driving, select“On”. The sys-
tem adjusts to the optimum volume and
tone quality according to the speed of car,
wind noise or other noise. (e) Tone and balance
Tone
How good an audio program sounds to you
is largely determined by the mix of the
treble, mid and bass levels. In fact, differ-
ent kinds of music and vocal programs
usually sound better with different mixes of
treble, mid and bass.
Balance
A good balance of the left and right stereo
channels and of the front and rear sound
levels is also important.
Keep in mind that if you are listening to a
stereo recording or broadcast, changing
the right/left balance will increase the vol-
ume of one group of sounds while de-
creasing the volume of another.
11 08.03HS250h_NAVI_U
75051U
Page 196 of 413
AUDIO/VIDEO SYSTEM
195
U6039LC
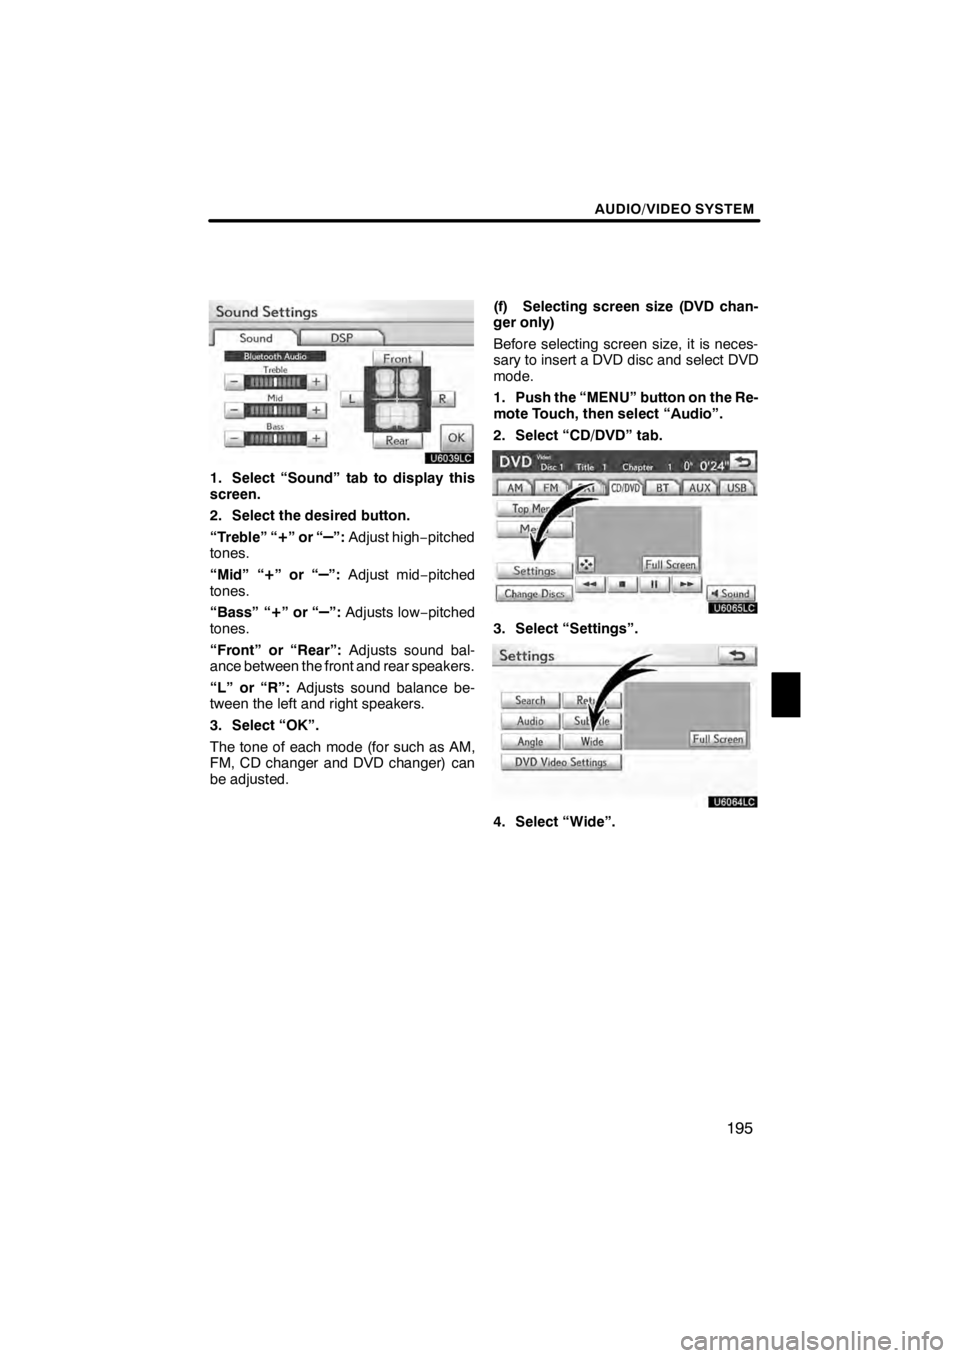
1. Select “Sound” tab to display this
screen.
2. Select the desired button.
“Treble” “
+”or“–”:Adjust high −pitched
tones.
“Mid” “
+”or“–”: Adjust mid −pitched
tones.
“Bass” “
+”or“–”: Adjusts low− pitched
tones.
“Front” or “Rear”: Adjusts sound bal-
ance between the front and rear speakers.
“L” or “R”: Adjusts sound balance be-
tween the left and right speakers.
3. Select “OK”.
The tone of each mode (for such as AM,
FM, CD changer and DVD changer) can
be adjusted. (f) Selecting screen size (DVD chan-
ger only)
Before selecting screen size, it is neces-
sary to insert a DVD disc and select DVD
mode.
1. Push the “MENU” button on the Re-
mote Touch, then select “Audio”.
2. Select “CD/DVD” tab.
U6065LC
3. Select “Settings”.
U6064LC
4. Select “Wide”.
11 08.03HS250h_NAVI_U
75051U
7
Page 277 of 413
AIR CONDITIONING
276
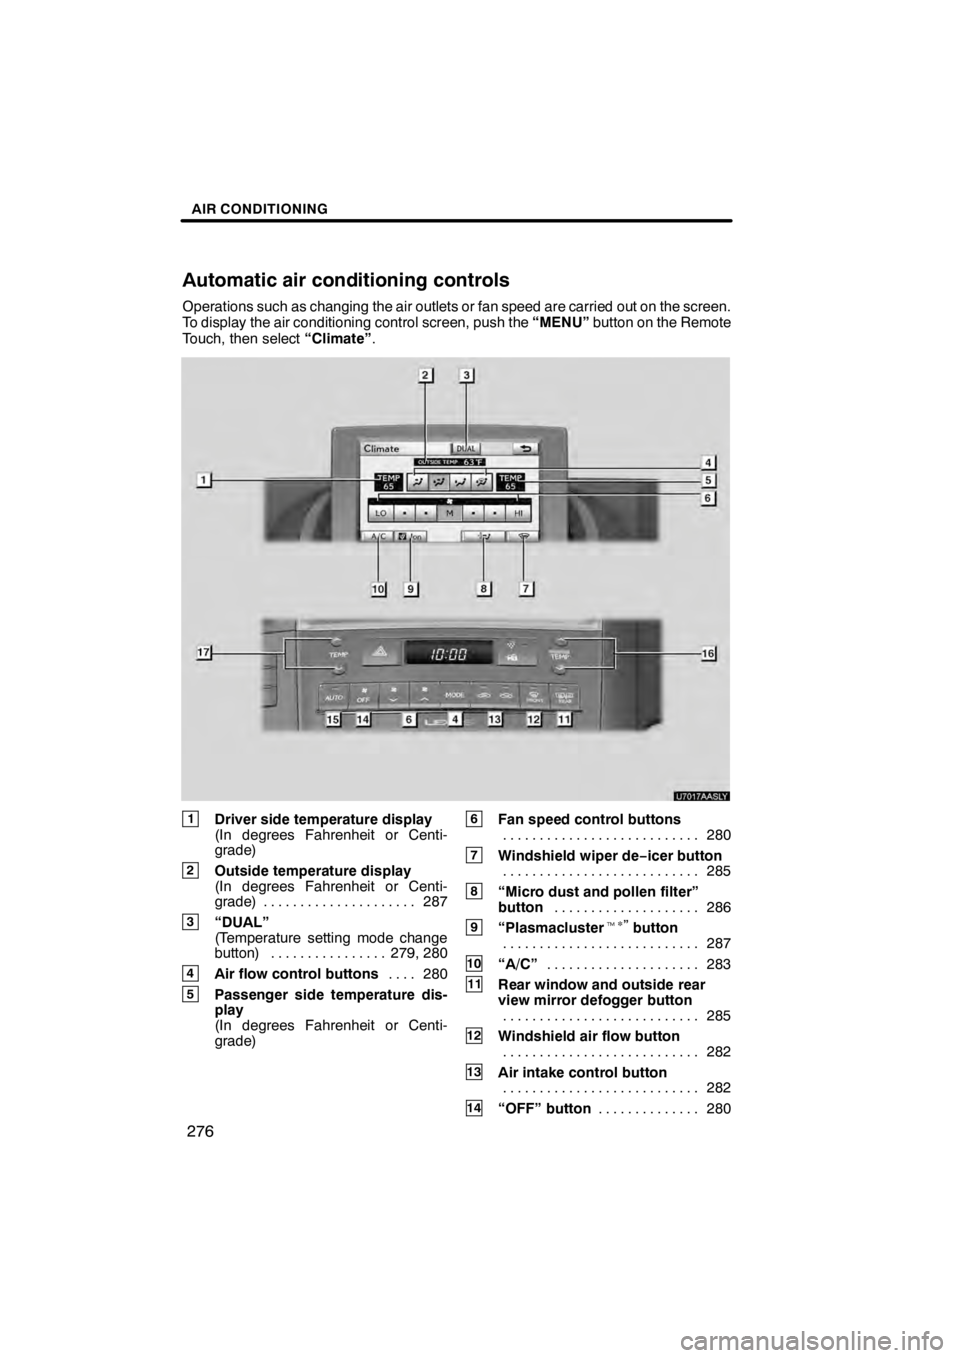
Operations such as changing the air outlets or fan speed are carried out on the screen.
To display the air conditioning control screen, push the“MENU”button on the Remote
Touch, then select “Climate”.
U7017AASLY
1Driver side temperature display
(In degrees Fahrenheit or Centi-
grade)
2Outside temperature display
(In degrees Fahrenheit or Centi-
grade) 287.....................
3“DUAL”
(Temperature setting mode change
button) 279, 280 ................
4Air flow control buttons 280
....
5Passenger side temperature dis-
play
(In degrees Fahrenheit or Centi-
grade)
6Fan speed control buttons
280
...........................
7Windshield wiper de− icer button
285
...........................
8“Micro dust and pollen filter”
button 286
....................
9“Plasmacluster t∗
”button
287
...........................
10“A/C” 283
.....................
11Rear window and outside rear
view mirror defogger button
285
...........................
12Windshield air flow button
282
...........................
13Air intake control button
282
...........................
14“OFF” button 280
..............
11 08.03HS250h_NAVI_U
75051U
Automatic air conditioning controls
Page 284 of 413
AIR CONDITIONING
283
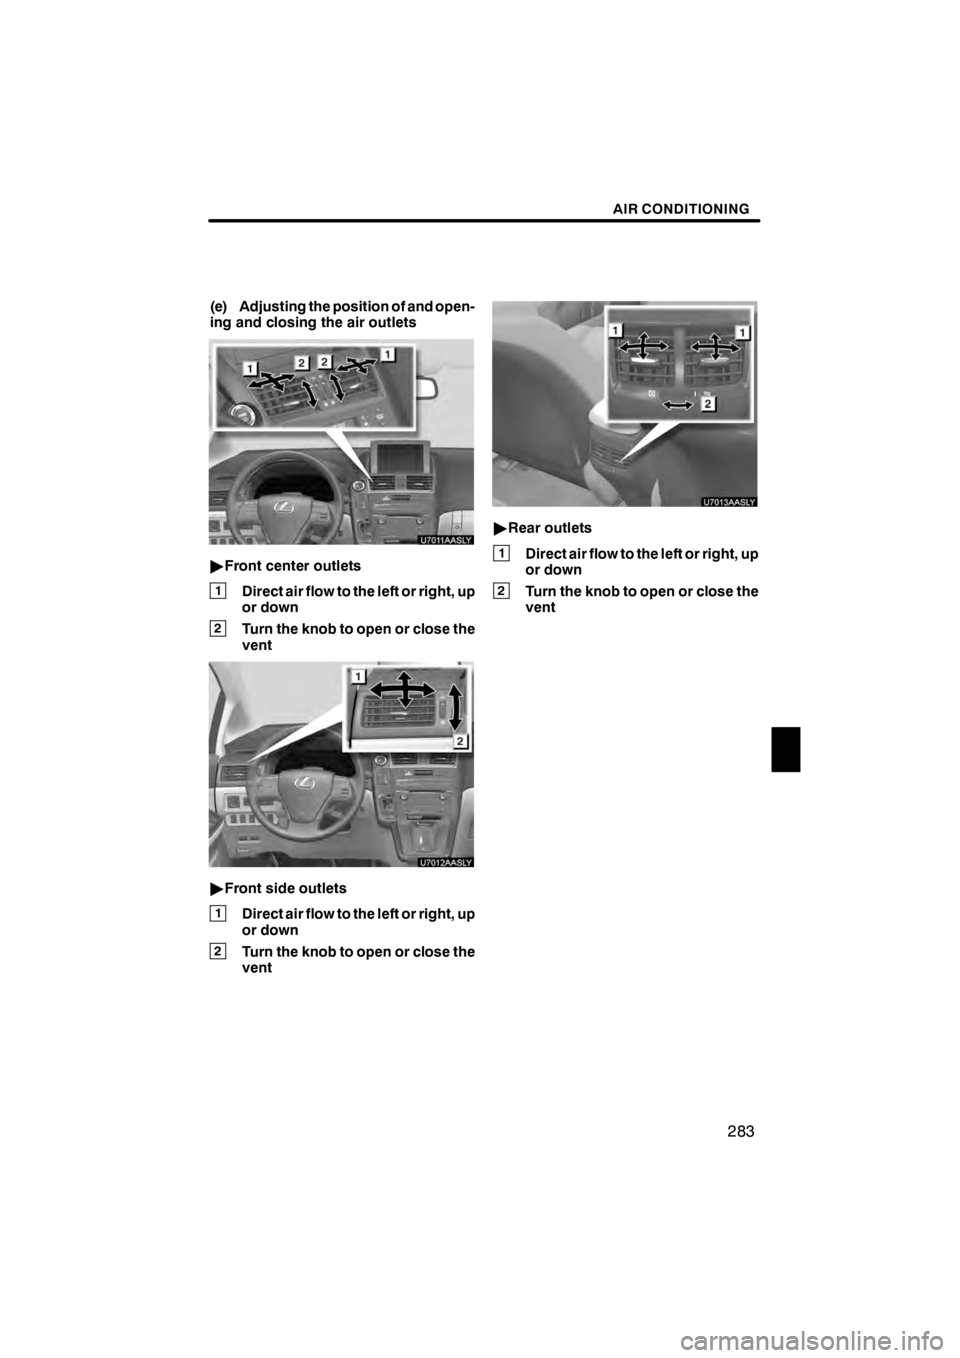
(e) Adjusting the position of and open-
ing and closing the air outlets
U7011AASLY
"Front center outlets
1Direct air flow to the left or right, up
or down
2Turn the knob to open or close the
vent
U7012AASLY
"Front side outlets
1Direct air flow to the left or right, up
or down
2Turn the knob to open or close the
vent
U7013AASLY
"Rear outlets
1Direct air flow to the left or right, up
or down
2Turn the knob to open or close the
vent
11 08.03HS250h_NAVI_U
75051U
8
Page 286 of 413
AIR CONDITIONING
285
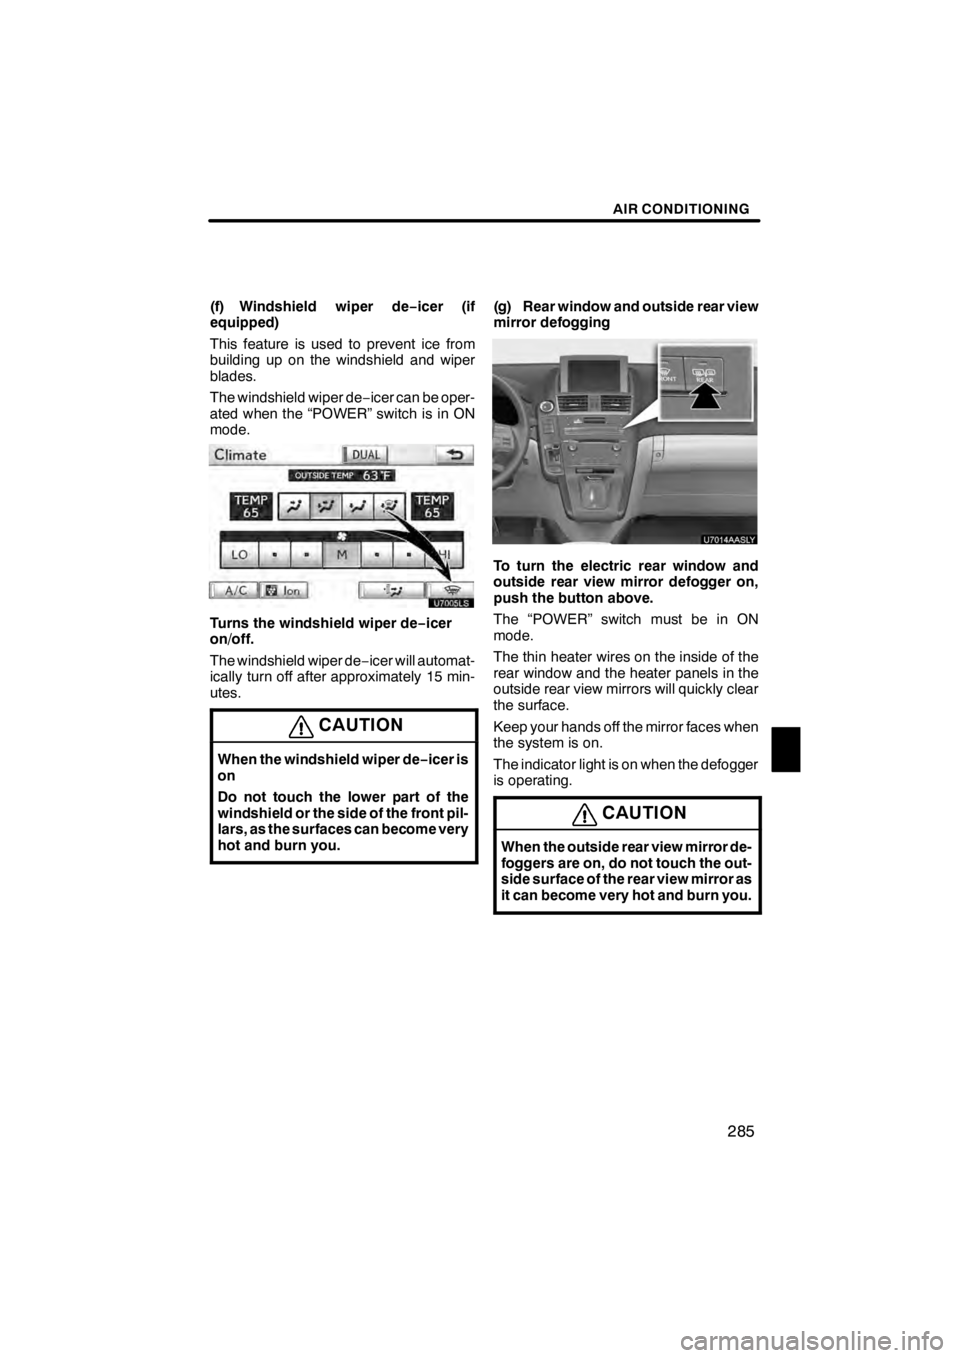
(f) Windshield wiper de−icer (if
equipped)
This feature is used to prevent ice from
building up on the windshield and wiper
blades.
The windshield wiper de −icer can be oper-
ated when the “POWER” switch is in ON
mode.
Turns the windshield wiper de −icer
on/off.
The windshield wiper de −icer will automat-
ically turn off after approximately 15 min-
utes.
CAUTION
When the windshield wiper de −icer is
on
Do not touch the lower part of the
windshield or the side of the front pil-
lars, as the surfaces can become very
hot and burn you.
(g) Rear window and outside rear view
mirror defogging
U7014AASLY
To turn the electric rear window and
outside rear view mirror defogger on,
push the button above.
The “POWER” switch must be in ON
mode.
The thin heater wires on the inside of the
rear window and the heater panels in the
outside rear view mirrors will quickly clear
the surface.
Keep your hands off the mirror faces when
the system is on.
The indicator light is on when the defogger
is operating.
CAUTION
When the outside rear view mirror de-
foggers are on, do not touch the out-
side surface of the rear view mirror as
it can become very hot and burn you.
11 08.03HS250h_NAVI_U
75051U
8
Page 287 of 413
AIR CONDITIONING
286
The system will automatically shut off
when the defogger has operated about 15
minutes.
If further defrosting or defogging is de-
sired, simply actuate the switch again.
When the surface has cleared, push the
button once again to turn the defogger off.
Continuous use may cause the 12−volt
battery to discharge, especially during
stop− and−go driving. The defogger is not
designed to dry rain water or to melt snow.
If the outside rear view mirrors are heavily
coated with ice, use a spray de −icer before
operating the system.
NOTICE
DWhen cleaning the inside of the
rear window, be careful not to
scratch or damage the heater
wires or connectors.
DTo prevent the12− volt battery from
being discharged, turn the switch
off when the hybrid system is off.
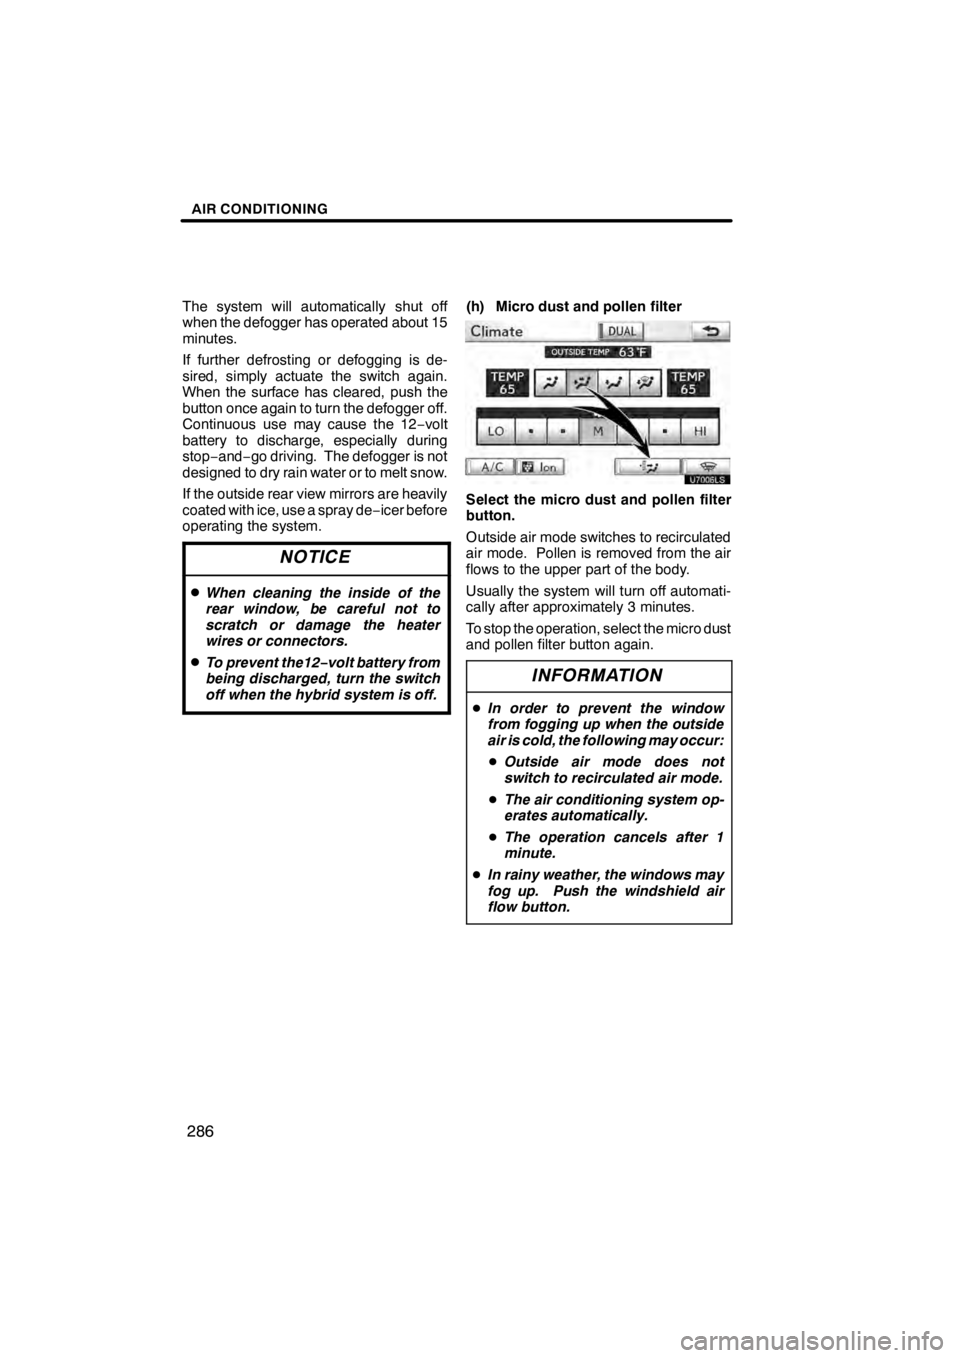
(h) Micro dust and pollen filter
Select the micro dust and pollen filter
button.
Outside air mode switches to recirculated
air mode. Pollen is removed from the air
flows to the upper part of the body.
Usually the system will turn off automati-
cally after approximately 3 minutes.
To stop the operation, select the micro dust
and pollen filter button again.
INFORMATION
D In order to prevent the window
from fogging up when the outside
air is cold, the following may occur:
D Outside air mode does not
switch to recirculated air mode.
D The air conditioning system op-
erates automatically.
D The operation cancels after 1
minute.
D In rainy weather, the windows may
fog up. Push the windshield air
flow button.
11 08.03HS250h_NAVI_U
75051U
Page 290 of 413

SECTION9
REAR VIEW MONITOR SYSTEM
289
REAR VIEW MONITOR SYSTEM
DRear view monitor system 290 ..............................
11 08.03HS250h_NAVI_U
75051U
9
Page 291 of 413

REAR VIEW MONITOR SYSTEM
290
The rear view monitor system assists
the driver by displaying an image of the
view behind the vehicle while backing
up. The image is displayed in reverse
on the screen. This allows the image to
appear in the same manner as that of
the rear view mirror.
To display the rear view image on the
screen, shift the shift position to “R”
when the “POWER” switch is in ON
mode.
If you move the shift position out of the “R”,
the screen returns to the previous screen.
Operating another function of the naviga-
tion system will display another screen.
Vehicles with intuitive parking assist−
sensor — when the intuitive parking as-
sist− sensors are turned on and an ob-
stacle is detected in front of or behind
your vehicle, a warning appears on the
right top of the rear view monitor. For
details, see “Intuitive parking assist” on
page 304.
The rear view monitor system is a supple-
ment device intended to assist back up.
When backing up, be sure to check behind
and all around the vehicle visually.CAUTION
DNever depend on the rear view
monitor system entirely when
backing up. Always make sure
your intended path is clear.
Use caution, just as you would
when backing up any vehicle.
DNever back up while looking only at
the screen. The image on the
screen is different from actual
conditions. Depicted distances
between objects and flat surfaces
will differ from actual distance. If
you back up while looking only at
the screen, you may hit a vehicle, a
person or an object. When backing
up, be sure to check behind and all
around the vehicle visually and
with mirrors before proceeding.
DDo not use the system when the
trunk is not completely closed.
DUse your own eyes to confirm the
vehicle’s surroundings, as the dis-
played image may become faint or
dark, and moving images will be
distorted, or not entirely visible
when the outside temperature is
low. When backing up, be sure to
check behind and all around the ve-
hicle visually and with mirror be-
fore proceeding.
DDo not use the system in the follow-
ing cases:
DOn icy or slick road surfaces, or
in snow.
DWhen using tire chains or emer-
gency tires.
DOn an uneven or indirect road,
such as a slope or curve.
11 08.03HS250h_NAVI_U
75051U
Rear view monitor system