Lexus IS F 2010 Audio/video System / LEXUS 2010 IS F QUICK GUIDE (OM53791U) User Guide
Manufacturer: LEXUS, Model Year: 2010,
Model line: IS F,
Model: Lexus IS F 2010
Pages: 62, PDF Size: 3.3 MB
Lexus IS F 2010 Audio/video System / LEXUS 2010 IS F QUICK GUIDE (OM53791U) User Guide
IS F 2010
Lexus
Lexus
https://www.carmanualsonline.info/img/36/29683/w960_29683-0.png
Lexus IS F 2010 Audio/video System / LEXUS 2010 IS F QUICK GUIDE (OM53791U) User Guide
Trending: display, door lock, clock, light, wheel, service, change time
Page 11 of 62

11
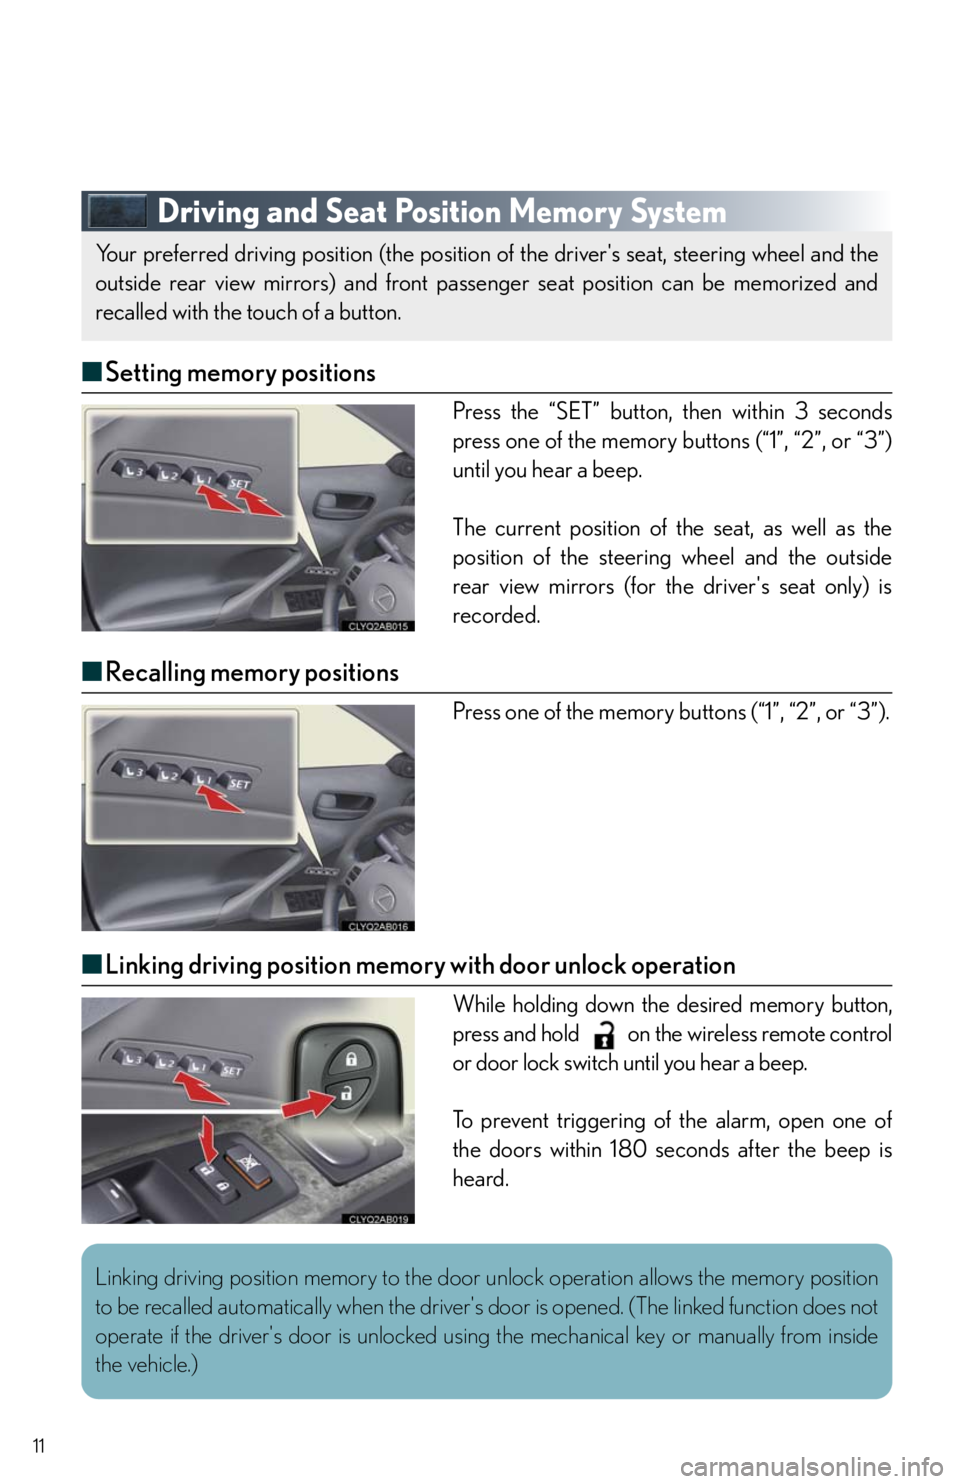
Driving and Seat Position Memory System
â– Setting memory positions
Press the “SET” button, then within 3 seconds
press one of the memory buttons (“1”, “2”, or “3”)
until you hear a beep.
The current position of the seat, as well as the
position of the steering wheel and the outside
rear view mirrors (for the driver's seat only) is
recorded.
â– Recalling memory positions
Press one of the memory buttons (“1”, “2”, or “3”).
â– Linking driving position memory with door unlock operation
While holding down the desired memory button,
press and hold on the wireless remote control
or door lock switch until you hear a beep.
To prevent triggering of the alarm, open one of
the doors within 180 seconds after the beep is
heard.
Your preferred driving position (the position of the driver's seat, steering wheel and the
outside rear view mirrors) and front passenger seat position can be memorized and
recalled with the touch of a button.
Linking driving position memory to the door unlock operation allows the memory position
to be recalled automatically when the driver's door is opened. (The linked function does not
operate if the driver's door is unlocked using the mechanical key or manually from inside
the vehicle.)
Page 12 of 62
12
Head Restraints
â– Vertical adjustment (front seats)
To r a i s e: push the head restraint upward.
To l o w e r: push the head restraint down while
pressing the lock release button.
â– Folding (rear seats only)
Pull the head restraint up while pressing the lock
release button.
Seat Belts
â– Adjusting shoulder belt height (front seats only)
To r a i s e: push the anchor upward.
To l o w e r: depress the button and push the anchor
down.
â– Seat belt comfort guides (rear seats only)
If the shoulder belt sits close to the neck, slide the
comfort guide forward.
Lock
release
button
Lock release button
Page 13 of 62
13
Anti-glare Inside Rear View Mirror
To turn automatic mode on/off, press the switch.
The indicator comes on when automatic mode is
turned on.
The anti-glare mirror uses a sensor to detect light from vehicles behind and automatically
reduces glare.
Page 14 of 62
14
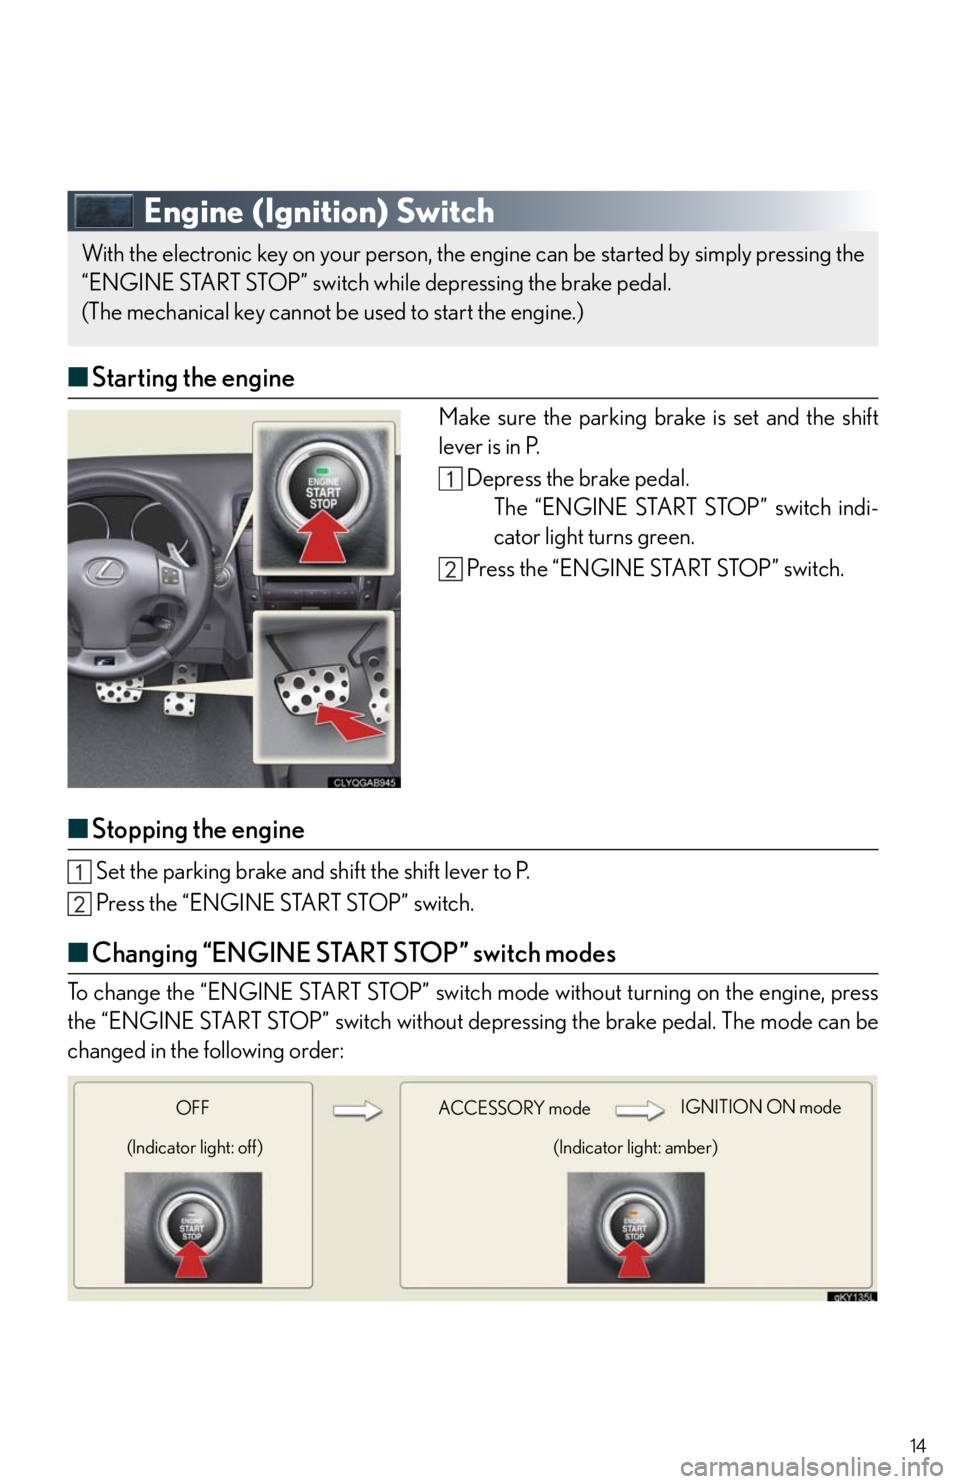
Engine (Ignition) Switch
â– Starting the engine
Make sure the parking brake is set and the shift
lever is in P.
Depress the brake pedal.
The “ENGINE START STOP” switch indi-
cator light turns green.
Press the “ENGINE START STOP” switch.
â– Stopping the engine
Set the parking brake and shift the shift lever to P.
Press the “ENGINE START STOP” switch.
■Changing “ENGINE START STOP” switch modes
To change the “ENGINE START STOP” switch mode without turning on the engine, press
the “ENGINE START STOP” switch without depressing the brake pedal. The mode can be
changed in the following order:
With the electronic key on your person, the engine can be started by simply pressing the
“ENGINE START STOP” switch while depressing the brake pedal.
(The mechanical key cannot be used to start the engine.)
ACCE SSORY modeIGNITION ON mode
(Indicator light: amber) OFF
(Indicator light: off)
Page 15 of 62
15
Automatic Transmission
â– Shift positions
PPa r k
RReverse
NNeutral (drive not engaged)
DDrive
MM mode
The vehicle can only be shifted out of P when
the “ENGINE START STOP” switch is in
IGNITION ON mode and the brake pedal is
depressed.
Page 16 of 62
16
â– Changing shift ranges in the D position
Operating the paddle shift switches allows shift ranges to be selected to suit the driving con-
ditions.
Pull the “-” paddle shift switch toward you.
The indicator in the meter cluster will
change to display the selected shift range.
Higher shift range:
Pull the “+” paddle shift switch toward you.
Lower shift range:
Pull the “-” paddle shift switch toward you.
Pulling and holding the “+” paddle shift switch for a certain period of time allows you to
return to normal D position driving. If the accelerator pedal is depressed for more than a
certain period of time in one range, shift range selection in the D position will be automati-
cally deactivated.
Page 17 of 62
17
â– Changing gears in the M position
Operating the shift lever or paddle shift switches allows a gear to be selected and held,
enabling you to time gear shifts as you please while driving.
Shift the shift lever to M.
The indicator in the meter cluster will
change to display the selected gear.
To u p s h i f t :
Move the shift lever in the “+” direction, or
pull the “+” paddle shift switch toward you.
To d o w n s h i f t :
Move the shift lever in the “-” direction, or
pull the “-” paddle shift switch toward you.
In M mode, the gear will change only when the shift lever or paddle shift switches are oper-
ated. However, when the vehicle speed drops the gear will be automatically downshifted.
Page 18 of 62
18
F-Sport Mode Total Control Switch
“Sport” mode
Various driving controls are adjusted,
enabling sporty driving.
Snow mode
For starting or accelerating on snow-covered
roads or other slippery surfaces.
An indicator comes on in the meter cluster
when in “Sport” or snow mode.
F-sport mode total control switch allows you to select a driving mode that suits the road
conditions or your preference.
1
2
To cancel the mode, press the same side of the switch again. When the “ENGINE START
STOP” switch is turned OFF, the mode is automatically deactivated.
Page 19 of 62
19
Parking Brake
To set the parking brake: firmly depress the park-
ing brake pedal.
To release the parking brake: depress the park-
ing brake pedal again.
Tu r n S i g n a l L e v e r
Right turn signal
Left turn signal
CanadaU.S.A.
1
2
To signal a lane change, move the lever partway and hold.
Page 20 of 62
20
Multi-information Display
â– Display information
â—ŹTrip information
ď‚·Outside temperature
ď‚·Driving range
ď‚·Average fuel consumption
ď‚·Average fuel consumption after refueling
ď‚·Current fuel consumption
ď‚·Average vehicle speed
ď‚·Gear position
â—ŹSatellite switch mode
â—ŹIntuitive parking assist information
(if equipped)
â—ŹDynamic radar cruise control settings
(if equipped)
â—ŹWa r n i n g m e s s a g e s
â– Changing the display of trip information
Trip information items can be switched by press-
ing the “DISP” switch.
The multi-information display shows information about your vehicle, including the items
shown below.
Ty p e ATy p e B
â– When using the intuitive parking assist or dynamic radar cruise control, the appropriate
display is shown on the screen.
â– In the event that a problem is detected in any of the vehicle's systems, a warning message is
shown on the multi-information display.
Trending: alarm, fuel, bluetooth, low beam, brake, phone, wheel


