change time Lexus IS F 2011 Owner's Manual
[x] Cancel search | Manufacturer: LEXUS, Model Year: 2011, Model line: IS F, Model: Lexus IS F 2011Pages: 529, PDF Size: 13.89 MB
Page 26 of 529

IS F_EE
26
For your information
Main Owner’s Manual
Please note that this manual covers all models and all equipment, including
options. Therefore, you may find some explanations for equipment not
installed on your vehicle.
All specifications provided in this manual are current at the time of printing.
However, because of the Lexus policy of continual product improvement,
we reserve the right to make changes at any time without notice.
Depending on specifications, the vehicle shown in the illustrations may dif-
fer from your vehicle in terms of color and equipment.
Accessories, spare parts and modification of your Lexus
Both genuine Lexus and a wide variety of other spare parts and accessories
for Lexus vehicles are currently available on the market. Should it be deter-
mined that any of the genuine Lexus parts or accessories supplied with the
vehicle need to be replaced, Toyota Motor Corporation recommends that
genuine Lexus parts or accessories, be used to replace them. Other parts or
accessories of matching quality can also be used. Lexus cannot accept any
liability or guarantee spare parts and accessories which are not genuine
Lexus products, nor for replacement or installation involving such parts. In
addition, damage or performance problems resulting from the use of non-
genuine Lexus spare parts or accessories may not be covered under war-
ranty.
Page 45 of 529

42
1-2. Opening, closing and locking the doors and trunk
IS F_EE
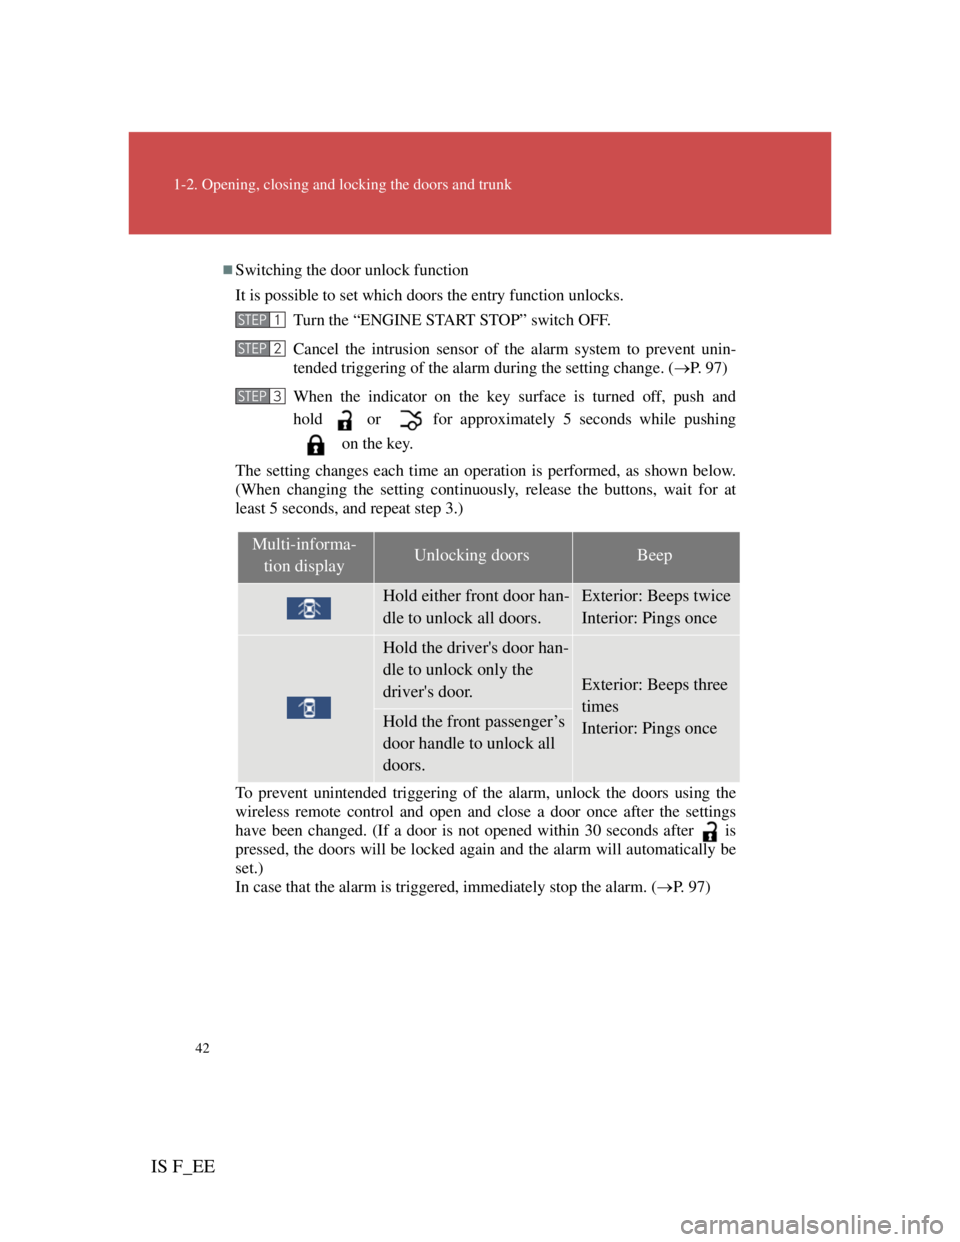
Switching the door unlock function
It is possible to set which doors the entry function unlocks.
Turn the “ENGINE START STOP” switch OFF.
Cancel the intrusion sensor of the alarm system to prevent unin-
tended triggering of the alarm during the setting change. (P. 97)
When the indicator on the key surface is turned off, push and
hold or for approximately 5 seconds while pushing
on the key.
The setting changes each time an operation is performed, as shown below.
(When changing the setting continuously, release the buttons, wait for at
least 5 seconds, and repeat step 3.)
To prevent unintended triggering of the alarm, unlock the doors using the
wireless remote control and open and close a door once after the settings
have been changed. (If a door is not opened within 30 seconds after is
pressed, the doors will be locked again and the alarm will automatically be
set.)
In case that the alarm is triggered, immediately stop the alarm. (P. 9 7 )
STEP1
STEP2
STEP3
Multi-informa-
tion displayUnlocking doorsBeep
Hold either front door han-
dle to unlock all doors.Exterior: Beeps twice
Interior: Pings once
Hold the driver's door han-
dle to unlock only the
driver's door.
Exterior: Beeps three
times
Interior: Pings once
Hold the front passenger’s
door handle to unlock all
doors.
Page 155 of 529

145
2-1. Driving procedures
2
When driving
IS F_EE
NOTICE
When parking the vehicle
Always put the shift lever in P. Failure to do so may cause the vehicle to
move or the vehicle may accelerate suddenly if the accelerator pedal is acci-
dentally depressed.
Avoiding damage to vehicle parts
Do not turn the steering wheel fully in either direction and hold it there for
an extended period of time.
Doing so may damage the power steering motor.
When driving over bumps in the road, drive as slowly as possible to avoid
damaging the wheels, underside of the vehicle, etc.
If you get a flat tire while driving
A flat or damaged tire may cause the following situations. Hold the steering
wheel firmly and gradually press the brake pedal to slow down the vehicle.
It may be difficult to control your vehicle.
The vehicle will make abnormal sounds.
The vehicle will behave abnormally.
Information on what to do in case of a flat tire (P. 446)
NOTICE
When encountering flooded roads
Do not drive on a road that has flooded after heavy rain etc. Doing so may
cause the following serious damage to the vehicle.
Engine stalling
Short in electrical components
Engine damage caused by water immersion
In the event that you drive on a flooded road and the vehicle is flooded, be
sure to have any authorized Lexus dealer or repairer, or another duly quali-
fied and equipped professional check the following.
Brake function
Changes in quantity and quality of oil and fluid used for the engine, trans-
mission, differential, etc.
Lubricant condition for the propeller shaft, bearings and suspension joints
(where possible) and the function of all joints, bearings, etc.
Page 157 of 529

147
2-1. Driving procedures
2
When driving
IS F_EE
Changing “ENGINE START STOP” switch mode
Modes can be changed by pressing the “ENGINE START
STOP” switch with the brake pedal released. (The mode changes
each time the switch is pressed.)
OFF
*
The emergency flashers can
be used.
ACCESSORY mode
Some electrical components
such as the audio system can
be used.
The “ENGINE START
STOP” switch indicator turns
amber.
IGNITION ON mode
All electrical components can
be used.
The “ENGINE START
STOP” switch indicator turns
amber.
*:If the shift lever is in a posi-
tion other than P when turning
off the engine, the “ENGINE
START STOP” switch will be
d
Page 165 of 529

155
2-1. Driving procedures
2
When driving
IS F_EE
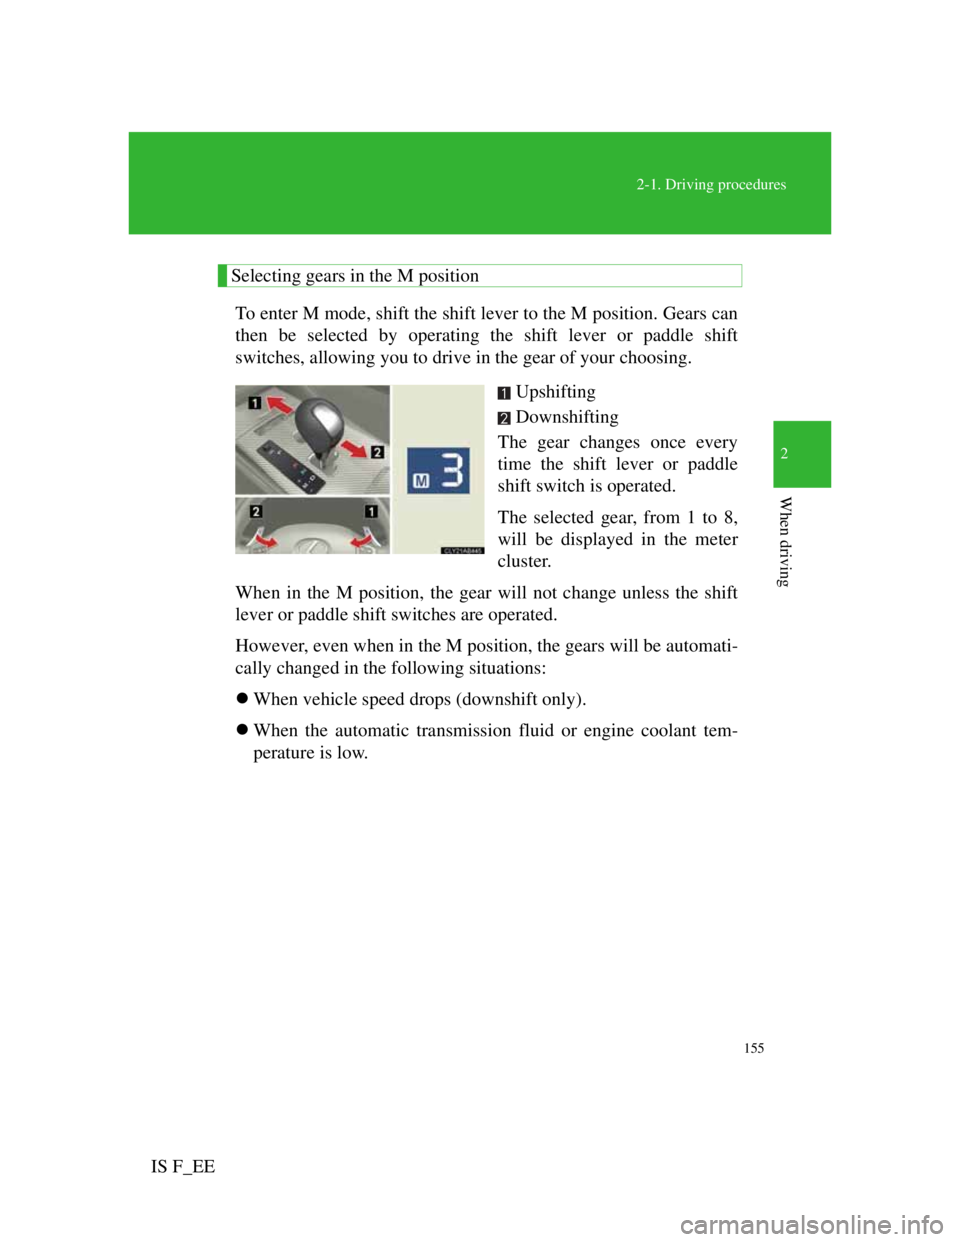
Selecting gears in the M position
To enter M mode, shift the shift lever to the M position. Gears can
then be selected by operating the shift lever or paddle shift
switches, allowing you to drive in the gear of your choosing.
Upshifting
Downshifting
The gear changes once every
time the shift lever or paddle
shift switch is operated.
The selected gear, from 1 to 8,
will be displayed in the meter
cluster.
When in the M position, the gear will not change unless the shift
lever or paddle shift switches are operated.
However, even when in the M position, the gears will be automati-
cally changed in the following situations:
When vehicle speed drops (downshift only).
When the automatic transmission fluid or engine coolant tem-
perature is low.
Page 174 of 529

163
2-2. Instrument cluster
2
When driving
IS F_EE
Changing units for the digital speedometer (right-hand drive vehicles only)
Units for the digital speedometer can be changed between km/h and mph by
pushing and holding the odometer/trip meter reset button while the odome-
ter is displayed. At this time, all the units for the multi-information display
will also change.
CAUTION
When the temperature of the display is extremely low
Allow the interior of the vehicle to warm up before using the shift position
and shift range/gear display. At extremely low temperatures, the display
may respond slowly, and display changes may be delayed.
For example, there is a lag between the driver’s downshifting and the new
gear number appearing on the display. In this case, wait until the display
changes and take care not to downshift again, causing rapid and excessive
engine braking and possibly an accident resulting in death or serious injury.
NOTICE
To prevent damage to the engine and its components
Do not let the indicator needle of the tachometer enter the red zone, which
indicates the maximum engine speed.
The following may indicate that the engine is overheating. Immediately
stop the vehicle in a safe place. (P. 465)
• The display on the engine coolant temperature gauge flashes
• The display on the engine oil temperature gauge flashes
Page 188 of 529

177
2-3. Operating the lights and windshield wipers
2
When driving
IS F_EE
The windshield wipers and washer can be operated when
The “ENGINE START STOP” switch is in IGNITION ON mode.
Effects of vehicle speed on wiper operation
With the settings other than “AUTO” also, the time until drip prevention
wiper sweep occurs is changed depending on vehicle speed.
Low speed wiper operation selected, wiper operation will be switched from
low speed to intermittent wiper operation only when the vehicle is station-
ary.
“AUTO” mode
If the wiper switch is turned to the “AUTO” position while the
“ENGINE START STOP” switch is in IGNITION ON mode, the wiper
will operate once to show that auto mode is activated.
If the temperature of the raindrop sensor is 90C (194F) or higher, or -
30C (-22F) or lower, automatic operation may not occur. In this case,
operate the wipers in any mode other than “AUTO”.
Outside rear view mirror defogger activation linked to windshield wiper
operation
The outside rear view mirror defogger automatically turns on when you
operate the windshield wipers.
The raindrop sensor judges the
amount of raindrops.
The sensitivity of sensor can be
adjusted by turning the knob.
Increases the sensitivity
Decreases the sensitivity
Page 192 of 529

181
2-4. Using other driving systems
2
When driving
IS F_EE
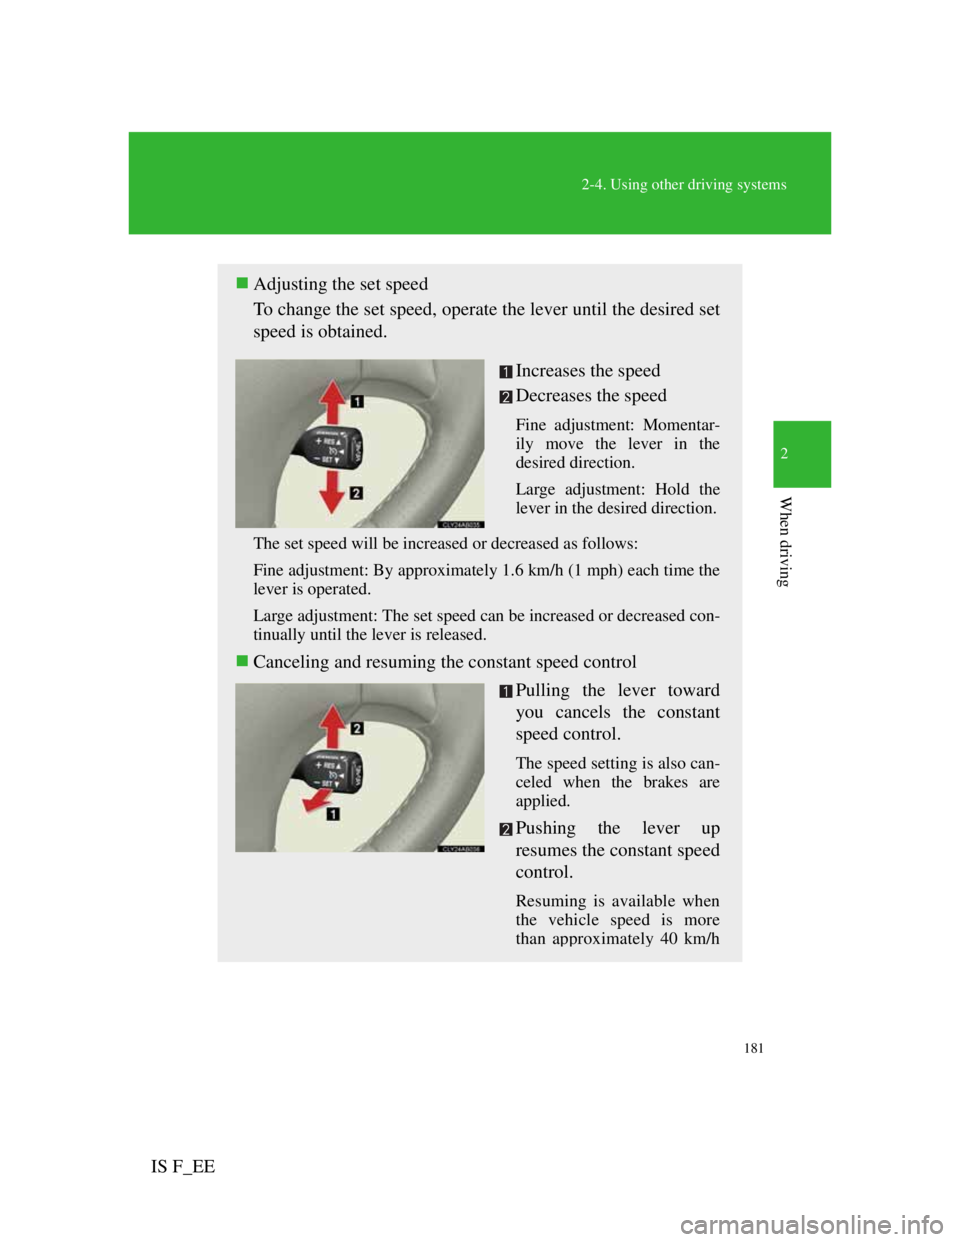
Adjusting the set speed
To change the set speed, operate the lever until the desired set
speed is obtained.
Increases the speed
Decreases the speed
Fine adjustment: Momentar-
ily move the lever in the
desired direction.
Large adjustment: Hold the
lever in the desired direction.
The set speed will be increased or decreased as follows:
Fine adjustment: By approximately 1.6 km/h (1 mph) each time the
lever is operated.
Large adjustment: The set speed can be increased or decreased con-
tinually until the lever is released.
Canceling and resuming the constant speed control
Pulling the lever toward
you cancels the constant
speed control.
The speed setting is also can-
celed when the brakes are
applied.
Pushing the lever up
resumes the constant speed
control.
Resuming is available when
the vehicle speed is more
than approximately 40 km/h
Page 197 of 529

186
2-4. Using other driving systems
IS F_EE
Adjusting the set speed
To change the set speed, operate the lever until the desired set
speed is displayed.
Increases the speed
Decreases the speed
Fine adjustment: Momentar-
ily move the lever in the
desired direction.
Large adjustment: Hold the
lever in the desired direction.
In the vehicle-to-vehicle distance control mode, the set speed will
be increased or decreased as follows:
• When the set speed is shown in “MPH”
Fine adjustment: By approximately 8 km/h (5 mph) each time the
lever is operated
Large adjustment: By approximately 8 km/h (5 mph) for each
0.75 seconds the lever is held
• When the set speed is shown in “km/h”
Fine adjustment: By approximately 5 km/h (3.1 mph) each time
the lever is operated
Large adjustment: By approximately 5 km/h (3.1 mph) for each
0.75 seconds the lever is held
In the constant speed control mode (P. 191), the set speed will be
increased or decreased as follows:
Fine adjustment: By approximately 1.6 km/h (1 mph) each time the
lever is operated
Large adjustment: The set speed can be increased or decreased con-
tinually until the lever is released.
Page 250 of 529

236
3-1. Using the air conditioning system and defogger
IS F_EE
Rear window and outside rear view mirror defoggers
The defogger can be operated when
The “ENGINE START STOP” switch is in IGNITION ON mode.
CAUTION
When the outside rear view mirror defoggers are on
Do not touch the outside surface of the rear view mirror, as it can become
very hot and burn you.
These features are used to defog the rear window, and to remove rain-
drops, dew and frost from the outside rear view mirrors.
With navigation system
Owners of models equipped with a navigation system should refer to
the “Navigation System Owner's Manual”.
Without navigation system
On/off
The defoggers will automati-
cally turn off after 15 to 60
minutes. The operation time
changes according to the
ambient temperature and
vehicle speed.