check engine Lexus IS200t 2015 Owner's Manual
[x] Cancel search | Manufacturer: LEXUS, Model Year: 2015, Model line: IS200t, Model: Lexus IS200t 2015Pages: 612, PDF Size: 132.21 MB
Page 6 of 612
TABLE OF CONTENTS6
IS200t_EE(OM53D19E)
7-1. Maintenance and careCleaning and protecting the vehicle exterior .................428
Cleaning and protecting the vehicle interior ..................432
7-2. Maintenance Maintenance requirements.............................435
7-3. Do-it-yourself maintenance
Do-it-yourself service precautions ................................ 437
Hood ...............................................439
Positioning a floor jack .............440
Engine compartment................. 441
Tires ................................................... 451
Tire inflation pressure................460
Wheels............................................ 462
Air conditioning filter................464
Electronic key battery ..............466
Checking and replacing fuses .............................................. 469
Light bulbs ..................................... 473
8-1. Essential information Emergency flashers...................490
If your vehicle has to be stopped
in an emergency ....................... 491 8-2. Steps to take
in an emergency
If your vehicle needs to be towed ................................ 492
If you think something is wrong .......................................498
Fuel pump shut off system ...... 499
If a warning light turns on or a warning buzzer
sounds......................................... 500
If a warning message is displayed................................ 506
If you have a flat tire (vehicles with
a spare tire) ................................ 522
If you have a flat tire (vehicles with emergency
tire puncture repair kit).........533
If the engine will not start ........ 547
If the shift lever cannot be shifted from P .....................549
If the electronic key does not operate properly ............ 550
If the vehicle battery is discharged .............................553
If your vehicle overheats ......... 557
If the vehicle becomes stuck............................................... 561
7Maintenance and care
8When trouble arises
Page 13 of 612
13Pictorial index
IS200t_EE(OM53D19E)
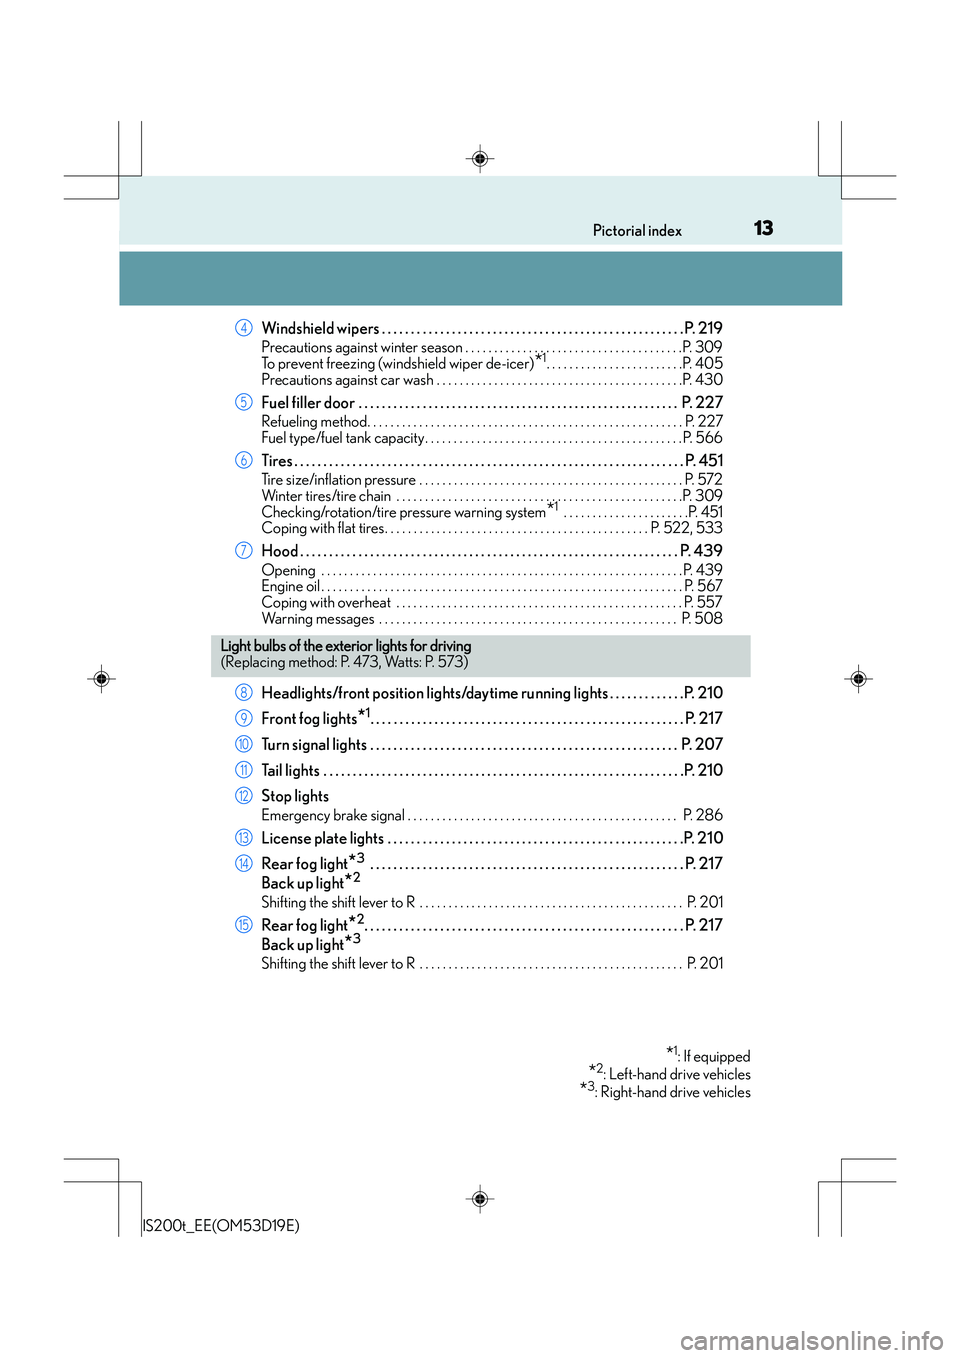
Windshield wipers . . . . . . . . . . . . . . . . . . . . . . . . . . . . . . . . . . . . . . . . . . . . . . . . . . . . P. 219
Precautions against winter season . . . . . . . . . . . . . . . . . . . . . . . . . . . . . . . . . . . . . .P. 309
To prevent freezing (windshield wiper de-icer)
*1. . . . . . . . . . . . . . . . . . . . . . . .P. 405
Precautions against car wash . . . . . . . . . . . . . . . . . . . . . . . . . . . . . . . . . . . . . . . . . . .P. 430
Fuel filler door . . . . . . . . . . . . . . . . . . . . . . . . . . . . . . . . . . . . . . . . . . . . . . . . . . . . . . . P. 2 2 7
Refueling method. . . . . . . . . . . . . . . . . . . . . . . . . . . . . . . . . . . . . . . . . . . . . . . . . . . . . . . P. 227
Fuel type/fuel tank capacity. . . . . . . . . . . . . . . . . . . . . . . . . . . . . . . . . . . . . . . . . . . . . P. 566
Tires . . . . . . . . . . . . . . . . . . . . . . . . . . . . . . . . . . . . . . . . . . . . . . . . . . . . . . . . . . . . . . . . . . . P. 451
Tire size/inflation pressure . . . . . . . . . . . . . . . . . . . . . . . . . . . . . . . . . . . . . . . . . . . . . . P. 572
Winter tires/tire chain . . . . . . . . . . . . . . . . . . . . . . . . . . . . . . . . . . . . . . . . . . . . . . . . . .P. 3 09
Checking/rotation/tire pressure warning system
*1 . . . . . . . . . . . . . . . . . . . . . .P. 451
Coping with flat tires. . . . . . . . . . . . . . . . . . . . . . . . . . . . . . . . . . . . . . . . . . . . . . P. 522, 533
Hood . . . . . . . . . . . . . . . . . . . . . . . . . . . . . . . . . . . . . . . . . . . . . . . . . . . . . . . . . . . . . . . . . P. 439
Opening . . . . . . . . . . . . . . . . . . . . . . . . . . . . . . . . . . . . . . . . . . . . . . . . . . . . . . . . . . . . . . . P. 439
Engine oil . . . . . . . . . . . . . . . . . . . . . . . . . . . . . . . . . . . . . . . . . . . . . . . . . . . . . . . . . . . . . . . P. 567
Coping with overheat . . . . . . . . . . . . . . . . . . . . . . . . . . . . . . . . . . . . . . . . . . . . . . . . . . P. 557
Warning messages . . . . . . . . . . . . . . . . . . . . . . . . . . . . . . . . . . . . . . . . . . . . . . . . . . . . P. 508
Headlights/front position lights/daytime ru nning lights . . . . . . . . . . . . .P. 210
Front fog lights
*1. . . . . . . . . . . . . . . . . . . . . . . . . . . . . . . . . . . . . . . . . . . . . . . . . . . . . . P. 217
Turn signal lights . . . . . . . . . . . . . . . . . . . . . . . . . . . . . . . . . . . . . . . . . . . . . . . . . . . . . P. 207
Tail lights . . . . . . . . . . . . . . . . . . . . . . . . . . . . . . . . . . . . . . . . . . . . . . . . . . . . . . . . . . . . . .P. 210
Stop lights
Emergency brake signal . . . . . . . . . . . . . . . . . . . . . . . . . . . . . . . . . . . . . . . . . . . . . . . P. 286
License plate lights . . . . . . . . . . . . . . . . . . . . . . . . . . . . . . . . . . . . . . . . . . . . . . . . . . .P. 21 0
Rear fog light
*3 . . . . . . . . . . . . . . . . . . . . . . . . . . . . . . . . . . . . . . . . . . . . . . . . . . . . . . P. 217
Back up light
*2
Shifting the shift lever to R . . . . . . . . . . . . . . . . . . . . . . . . . . . . . . . . . . . . . . . . . . . . . . P. 20 1
Rear fog light*2. . . . . . . . . . . . . . . . . . . . . . . . . . . . . . . . . . . . . . . . . . . . . . . . . . . . . . . P. 217
Back up light
*3
Shifting the shift lever to R . . . . . . . . . . . . . . . . . . . . . . . . . . . . . . . . . . . . . . . . . . . . . . P. 20 1
4
5
6
7
Light bulbs of the exterior lights for driving
(Replacing method: P. 473, Watts: P. 573)
*1: If equipped
*2: Left-hand drive vehicles
*3: Right-hand drive vehicles
8
9
10
11
12
13
14
15
Page 33 of 612

331-1. For safe use
1
For safety and security
IS200t_EE(OM53D19E)
CAUTION
Observe the following precautions.
Failure to do so may cause the driver's floor mat to slip, possibly interfering with the ped-
als while driving. An unexpect edly high speed may result or it may become difficult to
stop the vehicle. This could lead to an acc ident, resulting in death or serious injury.
■When installing the driver’s floor mat
●Do not use floor mats designed for other models or different model year vehicles,
even if they are Lexus Genuine floor mats.
●Only use floor mats designed for the driver’s seat.
●Always install the floor mat securely using the retaining hooks (clips) provided.
●Do not use two or more floor mats on top of each other.
●Do not place the floor mat bottom-side up or upside-down.
■Before driving
●Check that the floor mat is securely fixed in
the correct place with all the provided retain-
ing hooks (clips). Be especially careful to per-
form this check after cleaning the floor.
●With the engine stopped and the shift lever in
P, fully depress each pedal to the floor to
make sure it does not interfere with the floor
mat.
Page 76 of 612
761-1. For safe use
IS200t_EE(OM53D19E)
Exhaust gas precautions
Harmful substance to the human body is included in exhaust gases if inhaled.
CAUTION
Exhaust gases include harmful carbon monoxi de (CO), which is colorless and odorless.
Observe the following precautions.
Failure to do so may cause exhaust gases enter the vehicle and may lead to an accident
caused by light-headedness, or may lead to death or a serious health hazard.
■Important points while driving
●Keep the trunk lid closed.
●If you smell exhaust gases in the vehicle even when the trunk lid is closed, open the
windows and have the vehicle inspected at any authorized Lexus dealer or repairer,
or another duly qualified and equipped professional as soon as possible.
■When parking
●If the vehicle is in a poorly ventilated area or a closed area, such as a garage, stop the
engine.
●Do not leave the vehicle with the engine on for a long time.
If such a situation cannot be avoided, park the vehicle in an open space and ensure
that exhaust fumes do not enter the vehicle interior.
●Do not leave the engine running in an area with snow build-up, or where it is snowing.
If snowbanks build up around the vehicle while the engine is running, exhaust gases
may collect and enter the vehicle.
■Exhaust pipe
The exhaust system needs to be checked periodically. If there is a hole or crack caused
by corrosion, damage to a joint or abnormal exhaust noise, be sure to have the vehicle
inspected and repaired by any authorized Lexus dealer or repairer, or another duly
qualified and equipped professional.
Page 84 of 612
841-2. Theft deterrent system
IS200t_EE(OM53D19E)
Do one of the following to deactivate or stop the alarm:
●Unlock the doors or open the trunk using the entry function or wireless
remote control.
●Start the engine. (The alarm will be deactivated or stopped after a few sec-
onds.)
■System maintenance
The vehicle has a maintenance-free type alarm system.
■Items to check before locking the vehicle
To prevent unexpected triggering of the alarm and vehicle theft, make sure of the follow-
ing:
●Nobody is in the vehicle.
●The windows and moon roof (if equipped) are closed before the alarm is set.
●No valuables or other personal items are left in the vehicle.
Deactivating or stopping the alarm
Page 91 of 612
912. Instrument cluster
2
Instrument cluster
IS200t_EE(OM53D19E)
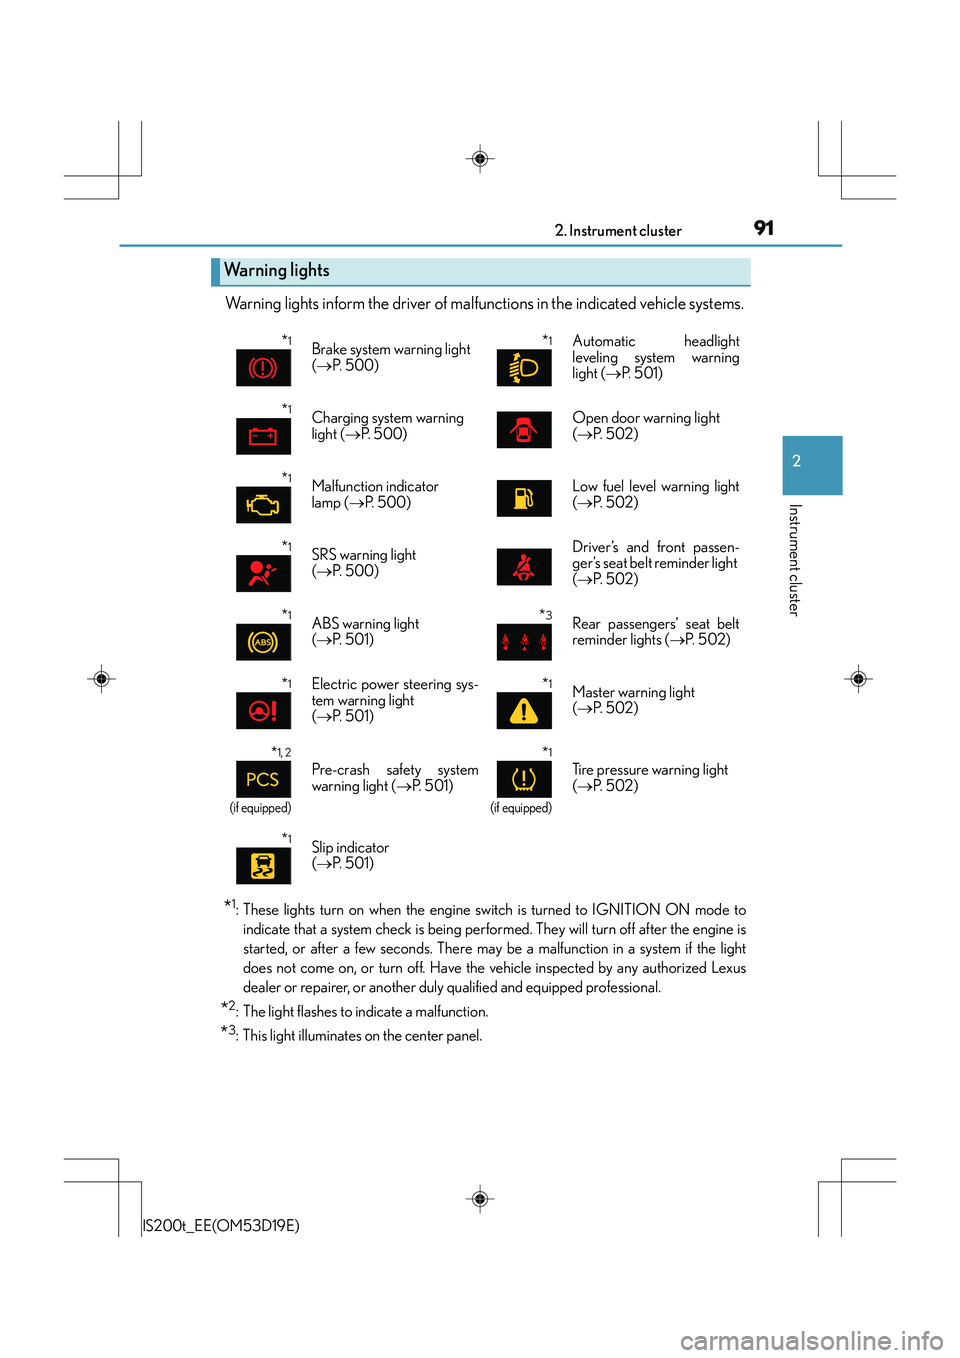
Warning lights inform the driver of malfunctions in the indicated vehicle systems.
*1: These lights turn on when the engine switch is turned to IGNITION ON mode toindicate that a system check is being perfor med. They will turn off after the engine is
started, or after a few seconds. There may be a malfunction in a system if the light
does not come on, or turn off. Have the vehicle inspected by any authorized Lexus
dealer or repairer, or another duly qualified and equipped professional.
*2: The light flashes to indicate a malfunction.
*3: This light illuminates on the center panel.
Wa r n i n g l i g h t s
*1Brake system warning light
(→ P. 5 0 0 )*1 Automatic headlight
leveling system warning
light ( →P. 5 0 1 )
*1Charging system warning
light ( →P. 5 0 0 )Open door warning light
(→ P. 5 0 2 )
*1Malfunction indicator
lamp ( →P. 500)Low fuel level warning light
(→ P. 5 0 2 )
*1SRS warning light
(→ P. 5 0 0 )Driver’s and front passen-
ger’s seat belt reminder light
(→ P. 5 0 2 )
*1ABS warning light
(→ P. 5 0 1 )*3Rear passengers’ seat belt
reminder lights ( →P. 5 0 2 )
*1Electric power steering sys-
tem warning light
(→ P. 5 0 1 )*1Master warning light
(→ P. 5 0 2 )
*1, 2
(if equipped)
Pre-crash safety system
warning light ( →P. 5 0 1 )
*1
(if equipped)
Tire pressure warning light
(→ P. 5 0 2 )
*1Slip indicator
(→ P. 5 0 1 )
Page 93 of 612
932. Instrument cluster
2
Instrument cluster
IS200t_EE(OM53D19E)
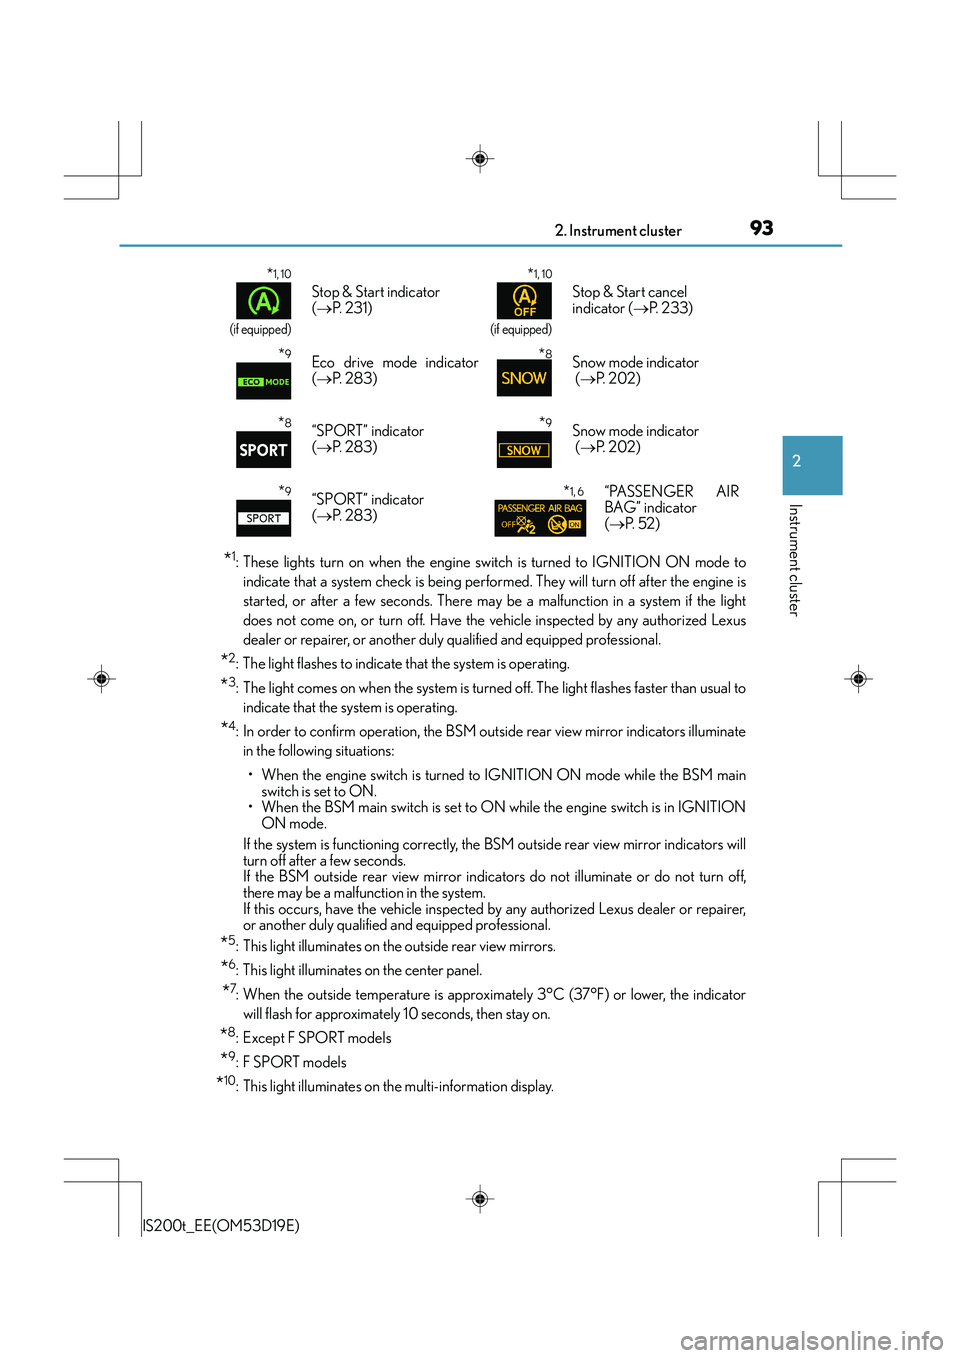
*1: These lights turn on when the engine switch is turned to IGNITION ON mode toindicate that a system check is being perfor med. They will turn off after the engine is
started, or after a few seconds. There may be a malfunction in a system if the light
does not come on, or turn off. Have the vehicle inspected by any authorized Lexus
dealer or repairer, or another duly qualified and equipped professional.
*2: The light flashes to indicate that the system is operating.
*3: The light comes on when the system is turned off. The light flashes faster than usual to
indicate that the system is operating.
*4: In order to confirm operation, the BSM outside rear view mirror indicators illuminatein the following situations:
• When the engine switch is turned to IGNITION ON mode while the BSM main switch is set to ON.
• When the BSM main switch is set to ON while the engine switch is in IGNITION ON mode.
If the system is functioning correctly, the BSM outside rear view mirror indicators will
turn off after a few seconds.
If the BSM outside rear view mirror indicators do not illuminate or do not turn off,
there may be a malfunction in the system.
If this occurs, have the vehicle inspected by any authorized Lexus dealer or repairer,
or another duly qualified and equipped professional.
*5: This light illuminates on the outside rear view mirrors.
*6: This light illuminates on the center panel.
*7: When the outside temperature is approxim ately 3°C (37°F) or lower, the indicator
will flash for approximately 10 seconds, then stay on.
*8:Except F SPORT models
*9:F SPORT models
*10: This light illuminates on the multi-information display.
*1, 10
(if equipped)
Stop & Start indicator
( → P. 2 3 1 )
*1, 10
(if equipped)
Stop & Start cancel
indicator ( →P. 2 3 3 )
*9Eco drive mode indicator
(→ P. 2 8 3 )*8Snow mode indicator
(→ P. 202)
*8“SPORT” indicator
(→ P. 2 8 3 )*9Snow mode indicator
(→ P. 202)
*9“SPORT” indicator
(→ P. 2 8 3 )*1, 6“PASSENGER AIR
BAG” indicator
(→ P. 5 2 )
Page 99 of 612
992. Instrument cluster
2
Instrument cluster
IS200t_EE(OM53D19E)
NOTICE
■To prevent damage to the engine and its components
●Do not let the indicator needle of the tachometer enter the red zone, which indicates
the maximum engine speed.
●The engine may be overheating if the engine coolant temperature gauge is in the red
zone (H). In this case, immediately stop the vehicle in a safe place, and check the
engine after it has cooled completely. (→P. 557)
Page 154 of 612
1543-3. Adjusting the seats
IS200t_EE(OM53D19E)
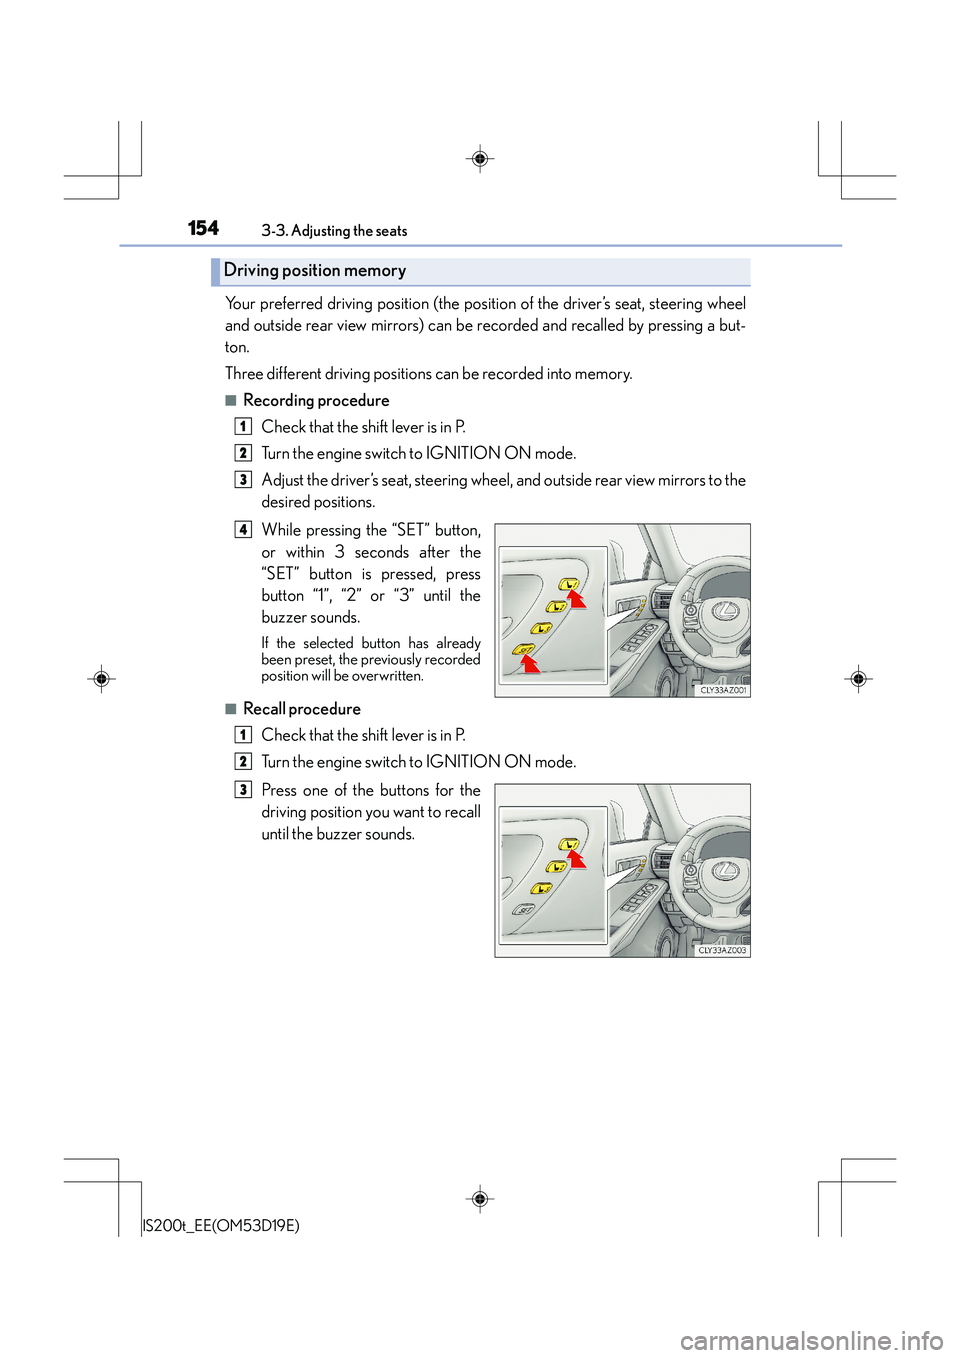
Your preferred driving position (the position of the driver’s seat, steering wheel
and outside rear view mirrors) can be recorded and recalled by pressing a but-
ton.
Three different driving positions can be recorded into memory.
■Recording procedure
Check that the shift lever is in P.
Turn the engine switch to IGNITION ON mode.
Adjust the driver’s seat, steering wheel, and outside rear view mirrors to the
desired positions.
While pressing the “SET” button,
or within 3 seconds after the
“SET” button is pressed, press
button “1”, “2” or “3” until the
buzzer sounds.
If the selected button has already
been preset, the previously recorded
position will be overwritten.
■Recall procedureCheck that the shift lever is in P.
Turn the engine switch to IGNITION ON mode.
Press one of the buttons for the
driving position you want to recall
until the buzzer sounds.
Driving position memory
1
2
3
4
1
2
3
Page 156 of 612
1563-3. Adjusting the seats
IS200t_EE(OM53D19E)
Each electronic key (including a card key) can be registered to recall your pre-
ferred driving position.
■Registering procedure
Record your driving position to button “1”, “2” or “3” before performing the
following:
Carry only the key you want to register, and then close the driver’s door. If 2 or
more keys are in the vehicle, the driving position cannot be recorded properly.Check that the shift lever is in P.
Turn the engine switch to IGNITION ON mode.
Recall the driving position that you want to record.
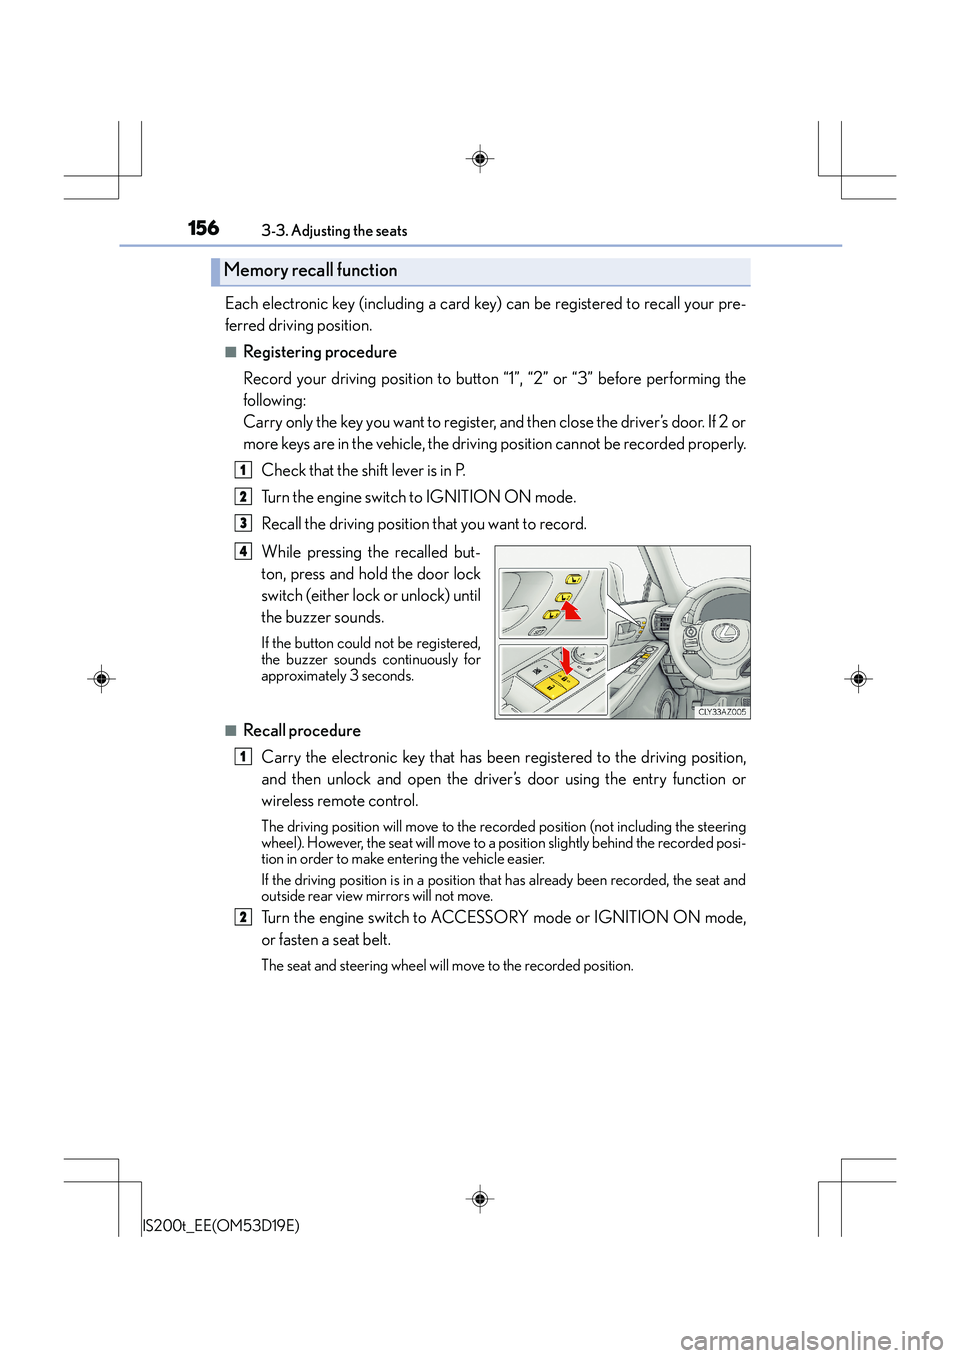
While pressing the recalled but-
ton, press and hold the door lock
switch (either lock or unlock) until
the buzzer sounds.
If the button could not be registered,
the buzzer sounds continuously for
approximately 3 seconds.
■Recall procedureCarry the electronic key that has been registered to the driving position,
and then unlock and open the driver ’s door using the entry function or
wireless remote control.
The driving position will move to the reco rded position (not including the steering
wheel). However, the seat will move to a position slightly behind the recorded posi-
tion in order to make entering the vehicle easier.
If the driving position is in a position that has already been recorded, the seat and
outside rear view mirrors will not move.
Turn the engine switch to ACCESSORY mode or IGNITION ON mode,
or fasten a seat belt.
The seat and steering wheel will move to the recorded position.
Memory recall function
1
2
3
4
1
2