lights Lexus IS200t 2016 Navigation Manual / LEXUS 2016 IS200T,IS300,IS350 (OM53D18U) Workshop Manual
[x] Cancel search | Manufacturer: LEXUS, Model Year: 2016, Model line: IS200t, Model: Lexus IS200t 2016Pages: 600, PDF Size: 7.94 MB
Page 408 of 600

4087-1. Maintenance and care
IS350/300/200t_U (OM53D18U)
NOTICE
■To prevent paint deterioration and corrosio n on the body and components (aluminum
wheels etc.)
●Wash the vehicle immediately in the following cases:
• After driving near the sea coast
• After driving on salted roads
• If coal tar or tree sap is present on the paint surface
• If dead insects, insect droppings or bird droppings are present on the paint surface
• After driving in an area contaminated wi th soot, oily smoke, mine dust, iron pow-
der or chemical substances
• If the vehicle becomes heavily soiled with dust or mud
• If liquids such as benzene and gaso line are spilled on the paint surface
●If the paint is chipped or scratched, have it repaired immediately.
●To prevent the wheels from corroding, remo ve any dirt and store in a place with low
humidity when storing the wheels.
■Cleaning the exterior lights
●Wash carefully. Do not use organic substances or scrub with a hard brush.
This may damage the su rfaces of the lights.
●Do not apply wax to the surfaces of the lights.
Wax may cause damage to the lenses.
■When using an automatic car wash (vehicle s with rain-sensing windshield wipers)
Set the wipers to the interm ittent windshield wipers. (P. 1 9 0 )
If AUTO mode is selected, the wipers may operate and the wiper blades may be dam-
aged.
■When using a high pressure car wash
Do not bring the nozzle tip close to boots (rubber or resin manufactured cover), con-
nectors or the following parts. The parts may be damaged if they come into contact
with high-pressure water.
• Traction related parts
• Steering parts • Suspension parts
•Brake parts
Page 416 of 600

4167-2. Maintenance
IS350/300/200t_U (OM53D18U)
Vehicle interior
ItemsCheck points
Accelerator pedal• The accelerator pedal should move smoothly (with- out uneven pedal effort or catching).
Automatic transmission
“Park” mechanism• When parked on a slope and the shift lever is in P, isthe vehicle securely stopped?
Brake pedal
• Does the brake pedal move smoothly?
• Does the brake pedal have appropriate clearance
from the floor? ( P. 5 3 3 )
• Does the brake pedal have the correct amount of
free play? ( P. 5 3 3 )
Brakes
• The vehicle should not pull to one side when the
brakes are applied.
• The brakes should work effectively.
• The brake pedal should not feel spongy.
• The brake pedal should not get too close to the floor when the brakes are applied.
Head restraints• Do the head restraints move smoothly and lock
securely?
Indicators/buzzers• Do the indicators and buzzers function properly?
Lights• Do all the lights come on?
Parking brake
• Moves smoothly?
• When parked on a slope and the parking brake is on,is the vehicle securely stopped?
Seat belts•Do the seat belt s operate smoothly?
• The seat belts should not be damaged.
Seats• Do the seat controls operate properly?
Steering wheel
• Does the steering wheel rotate smoothly?
• Does the steering wheel have the correct amount of free play?
• There should not be an y strange sounds coming
from the steering wheel.
Page 454 of 600
4547-3. Do-it-yourself maintenance
IS350/300/200t_U (OM53D18U)
■After a fuse is replaced
●If the lights do not turn on even after the fuse has been replaced, a bulb may need
replacement. ( P. 4 5 5 )
●If the replaced fuse blows again, have the vehicle inspected by your Lexus dealer.
■If there is an overload in a circuit
The fuses are designed to blow, protecting the wiring harness from damage.
■When replacing light bulbs
Lexus recommends that you use genuine Le xus products designed for this vehicle.
Because certain bulbs are connected to circuits designed to prevent overload, non-gen-
uine parts or parts not designed for this vehicle may be unusable.
CAUTION
■To prevent system breakdowns and vehicle fire
Observe the following precautions.
Failure to do so may cause damage to the vehicle, and possibly a fire or injury.
●Never use a fuse of a higher amperage rati ng than that indicated, or use any other
object in place of a fuse.
●Always use a genuine Lexus fuse or equivalent.
Never replace a fuse with a wire, even as a temporary fix.
●Do not modify the fuses or fuse boxes.
NOTICE
■Before replacing fuses
Have the cause of electrical overload determ ined and repaired by your Lexus dealer as
soon as possible.
Page 456 of 600
4567-3. Do-it-yourself maintenance
IS350/300/200t_U (OM53D18U)
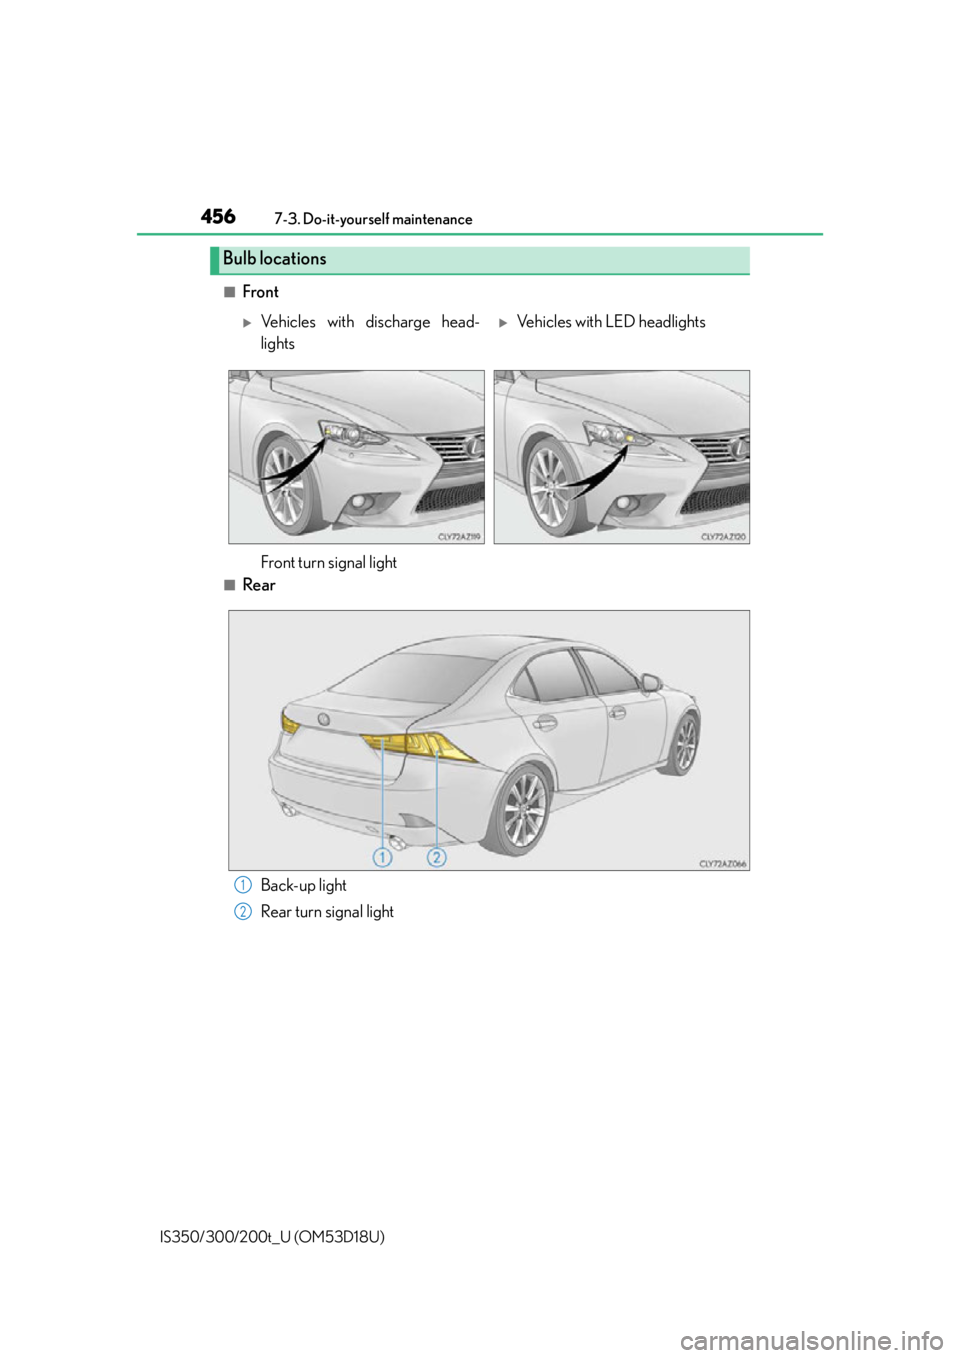
■Front
■Rear
Bulb locations
Vehicles with discharge head-
lightsVehicles with LED headlights
Front turn signal light
Back-up light
Rear turn signal light1
2
Page 457 of 600
4577-3. Do-it-yourself maintenance
7
Maintenance and care
IS350/300/200t_U (OM53D18U)
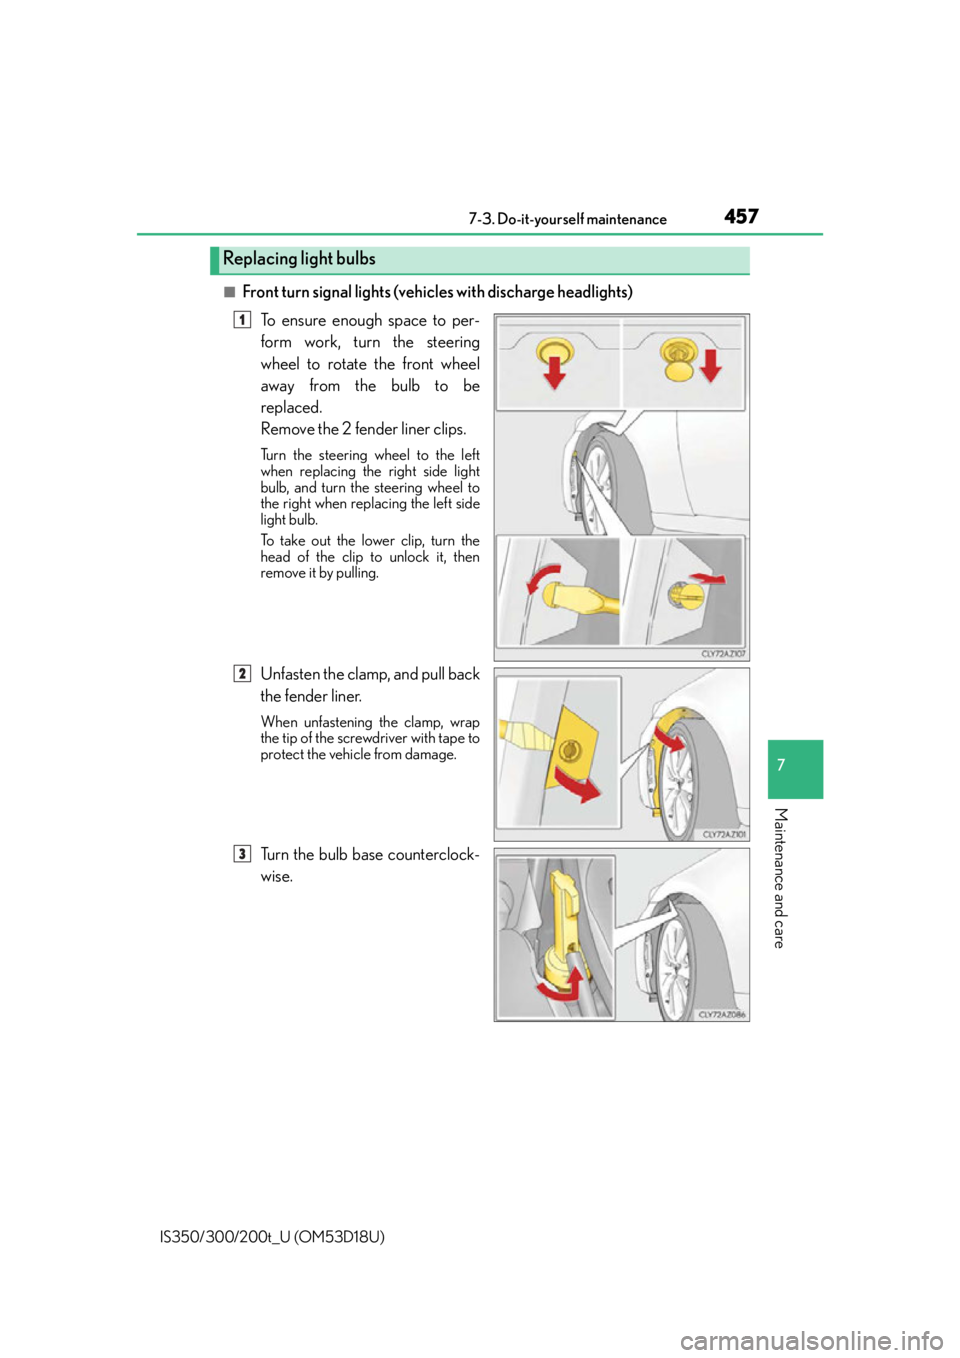
■Front turn signal lights (vehicles with discharge headlights)To ensure enough space to per-
form work, turn the steering
wheel to rotate the front wheel
away from the bulb to be
replaced.
Remove the 2 fender liner clips.
Turn the steering wheel to the left
when replacing the right side light
bulb, and turn the steering wheel to
the right when replacing the left side
light bulb.
To take out the lower clip, turn the
head of the clip to unlock it, then
remove it by pulling.
Unfasten the clamp, and pull back
the fender liner.
When unfastening the clamp, wrap
the tip of the screwdriver with tape to
protect the vehicle from damage.
Turn the bulb base counterclock-
wise.
Replacing light bulbs
1
2
3
Page 459 of 600
4597-3. Do-it-yourself maintenance
7
Maintenance and care
IS350/300/200t_U (OM53D18U)
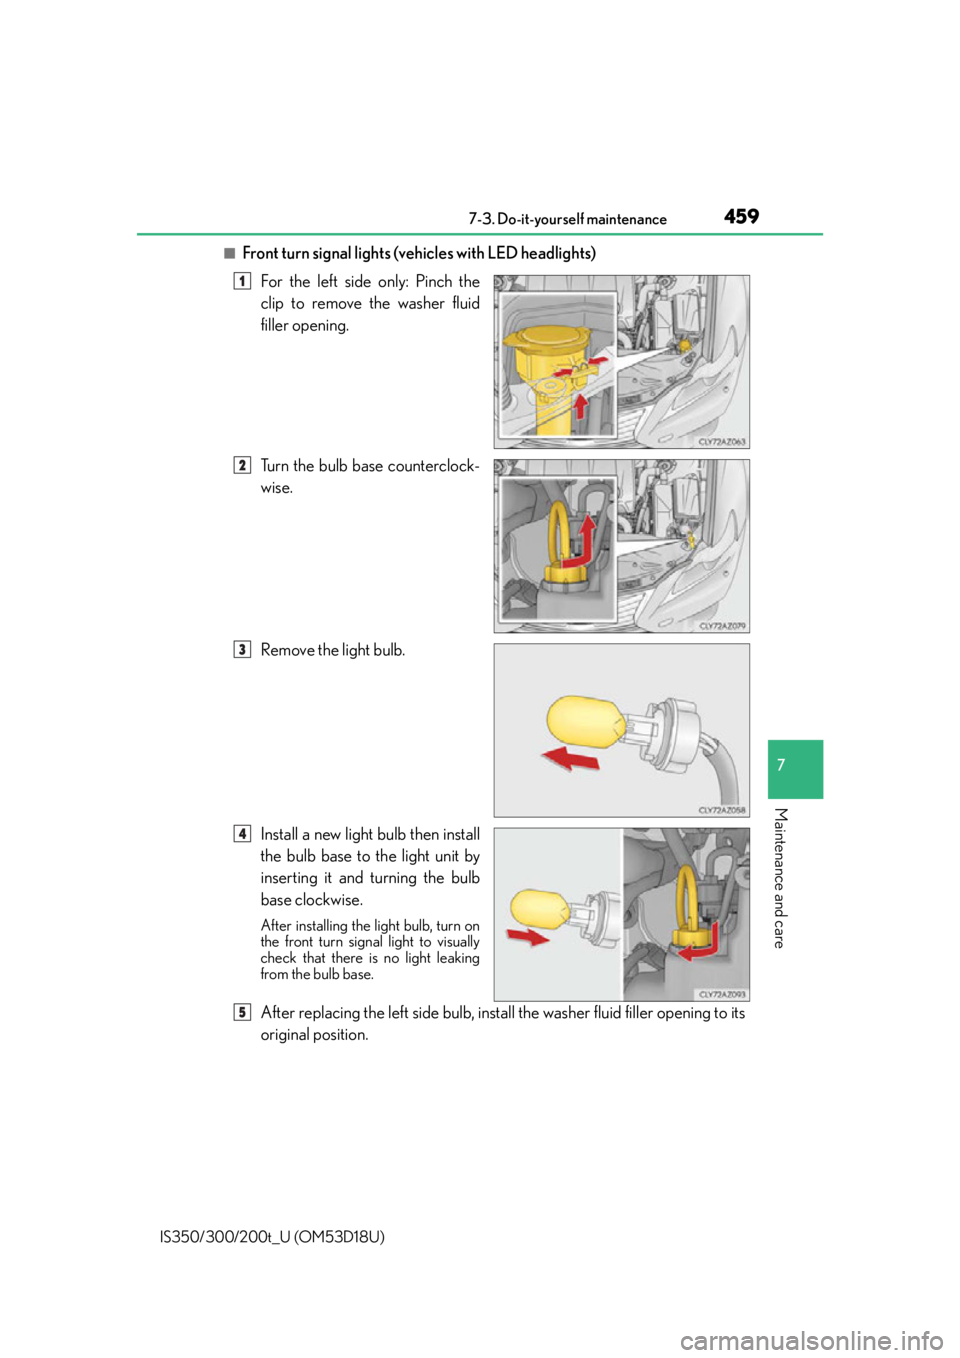
■Front turn signal lights (vehicles with LED headlights)For the left side only: Pinch the
clip to remove the washer fluid
filler opening.
Turn the bulb base counterclock-
wise.
Remove the light bulb.
Install a new light bulb then install
the bulb base to the light unit by
inserting it and turning the bulb
base clockwise.
After installing the light bulb, turn on
the front turn signal light to visually
check that there is no light leaking
from the bulb base.
After replacing the left side bulb, insta ll the washer fluid filler opening to its
original position.
1
2
3
4
5
Page 460 of 600

4607-3. Do-it-yourself maintenance
IS350/300/200t_U (OM53D18U)
■Rear turn signal lights Open the trunk, and remove the
2 covers and 2 screws.
When removing the cover, wrap the
tip of the screwdriver with tape to
protect the vehicle from damage.
Push and pull the light unit toward
the rear of the vehicle as shown in
the illustration to remove it.
Apply protective tape to the periph-
eral of the light un it installation sur-
face on the vehicle body, such as the
rear bumper, to protect the vehicle
from damage.
Pushing on the portion A in the illus-
tration toward the rear of the vehicle
will make disengagement of the tabs
easier.
Turn the bulb base counterclock-
wise.
Remove the light bulb.
1
2
3
4
Page 463 of 600

4637-3. Do-it-yourself maintenance
7
Maintenance and care
IS350/300/200t_U (OM53D18U)
■Replacing the following bulbs
If any of the lights listed below has burnt out, have it replaced by your Lexus
dealer.
●Headlights
●Parking lights and daytime running lights
●Side marker lights
●Side turn signal lights
●Fog lights (if equipped)
●Outer foot lights
●Stop/tail lights
●Tail lights
●High mounted stoplight
●License plate lights
■Discharge headlights (if equipped)
If voltage to the discharge bulbs is insufficient, the bulbs may not come on, or may go out
temporarily. The discharge bulbs will come on when normal power is restored.
■LED Lights
The lights other than the discharge headlights (if equipped), front turn signal lights, rear
turn signal lights, back-up light and outer foot lights each consist of a number of LEDs. If
any of the LEDs burn out, take your vehicle to your Lexus dealer to have the light
replaced.
■Condensation build-up on the inside of the lens
Temporary condensation build-up on the inside of the headlight lens does not indicate a
malfunction. Contact your Lexus dealer for mo re information in the following situations:
●Large drops of water have built up on the inside of the lens.
●Wa t e r h a s b u i l t u p i nside the headlight.
■When replacing the front turn signal lights (vehicles with LED headlights)
When the washer fluid filler opening is removed with a large amount of washer fluid con-
tained in the washer tank, washer fluid ma y spill onto the vehicle and cleaning may be
required.
■When replacing light bulbs
P. 4 5 4
Page 464 of 600
4647-3. Do-it-yourself maintenance
IS350/300/200t_U (OM53D18U)
CAUTION
■Replacing light bulbs
●Turn off the lights. Do not attempt to replace the bulb immediately after turning off the
lights.
The bulbs become very hot and may cause burns.
●Do not touch the glass portion of the light bulb with bare hands. When it is unavoid-
able to hold the glass portion, use and ho ld with a clean dry cloth to avoid getting
moisture and oils on the bulb.
Also, if the bulb is scratched or dropped, it may blow out or crack.
●Fully install light bulbs and any parts used to secure them. Failure to do so may result
in heat damage, fire, or water entering the headlight unit. This may damage the head-
lights or cause condensation to build up on the lens.
■Discharge headlights (if equipped)
●Contact your Lexus dealer before replacing the discharge headlights (including light
bulbs).
●Do not touch the discharge headlight’s high voltage socket when the headlights are
turned on.
An extremely high voltage of 30000 V will be discharged and could result in death
or serious injury by electric shock.
●Do not attempt to take apart or repair the headlight bulbs, connectors, power supply
circuits, or related components.
Doing so could result in electric shock and death or serious injury.
■To prevent damage or fire
●Make sure bulbs are fully seated and locked.
●Check the wattage of the bulb before installin g to prevent heat damage.
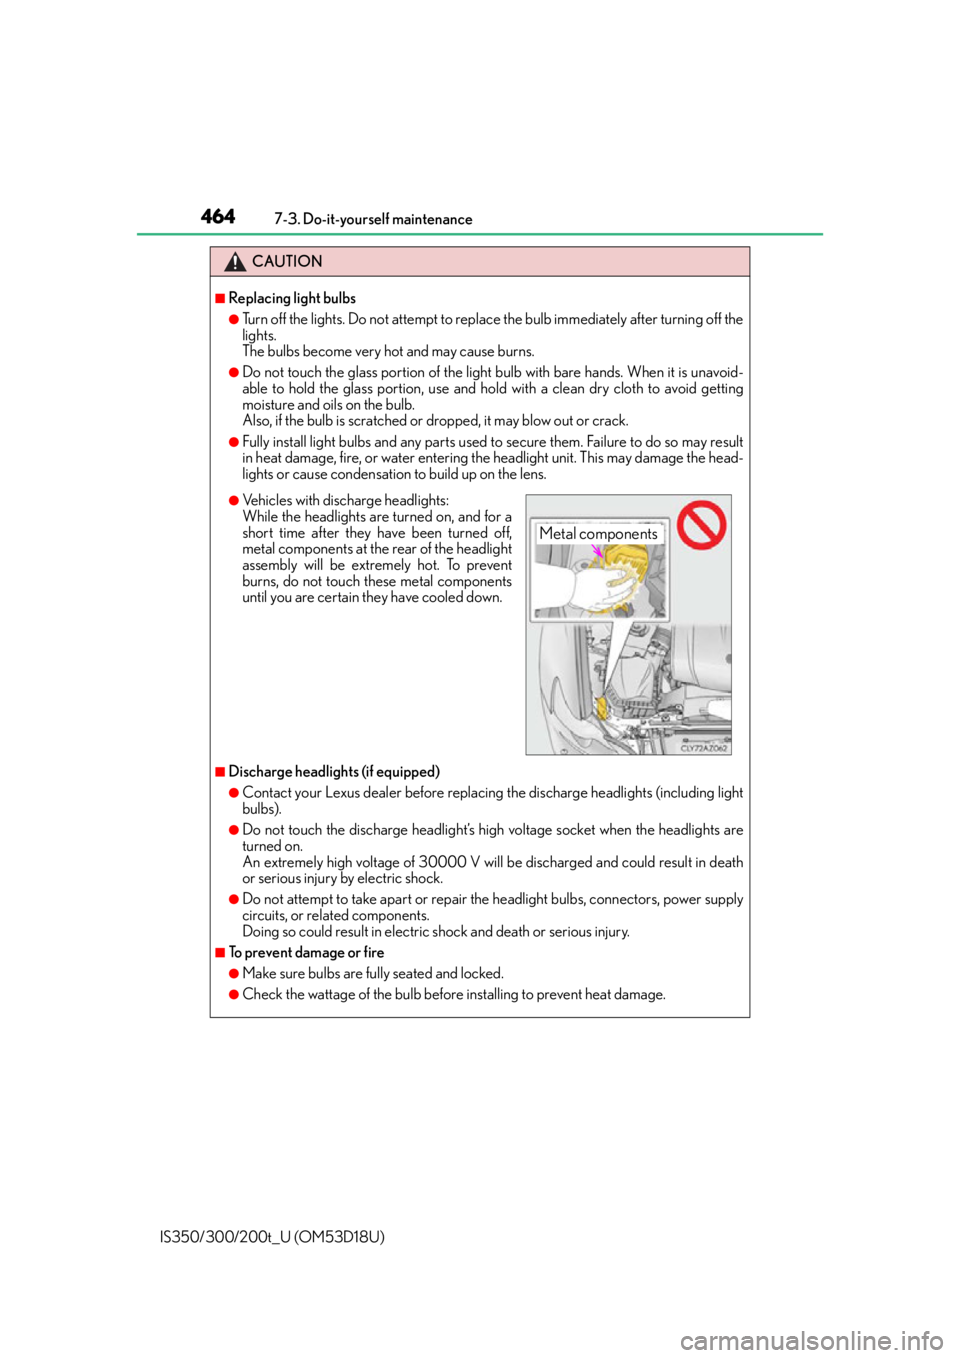
●Vehicles with discharge headlights:
While the headlights are turned on, and for a
short time after they have been turned off,
metal components at the rear of the headlight
assembly will be extremely hot. To prevent
burns, do not touch these metal components
until you are certain they have cooled down.
Metal components
Page 476 of 600

4768-2. Steps to take in an emergency
IS350/300/200t_U (OM53D18U)
If a warning light turns on or a warning buzzer
sounds
Calmly perform the following actions if any of the warning lights comes on or
flashes. If a light comes on or flashes, but then goes off, this does not necessar-
ily indicate a malfunction in the system. However, if this continues to occur,
have the vehicle inspected by your Lexus dealer.
Warning light and warning buzzer list
Warning lightWarning light/Details/Actions
(U.S.A.)
(Canada)
Brake system warning light (warning buzzer)*1
Indicates that:
• The brake fluid level is low; or
• The brake system is malfunctioning This light also comes on when the parking brake is not released.
If the light turns off after the pa rking brake is fully released the
system is operating normally.
Immediately stop the vehicle in a safe place and contact your
Lexus dealer. Continuing to drive the vehicle may be dangerous.
Charging system warning light
Indicates a malfunction in the vehicle’s charging system
Immediately stop the vehicle in a safe place and contact your
Lexus dealer.
(U.S.A.)
(Canada)
Malfunction indicator lamp Indicates a malfunction in:
• The electronic engine control system;
• The electronic throttle control system; or
• The electronic automatic transmission control system
Have the vehicle inspected by your Lexus dealer immediately.
SRS warning light
Indicates a malfunction in:
• The SRS airbag system;
• The front passenger occupant classification system; or
• The seat belt pretensioner system
Have the vehicle inspected by your Lexus dealer immediately.
(U.S.A.)
(Canada)
ABS warning light Indicates a malfunction in:
• The ABS; or
• The brake assist system
Have the vehicle inspected by your Lexus dealer immediately.