turn signal bulb Lexus IS200t 2016 Navigation Manual / LEXUS 2016 IS200T,IS300,IS350 OWNERS MANUAL (OM53D18U)
[x] Cancel search | Manufacturer: LEXUS, Model Year: 2016, Model line: IS200t, Model: Lexus IS200t 2016Pages: 600, PDF Size: 7.94 MB
Page 15 of 600
15Pictorial index
IS350/300/200t_U (OM53D18U)
Windshield wipers . . . . . . . . . . . . . . . . . . . . . . . . . . . . . . . . . . . . . . . . . . . . . . . . . . . . P. 187
Precautions against winter season . . . . . . . . . . . . . . . . . . . . . . . . . . . . . . . . . . . . . . P. 270
To prevent freezing (windshield wiper de-icer)
* . . . . . . . . . . . . . . . . . . . . . . . . P. 372
Precautions against car wash . . . . . . . . . . . . . . . . . . . . . . . . . . . . . . . . . . . . . . . . . . .P. 407
Fuel filler door . . . . . . . . . . . . . . . . . . . . . . . . . . . . . . . . . . . . . . . . . . . . . . . . . . . . . . . .P. 194
Refueling method . . . . . . . . . . . . . . . . . . . . . . . . . . . . . . . . . . . . . . . . . . . . . . . . . . . . . . . P . 194
Fuel type/fuel tank capacity . . . . . . . . . . . . . . . . . . . . . . . . . . . . . . . . . . . . . . . . . . . . . P. 526
Tires . . . . . . . . . . . . . . . . . . . . . . . . . . . . . . . . . . . . . . . . . . . . . . . . . . . . . . . . . . . . . . . . . . P. 434
Tire size/inflation pressure . . . . . . . . . . . . . . . . . . . . . . . . . . . . . . . . . . . . . . . . . . . . . P. 534
Winter tires/tire chain. . . . . . . . . . . . . . . . . . . . . . . . . . . . . . . . . . . . . . . . . . . . . . . . . . . P. 270
Checking/rotation/tire pressure warning system . . . . . . . . . . . . . . . . . . . . . . . .P. 434
Coping with flat tires . . . . . . . . . . . . . . . . . . . . . . . . . . . . . . . . . . . . . . . . . . . . . . . . . . . . P. 496
Hood . . . . . . . . . . . . . . . . . . . . . . . . . . . . . . . . . . . . . . . . . . . . . . . . . . . . . . . . . . . . . . . . . .P. 421
Opening. . . . . . . . . . . . . . . . . . . . . . . . . . . . . . . . . . . . . . . . . . . . . . . . . . . . . . . . . . . . . . . . P. 421
Engine oil . . . . . . . . . . . . . . . . . . . . . . . . . . . . . . . . . . . . . . . . . . . . . . . . . . . . . . . . . . . . . . . P. 527
Coping with overheat . . . . . . . . . . . . . . . . . . . . . . . . . . . . . . . . . . . . . . . . . . . . . . . . . . . P. 51 6
Warning messages . . . . . . . . . . . . . . . . . . . . . . . . . . . . . . . . . . . . . . . . . . . . . . . . . . . . P. 484
Headlights/parking lights/daytime running ligh ts . . . . . . . . . . . . . . . . . . . P. 178
Fog lights
* . . . . . . . . . . . . . . . . . . . . . . . . . . . . . . . . . . . . . . . . . . . . . . . . . . . . . . . . . . . .P. 186
Turn signal lights . . . . . . . . . . . . . . . . . . . . . . . . . . . . . . . . . . . . . . . . . . . . . . . . . . . . . . P . 175
Tail lights . . . . . . . . . . . . . . . . . . . . . . . . . . . . . . . . . . . . . . . . . . . . . . . . . . . . . . . . . . . . . . P. 178
Stop lights . . . . . . . . . . . . . . . . . . . . . . . . . . . . . . . . . . . . . . . . . . . . . . . . . . . . . . . . . . . . P. 150
License plate lights . . . . . . . . . . . . . . . . . . . . . . . . . . . . . . . . . . . . . . . . . . . . . . . . . . . P. 17 8
Back-up lights
Shifting the shift lever to R . . . . . . . . . . . . . . . . . . . . . . . . . . . . . . . . . . . . . . . . . . . . . . P. 16 9
Side marker lights . . . . . . . . . . . . . . . . . . . . . . . . . . . . . . . . . . . . . . . . . . . . . . . . . . . . P. 178
4
5
6
7
Light bulbs of the exterior lights for driving(Replacing method: P. 455, Watts: P. 536)
*: If equipped
8
9
10
11
12
13
14
15
Page 176 of 600

1764-2. Driving procedures
IS350/300/200t_U (OM53D18U)
■Turn signals can be operated when
The engine switch is in IGNITION ON mode.
■If the indicator flashes faster than usual
Check that a light bulb in the front or rear turn signal lights has not burned out.
■If the turn signals stop flashing befo re a lane change has been performed
Operate the lever again.
■Customization
The number of times the turn signals flash during a lane change can be changed.
(Customizable feature P. 5 5 2 )
Page 456 of 600
4567-3. Do-it-yourself maintenance
IS350/300/200t_U (OM53D18U)
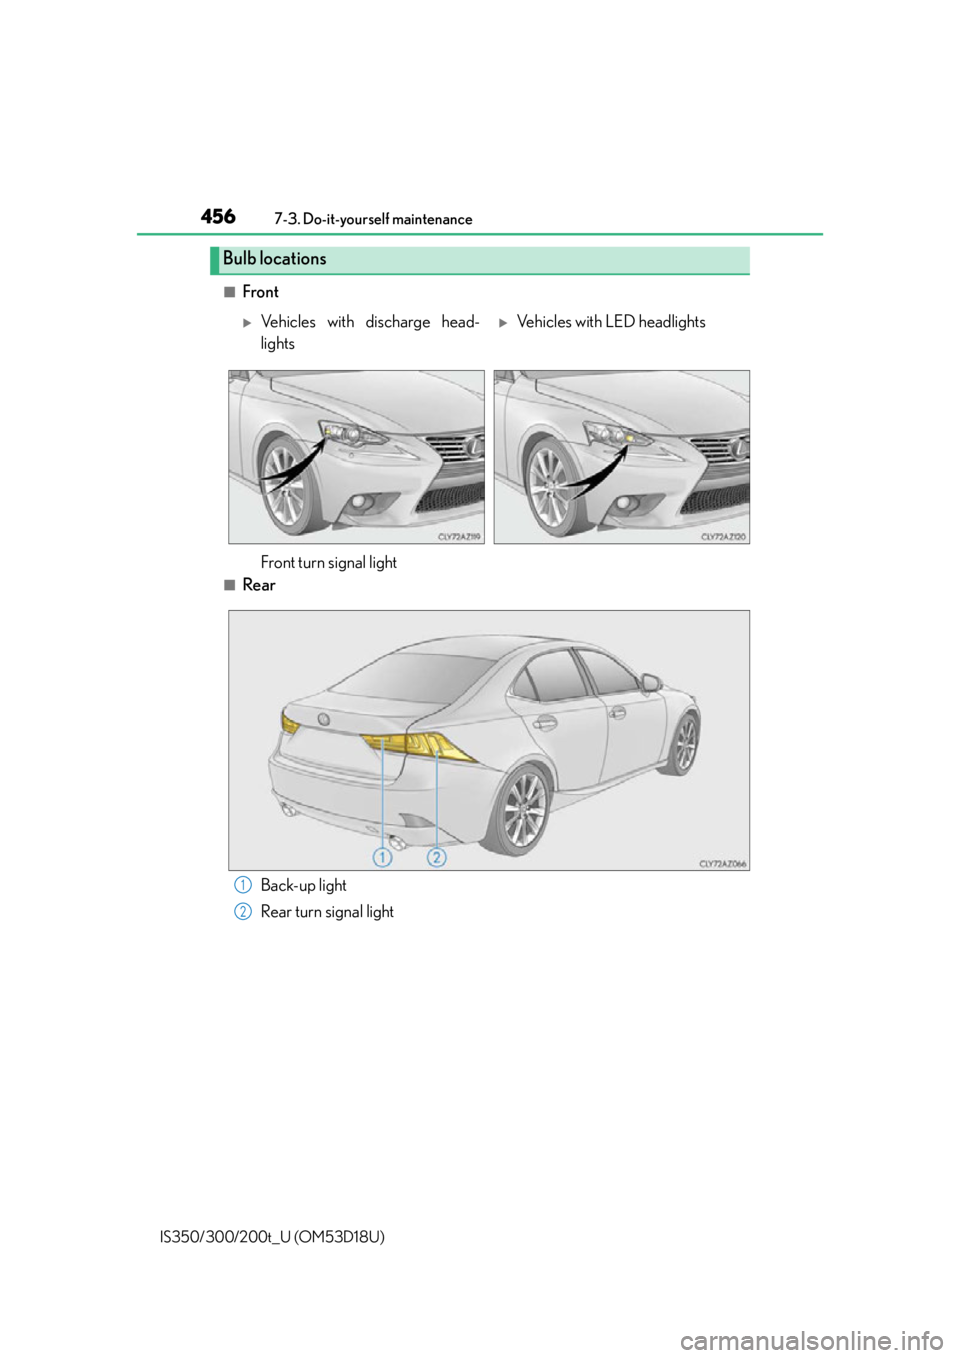
■Front
■Rear
Bulb locations
Vehicles with discharge head-
lightsVehicles with LED headlights
Front turn signal light
Back-up light
Rear turn signal light1
2
Page 457 of 600
4577-3. Do-it-yourself maintenance
7
Maintenance and care
IS350/300/200t_U (OM53D18U)
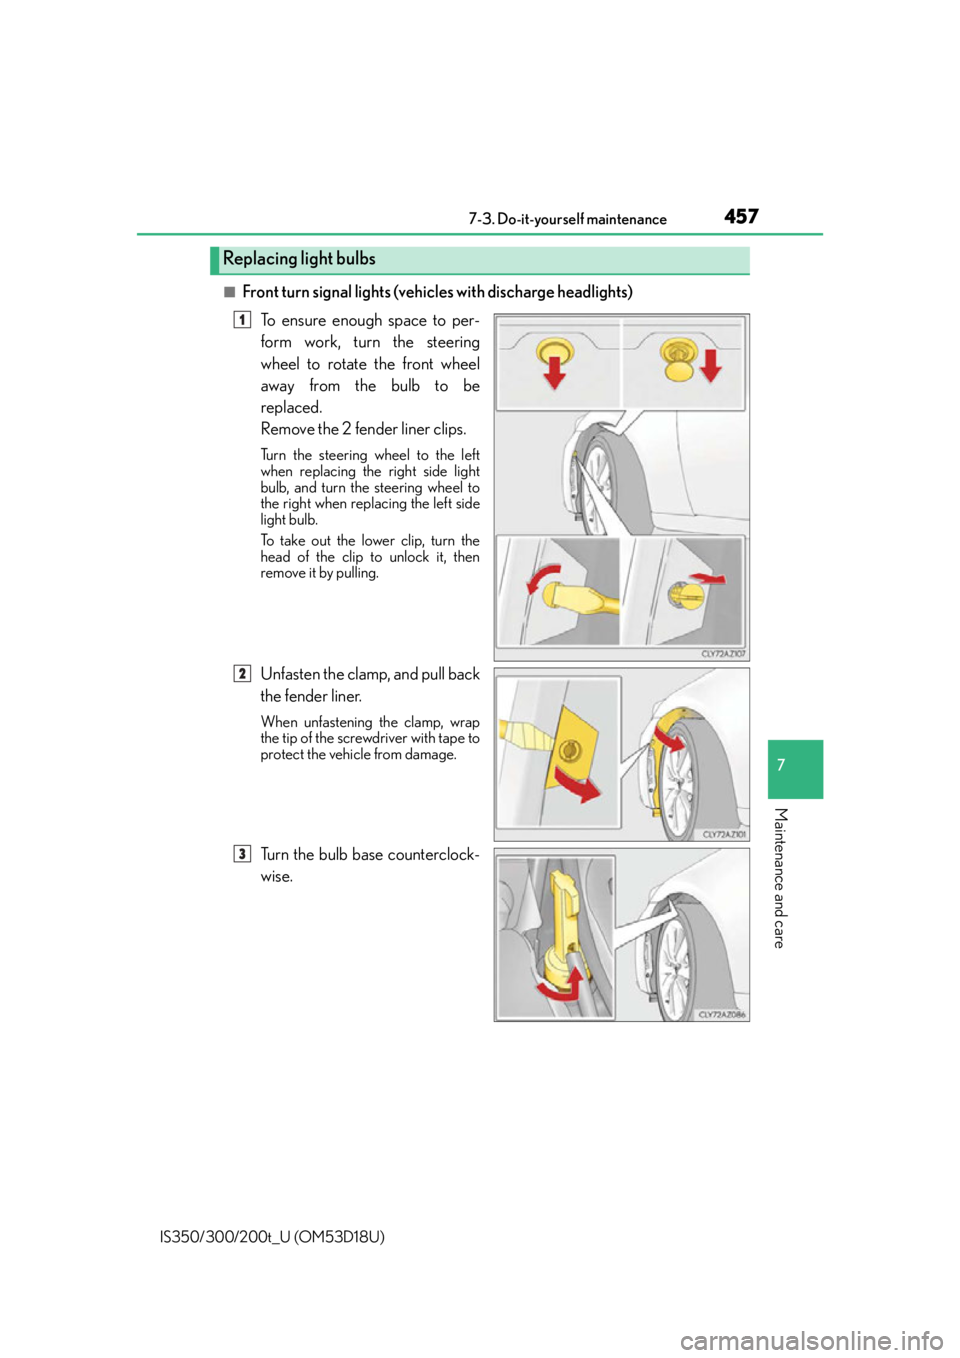
■Front turn signal lights (vehicles with discharge headlights)To ensure enough space to per-
form work, turn the steering
wheel to rotate the front wheel
away from the bulb to be
replaced.
Remove the 2 fender liner clips.
Turn the steering wheel to the left
when replacing the right side light
bulb, and turn the steering wheel to
the right when replacing the left side
light bulb.
To take out the lower clip, turn the
head of the clip to unlock it, then
remove it by pulling.
Unfasten the clamp, and pull back
the fender liner.
When unfastening the clamp, wrap
the tip of the screwdriver with tape to
protect the vehicle from damage.
Turn the bulb base counterclock-
wise.
Replacing light bulbs
1
2
3
Page 458 of 600
4587-3. Do-it-yourself maintenance
IS350/300/200t_U (OM53D18U)
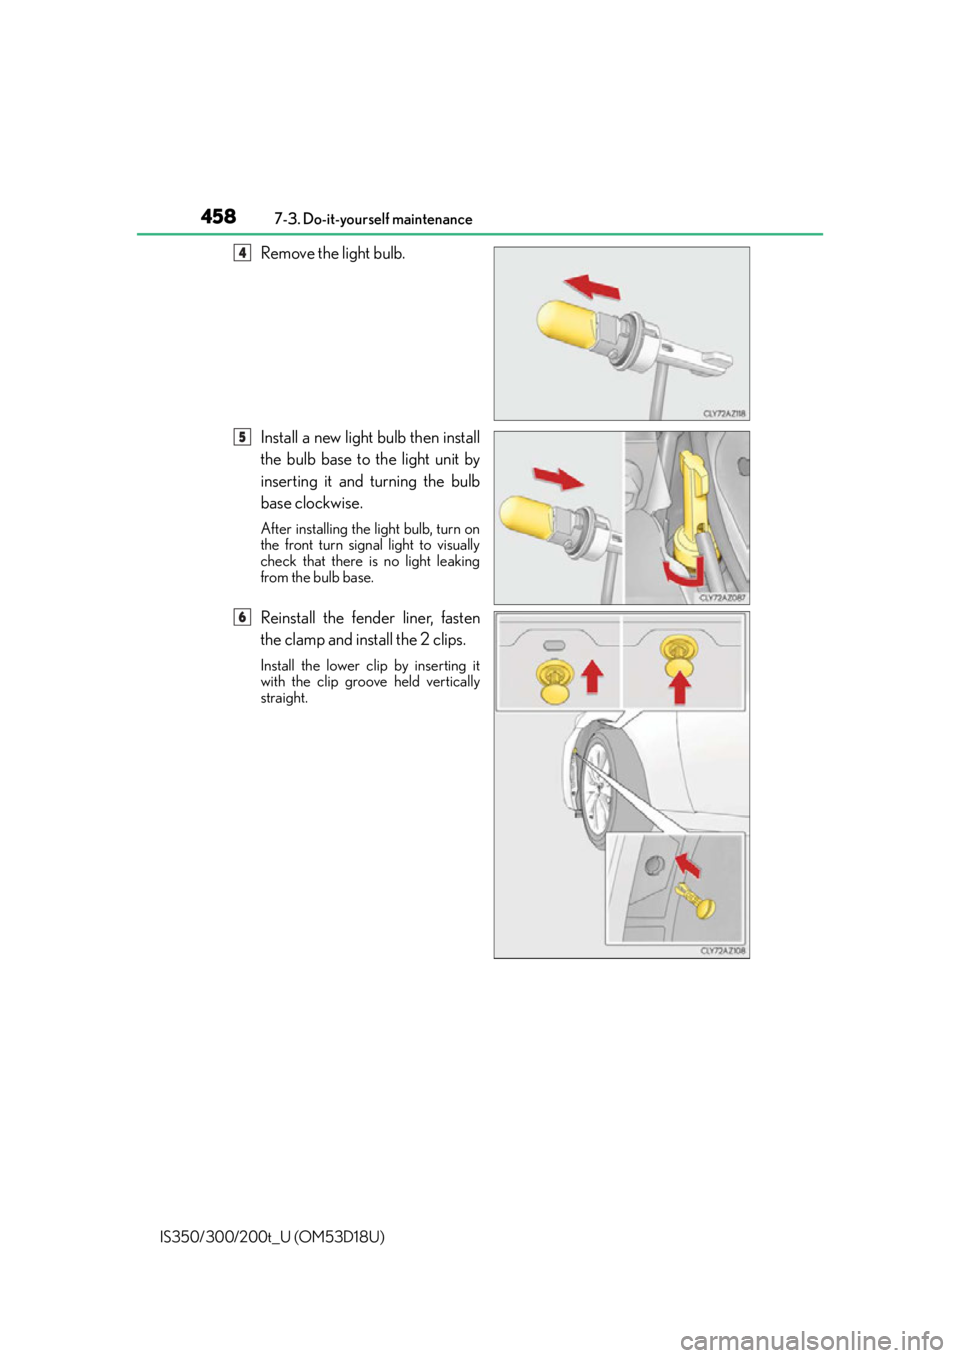
Remove the light bulb.
Install a new light bulb then install
the bulb base to the light unit by
inserting it and turning the bulb
base clockwise.
After installing the light bulb, turn on
the front turn signal light to visually
check that there is no light leaking
from the bulb base.
Reinstall the fender liner, fasten
the clamp and install the 2 clips.
Install the lower clip by inserting it
with the clip groove held vertically
straight.
4
5
6
Page 459 of 600
4597-3. Do-it-yourself maintenance
7
Maintenance and care
IS350/300/200t_U (OM53D18U)
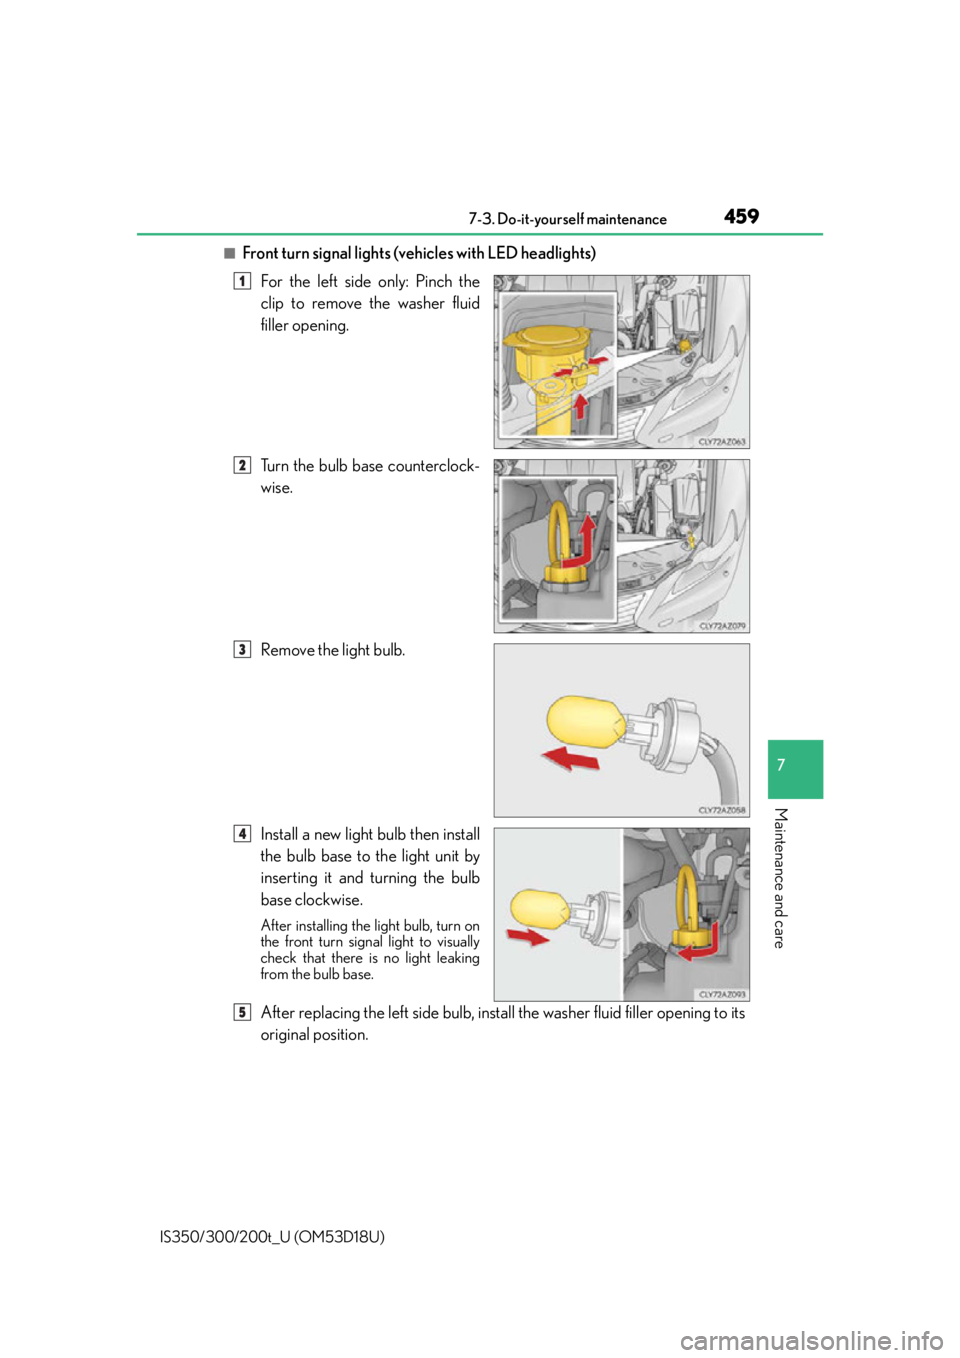
■Front turn signal lights (vehicles with LED headlights)For the left side only: Pinch the
clip to remove the washer fluid
filler opening.
Turn the bulb base counterclock-
wise.
Remove the light bulb.
Install a new light bulb then install
the bulb base to the light unit by
inserting it and turning the bulb
base clockwise.
After installing the light bulb, turn on
the front turn signal light to visually
check that there is no light leaking
from the bulb base.
After replacing the left side bulb, insta ll the washer fluid filler opening to its
original position.
1
2
3
4
5
Page 460 of 600

4607-3. Do-it-yourself maintenance
IS350/300/200t_U (OM53D18U)
■Rear turn signal lights Open the trunk, and remove the
2 covers and 2 screws.
When removing the cover, wrap the
tip of the screwdriver with tape to
protect the vehicle from damage.
Push and pull the light unit toward
the rear of the vehicle as shown in
the illustration to remove it.
Apply protective tape to the periph-
eral of the light un it installation sur-
face on the vehicle body, such as the
rear bumper, to protect the vehicle
from damage.
Pushing on the portion A in the illus-
tration toward the rear of the vehicle
will make disengagement of the tabs
easier.
Turn the bulb base counterclock-
wise.
Remove the light bulb.
1
2
3
4
Page 461 of 600

4617-3. Do-it-yourself maintenance
7
Maintenance and care
IS350/300/200t_U (OM53D18U)
Install a new light bulb then install
the bulb base to the light unit by
inserting it and turning the bulb
base clockwise.
After installing the light bulb, turn on
the rear turn signal light to visually
check that there is no light leaking
from the bulb base.
Align the tabs and push the light
unit toward the front of the vehicle
to install it.
Remove the protective tape applied
to the peripheral of the light unit
installation surface on the vehicle
body.
Install the 2 screws and 2 covers.
5
6
7
Page 463 of 600

4637-3. Do-it-yourself maintenance
7
Maintenance and care
IS350/300/200t_U (OM53D18U)
■Replacing the following bulbs
If any of the lights listed below has burnt out, have it replaced by your Lexus
dealer.
●Headlights
●Parking lights and daytime running lights
●Side marker lights
●Side turn signal lights
●Fog lights (if equipped)
●Outer foot lights
●Stop/tail lights
●Tail lights
●High mounted stoplight
●License plate lights
■Discharge headlights (if equipped)
If voltage to the discharge bulbs is insufficient, the bulbs may not come on, or may go out
temporarily. The discharge bulbs will come on when normal power is restored.
■LED Lights
The lights other than the discharge headlights (if equipped), front turn signal lights, rear
turn signal lights, back-up light and outer foot lights each consist of a number of LEDs. If
any of the LEDs burn out, take your vehicle to your Lexus dealer to have the light
replaced.
■Condensation build-up on the inside of the lens
Temporary condensation build-up on the inside of the headlight lens does not indicate a
malfunction. Contact your Lexus dealer for mo re information in the following situations:
●Large drops of water have built up on the inside of the lens.
●Wa t e r h a s b u i l t u p i nside the headlight.
■When replacing the front turn signal lights (vehicles with LED headlights)
When the washer fluid filler opening is removed with a large amount of washer fluid con-
tained in the washer tank, washer fluid ma y spill onto the vehicle and cleaning may be
required.
■When replacing light bulbs
P. 4 5 4
Page 536 of 600
5369-1. Specifications
IS350/300/200t_U (OM53D18U)
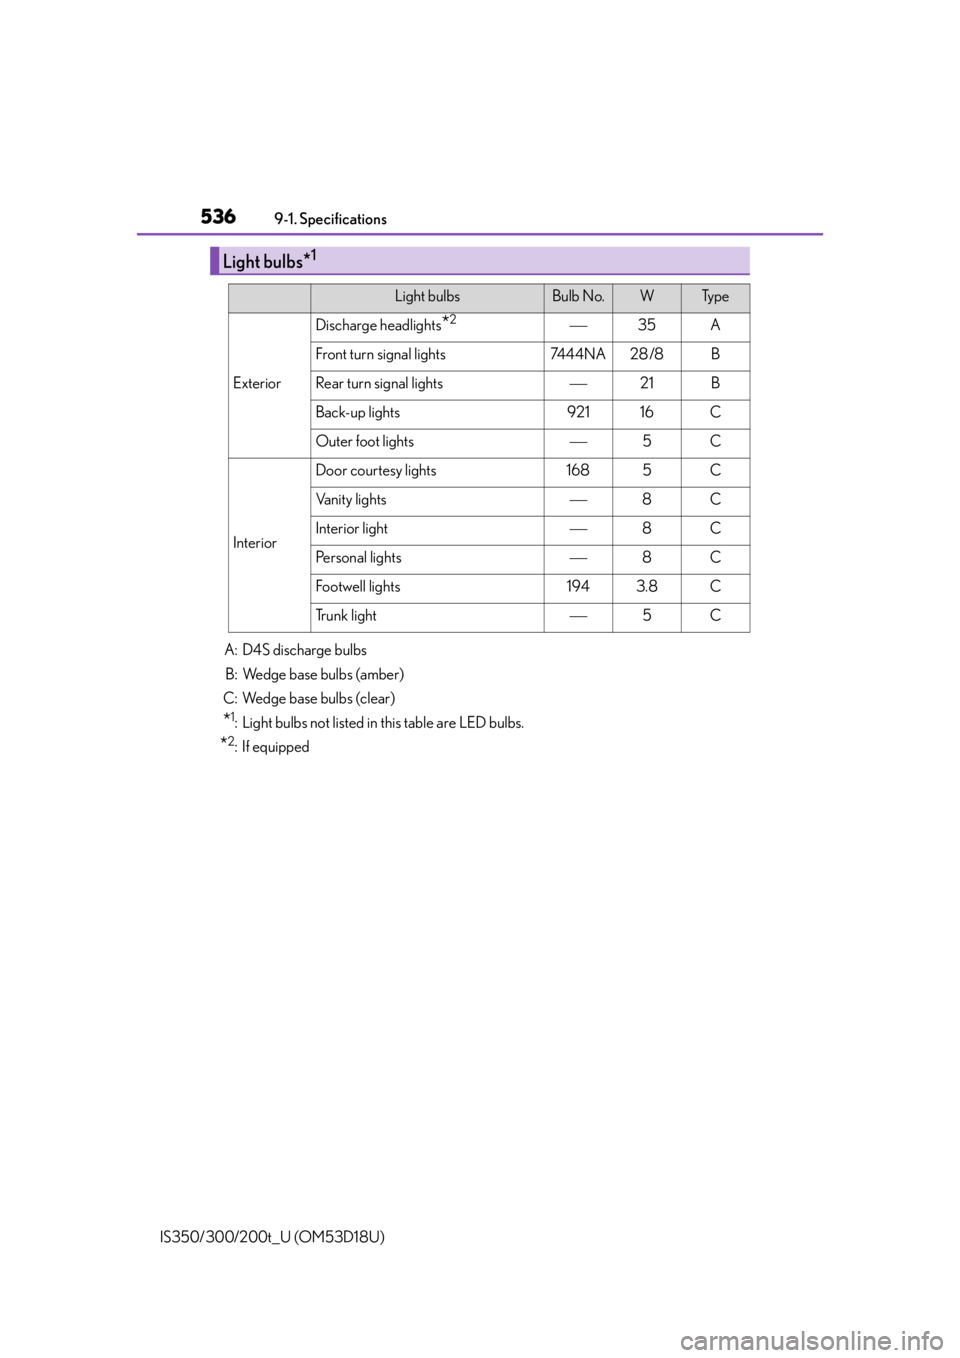
Light bulbs*1
Light bulbsBulb No.WTy p e
Exterior
Discharge headlights*235A
Front turn signal lights7444NA28 /8B
Rear turn signal lights21B
Back-up lights92116C
Outer foot lights5C
Interior
Door courtesy lights1685C
Vanity lights8C
Interior light8C
Pe r s o n a l l i g h t s8C
Footwell lights1943.8C
Trunk light5C
A: D4S discharge bulbs B: Wedge base bulbs (amber)
C: Wedge base bulbs (clear)
*1: Light bulbs not listed in this table are LED bulbs.
*2: If equipped