light Lexus IS200t 2016 Quick Guide / LEXUS 2016 IS200T,IS300,IS350 OWNERS MANUAL (OM53D18U)
[x] Cancel search | Manufacturer: LEXUS, Model Year: 2016, Model line: IS200t, Model: Lexus IS200t 2016Pages: 600, PDF Size: 7.94 MB
Page 376 of 600
3766-1. Using the air conditioning system
IS350/300/200t_U (OM53D18U)
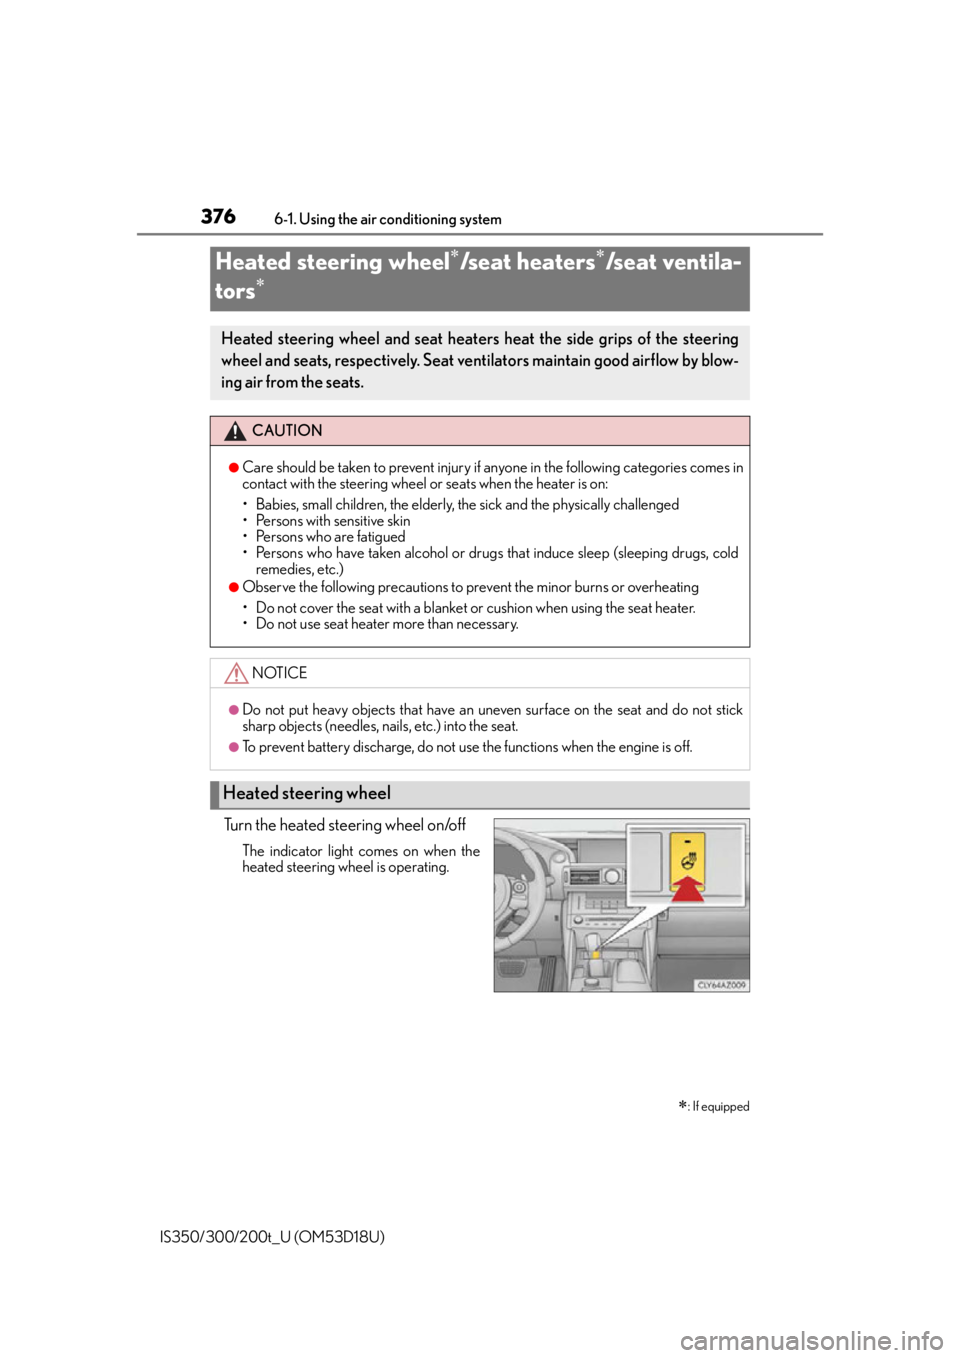
Turn the heated steering wheel on/off
The indicator light comes on when the
heated steering wheel is operating.
Heated steering wheel/seat heaters/seat ventila-
tors
: If equipped
Heated steering wheel and seat heaters heat the side grips of the steering
wheel and seats, respectively. Seat ventilators maintain good airflow by blow-
ing air from the seats.
CAUTION
●Care should be taken to prevent injury if anyone in the following categories comes in
contact with the steering wheel or seats when the heater is on:
• Babies, small children, the elderly, the sick and the physically challenged
• Persons with sensitive skin
• Persons who are fatigued
• Persons who have taken alcohol or drugs that induce sleep (sleeping drugs, cold
remedies, etc.)
●Observe the following precautions to prevent the minor burns or overheating
• Do not cover the seat with a blanket or cushion when using the seat heater.
• Do not use seat heater more than necessary.
NOTICE
●Do not put heavy objects that have an uneven surface on the seat and do not stick
sharp objects (needles, nails, etc.) into the seat.
●To prevent battery discharge, do not use the functions when the engine is off.
Heated steering wheel
Page 377 of 600
3776-1. Using the air conditioning system
6
Interior features
IS350/300/200t_U (OM53D18U)
●The heated steering wheel can be used when the engine switch is in IGNITION ON
mode.
●The heated steering wheel will automatically turn off after about 30 minutes.
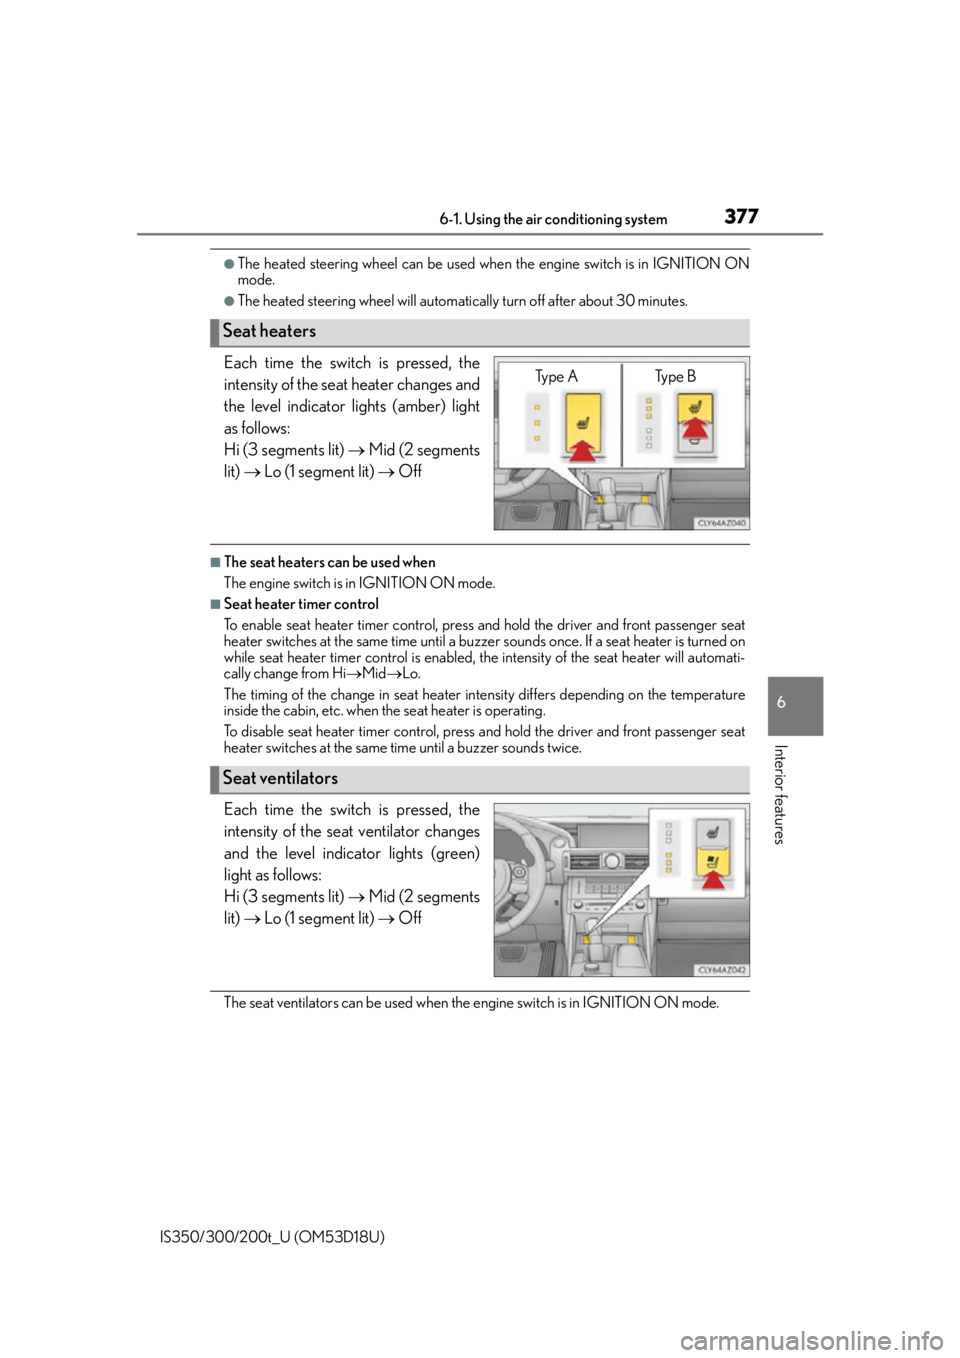
Each time the switch is pressed, the
intensity of the seat heater changes and
the level indicator lights (amber) light
as follows:
Hi (3 segments lit) Mid (2 segments
lit) Lo (1 segment lit) Off
■The seat heaters can be used when
The engine switch is in IGNITION ON mode.
■Seat heater timer control
To enable seat heater timer control, press and hold the driver and front passenger seat
heater switches at the same time until a buzzer sounds once. If a seat heater is turned on
while seat heater timer control is enabled, the intensity of the seat heater will automati-
cally change from Hi Mid Lo.
The timing of the change in seat heater intensity differs depending on the temperature
inside the cabin, etc. when the seat heater is operating.
To disable seat heater timer control, press and hold the driver and front passenger seat
heater switches at the same time until a buzzer sounds twice.
Each time the switch is pressed, the
intensity of the seat ventilator changes
and the level indicator lights (green)
light as follows:
Hi (3 segments lit) Mid (2 segments
lit) Lo (1 segment lit) Off
The seat ventilators can be used when the engine switch is in IGNITION ON mode.
Seat heaters
Type A Type B
Seat ventilators
Page 378 of 600
378
IS350/300/200t_U (OM53D18U)6-2. Using the interior lights
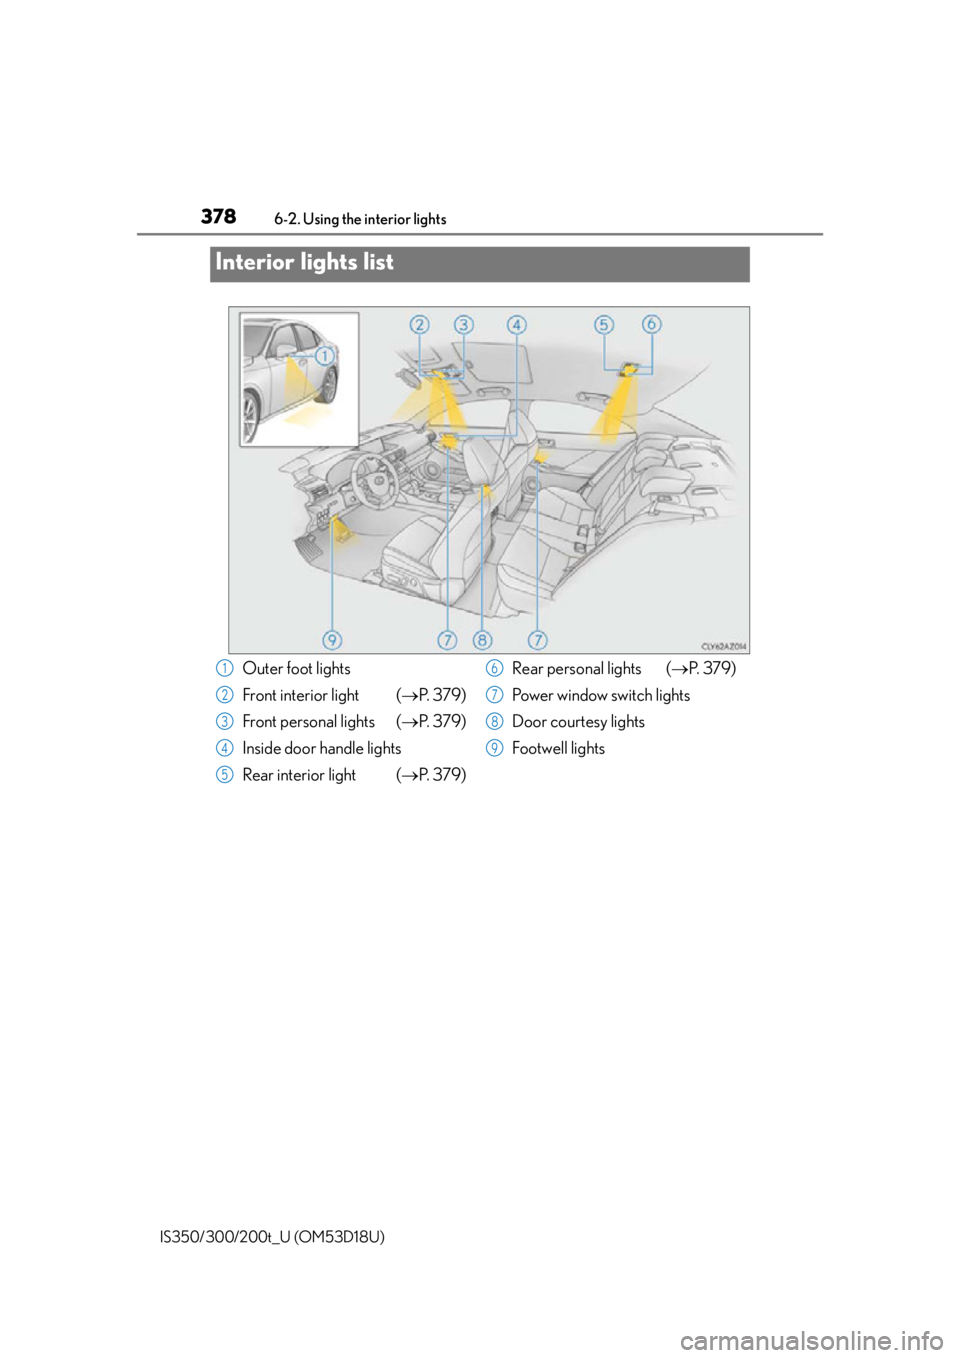
Interior lights list
Outer foot lights
Front interior light (
P. 3 7 9 )
Front personal lights ( P. 3 7 9 )
Inside door handle lights
Rear interior light ( P. 3 7 9 )Rear personal lights (
P. 3 7 9 )
Power window switch lights
Door courtesy lights
Footwell lights1
2
3
4
5
6
7
8
9
Page 379 of 600
3796-2. Using the interior lights
6
Interior features
IS350/300/200t_U (OM53D18U)
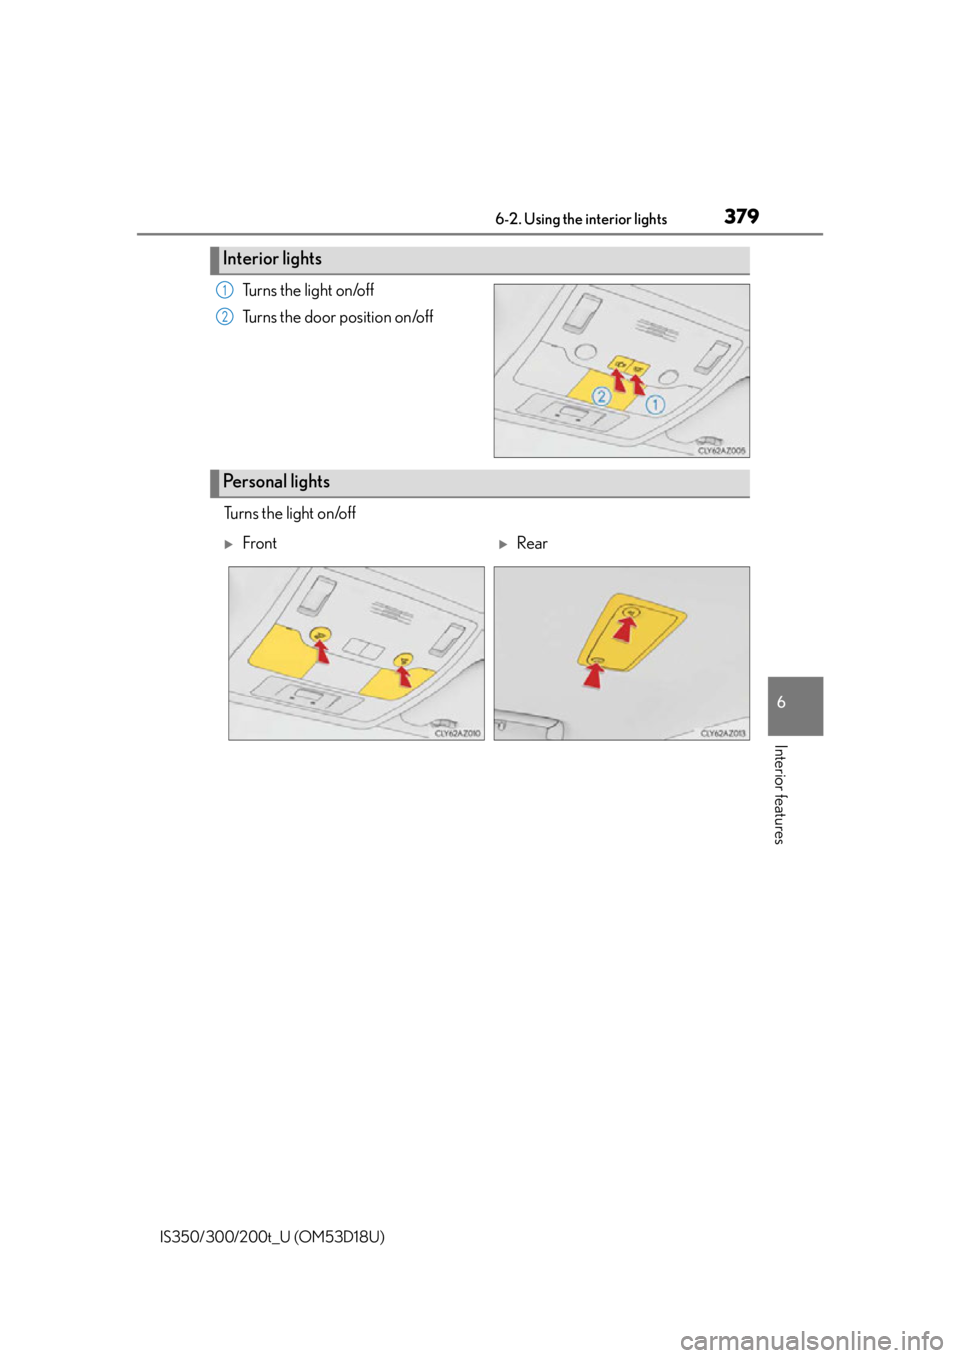
Tu r n s t h e l i g h t o n /o f f
Turns the door position on/off
Tu r n s t h e l i g h t o n /o f f
Interior lights
1
2
Personal lights
FrontRear
Page 380 of 600

3806-2. Using the interior lights
IS350/300/200t_U (OM53D18U)
■The interior lights and personal lights can be operated when
The interior lights and personal lights can be used regardless of the engine switch mode.
However, when the engine switch is turned off, they can be used only when the battery
protection function is not operating.
■Battery protection function
To prevent the battery from being discharged, approximately 20 minutes after the
engine switch is turned off, the power supplied to the interior lights, personal lights, and
other lights will be cut off automatically. (If the interior lights, etc. are left on when the
engine switch is turned off, they will be turned off automatically.)
To turn the interior lights, etc. back on, tu rn the engine switch to ACCESSORY or IGNI-
TION ON mode or operate the interior light switch until the interior lights turn on.
If any of the lights are illuminated automatica lly due to the illuminated entry system, the
battery protection function will be canceled.
■Illuminated entry system
The lights automatically turn on/off according to engine switch mode, the presence of the
electronic key, whether the doors are locked/unlocked, and whether the doors are
opened/closed.
■Customization
Setting (e.g. the time elapsed before lights turn off) can be changed.
(Customizable features: P. 5 5 2 )
NOTICE
To prevent battery discharge, do not leave the lights on longer than necessary when the
engine is off.
Page 381 of 600
381
IS350/300/200t_U (OM53D18U)
6
Interior features
6-3. Using the storage features
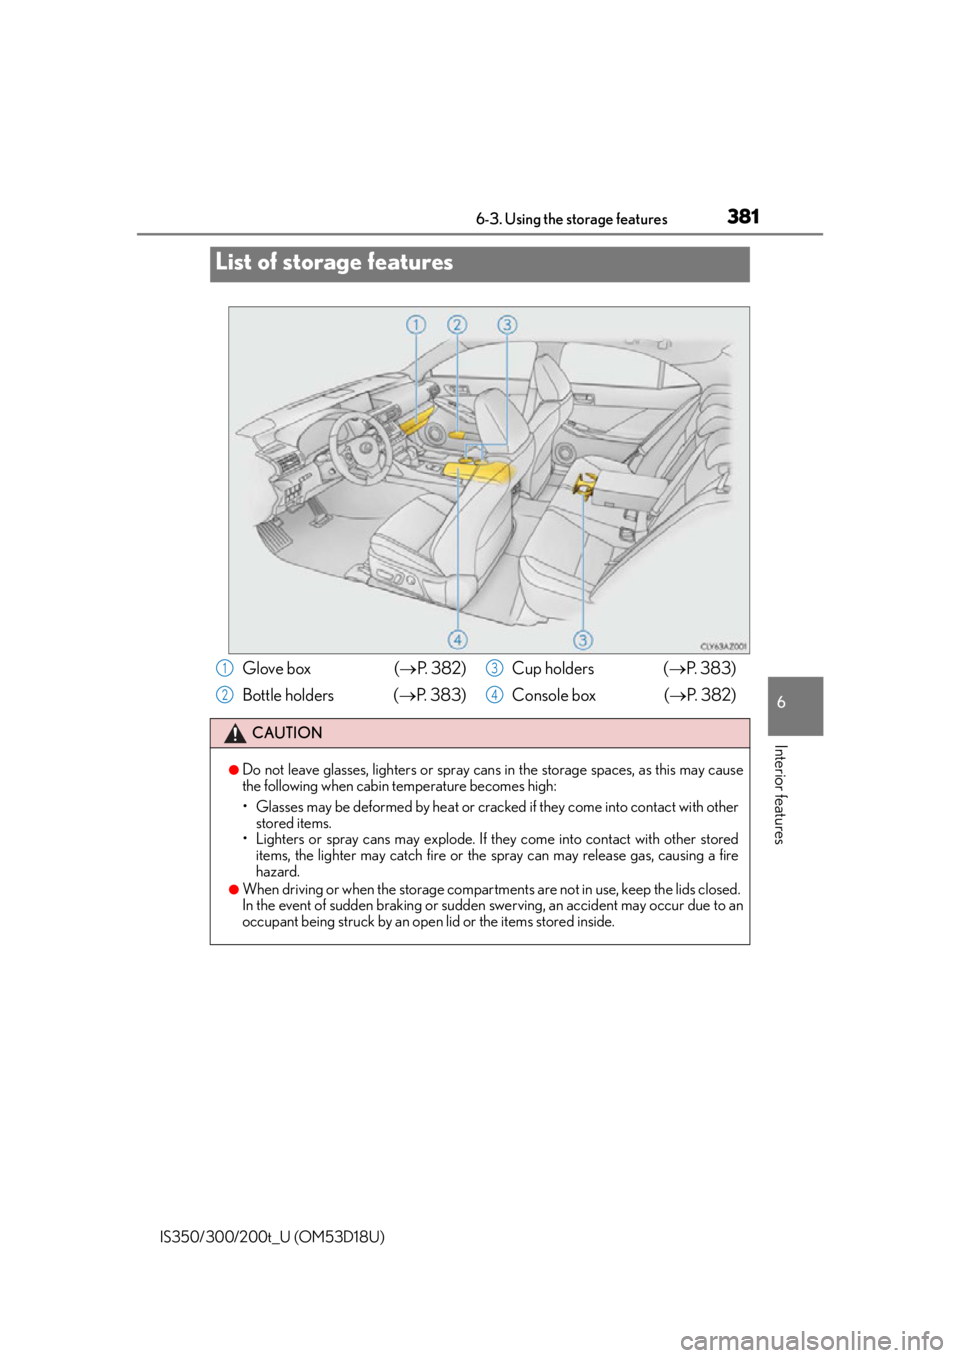
List of storage features
Glove box (P. 3 8 2 )
Bottle holders ( P. 383) Cup holders (
P. 3 8 3 )
Console box ( P. 3 8 2 )
CAUTION
●Do not leave glasses, lighters or spray cans in the storage spaces, as this may cause
the following when cabin temperature becomes high:
• Glasses may be deformed by heat or cracked if they come into contact with other
stored items.
• Lighters or spray cans may explode. If they come into contact with other stored
items, the lighter may catch fire or the spray can may release gas, causing a fire
hazard.
●When driving or when the storage compartmen ts are not in use, keep the lids closed.
In the event of sudden braking or sudden swerving, an accident may occur due to an
occupant being struck by an open lid or the items stored inside.
1
2
3
4
Page 382 of 600
3826-3. Using the storage features
IS350/300/200t_U (OM53D18U)
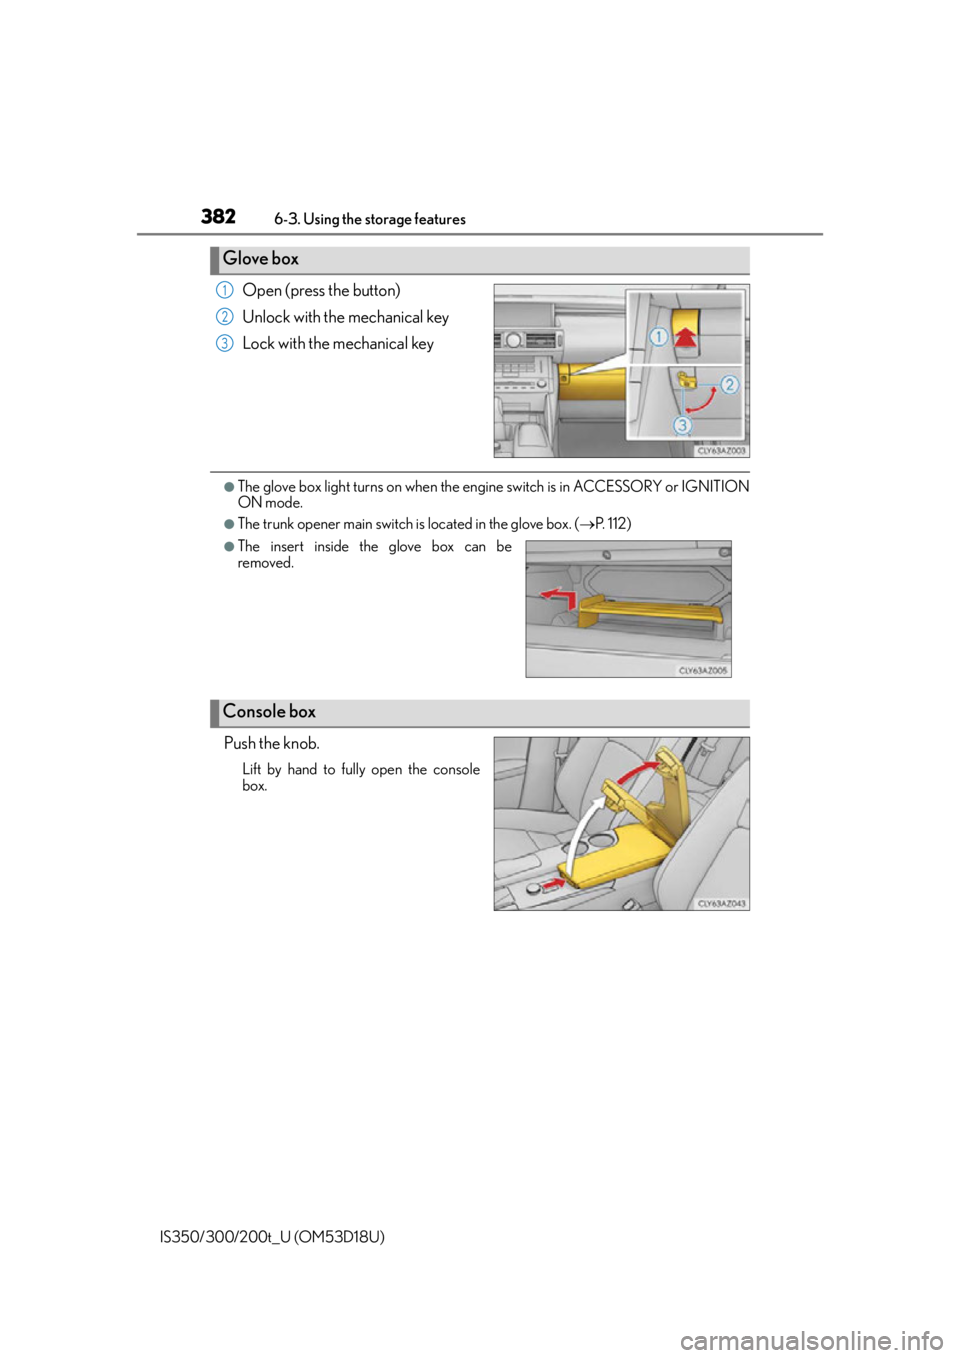
Open (press the button)
Unlock with the mechanical key
Lock with the mechanical key
●The glove box light turns on when the engine switch is in ACCESSORY or IGNITION
ON mode.
●The trunk opener main switch is located in the glove box. ( P. 1 1 2 )
Push the knob.
Lift by hand to fully open the console
box.
Glove box
1
2
3
●The insert inside the glove box can be
removed.
Console box
Page 387 of 600

387
IS350/300/200t_U (OM53D18U)
6
Interior features
6-4. Using the other interior features
To set the visor in the forward posi-
tion, flip it down.
To set the visor in the side position,
flip down, unhook, and swing it to the
side.
Slide the cover to open.
The light turns on when the cover is
opened.
The clock can be adjusted. Pressing and holding will move the
clock hands backward.
Pressing and holding will move the
clock hands forward.
Other interior features
Sun visors
1
2
Vanity mirrors
Clock
1
2
Page 392 of 600
3926-4. Using the other interior features
IS350/300/200t_U (OM53D18U)
The garage door opener (HomeLink® Universal Transceiver) is manufactured
under license from HomeLink®.
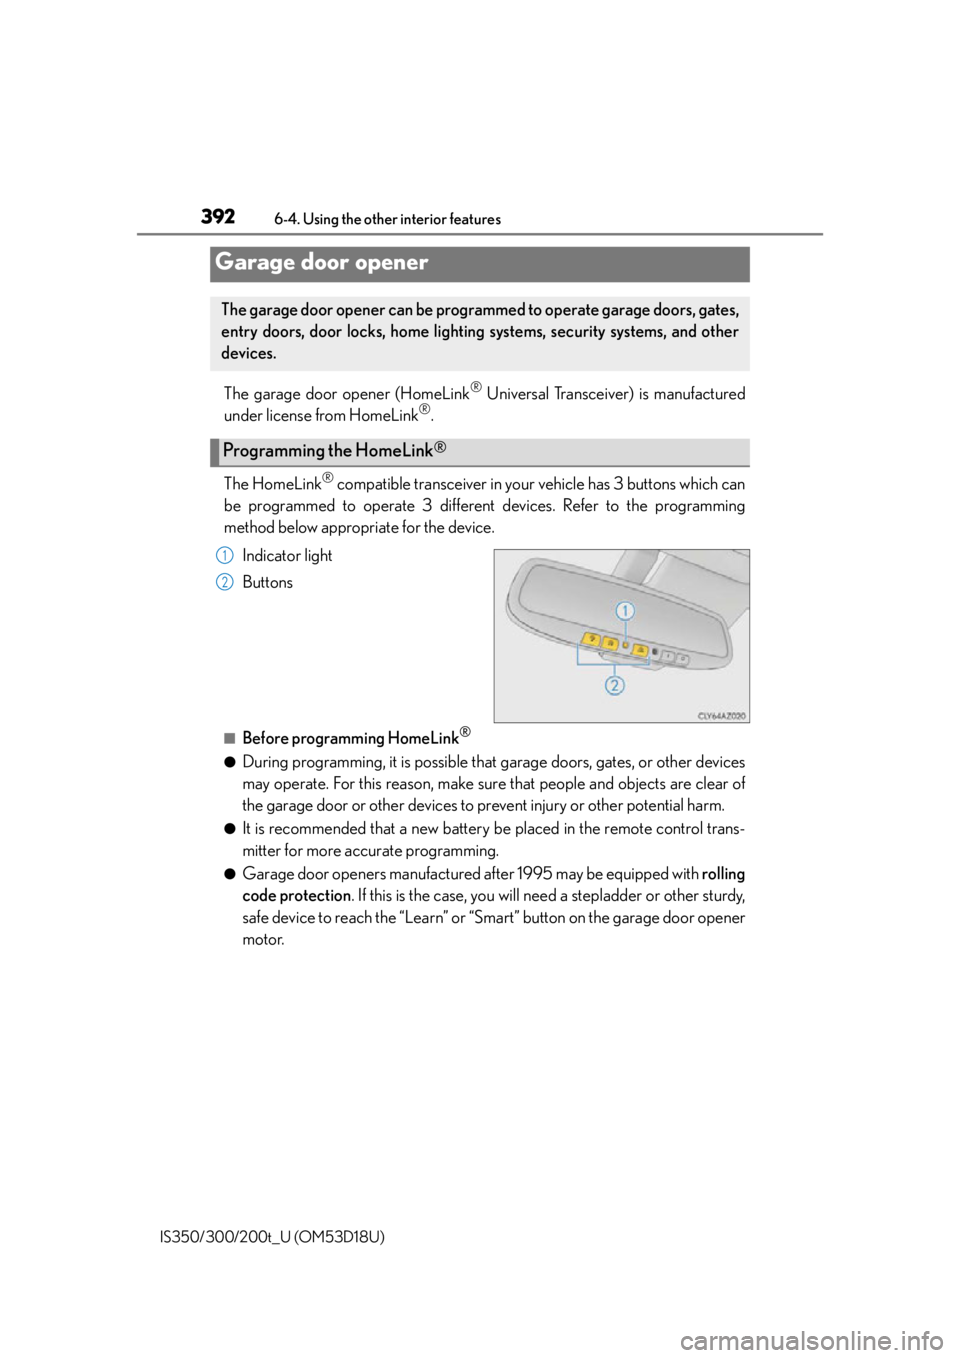
The HomeLink
® compatible transceiver in your vehicle has 3 buttons which can
be programmed to operate 3 different devices. Refer to the programming
method below appropriate for the device.
Indicator light
Buttons
■Before programming HomeLink®
●During programming, it is possible that garage doors, gates, or other devices
may operate. For this reason, make sure that people and objects are clear of
the garage door or other devices to pr event injury or other potential harm.
●It is recommended that a new battery be placed in the remote control trans-
mitter for more accurate programming.
●Garage door openers manufactured after 1995 may be equipped with rolling
code protection . If this is the case, you will need a stepladder or other sturdy,
safe device to reach the “Learn” or “S mart” button on the garage door opener
motor.
Garage door opener
The garage door opener can be programmed to operate garage doors, gates,
entry doors, door locks, home lighting systems, security systems, and other
devices.
Programming the HomeLink®
1
2
Page 393 of 600
3936-4. Using the other interior features
6
Interior features
IS350/300/200t_U (OM53D18U)
■Programming HomeLink®
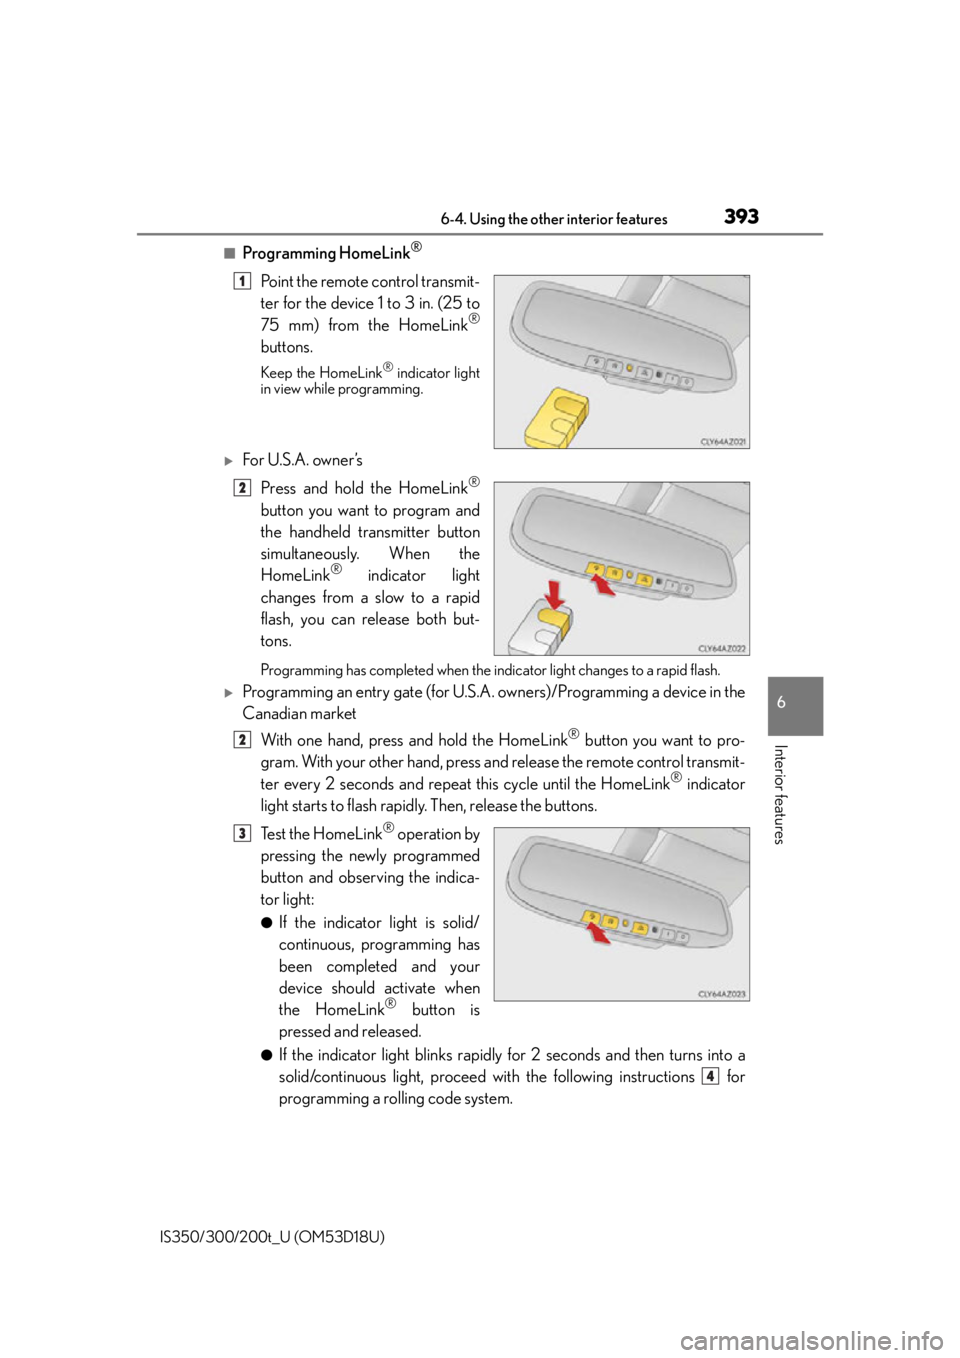
Point the remote control transmit-
ter for the device 1 to 3 in. (25 to
75 mm) from the HomeLink
®
buttons.
Keep the HomeLink® indicator light
in view while programming.
For U.S.A. owner ’s
Press and hold the HomeLink
®
button you want to program and
the handheld transmitter button
simultaneously. When the
HomeLink
® indicator light
changes from a slow to a rapid
flash, you can release both but-
tons.
Programming has completed when the indicator light changes to a rapid flash.
Programming an entry gate (for U.S.A. owners)/Programming a device in the
Canadian market
With one hand, press and hold the HomeLink
® button you want to pro-
gram. With your other hand, press and release the remote control transmit-
ter every 2 seconds and repeat this cycle until the HomeLink
® indicator
light starts to flash rapidly. Then, release the buttons.
Te s t t h e H o m e L i n k
® operation by
pressing the newly programmed
button and observing the indica-
tor light:
●If the indicator light is solid/
continuous, programming has
been completed and your
device should activate when
the HomeLink
® button is
pressed and released.
●If the indicator light blinks rapidly for 2 seconds and then turns into a
solid/continuous light, proceed with the following instructions for
programming a rolling code system.
1
2
2
3
4