park Lexus IS200t 2016 Quick Guide / LEXUS 2016 IS200T,IS300,IS350 (OM53D18U) Owner's Manual
[x] Cancel search | Manufacturer: LEXUS, Model Year: 2016, Model line: IS200t, Model: Lexus IS200t 2016Pages: 600, PDF Size: 7.94 MB
Page 170 of 600
1704-2. Driving procedures
IS350/300/200t_U (OM53D18U)
*1: To improve fuel efficiency and reduce noise, shift the shift lever to D for normal driv-
ing.
*2: Any gear range can be fixed when driving in M mode.
■Sport mode/Eco drive mode
P. 2 4 6
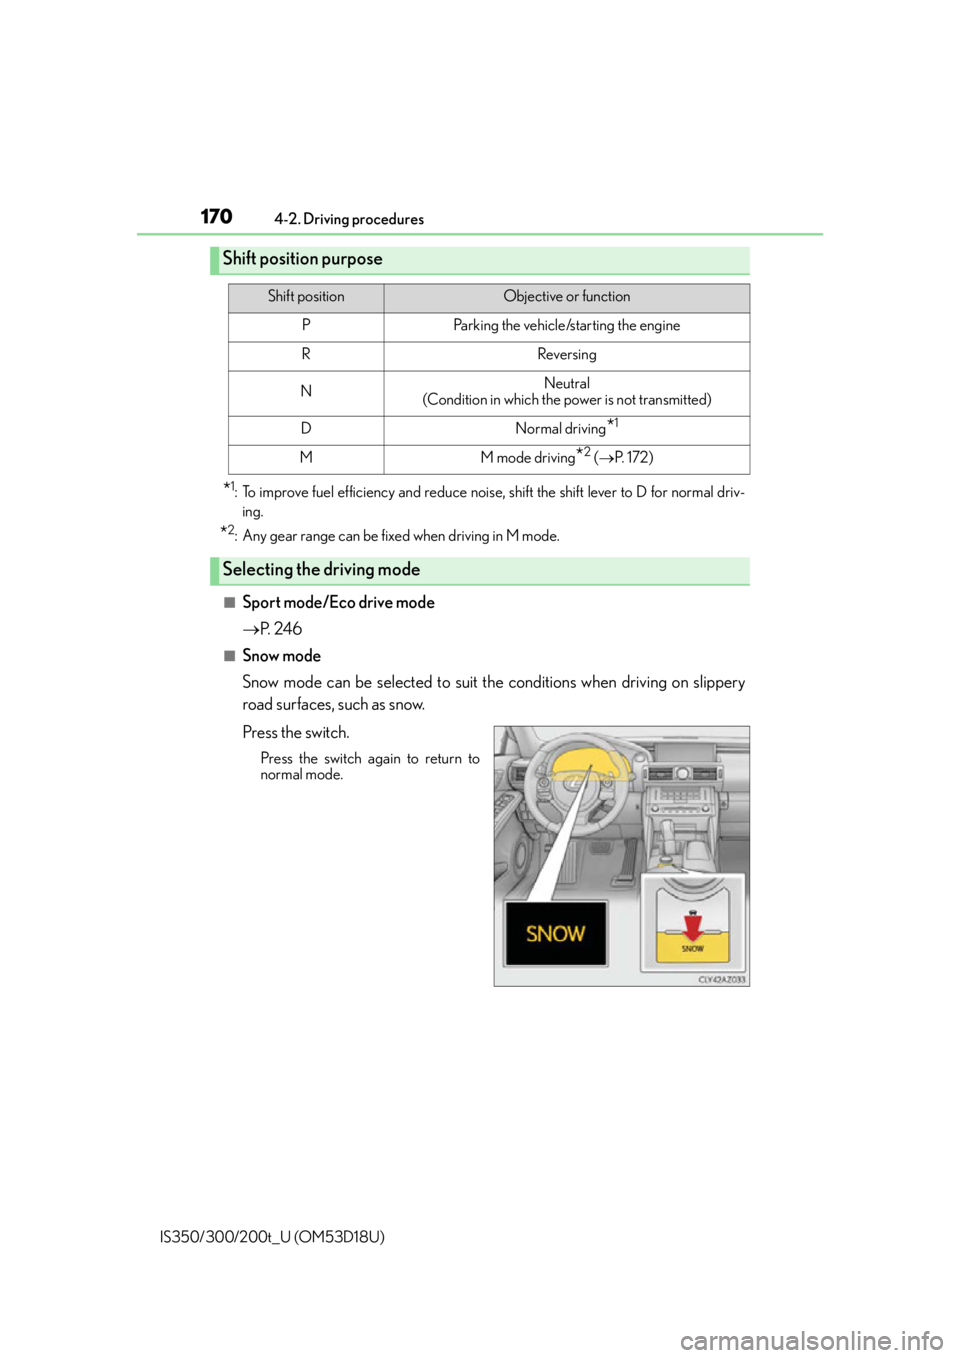
■Snow mode
Snow mode can be selected to suit th e conditions when driving on slippery
road surfaces, such as snow.
Press the switch.
Press the switch again to return to
normal mode.
Shift position purpose
Shift positionObjective or function
PParking the vehicle/starting the engine
RReversing
NNeutral
(Condition in which the power is not transmitted)
DNormal driving*1
MM mode driving*2 ( P. 1 7 2 )
Selecting the driving mode
Page 177 of 600
1774-2. Driving procedures
4
Driving
IS350/300/200t_U (OM53D18U)
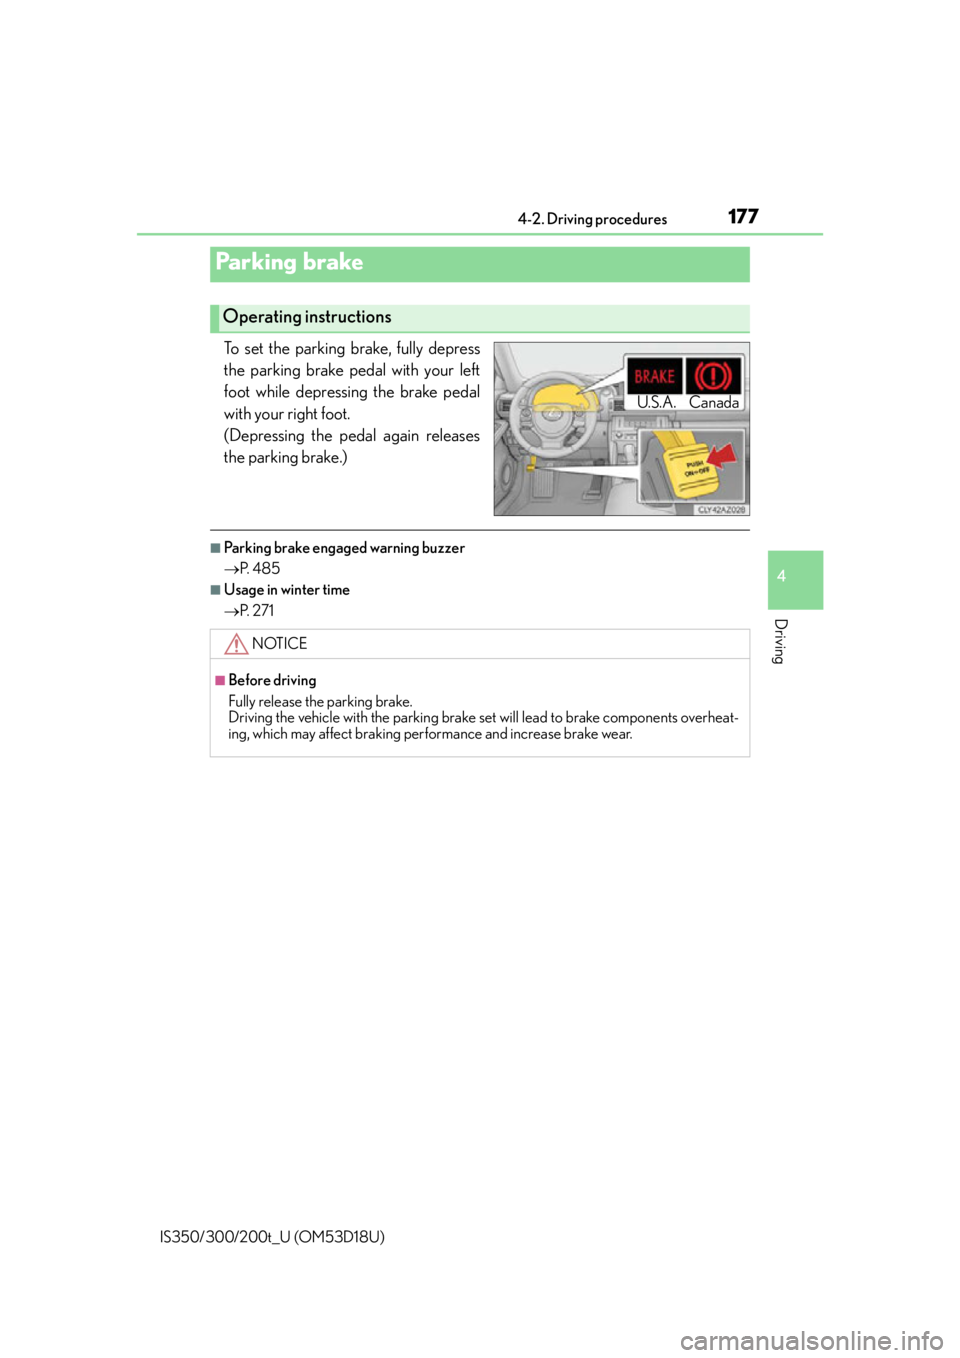
To set the parking brake, fully depress
the parking brake pedal with your left
foot while depressing the brake pedal
with your right foot.
(Depressing the pedal again releases
the parking brake.)
■Parking brake engaged warning buzzer
P. 4 8 5
■Usage in winter time
P. 2 7 1
Parking brake
Operating instructions
U.S.A. Canada
NOTICE
■Before driving
Fully release the parking brake.
Driving the vehicle with the parking brake set will lead to brake components overheat-
ing, which may affect braking perf ormance and increase brake wear.
Page 178 of 600
178
IS350/300/200t_U (OM53D18U)4-3. Operating the lights and wipers
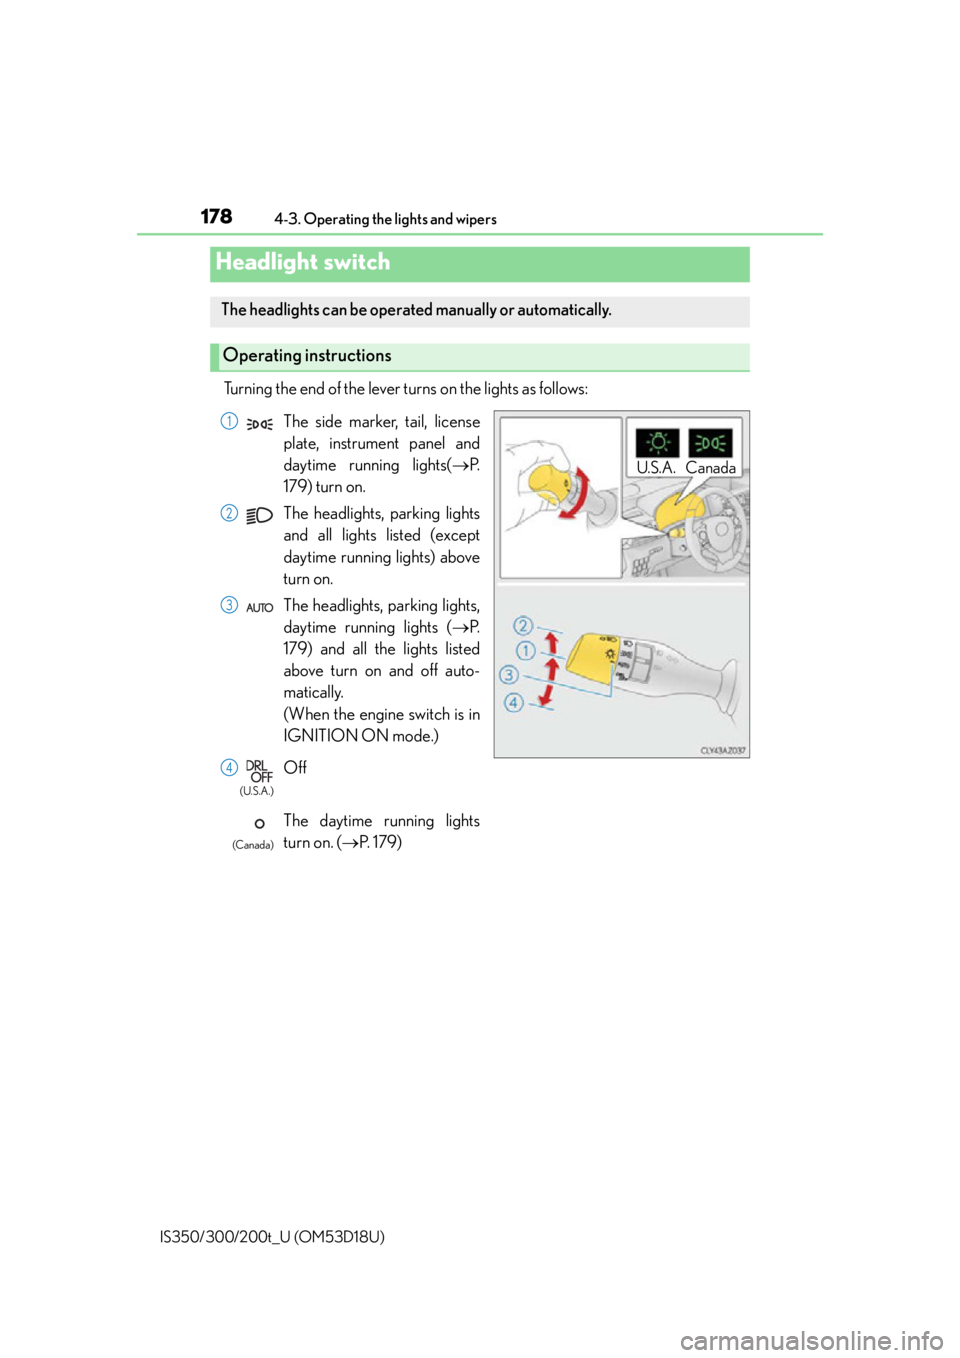
Turning the end of the lever turns on the lights as follows:
Headlight switch
The headlights can be operated manually or automatically.
Operating instructions
U.S.A. Canada
The side marker, tail, license
plate, instrument panel and
daytime running lights(
P.
179) turn on.
The headlights, parking lights
and all lights listed (except
daytime running lights) above
turn on.
The headlights, parking lights,
daytime running lights ( P.
179) and all the lights listed
above turn on and off auto-
matically.
(When the engine switch is in
IGNITION ON mode.)
Off
The daytime running lights
turn on. ( P. 1 7 9 )
1
2
3
4
(U.S.A.)
(Canada)
Page 179 of 600
1794-3. Operating the lights and wipers
4
Driving
IS350/300/200t_U (OM53D18U)
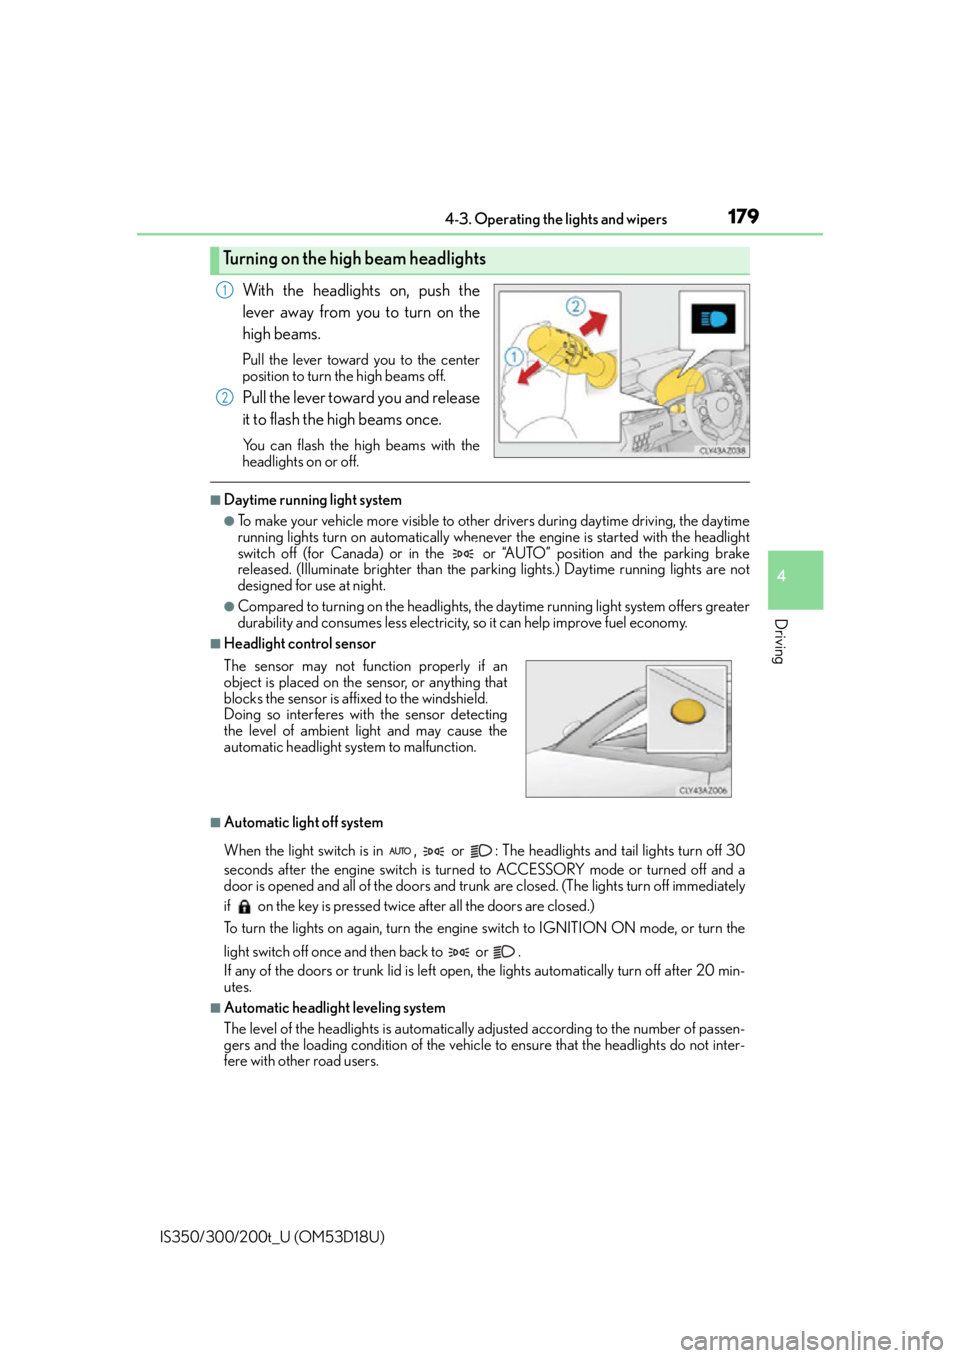
With the headlights on, push the
lever away from you to turn on the
high beams.
Pull the lever toward you to the center
position to turn the high beams off.
Pull the lever toward you and release
it to flash the high beams once.
You can flash the high beams with the
headlights on or off.
■Daytime running light system
●To make your vehicle more visible to other drivers during daytime driving, the daytime
running lights turn on automatically whenever the engine is started with the headlight
switch off (for Canada) or in the or “AUTO” position and the parking brake
released. (Illuminate brighter than the par king lights.) Daytime running lights are not
designed for use at night.
●Compared to turning on the headlights, the daytime running light system offers greater
durability and consumes less electricity, so it can help improve fuel economy.
■Headlight control sensor
■Automatic light off system
When the light switch is in , or : The headlights and tail lights turn off 30
seconds after the engine switch is turned to ACCESSORY mode or turned off and a
door is opened and all of the doors and trunk are closed. (The lights turn off immediately
if on the key is pressed twice after all the doors are closed.)
To turn the lights on again, turn the engine switch to IGNITION ON mode, or turn the
light switch off once and then back to or .
If any of the doors or trunk lid is left open, the lights automatically turn off after 20 min-
utes.
■Automatic headlight leveling system
The level of the headlights is automatically ad justed according to the number of passen-
gers and the loading condition of the vehicle to ensure that the headlights do not inter-
fere with other road users.
Turning on the high beam headlights
1
2
The sensor may not function properly if an
object is placed on the sensor, or anything that
blocks the sensor is affixed to the windshield.
Doing so interferes with the sensor detecting
the level of ambient light and may cause the
automatic headlight system to malfunction.
Page 185 of 600

1854-3. Operating the lights and wipers
4
Driving
IS350/300/200t_U (OM53D18U)
NOTICE
■Notes when using the Automatic High Beam system
●Do not touch the camera sensor.
●Do not subject the camera sensor to a strong impact.
●Do not disassemble the camera sensor.
●Do not spill liquid onto the camera sensor.
●Do not apply window tinting or stickers to the camera sensor or the area of wind-
shield near the camera sensor.
●Do not place items on the dashboard. There is a possibility that the camera sensor will
mistake items reflected in the windshield for streetlights, the headlights of other vehi-
cles, etc.
●Do not install a parking tag or any other accessories near or around the camera sen-
sor.
●Do not overload the vehicle.
●Do not modify the vehicle.
●Do not replace windshield with non-genuine windshield.
Contact your Lexus dealer.
Observe the following to ensure that the Auto-
matic High Beam functions correctly.
Page 194 of 600
194
IS350/300/200t_U (OM53D18U)4-4. Refueling
●Close all the doors and windows, and turn the engine switch off.
●Confirm the type of fuel.
■Fuel types
P. 5 2 6
■Fuel tank opening for unleaded gasoline
To help prevent incorrect fueling, your vehicle has a fuel tank opening that only accom-
modates the special nozzle on unleaded fuel pumps.
Opening the fuel tank cap
Perform the following steps to open the fuel tank cap:
Before refueling the vehicle
CAUTION
■When refueling the vehicle
Observe the following precautions while refu eling the vehicle. Failure to do so may
result in death or serious injury.
●After exiting the vehicle and before openin g the fuel door, touch an unpainted metal
surface to discharge any static electricity. It is important to discharge static electricity
before refueling because sparks resulting fr om static electricity can cause fuel vapors
to ignite while refueling.
●Always hold the grips on th e fuel tank cap and turn it slowly to remove it.
A whooshing sound may be heard when the fuel tank cap is loosened. Wait until the
sound cannot be heard before fully removing the cap. In hot weather, pressurized fuel
may spray out the filler neck and cause injury.
●Do not allow anyone that has not discharged static electricity from their body to come
close to an open fuel tank.
●Do not inhale vaporized fuel.
Fuel contains substances th at are harmful if inhaled.
●Do not smoke while refueling the vehicle.
Doing so may cause the fuel to ignite and cause a fire.
●Do not return to the vehicle or touch any person or object that is statically charged.
This may cause static electricity to build up, resulting in a possible ignition hazard.
■When refueling
Observe the following precautions to prevent fuel overflowing from the fuel tank:
●Securely insert the fuel nozzle into the fuel filler neck.
●Stop filling the tank after the fuel nozzle automatically clicks off.
●Do not top off the fuel tank.
Page 220 of 600

2204-5. Using the driving support systems
IS350/300/200t_U (OM53D18U)
■Temporary cancelation of the LDA system functions
If any of the following occurs, the LDA system functions will be temporarily canceled. The
functions will resume after the necessar y operating conditions have returned.
●The turn signal lever is operated.
●The vehicle speed deviates from the operating range of the LDA system functions.
●When the lane lines cannot be recognized while driving.
●When the lane departure warning sounds.
The lane departure warning function will no t operate again for a several seconds after it
has been activated, even if the vehicle leaves the lane again.
■The lane departure warning
Depending on the audio system sound level or air conditioning fan noise while the audio
system or air conditioning system is in use, it may be difficult to hear the warning sound.
■After the vehicle has been parked in the sun
The LDA system may not be available and a warning message ( P. 486) will be dis-
played for a while after driving has started. When the temperature in the cabin decreases
and the temperature around the camera sensor ( P. 202) becomes suitable for its
operation, the functions will begin to operate.
■If there are lane markers on only one side of the vehicle
The lane departure warning will not operate fo r the side on which lane markers could not
be recognized.
■Conditions in which the functi on may not operate correctly
In the following situations, the camera sensor may be unable to recognize lane markers
causing the lane departure warn ing function to operate incorrectly. However, this does
not indicate a malfunction.
●When driving through an area with no lane markers, such as a tollbooth, a crossing or
before a ticket checkpoint
●When driving on a sharp curve
●When lane markers are extremely narrow or extremely wide
●When the vehicle leans to one side an unus ual amount due to a heavy load or improper
tire inflation pressure
●When the following distance between your vehicle and the vehicle ahead is extremely
short
●When the lane markers are yellow (These may be more difficult for the system to rec-
ognize compared to white markers.)
●When the lane markers are broken, Botts’ dots (raised pavement markers) or stones
●When the lane markers are on a curb etc.
●When lane markers are obscured or partially obscured by sand, dirt, etc.
●When there are shadows on the road running parallel with lane markers, or if a shadow
covers the lane markers
●When driving on a particularly brig ht road surface, such as concrete
●When driving on a road surface that is bright due to reflected light
●When driving in a location where the light level changes rapi dly, such as the entrance to
or exit from a tunnel
●When sunlight or the headlights of oncoming vehicles are shining directly into the cam-
era lens
Page 223 of 600
2234-5. Using the driving support systems
4
Driving
IS350/300/200t_U (OM53D18U)
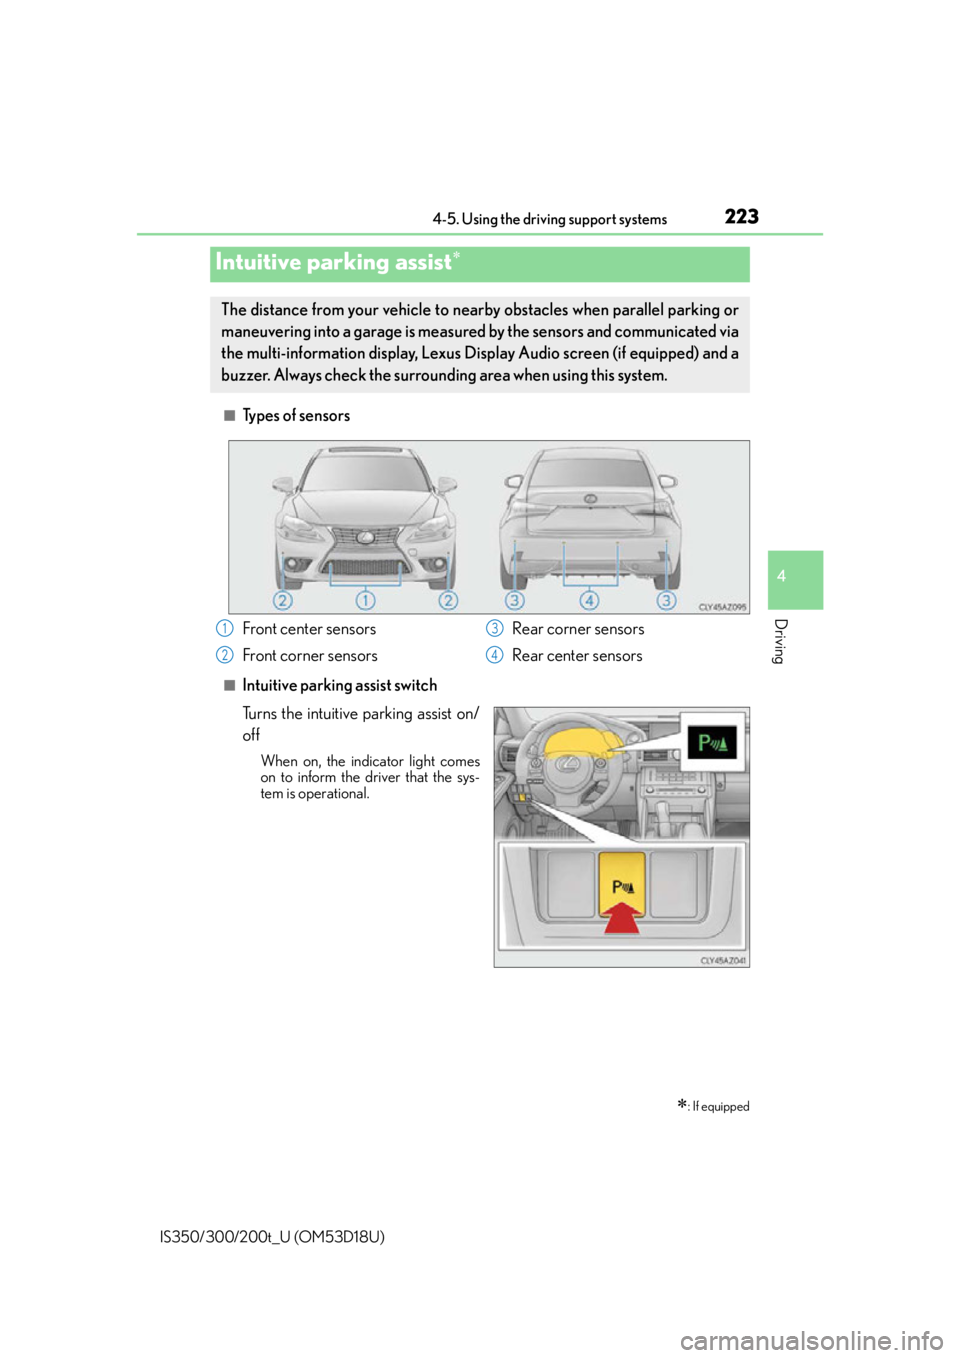
■Types of sensors
■Intuitive parking assist switch
Turns the intuitive parking assist on/
off
When on, the indicator light comes
on to inform the driver that the sys-
tem is operational.
Intuitive parking assist
: If equipped
The distance from your vehicle to nearby obstacles when parallel parking or
maneuvering into a garage is measure d by the sensors and communicated via
the multi-information display, Lexus Di splay Audio screen (if equipped) and a
buzzer. Always check the surrounding area when using this system.
Front center sensors
Front corner sensors Rear corner sensors
Rear center sensors1
2
3
4
Page 227 of 600
2274-5. Using the driving support systems
4
Driving
IS350/300/200t_U (OM53D18U)
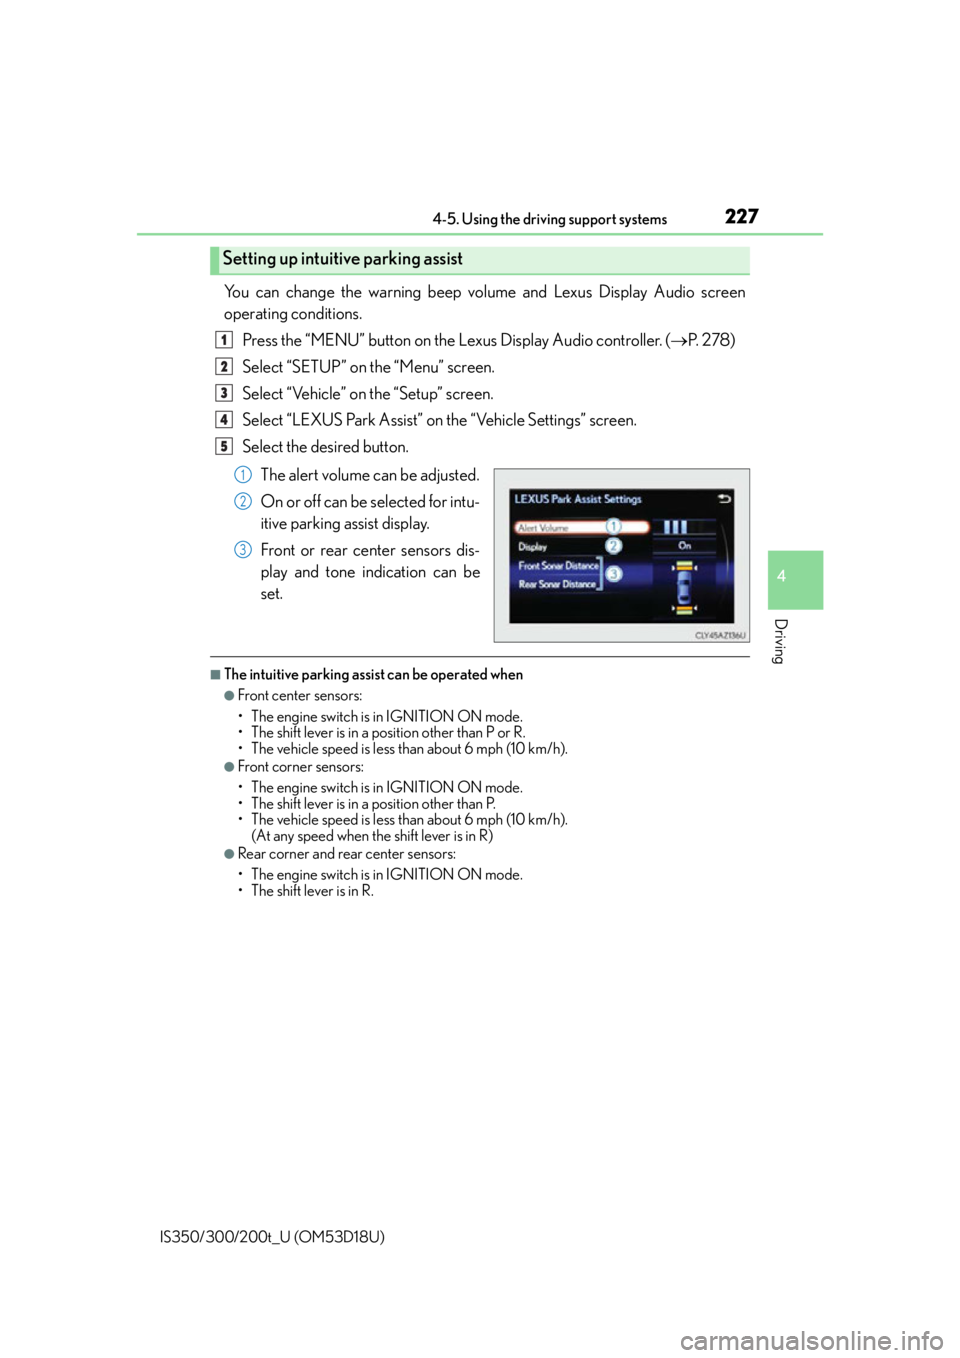
You can change the warning beep volume and Lexus Display Audio screen
operating conditions.Press the “MENU” button on the Lexus Display Audio controller. ( P. 2 7 8 )
Select “SETUP” on the “Menu” screen.
Select “Vehicle” on the “Setup” screen.
Select “LEXUS Park Assist” on the “Vehicle Settings” screen.
Select the desired button.
The alert volume can be adjusted.
On or off can be selected for intu-
itive parking assist display.
Front or rear center sensors dis-
play and tone indication can be
set.
■The intuitive parking assist can be operated when
●Front center sensors:
• The engine switch is in IGNITION ON mode.
• The shift lever is in a position other than P or R.
• The vehicle speed is less than about 6 mph (10 km/h).
●Front corner sensors:
• The engine switch is in IGNITION ON mode.
• The shift lever is in a position other than P.
• The vehicle speed is less than about 6 mph (10 km/h).(At any speed when the shift lever is in R)
●Rear corner and rear center sensors:
• The engine switch is in IGNITION ON mode.
• The shift lever is in R.
Setting up intuitive parking assist
1
2
3
4
5
1
2
3
Page 228 of 600

2284-5. Using the driving support systems
IS350/300/200t_U (OM53D18U)
■Sensor detectio n information
●The sensor’s detection areas are limited to the areas around the vehicle’s front corner
and rear bumpers.
●Certain vehicle conditions and the surround ing environment may affect the ability of
the sensor to correctly detect obstacles. Particular instances where this may occur are
listed below.
• There is dirt, snow or ice on the sensor . (Wiping the sensors will resolve this prob-
lem.)
• The sensor is frozen. (Thawing th e area will resolve this problem.)
In especially cold weather, if a sensor is frozen the screen may show an abnormal
display, or obstacles may not be detected.
• The sensor is covered in any way.
• The vehicle is leaning co nsiderably to one side.
• On an extremely bumpy road, on an incline, on gravel, or on grass.
• The vicinity of the vehicle is noisy due to vehicle horns, motorcycle engines, air brakes of large vehicles, or other loud noises producing ultrasonic waves.
• There is another vehicle equipped with parking assist sensors in the vicinity.
• The sensor is coated with a sheet of spray or heavy rain.
• The vehicle is equipped with a fender pole or wireless antenna.
• Towing eyelets are installed.
• The bumper or sensor receives a strong impact.
• The vehicle is approaching a tall or curved curb.
• In harsh sunlight or intense cold weather.
• The area directly under the bumpers is not detected.
• If obstacles draw too close to the sensor.
• A non-genuine Lexus suspension (low ered suspension etc.) is installed.
• People may not be detected if they are wearing certain types of clothing.
In addition to the examples above, there ar e instances in which, because of their shape,
signs and other objects may be judged by the sensor to be closer than they are.
●The shape of the obstacle may prevent the sensor from detecting it. Pay particular
attention to the following obstacles:
• Wires, fences, ropes, etc.
• Cotton, snow and other materials that absorb sound waves
• Sharply-angled objects
•Low obstacles
• Tall obstacles with upper sections projecting outwards in the direction of your vehi-
cle
●The following situations may occur during use.
• Depending on the shape of the obstacle and other factors, the detection distance may shorten, or detect ion may be impossible.
• Obstacles may not be detected if they are too close to the sensor.
• There will be a short delay between obst acle detection and display. Even at slow
speeds, there is a possibility that the obstacle will come within the sensor’s detection
areas before the display is shown and the warning beep sounds.
• Thin posts or objects lower than the sensor may not be detected when approached,
even if they have been detected once.
• It might be difficult to hear beeps due to the volume of the audio system or air flow noise of the air conditioning system.