Date Lexus IS200t 2017 Owner's Manuals
[x] Cancel search | Manufacturer: LEXUS, Model Year: 2017, Model line: IS200t, Model: Lexus IS200t 2017Pages: 676, PDF Size: 149.78 MB
Page 104 of 676
1042. Instrument cluster
IS200t_EE(OM53D77E)
*1: Resetting: P. 101
*2: Use the displayed fuel consumption as a reference.
*3: When only a small amount of fuel is added to the tank, the display may not be
updated.
When refueling, turn the engine switch off. If the vehicle is refueled without turning the
engine switch off, the display may not be updated.
*4: This distance is computed based on your average fuel consumption. As a result, theactual distance that can be driven may differ from that displayed.
■Eco Driving Indicator
P. 113
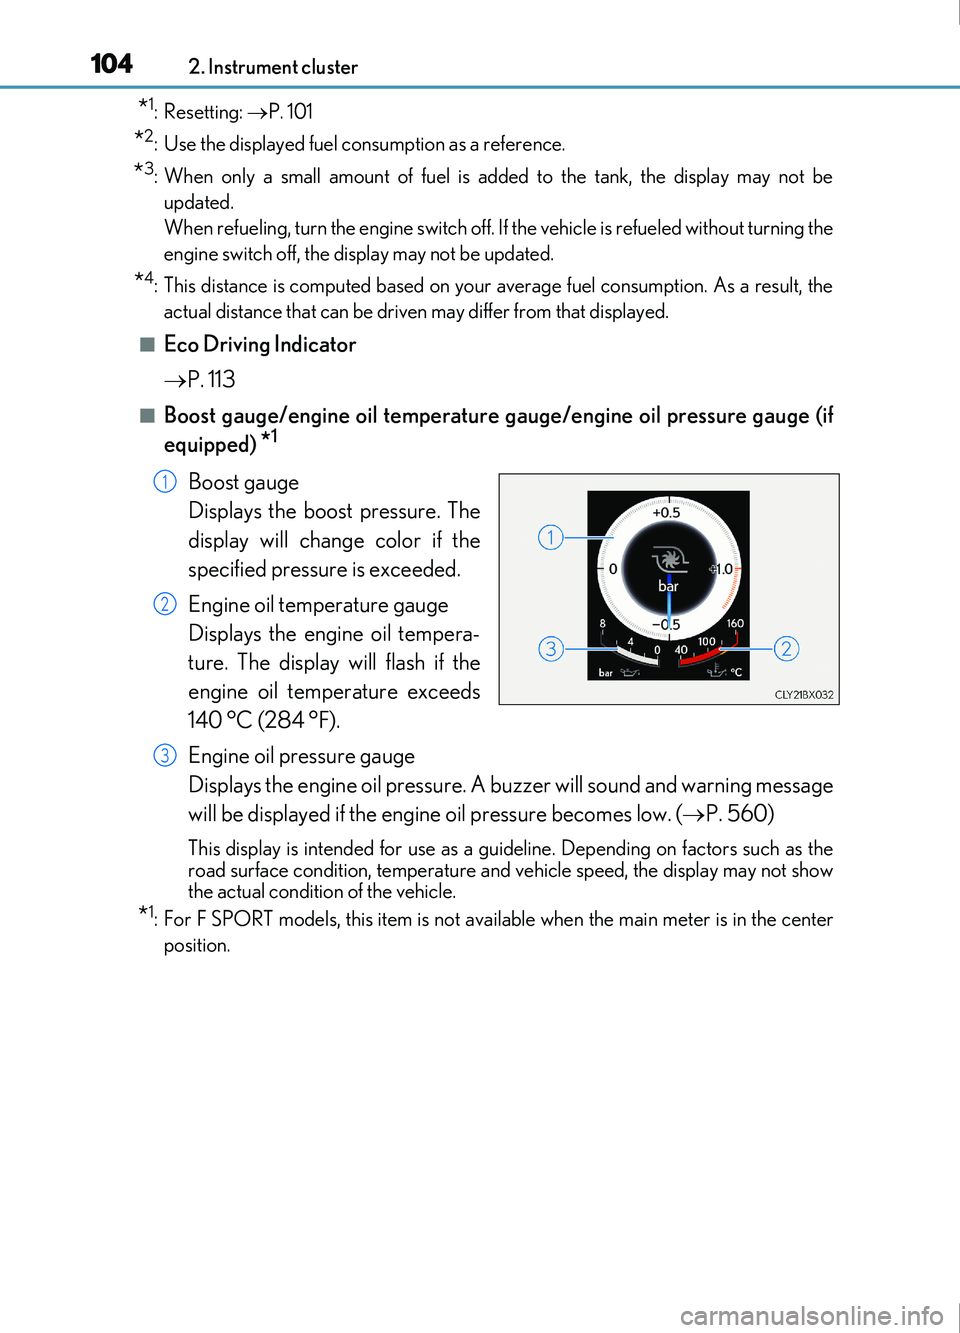
■Boost gauge/engine oil temperature gauge/engine oil pressure gauge (if
equipped)
*1
Boost gauge
Displays the boost pressure. The
display will change color if the
specified pressure is exceeded.
Engine oil temperature gauge
Displays the engine oil tempera-
ture. The display will flash if the
engine oil temperature exceeds
140 °C (284 °F).
Engine oil pressure gauge
Displays the engine oil pressure. A buzzer will sound and warning message
will be displayed if the engine oil pressure becomes low. ( P. 560)
This display is intended for use as a guid eline. Depending on factors such as the
road surface condition, temperature and vehicle speed, the display may not show
the actual condition of the vehicle.
*1: For F SPORT models, this item is not ava ilable when the main meter is in the center
position.
1
2
3
Page 117 of 676
1172. Instrument cluster
2
Instrument cluster
IS200t_EE(OM53D77E)
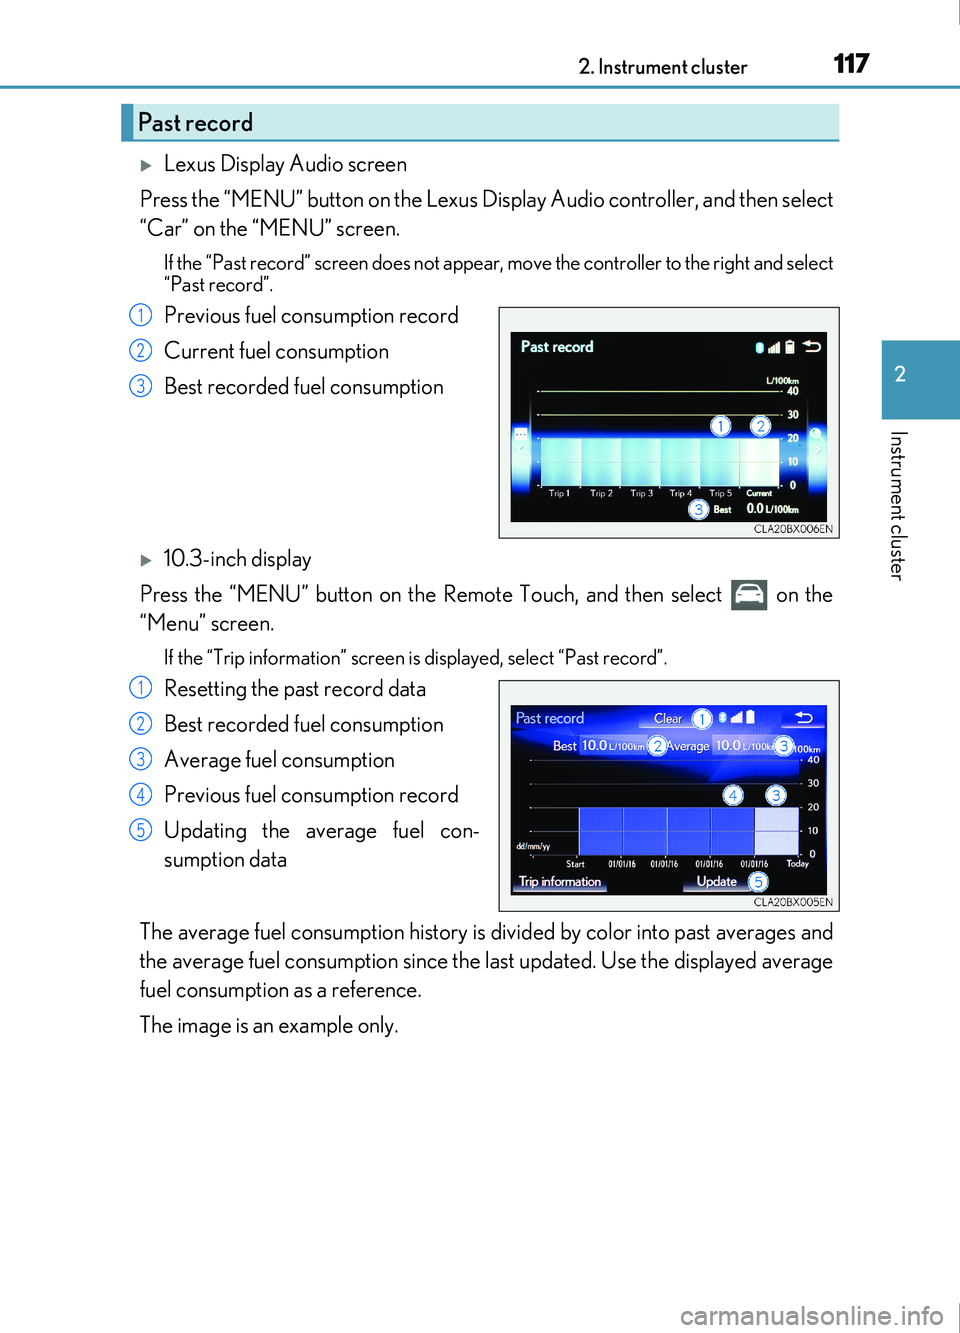
Lexus Display Audio screen
Press the “MENU” button on the Lexus Display Audio controller, and then select
“Car” on the “MENU” screen.
If the “Past record” screen does not appear , move the controller to the right and select
“Past record”.
Previous fuel consumption record
Current fuel consumption
Best recorded fuel consumption
10.3-inch display
Press the “MENU” button on the Remote Touch, and then select on the
“Menu” screen.
If the “Trip information” screen is displayed, select “Past record”.
Resetting the past record data
Best recorded fuel consumption
Average fuel consumption
Previous fuel consumption record
Updating the average fuel con-
sumption data
The average fuel consumption history is di vided by color into past averages and
the average fuel consumption since the last updated. Use the displayed average
fuel consumption as a reference.
The image is an example only.
Past record
1
2
3
1
2
3
4
5
Page 118 of 676
1182. Instrument cluster
IS200t_EE(OM53D77E)
■Updating the past record data
Vehicles with a Lexus Display Audio system
Update the average fuel consumption by moving the controller to the left and select
“Update” to measure the current fuel consumption again.
Vehicles with a 10.3-inch display
Update the average fuel consumption by selecting “Update” to measure the current fuel
consumption again.
■Resetting the data
Vehicles with a Lexus Display Audio system
The fuel consumption data can be deleted by moving the controller to the left and select
“Clear”.
Vehicles with a 10.3-inch display
The fuel consumption data can be deleted by selecting “Clear”.
■Cruising range
Displays the estimated maximum distance that can be driven with the quantity of fuel
remaining.
This distance is computed based on your average fuel consumption.
As a result, the actual distance that can be driven may differ from that displayed.
Page 234 of 676
234
IS200t_EE(OM53D77E)4-4. Refueling
●Close all the doors and windows, and turn the engine switch off.
●Confirm the type of fuel.
■Fuel types
P. 632
■Fuel tank opening for unleaded gasoline
To help prevent incorrect fueling, your vehicle has a fuel tank opening that only accom-
modates the special nozzle on unleaded fuel pumps.
Opening the fuel tank cap
Perform the following steps to open the fuel tank cap:
Before refueling the vehicle
Page 322 of 676
3224-5. Using the driving support systems
IS200t_EE(OM53D77E)
WARNING
■When using the Lexus parking assist monitor system
The parking assist monitor is a supplemental device intended to assist the driver when
backing up. When backing up, be sure to check visually behind and all around the vehi-
cle before proceeding.
Observe the following precautions to avoid an accident that could result in death or
serious injuries.
●Never depend on the parking assist monitor entirely when backing up. The image
and the position of the guide lines displayed on the screen may differ from the actual
state.
Use caution, just as you would when backing up any vehicle.
●Be sure to back up slowly, depressing the brake pedal to control vehicle speed.
●If you seem likely to hit nearby vehicles , obstacles, people or mount the shoulder,
depress the brake pedal to stop the vehicle.
●The instructions given are only guidelines.
When and how much to turn the steering wheel will vary according to traffic condi-
tions, road surface conditions, vehicle condition, etc. when parking. It is necessary to
be fully aware of this before using the parking assist system.
●When parking, be sure to check that th e parking space will accommodate your vehi-
cle before maneuvering into it.
●Do not use the parking assist monitor in the following cases:
• On icy or slick road surfaces, or in snow
• When using tire chains or emergency tires
• When the trunk lid is not closed completely
• On roads that are not flat or straight, such as curves or slopes.
●In low temperatures, the screen may darken or the image may become faint. The
image could distort when the vehicle is moving, or you may become unable to see the
image on the screen. Be sure to check direct visually and with the mirrors all around
the vehicle before proceeding.
●If the tire sizes are changed, the position of the guide lines displayed on the screen
may change.
●The camera uses a special lens. The distances between objects and pedestrians that
appear in the image displayed on the screen will differ from the actual distances.
( P. 316)
●Estimated course line display mode: If the steering wheel is straight and the vehicle
width guide lines and the estimated course lin es are not in alignment, have the vehicle
inspected by any authorized Lexus retailer or Lexus authorized repairer, or any reli-
able repairer.
Page 363 of 676

3635-2. Setup
5
Lexus Display Audio system
IS200t_EE(OM53D77E)
Go to “General settings”: “MENU” button “Setup” “General”
General settings
Settings are available for adjusting the operation sounds, screen animation,
etc.
Screen for general settings
ButtonFunction
“Language”Change language. The selectable languages may
differ depending on the model or region.
“Units of measurement”Change the distance unit.
“Beep”Set the beep sound on/off.
“Button colour”Change the button color.
“Customise images”Change the startup image and screen off image.
( P. 364)
“Animation”Set the animation effect on/off.
“Delete personal data”Delete personal data ( P. 365)
“Software update”
Update program versions. For details, contact any
authorized Lexus retailer or Lexus authorized
repairer, or any reliable repairer.
“Gracenote® database
update”Update gracenote database versions. For details,
contact any authorized Lexus retailer or Lexus
authorized repairer, or any reliable repairer.
“Software information”Display the open source license.
Page 365 of 676

3655-2. Setup
5
Lexus Display Audio system
IS200t_EE(OM53D77E)
■USB memory
When saving the images to a USB memory device, name the folder that the images are
saved to “Image”.
●Compatible device formats
The following device format can be used: • The image’s file format must be JPEG
• USB communication format: USB2.0 FS (480 Mbps)
• File system format: FAT16/32 (Windows)
• Correspondence class: Mass storage class
●JPEG file compatibility
Compatible image size: Maximum 10 MB
Go to “Delete personal data”: “MENU” button “Setup” “General”
“Delete personal data”
Select “Delete”.
Check carefully beforehand, as data cannot be retrieved once deleted.
The following personal data will be deleted or changed to its default settings.
• Phonebook data
•Voice tag
• Call history data
•Favorite data
• Bluetooth
® devices data
• Phone sound settings
• Detailed Bluetooth
® settings
• Audio/video setting
• Customized image data
•FM info setting
• Software update history
• Software update detail information
• Phone display setting
• Contact/call history setting
• Messaging setting
NOTICE
■To prevent damage to the USB memory device or its terminals
P. 394
Deleting personal data
1
2
Page 372 of 676
3725-3. Using the audio system
IS200t_EE(OM53D77E)
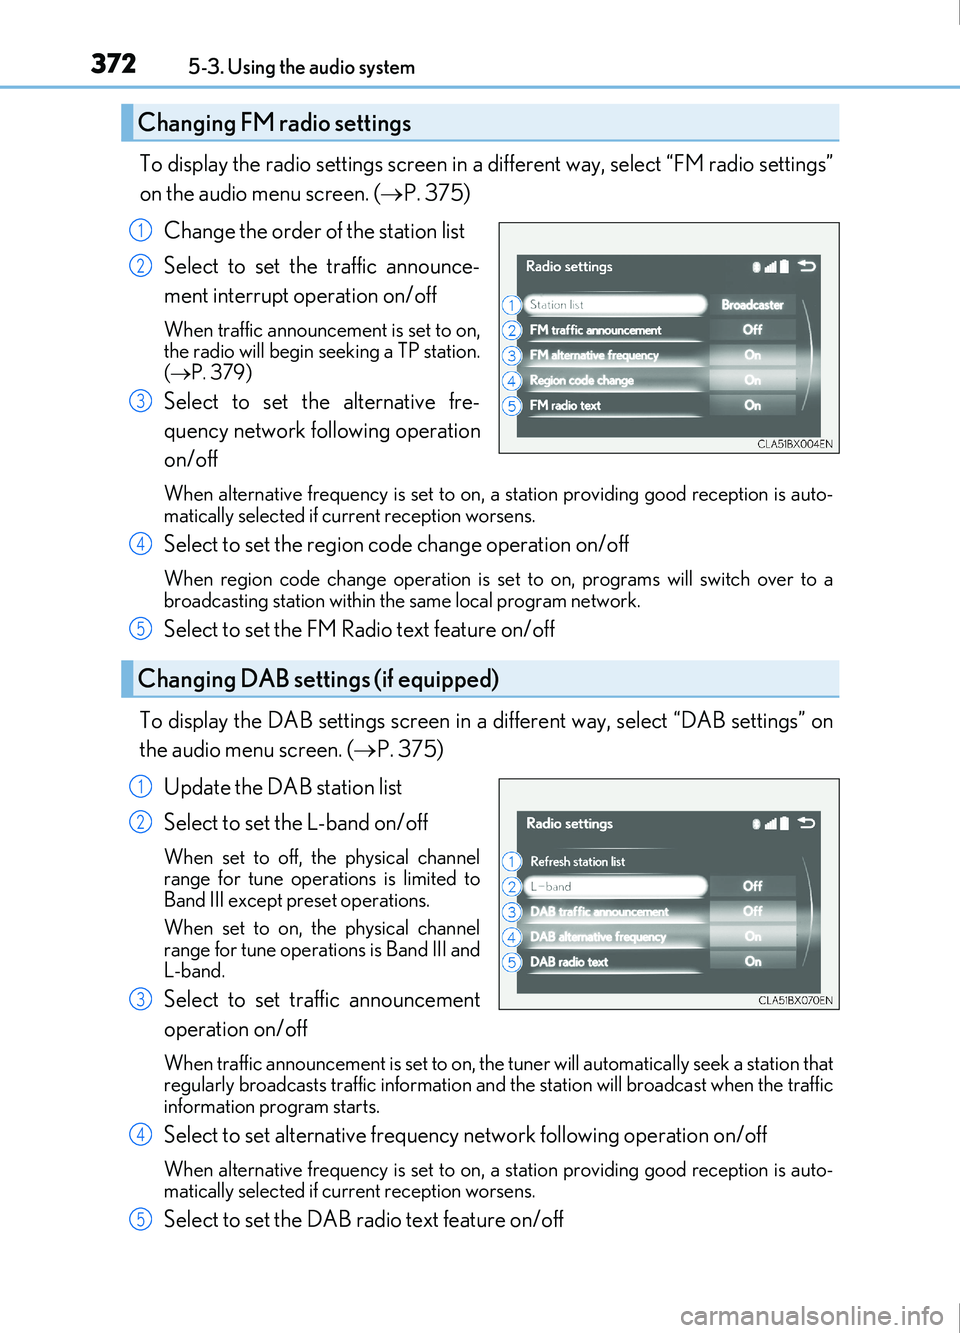
To display the radio settings screen in a different way, select “FM radio settings”
on the audio menu screen. (P. 375)
Change the order of the station list
Select to set the traffic announce-
ment interrupt operation on/off
When traffic announcement is set to on,
the radio will begin seeking a TP station.
( P. 379)
Select to set the alternative fre-
quency network following operation
on/off
When alternative frequency is set to on, a station providing good reception is auto-
matically selected if current reception worsens.
Select to set the region code change operation on/off
When region code change operation is se t to on, programs will switch over to a
broadcasting station within th e same local program network.
Select to set the FM Radio text feature on/off
To display the DAB settings screen in a different way, select “DAB settings” on
the audio menu screen. ( P. 375)
Update the DAB station list
Select to set the L-band on/off
When set to off, the physical channel
range for tune operations is limited to
Band III except preset operations.
When set to on, the physical channel
range for tune operations is Band III and
L-band.
Select to set traffic announcement
operation on/off
When traffic announcement is set to on, the tuner will automatically seek a station that
regularly broadcasts traffic information and the station will broadcast when the traffic
information program starts.
Select to set alternative frequency network following operation on/off
When alternative frequency is set to on, a station providing good reception is auto-
matically selected if current reception worsens.
Select to set the DAB radio text feature on/off
Changing FM radio settings
1
2
3
Changing DAB settings (if equipped)
4
5
1
2
3
4
5
Page 419 of 676
419
5
Lexus Display Audio system
IS200t_EE(OM53D77E)5-10. Phonebook
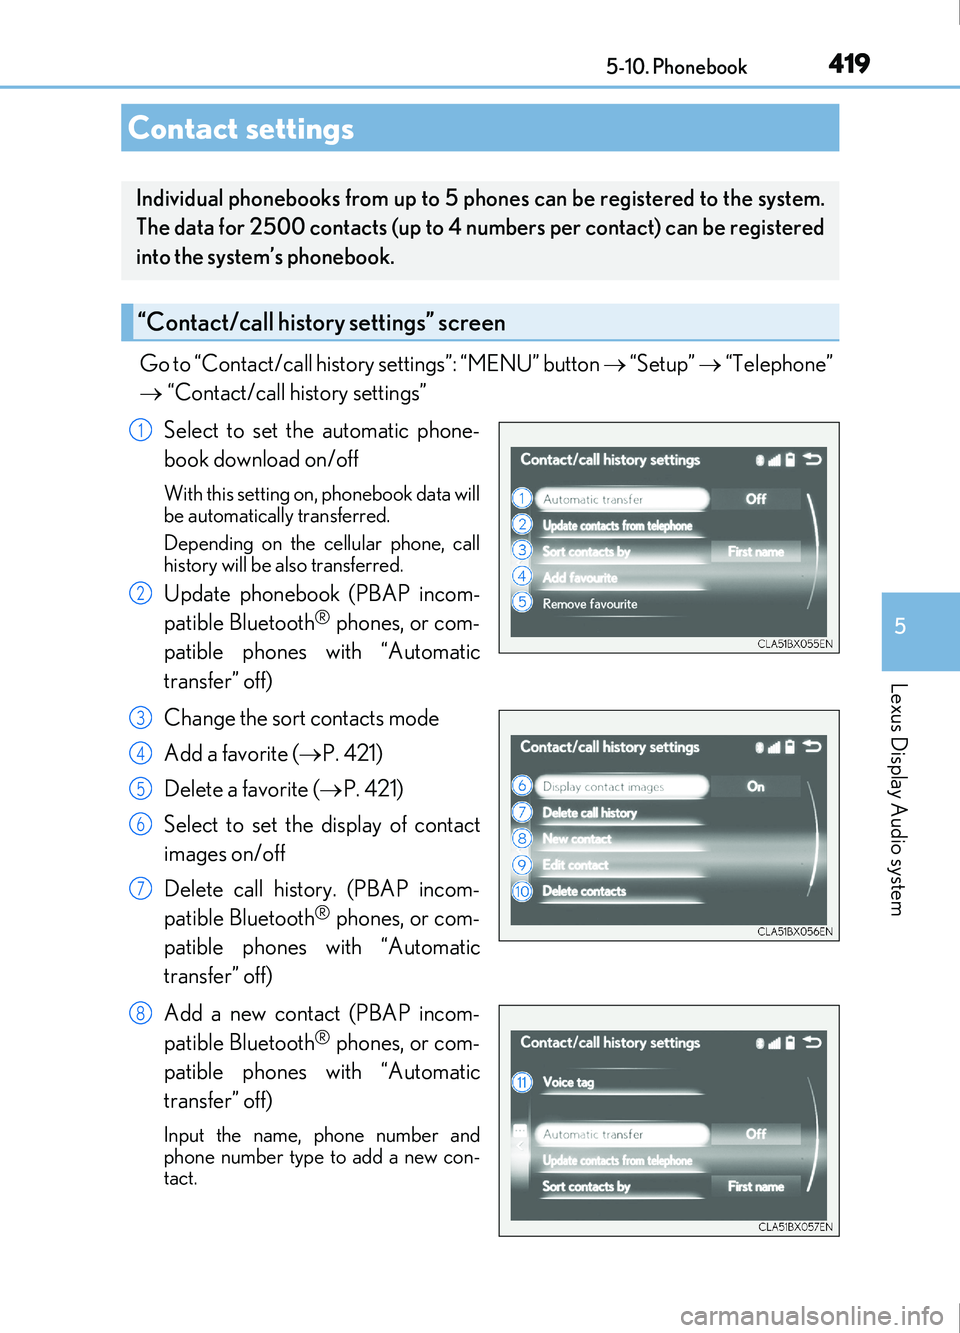
Go to “Contact/call history
settings”: “MENU” button “Setup” “Telephone”
“Contact/call history settings”
Select to set the automatic phone-
book download on/off
With this setting on, phonebook data will
be automatically transferred.
Depending on the cellular phone, call
history will be also transferred.
Update phonebook (PBAP incom-
patible Bluetooth
® phones, or com-
patible phones with “Automatic
transfer” off)
Change the sort contacts mode
Add a favorite ( P. 421)
Delete a favorite ( P. 421)
Select to set the display of contact
images on/off
Delete call history. (PBAP incom-
patible Bluetooth
® phones, or com-
patible phones with “Automatic
transfer” off)
Add a new contact (PBAP incom-
patible Bluetooth
® phones, or com-
patible phones with “Automatic
transfer” off)
Input the name, phone number and
phone number type to add a new con-
tact.
Contact settings
Individual phonebooks from up to 5 phon es can be registered to the system.
The data for 2500 contacts (up to 4 numbers per contact) can be registered
into the system’s phonebook.
“Contact/call history settings” screen
1
2
3
4
5
6
7
8
Page 420 of 676
4205-10. Phonebook
IS200t_EE(OM53D77E)
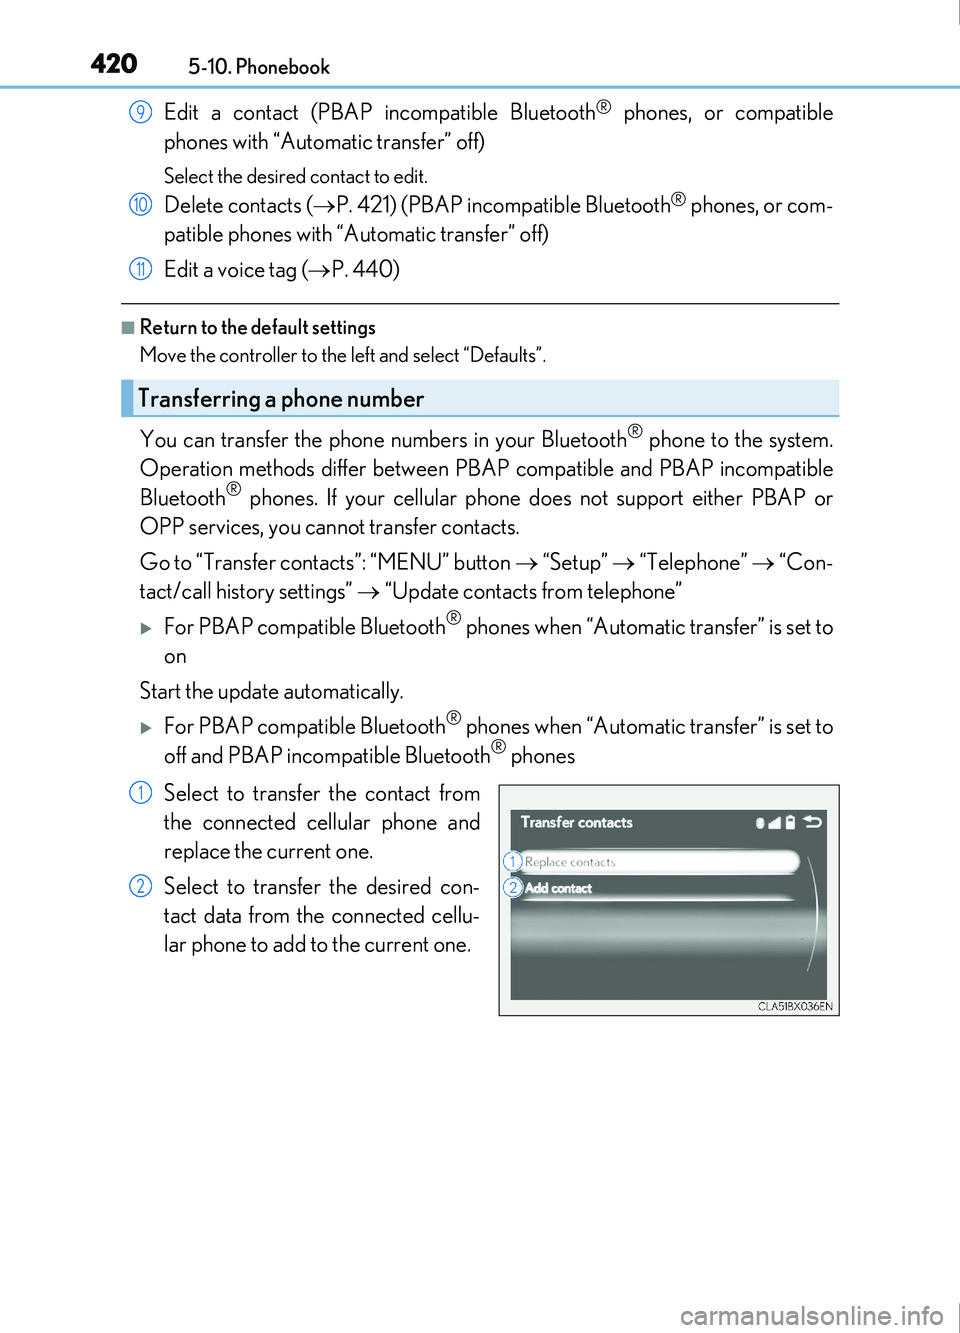
Edit a contact (PBAP incompatible Bluetooth® phones, or compatible
phones with “Automatic transfer” off)
Select the desired contact to edit.
Delete contacts ( P. 421) (PBAP incompatible Bluetooth® phones, or com-
patible phones with “Automatic transfer” off)
Edit a voice tag ( P. 440)
■Return to the default settings
Move the controller to the left and select “Defaults”.
You can transfer the phone numbers in your Bluetooth® phone to the system.
Operation methods differ between PBAP compatible and PBAP incompatible
Bluetooth
® phones. If your cellular phone does not support either PBAP or
OPP services, you cannot transfer contacts.
Go to “Transfer contacts”: “MENU” button “Setup” “Telephone” “Con-
tact/call history settings” “Update contacts from telephone”
For PBAP compatible Bluetooth® phones when “Automatic transfer” is set to
on
Start the update automatically.
For PBAP compatible Bluetooth® phones when “Automatic transfer” is set to
off and PBAP incompatible Bluetooth® phones
Select to transfer the contact from
the connected cellular phone and
replace the current one.
Select to transfer the desired con-
tact data from the connected cellu-
lar phone to add to the current one.
Transferring a phone number
9
10
11
1
2