Lexus IS220d 2012 Owner's Manual
Manufacturer: LEXUS, Model Year: 2012, Model line: IS220d, Model: Lexus IS220d 2012Pages: 609, PDF Size: 14.63 MB
Page 401 of 609

382
3-7. Other interior features
IS250/220d/200d_EE
Floor mat
Use only floor mats designed specifically for vehicles of the same
model and model year as your vehicle. Fix them securely in place onto
the carpet.
Fix the floor mat in place
using the retaining hooks
(clips) provided.
The shape of the retaining
hooks (clips) and the fixing
procedure of the floor mat for
your vehicle may differ from
those shown in the illustra-
tion. For details, refer to the
floor mat retention clip
illii i
Page 402 of 609

383
3-7. Other interior features
3
Interior features
IS250/220d/200d_EE
CAUTION
Observe the following precautions.
Failure to do so may cause the driver's floor mat to slip, possibly interfering
with the pedals while driving. An unexpectedly high speed may result or it
may become difficult to stop the vehicle, leading to a serious accident.
When installing the driver's floor mat
Do not use floor mats designed for other models or different model year
vehicles, even if they are Lexus Genuine floor mats.
Only use floor mats designed for the driver's seat.
Always install the floor mat securely using the retaining hooks (clips) pro-
vided.
Do not use two or more floor mats on top of each other.
Do not place the floor mat bottom-side up or upside-down.
Before driving
Check that the floor mat is securely
fixed in the correct place with all the
provided retaining hooks (clips). Be
especially careful to perform this check
after cleaning the floor.
With the engine stopped and the shift
lever in P (automatic transmission) or
N (manual transmission), fully depress
each pedal to the floor to make sure it
does not interfere with the floor mat.
Page 403 of 609

384
3-7. Other interior features
IS250/220d/200d_EE
Trunk features
Cargo hooks
Cargo hooks are provided for
securing loose items.
Shopping bag hooks
First-aid kit storage belt
Loosen
Tighten
Page 404 of 609

385
3-7. Other interior features
3
Interior features
IS250/220d/200d_EE
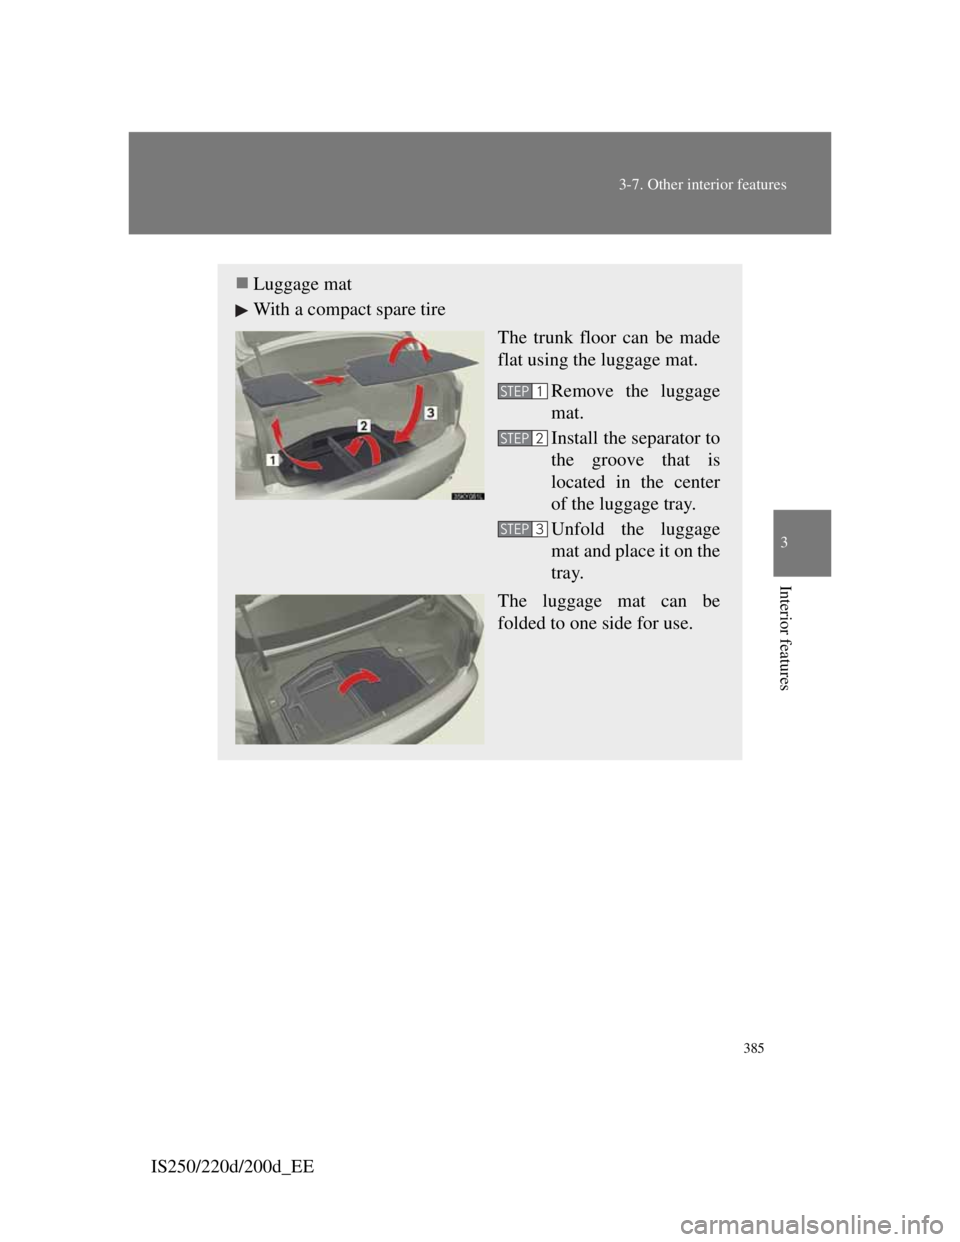
Luggage mat
With a compact spare tire
The trunk floor can be made
flat using the luggage mat.
Remove the luggage
mat.
Install the separator to
the groove that is
located in the center
of the luggage tray.
Unfold the luggage
mat and place it on the
tray.
The luggage mat can be
folded to one side for use.
STEP1
STEP2
STEP3
Page 405 of 609

386
3-7. Other interior features
IS250/220d/200d_EE
CAUTION
When the cargo hooks are not in use
To avoid injury, always return the cargo hooks to their positions when they
are not in use.
NOTICE
When using the luggage mat (with a compact spare tire)
Always attach the separator.
Do not place anything that weighs 20 kg (44 lb.) or more on the mat.
When closing the trunk (except with a compact spare tire)
Do not leave the luggage mat lever hooked on the edge of the trunk.
The luggage mat may get damaged.
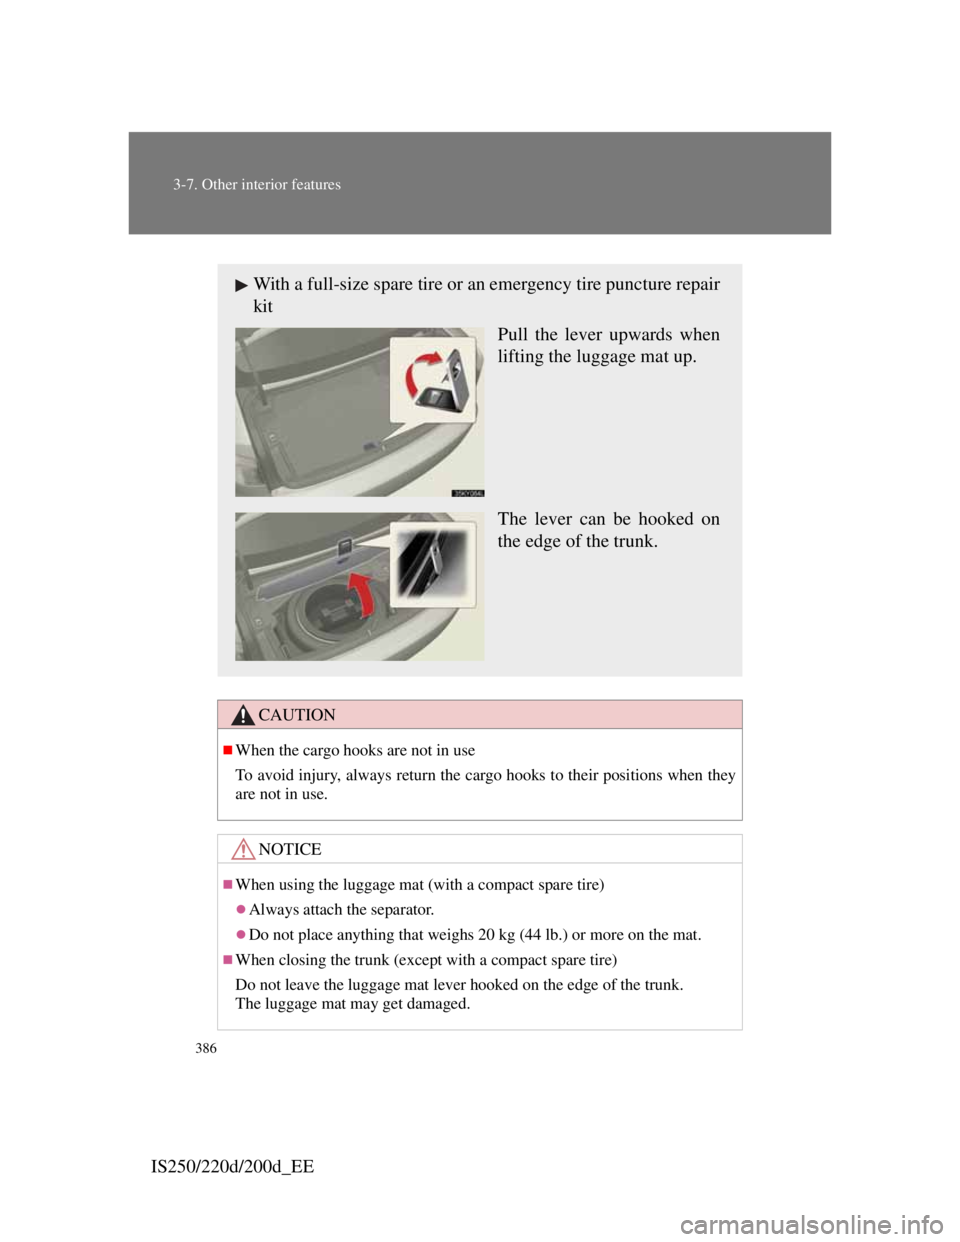
With a full-size spare tire or an emergency tire puncture repair
kit
Pull the lever upwards when
lifting the luggage mat up.
The lever can be hooked on
the edge of the trunk.
Page 406 of 609

387
3-7. Other interior features
3
Interior features
IS250/220d/200d_EE
Page 407 of 609

4Maintenance and care
387
4-1. Maintenance and care
Cleaning and protecting
the vehicle exterior ........ 388
Cleaning and protecting
the vehicle interior ......... 392
4-2. Maintenance
Maintenance
requirements .................. 395
4-3. Do-it-yourself
maintenance
Do-it-yourself service
precautions..................... 398
Hood ................................ 401
Positioning a floor jack .... 402
Engine compartment ........ 404
Tires ................................. 420
Tire inflation pressure ...... 424
Wheels ............................. 426
Air conditioning filter ...... 428
Electronic key battery ...... 431
Checking and replacing
fuses ............................... 433
Light bulbs ....................... 448
Page 408 of 609

388
IS250/220d/200d_EE
4-1. Maintenance and care
Cleaning and protecting the vehicle exterior
Automatic car washes
Fold the mirrors back before washing the vehicle.
Brushes used in automatic car washes may scratch the vehicle surface
and harm your vehicle’s paint.
High pressure car washes
Do not allow the nozzles of the car wash to come within close proximity
of the windows.
Before car wash, check that the fuel filler door on your vehicle is closed
properly.
Touch-up paint (if equipped)
Touch-up paint may be used to cover small chips or scratches.
Apply the paint soon after the damage occurs or corrosion may set in. To
apply the touch-up paint so it is hardly noticeable the trick is to apply it only
to the bare spots. Apply only the smallest amount possible and do not paint
the surface around the scratch or chip.
Perform the following to protect the vehicle and maintain it in prime
condition.
Working from top to bottom, liberally apply water to the
vehicle body, wheel wells and underside of the vehicle to
remove any dirt and dust.
Wash the vehicle body using a sponge or soft cloth, such as
a chamois.
For hard-to-remove marks, use car wash soap and rinse
thoroughly with water.
Wipe away any water.
Wax the vehicle when the waterproof coating deteriorates.
If water does not bead on a clean surface, apply wax when the vehi-
cle body is cool.
Page 409 of 609

389
4-1. Maintenance and care
4
Maintenance and care
IS250/220d/200d_EE
Aluminum wheels
Remove any dirt immediately by using a neutral detergent. Do not use
hard brushes or abrasive cleaners. Do not use strong or harsh chemical
cleaners.
Use the same mild detergent and wax as used on the paint.
Do not use detergent on the wheels when they are hot, for example after
driving for long distance in the hot weather.
Wash detergent from the wheels immediately after use.
Bumpers
Do not scrub with abrasive cleaners.
Outside rear view mirror rain-clearing coating (if equipped)
Observe the following precautions in order to retain the rain-clearing prop-
erties of the mirror.
Clean the mirrors using car shampoo or glass cleaner that does not con-
tain silicone or an abrasive compound, and rinse thoroughly with water.
Allow the mirrors to be exposed to direct sunlight for 1 to 2 days.
CAUTION
When cleaning the windshield (vehicles with rain-sensing windshield wip-
ers)
When the upper part of the windshield where the raindrop sensor is
located is touched by hand
When a wet rag or similar is held close to the raindrop sensor
If something bumps against the windshield
If you directly touch the raindrop sensor body or if something bumps into
the raindrop sensor
Set the wiper switch to off.
If the wiper switch is in “AUTO”, the
wipers may operate unexpectedly in the
following situations, and may result in
hands being caught or other serious inju-
ries and cause damage to the wiper
blades.Off
Page 410 of 609

390
4-1. Maintenance and care
IS250/220d/200d_EE
CAUTION
Caution about the exhaust pipe
Exhaust gasses cause the exhaust pipe to become quite hot.
When washing the vehicle, be careful not to touch the pipe until it has
cooled sufficiently, as touching a hot exhaust pipe can cause burns.
NOTICE
To prevent paint deterioration and corrosion on the body and components
(aluminum wheels etc.)
Wash the vehicle immediately in the following cases:
• After driving near the sea coast
• After driving on salted roads
• If you see coal tar or tree sap on the paint surface
• If you see dead insects, insect droppings or bird droppings on the paint
• After driving in an area contaminated with soot, oily smoke, mine
dust, iron powder or chemical substances
• If the vehicle becomes heavily soiled in dust or mud
• If liquids such as benzene and gasoline are spilled on the paint surface
If the paint is chipped or scratched, have it repaired immediately.
To prevent the wheels from corroding, remove any dirt and store in a
place with low humidity when storing the wheels.
Cleaning the exterior lights
Wash carefully. Do not use organic substances or scrub with a hard brush.
This may damage the surfaces of the lights.
Do not apply wax on the surfaces of the lights.
Wax may cause damage to the lenses.
To prevent damage to the windshield wiper arms
When lifting the wiper arms away from the windshield, pull the driver side
wiper arm upward first, and repeat for the passenger side. When returning
the wipers to their original position, do so from the passenger side first.