lock Lexus IS250 2006 Using the audio system / LEXUS 2006 IS350/250 FROM MAY 2006 PROD. (OM53619U) Service Manual
[x] Cancel search | Manufacturer: LEXUS, Model Year: 2006, Model line: IS250, Model: Lexus IS250 2006Pages: 437, PDF Size: 11.01 MB
Page 63 of 437
45
1
Before driving
1-4. Opening and closing the windows and moon roof
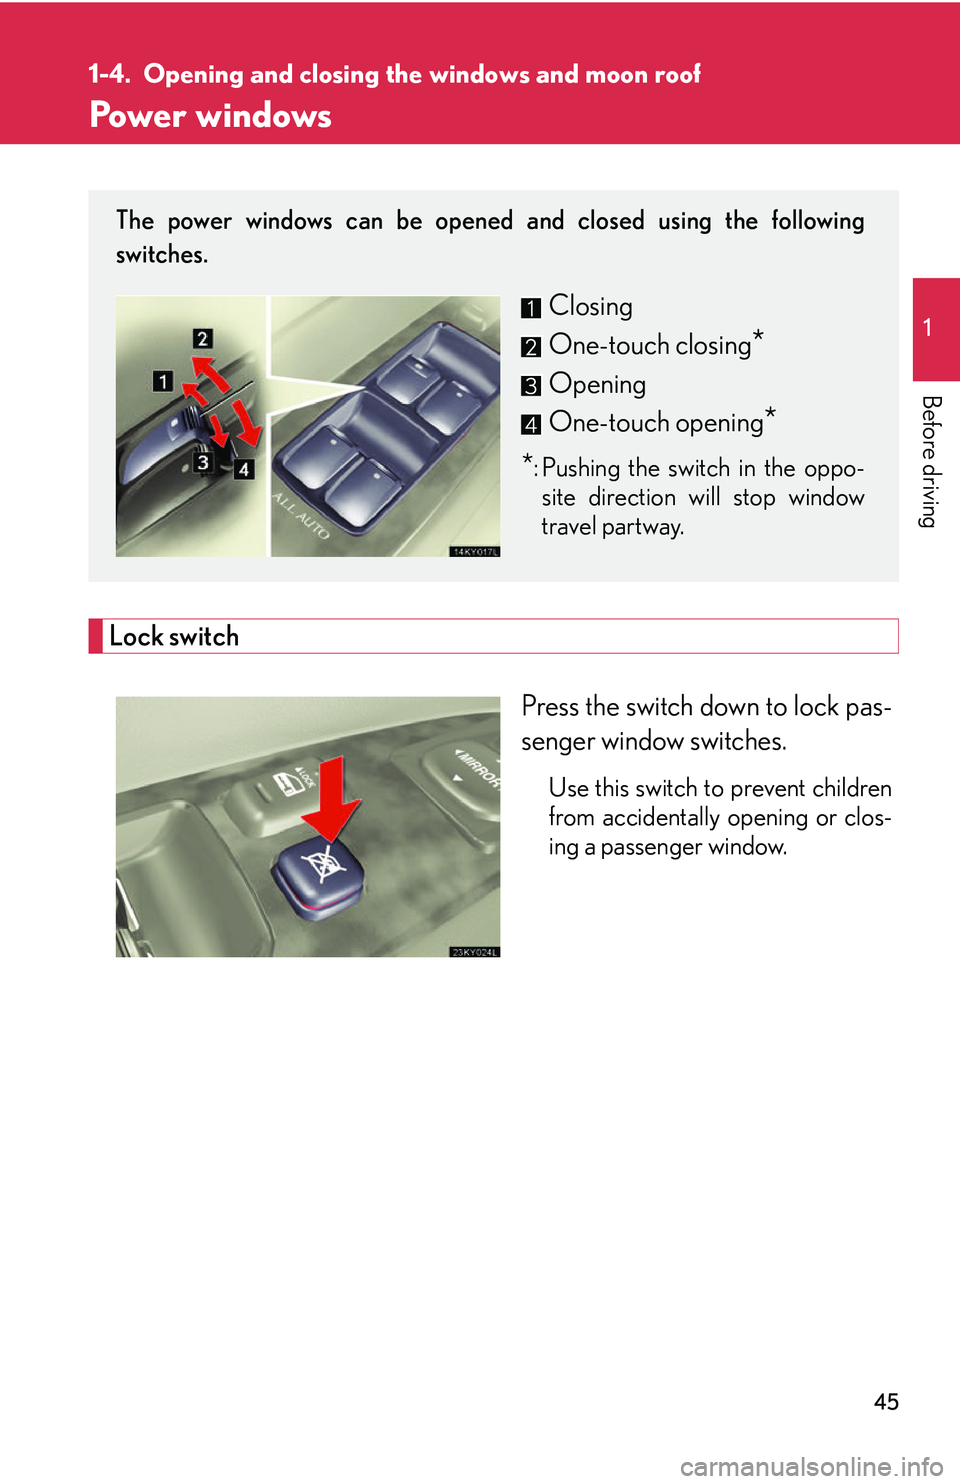
Power windows
Lock switch
Press the switch down to lock pas-
senger window switches.
Use this switch to prevent children
from accidentally opening or clos-
ing a passenger window.
The power windows can be opened and closed using the following
switches.
Closing
One-touch closing
*
Opening
One-touch opening
*
*: Pushing the switch in the oppo-site direction will stop window
travel partway.
Page 64 of 437

46
1-4. Opening and closing the windows and moon roof
■The power windows can be operated when
The engine switch is in IG-ON mode.
■Linked door lock window operation
●The power windows can be opened and closed using the mechanical key.
( P. 3 6 3 )
●The power windows can be opened using the wireless remote control. ( P. 1 6 )
■Operating the power windows after turning the engine switch OFF
The power windows can be operated for ap proximately 45 seconds even after the
engine switch is switched to ACC mode or turned OFF. They cannot, however, be
operated once either front door is opened.
■Jam protection function
If an object becomes caught between th e window and the window frame, window
travel is stopped and the window is opened slightly.
■When the battery is disconnected
The power windows must be initialized in order to ensure proper operation. (Per-
form for each window with the switch for each seat.)
Open the window halfway.
Fully close the window by pulling the switch up and continue holding the
switch for one second.
The indicator on the switch changes from a flashing pattern to being on when initial
settings are complete.
■Customization
Settings (e.g. linked door lock operation) can be changed. ( P. 400)
STEP1
STEP2
Page 67 of 437

49
1-4. Opening and closing the windows and moon roof
1
Before driving
■The moon roof can be operated when
The engine switch is in IG-ON mode.
■Linked door lock moon roof operation
●The moon roof can be opened and closed using the mechanical key. (P. 363)
●The moon roof can be opened using the wireless remote control. ( P. 1 6 )
■Operating the moon roof after turning the engine switch OFF
The moon roof can be operated for ap proximately 45 seconds even after the
engine switch is switched to ACC mode or turned OFF. It cannot, however, be
operated once either front door is opened.
■Jam protection function
If an object is detected between the moon roof and the frame while closing or tilting
down, travel is stopped and the moon roof opens slightly.
■If the moon roof can not be closed
Pressing the switch of at position for more than 10 seconds closes the moon
roof.
■To reduce moon roof wind noise
●Drive with the moon roof switch in the position when you open and close
the moon roof manually.
●Drive with the moon roof where it has stopped when opening automatically.
■Sunshade
The sunshade can be opened and closed manually. However, the sunshade will
open automatically when the moon roof is opened.
■Customization
Settings (e.g. linked door lock operation) can be changed. ( P. 400)
Page 74 of 437
56
1-6. Anti-theft system
Alarm
Deactivating or stopping the alarmDo one of the following:
● Unlock the doors or trunk using th e entry function or the wireless
remote door lock function.
● Start the engine. (The alarm will be deactivated or stopped after a few
seconds.)
■Items to check before locking the vehicle
To prevent unintended triggering of the alar m, check that there is no one in the vehi-
cle, and that all windows and moon roof are closed before locking the vehicle.
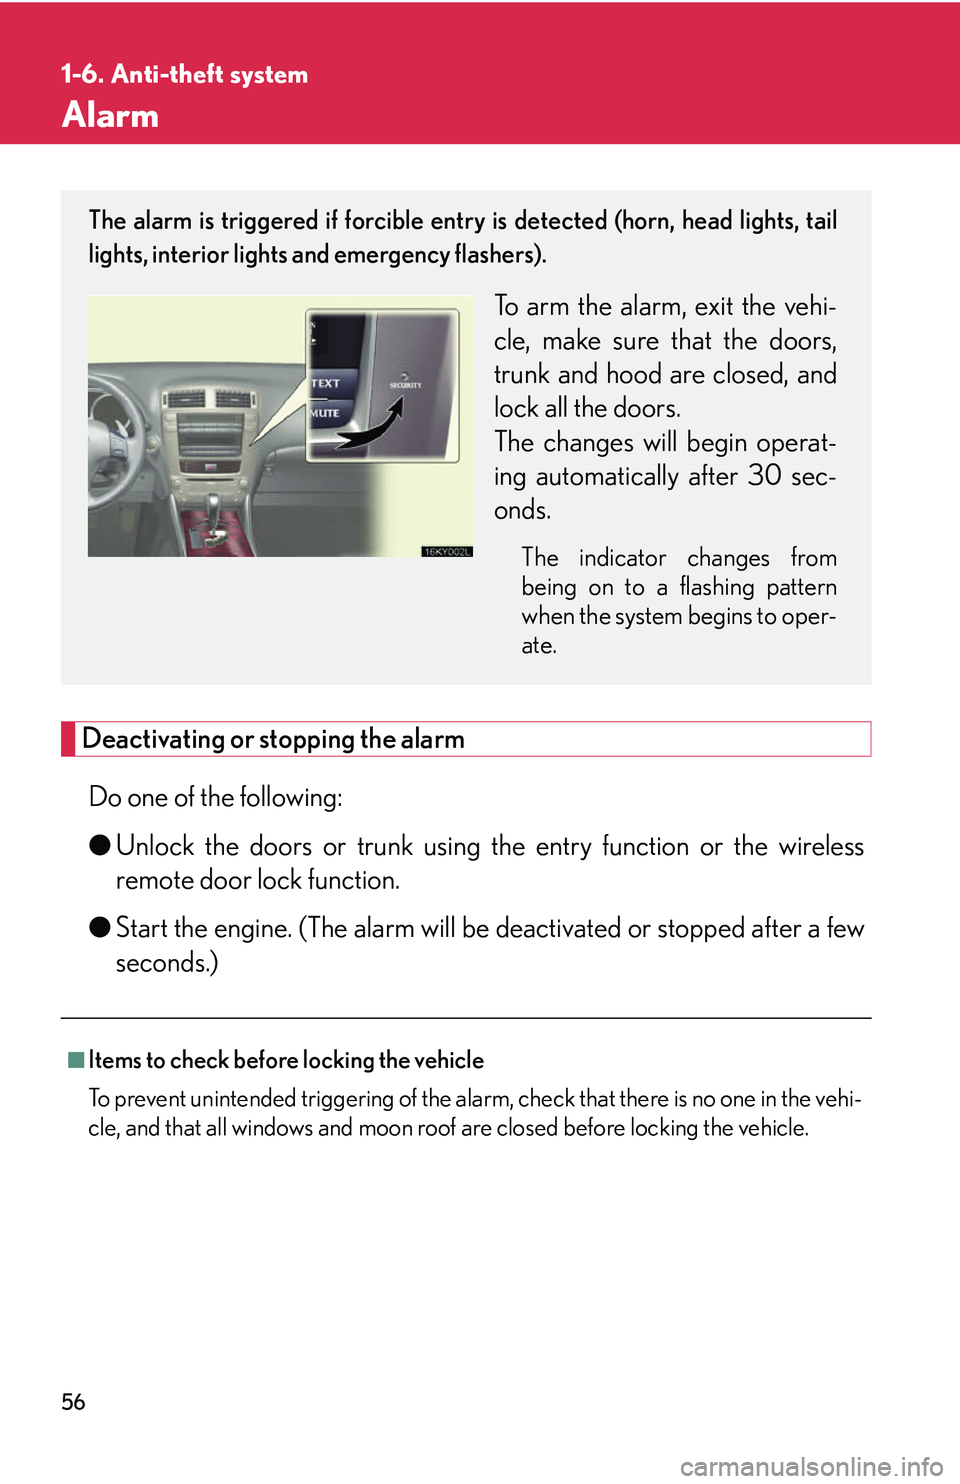
The alarm is triggered if forcible entry is detected (horn, head lights, tail
lights, interior lights and emergency flashers).
To arm the alarm, exit the vehi-
cle, make sure that the doors,
trunk and hood are closed, and
lock all the doors.
The changes will begin operat-
ing automatically after 30 sec-
onds.
The indicator changes from
being on to a flashing pattern
when the system begins to oper-
ate.
Page 75 of 437

57
1-6. Anti-theft system
1
Before driving
■Alarm operation
The alarm is triggered in the following situations
●A locked door or trunk is opened in any way other than using a wireless remote
control, such as someone exiting the vehicle after the alarm is activated.
●The hood is opened while the vehicle is locked.
●The battery is reconnected.
■When the battery is disconnected
Be sure to cancel the alarm system.
If the battery is discharged before canceling the alarm, the system may be triggered
when the battery is reconnected.
■Pa n i c m o d e
When is pushed for longer than about
one second, the headlights/tail lights/emer-
gency flashers will flash, the front and rear
interior lights will come on, and an alarm will
sound for about 60 seconds to deter any
person from trying to break into or damage
your vehicle.
To stop the alarm, push any button on the
wireless remote control.
Page 77 of 437

59
1
Before driving
1-7. Safety information
Correct driving posture
CAUTION
■While driving
●Do not adjust the position of the driver’s seat while driving.
Doing so could cause the driver to lose control of the vehicle.
Drive in a good posture as follows:
Sit upright and well back in
the seat. (P. 2 6 )
Adjust the position of the seat
forward or backward to
ensure the pedals can be
reached and easily
depressed to the extent
required. ( P. 2 6 )
Adjust the seatback so that
the controls are easily opera-
ble.
Adjust the tilt and telescopic
positions of the steering
wheel downward so the air-
bag is facing your chest.
( P. 4 0 , 4 1 )
Lock the head restraint in
place with the center of the
head restraint closest to the
top of your ears. ( P. 3 3 )
Wear the seat belt correctly.
( P. 3 4 )
Page 78 of 437

60
1-7. Safety information
CAUTION
■While driving
●Do not place a cushion between the driver or passenger and the seatback.
A cushion may prevent correct posture from being achieved, and reduce the
effectiveness of the seat belt and head re straint, increasing the risk of death or
serious injury to the driver or passenger.
●Do not place anything under the front seats.
Objects placed under the front seats may become jammed in the seat tracks and
stop the seat from locking in place. This may lead to an accident. The adjustment
mechanism may also be damaged.
■Adjusting the seat position:
●Take care when adjusting the seat position to ensure that other passengers are
not injured by the moving seat.
●Do not put your hands under the seat or near the moving parts to avoid injury.
Fingers or hands may become jammed in the seat mechanism.
Page 93 of 437
75
1
1-7. Safety information
Before driving
Installing child restraints
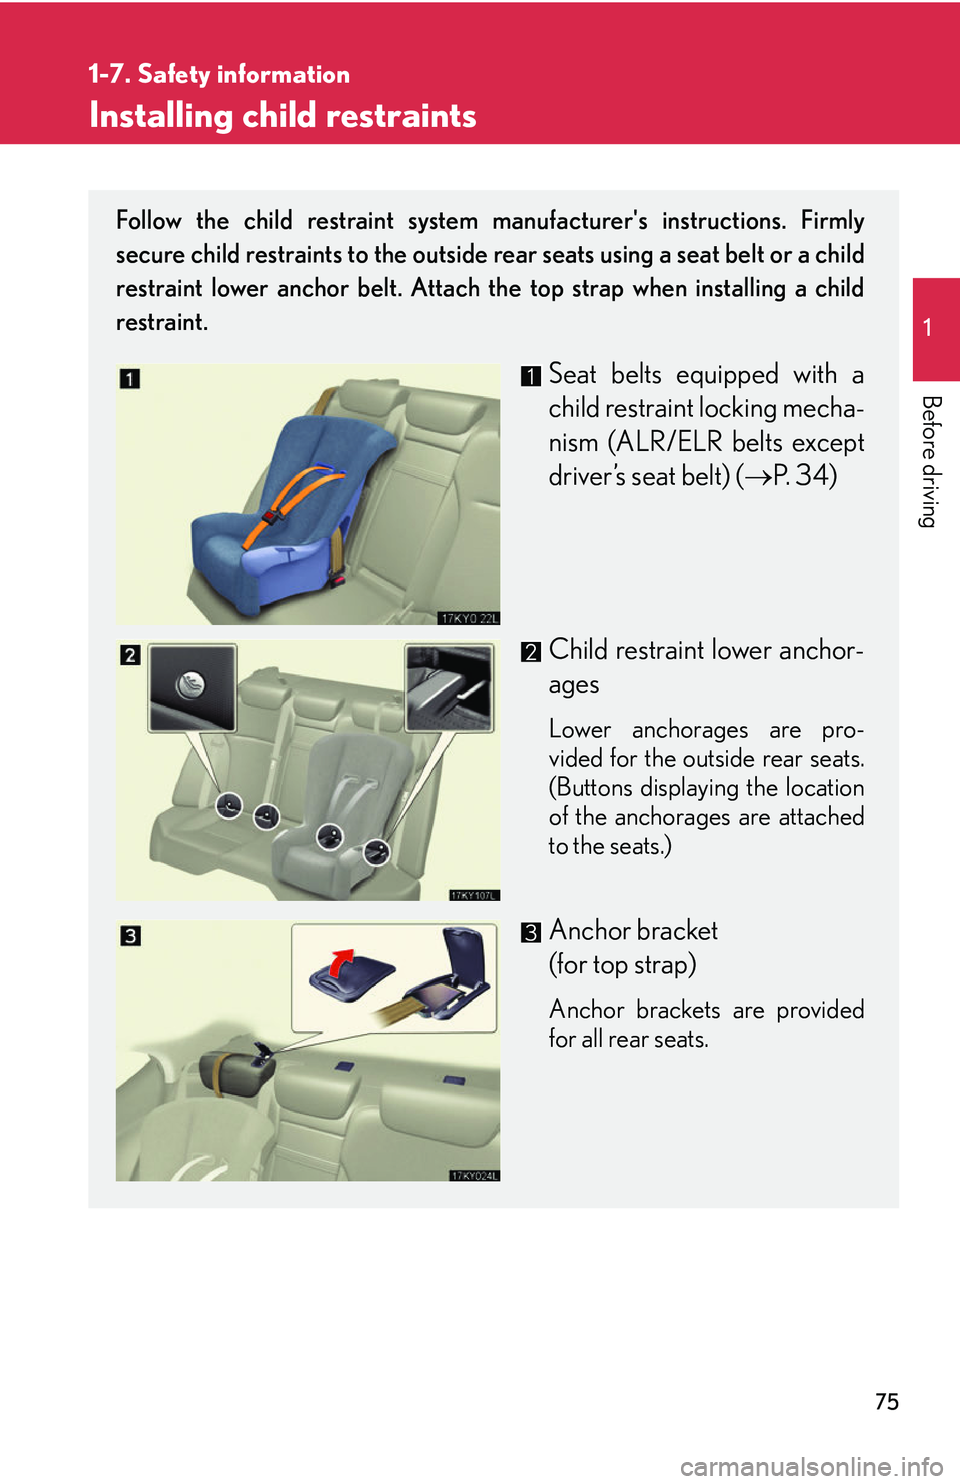
Follow the child restraint system manufacturer's instructions. Firmly
secure child restraints to the outside rear seats using a seat belt or a child
restraint lower anchor belt. Attach the top strap when installing a child
restraint.
Seat belts equipped with a
child restraint locking mecha-
nism (ALR/ELR belts except
driver’s seat belt) ( P. 3 4 )
Child restraint lower anchor-
ages
Lower anchorages are pro-
vided for the outside rear seats.
(Buttons displaying the location
of the anchorages are attached
to the seats.)
Anchor bracket
(for top strap)
Anchor brackets are provided
for all rear seats.
Page 94 of 437
76
1-7. Safety information
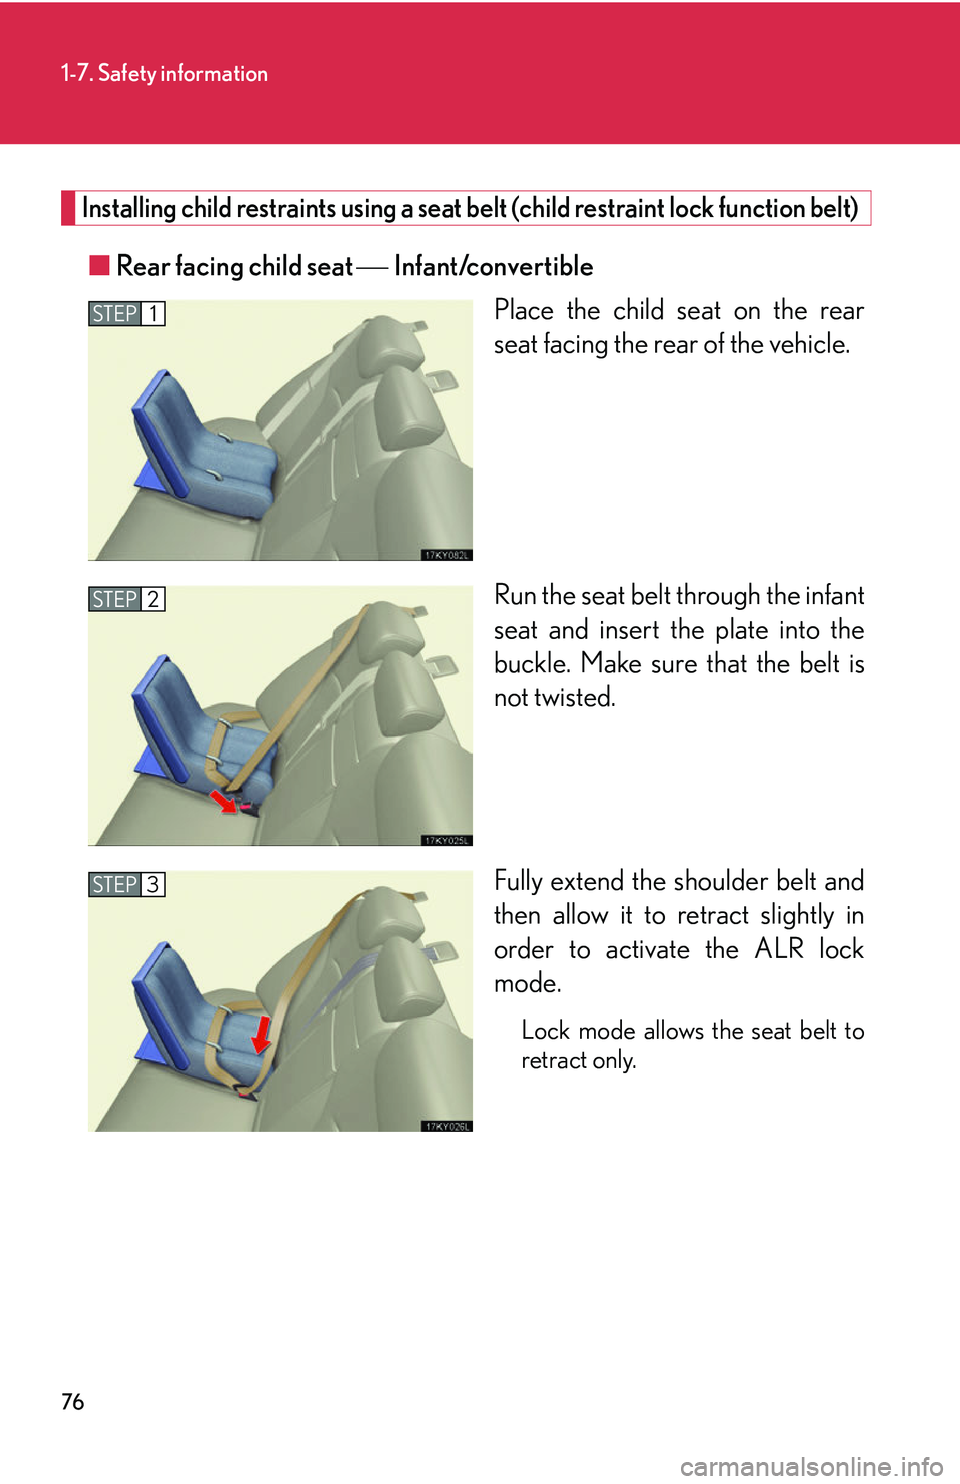
Installing child restraints using a seat belt (child restraint lock function belt)
■Rear facing child seat Infant/convertible
Place the child seat on the rear
seat facing the rear of the vehicle.
Run the seat belt through the infant
seat and insert the plate into the
buckle. Make sure that the belt is
not twisted.
Fully extend the shoulder belt and
then allow it to retract slightly in
order to activate the ALR lock
mode.
Lock mode allows the seat belt to
retract only.
STEP1
STEP2
STEP3
Page 95 of 437
77
1-7. Safety information
1
Before driving
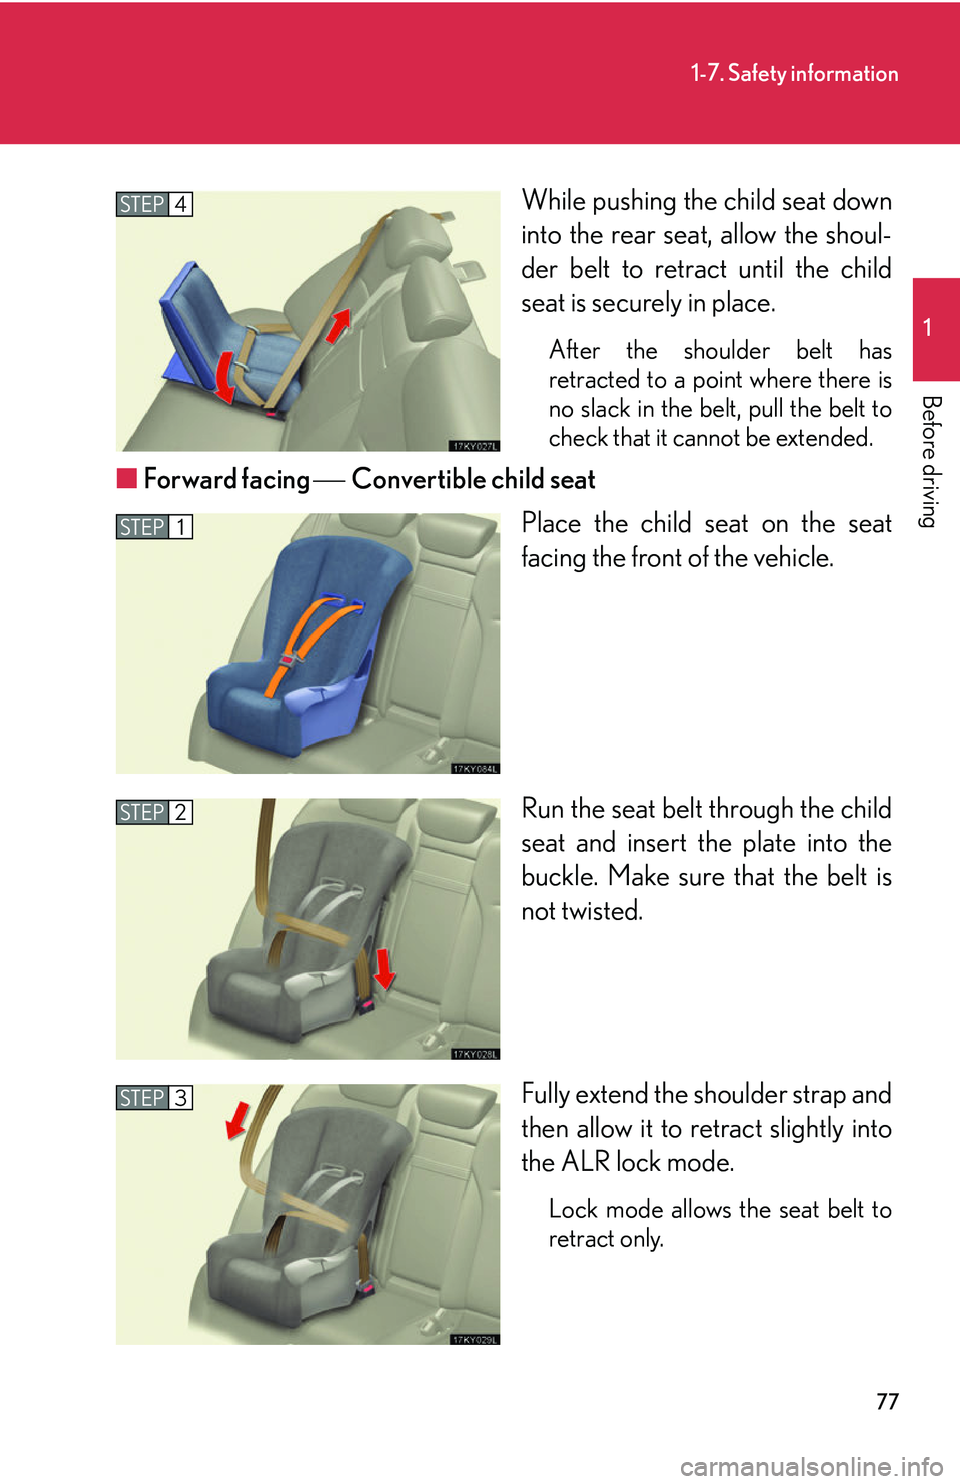
While pushing the child seat down
into the rear seat, allow the shoul-
der belt to retract until the child
seat is securely in place.
After the shoulder belt has
retracted to a point where there is
no slack in the belt, pull the belt to
check that it cannot be extended.
■Forward facing Convertible child seat
Place the child seat on the seat
facing the front of the vehicle.
Run the seat belt through the child
seat and insert the plate into the
buckle. Make sure that the belt is
not twisted.
Fully extend the shoulder strap and
then allow it to retract slightly into
the ALR lock mode.
Lock mode allows the seat belt to
retract only.
STEP4
STEP1
STEP2
STEP3