light Lexus IS250 2008 Using the air conditioning system and defogger / LEXUS 2008 IS250 (OM53699U) Owners Manual
[x] Cancel search | Manufacturer: LEXUS, Model Year: 2008, Model line: IS250, Model: Lexus IS250 2008Pages: 464, PDF Size: 6.61 MB
Page 309 of 464

309
4-3. Do-it-yourself maintenance
4
Maintenance and care
■How to initialize the tire pressure warning system
To initialize the system, use the satellite switch. ( P. 245)
Park the vehicle in safe plac e and turn the “ENGINE START
STOP” switch OFF.
While the vehicle is moving, initialization is not performed.
Adjust the tire inflation pressure to the specified cold tire inflation
pressure level. ( P. 415)
Make sure to adjust the tire pressure to the specified cold tire inflation
pressure level. The tire pressure warning system will operate based on
this pressure level.
Turn the “ENGINE START STOP” switch to IGNITION ON
mode.
The tire inflation pressure initial-
ization setting display
Continue to press or until the
initialization setting display
appears.
It may take several minutes to com-
plete the setting. Wait for several
minutes before turning the
“ENGINE START STOP” switch to
OFF if necessary.
Recording tire inflation pressure
settings
Press and hold the “ON/OFF” but-
ton until the tire pressure warning
light blinks slowly 3 times and the
message “PRESSURE INITIAL”
showing that the initial setting is
complete is displayed on the multi-
information display.
Wait for a few minutes with the IGNITION ON mode, and then
turn the “ENGINE START STOP” switch OFF.
STEP1
STEP2
STEP3
STEP4
STEP5
Page 310 of 464

310
4-3. Do-it-yourself maintenance
Registering and selecting ID codesTo select tire pressure warning valve and transmitter ID codes, use the
satellite switch. ( P. 245)
■ Registering ID codes
2 sets of tire pressure warning valve and transmitter ID codes can be
registered. Once a second set of ti res is registered at “2ND”, you can
switch between tire set settings simply by pressing the tire pressure
warning select switch.
There are 2 settings:
“MAIN” position: The ID code of the tire pressure warning valve and
transmitter on the tires originally inst alled on the vehicle is registered.
“2ND” position:The ID code is not registered. When you replace a
new set of tires, purchase tire pres sure warning valves and transmitters
from your Lexus dealer and have th e new ID code registered by your
Lexus dealer.
■ Selecting ID codes
When replacing tires, make sure to select the ID code set that matches
the new tire set. If the tire pressure select switch is set to the wrong tire
setting, the tire pressure warnin g system will not operate properly.
After driving for about 20 minutes, the tire pressure warning light
comes on after blinking for 1 minu te to indicate a system malfunction.
Tire pressure warning valve and
transmitter ID code settings dis-
play
Press or repeatedly until the
setting display appears.
Switching ID codes
Press the “ON/OFF” button to
switch between “MAIN” and
“2ND” ID codes.
Page 311 of 464

311
4-3. Do-it-yourself maintenance
4
Maintenance and care
■When to replace your vehicle’s tires
Tires should be replaced if:
●You have tire damage such as cuts, splits, cracks deep enough to expose the
fabric or bulges indicating internal damage
●A tire goes flat repeatedly or cannot be properly repaired due to the size or
location of a cut or other damage
If you are not sure, consult with your Lexus dealer.
■Replacing tires and wheels
If the ID code of the tire pressure warn ing valve and transmitter is not registered,
the tire pressure warning system will not work properly. After driving for about 20
minutes, the tire pressure warning light comes on after blinking for 1 minute to indi-
cate a system malfunction.
■Tire life
Any tire over 6 years old must be checked by a qualified technician even if they
have seldom or never been used or damage is not obvious.
■If the tread wears down below 0.16 in. (4 mm) on snow tires
The effectiveness of snow tires is lost.
■Low profile tires (models not equipped with 16-inch tires)
Generally, low profile tires will wear more rapidly and tire grip performance will be
reduced on snowy and/or icy roads when co mpared to standard tires. Be sure to
use snow tires or tire chains
* on snowy and/or icy roads and drive carefully at a
speed appropriate for road and weather conditions.
*: Tire chains cannot be mounted on 18-inch tires.
■Maximum load of tire
Check that the maximum load of the replaced tire is greater than 1 /2 of the Gross
Axle Weight Ratings (GAWR) of either the front axle or the rear axle, whichever is
greater.
As for the maximum load of the tire, see the load limit at maximum cold tire inflation
pressure mentioned on the sidewall of the tire, and as for the Gross Axle Weight
Ratings (GAWR), see the Certification Label. (
P. 3 1 6 , 4 2 4 ) .
Page 312 of 464

312
4-3. Do-it-yourself maintenance
■Tire types
1 Summer tiresSummer tires are high-speed performance tires best suited to highway driving
under dry conditions. Since summer tires do not have the same traction perfor-
mance as snow tires, summer tires are inadequate for driving on snow-covered
or icy roads. For driving on snow-covered roads or icy roads, the use of snow tires
is recommended. When installing snow tires, be sure to replace all four tires.
2 All season tires All season tires are designed to provide better traction in snow and to be ade-
quate for driving in most winter conditions , as well as for use year round. All sea-
son tires, however, do not have adequa te traction performance compared with
snow tires in heavy or loos e snow. Also, all season tires fall short in acceleration
and handling performance compared with summer tires in highway driving.
3Snow tires For driving on snow-covered roads or ic y roads, we recommend using snow tires.
If you need snow tires, select tires of the same size, construction and load capac-
ity as the originally installed tires. Since your vehicle has radial tires as original
equipment, make sure your snow tires also have radial construction. Do not install
studded tires without first checking loca l regulations for possible restriction.
Snow tires should be installed on all wheels. ( P. 1 8 3 )
■Initializing the tire pressure warning system
Initialize the tires with the tire inflatio n pressure adjusted to the specified level.
■When the initialization of the tire pressure warning system has failed
Initialization can be completed in a few minutes. However, in the following cases,
the settings have not been recorded and the system will not operate properly. If
repeated attempts to record tire inflation pressure settings are unsuccessful, have
the vehicle inspected by your Lexus dealer.
●When operating the tire pressure warnin g reset switch, the tire pressure warn-
ing light does not flash 3 times and the setting message does not appear on the
multi-information display.
●After carrying out the initialization proc edure, the tire pressure warning light
blinks for 1 minute then stays on after driving for about 20 minutes.
Page 314 of 464

314
4-3. Do-it-yourself maintenance
CAUTION
■When inspecting or replacing tires
Observe the following precautions to prevent accidents. Failure to do so may cause
damage to parts of the drive train, as well as dangerous handling characteristics,
which may lead to fatal or injury accidents.
●Do not mix tires of different makes, models, tread patterns or treadwear.
●Do not use tire sizes other than those recommended by Lexus.
●Do not mix radial, bias-belted, or bias-ply tires.
●Do not mix summer, all season and winter tires.
■When initializing the tire pressure warning system
Do not press the satellite switch without first adjusting the tire inflation pressure to
the specified level. Otherwise, the tire pressure warning light may not come on
even if the tire inflation pressure is low, or it may come on when the tire inflation
pressure is actually normal.
NOTICE
■Repairing or replacing tires, wheels and tire pressure warning valves and trans-
mitters
When removing or fitting the wheels, tire s or the tire pressure warning valve and
transmitter, contact your Lexus dealer as the tire pressure warning valve and trans-
mitter may be damaged if not handled correctly.
■To avoid damaging the tire pressu re warning valves and transmitters
Do not use liquid sealants on flat tires.
Page 331 of 464

331
4-3. Do-it-yourself maintenance
4
Maintenance and care
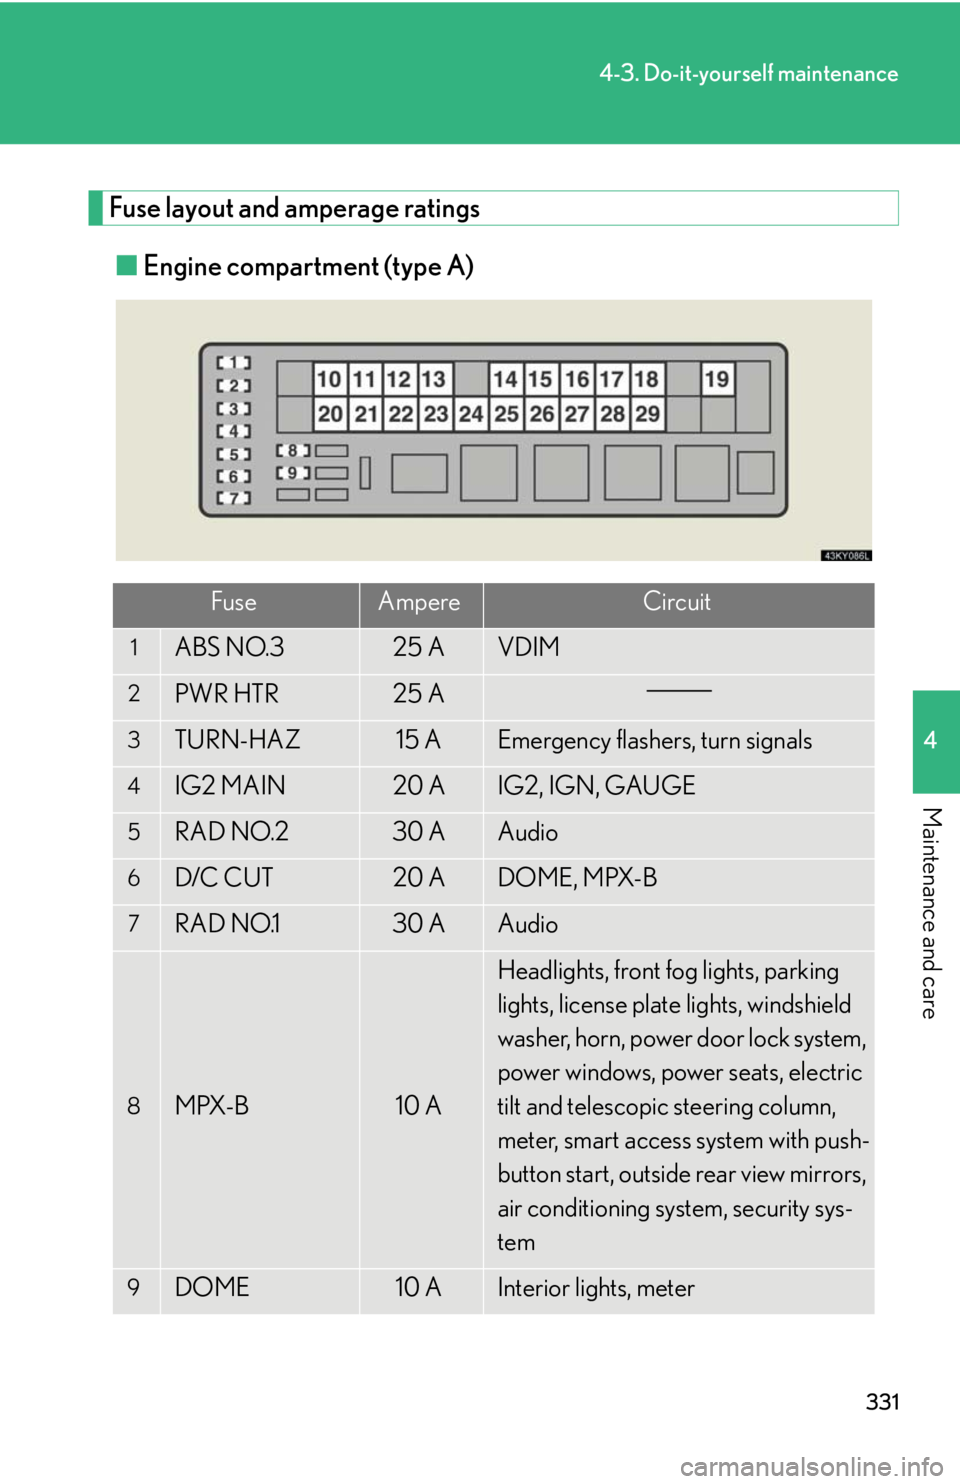
Fuse layout and amperage ratings■ Engine compartment (type A)
FuseAmpereCircuit
1ABS NO.325 AVDIM
2PWR HTR25 A
3TURN-HAZ15 AEmergency flashers, turn signals
4IG2 MAIN20 AIG2, IGN, GAUGE
5RAD NO.230 AAudio
6D/C CUT20 ADOME, MPX-B
7RAD NO.130 AAudio
8MPX-B10 A
Headlights, front fog lights, parking
lights, license plate lights, windshield
washer, horn, power door lock system,
power windows, power seats, electric
tilt and telescopic steering column,
meter, smart access system with push-
button start, outside rear view mirrors,
air conditioning system, security sys-
tem
9DOME10 AInterior lights, meter
Page 332 of 464

332
4-3. Do-it-yourself maintenance
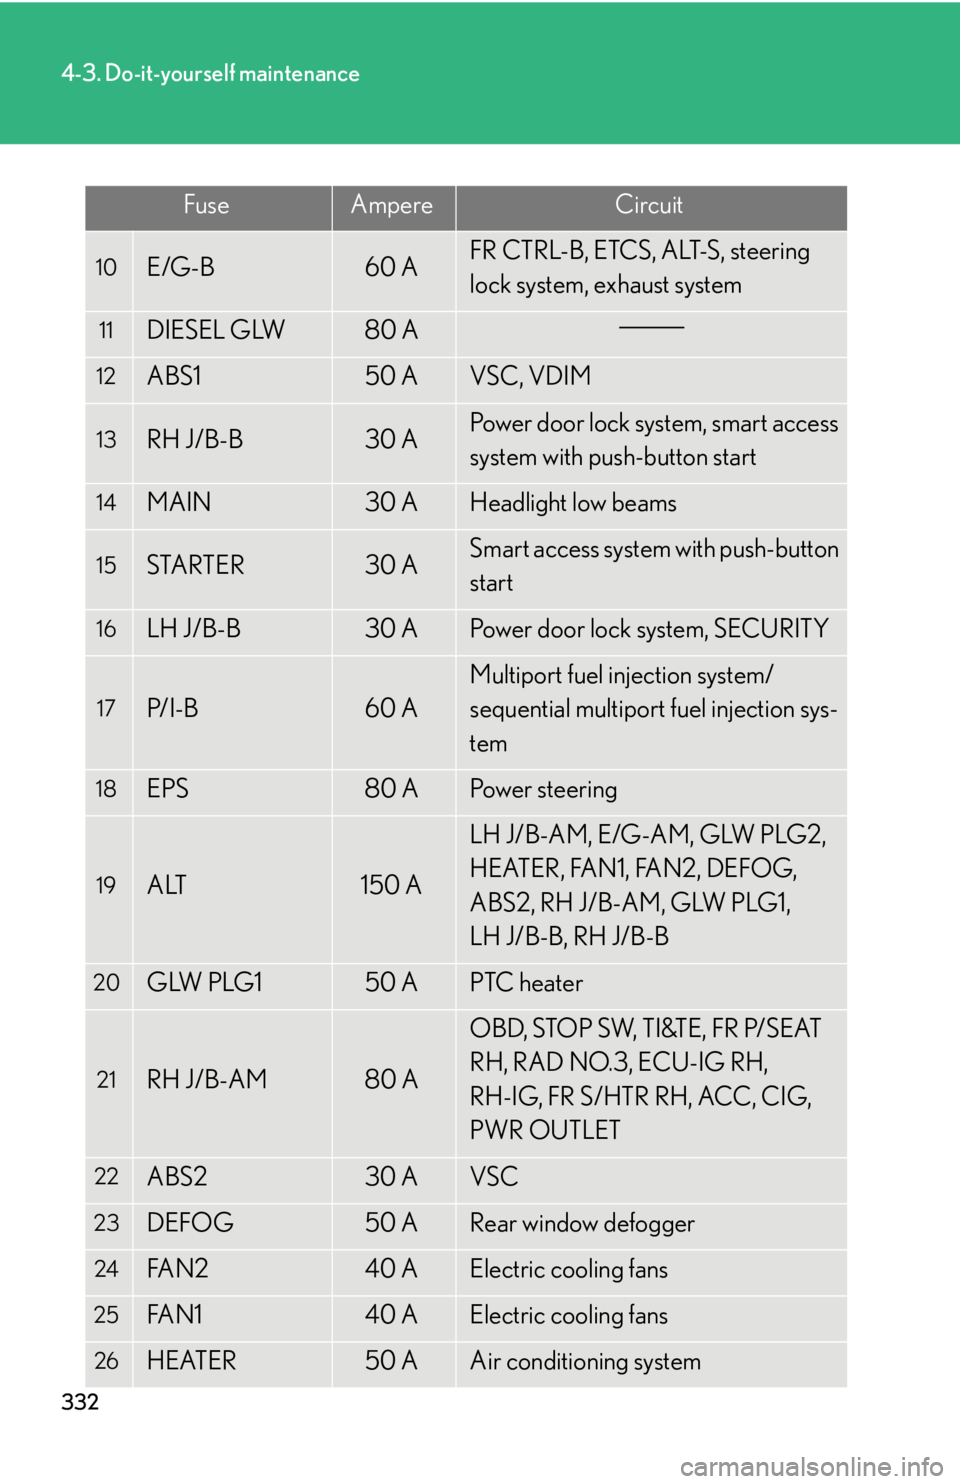
FuseAmpereCircuit
10E/G-B60 AFR CTRL-B, ETCS, ALT-S, steering
lock system, exhaust system
11DIESEL GLW80 A
12ABS150 AVSC, VDIM
13RH J/B-B30 APower door lock system, smart access
system with push-button start
14MAIN30 AHeadlight low beams
15STARTER30 ASmart access system with push-button
start
16LH J/B-B30 APower door lock system, SECURITY
17P/I-B60 A
Multiport fuel injection system/
sequential multiport fuel injection sys-
tem
18EPS80 APower steering
19ALT150 A
LH J/B-AM, E/G-AM, GLW PLG2,
H E AT E R , FA N 1 , FA N 2 , D E F O G,
ABS2, RH J/B-AM, GLW PLG1,
LH J/B-B, RH J/B-B
20GLW PLG150 APTC heater
21RH J/B-AM80 A
OBD, STOP SW, TI&TE, FR P/SEAT
RH, RAD NO.3, ECU-IG RH,
RH-IG, FR S/HTR RH, ACC, CIG,
PWR OUTLET
22ABS230 AVSC
23DEFOG50 ARear window defogger
24FA N 240 AElectric cooling fans
25FA N 140 AElectric cooling fans
26HEATER50 AAir conditioning system
Page 333 of 464

333
4-3. Do-it-yourself maintenance
4
Maintenance and care
FuseAmpereCircuit
27GLW PLG250 APTC heater
28E/G-AM60 AHeadlight cleaners, front fog lights,
parking lights, air conditioning system
29LH J/B-AM80 A
S/ROOF, FR P/SEAT LH, TV NO.1,
A/C, FUEL/OPEN, PSB, FR WIP,
H-LP LVL, LH-IG, ECU-IG LH,
PANEL, TAIL, MIR HTR,
FR S/HTR LH
Page 334 of 464

334
4-3. Do-it-yourself maintenance
■Engine compartment (type B)
FuseAmpereCircuit
1FR CTRL-B25 AHeadlight high beam, horn
2A/F15 AExhaust system
3ETCS10 A
Multiport fuel injection system/
sequential multiport fuel injection sys-
tem
4ALT-S7. 5 ACharging system
5STR LOCK25 ASteering lock
6H-LP CLN30 AHeadlight cleaner
7A/C COMP7. 5 AAir conditioning system
8DEICER25 A
9FR CTRL-AM30 AFront fog lights, parking lights, wind-
shield washer
10IG210 AIgnition system
11EFI NO.210 AFuel system, exhaust system
12H-LP R LWR15 AHeadlight low beam (right)
13H-LP L LWR15 AHeadlight low beam (left)
Page 335 of 464

335
4-3. Do-it-yourself maintenance
4
Maintenance and care
FuseAmpereCircuit
14F/ P M P25 AFuel system
15EFI25 A
Multiport fuel injection system/
sequential multiport fuel injection sys-
tem
16INJ20 A
Multiport fuel injection system/
sequential multiport fuel injection sys-
tem
17H-LP UPR15 AHeadlight high beams
18HORN10 AHorns
19WA S H E R20 AWindshield washer
20FR TAIL10 AParking lights
21FR FOG15 AFront fog lights