height Lexus IS250 2008 Using the air conditioning system and defogger / LEXUS 2008 IS250 OWNER'S MANUAL (OM53699U)
[x] Cancel search | Manufacturer: LEXUS, Model Year: 2008, Model line: IS250, Model: Lexus IS250 2008Pages: 464, PDF Size: 6.61 MB
Page 44 of 464

44
1-3. Adjustable components (seats, mirrors, steering wheel)
Front seats
Manual seat
Seat position lever
Seatback angle lever
Vertical height adjustment lever
Seat cushion (front) angle knob
Page 45 of 464

45
1-3. Adjustable components (seats, mirrors, steering wheel)
1
Before driving
CAUTION
■Seat adjustment
●Do not recline the seat more than necessary when the vehicle is in motion to
reduce the risk of sliding under the lap belt.
If the seat is too reclined, the lap belt may slide past the hips and apply restraint
forces directly to the abdomen or your neck may contact the shoulder belt,
increasing the risk of death or serious injury in the event of an accident.
●Manual seat only: After adjusting the seat , make sure that the seat is locked in
position.
Power seat
Seat position switch
Seatback angle switch
Seat cushion (front) angle switch
Vertical height adjustment switch
Lumbar support switch
Page 51 of 464

51
1
1-3. Adjustable components (seats, mirrors, steering wheel)
Before driving
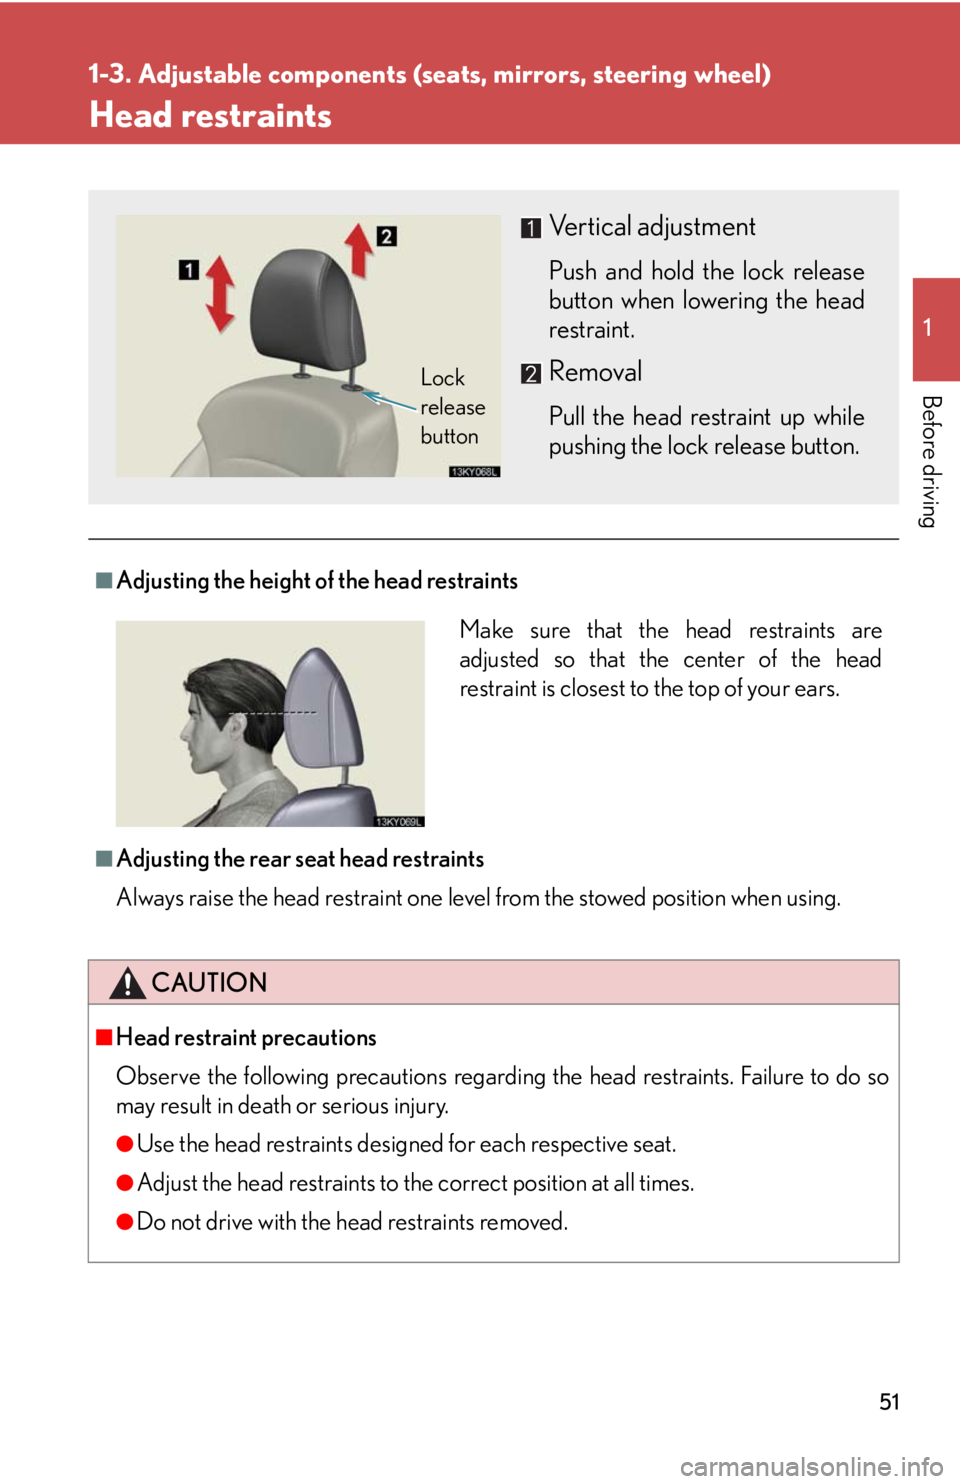
Head restraints
■Adjusting the height of the head restraints
■Adjusting the rear seat head restraints
Always raise the head restraint one level from the stowed position when using.
CAUTION
■Head restraint precautions
Observe the following precautions regarding the head restraints. Failure to do so
may result in death or serious injury.
●Use the head restraints designed for each respective seat.
●Adjust the head restraints to the correct position at all times.
●Do not drive with the head restraints removed.
Vertical adjustment
Push and hold the lock release
button when lowering the head
restraint.
Removal
Pull the head restraint up while
pushing the lock release button.
Lock
release
button
Make sure that the head restraints are
adjusted so that the center of the head
restraint is closest to the top of your ears.
Page 53 of 464

53
1-3. Adjustable components (seats, mirrors, steering wheel)
1
Before driving
Seat belt comfort guide (outside rear seats)If the shoulder belt sits close to a
person’s neck, slide the seat belt
comfort guide forward.
Seat belt pretensioners (front and outside rear seats)The pretensioner helps the seat
belt to quickly restrain the occu-
pant by retracting the seat belt
when the vehicle is subjected to
certain types of severe frontal colli-
sion.
The pretensioner may not activate
in the event of a minor frontal
impact, a side impact or a rear
impact.
■ Adjusting the height of the belt (front seats)
Down
Up
Move the height adjuster up and
down as needed until you hear a
click.
Page 388 of 464

388
5-2. Steps to take in an emergency
CAUTION
■Using the tire jack
Improper use of the tire jack may lead to death or injuries due to the vehicle sud-
denly falling off the jack.
●Do not use the tire jack for any purpose other than replacing tires or installing and
removing tire chains.
●Only use the tire jack that comes with this vehicle for replacing a flat tire.
Do not use it on other vehicles, and do not use other tire jacks for replacing tires
on this vehicle.
●Always check that the tire jack is securely set to the jack point.
●Do not put any part of your body under the vehicle supported by a jack.
●Do not start or run the engine while your vehicle is supported by the jack.
●Do not raise the vehicle while someone is in it.
●When raising the vehicle, do not put an object on or under the jack.
●Do not raise the vehicle to a height greate r than that required to replace the tire.
●Use a jack stand if it is necessary to get under the vehicle.
Take particular care when lowering the vehicle to ensure that no one working on or
near the vehicle may be injured.
■Replacing a flat tire
Observe the following precautions to reduce the risk of death or serious injury.
●Never use oil or grease on the wheel bolts or wheel nuts.
The oil or grease can cause the wheel nuts to loosen, causing a serious accident.
Remove any oil or grease on the wheel bolts or wheel nuts.
●Have the wheel nuts tightened with a torque wrench to 76 ft•lbf (103 N•m, 10.5
kgf•m) as soon as possible after changing wheels.
Failure to follow these precautions could cause the nuts to loosen and the wheels
may fall off, which could lead to an accident causing death or serious injury.
Page 406 of 464

406
6-1. Specifications
Maintenance data (fuel, oil level, etc.)
Dimensions and weight
*1: Unladen vehicle
*2: Vehicle with 255/40R18 tires
*3: Vehicle with tires other than the above
Overall length180.1 in. (4575 mm)
Overall width70.9 in. (1800 mm)
Overall height *1
2WD
models56.1 in. (1425 mm)
AW D
models56.7 in. (1440 mm)
Wheelbase107.4 in. (2730 mm)
Tr e a d
Front60.4 in. (1535 mm)
Rear60.0 in. (1525 mm)*2
60.4 in. (1535 mm)*3
Vehicle capacity weight
(Occupants + luggage)825 lb. (375 kg)
Page 426 of 464

426
6-1. Specifications
Typical DOT and tire identification number (TIN)DOT symbol
*
Tire Identification Number (TIN)
Tire manufacturer's identifica-
tion mark
Tire size code
Manufacturer's optional tire
type code (3 or 4 letters)
Manufacturing week
Manufacturing year
*: The DOT symbol certifies thatthe tire conforms to applicable
Federal Motor Vehicle Safety
Standards.
Tire size
■ Typical tire size information
The illustration indicates typical
tire size.
Ti r e u s e
(P = Passenger car,
T = Temporary use)
Section width (millimeters)
Aspect ratio
(tire height to section width)
Tire construction code
(R = Radial, D = Diagonal)
Wheel diameter (inches)
Load index (2 or 3 digits)
Speed symbol
(alphabet with one letter)