light Lexus IS250 2009 Using the audio system / LEXUS 2009 IS350/250 OWNER'S MANUAL (OM53669U)
[x] Cancel search | Manufacturer: LEXUS, Model Year: 2009, Model line: IS250, Model: Lexus IS250 2009Pages: 488, PDF Size: 6.24 MB
Page 392 of 488

392
5-2. Steps to take in an emergency
If a warning message is displayed
Stop the vehicle immediately.A buzzer sounds and a warning message is shown on the multi-informa-
tion display. The following warnings indicate the possibility of damage to
the vehicle that may lead to an acci dent. Immediately stop the vehicle in a
safe place and contact your Lexus dealer.
Wa r n i n g m e s s a g eDetails
(Flashing)
Indicates an abnormal engine oil pressure.
The warning light may turn on if the engine oil pres-
sure is too low.
If a warning is shown on the multi-information display, stay calm and per-
form the following actions:
Master warning light
The master warning light also
comes on or flashes in order to
indicate that a message is cur-
rently being displayed on the
multi-information display.
Multi-information display
If any of the warning li ght turns on again after performing the following
actions, contact your Lexus dealer.
Page 393 of 488

5
When trouble arises
393
5-2. Steps to take in an emergency
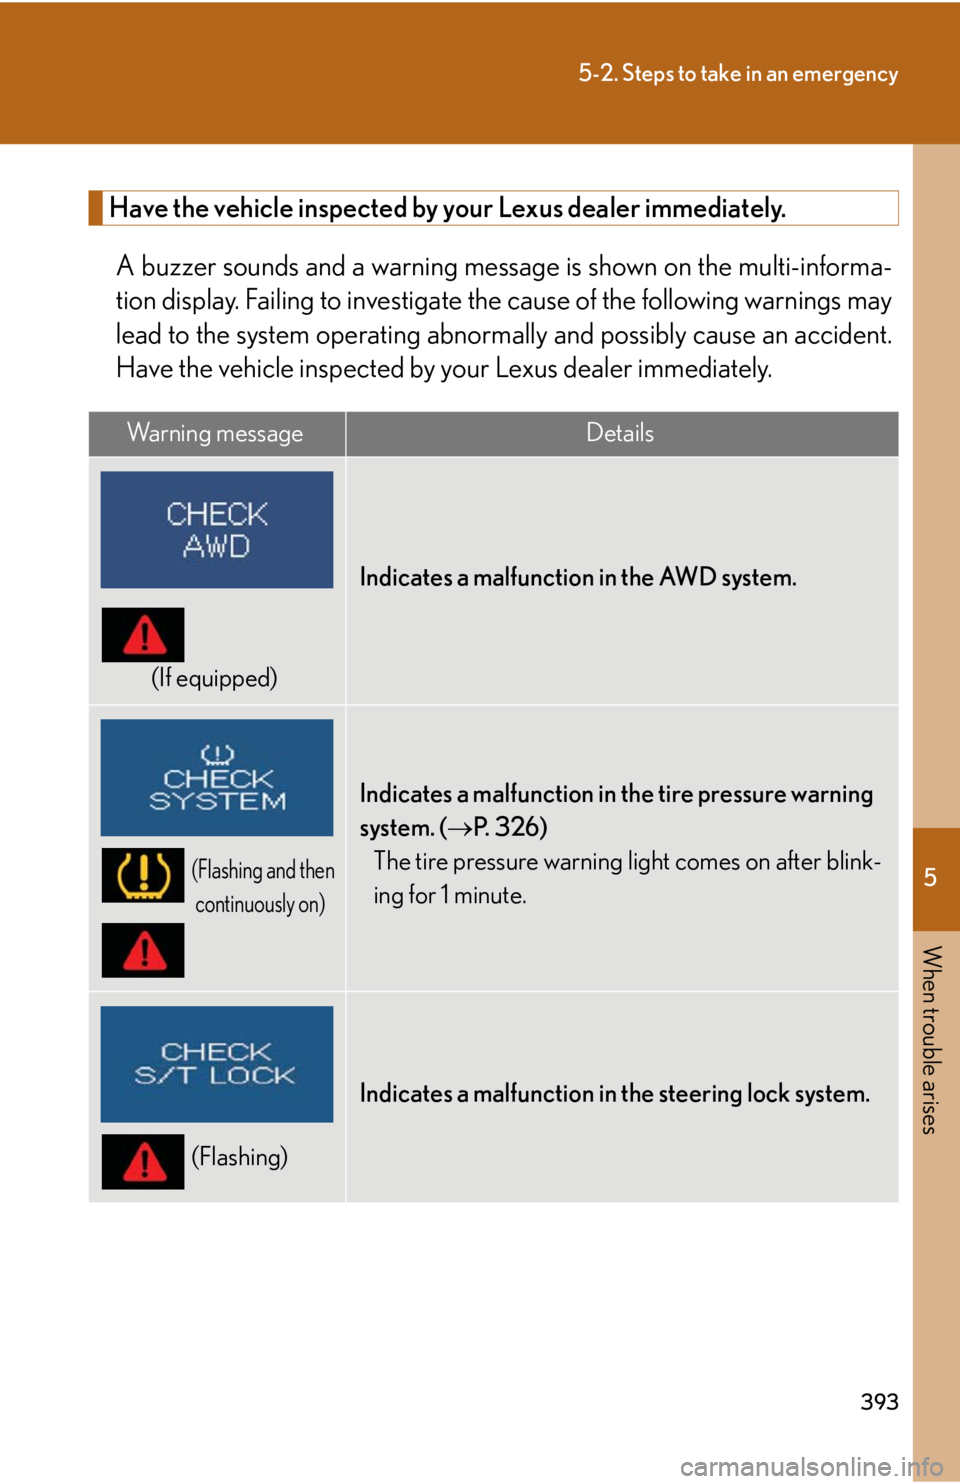
Have the vehicle inspected by your Lexus dealer immediately.A buzzer sounds and a warning message is shown on the multi-informa-
tion display. Failing to investigate the cause of the following warnings may
lead to the system operating abnormally and possibly cause an accident.
Have the vehicle inspected by your Lexus dealer immediately.
Wa r n i n g m e s s a g eDetails
(If equipped)
Indicates a malfunction in the AWD system.
(Flashing and then
continuously on)
Indicates a malfunction in the tire pressure warning
system. ( P. 3 2 6 )
The tire pressure warning light comes on after blink-
ing for 1 minute.
(Flashing)
Indicates a malfunction in the steering lock system.
Page 399 of 488

5
When trouble arises
399
5-2. Steps to take in an emergency
Wa r n i n g m e s s a g eDetailsCorrection procedure
(Flashing and then con-tinuously on)
(Flashing)
(If equipped)Indicates that the radar
cruise control system is
unable to judge vehicle-
to-vehicle distance.
• Switch the driving mode to either the normal or
power mode.
• If the windshield wipers
are on, turn them off or
set them to either the
intermittent or the slow
mode.
(Flashing)
(If equipped)
Indicates that your vehi-
cle is nearing the vehicle
ahead (in radar cruise
mode).
Slow the vehicle by apply-
ing the brakes.
■Changing the engine oil (U.S.A. only)
Make sure to reset the oil change system. ( P. 313)
■Warning light display in radar cruise mode
In the following cases, the warning light may not be displayed even if vehicle-to-
vehicle distance closes.
●When your vehicle and the vehicle ahead are traveling at the same speed or the
vehicle ahead is traveling more quickly than your vehicle
●When the vehicle ahead is traveling at a very low speed
●Immediately after cruise control speed is set
●At the instant the accelerator pedal is depressed
Page 400 of 488

400
5-2. Steps to take in an emergency
Follow the correction procedures.After taking the specified steps to co rrect the suspected problem, check
that the warning light turns off.
Interior
buzzerExterior buzzerWa r n i n g m e s s a g eDetailsCorrection
procedure
Once
(Comes on for 10 seconds.)
(Flashing)
Indicates that an
attempt was made
to start the engine
without the elec-
tronic key being
present, or the
electronic key was
not functioning
normally.
Start the engine
with the elec-
tronic key
present.
*
Once3 times
(Flashing)
Indicates that a
door other than
the driver’s door
has been opened
or closed with the
“ENGINE START
STOP” switch in
any mode other
than OFF and the
electronic key
outside of the
detection area.
Confirm the loca-
tion of the elec-
tronic key.
Page 406 of 488

406
5-2. Steps to take in an emergency
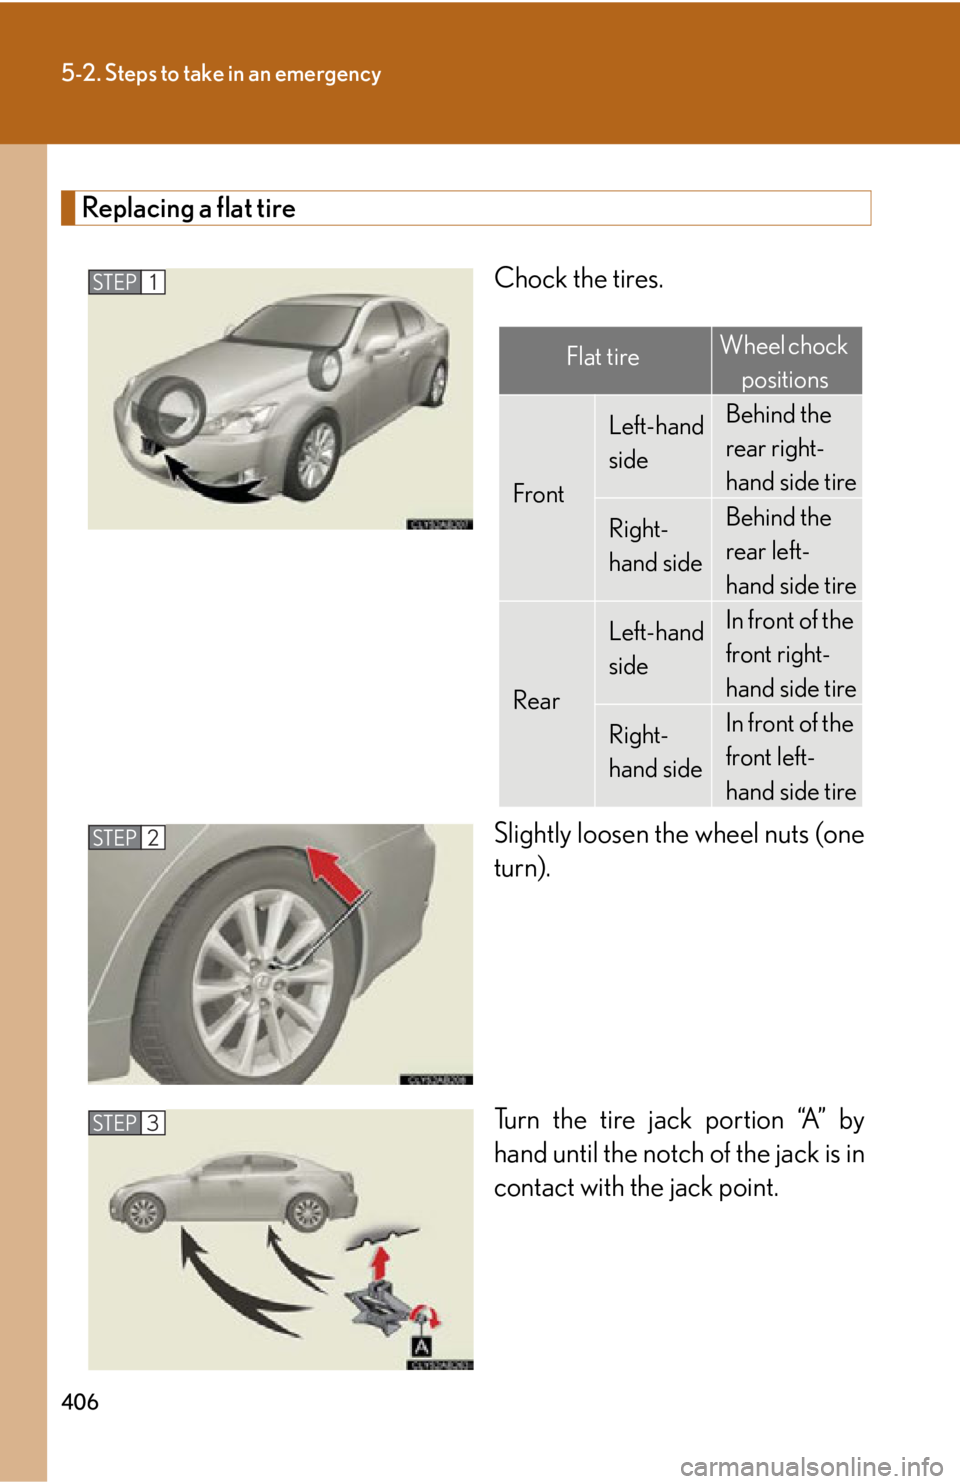
Replacing a flat tireChock the tires.
Slightly loosen the wheel nuts (one
turn).
Turn the tire jack portion “A” by
hand until the notch of the jack is in
contact with the jack point.
STEP1
Flat tireWheel chock positions
Front
Left-hand
sideBehind the
rear right-
hand side tire
Right-
hand sideBehind the
rear left-
hand side tire
Rear
Left-hand
sideIn front of the
front right-
hand side tire
Right-
hand sideIn front of the
front left-
hand side tire
STEP2
STEP3
Page 407 of 488

5
When trouble arises
407
5-2. Steps to take in an emergency
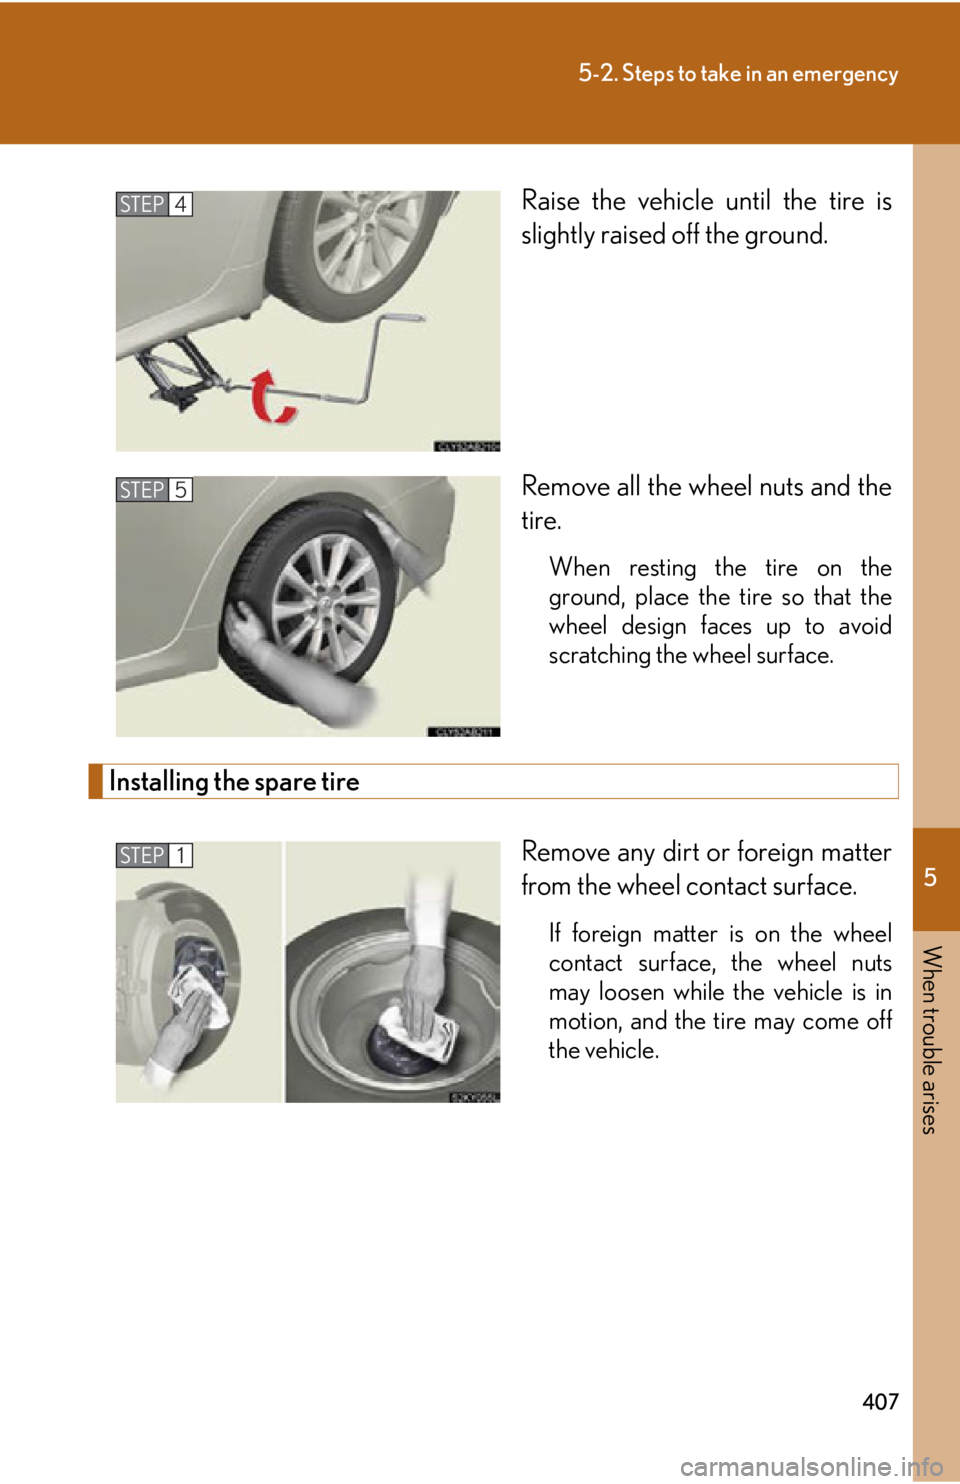
Raise the vehicle until the tire is
slightly raised off the ground.
Remove all the wheel nuts and the
tire.
When resting the tire on the
ground, place the tire so that the
wheel design faces up to avoid
scratching the wheel surface.
Installing the spare tireRemove any dirt or foreign matter
from the wheel contact surface.
If foreign matter is on the wheel
contact surface, the wheel nuts
may loosen while the vehicle is in
motion, and the tire may come off
the vehicle.
STEP4
STEP5
STEP1
Page 409 of 488

5
When trouble arises
409
5-2. Steps to take in an emergency
■The compact spare tire
●The compact spare tire is identified by the label “TEMPORARY USE ONLY”
on the tire sidewall.
Use the compact spare tire temporarily only in an emergency.
●Make sure to check the tire pressure of the compact spare tire. (P. 4 3 9 )
■When using the compact spare tire
As the compact spare tire is not equipped with the tire pressure warning valve and
transmitter, low inflation pressure of the spare tire will not be warned. Also, if you
replace the compact spare tire after the tire pressure warning light comes on, the
light remains on.
■If you have a flat rear tire on a road covered with snow or ice
Install the compact spare tire on the front of the vehicle. Perform the following steps
and fit tire chains to the rear tires.
Replace a front tire with the compact spare tire.
Replace the flat rear tire with the tire removed from the front of the vehi-
cle.
Fit tire chains to the rear tires.
■After completing the tire change
The tire pressure warning system must be reset. ( P. 3 2 7 )
STEP1
STEP2
STEP3
Page 413 of 488

5
When trouble arises
413
5-2. Steps to take in an emergency
If the engine will not start
If the engine will not start, even though correct starting procedures are
being followed (
P. 126), consider each of the following points.
■The engine will not start even when the starter motor operates
normally.
One of the following may be the cause of the problem.
● There may not be sufficient fuel in the vehicle’s tank.
Refuel the vehicle.
● The engine may be flooded.
Try to restart the engine once more following correct starting
procedures. ( P. 1 2 6 )
● There may be a malfunction in the engine immobilizer system.
( P. 7 7 )
■ The starter motor turns over slow ly, the interior lights and head-
lights are dim, or the horn does not sound or sounds at a low vol-
ume.
One of the following may be the cause of the problem.
● The battery may be discharged. ( P. 4 2 1 )
● The battery terminal connections may be loose or corroded.
■ The starter motor does not turn over, the interior lights and head-
lights do not turn on, or the horn does not sound.
One of the following may be the cause of the problem.
● One or both of the battery terminals may be disconnected.
● The battery may be discharged. ( P. 4 2 1 )
● There may be a malfunction in the steering lock system.
Contact your Lexus dealer if the problem cannot be repaired, or if
repair procedures are unknown.
Page 421 of 488

5
When trouble arises
421
5-2. Steps to take in an emergency
If the vehicle battery is discharged
The following procedures may be used to start the engine if the vehicle’s
battery is discharged.
You can call your Lexus dealer, or qualified repair shop.
If you have a set of jumper (or booster) cables and a second vehicle
with a 12-volt battery, you can jump start your Lexus following the steps
below.
Remove the engine compartment covers. ( P. 312)
Connecting the jumper cables.
Positive (+) battery terminal on your vehicle
Positive (+) battery terminal on the second vehicle
Negative (-) battery terminal on the second vehicle
Connect the jumper cable to ground on your vehicle as shown in the
illustration.
Start the engine of the second vehicle. Increase the engine
speed slightly and maintain at that level for approximately 5
minutes to recharge the battery of your vehicle.
Open and close any of the do ors with the “ENGINE START
STOP” switch OFF.
STEP1
STEP2
STEP3
STEP4
Page 422 of 488

422
5-2. Steps to take in an emergency
■Avoiding a discharged battery
●Turn off the headlights and the audio system while the engine is off.
●Turn off any unnecessary electrical components when the vehicle is running at a
low speed for an extended period, such as in heavy traffic, etc.
CAUTION
■Avoiding battery fires or explosions
Observe the following precautions to prevent accidentally igniting the flammable
gas that may be emitted from the battery.
●Make sure the jumper cable is connected to the correct terminal and that it is not
unintentionally in contact with any pa rt other than the intended terminal.
●Do not allow the jumper cables to come into contact with the “+” and “-” termi-
nals.
●Do not allow open flame or use matches, cigarette lighters or smoke near the
battery.
Maintain the engine speed on th e second vehicle and turn the
“ENGINE START STOP” switch to IGNITION ON mode,
then start the vehicle’s engine.
Once the vehicle’s engine has started, remove the jumper
cables in the exact reverse order in which they were con-
nected.
Once the engine starts, have the ve hicle checked at your Lexus dealer
as soon as possible.STEP5
STEP6