REV Lexus IS250 2015 Service Manual
[x] Cancel search | Manufacturer: LEXUS, Model Year: 2015, Model line: IS250, Model: Lexus IS250 2015Pages: 586, PDF Size: 8.66 MB
Page 162 of 586
1614-2. Driving procedures
4
Driving
IS350/250_U (OM53C50U)
■Auto power off function
If the vehicle is left in ACCESSORY mode for more than 20 minutes or IGNITION ON
mode (the engine is not running) for more than an hour with the shift lever in P, the engine
switch will automatically turn off. However, this function cannot entirely prevent battery
discharge. Do not leave the vehicle with the engine switch in ACCESSORY or IGNI-
TION ON mode for long periods of ti me when the engine is not running.
■Electronic key battery depletion
→P. 1 0 1
■Conditions affecting operation
→P. 116
■Notes for the entry function
→P. 117
■If the engine does not start
●Check that the shift lever is securely set in P. The engine may not start if the shift lever is
displaced out of P.
●The engine immobilizer system ma y not have been deactivated. (→P. 6 9 )
Contact your Lexus dealer.
■Steering lock
After turning the engine switch off and opening and closing the doors, the steering wheel
will be locked due to the steering lock func tion. Operating the engine switch again auto-
matically cancels the steering lock.
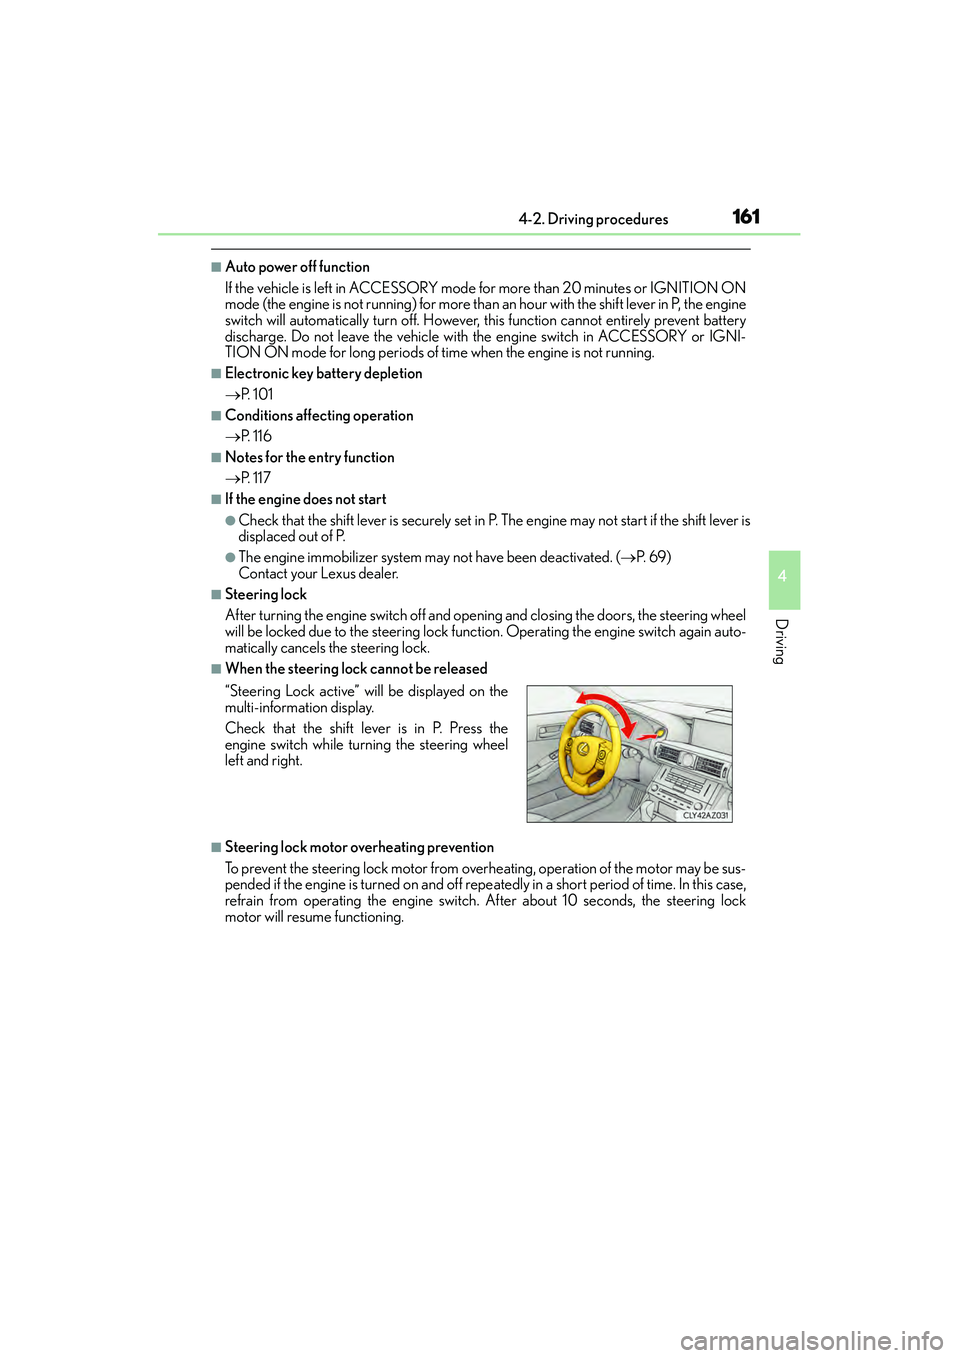
■When the steering lock cannot be released
■Steering lock motor overheating prevention
To prevent the steering lock motor from overheating, operation of the motor may be sus-
pended if the engine is turned on and off repe atedly in a short period of time. In this case,
refrain from operating the engine switch. After about 10 seconds, the steering lock
motor will resume functioning. “Steering Lock active” will be displayed on the
multi-information display.
Check that the shift lever is in P. Press the
engine switch while turning the steering wheel
left and right.
Page 164 of 586
1634-2. Driving procedures
4
Driving
IS350/250_U (OM53C50U)
NOTICE
■To prevent battery discharge
●Do not leave the engine switch in ACCESSORY or IGNITION ON mode for long
periods of time without the engine running.
●If “ACCESSORY” or “IGNITION ON” is displayed on the meters while the engine is
not running, the engine switch is not off. Exit the vehicle after turning the engine
switch off.
●Do not stop the engine when the shift lever is in a position other than P. If the engine is
stopped in another shift lever position, the engine switch will not be turned off but
instead be turned to ACCESSORY mode. If the vehicle is left in ACCESSORY
mode, battery discharge may occur.
■When starting the engine
●Do not race a cold engine.
●If the engine becomes difficult to start or stalls frequently, have your vehicle checked
by your Lexus dealer immediately.
■Symptoms indicating a malfunction with the engine switch
If the engine switch seems to be operating somewhat differently than usual, such as the
switch sticking slightly, there may be a malf unction. Contact your Lexus dealer immedi-
ately.
Page 166 of 586
1654-2. Driving procedures
4
Driving
IS350/250_U (OM53C50U)
*1: To improve fuel efficiency and reduce noise, shift the shift lever to D for normal driv-
ing.
*2: Any gear range can be fixed when driving in M mode.
■Sport mode/Eco drive mode
→ P. 2 3 7
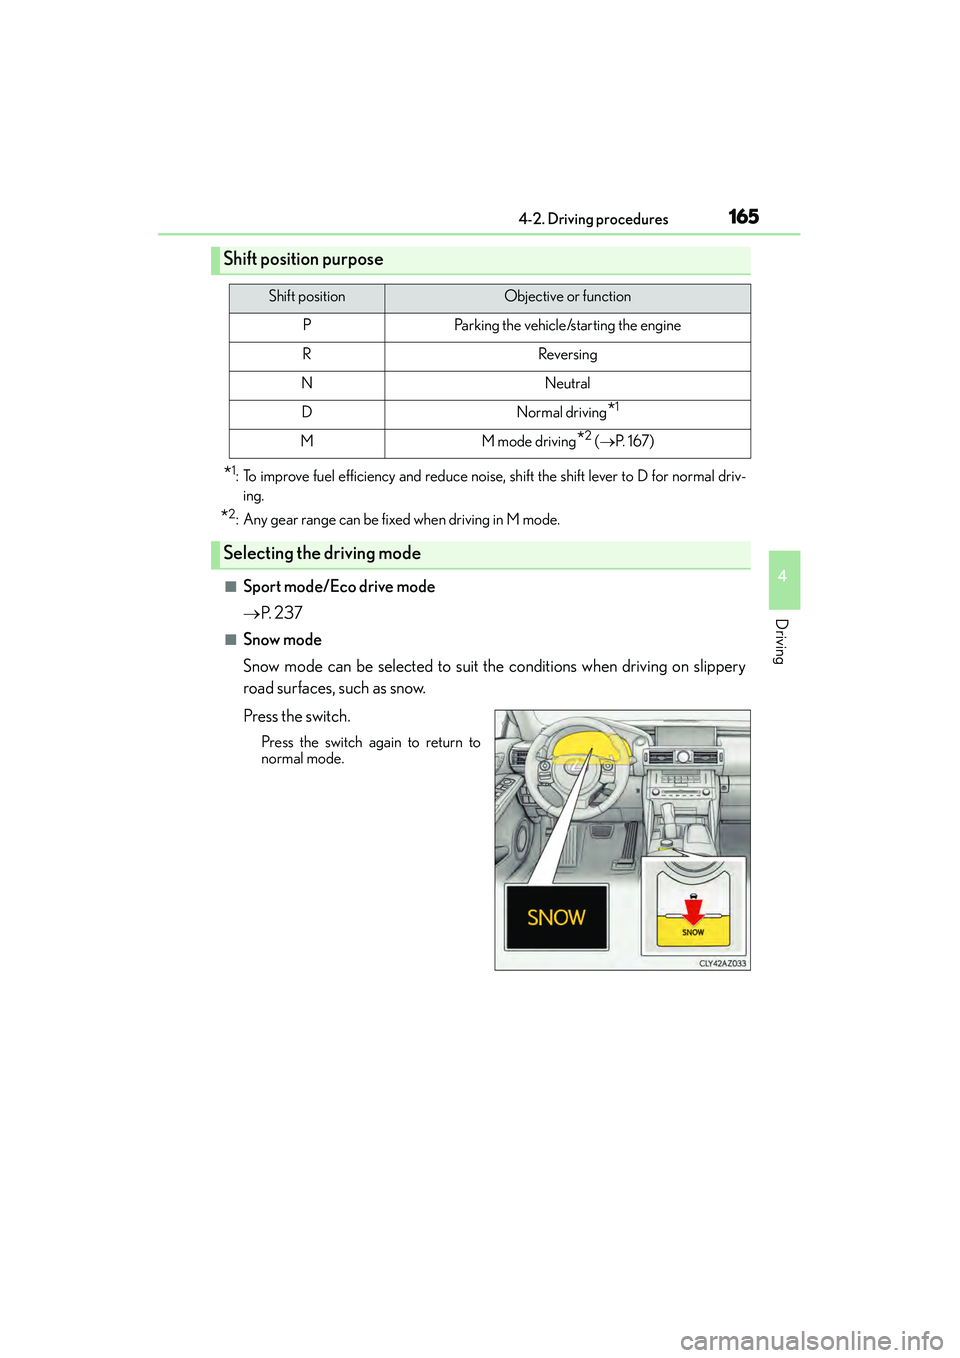
■Snow mode
Snow mode can be selected to suit the conditions when driving on slippery
road surfaces, such as snow.
Press the switch.
Press the switch again to return to
normal mode.
Shift position purpose
Shift positionObjective or function
PParking the vehicle/starting the engine
RReversing
NNeutral
DNormal driving*1
MM mode driving*2 (→ P. 1 6 7 )
Selecting the driving mode
Page 167 of 586
1664-2. Driving procedures
IS350/250_U (OM53C50U)
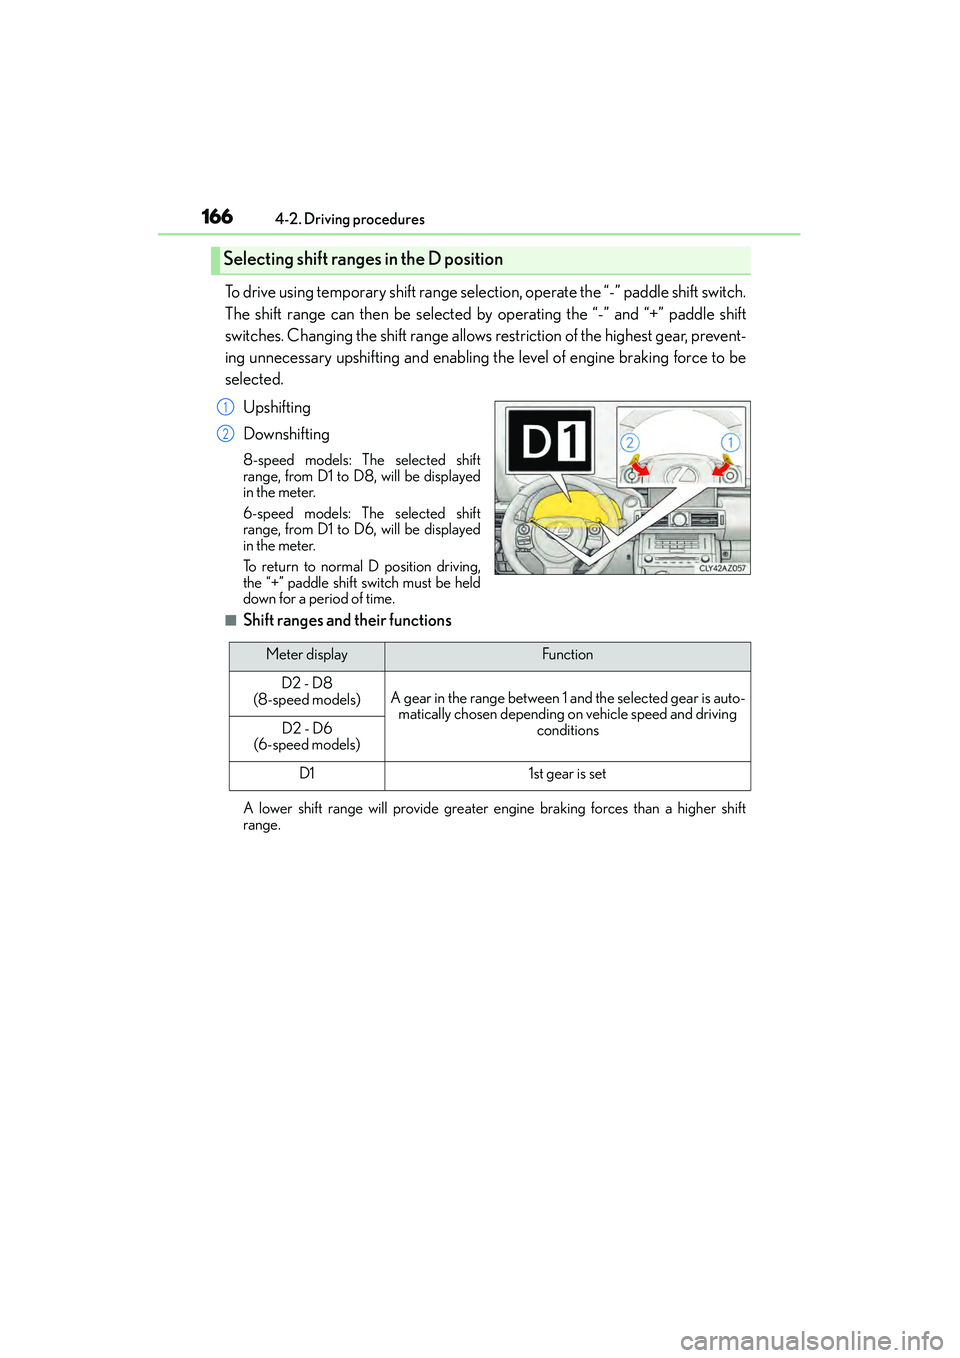
To drive using temporary shift range selection, operate the “-” paddle shift switch.
The shift range can then be selected by operating the “-” and “+” paddle shift
switches. Changing the shift range allows restriction of the highest gear, prevent-
ing unnecessary upshifting and enabling the level of engine braking force to be
selected. Upshifting
Downshifting
8-speed models: The selected shift
range, from D1 to D8, will be displayed
in the meter.
6-speed models: The selected shift
range, from D1 to D6, will be displayed
in the meter.
To return to normal D position driving,
the “+” paddle shift switch must be held
down for a period of time.
■Shift ranges and their functions
A lower shift range will provide greater engine braking forces than a higher shift
range.
Selecting shift ranges in the D position
1
2
Meter displayFunction
D2 - D8
(8-speed models)A gear in the range between 1 and the selected gear is auto- matically chosen depending on vehicle speed and driving conditions
D2 - D6
(6-speed models)
D11st gear is set
Page 168 of 586
1674-2. Driving procedures
4
Driving
IS350/250_U (OM53C50U)
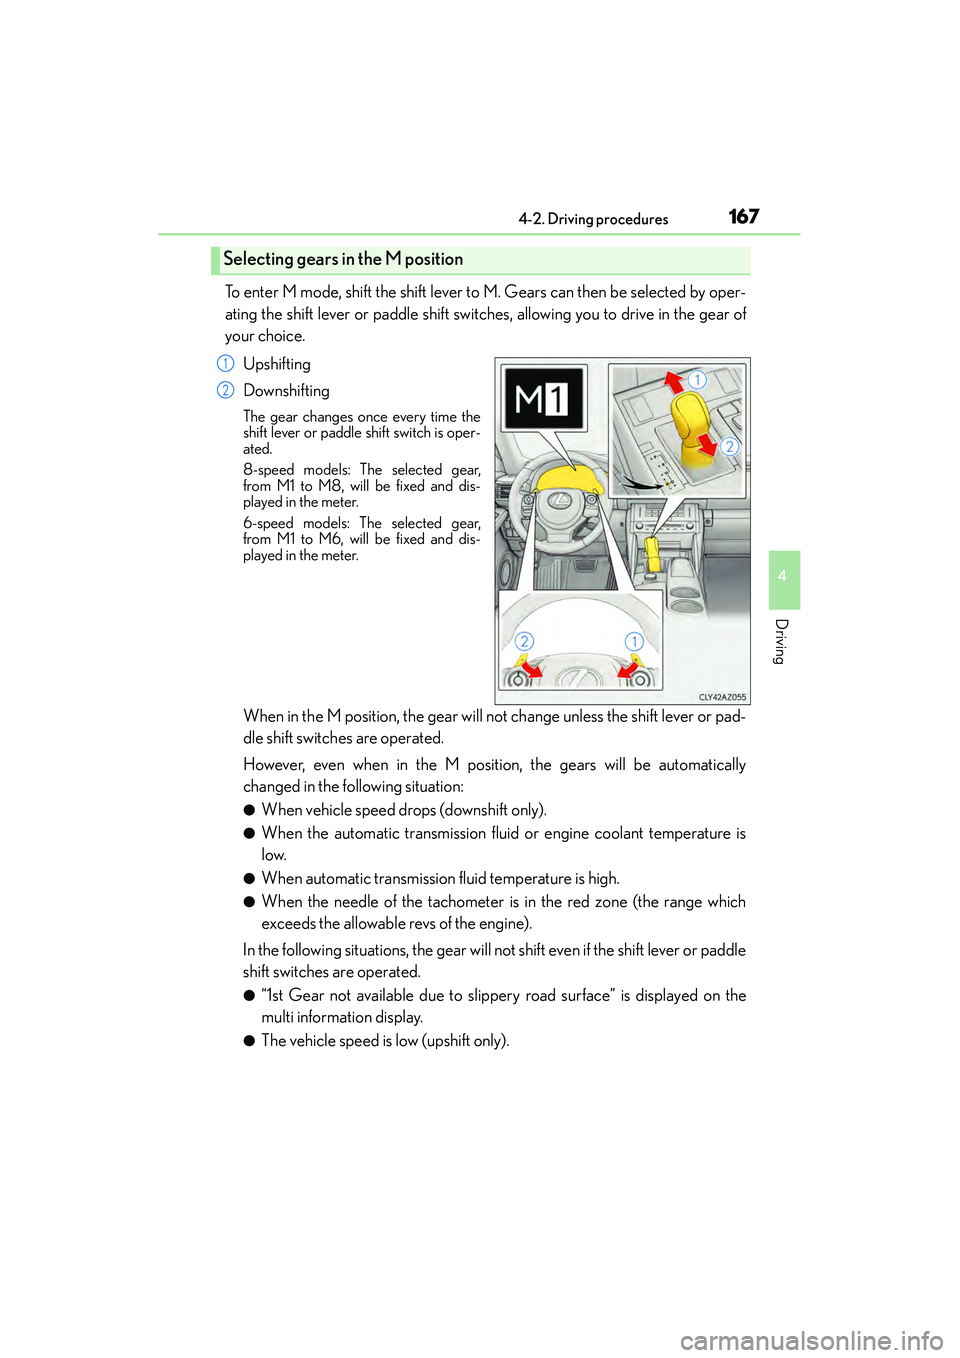
To enter M mode, shift the shift lever to M. Gears can then be selected by oper-
ating the shift lever or paddle shift switches, allowing you to drive in the gear of
your choice.Upshifting
Downshifting
The gear changes once every time the
shift lever or paddle shift switch is oper-
ated.
8-speed models: The selected gear,
from M1 to M8, will be fixed and dis-
played in the meter.
6-speed models: The selected gear,
from M1 to M6, will be fixed and dis-
played in the meter.
When in the M position, the gear will not change unless the shift lever or pad-
dle shift switches are operated.
However, even when in the M position, the gears will be automatically
changed in the following situation:
●When vehicle speed drops (downshift only).
●When the automatic transmission fluid or engine coolant temperature is
low.
●When automatic transmission fluid temperature is high.
●When the needle of the tachometer is in the red zone (the range which
exceeds the allowable revs of the engine).
In the following situations, the gear will not shift even if the shift lever or paddle
shift switches are operated.
●“1st Gear not available due to slippery road surface” is displayed on the
multi information display.
●The vehicle speed is low (upshift only).
Selecting gears in the M position
1
2
Page 176 of 586
1754-3. Operating the lights and wipers
4
Driving
IS350/250_U (OM53C50U)
■Light reminder buzzer
A buzzer sounds when the engine switch is turned off or turned to ACCESSORY mode
and the driver’s door is opened while the lights are turned on.
■Operation guide display (vehicles with rain-sensing windshield wipers only)
When the headlight switch is operated to and from the “AUTO” position, the current sta-
tus is displayed on the meters for a few seconds to show that AUTO mode is activated/
deactivated. ( →P. 8 9 )
■Customization
Settings (e.g. light sensor sensitivity) can be changed.
(Customizable features: →P. 5 3 7 )
NOTICE
■To prevent battery discharge
Do not leave the lights on longer than ne cessary when the engine is not running.
Page 186 of 586
1854-3. Operating the lights and wipers
4
Driving
IS350/250_U (OM53C50U)
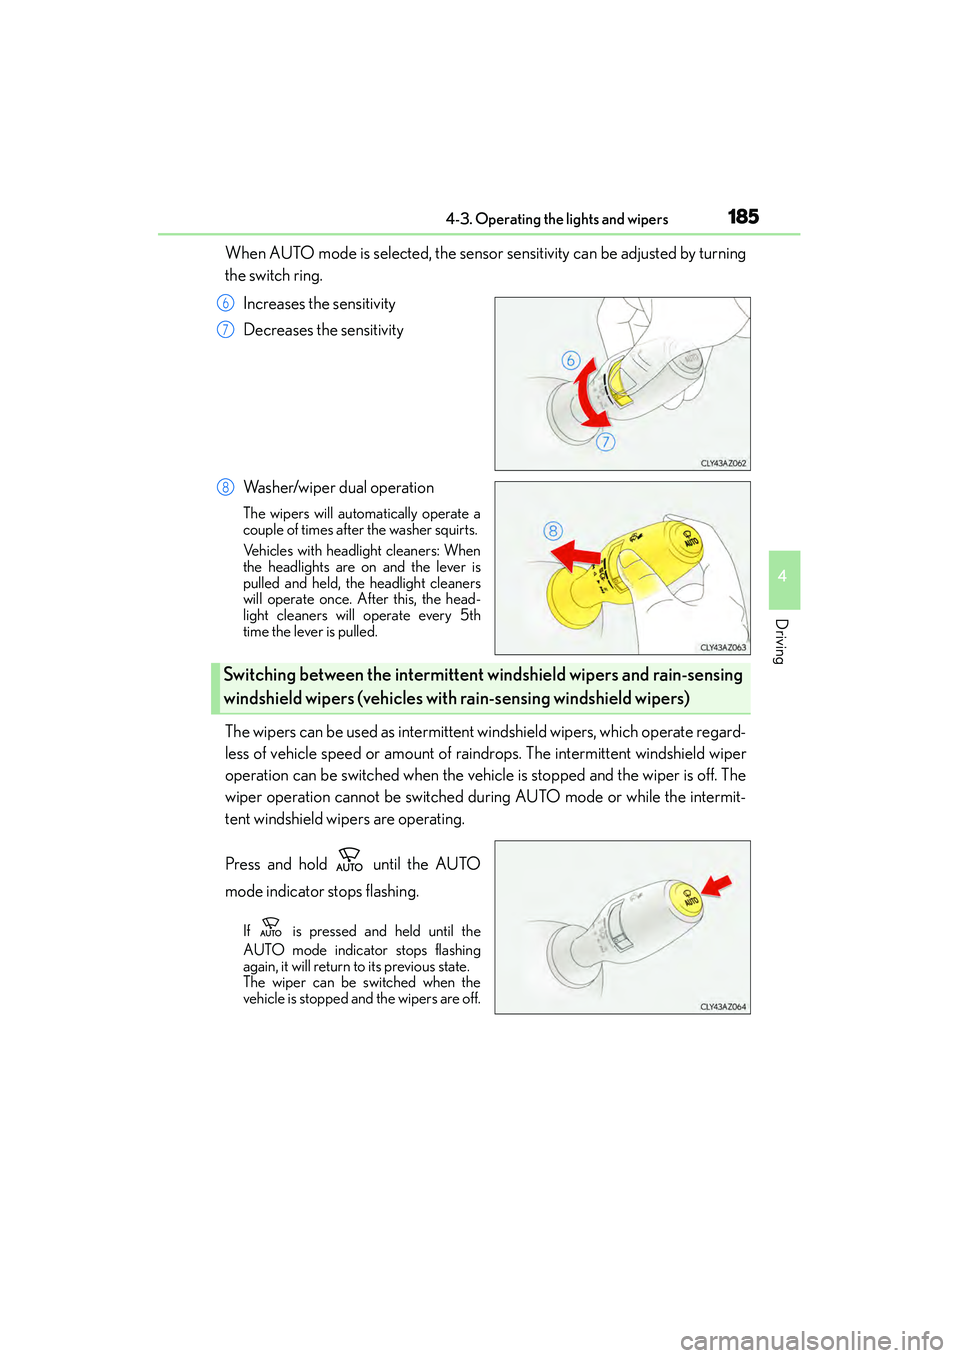
When AUTO mode is selected, the sensor sensitivity can be adjusted by turning
the switch ring.Increases the sensitivity
Decreases the sensitivity
Washer/wiper dual operation
The wipers will automatically operate a
couple of times after the washer squirts.
Vehicles with headlight cleaners: When
the headlights are on and the lever is
pulled and held, the headlight cleaners
will operate once. After this, the head-
light cleaners will operate every 5th
time the lever is pulled.
The wipers can be used as intermittent windshield wipers, which operate regard-
less of vehicle speed or amount of raindrops. The intermittent windshield wiper
operation can be switched when the vehicle is stopped and the wiper is off. The
wiper operation cannot be switched during AUTO mode or while the intermit-
tent windshield wipers are operating.
Press and hold until the AUTO
mode indicator stops flashing.
If is pressed and held until the
AUTO mode indicator stops flashing
again, it will return to its previous state.
The wiper can be switched when the
vehicle is stopped and the wipers are off.
6
7
8
Switching between the intermittent windshield wipers and rain-sensing
windshield wipers (vehicles with rain-sensing windshield wipers)
Page 187 of 586
1864-3. Operating the lights and wipers
IS350/250_U (OM53C50U)
■The windshield wiper and washer can be operated when
The engine switch is in IGNITION ON mode.
■Dripping prevention wiper sweep
After performing a washing and wiping operation several times, the wipers operate one
more time after a short delay to prevent dripping.
However, the last sweep will not happen if the vehicle is traveling above 106 mph (170
km/h).
■Effects of vehicle speed on wiper operation (vehicles with rain-sensing windshield wip-
ers)
Vehicle speed affects the following even when the wipers are not in AUTO mode.
●Intermittent wiper interval
●Wiper operation when the washer is being used (delay until drip prevention wiper
sweep occurs)
With low speed windshield wiper operation selected, wiper operation will be switched
from low speed to intermittent wiper operat ion only when the vehicle is stationary.
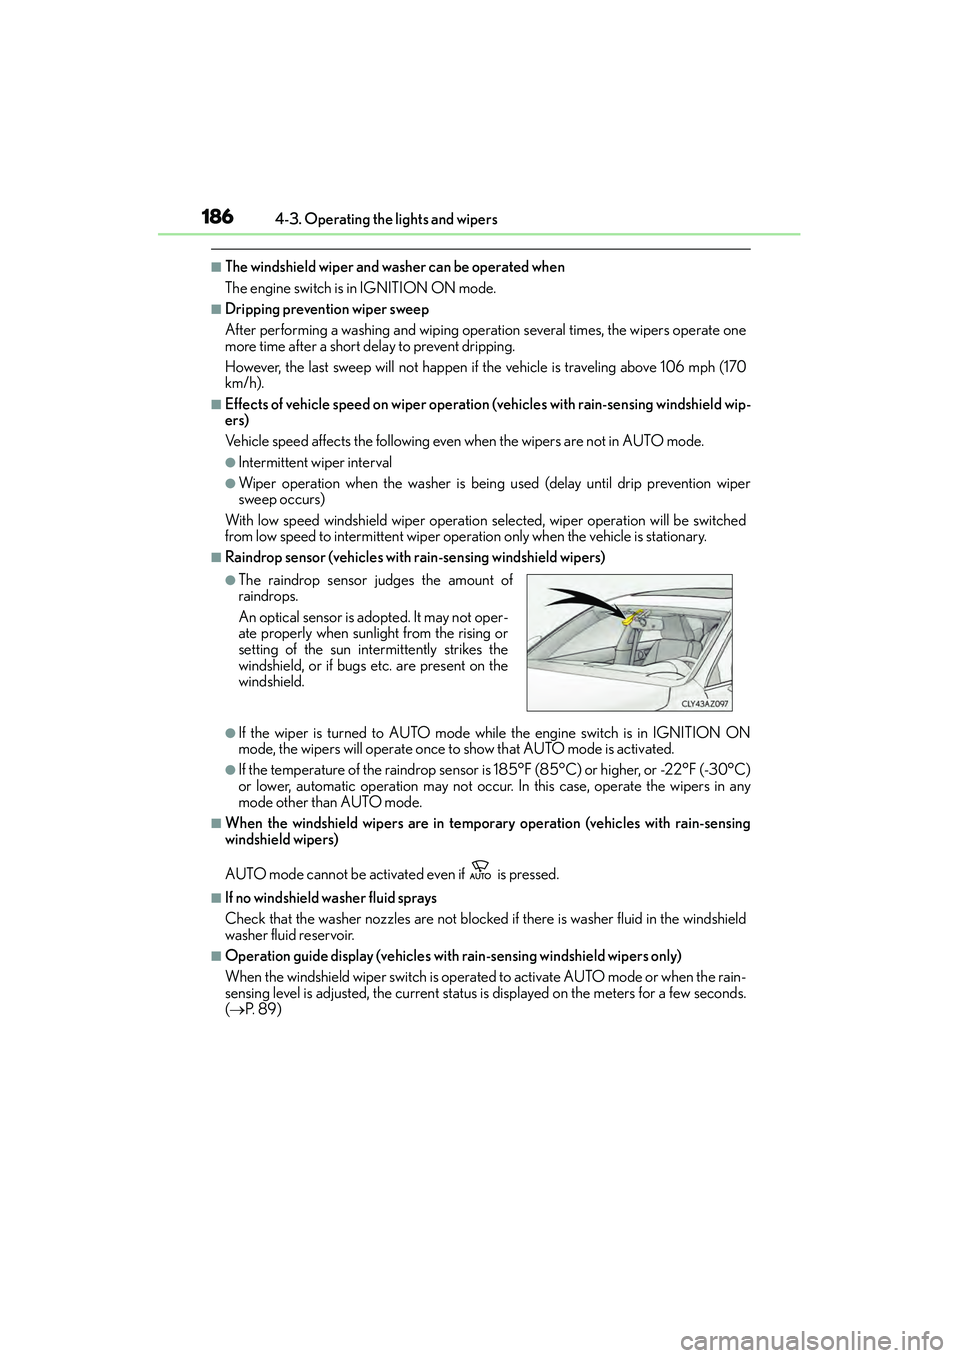
■Raindrop sensor (vehicles with rain-sensing windshield wipers)
●If the wiper is turned to AUTO mode while the engine switch is in IGNITION ON
mode, the wipers will operate once to show that AUTO mode is activated.
●If the temperature of the raindrop sensor is 185°F (85°C) or higher, or -22°F (-30°C)
or lower, automatic operation may not occur. In this case, operate the wipers in any
mode other than AUTO mode.
■When the windshield wipers are in temporary operation (vehicles with rain-sensing
windshield wipers)
AUTO mode cannot be activated even if is pressed.
■If no windshield washer fluid sprays
Check that the washer nozzles are not blocked if there is washer fluid in the windshield
washer fluid reservoir.
■Operation guide display (vehicles with rain-sensing windshield wipers only)
When the windshield wiper switch is operated to activate AUTO mode or when the rain-
sensing level is adjusted, the current status is displayed on the meters for a few seconds.
( → P. 8 9 )
●The raindrop sensor judges the amount of
raindrops.
An optical sensor is ad opted. It may not oper-
ate properly when sunlight from the rising or
setting of the sun intermittently strikes the
windshield, or if bugs etc. are present on the
windshield.
Page 189 of 586
188
IS350/250_U (OM53C50U)4-4. Refueling
●Close all the doors and windows, and turn the engine switch off.
●Confirm the type of fuel.
■Fuel types
Use unleaded gasoline (Octane rating 91 [Research Octane Number 96] or higher)
Opening the fuel tank cap
Perform the following steps to
open the fuel tank cap:
Before refueling the vehicle
CAUTION
■When refueling the vehicle
Observe the following precautions while refueling the vehicle. Failure to do so may
result in death or serious injury.
●After exiting the vehicle and before opening the fuel door, touch an unpainted metal
surface to discharge any static electricity. It is important to discharge static electricity
before refueling because sparks resulting fr om static electricity can cause fuel vapors
to ignite while refueling.
●Always hold the grips on the fuel tank cap and turn it slowly to remove it.
A whooshing sound may be heard when the fuel tank cap is loosened. Wait until the
sound cannot be heard before fully removing the cap. In hot weather, pressurized fuel
may spray out the filler neck and cause injury.
●Do not allow anyone that has not discharged static electricity from their body to come
close to an open fuel tank.
●Do not inhale vaporized fuel.
Fuel contains substances that are harmful if inhaled.
●Do not smoke while refueling the vehicle.
Doing so may cause the fuel to ignite and cause a fire.
●Do not return to the vehicle or touch any person or object that is statically charged.
This may cause static electricity to build up , resulting in a possible ignition hazard.
■When refueling
Observe the following precautions to prevent fuel overflowing from the fuel tank:
●Securely insert the fuel nozzle into the fuel filler neck.
●Stop filling the tank after the fuel nozzle automatically clicks off.
●Do not top off the fuel tank.
Page 201 of 586
2004-5. Using the driving support systems
IS350/250_U (OM53C50U)
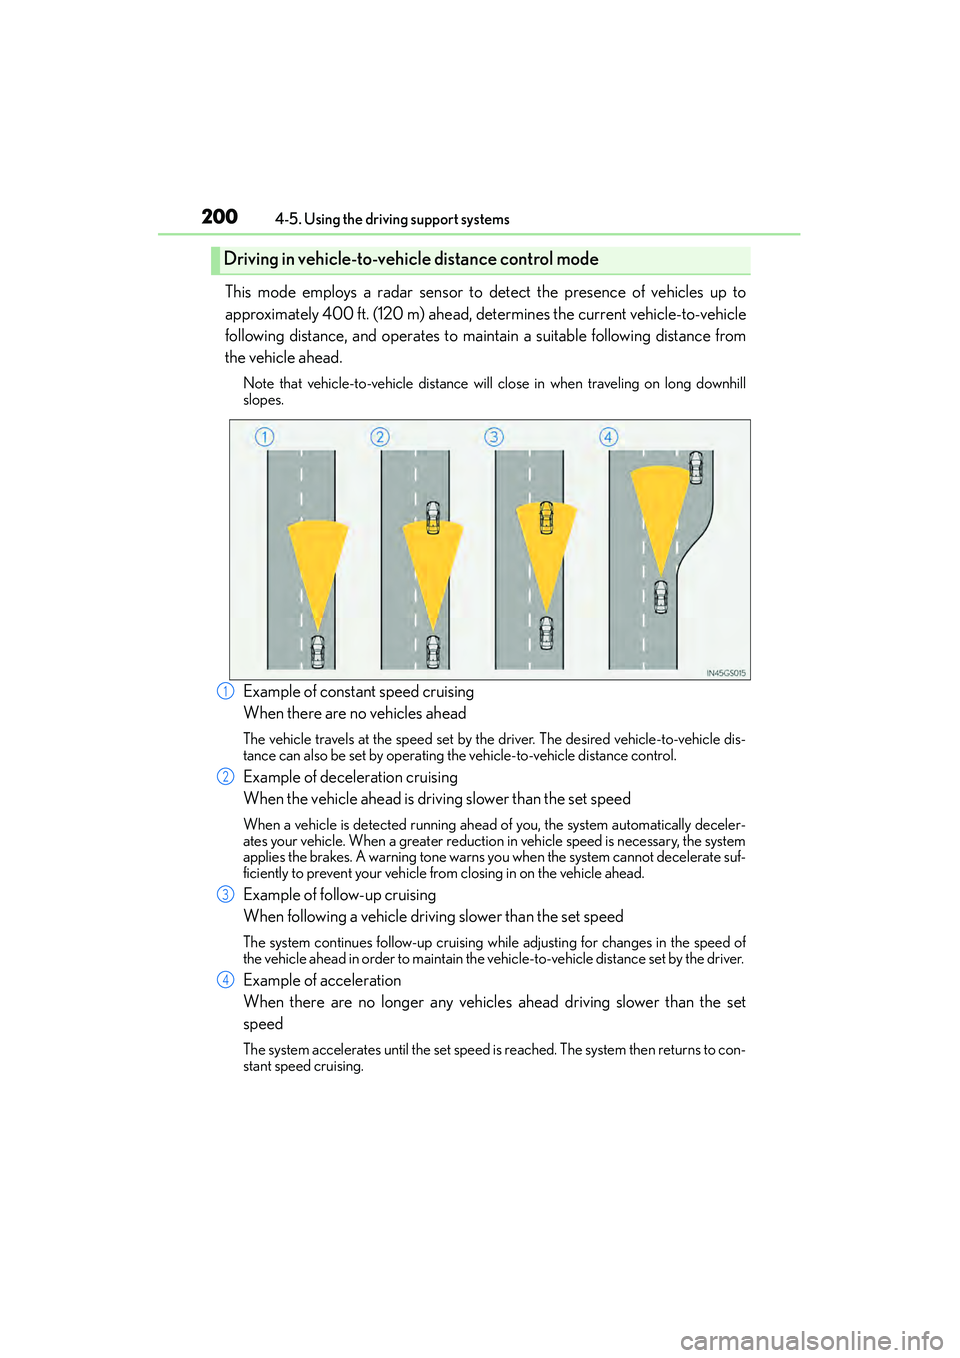
This mode employs a radar sensor to detect the presence of vehicles up to
approximately 400 ft. (120 m) ahead, determines the current vehicle-to-vehicle
following distance, and operates to maintain a suitable following distance from
the vehicle ahead.
Note that vehicle-to-vehicle distance will close in when traveling on long downhill
slopes.
Example of constant speed cruising
When there are no vehicles ahead
The vehicle travels at the speed set by the driver. The desired vehicle-to-vehicle dis-
tance can also be set by operating the vehicle-to-vehicle distance control.
Example of deceleration cruising
When the vehicle ahead is driving slower than the set speed
When a vehicle is detected running ahead of you, the system automatically deceler-
ates your vehicle. When a greater reduction in vehicle speed is necessary, the system
applies the brakes. A warning tone warns you when the system cannot decelerate suf-
ficiently to prevent your vehicle from closing in on the vehicle ahead.
Example of follow-up cruising
When following a vehicle driving slower than the set speed
The system continues follow-up cruising wh ile adjusting for changes in the speed of
the vehicle ahead in order to maintain the vehicle-to-vehicle distance set by the driver.
Example of acceleration
When there are no longer any vehicles ahead driving slower than the set
speed
The system accelerates until the set speed is reached. The system then returns to con-
stant speed cruising.
Driving in vehicle-to-vehicle distance control mode
1
2
3
4