brake Lexus IS250C 2012 Instrument cluster / LEXUS 2012 IS250C,IS350C (OM53A62U) Owner's Manual
[x] Cancel search | Manufacturer: LEXUS, Model Year: 2012, Model line: IS250C, Model: Lexus IS250C 2012Pages: 632, PDF Size: 6.77 MB
Page 149 of 632

149
2-1. Driving procedures
2
When driving
Manual transmissionCheck that the parking brake is set.
Check that the shift lever is set in N.
Firmly depress the clutch pedal.
The “ENGINE START STOP” switch indicator turns green.
Press the “ENGINE START
STOP” switch.
The engine will crank until it
starts or for up to 30 seconds,
whichever is less.
Continue depressing the clutch
pedal until the engine is com-
pletely started.
The engine can be started from
any “ENGINE START STOP”
switch mode.
STEP1
STEP2
STEP3
STEP4
Page 150 of 632

150
2-1. Driving procedures
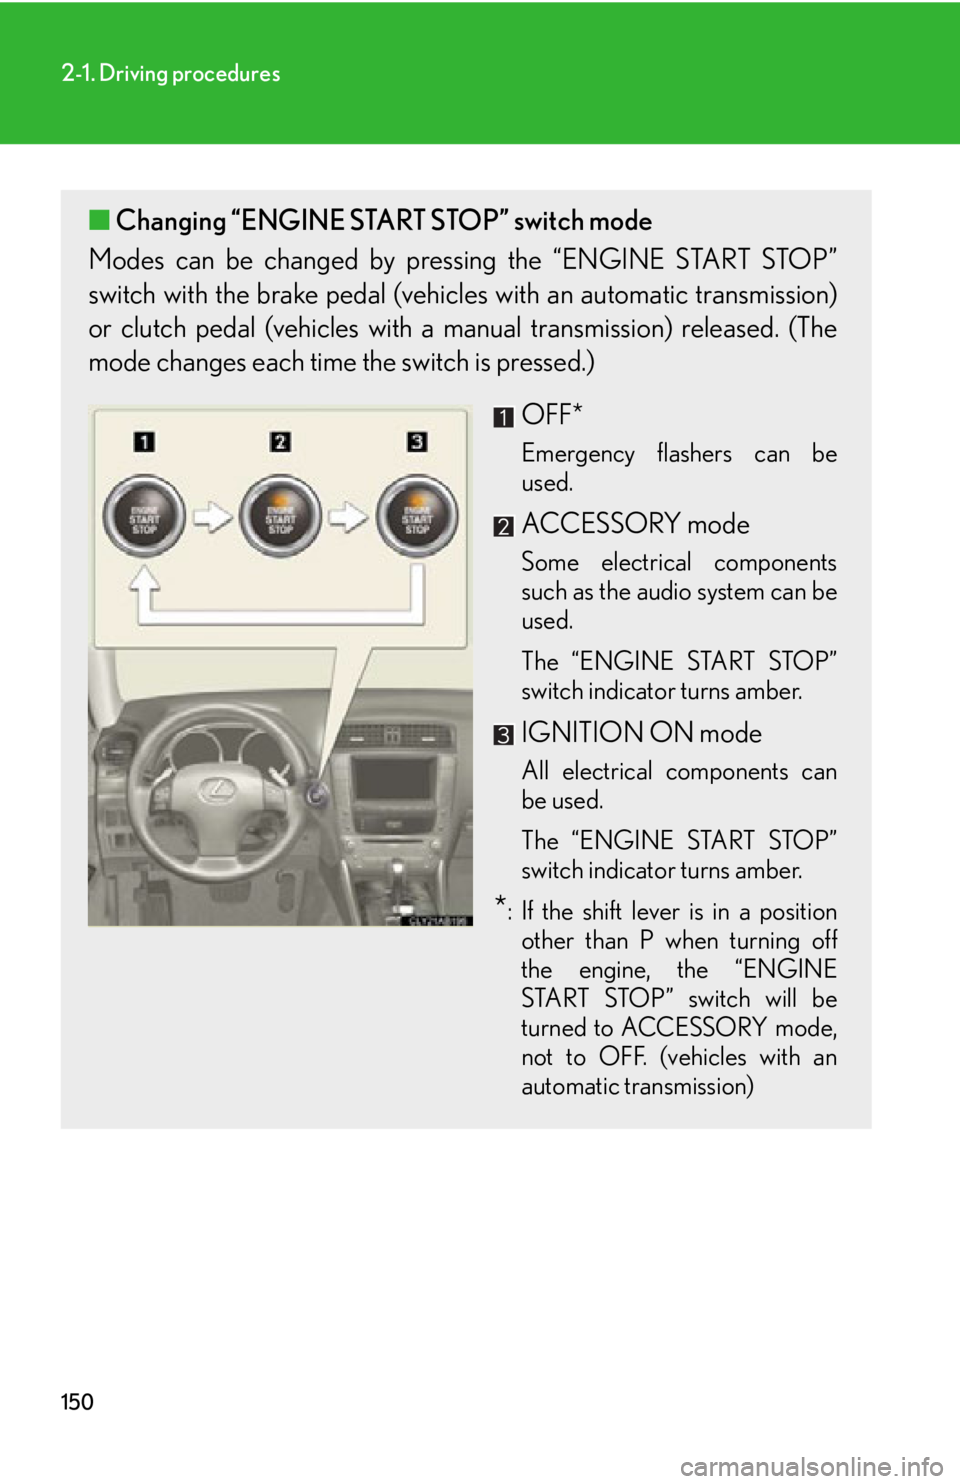
■Changing “ENGINE START STOP” switch mode
Modes can be changed by pressing the “ENGINE START STOP”
switch with the brake pedal (vehicles with an automatic transmission)
or clutch pedal (vehicles with a manual transmission) released. (The
mode changes each time the switch is pressed.)
OFF*
Emergency flashers can be
used.
ACCESSORY mode
Some electrical components
such as the audio system can be
used.
The “ENGINE START STOP”
switch indicator turns amber.
IGNITION ON mode
All electrical components can
be used.
The “ENGINE START STOP”
switch indicator turns amber.
*: If the shift lever is in a positionother than P when turning off
the engine, the “ENGINE
START STOP” switch will be
turned to ACCESSORY mode,
not to OFF. (vehicles with an
automatic transmission)
Page 152 of 632

152
2-1. Driving procedures
CAUTION
■When starting the engine
Always start the engine while sitting in the driver’s seat. Do not press the accelera-
tor while starting the engine under any circumstances.
Doing so may cause an accident resulting in death or serious injury.
■Stopping the engine in an emergency
If you want to stop the engine in an emergency while driving the vehicle, push and
hold the “ENGINE START STOP” switch for more than 3 seconds.
However, do not touch the “ENGINE START STOP” switch while driving except in
an emergency. Turning the engine off while driving will not cause loss of steering or
braking control, but the power assist to thes e systems will be lost. This will make it
more difficult to steer and brake, so you should pull over and stop the vehicle as
soon as it is safe to do so.
NOTICE
■To prevent battery discharge
Do not leave the “ENGINE START STOP” switch in ACCESSORY or IGNITION
ON mode for long periods without the engine running.
■When starting the engine
●Do not race a cold engine.
●If the engine becomes difficult to start or stalls frequently, have the engine
checked immediately.
Page 153 of 632

153
2-1. Driving procedures
2
When driving
Automatic transmission
: If equipped
Select a shift position appropriate for the driving conditions.
■Shifting the shift lever
While the “ENGINE START STOP” switch is in IGNITION
ON mode, depress the brake pedal and move the shift lever.
■ Shift position uses
*1: Shifting to the D position allows the sy stem to select a gear suitable for the
driving conditions. Setting the shift le ver to the D position is recommended
for normal driving.
*2: Selecting shift ranges using S mode re stricts the upper limit of the possible
gear ranges, controls engine brakin g forces, and prevents unnecessary
upshifting.
Shift positionFunction
PParking the vehicle or starting the engine
RReversing
NNeutral
DNormal driving*1
SS mode driving*2 ( P. 1 5 7 )
Page 163 of 632

163
2-1. Driving procedures
2
When driving
Parking brake
■Usage in winter time
See “Winter driving tips” for parking brake usage in winter time. (P. 2 3 8 )
Vehicles with an automatic transmission
Sets the parking brake
*
(Depressing the pedal again
releases the parking brake.)
*: Fully depress the parkingbrake pedal with your left
foot while depressing the
brake pedal with your right
foot.
Vehicles with a manual transmission
Sets
the parking brake
Fully set the parking brake while depressing the brake pedal.
Releases the parking brake
Slightly raise the lever and lower it completely while pressing the button.
Canada
U.S.A.
Canada
U.S.A.
Page 164 of 632

164
2-1. Driving procedures
NOTICE
■Before driving
Fully release the parking brake.
Driving the vehicle with the parking brake set will lead to brake components over-
heating, which may affect braking performance and increase brake wear.
Page 183 of 632

183
2-3. Operating the lights and windshield wipers
2
When driving
Turning on the high beam headlights
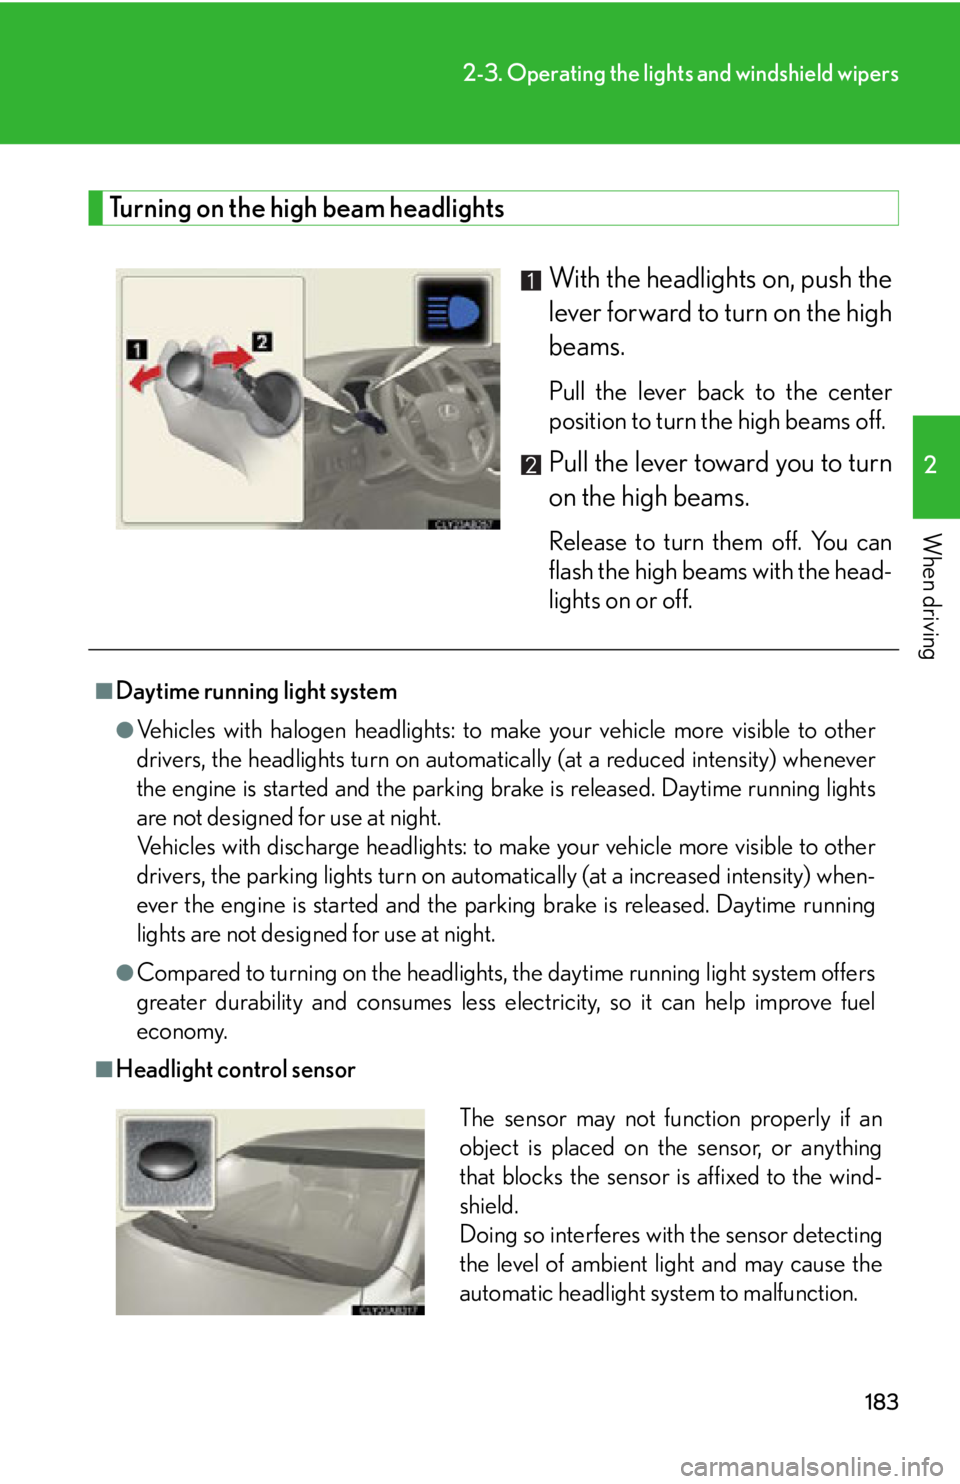
With the headlights on, push the
lever forward to turn on the high
beams.
Pull the lever back to the center
position to turn the high beams off.
Pull the lever toward you to turn
on the high beams.
Release to turn them off. You can
flash the high beams with the head-
lights on or off.
■Daytime running light system
●Vehicles with halogen headlights: to make your vehicle more visible to other
drivers, the headlights turn on automatically (at a reduced intensity) whenever
the engine is started and the parking brake is released. Daytime running lights
are not designed for use at night.
Vehicles with discharge headlights: to make your vehicle more visible to other
drivers, the parking lights turn on auto matically (at a increased intensity) when-
ever the engine is started and the parking brake is released. Daytime running
lights are not designed for use at night.
●Compared to turning on th e headlights, the daytime running light system offers
greater durability and consumes less electricity, so it can help improve fuel
economy.
■Headlight control sensor
The sensor may not function properly if an
object is placed on the sensor, or anything
that blocks the sensor is affixed to the wind-
shield.
Doing so interferes with the sensor detecting
the level of ambient light and may cause the
automatic headlight system to malfunction.
Page 196 of 632

196
2-4. Using other driving systems
■Adjusting the set speed
To change the set speed, operate the lever until the desired set
speed is obtained.
Increases the speed
Decreases the speed
Fine adjustment: Momentarily
move the lever in the desired
direction.
Large adjustment: Hold the
lever in the desired direction.
The set speed will be increased or decreased as follows:
Fine adjustment: By approximately 1 mph (1.6 km/h) each time the lever is
operated.
Large adjustment: The set speed can be increased or decreased continu-
ally until the lever is released.
■ Canceling and resuming the constant speed control
Pulling the lever toward you
cancels the constant speed
control.
The speed setting is also can-
celed when the brakes are
applied or the clutch pedal
(manual transmission only) is
depressed.
Pushing the lever up resumes
the constant speed control.
Resuming is available when the
vehicle speed is more than
approximately 25 mph (40
km/h).
Page 203 of 632

203
2-4. Using other driving systems
2
When driving
■Canceling and resuming the speed setting
Pulling the lever toward you
cancels the cruise control.
The speed setting is also can-
celed when the brakes are
applied.
Pushing the lever up resumes
the cruise control and returns
vehicle speed to the set
speed.
Resuming is available when
the vehicle speed is more than
approximately 25 mph (40
km/h).
Page 204 of 632

204
2-4. Using other driving systems
Driving in vehicle-to-vehicle distance control mode This mode employs a radar sensor to detect the presence of vehicles up
to approximately 400 ft. (120 m) ah ead, determines the current vehicle-
to-vehicle following distance, and op erates to maintain a suitable follow-
ing distance from the vehicle ahead.
Note that vehicle-to-vehicle distance will close in when traveling on long
downhill slopes.
Example of constant speed cruising
When there are no vehicles ahead
The vehicle travels at the speed set by the driver. The desired vehicle-to-vehi-
cle distance can also be set by operat ing the vehicle-to-vehicle distance con-
trol.
Example of deceleration cruising
When the vehicle ahead is driving slower than the set speed
When a vehicle is detected running ahead of you, the system automatically
decelerates your vehicle. When a grea ter reduction in vehicle speed is nec-
essary, the system applies the brakes. A warning tone warns you when the
system cannot decelerate sufficiently to prevent your vehicle from closing in
on the vehicle ahead.