LEXUS IS300 2023 Owner's Manual
Manufacturer: LEXUS, Model Year: 2023, Model line: IS300, Model: LEXUS IS300 2023Pages: 96, PDF Size: 5.32 MB
Page 21 of 96
20
IS500_IS350_IS300_QG_U
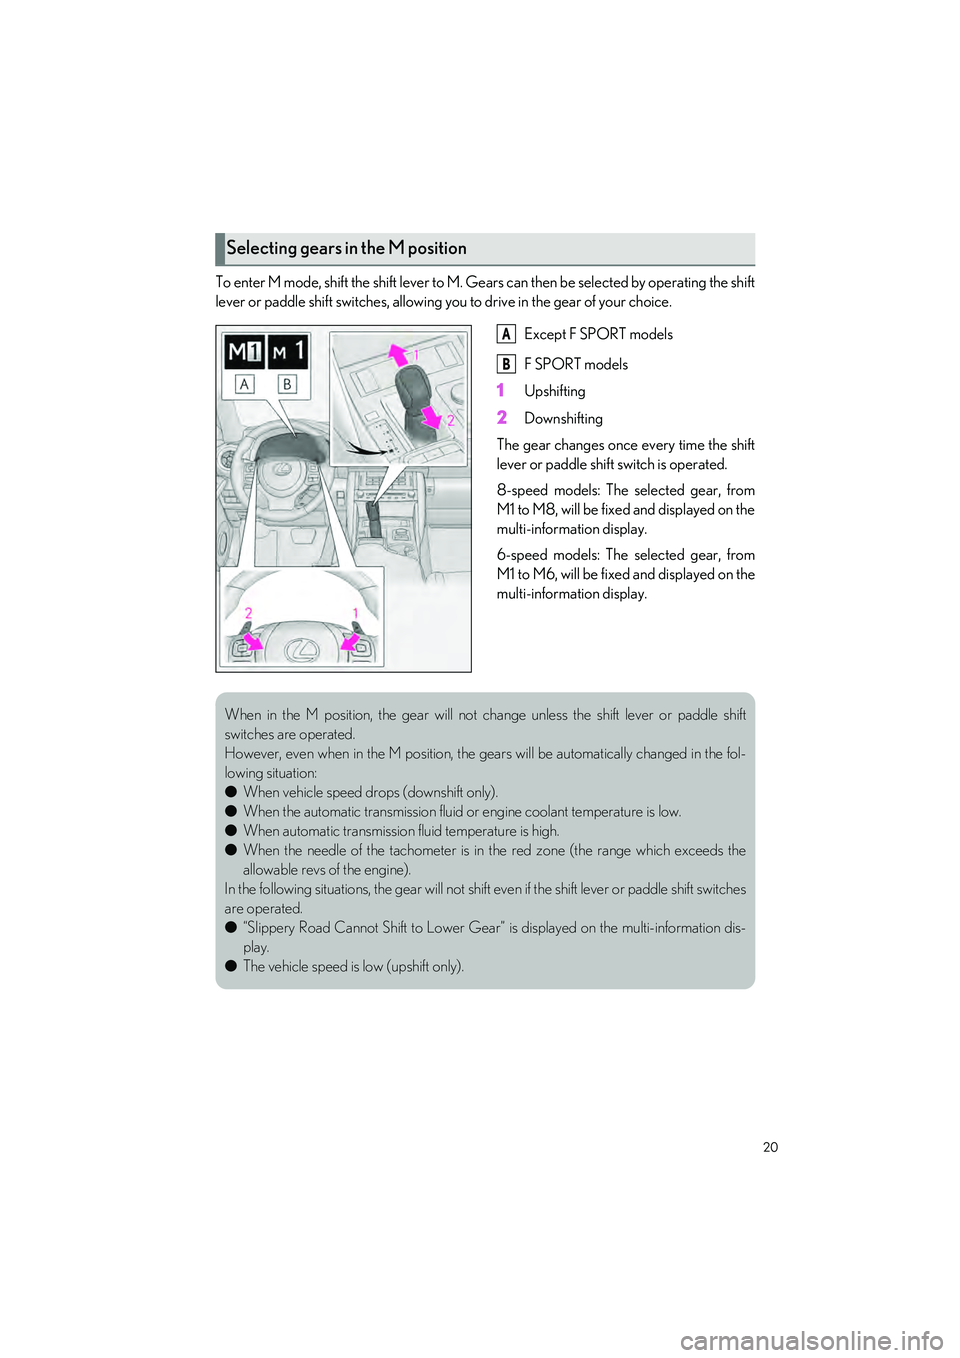
To enter M mode, shift the shift lever to M. Gears can then be selected by operating the shift
lever or paddle shift switches, allowing you to drive in the gear of your choice.
Except F SPORT models
F SPORT models
1Upshifting
2Downshifting
The gear changes once every time the shift
lever or paddle shift switch is operated.
8-speed models: The selected gear, from
M1 to M8, will be fixed and displayed on the
multi-informat ion display.
6-speed models: The selected gear, from
M1 to M6, will be fixed and displayed on the
multi-informat ion display.
Selecting gears in the M position
A
B
When in the M position, the g ear will not change unless the shift lever or paddle shift
switches are operated.
However, even when in the M position, the gears will be automatically changed in the fol-
lowing situation:
● When vehicle speed drops (downshift only).
● When the automatic transmi ssion fluid or engine coolant temperature is low.
● When automatic transmission fluid temperature is high.
● When the needle of the tachometer is in the red zone (the range which exceeds the
allowable revs of the engine).
In the following situations, the g ear will not shift even if the shift lever or paddle shift switches
are operated.
● “Slippery Road Cannot Shift to Lower Gear” is displayed on the multi-information dis-
play.
● The vehicle speed is low (upshift only).
Page 22 of 96
21
IS500_IS350_IS300_QG_U
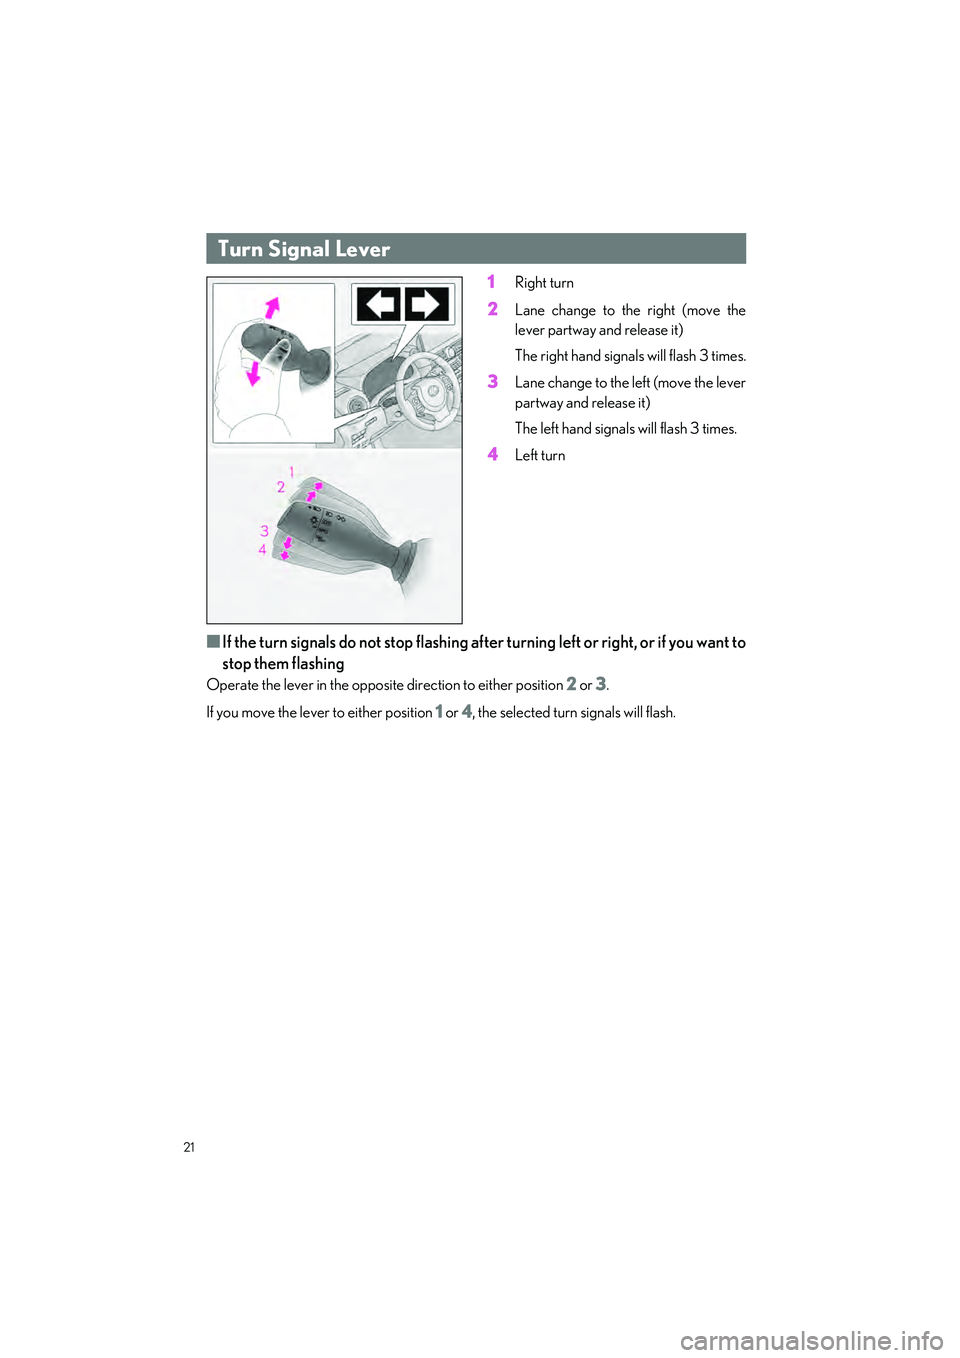
1Right turn
2Lane change to the right (move the
lever partway and release it)
The right hand signal s will flash 3 times.
3Lane change to the left (move the lever
partway and release it)
The left hand signals will flash 3 times.
4Left turn
■If the turn signals do not stop flashing af ter turning left or right, or if you want to
stop them flashing
Operate the lever in the opposite direction to either position 2 or 3.
If you move the lever to either position
1 or 4, the selected turn signals will flash.
Turn Signal Lever
Page 23 of 96
22
IS500_IS350_IS300_QG_U
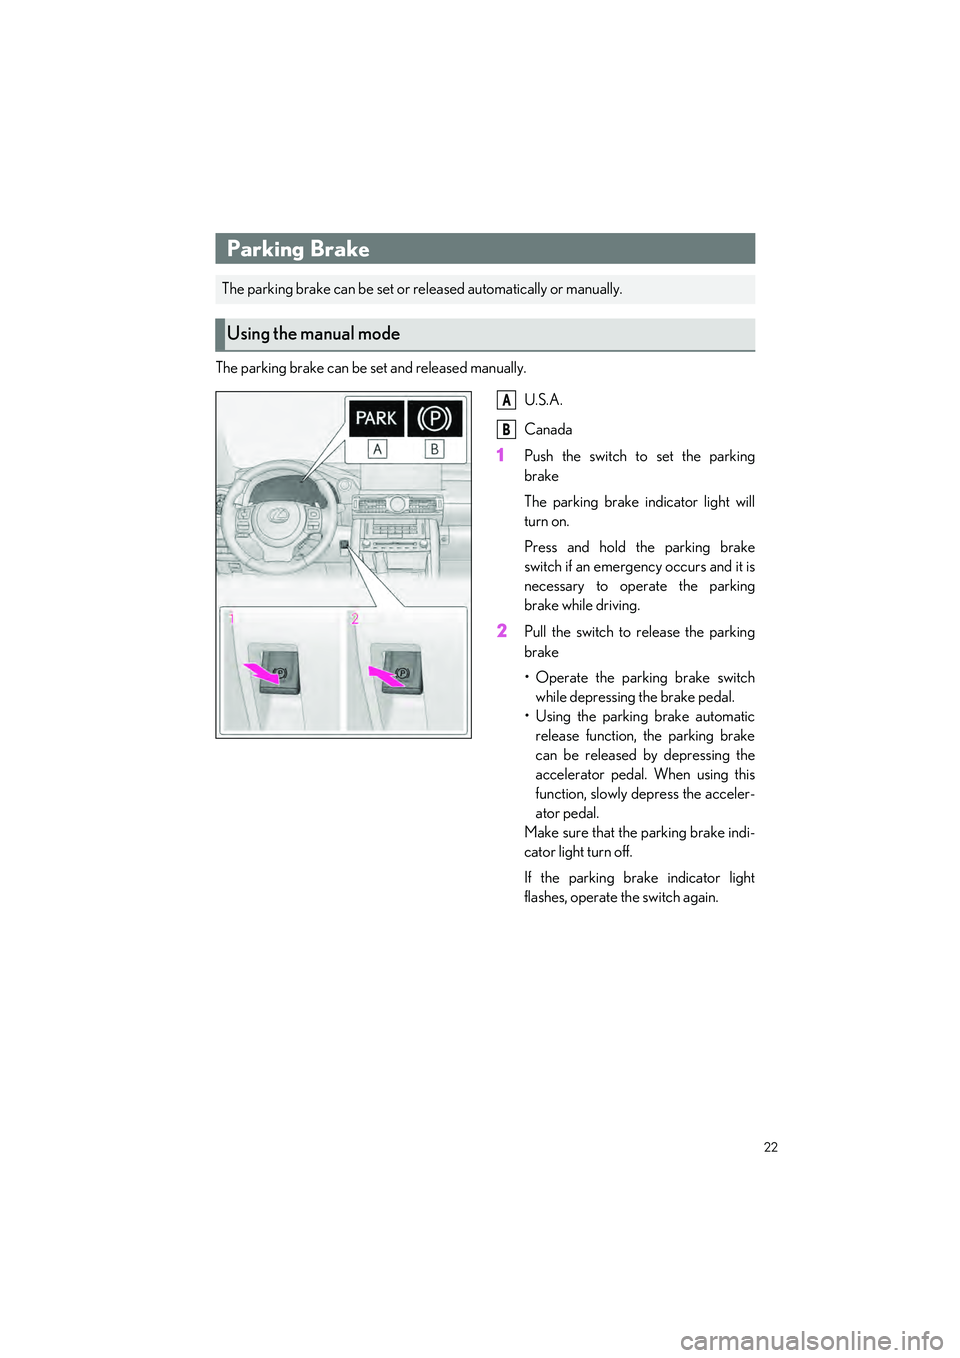
The parking brake can be set and released manually.U.S.A.
Canada
1Push the switch to set the parking
brake
The parking brake indicator light will
turn on.
Press and hold the parking brake
switch if an emerge ncy occurs and it is
necessary to operate the parking
brake while driving.
2Pull the switch to release the parking
brake
• Operate the parking brake switch while depressing the brake pedal.
• Using the parking brake automatic release function, the parking brake
can be released by depressing the
accelerator pedal. When using this
function, slowly depress the acceler-
ator pedal.
Make sure that the parking brake indi-
cator light turn off.
If the parking brake indicator light
flashes, operate the switch again.
Parking Brake
The parking brake can be set or re leased automatically or manually.
Using the manual mode
A
B
Page 24 of 96
23
IS500_IS350_IS300_QG_U
In automatic mode, the parking brake can be set or released automatically according to the
shift lever operation. Also, even in automatic mode, the parkin g brake can be set or released
manually.
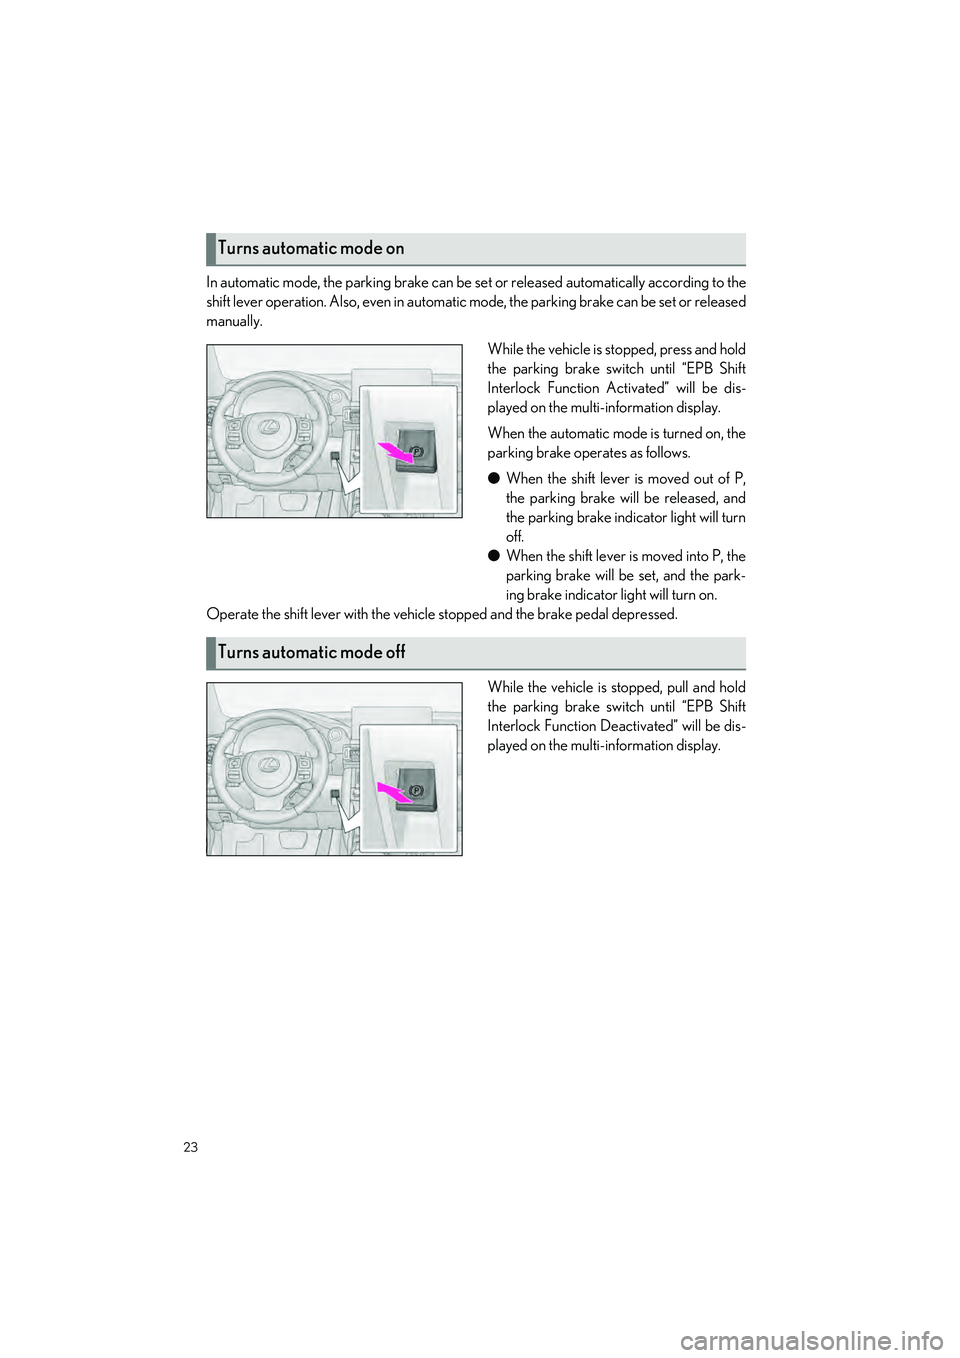
While the vehicle is stopped, press and hold
the parking brake switch until “EPB Shift
Interlock Function Activated” will be dis-
played on the multi-information display.
When the automatic mode is turned on, the
parking brake operates as follows.
● When the shift lever is moved out of P,
the parking brake will be released, and
the parking brake indicator light will turn
off.
● When the shift lever is moved into P, the
parking brake will be set, and the park-
ing brake indicator light will turn on.
Operate the shift lever with the vehicle stopped and the brake pedal depressed.
While the vehicle is stopped, pull and hold
the parking brake switch until “EPB Shift
Interlock Function Deactivated” will be dis-
played on the multi-information display.
Turns automatic mode on
Turns automatic mode off
Page 25 of 96
24
IS500_IS350_IS300_QG_U
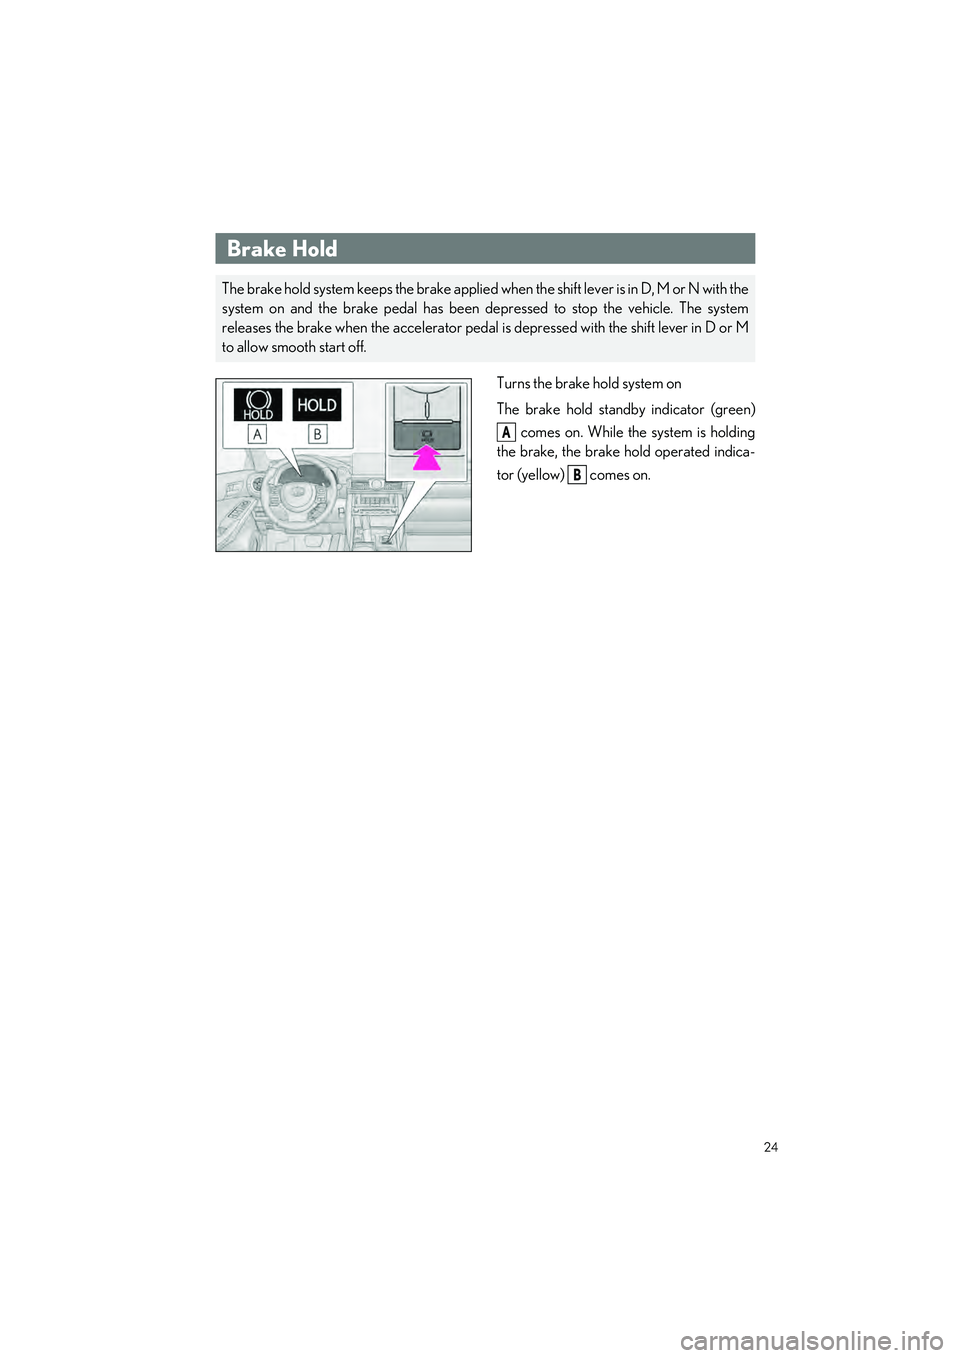
Turns the brake hold system on
The brake hold standby indicator (green) comes on. While the system is holding
the brake, the brake hold operated indica-
tor (yellow) comes on.
Brake Hold
The brake hold system keeps the brake applied when the shift lever is in D, M or N with the
system on and the brake pedal has been depressed to stop the vehicle. The system
releases the brake when the accelerator pedal is depressed with the shift lever in D or M
to allow smooth start off.
A
B
Page 26 of 96
25
IS500_IS350_IS300_QG_U
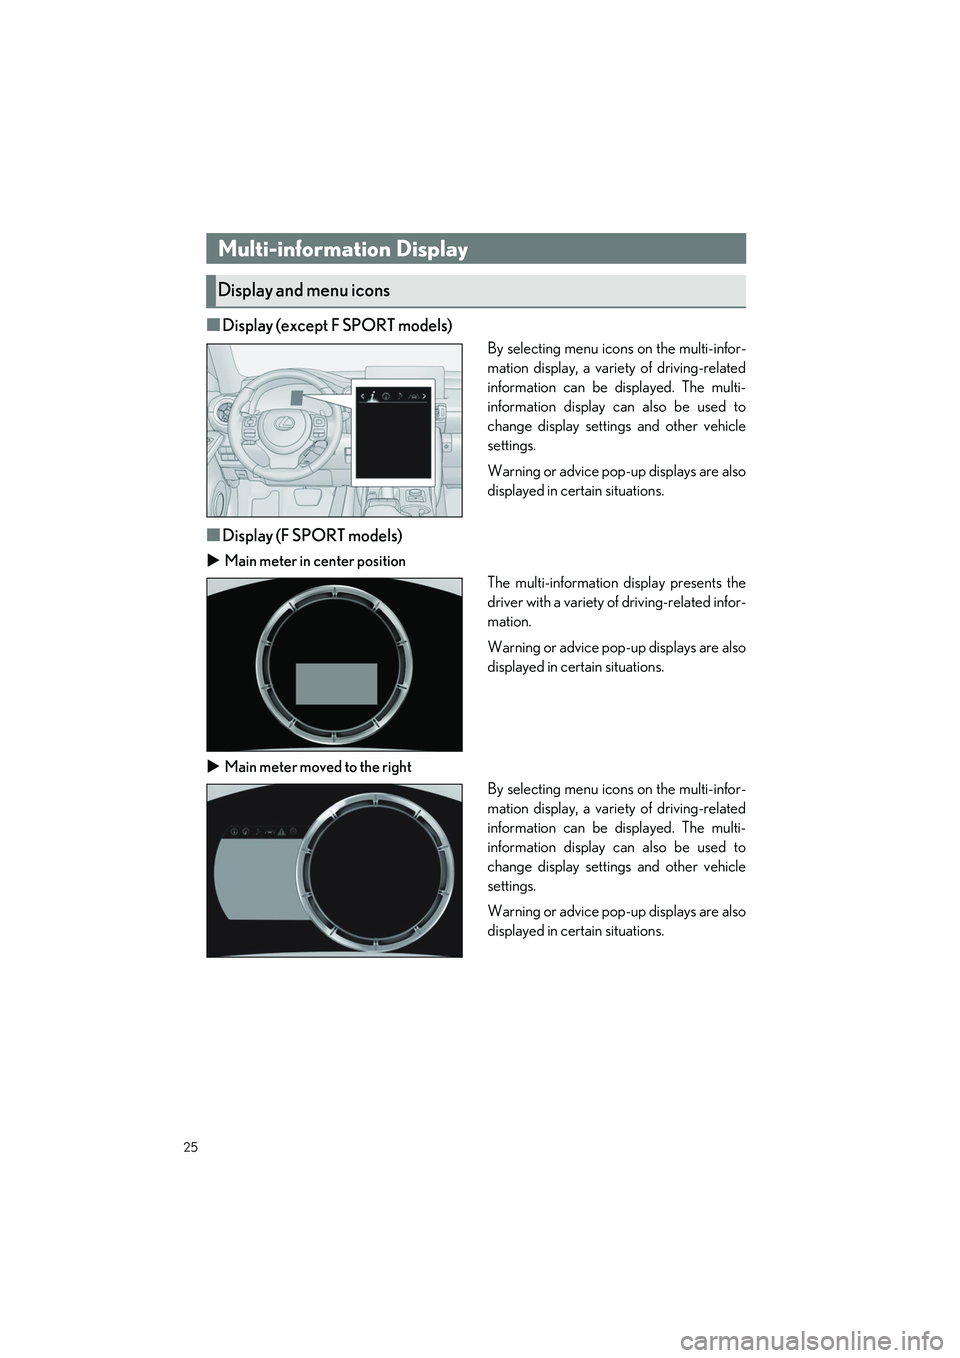
■Display (except F SPORT models)
By selecting menu icons on the multi-infor-
mation display, a variety of driving-related
information can be displayed. The multi-
information display can also be used to
change display settin gs and other vehicle
settings.
Warning or advice pop-up displays are also
displayed in certain situations.
■Display (F SPORT models)
Main meter in center position
The multi-information display presents the
driver with a variety of driving-related infor-
mation.
Warning or advice pop-up displays are also
displayed in certain situations.
Main meter moved to the right
By selecting menu icons on the multi-infor-
mation display, a variety of driving-related
information can be displayed. The multi-
information display can also be used to
change display settin gs and other vehicle
settings.
Warning or advice pop-up displays are also
displayed in certain situations.
Multi-information Display
Display and menu icons
Page 27 of 96
26
IS500_IS350_IS300_QG_U
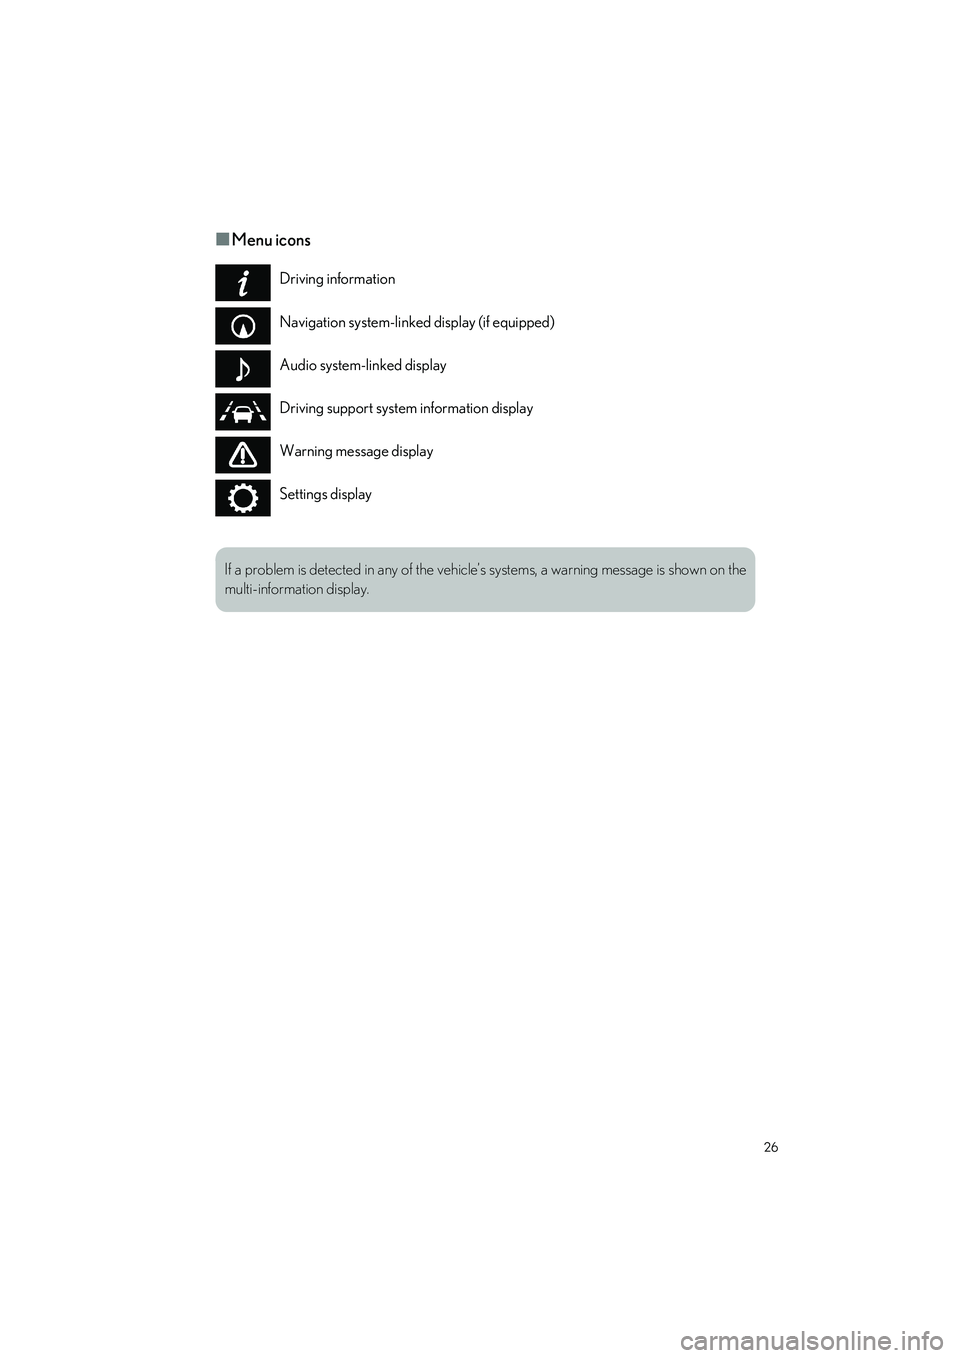
■Menu icons
Driving information
Navigation system-linked display (if equipped)
Audio system-linked display
Driving support system information display
Warning message display
Settings display
If a problem is detected in any of the vehicle’s systems, a warning message is shown on the
multi-information display.
Page 28 of 96

27
IS500_IS350_IS300_QG_U
/ : Select menu icons
/ : Change displayed content,
scroll up/down the screen and move
the cursor up/down
Press: Enter/Set
Press and hold: Reset
Except F SPORT models
Display the top screen and re turn to the previous screen
Press and hold : Register current screen as the top screen
Call sending/receiving and history display
Linked with the hands-free system, sending or receiving call is displayed. For details
regarding the hands-free system, refer to the “NAVIGATION AND MULTIMEDIA
SYSTEM OWNER’S MANUAL”.
F SPORT models
Move the main meter and retu rn to the previous screen
Call sending/receiving and history display
Linked with the hands-free system, sending or receiving call is displayed. For details
regarding the hands-free system, refer to the “NAVIGATION AND MULTIMEDIA
SYSTEM OWNER’S MANUAL”.
Changing the meter display
A
B
C
D
C
D
Page 29 of 96
28
IS500_IS350_IS300_QG_U
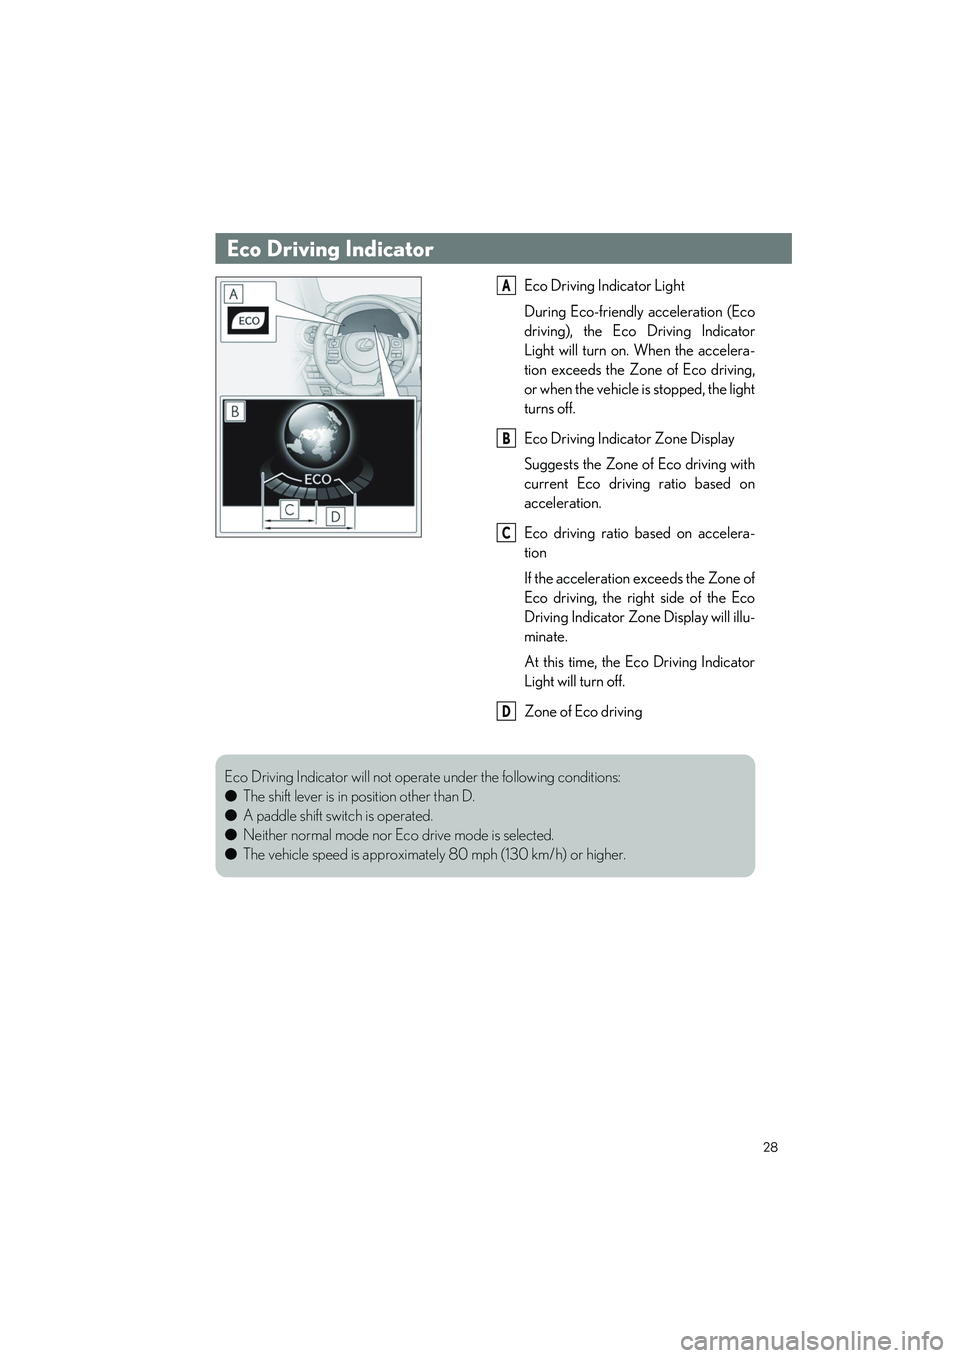
Eco Driving Indicator Light
During Eco-friendly acceleration (Eco
driving), the Eco Driving Indicator
Light will turn on. When the accelera-
tion exceeds the Zone of Eco driving,
or when the vehicle is stopped, the light
turns off.
Eco Driving Indicator Zone Display
Suggests the Zone of Eco driving with
current Eco driving ratio based on
acceleration.
Eco driving ratio ba sed on accelera-
tion
If the acceleration exceeds the Zone of
Eco driving, the right side of the Eco
Driving Indicator Zone Display will illu-
minate.
At this time, the Eco Driving Indicator
Light will turn off.
Zone of Eco driving
Eco Driving Indicator
A
B
C
D
Eco Driving Indicator will not operate under the following conditions:
● The shift lever is in position other than D.
● A paddle shift switch is operated.
● Neither normal mode nor Ec o drive mode is selected.
● The vehicle speed is approximately 80 mph (130 km/h) or higher.
Page 30 of 96
29
IS500_IS350_IS300_QG_U
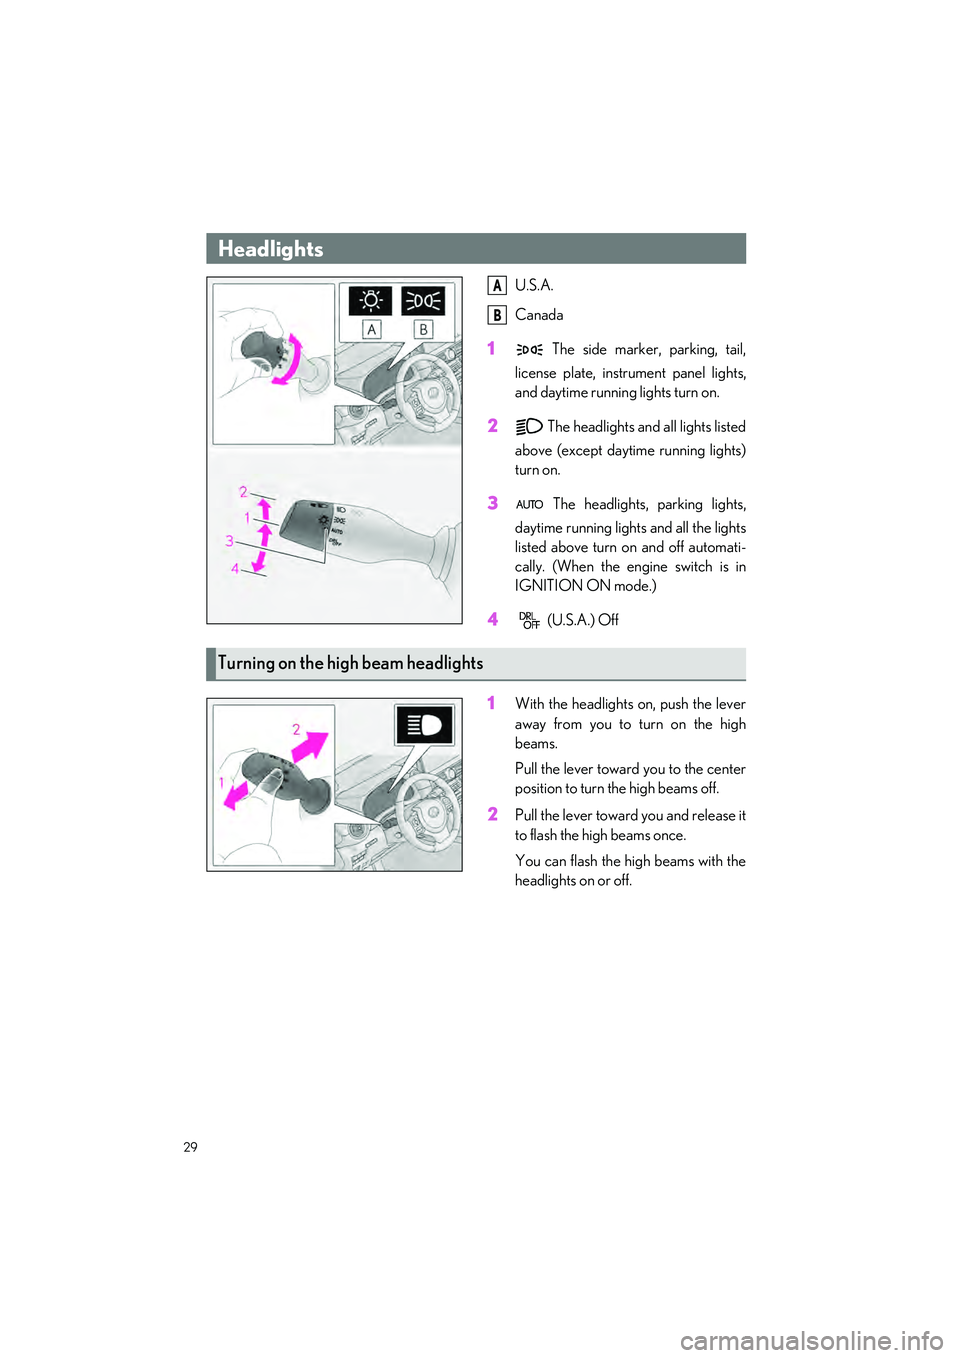
U.S.A.
Canada
1 The side marker, parking, tail,
license plate, inst rument panel lights,
and daytime running lights turn on.
2 The headlights and all lights listed
above (except daytime running lights)
turn on.
3 The headlights, parking lights,
daytime running lights and all the lights
listed above turn on and off automati-
cally. (When the engine switch is in
IGNITION ON mode.)
4 (U.S.A.) Off
1With the headlights on, push the lever
away from you to turn on the high
beams.
Pull the lever toward you to the center
position to turn the high beams off.
2Pull the lever toward you and release it
to flash the high beams once.
You can flash the high beams with the
headlights on or off.
Headlights
A
B
Turning on the high beam headlights