display Lexus IS300h 2013 Navigation manual
[x] Cancel search | Manufacturer: LEXUS, Model Year: 2013, Model line: IS300h, Model: Lexus IS300h 2013Pages: 415, PDF Size: 42.75 MB
Page 209 of 415
209
3. MEDIA OPERATION
4
AUDIO/VIDEO SYSTEM
IS300h/250_Navi_EE
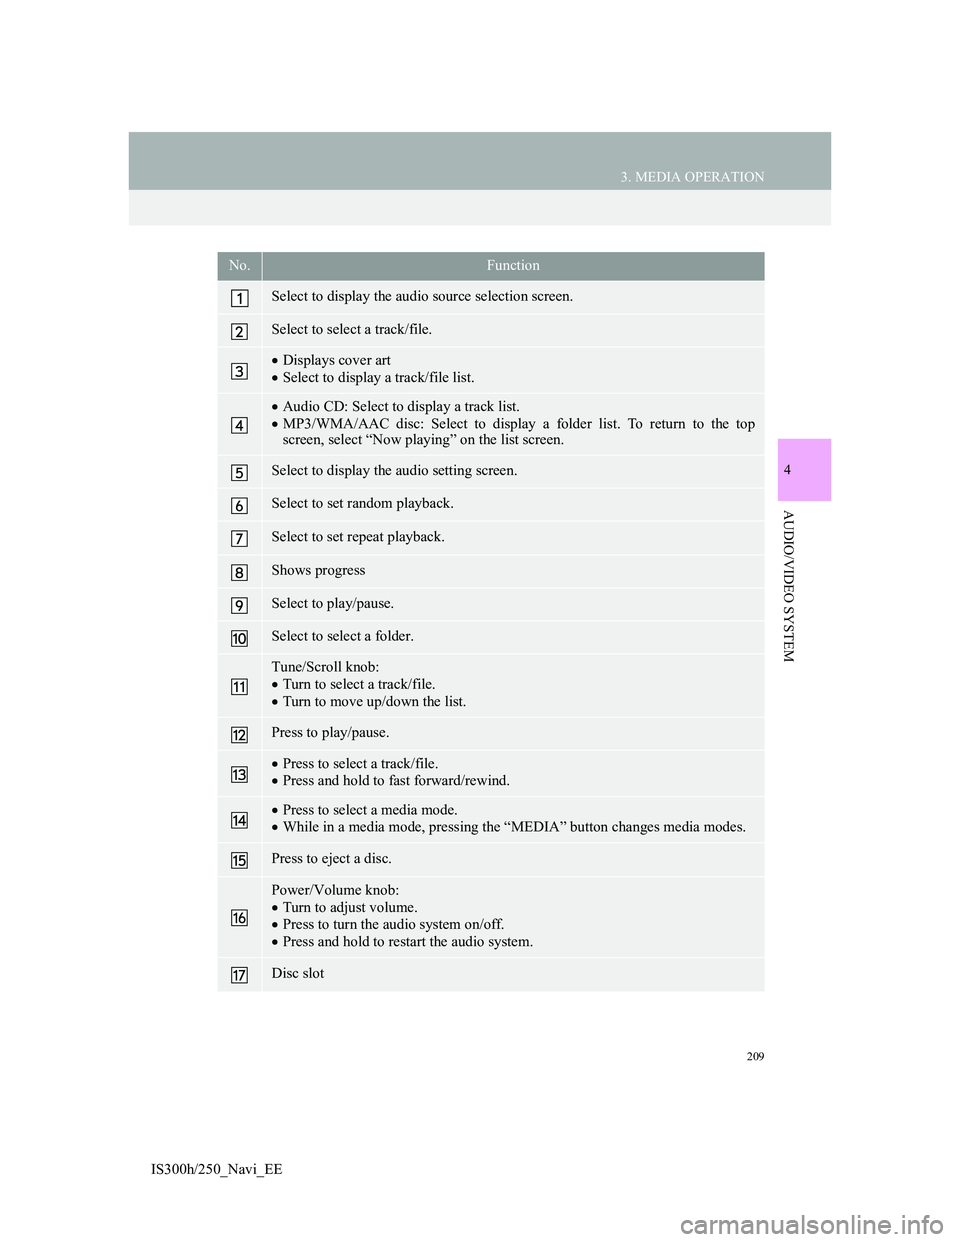
No.Function
Select to display the audio source selection screen.
Select to select a track/file.
Displays cover art
Select to display a track/file list.
Audio CD: Select to display a track list.
MP3/WMA/AAC disc: Select to display a folder list. To return to the top
screen, select “Now playing” on the list screen.
Select to display the audio setting screen.
Select to set random playback.
Select to set repeat playback.
Shows progress
Select to play/pause.
Select to select a folder.
Tune/Scroll knob:
Turn to select a track/file.
Turn to move up/down the list.
Press to play/pause.
Press to select a track/file.
Press and hold to fast forward/rewind.
Press to select a media mode.
While in a media mode, pressing the “MEDIA” button changes media modes.
Press to eject a disc.
Power/Volume knob:
Turn to adjust volume.
Press to turn the audio system on/off.
Press and hold to restart the audio system.
Disc slot
Page 210 of 415
210
3. MEDIA OPERATION
IS300h/250_Navi_EE
INFORMATION
If a disc contains CD-DA files and MP3/WMA/AAC files, only the CD-DA files
can be played back.
If a CD-TEXT disc is inserted, the title of the disc and track will be displayed. Up
to 32 characters can be displayed.
If the disc contains no CD-TEXT, only the track number would be displayed on the
screen.
Page 213 of 415
213
3. MEDIA OPERATION
IS300h/250_Navi_EE
4
AUDIO/VIDEO SYSTEM
2. DVD
For safety reasons, the DVD video discs can only be viewed when the follow-
ing conditions are met:
(a) The vehicle is completely stopped.
(b) The engine
mode.
(c) The parking brake is applied.
While driving in DVD video mode, only the DVD’s audio can be heard.
The playback condition of some DVD discs may be determined by the DVD
software producer. This DVD player plays a disc as the software producer in-
tended. As such, some functions may not work properly. Be sure to read the
instruction manual that comes with the individual DVD disc. (P.258)
OVERVIEW
The DVD operation screen can be reached by the following methods:
Inserting a disc (P.194)
Using the instrument panel
Press the “MEDIA” button to display the audio control screen.
Using the Remote Touch
Press the “MENU” button on the Remote Touch, then select “Audio” to display
the audio control screen.
Page 215 of 415
215
3. MEDIA OPERATION
4
AUDIO/VIDEO SYSTEM
IS300h/250_Navi_EE
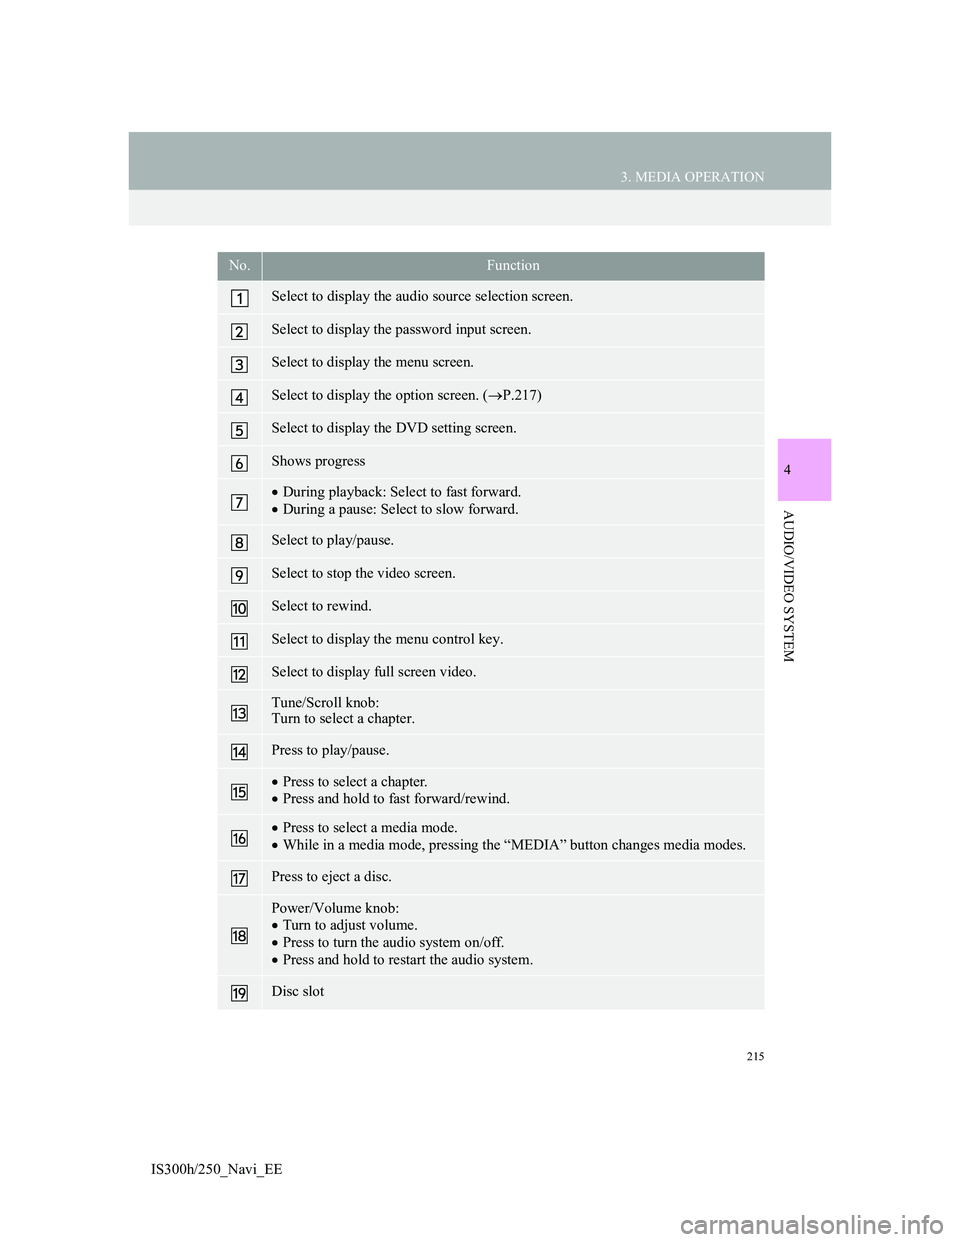
No.Function
Select to display the audio source selection screen.
Select to display the password input screen.
Select to display the menu screen.
Select to display the option screen. (P.217)
Select to display the DVD setting screen.
Shows progress
During playback: Select to fast forward.
During a pause: Select to slow forward.
Select to play/pause.
Select to stop the video screen.
Select to rewind.
Select to display the menu control key.
Select to display full screen video.
Tune/Scroll knob:
Turn to select a chapter.
Press to play/pause.
Press to select a chapter.
Press and hold to fast forward/rewind.
Press to select a media mode.
While in a media mode, pressing the “MEDIA” button changes media modes.
Press to eject a disc.
Power/Volume knob:
Turn to adjust volume.
Press to turn the audio system on/off.
Press and hold to restart the audio system.
Disc slot
Page 217 of 415

217
3. MEDIA OPERATION
4
AUDIO/VIDEO SYSTEM
IS300h/250_Navi_EE
1Select “Options”.
2The following screen is displayed.
DVD OPTIONSNo
.FunctionPage
Select to display the title
search screen.218
Select to display the pre-
determined scene on the
screen and start playing.
Select to display the audio
selection screen.218
Select to display the subti-
tle selection screen.218
Select to display the angle
selection screen.219
Select to change the
screen size.198
Select to display the im-
age quality adjustment
screen.
198
Page 218 of 415

218
3. MEDIA OPERATION
IS300h/250_Navi_EE
1Select “Search”.
2Enter the title number and select
“OK”.
The player starts playing video for that
title number.
1Select “Audio”.
2Each time “Change” is selected, the
audio language is changed.
The languages available are restricted
to those available on the DVD disc.
1Select “Subtitle”.
2Each time “Change” is selected, the
language the subtitles are displayed
in is changed.
The languages available are restricted
to those available on the DVD disc.
When “Hide” is selected, the subtitles
can be hidden.
SEARCHING BY TITLE
CHANGING THE AUDIO
LANGUAGE
CHANGING THE SUBTITLE
LANGUAGE
Page 220 of 415
220
3. MEDIA OPERATION
IS300h/250_Navi_EE
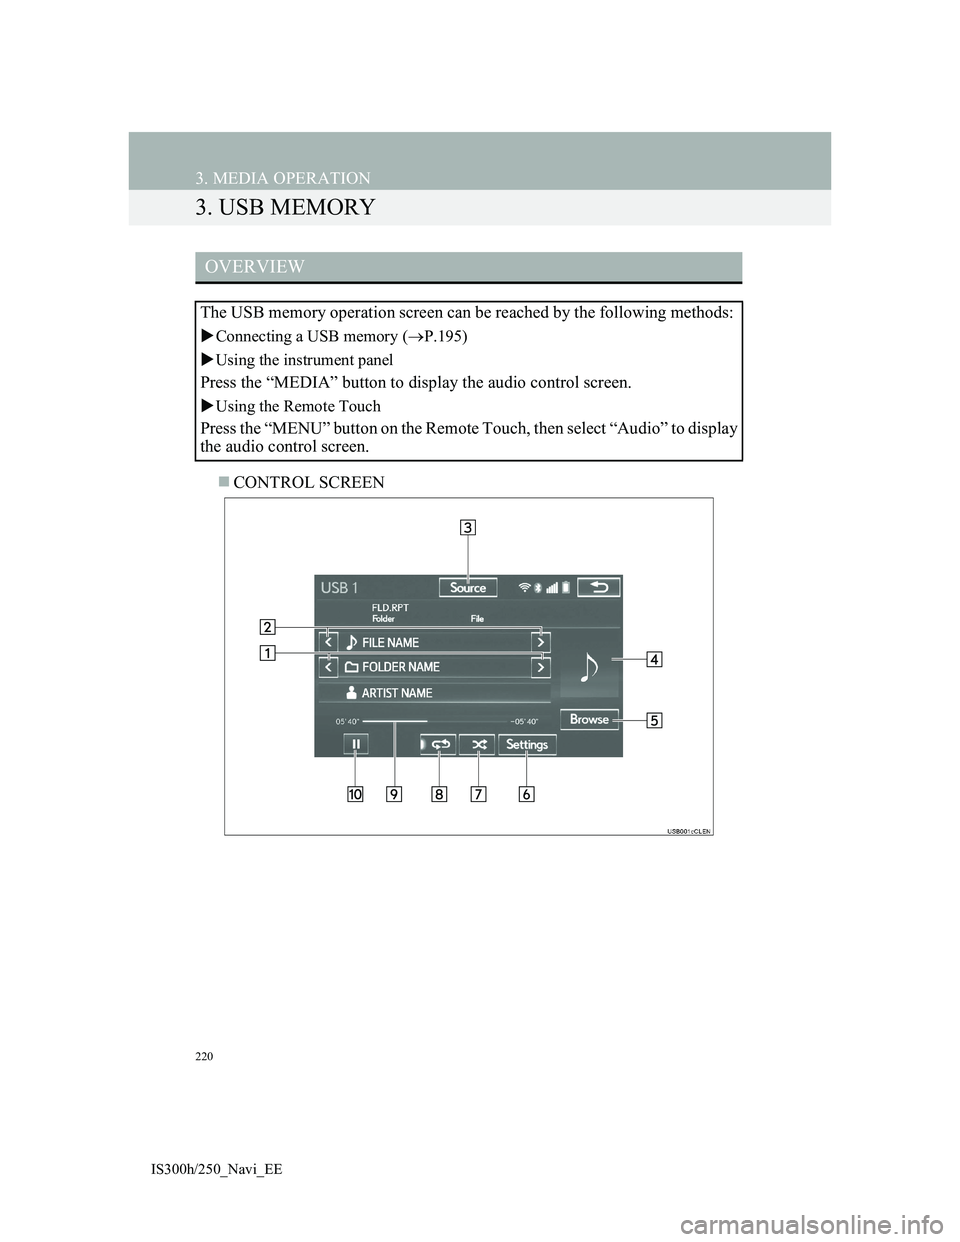
3. USB MEMORY
CONTROL SCREEN
OVERVIEW
The USB memory operation screen can be reached by the following methods:
Connecting a USB memory (P.195)
Using the instrument panel
Press the “MEDIA” button to display the audio control screen.
Using the Remote Touch
Press the “MENU” button on the Remote Touch, then select “Audio” to display
the audio control screen.
Page 222 of 415
222
3. MEDIA OPERATION
IS300h/250_Navi_EE
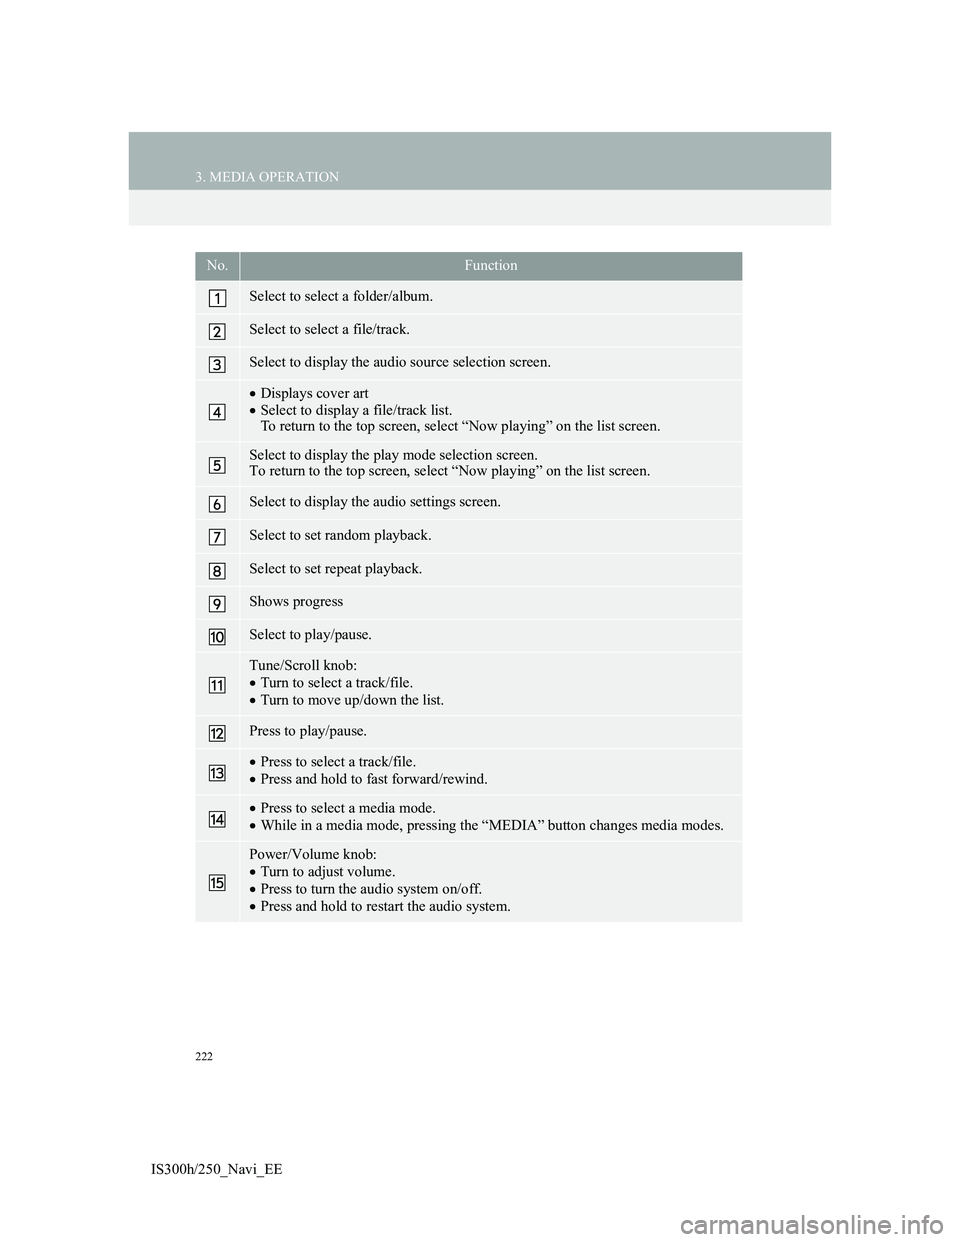
No.Function
Select to select a folder/album.
Select to select a file/track.
Select to display the audio source selection screen.
Displays cover art
Select to display a file/track list.
To return to the top screen, select “Now playing” on the list screen.
Select to display the play mode selection screen.
To return to the top screen, select “Now playing” on the list screen.
Select to display the audio settings screen.
Select to set random playback.
Select to set repeat playback.
Shows progress
Select to play/pause.
Tune/Scroll knob:
Turn to select a track/file.
Turn to move up/down the list.
Press to play/pause.
Press to select a track/file.
Press and hold to fast forward/rewind.
Press to select a media mode.
While in a media mode, pressing the “MEDIA” button changes media modes.
Power/Volume knob:
Turn to adjust volume.
Press to turn the audio system on/off.
Press and hold to restart the audio system.
Page 225 of 415
225
3. MEDIA OPERATION
IS300h/250_Navi_EE
4
AUDIO/VIDEO SYSTEM
4. iPod
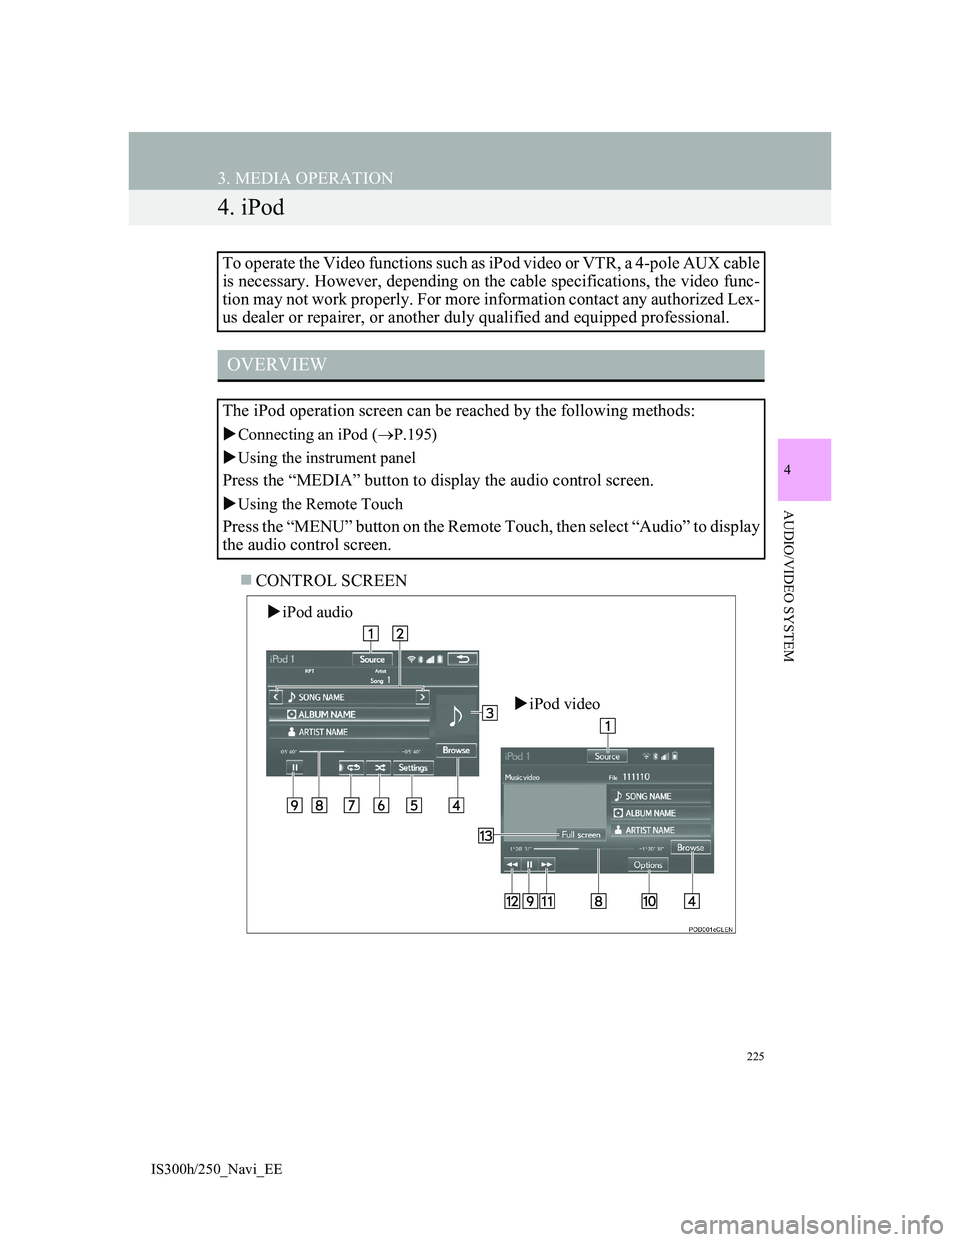
CONTROL SCREEN To operate the Video functions such as iPod video or VTR, a 4-pole AUX cable
is necessary. However, depending on the cable specifications, the video func-
tion may not work properly. For more information contact any authorized Lex-
us dealer or repairer, or another duly qualified and equipped professional.
OVERVIEW
The iPod operation screen can be reached by the following methods:
Connecting an iPod (P.195)
Using the instrument panel
Press the “MEDIA” button to display the audio control screen.
Using the Remote Touch
Press the “MENU” button on the Remote Touch, then select “Audio” to display
the audio control screen.
iPod audio
iPod video
Page 227 of 415
227
3. MEDIA OPERATION
4
AUDIO/VIDEO SYSTEM
IS300h/250_Navi_EE
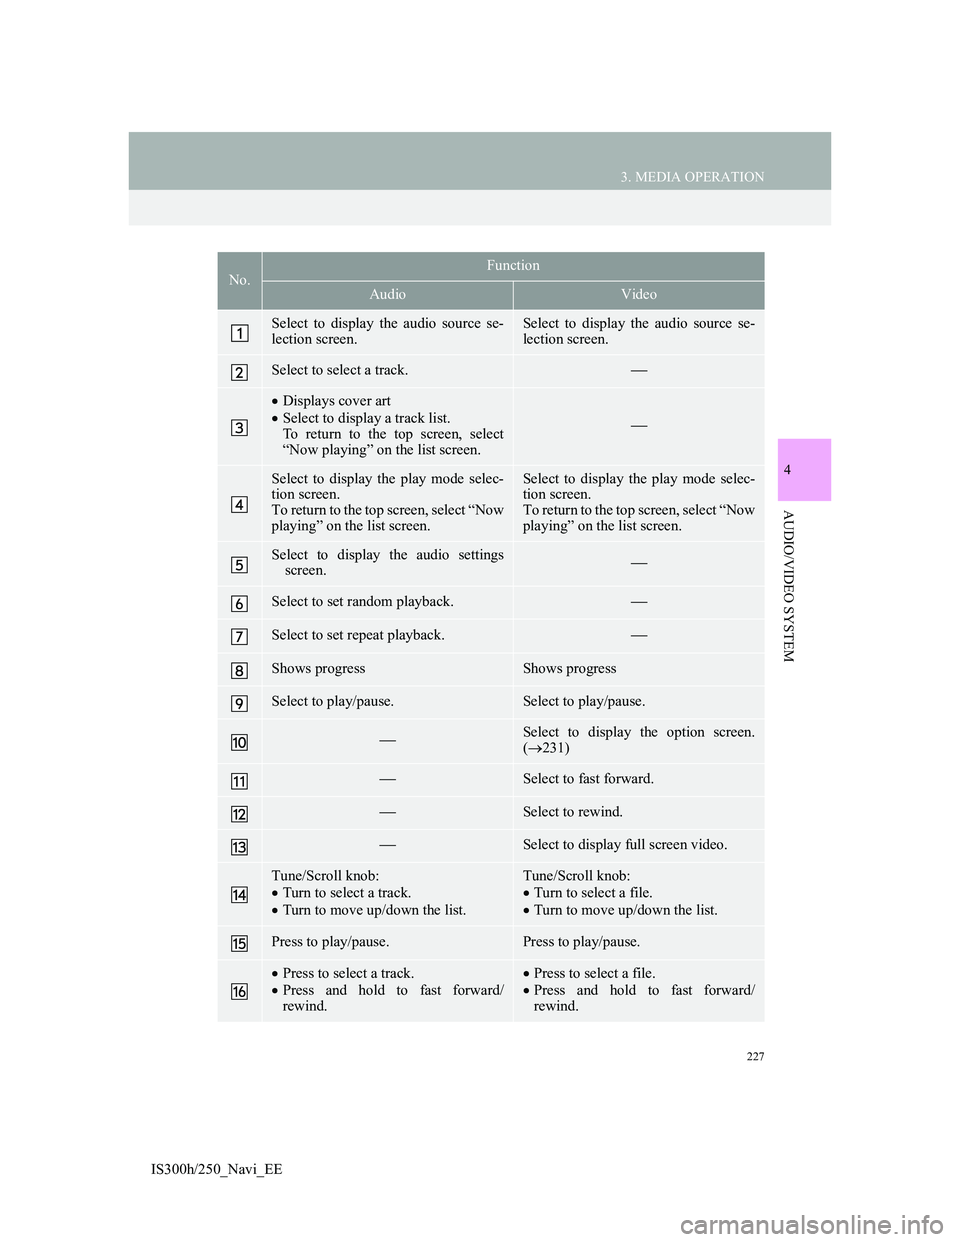
No.Function
AudioVideo
Select to display the audio source se-
lection screen.Select to display the audio source se-
lection screen.
Select to select a track.
Displays cover art
Select to display a track list.
To return to the top screen, select
“Now playing” on the list screen.
Select to display the play mode selec-
tion screen.
To return to the top screen, select “Now
playing” on the list screen.Select to display the play mode selec-
tion screen.
To return to the top screen, select “Now
playing” on the list screen.
Select to display the audio settings
screen.
Select to set random playback.
Select to set repeat playback.
Shows progressShows progress
Select to play/pause.Select to play/pause.
Select to display the option screen.
(231)
Select to fast forward.
Select to rewind.
Select to display full screen video.
Tune/Scroll knob:
Turn to select a track.
Turn to move up/down the list.Tune/Scroll knob:
Turn to select a file.
Turn to move up/down the list.
Press to play/pause.Press to play/pause.
Press to select a track.
Press and hold to fast forward/
rewind.Press to select a file.
Press and hold to fast forward/
rewind.