wire Lexus IS300h 2013 Owner's Guide
[x] Cancel search | Manufacturer: LEXUS, Model Year: 2013, Model line: IS300h, Model: Lexus IS300h 2013Pages: 628, PDF Size: 20.23 MB
Page 462 of 628
4487-3. Do-it-yourself maintenance
IS300h_EE(OM53B95E)
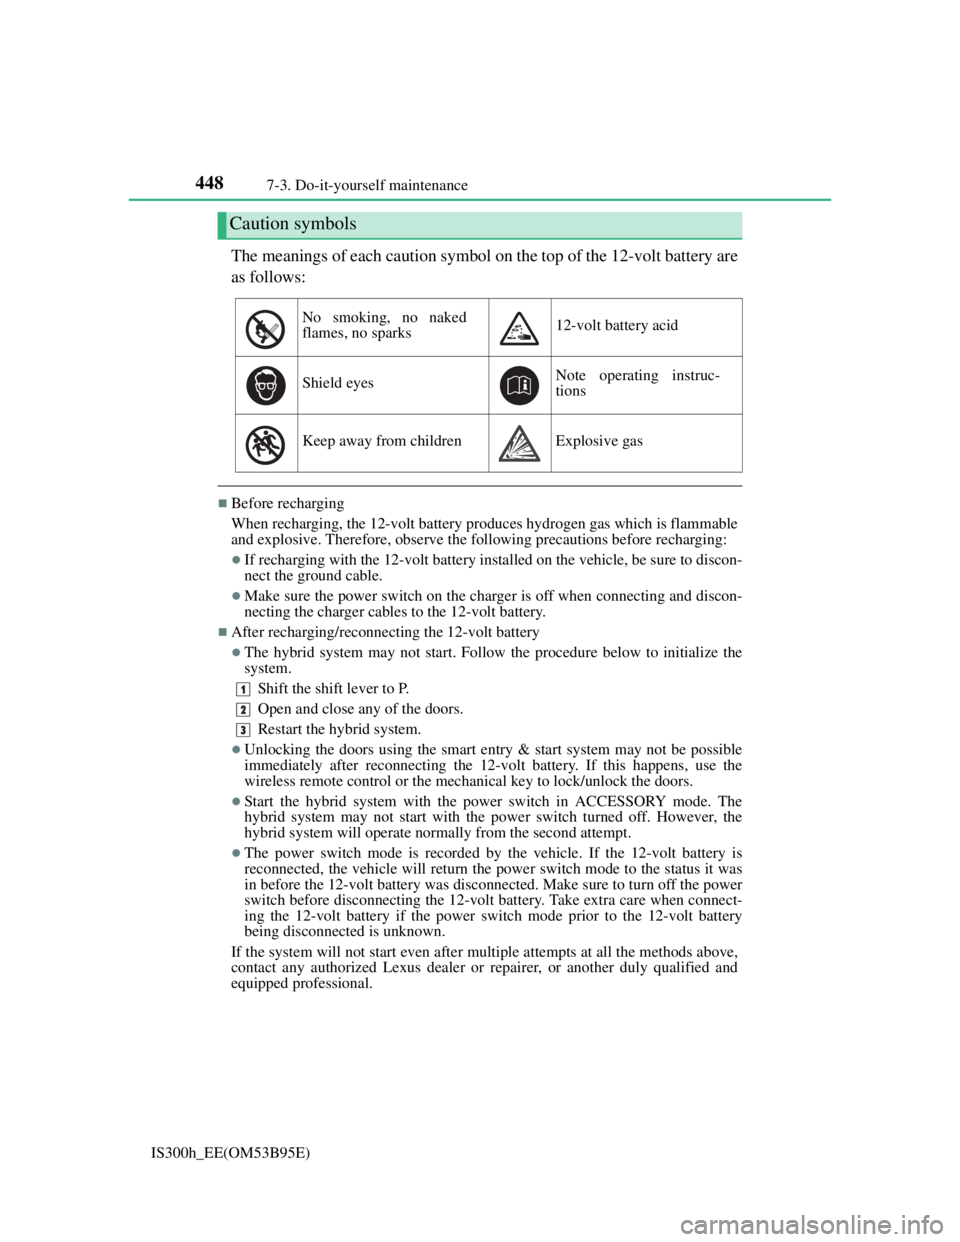
The meanings of each caution symbol on the top of the 12-volt battery are
as follows:
Before recharging
When recharging, the 12-volt battery produces hydrogen gas which is flammable
and explosive. Therefore, observe the following precautions before recharging:
If recharging with the 12-volt battery installed on the vehicle, be sure to discon-
nect the ground cable.
Make sure the power switch on the charger is off when connecting and discon-
necting the charger cables to the 12-volt battery.
After recharging/reconnecting the 12-volt battery
The hybrid system may not start. Follow the procedure below to initialize the
system.
Shift the shift lever to P.
Open and close any of the doors.
Restart the hybrid system.
Unlocking the doors using the smart entry & start system may not be possible
immediately after reconnecting the 12-volt battery. If this happens, use the
wireless remote control or the mechanical key to lock/unlock the doors.
Start the hybrid system with the power switch in ACCESSORY mode. The
hybrid system may not start with the power switch turned off. However, the
hybrid system will operate normally from the second attempt.
The power switch mode is recorded by the vehicle. If the 12-volt battery is
reconnected, the vehicle will return the power switch mode to the status it was
in before the 12-volt battery was disconnected. Make sure to turn off the power
switch before disconnecting the 12-volt battery. Take extra care when connect-
ing the 12-volt battery if the power switch mode prior to the 12-volt battery
being disconnected is unknown.
If the system will not start even after multiple attempts at all the methods above,
contact any authorized Lexus dealer or repairer, or another duly qualified and
equipped professional.
Caution symbols
No smoking, no naked
flames, no sparks12-volt battery acid
Shield eyesNote operating instruc-
tions
Keep away from childrenExplosive gas
1
2
3
Page 468 of 628

4547-3. Do-it-yourself maintenance
IS300h_EE(OM53B95E)
Situations in which the tire pressure warning system may not operate properly
In the following cases, the tire pressure warning system may not operate prop-
erly.
• If non-genuine Lexus wheels are used.
• A tire has been replaced with a tire that is not an OE (Original Equipment)
tire.
• A tire has been replaced with a tire that is not of the specified size.
• Tire chains etc. are equipped.
• Lock nuts are equipped.
• An auxiliary-supported run-flat tire is equipped.
• If a window tint that affects the radio wave signals is installed.
• If there is a lot of snow or ice on the vehicle, particularly around the wheels
or wheel housings.
• If the tire inflation pressure is extremely higher than the specified level.
• If tires not equipped with tire pressure warning valves and transmitters are
used.
• If the ID code on the tire pressure warning valves and transmitters is not reg-
istered in the tire pressure warning computer.
Performance may be affected in the following situations.
• Near a TV tower, electric power plant, gas station, radio station, large dis-
play, airport or other facility that generates strong radio waves or electrical
noise
• When carrying a portable radio, cellular phone, cordless phone or other
wireless communication device
When the vehicle is parked, the time taken for the warning to start or go off
could be extended.
When tire inflation pressure declines rapidly for example when a tire has burst,
the warning may not function.
The initialization operation
Make sure to carry out initialization after adjusting the tire inflation pressure.
Also, make sure the tires are cold before carrying out initialization or tire infla-
tion pressure adjustment.
If you have accidentally turned the power switch off during initialization, it is
not necessary to press the reset switch again as initialization will restart auto-
matically when the power switch has been turned to ON mode for the next time.
If you accidentally press the reset switch when initialization is not necessary,
adjust the tire inflation pressure to the specified level when the tires are cold,
and conduct initialization again.
Warning performance of the tire pressure warning system
The warning of the tire pressure warning system will change in accordance with
the conditions under which it was initialized. For this reason, the system may
give a warning even if the tire pressure does not reach a low enough level, or if
the pressure is higher than the pressure that was adjusted to when the system was
initialized.
Page 487 of 628
4737-3. Do-it-yourself maintenance
7
Maintenance and care
IS300h_EE(OM53B95E)
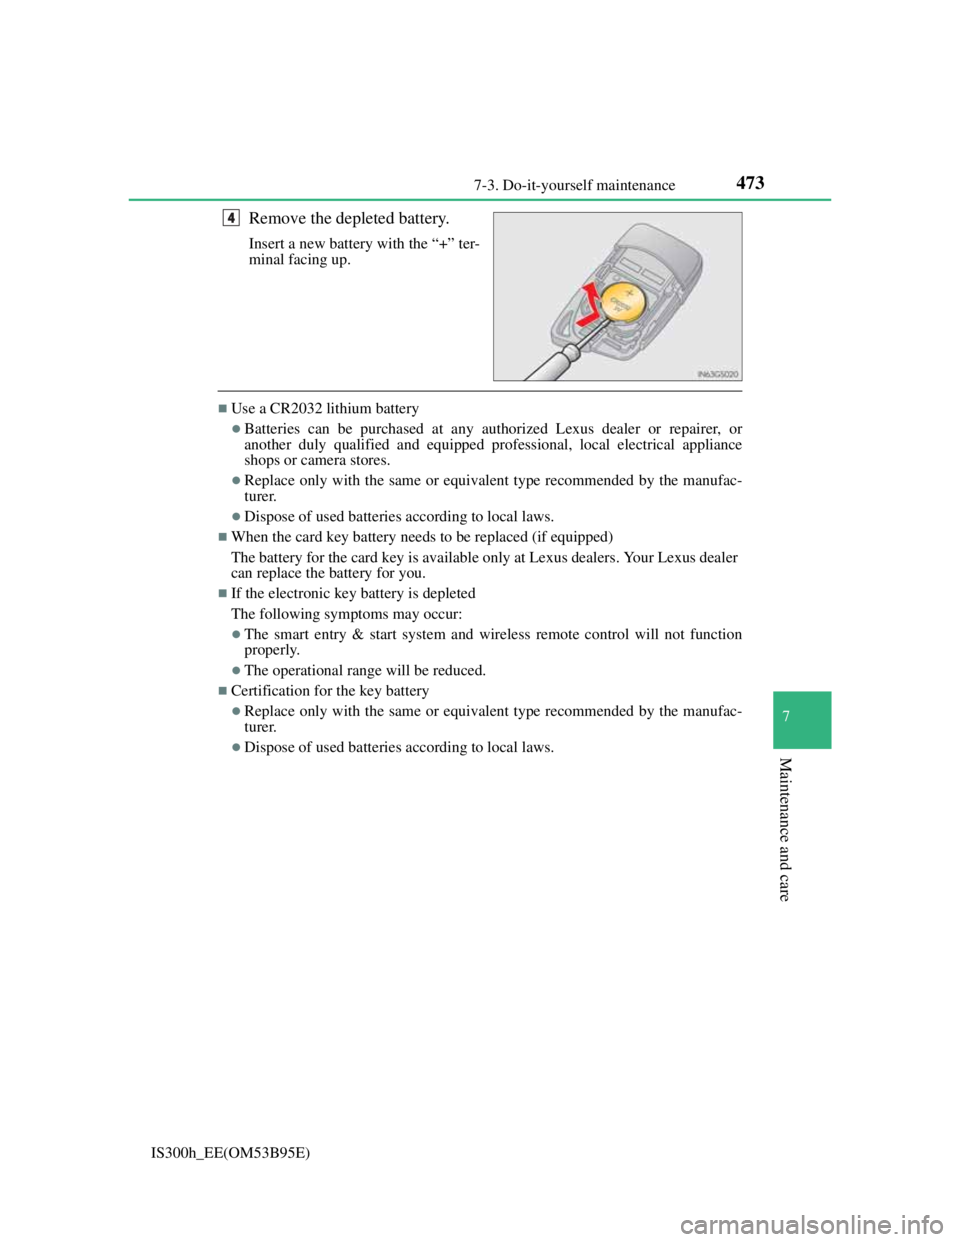
Remove the depleted battery.
Insert a new battery with the “+” ter-
minal facing up.
Use a CR2032 lithium battery
Batteries can be purchased at any authorized Lexus dealer or repairer, or
another duly qualified and equipped professional, local electrical appliance
shops or camera stores.
Replace only with the same or equivalent type recommended by the manufac-
turer.
Dispose of used batteries according to local laws.
When the card key battery needs to be replaced (if equipped)
The battery for the card key is available only at Lexus dealers. Your Lexus dealer
can replace the battery for you.
If the electronic key battery is depleted
The following symptoms may occur:
The smart entry & start system and wireless remote control will not function
properly.
The operational range will be reduced.
Certification for the key battery
Replace only with the same or equivalent type recommended by the manufac-
turer.
Dispose of used batteries according to local laws.
4
Page 492 of 628

4787-3. Do-it-yourself maintenance
IS300h_EE(OM53B95E)
After a fuse is replaced
If the lights do not turn on even after the fuse has been replaced, a bulb may
need replacement. (P. 479)
If the replaced fuse blows again, have the vehicle inspected by any authorized
Lexus dealer or repairer, or another duly qualified and equipped professional.
If there is an overload in a circuit
The fuses are designed to blow, protecting the wiring harness from damage.
When replacing light bulbs
Lexus recommends that you use genuine Lexus products designed for this vehi-
cle. Because certain bulbs are connected to circuits designed to prevent overload,
non-genuine parts or parts not designed for this vehicle may be unusable.
CAUTION
To prevent system breakdowns and vehicle fire
Observe the following precautions.
Failure to do so may cause damage to the vehicle, and possibly a fire or injury.
Never use a fuse of a higher amperage rating than that indicated, or use any
other object in place of a fuse.
Always use a genuine Lexus fuse or equivalent.
Never replace a fuse with a wire, even as a temporary fix.
Do not modify the fuses or fuse boxes.
Fuse box near the power control unit
Never check or replace the fuses as there are high voltage parts and wiring near
the fuse box.
Doing so may cause electric shock, resulting in death or serious injury.
NOTICE
Before replacing fuses
Have the cause of electrical overload determined and repaired by any autho-
rized Lexus dealer or repairer, or another duly qualified and equipped profes-
sional as soon as possible.
Page 502 of 628
4887-3. Do-it-yourself maintenance
IS300h_EE(OM53B95E)
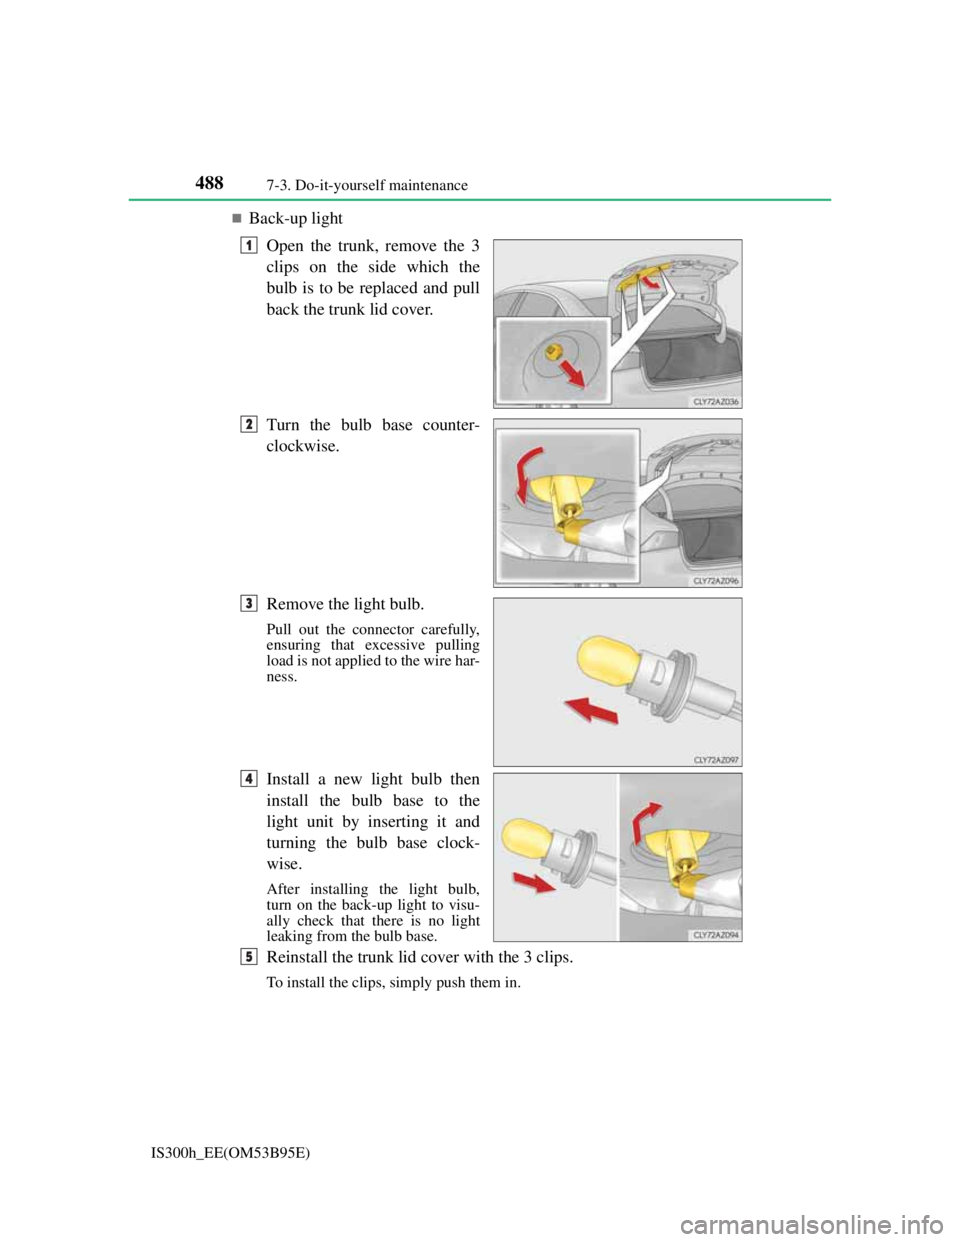
Back-up light
Open the trunk, remove the 3
clips on the side which the
bulb is to be replaced and pull
back the trunk lid cover.
Turn the bulb base counter-
clockwise.
Remove the light bulb.
Pull out the connector carefully,
ensuring that excessive pulling
load is not applied to the wire har-
ness.
Install a new light bulb then
install the bulb base to the
light unit by inserting it and
turning the bulb base clock-
wise.
After installing the light bulb,
turn on the back-up light to visu-
ally check that there is no light
leaking from the bulb base.
Reinstall the trunk lid cover with the 3 clips.
To install the clips, simply push them in.
1
2
3
4
5
Page 506 of 628
4927-3. Do-it-yourself maintenance
IS300h_EE(OM53B95E)
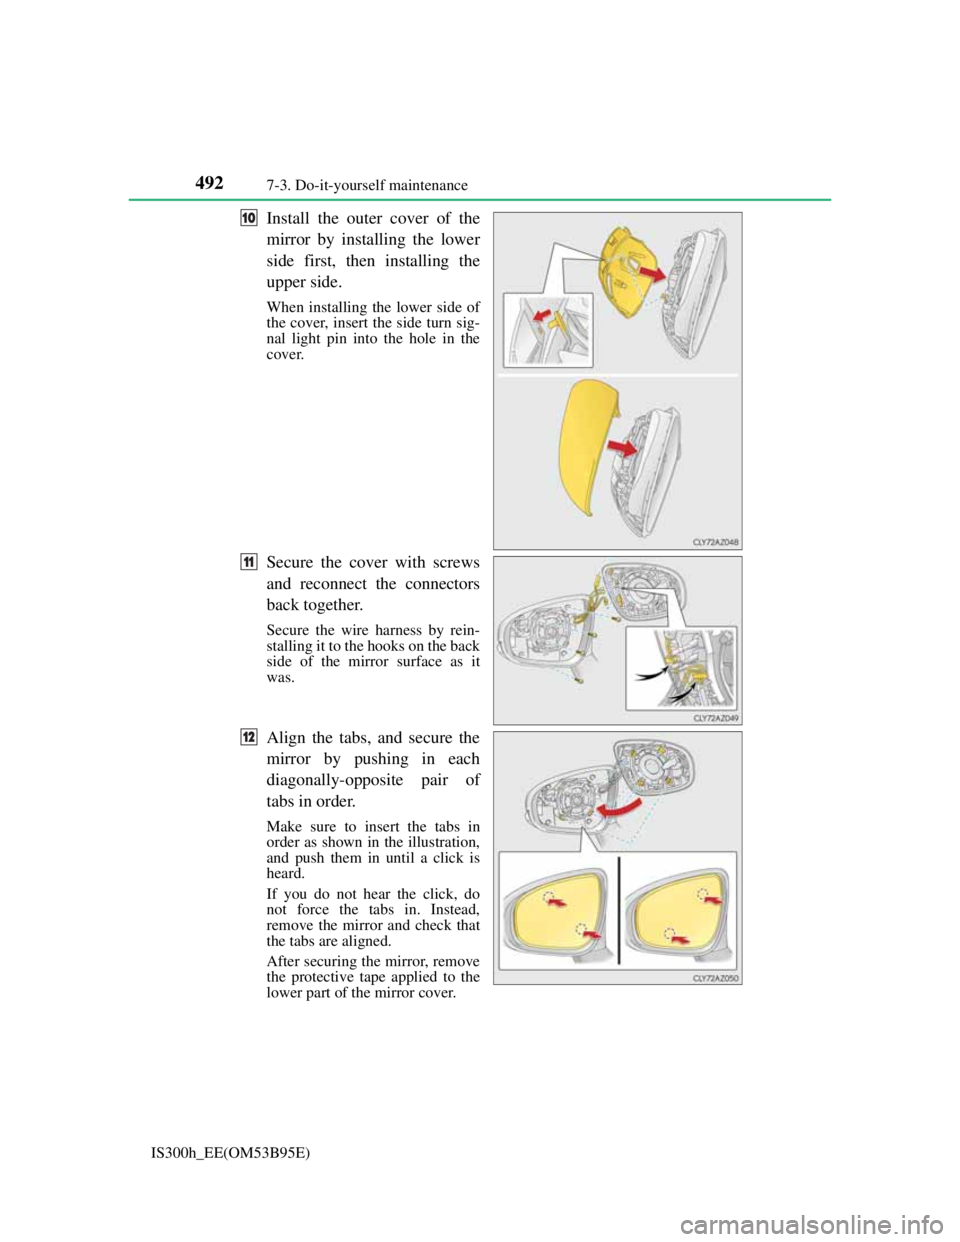
Install the outer cover of the
mirror by installing the lower
side first, then installing the
upper side.
When installing the lower side of
the cover, insert the side turn sig-
nal light pin into the hole in the
cover.
Secure the cover with screws
and reconnect the connectors
back together.
Secure the wire harness by rein-
stalling it to the hooks on the back
side of the mirror surface as it
was.
Align the tabs, and secure the
mirror by pushing in each
diagonally-opposite pair of
tabs in order.
Make sure to insert the tabs in
order as shown in the illustration,
and push them in until a click is
heard.
If you do not hear the click, do
not force the tabs in. Instead,
remove the mirror and check that
the tabs are aligned.
After securing the mirror, remove
the protective tape applied to the
lower part of the mirror cover.
10
11
12
Page 563 of 628
5498-2. Steps to take in an emergency
8
When trouble arises
IS300h_EE(OM53B95E)
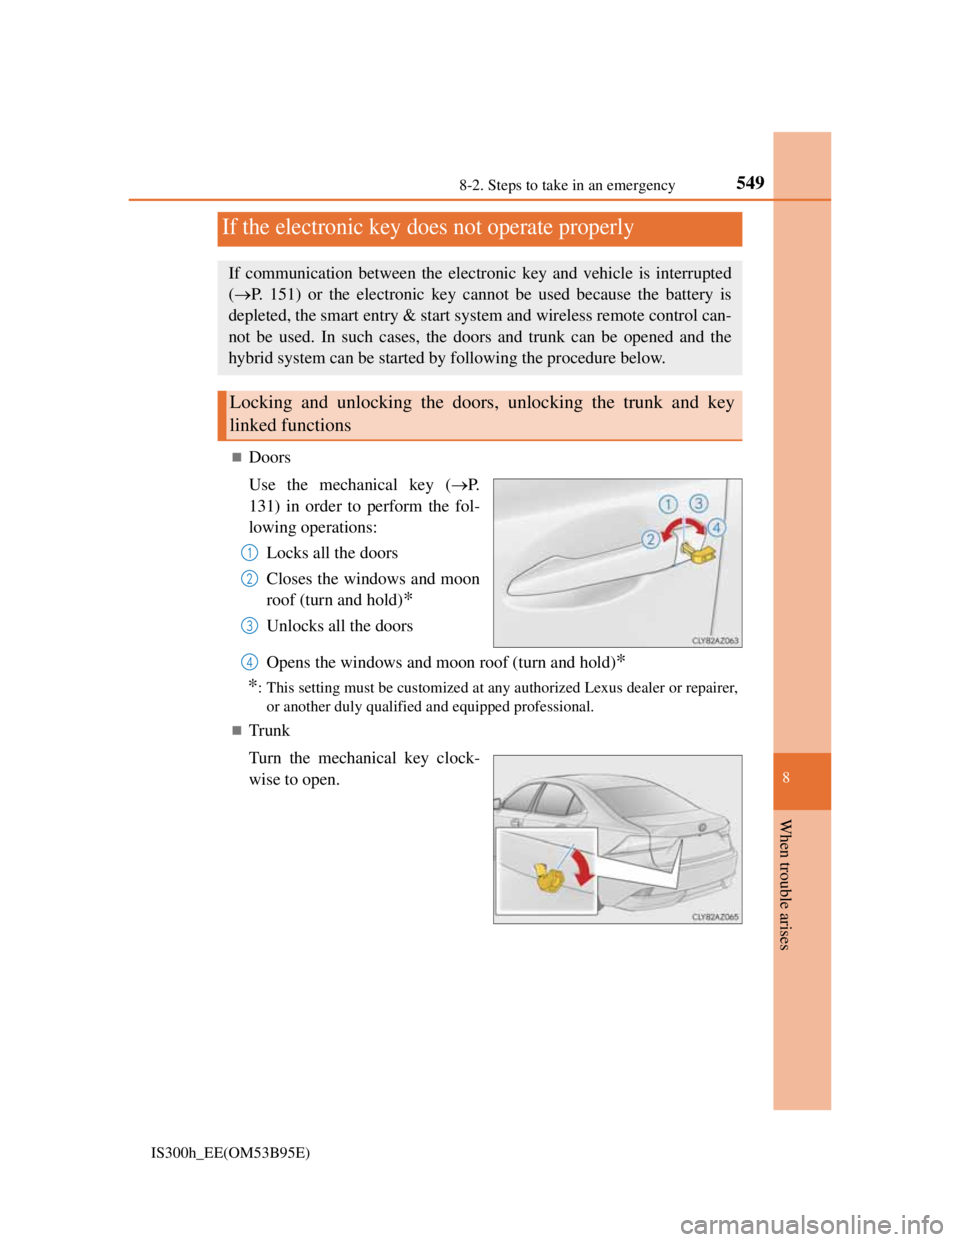
Doors
Use the mechanical key (P.
131) in order to perform the fol-
lowing operations:
Locks all the doors
Closes the windows and moon
roof (turn and hold)
*
Unlocks all the doors
Opens the windows and moon roof (turn and hold)
*
*
: This setting must be customized at any authorized Lexus dealer or repairer,
or another duly qualified and equipped professional.
Trunk
Turn the mechanical key clock-
wise to open.
If the electronic key does not operate properly
If communication between the electronic key and vehicle is interrupted
(P. 151) or the electronic key cannot be used because the battery is
depleted, the smart entry & start system and wireless remote control can-
not be used. In such cases, the doors and trunk can be opened and the
hybrid system can be started by following the procedure below.
Locking and unlocking the doors, unlocking the trunk and key
linked functions
1
2
3
4
Page 567 of 628
5538-2. Steps to take in an emergency
8
When trouble arises
IS300h_EE(OM53B95E)
Once the hybrid system has started, remove the jumper cables in the
exact reverse order from which they were connected.
Once the hybrid system starts, have the vehicle inspected at any autho-
rized Lexus dealer or repairer, or another duly qualified and equipped
professional as soon as possible.
Starting the hybrid system when the 12-volt battery is discharged
The hybrid system cannot be started by push-starting.
To prevent 12-volt battery discharge
Turn off the headlights and the audio system while the hybrid system is off.
Turn off any unnecessary electrical components when the vehicle is running at
a low speed for an extended period, such as in heavy traffic.
Charging the 12-volt battery
The electricity stored in the 12-volt battery will discharge gradually even when
the vehicle is not in use, due to natural discharge and the draining effects of cer-
tain electrical appliances. If the vehicle is left for a long time, the 12-volt battery
may discharge, and the hybrid system may be unable to start. (The 12-volt bat-
tery recharges automatically while the hybrid system is operating.)
When recharging or replacing the 12-volt battery
For vehicles with an alarm: Make sure that the key is not inside the vehicle
when recharging or replacing the 12-volt battery. The key may be locked in the
vehicle if the alarm is activated. (P. 98)
In some cases, it may not be possible to unlock the doors using the smart entry
& start system when the 12-volt battery is discharged. Use the wireless remote
control or the mechanical key to lock or unlock the doors.
The hybrid system may not start on the first attempt after the 12-volt battery has
recharged but will start normally after the second attempt. This is not a mal-
function.
The power switch mode is memorized by the vehicle. When the 12-volt battery
is reconnected, the system will return to the mode it was in before the 12-volt
battery was discharged. Before disconnecting the 12-volt battery, turn the
power switch off.
If you are unsure what mode the power switch was in before the 12-volt battery
discharged, be especially careful when reconnecting the 12-volt battery.
8
Page 594 of 628
579
9 9-2. Customization
Vehicle specifications
IS300h_EE(OM53B95E)
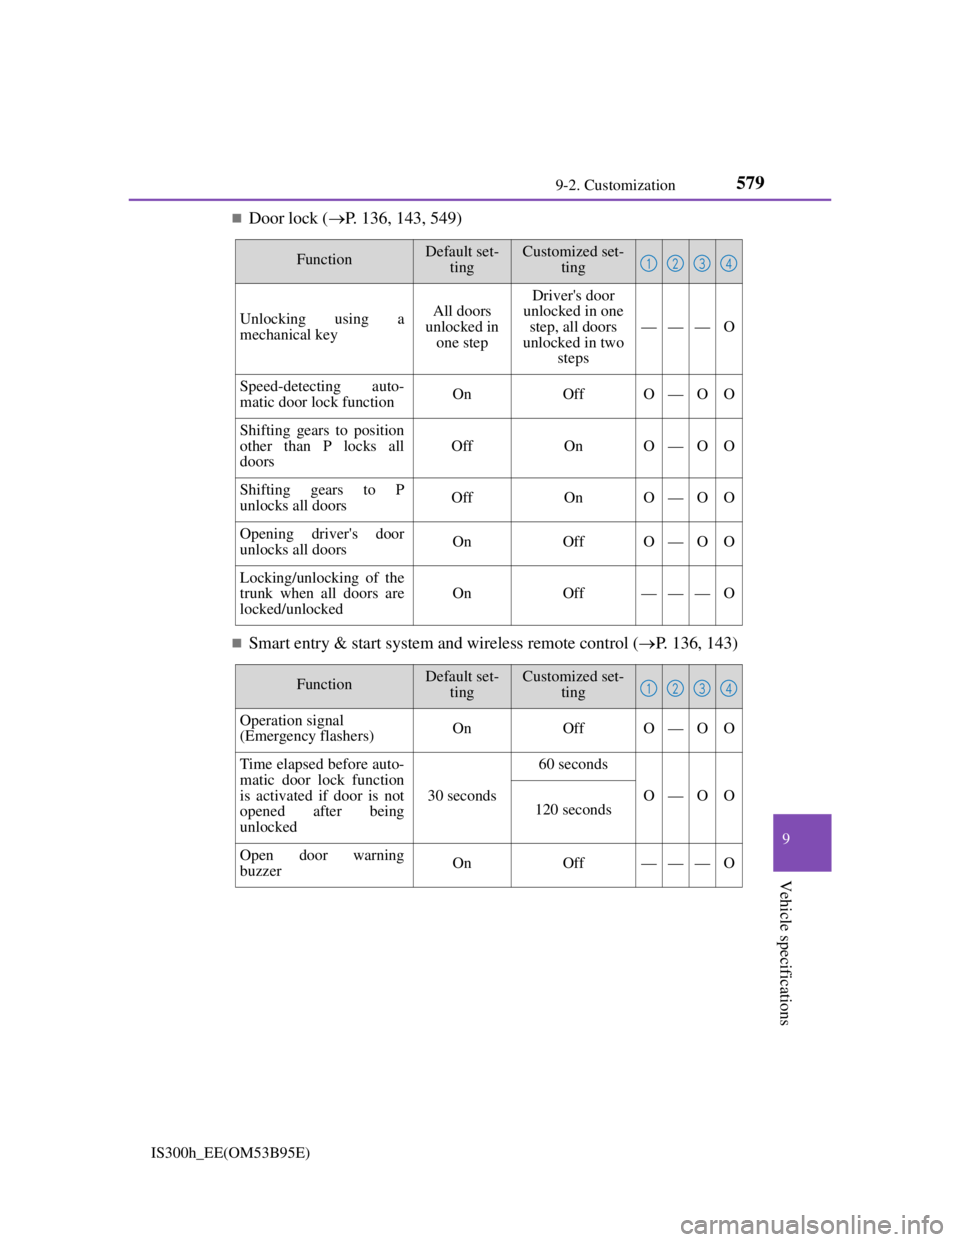
Door lock (P. 136, 143, 549)
Smart entry & start system and wireless remote control (P. 136, 143)
FunctionDefault set-
tingCustomized set-
ting
Unlocking using a
mechanical keyAll doors
unlocked in
one stepDriver's door
unlocked in one
step, all doors
unlocked in two
steps
———O
Speed-detecting auto-
matic door lock functionOnOffO—OO
Shifting gears to position
other than P locks all
doors
OffOnO—OO
Shifting gears to P
unlocks all doorsOffOnO—OO
Opening driver's door
unlocks all doorsOnOffO—OO
Locking/unlocking of the
trunk when all doors are
locked/unlockedOnOff———O
1234
FunctionDefault set-
tingCustomized set-
ting
Operation signal
(Emergency flashers)OnOffO—OO
Time elapsed before auto-
matic door lock function
is activated if door is not
opened after being
unlocked
30 seconds
60 seconds
O—OO120 seconds
Open door warning
buzzerOnOff———O
1234
Page 595 of 628
5809-2. Customization
IS300h_EE(OM53B95E)
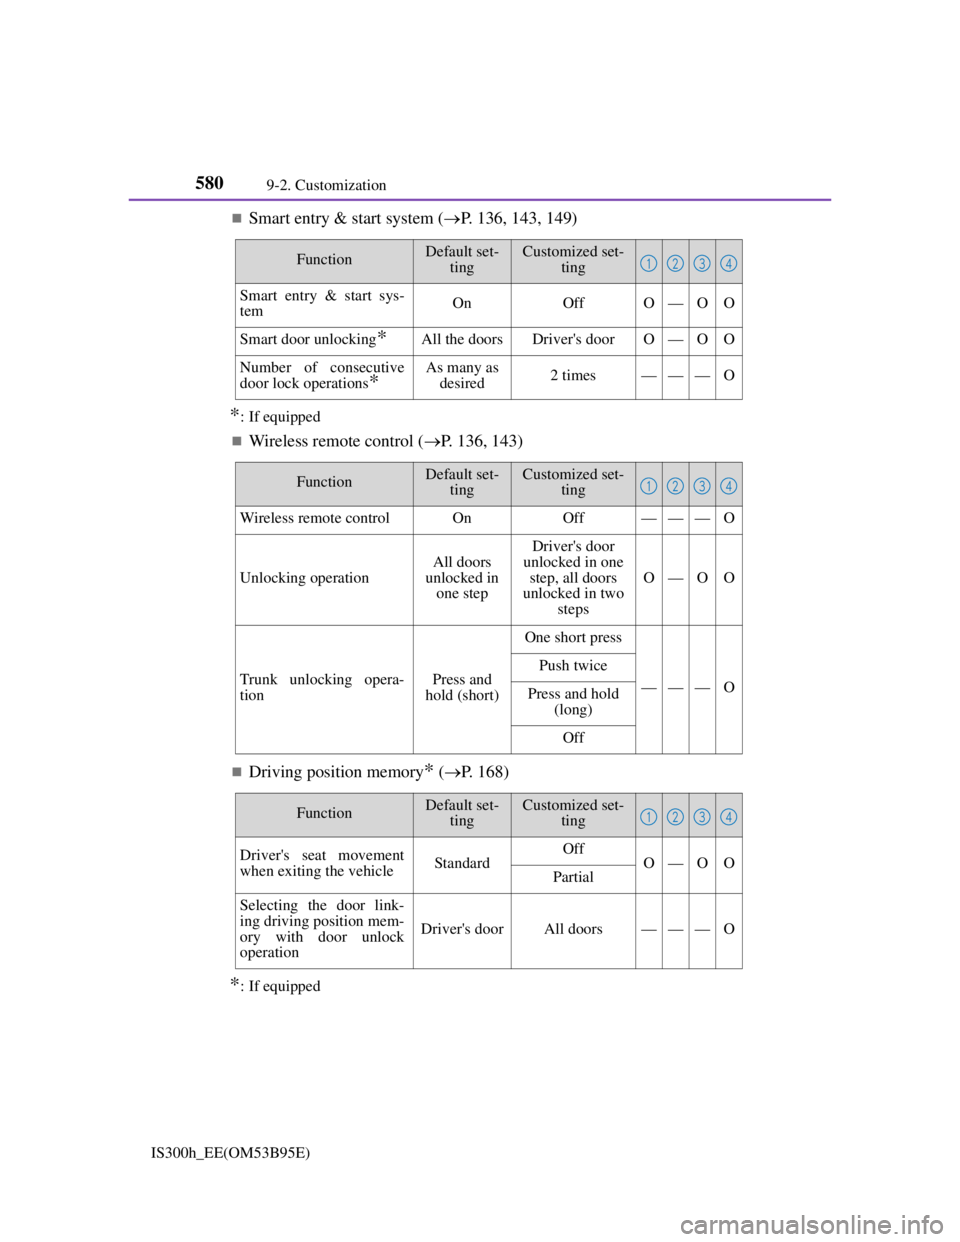
Smart entry & start system (P. 136, 143, 149)
*: If equipped
Wireless remote control (P. 136, 143)
Driving position memory* (P. 168)
*: If equipped
FunctionDefault set-
tingCustomized set-
ting
Smart entry & start sys-
temOnOffO—OO
Smart door unlocking*All the doorsDriver's doorO—OO
Number of consecutive
door lock operations
*
As many as
desired2 times———O
1234
FunctionDefault set-
tingCustomized set-
ting
Wireless remote controlOnOff———O
Unlocking operation
All doors
unlocked in
one step
Driver's door
unlocked in one
step, all doors
unlocked in two
steps
O—OO
Trunk unlocking opera-
tionPress and
hold (short)
One short press
———O
Push twice
Press and hold
(long)
Off
1234
FunctionDefault set-
tingCustomized set-
ting
Driver's seat movement
when exiting the vehicleStandardOffO—OOPartial
Selecting the door link-
ing driving position mem-
ory with door unlock
operation
Driver's doorAll doors———O
1234