bluetooth Lexus IS300h 2014 Navigation manual
[x] Cancel search | Manufacturer: LEXUS, Model Year: 2014, Model line: IS300h, Model: Lexus IS300h 2014Pages: 404, PDF Size: 35.2 MB
Page 337 of 404
337
1. TELEPHONE OPERATION (HANDS-FREE SYSTEM FOR CELLULAR PHONES)
IS300h/250_Navi_EE
TELEPHONE
7
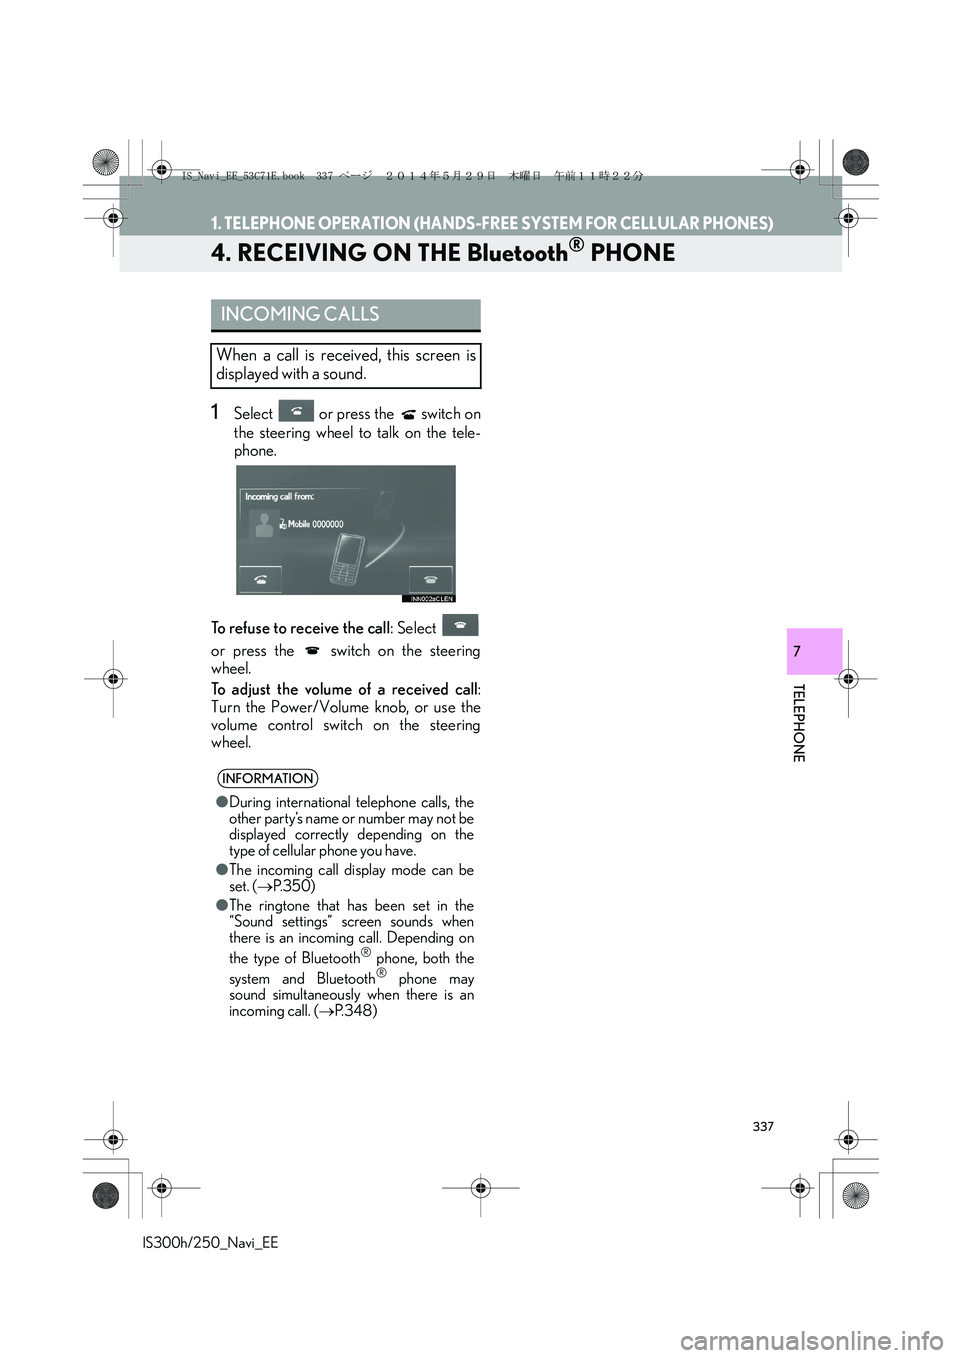
4. RECEIVING ON THE Bluetooth® PHONE
1Select or press the switch on
the steering wheel to talk on the tele-
phone.
To refuse to receive the call: Select
or press the switch on the steering
wheel.
To adjust the volume of a received call:
Turn the Power/Volume knob, or use the
volume control switch on the steering
wheel.
INCOMING CALLS
When a call is received, this screen is
displayed with a sound.
INFORMATION
●During international telephone calls, the
other party’s name or number may not be
displayed correctly depending on the
type of cellular phone you have.
●The incoming call display mode can be
set. (→P. 3 5 0 )
●The ringtone that has been set in the
“Sound settings” screen sounds when
there is an incoming call. Depending on
the type of Bluetooth
® phone, both the
system and Bluetooth® phone may
sound simultaneously when there is an
incoming call. (→P. 3 4 8 )
IS_Navi_EE_53C71E.book 337 ページ 2014年5月29日 木曜日 午前11時22分
Page 338 of 404
338
1. TELEPHONE OPERATION (HANDS-FREE SYSTEM FOR CELLULAR PHONES)
IS300h/250_Navi_EE
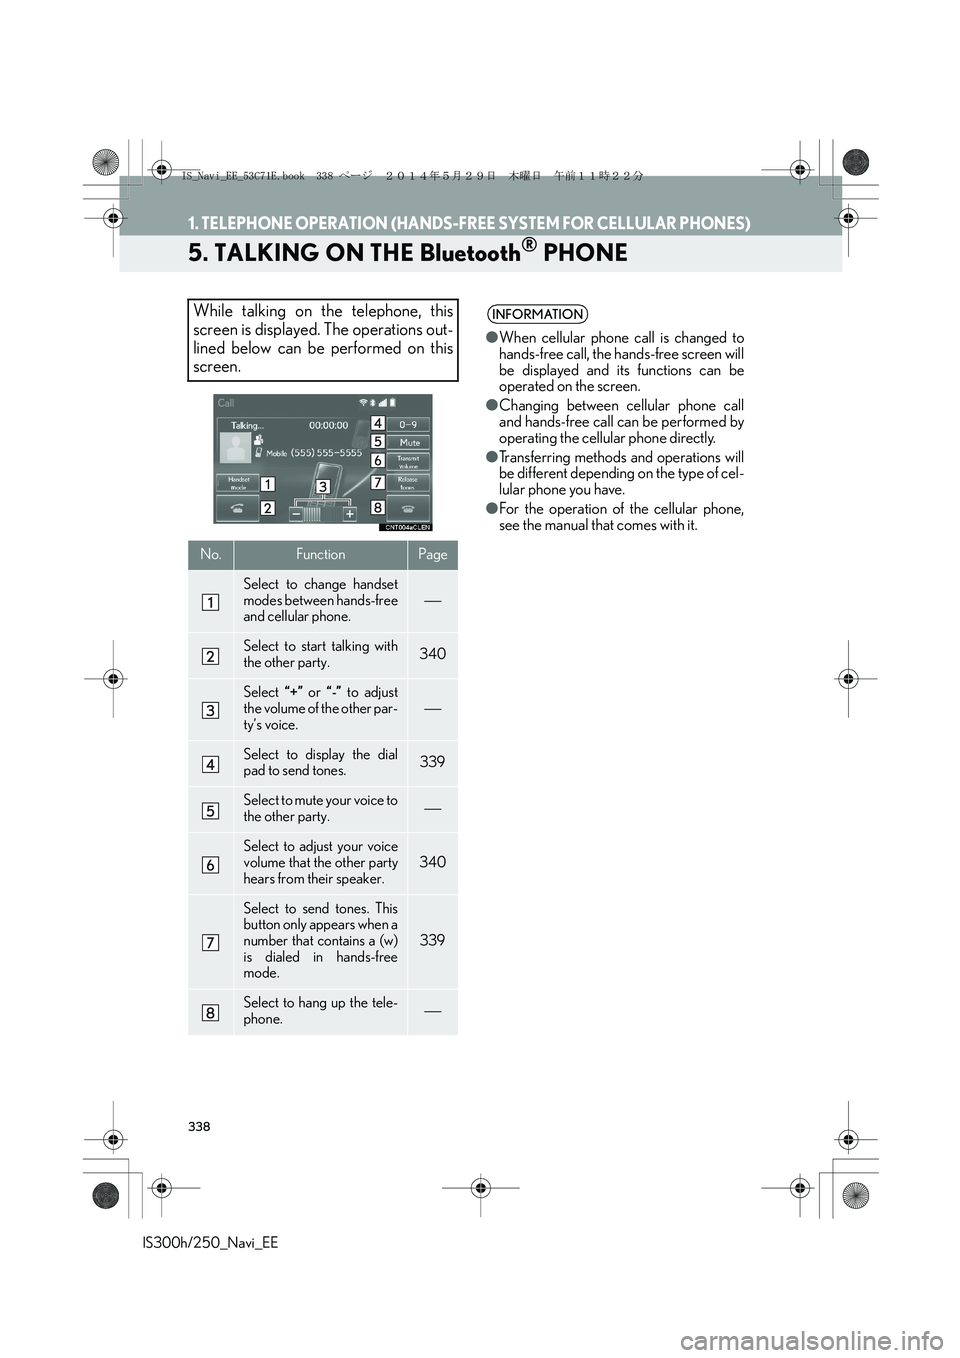
5. TALKING ON THE Bluetooth® PHONE
While talking on the telephone, this
screen is displayed. The operations out-
lined below can be performed on this
screen.
No.FunctionPage
Select to change handset
modes between hands-free
and cellular phone.
Select to start talking with
the other party.340
Select “+” or “-” to adjust
the volume of the other par-
ty’s voice.
Select to display the dial
pad to send tones.339
Select to mute your voice to
the other party.
Select to adjust your voice
volume that the other party
hears from their speaker.340
Select to send tones. This
button only appears when a
number that contains a (w)
is dialed in hands-free
mode.
339
Select to hang up the tele-
phone.
INFORMATION
●When cellular phone call is changed to
hands-free call, the hands-free screen will
be displayed and its functions can be
operated on the screen.
●Changing between cellular phone call
and hands-free call can be performed by
operating the cellular phone directly.
●Transferring methods and operations will
be different depending on the type of cel-
lular phone you have.
●For the operation of the cellular phone,
see the manual that comes with it.
IS_Navi_EE_53C71E.book 338 ページ 2014年5月29日 木曜日 午前11時22分
Page 341 of 404
341
1. TELEPHONE OPERATION (HANDS-FREE SYSTEM FOR CELLULAR PHONES)
IS300h/250_Navi_EE
TELEPHONE
7
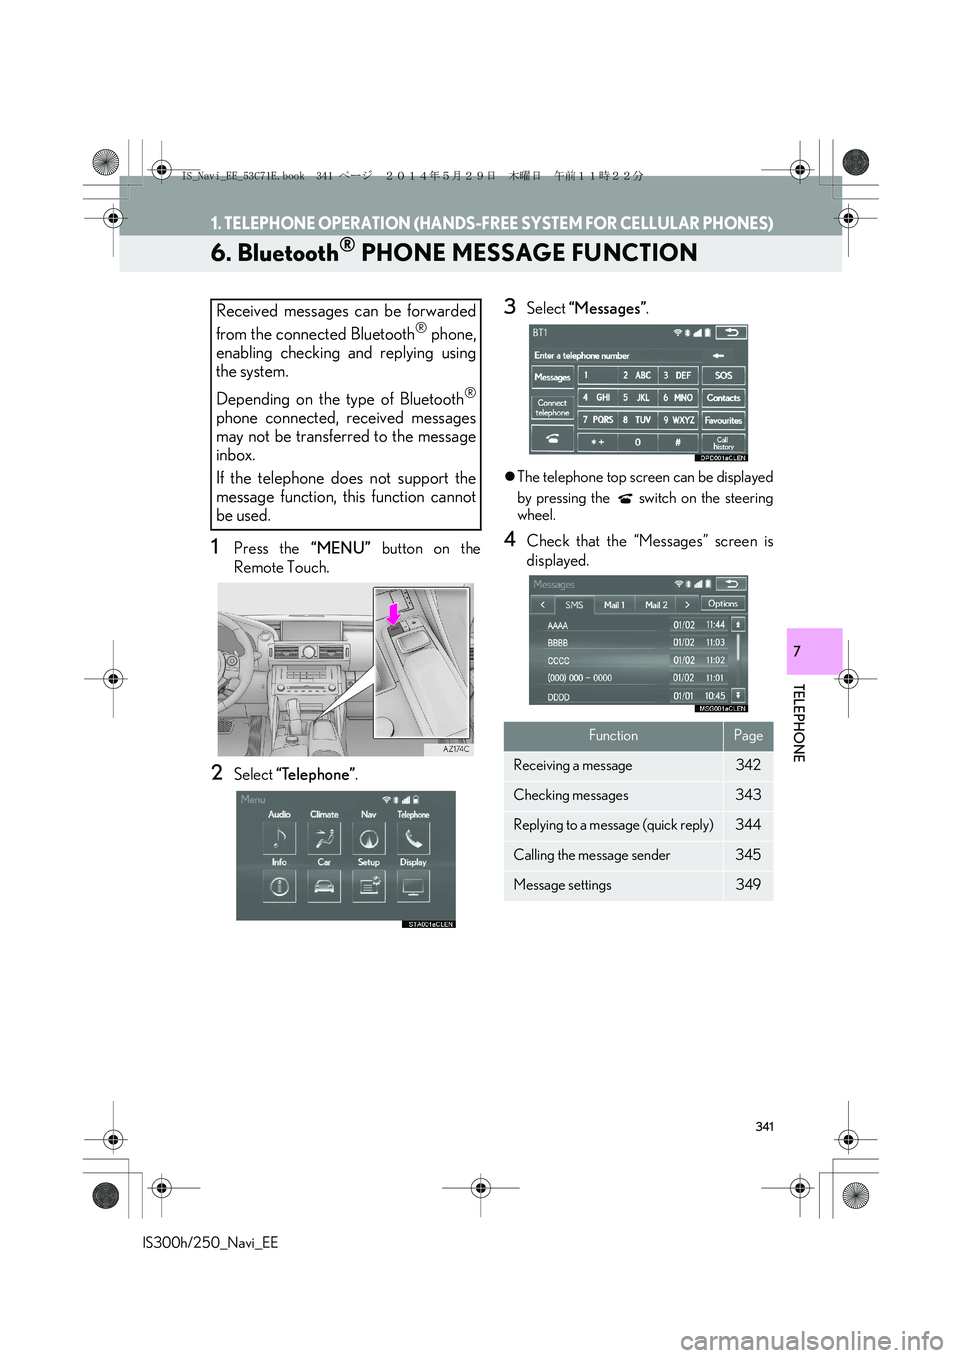
6. Bluetooth® PHONE MESSAGE FUNCTION
1Press the “MENU” button on the
Remote Touch.
2Select “Telephone”.
3Select “Messages”.
�zThe telephone top screen can be displayed
by pressing the switch on the steering
wheel.
4Check that the “Messages” screen is
displayed.
Received messages can be forwarded
from the connected Bluetooth
® phone,
enabling checking and replying using
the system.
Depending on the type of Bluetooth
®
phone connected, received messages
may not be transferred to the message
inbox.
If the telephone does not support the
message function, this function cannot
be used.
FunctionPage
Receiving a message342
Checking messages 343
Replying to a message (quick reply)344
Calling the message sender345
Message settings349
IS_Navi_EE_53C71E.book 341 ページ 2014年5月29日 木曜日 午前11時22分
Page 343 of 404
343
1. TELEPHONE OPERATION (HANDS-FREE SYSTEM FOR CELLULAR PHONES)
TELEPHONE
IS300h/250_Navi_EE
7
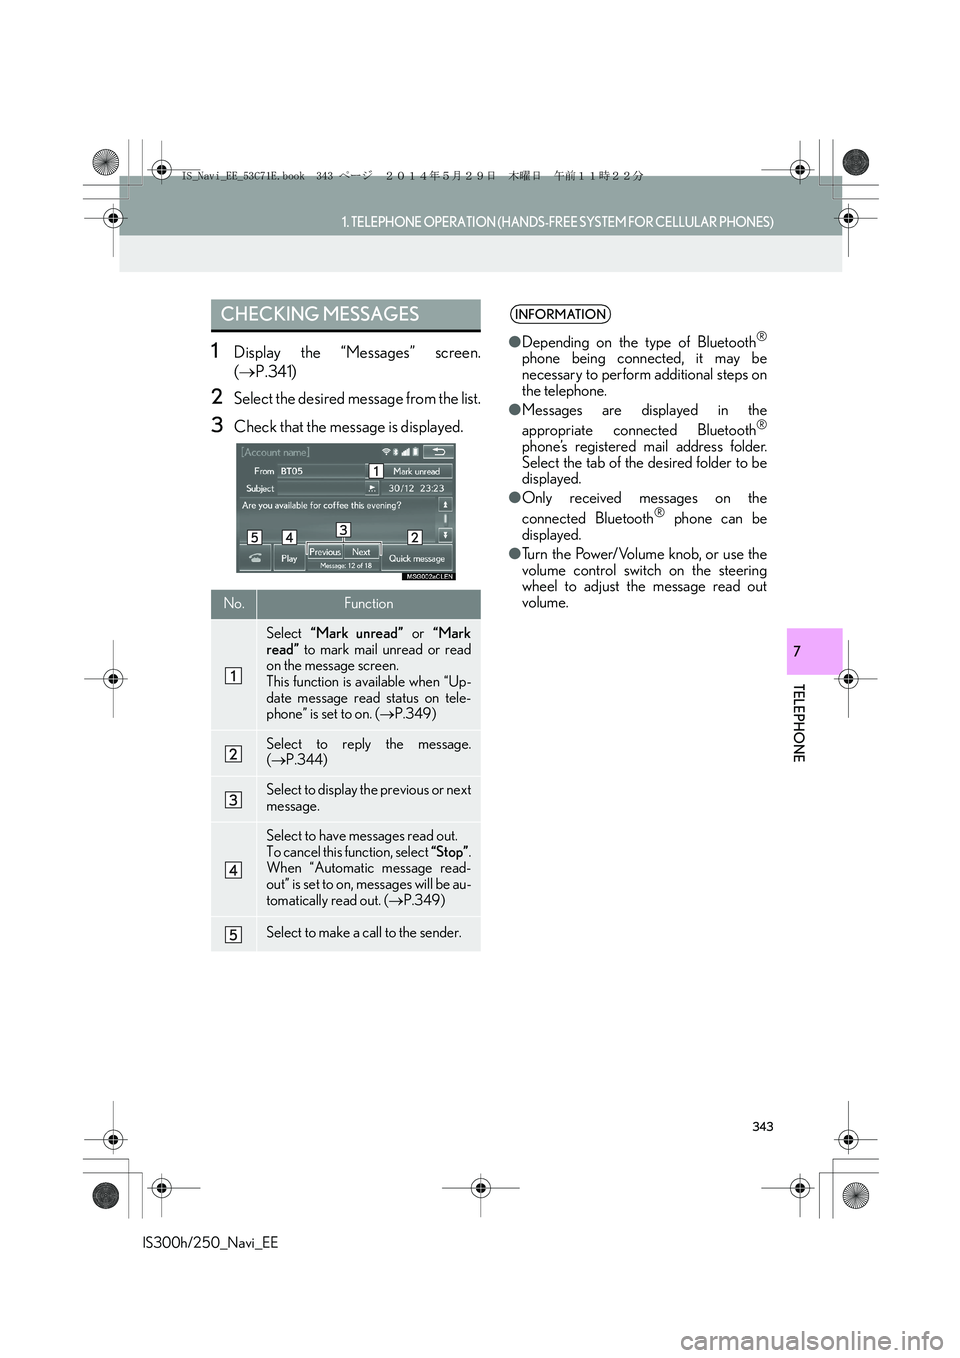
1Display the “Messages” screen.
(→P.341)
2Select the desired message from the list.
3Check that the message is displayed.
CHECKING MESSAGES
No.Function
Select “Mark unread” or “Mark
read” to mark mail unread or read
on the message screen.
This function is available when “Up-
date message read status on tele-
phone” is set to on. (→P.349)
Select to reply the message.
(→P.344)
Select to display the previous or next
message.
Select to have messages read out.
To cancel this function, select “Stop”.
When “Automatic message read-
out” is set to on, messages will be au-
tomatically read out. (→P.349)
Select to make a call to the sender.
INFORMATION
●Depending on the type of Bluetooth®
phone being connected, it may be
necessary to perform additional steps on
the telephone.
●Messages are displayed in the
appropriate connected Bluetooth
®
phone’s registered mail address folder.
Select the tab of the desired folder to be
displayed.
●Only received messages on the
connected Bluetooth
® phone can be
displayed.
●Turn the Power/Volume knob, or use the
volume control switch on the steering
wheel to adjust the message read out
volume.
IS_Navi_EE_53C71E.book 343 ページ 2014年5月29日 木曜日 午前11時22分
Page 350 of 404
350
2. SETUP
IS300h/250_Navi_EE
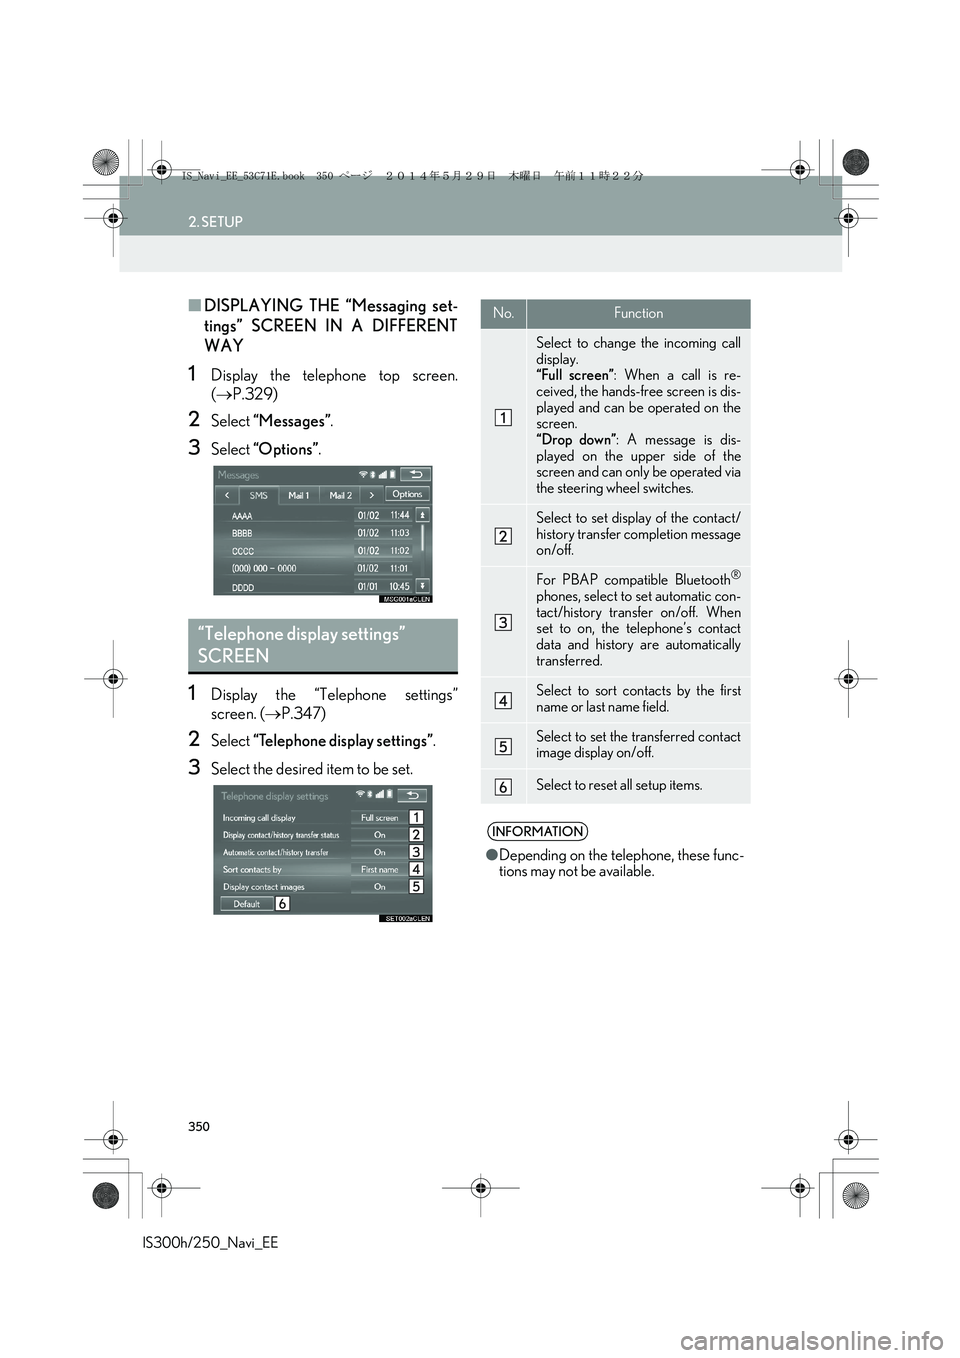
■DISPLAYING THE “Messaging set-
tings” SCREEN IN A DIFFERENT
WAY
1Display the telephone top screen.
(→P.329)
2Select “Messages”.
3Select “Options”.
1Display the “Telephone settings”
screen. (→P.347)
2Select “Telephone display settings”.
3Select the desired item to be set.
“Telephone display settings”
SCREEN
No.Function
Select to change the incoming call
display.
“Full screen”: When a call is re-
ceived, the hands-free screen is dis-
played and can be operated on the
screen.
“Drop down”: A message is dis-
played on the upper side of the
screen and can only be operated via
the steering wheel switches.
Select to set display of the contact/
history transfer completion message
on/off.
For PBAP compatible Bluetooth®
phones, select to set automatic con-
tact/history transfer on/off. When
set to on, the telephone’s contact
data and history are automatically
transferred.
Select to sort contacts by the first
name or last name field.
Select to set the transferred contact
image display on/off.
Select to reset all setup items.
INFORMATION
●Depending on the telephone, these func-
tions may not be available.
IS_Navi_EE_53C71E.book 350 ページ 2014年5月29日 木曜日 午前11時22分
Page 354 of 404
354
2. SETUP
IS300h/250_Navi_EE
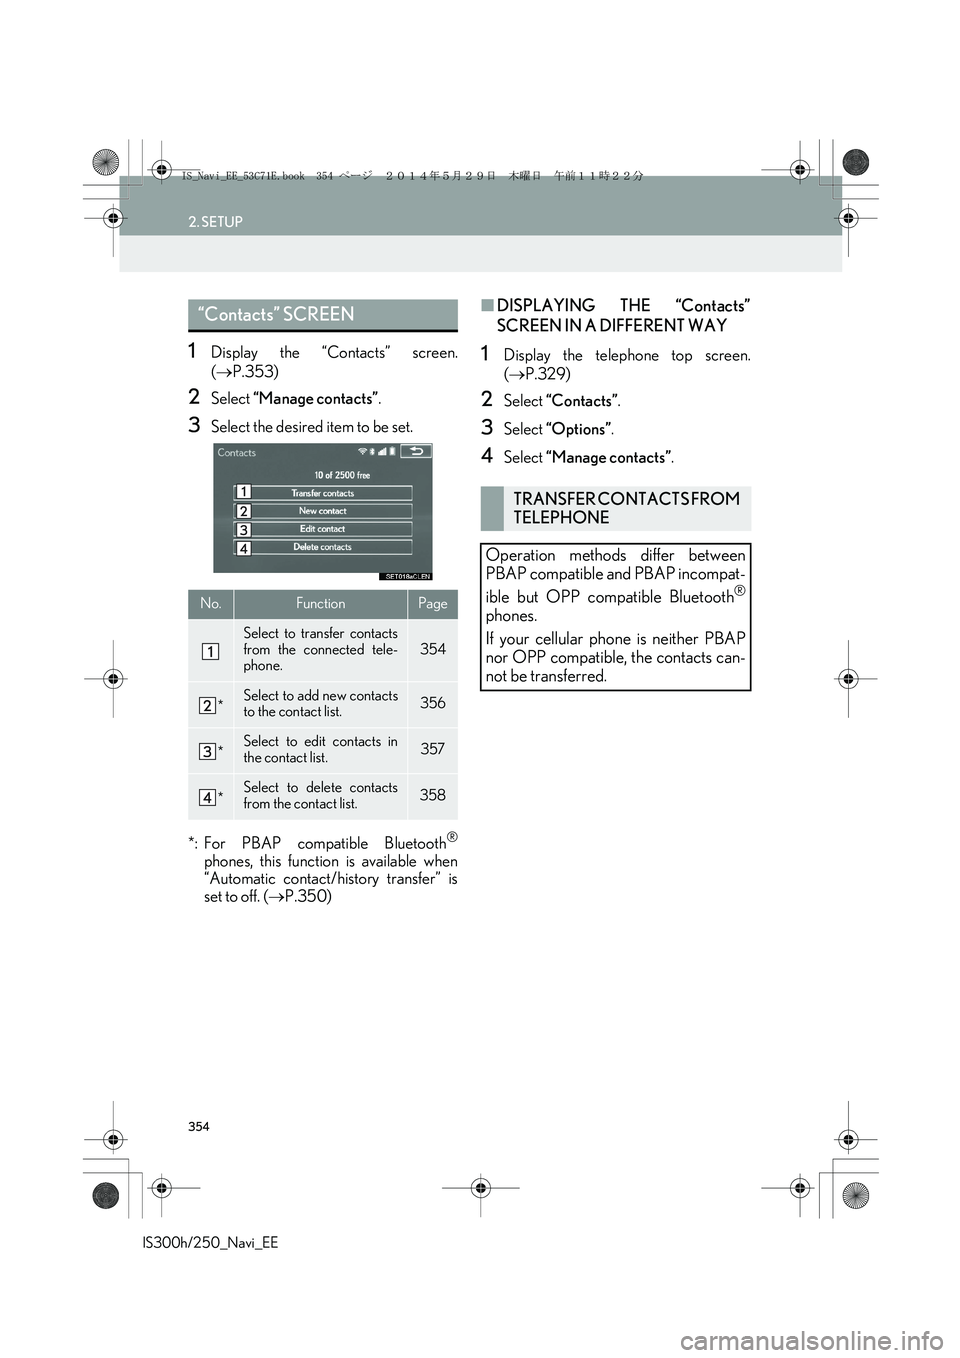
1Display the “Contacts” screen.
(→P.353)
2Select “Manage contacts”.
3Select the desired item to be set.
*: For PBAP compatible Bluetooth
®
phones, this function is available when
“Automatic contact/history transfer” is
set to off. (→P.350)
■DISPLAYING THE “Contacts”
SCREEN IN A DIFFERENT WAY
1Display the telephone top screen.
(→P.329)
2Select “Contacts”.
3Select “Options”.
4Select “Manage contacts”.
“Contacts” SCREEN
No.FunctionPage
Select to transfer contacts
from the connected tele-
phone.354
*Select to add new contacts
to the contact list.356
*Select to edit contacts in
the contact list.357
*Select to delete contacts
from the contact list.358
TRANSFER CONTACTS FROM
TELEPHONE
Operation methods differ between
PBAP compatible and PBAP incompat-
ible but OPP compatible Bluetooth
®
phones.
If your cellular phone is neither PBAP
nor OPP compatible, the contacts can-
not be transferred.
IS_Navi_EE_53C71E.book 354 ページ 2014年5月29日 木曜日 午前11時22分
Page 355 of 404

355
2. SETUP
IS300h/250_Navi_EE
TELEPHONE
7
■FOR PBAP COMPATIBLE
Bluetooth
® PHONES
�XWhen “Automatic contact/history trans-
fer” is set to on (→P.350)
1Select “Transfer contacts”.
�zContacts are transferred automatically.
2Check that a confirmation screen is dis-
played when the operation is complete.
�zThis operation may be unnecessary
depending on the type of cellular phone.
�zDepending on the type of cellular phone,
OBEX authentication may be required
when transferring contact data. Enter
“1234” into the Bluetooth
® phone.
�zIf another Bluetooth
® device is connected
when transferring contact data, depending
on the telephone, the connected
Bluetooth
® device may need to be discon-
nected.
�zDepending on the type of Bluetooth
®
phone being connected, it may be neces-
sary to perform additional steps on the
telephone.
�XWhen “Automatic contact/history trans-
fer” is set to off (→P.350)
1Follow the steps in “FOR PBAP IN-
COMPATIBLE BUT OPP COMPATI-
BLE Bluetooth
® PHONES” from
“STEP 1”. (→P.355)
■FOR PBAP INCOMPATIBLE BUT
OPP COMPATIBLE Bluetooth
®
PHONES
1Select “Transfer contacts”.
2Select “Replace contacts” or “Add con-
tact”.
“Replace contacts”: Select to transfer the
contact from the connected cellular phone
and replace the current one.
“Add contact”: Select to transfer the de-
sired contact data from the connected cel-
lular phone to add to the current one.
3Transfer the contact data to the system
using a Bluetooth
® phone.
�zThis operation may be unnecessary
depending on the type of cellular phone.
�zDepending on the type of cellular phone,
OBEX authentication may be required
when transferring contact data. Enter
“1234” into the Bluetooth
® phone.
�zTo cancel this function, select “Cancel”.
4Select “Done” when it appears on the
screen.
5Check that a confirmation screen is dis-
played when the operation is complete.
This operation cannot be performed
while driving.
IS_Navi_EE_53C71E.book 355 ページ 2014年5月29日 木曜日 午前11時22分
Page 356 of 404

356
2. SETUP
IS300h/250_Navi_EE
■UPDATING THE CONTACTS IN A
DIFFERENT WAY (FROM THE “Call
history” SCREEN)
1Display the telephone top screen.
(→P.329)
2Select “Call history” and select a con-
tact not yet registered in the contact list.
3Select “Update contact”.
4Select the desired contact.
5Select a telephone type for the tele-
phone number.
1Select “New contact”.
2Enter the name and select “OK”.
3Enter the telephone number and select
“OK”.
4Select the telephone type for the tele-
phone number.
5To add another number to this contact,
select “Yes”.
For PBAP compatible Bluetooth®
phones, this function is available when
“Automatic contact/history transfer” is
set to off. (→P.350)
REGISTERING A NEW
CONTACT TO THE CONTACT
LIST
New contact data can be registered.
Up to 4 numbers per person can be reg-
istered. For PBAP compatible
Bluetooth
® phones, this function is
available when “Automatic contact/his-
tory transfer” is set to off. (→P.350)
IS_Navi_EE_53C71E.book 356 ページ 2014年5月29日 木曜日 午前11時22分
Page 357 of 404

357
2. SETUP
IS300h/250_Navi_EE
TELEPHONE
7
■REGISTERING A NEW CONTACT
IN A DIFFERENT WAY (FROM THE
“Call history” SCREEN)
1Display the telephone top screen.
(→P.329)
2Select “Call history” and select a con-
tact not yet registered in the contact list.
3Select “Add to contacts”.
4Follow the steps in “REGISTERING A
NEW CONTACT TO THE CON-
TACTS LIST” from “STEP 2”.
(→P.356)
1Select “Edit contact”.
2Select the desired contact.
3Select corresponding to the de-
sired name or number.
�XFor editing the name
4Follow the steps in “REGISTERING A
NEW CONTACT TO THE CON-
TACTS LIST” from “STEP 2”.
(→P.356)
�XFor editing the number
4Follow the steps in “REGISTERING A
NEW CONTACT TO THE CON-
TACTS LIST” from “STEP 3”.
(→P.356)
EDITING THE CONTACT
DATA
For PBAP compatible Bluetooth
®
phones, this function is available when
“Automatic contact/history transfer” is
set to off. (→P.350)
IS_Navi_EE_53C71E.book 357 ページ 2014年5月29日 木曜日 午前11時22分
Page 358 of 404

358
2. SETUP
IS300h/250_Navi_EE
■EDITING THE CONTACT IN A DIF-
FERENT WAY (FROM THE “Con-
tact details” SCREEN)
1Display the telephone top screen.
(→P.329)
2Select “Contacts”, “Call history” or
“Favourites” and select the desired
contact.
3Select “Edit contact”.
“E-mail addresses”: Select to display all
registered e-mail addresses for the contact.
4Follow the steps in “EDITING THE
CONTACT DATA” from “STEP 3”.
(→P.357)
1Select “Delete contacts”.
2Select the desired contact and select
“Delete”.
3Select “Yes” when the confirmation
screen appears.
DELETING THE CONTACT
DATA
For PBAP compatible Bluetooth
®
phones, this function is available when
“Automatic contact/history transfer” is
set to off. (→P.350)
INFORMATION
●Multiple data can be selected and
deleted at the same time.
IS_Navi_EE_53C71E.book 358 ページ 2014年5月29日 木曜日 午前11時22分