light Lexus IS300h 2017 Owner's Manual
[x] Cancel search | Manufacturer: LEXUS, Model Year: 2017, Model line: IS300h, Model: Lexus IS300h 2017Pages: 692, PDF Size: 163.7 MB
Page 530 of 692
5307-3. Do-it-yourself maintenance
IS300h_EE(OM53D89E)
■When initialization of the tire pressure warning system has failed
Initialization can be completed in a few minute s. However, in the following cases, the set- tings have not been recorded and the system will not operate properly. If repeated
attempts to record tire inflation pressure settings are unsuccessful, have the vehicle
inspected by any authorized Le xus retailer or Lexus authorized repairer, or any reliable repairer.
●When operating the tire pre ssure warning reset switch, the tire pressure warning light
does not blink 3 times.
●After carrying out the initializat ion procedure, the tire pressure warning light blinks for 1
minute then stays on after driving for 20 minutes.
■Registering ID codes
The ID codes of the tire pressure warning valve and transmitters for two sets of wheels
can be registered.
It is not necessary to register the ID codes wh en replacing normal tires with snow tires, if the ID codes for the wheels of both normal tires and snow tires are registered before-
hand.
For information about changing ID codes, as k any authorized Lexus retailer or Lexus authorized repairer, or any reliable repairer.
Page 535 of 692
5357-3. Do-it-yourself maintenance
7
Maintenance and care
IS300h_EE(OM53D89E)
WARNING
■When inspecting or replacing tires
Observe the following precautions to prevent accidents.
Failure to do so may cause damage to parts of the drivetrain as well as dangerous han-
dling characteristics, which ma y lead to an accident resulting in death or serious injury.
●Do not mix tires of different makes, models or tread patterns.
Also, do not mix tires of re markably different treadwear.
●Do not use tire sizes other than those recommended by Lexus.
●Do not mix differently constructed tires (radial, bias-belted or bias-ply tires).
●Do not mix summer, all season and snow tires.
●Do not use tires that have been used on another vehicle. Do not use tires if you do not know how they were used previously.
●Vehicles with an emergency tire puncture repair kit: Do not tow anything if a tire that
has been repaired using the emergency tire puncture repair kit is installed. The load on the tire may cause unexpe cted damage to the tire.
■When initializing the tire pressure warning system
Do not operate the tire pressure warning reset switch without first adjusting the tire inflation pressure to the spec ified level. Otherwise, the tire pressure warning light may
not come on even if the tire inflation pressu re is low, or it may come on when the tire
inflation pressure is actually normal.
Page 539 of 692
5397-3. Do-it-yourself maintenance
7
Maintenance and care
IS300h_EE(OM53D89E)
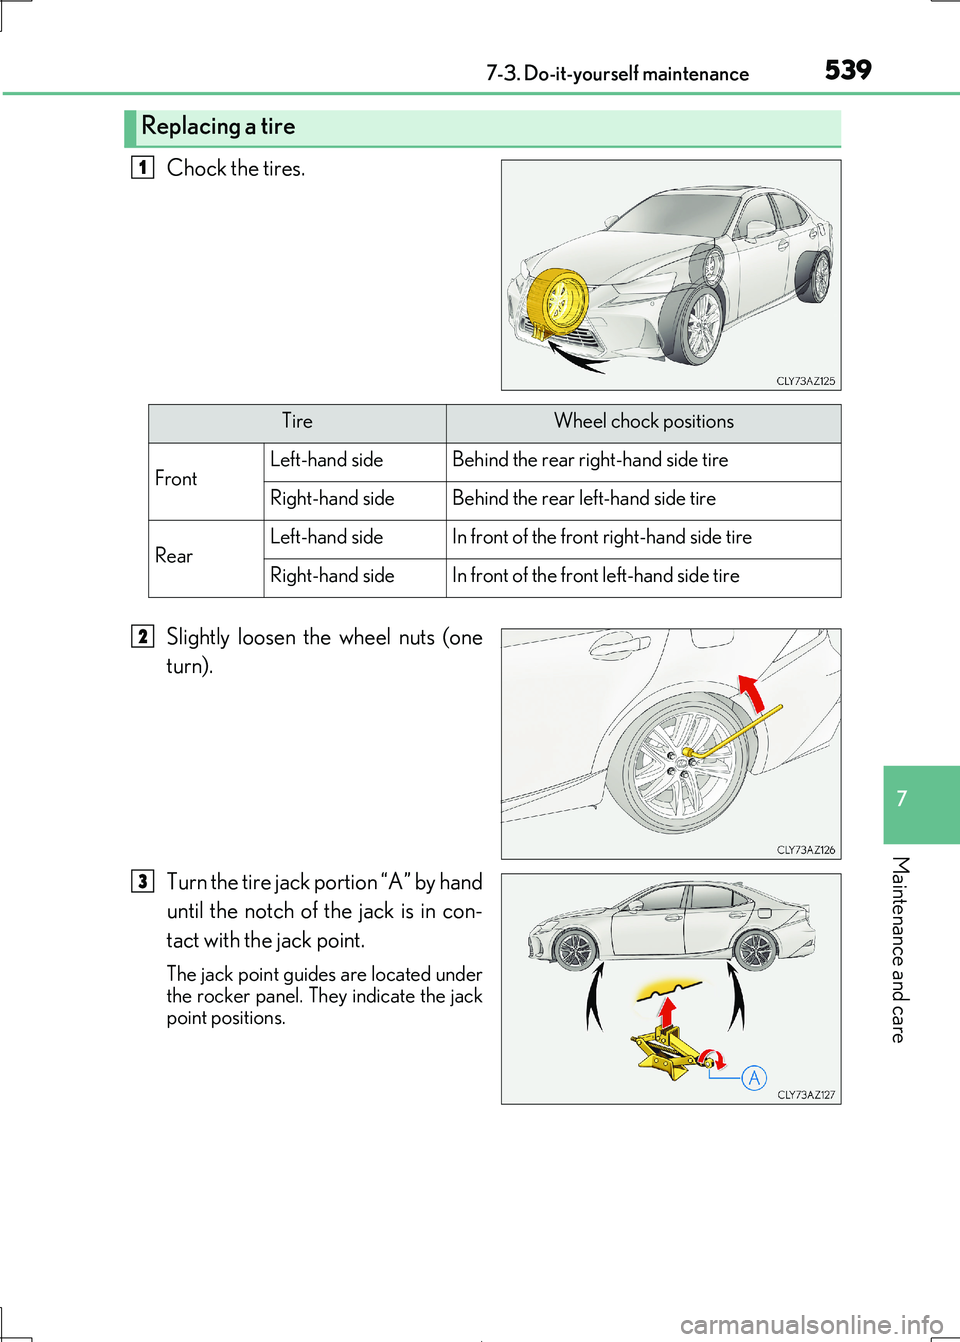
Chock the tires.
Slightly loosen the wheel nuts (one
turn).
Turn the tire jack portion “A” by hand
until the notch of the jack is in con-
tact with the jack point.
The jack point guides are located under
the rocker panel. They indicate the jack
point positions.
Replacing a tire
1
TireWheel chock positions
FrontLeft-hand sideBehind the rear right-hand side tire
Right-hand sideBehind the rear left-hand side tire
RearLeft-hand sideIn front of the front right-hand side tire
Right-hand sideIn front of the front left-hand side tire
2
3
Page 540 of 692
5407-3. Do-it-yourself maintenance
IS300h_EE(OM53D89E)
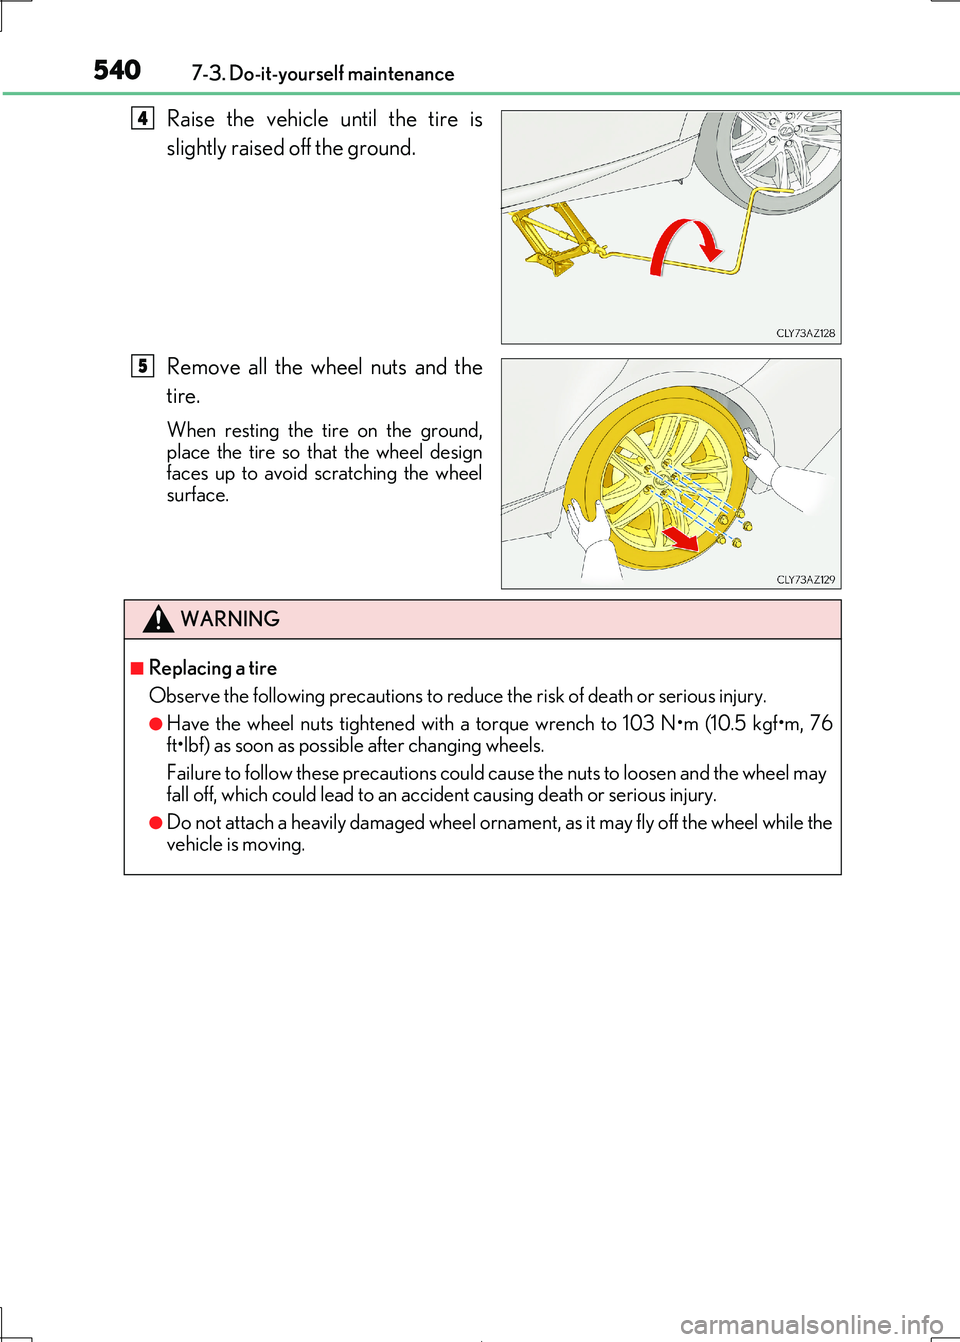
Raise the vehicle until the tire is
slightly raised off the ground.
Remove all the wheel nuts and the
tire.
When resting the tire on the ground,
place the tire so that the wheel design
faces up to avoid scratching the wheel surface.
4
5
WARNING
■Replacing a tire
Observe the following precautions to reduce the risk of death or serious injury.
●Have the wheel nuts tightened with a torque wrench to 103 N•m (10.5 kgf•m, 76
ft•lbf) as soon as possible after changing wheels.
Failure to follow these precautions could cause the nuts to loosen and the wheel may
fall off, which could lead to an accident causing death or serious injury.
●Do not attach a heavily damaged wheel orname nt, as it may fly off the wheel while the vehicle is moving.
Page 555 of 692
5557-3. Do-it-yourself maintenance
7
Maintenance and care
IS300h_EE(OM53D89E)
■After a fuse is replaced
●If the lights do not turn on even after the fuse has been replaced, a bulb may need
replacement. ( P. 556)
●If the replaced fuse blows again, have the vehicle inspected by any authorized Lexus
retailer or Lexus authorized re pairer, or any reliable repairer.
■If there is an overload in a circuit
The fuses are designed to blow, protecting the wiring harness from damage.
■When replacing light bulbs
Lexus recommends that you use genuine Lexus products designed for this vehicle. Because certain bulbs are connected to circui ts designed to prevent overload, non-gen-
uine parts or parts not designed for this vehicle may be unusable.
WARNING
■To prevent system breakdowns and vehicle fire
Observe the following precautions.
Failure to do so may cause damage to th e vehicle, and possibly a fire or injury.
●Never use a fuse of a higher amperage rating than that indicated, or use any other object in place of a fuse.
●Always use a genuine Lexus fuse or equivalent.
Never replace a fuse with a wi re, even as a temporary fix.
●Do not modify the fuses or fuse boxes.
■Fuse box near the power control unit
Never check or replace the fuses as there are high voltage parts and wiring near the fuse box.
Doing so may cause electric shock, re sulting in death or serious injury.
NOTICE
■Before replacing fuses
Have the cause of electrical overload de termined and repaired by any authorized
Lexus retailer or Lexus authorized repairer, or any reliable repairer as soon as possible.
Page 556 of 692
5567-3. Do-it-yourself maintenance
IS300h_EE(OM53D89E)
Check the wattage of the light bulb to be replaced. (P. 654)
Light bulbs
You may replace the following bulbs by yourself. The difficulty level of replace-
ment varies depending on the bulb. As there is a danger that components may
be damaged, we recommend that repl acement is carried out by any autho-
rized Lexus retailer or Lexus authori zed repairer, or any reliable repairer.
Preparing for light bulb replacement
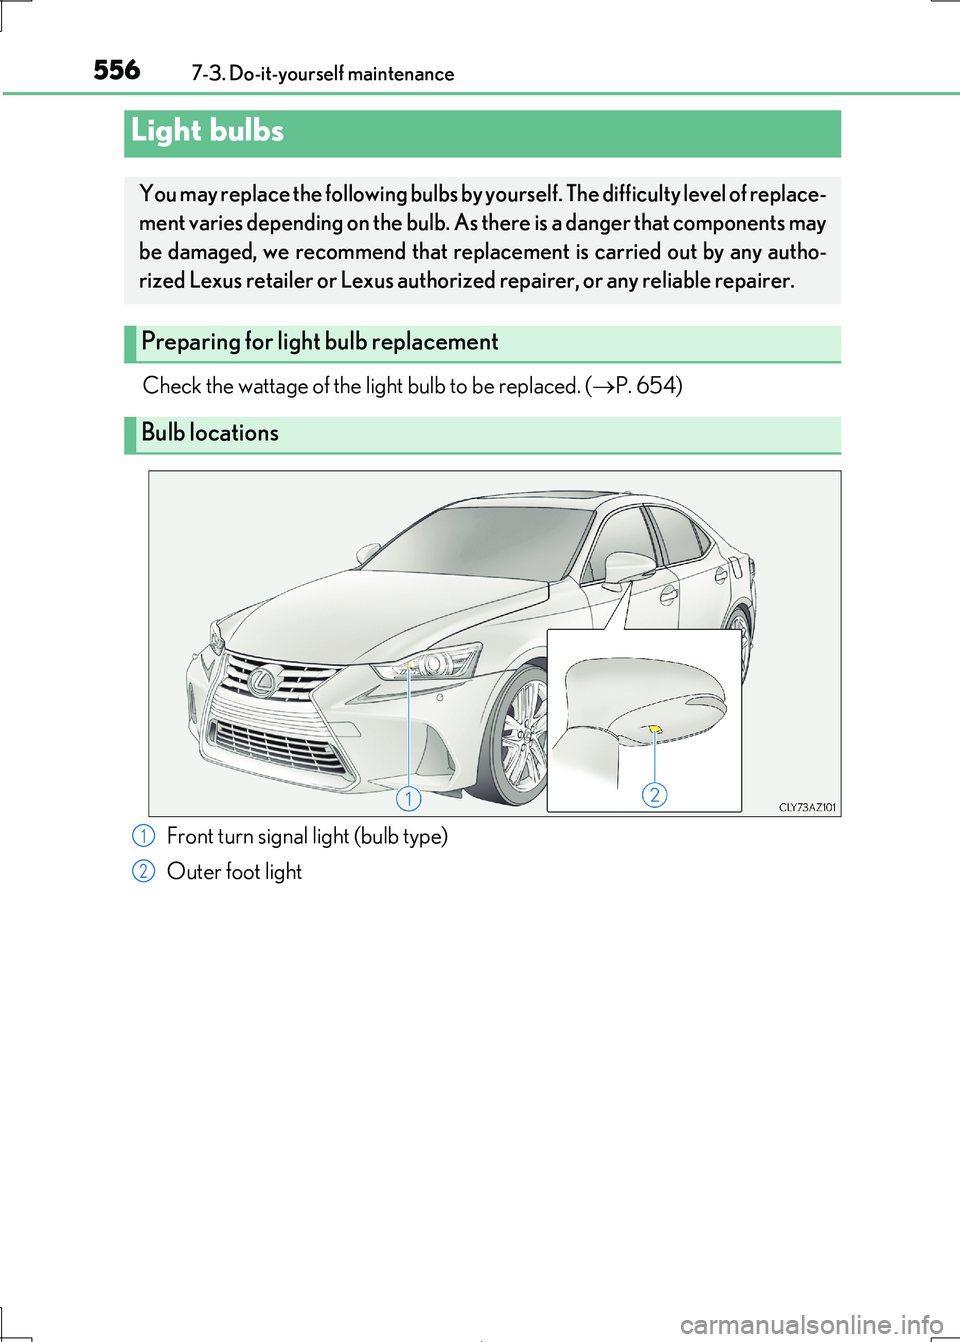
Bulb locations
Front turn signal light (bulb type)
Outer foot light
1
2
Page 557 of 692
5577-3. Do-it-yourself maintenance
7
Maintenance and care
IS300h_EE(OM53D89E)
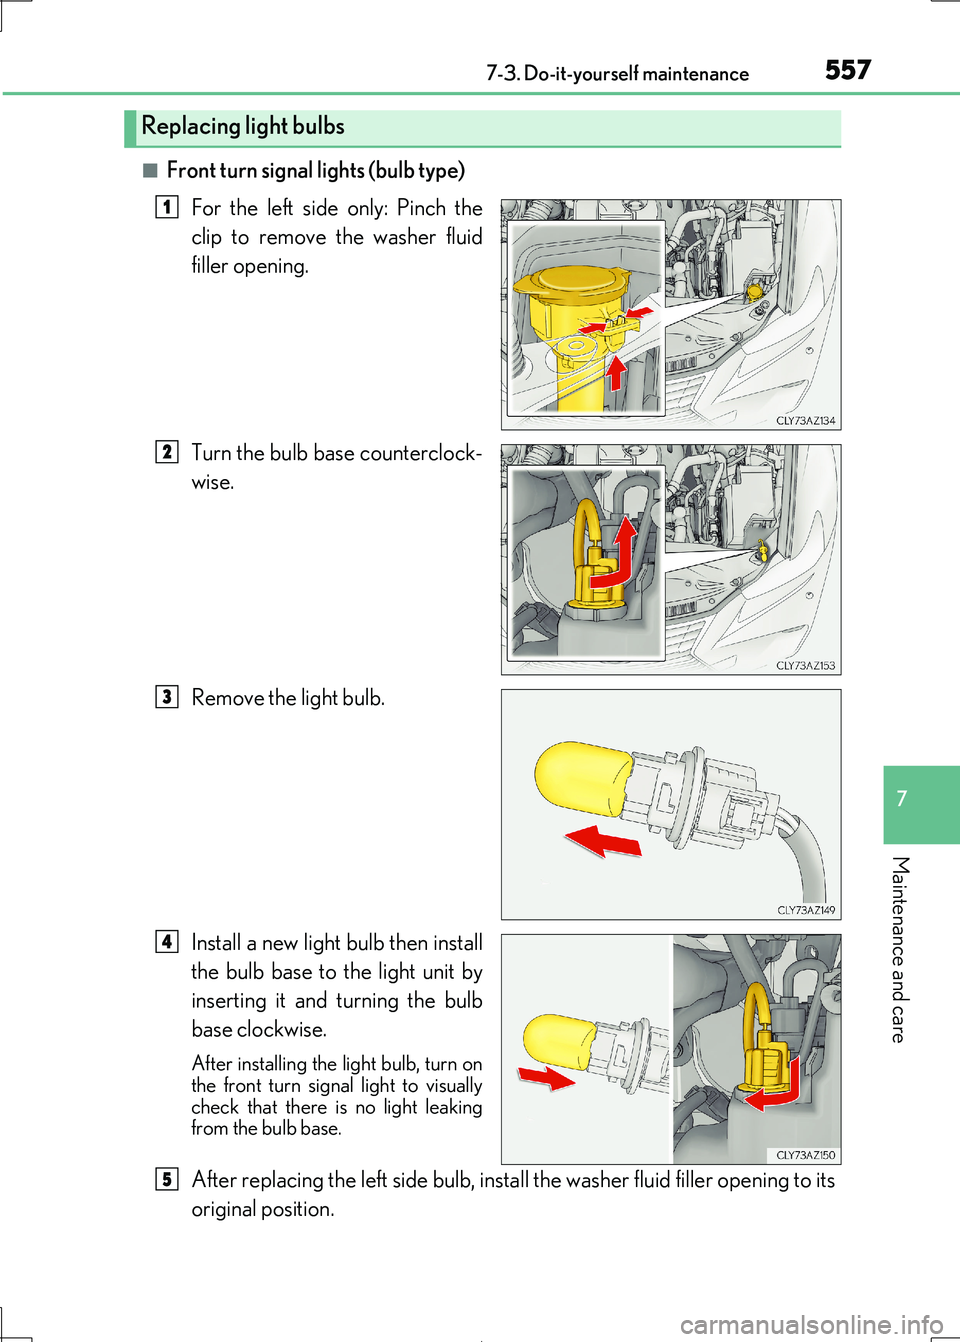
■Front turn signal lights (bulb type)
For the left side only: Pinch the
clip to remove the washer fluid
filler opening.
Turn the bulb base counterclock-
wise.
Remove the light bulb.
Install a new light bulb then install
the bulb base to the light unit by
inserting it and turning the bulb
base clockwise.
After installing the light bulb, turn on the front turn signal light to visually
check that there is no light leaking
from the bulb base.
After replacing the left side bulb, insta ll the washer fluid filler opening to its
original position.
Replacing light bulbs
1
2
3
4
5
Page 558 of 692
5587-3. Do-it-yourself maintenance
IS300h_EE(OM53D89E)
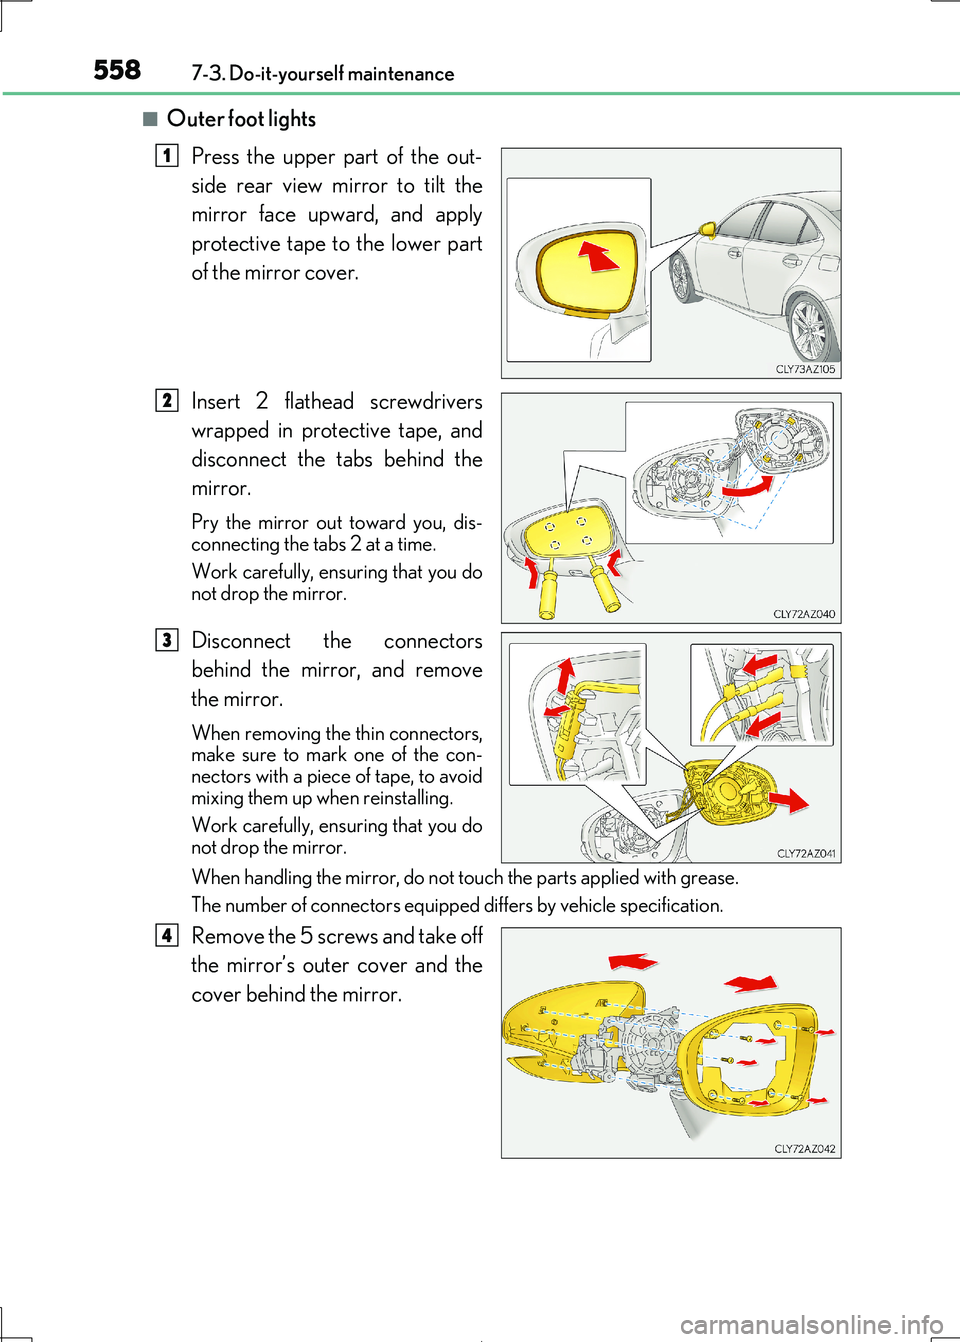
■Outer foot lights
Press the upper part of the out-
side rear view mirror to tilt the
mirror face upward, and apply
protective tape to the lower part
of the mirror cover.
Insert 2 flathead screwdrivers
wrapped in protective tape, and
disconnect the tabs behind the
mirror.
Pry the mirror out toward you, dis-
connecting the tabs 2 at a time.
Work carefully, ensuring that you do not drop the mirror.
Disconnect the connectors
behind the mirror, and remove
the mirror.
When removing the thin connectors,
make sure to mark one of the con-
nectors with a piece of tape, to avoid mixing them up when reinstalling.
Work carefully, ensuring that you do
not drop the mirror.
When handling the mirror, do not touch the parts applied with grease.
The number of connectors equipped differs by vehicle specification.
Remove the 5 screws and take off
the mirror’s outer cover and the
cover behind the mirror.
1
2
3
4
Page 559 of 692
5597-3. Do-it-yourself maintenance
7
Maintenance and care
IS300h_EE(OM53D89E)
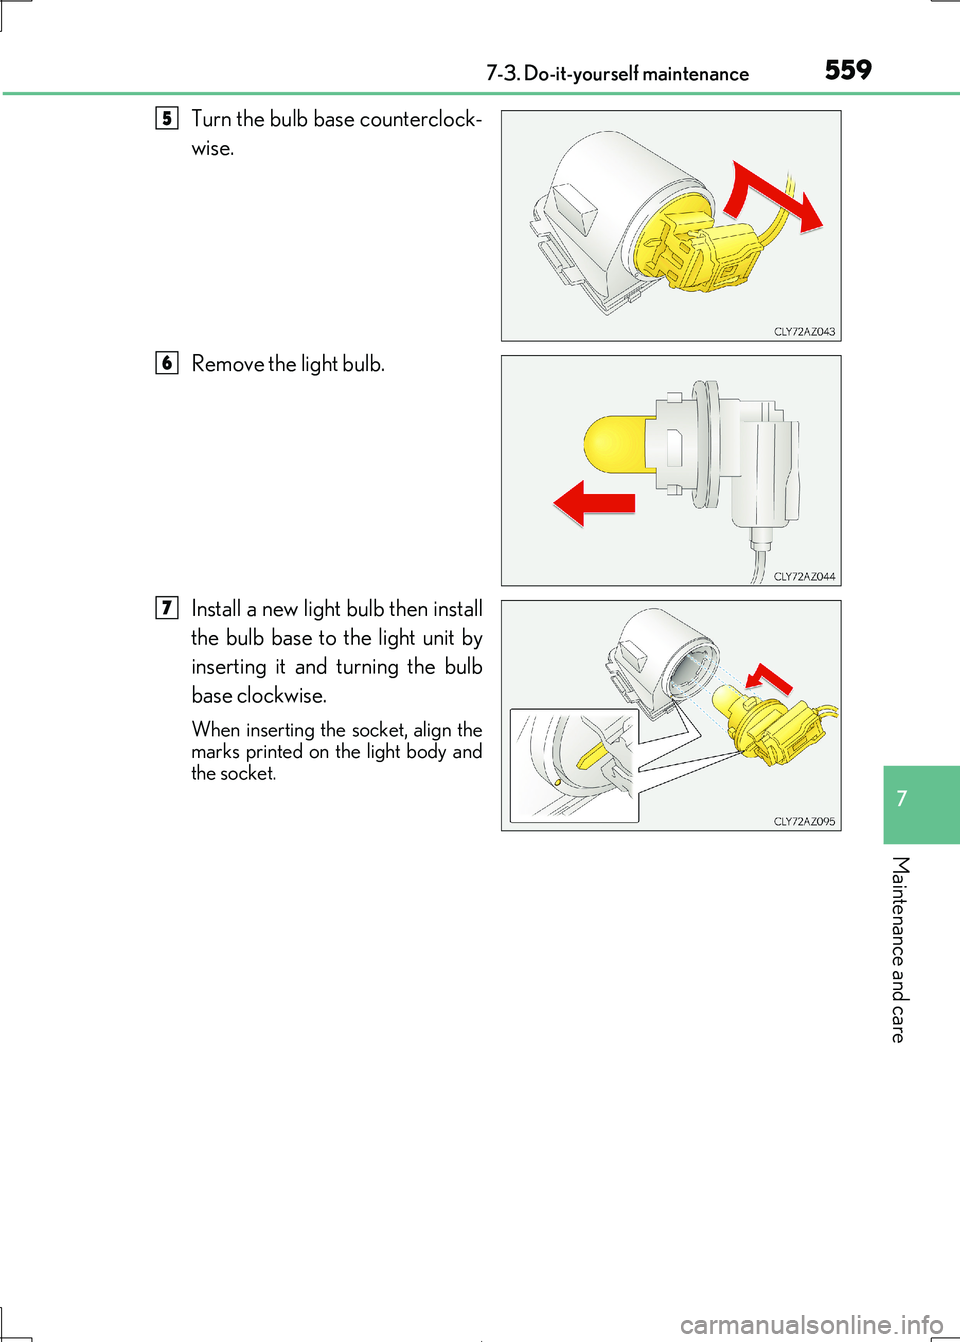
Turn the bulb base counterclock-
wise.
Remove the light bulb.
Install a new light bulb then install
the bulb base to the light unit by
inserting it and turning the bulb
base clockwise.
When inserting the socket, align the
marks printed on the light body and
the socket.
5
6
7
Page 560 of 692
5607-3. Do-it-yourself maintenance
IS300h_EE(OM53D89E)
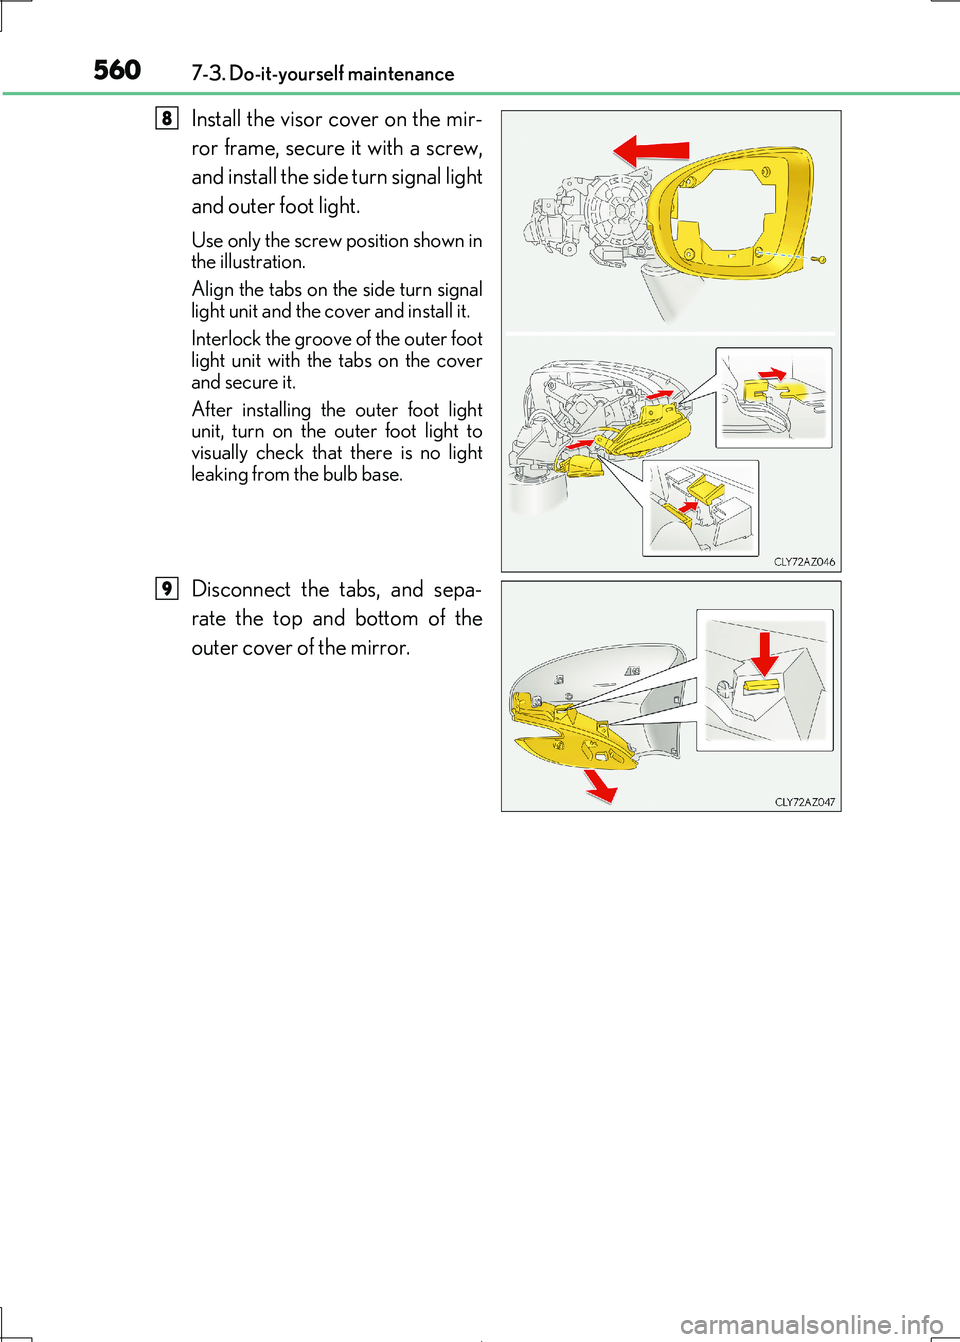
Install the visor cover on the mir-
ror frame, secure it with a screw,
and install the side turn signal light
and outer foot light.
Use only the screw position shown in
the illustration.
Align the tabs on the side turn signal
light unit and the co ver and install it.
Interlock the groove of the outer foot light unit with the tabs on the cover
and secure it.
After installing the outer foot light unit, turn on the outer foot light to
visually check that there is no light
leaking from the bulb base.
Disconnect the tabs, and sepa-
rate the top and bottom of the
outer cover of the mirror.
8
9