Open lexus LC500C 2021 / LEXUS 2021 LC500 CONVERTIBLE (OM11498U) Manual PDF
[x] Cancel search | Manufacturer: LEXUS, Model Year: 2021, Model line: LC500C, Model: Lexus LC500C 2021Pages: 410, PDF Size: 8.71 MB
Page 234 of 410
2325-3. Using the air conditioning system
5-3.Using the air conditioning system
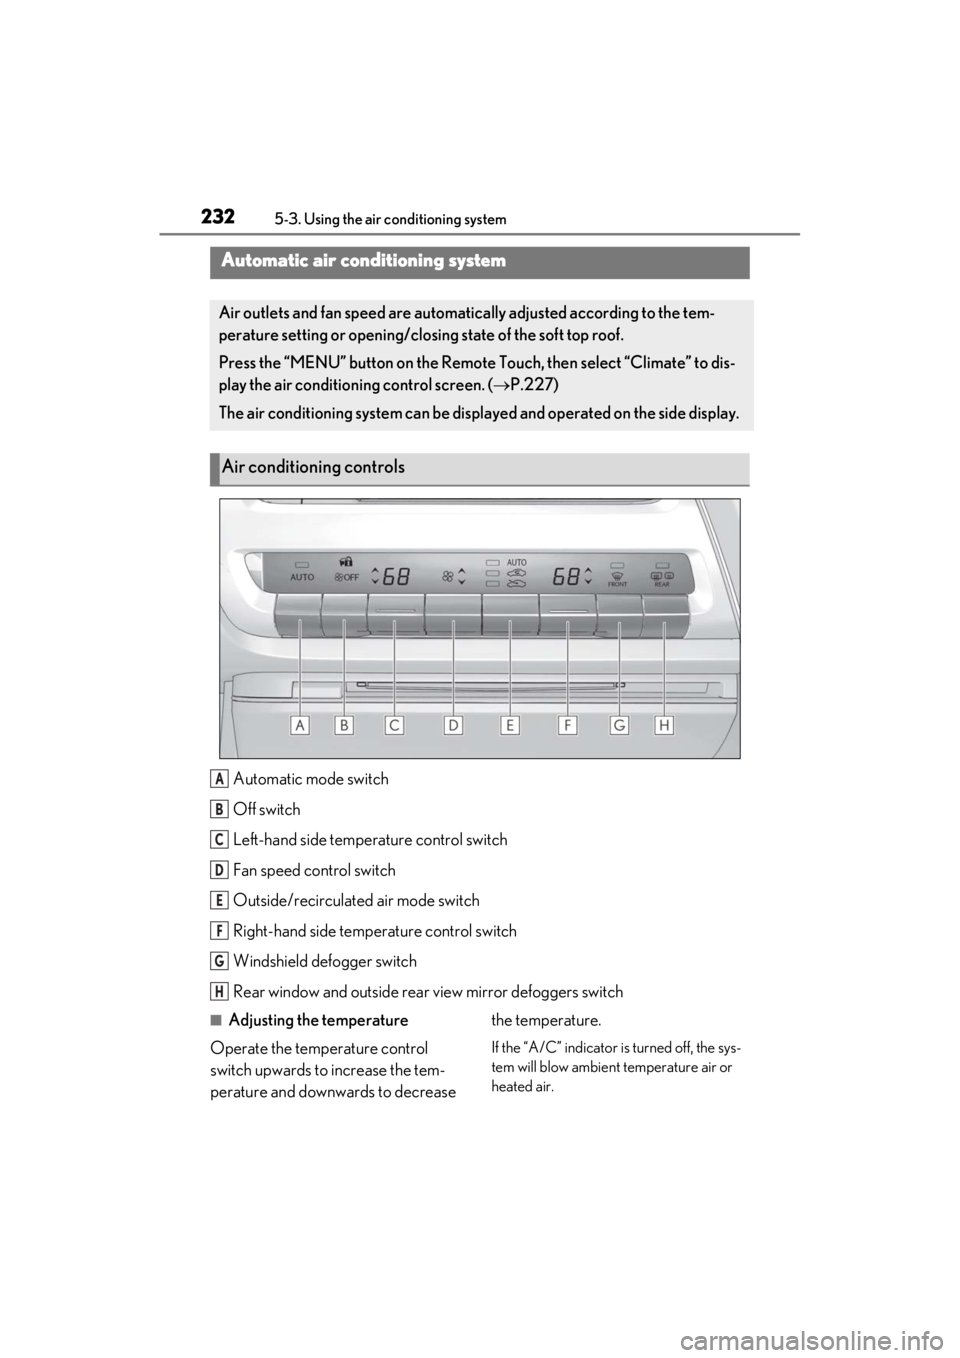
Automatic mode switch
Off switch
Left-hand side temperature control switch
Fan speed control switch
Outside/recirculated air mode switch
Right-hand side temp erature control switch
Windshield defogger switch
Rear window and outside rear view mirror defoggers switch
■Adjusting the temperature
Operate the temperature control
switch upwards to increase the tem-
perature and downwards to decrease the temperature.
If the “A/C” indicator is turned off, the sys-
tem will blow ambient temperature air or
heated air.
Automatic air conditioning system
Air outlets and fan speed are automati
cally adjusted according to the tem-
perature setting or opening/closing state of the soft top roof.
Press the “MENU” button on the Remote Touch, then select “Climate” to dis-
play the air conditioning control screen. ( P.227)
The air conditioning system can be displa yed and operated on the side display.
Air conditioning controls
A
B
C
D
E
F
G
H
Page 240 of 410
2385-3. Using the air conditioning system
3Adjust the temperature setting.
4
To stop the operation, press the off
switch or select “Off” on the sub
function menu. ( P.235)
If the fan speed setting or air flow
modes are operated , the automatic
mode indicator goes off. However,
automatic mode for functions other
than that operated is maintained.
■Using automatic mode
●Fan speed is adjusted automatically
according to the temperature setting and
the ambient conditions.
Therefore, the fan may stop for a while until
warm or cool air is ready to flow immedi-
ately after the automatic mode switch is
pressed or “AUTO” is selected.
●Cool air may blow around the upper
body even when the heater is on due to
sunlight.
●When the soft top roof is opened, the fan
speed and air outlets may be automati-
cally changed according to the sunlight
or vehicle speed.
■Windshield fog detection function
When automatic mode is set, the humidity
sensor detects fog on the windshield and
controls the air conditioning system to pre-
vent fog.
■Automatic mode for air intake control
In automatic mode, the system detects
exhaust gas and other pollutants and auto-
matically switches between outside air and
recirculated air modes.
When the dehumidification function is off,
and the fan is operating, turning automatic
mode on will activate the dehumidification
function.
To turn on the “DUAL” mode, perform
any of the following procedures:
Select “DUAL” on the sub function
menu. ( P.235)
Select “DUAL” on the option con-
trol screen.
Adjust the passenger’s side tem-
perature setting.
The indicator on the main control screen
comes on when the “DUAL” mode is on.
■Location of air outlets
The air outlets and air volume changes
NOTICE
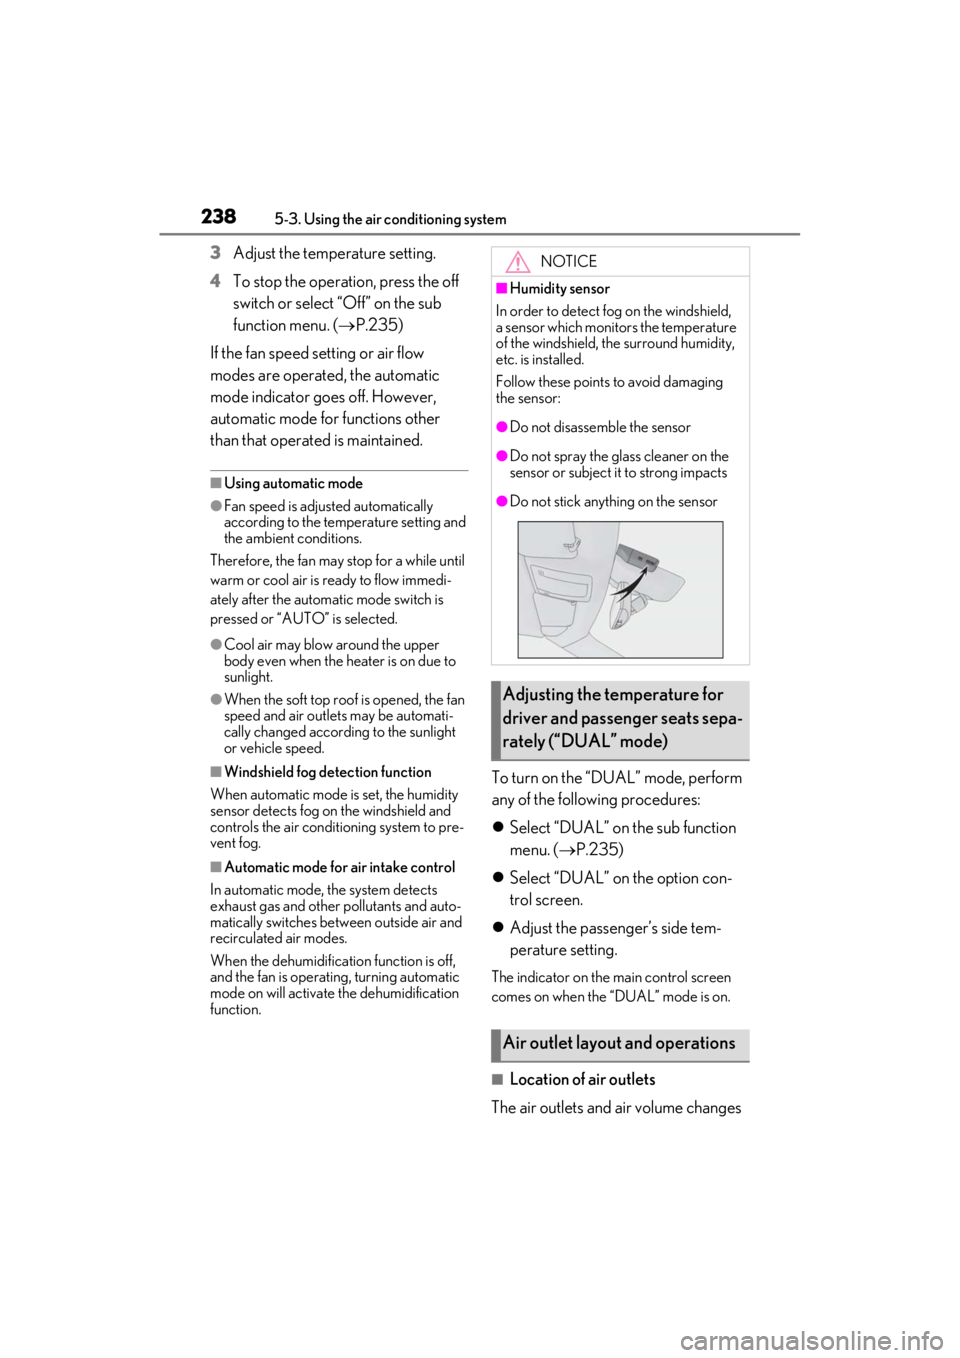
■Humidity sensor
In order to detect fog on the windshield,
a sensor which monitors the temperature
of the windshield, the surround humidity,
etc. is installed.
Follow these points to avoid damaging
the sensor:
●Do not disassemble the sensor
●Do not spray the glass cleaner on the
sensor or subject it to strong impacts
●Do not stick anything on the sensor
Adjusting the temperature for
driver and passenger seats sepa-
rately (“DUAL” mode)
Air outlet layout and operations
Page 241 of 410
2395-3. Using the air conditioning system
5
Interior features
according to the selected air flow
mode.
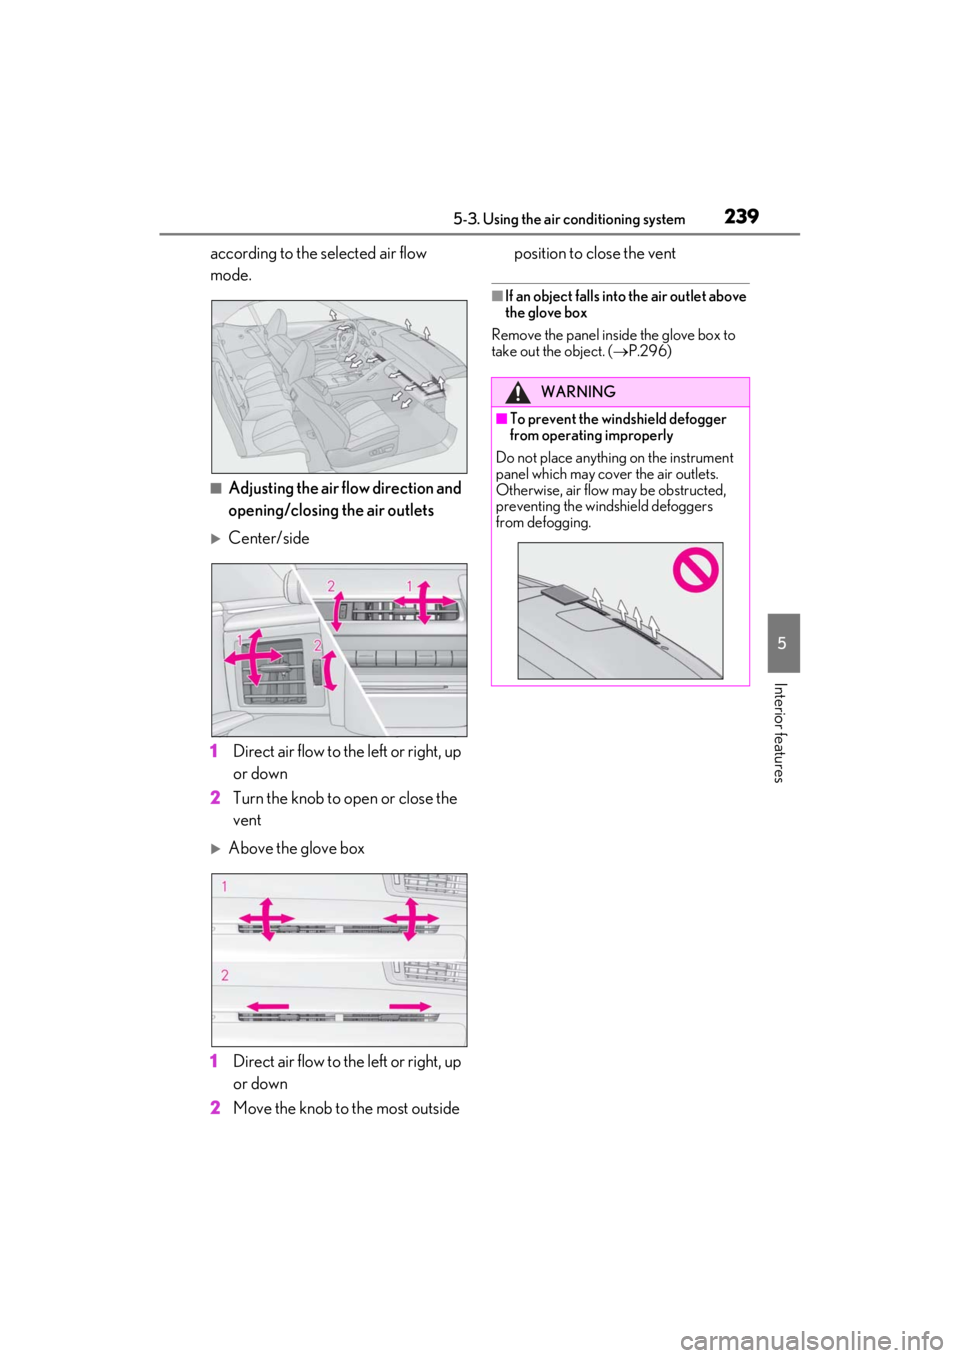
■Adjusting the air flow direction and
opening/closing the air outlets
Center/side
1
Direct air flow to the left or right, up
or down
2
Turn the knob to open or close the
vent
Above the glove box
1
Direct air flow to the left or right, up
or down
2
Move the knob to the most outside position to close the vent
■If an object falls into the air outlet above
the glove box
Remove the panel inside the glove box to
take out the object. ( P.296)
WARNING
■To prevent the windshield defogger
from operating improperly
Do not place anything on the instrument
panel which may cover the air outlets.
Otherwise, air flow may be obstructed,
preventing the windshield defoggers
from defogging.
Page 246 of 410
2445-4. Using the interior lights
5-4.Using the interior lights
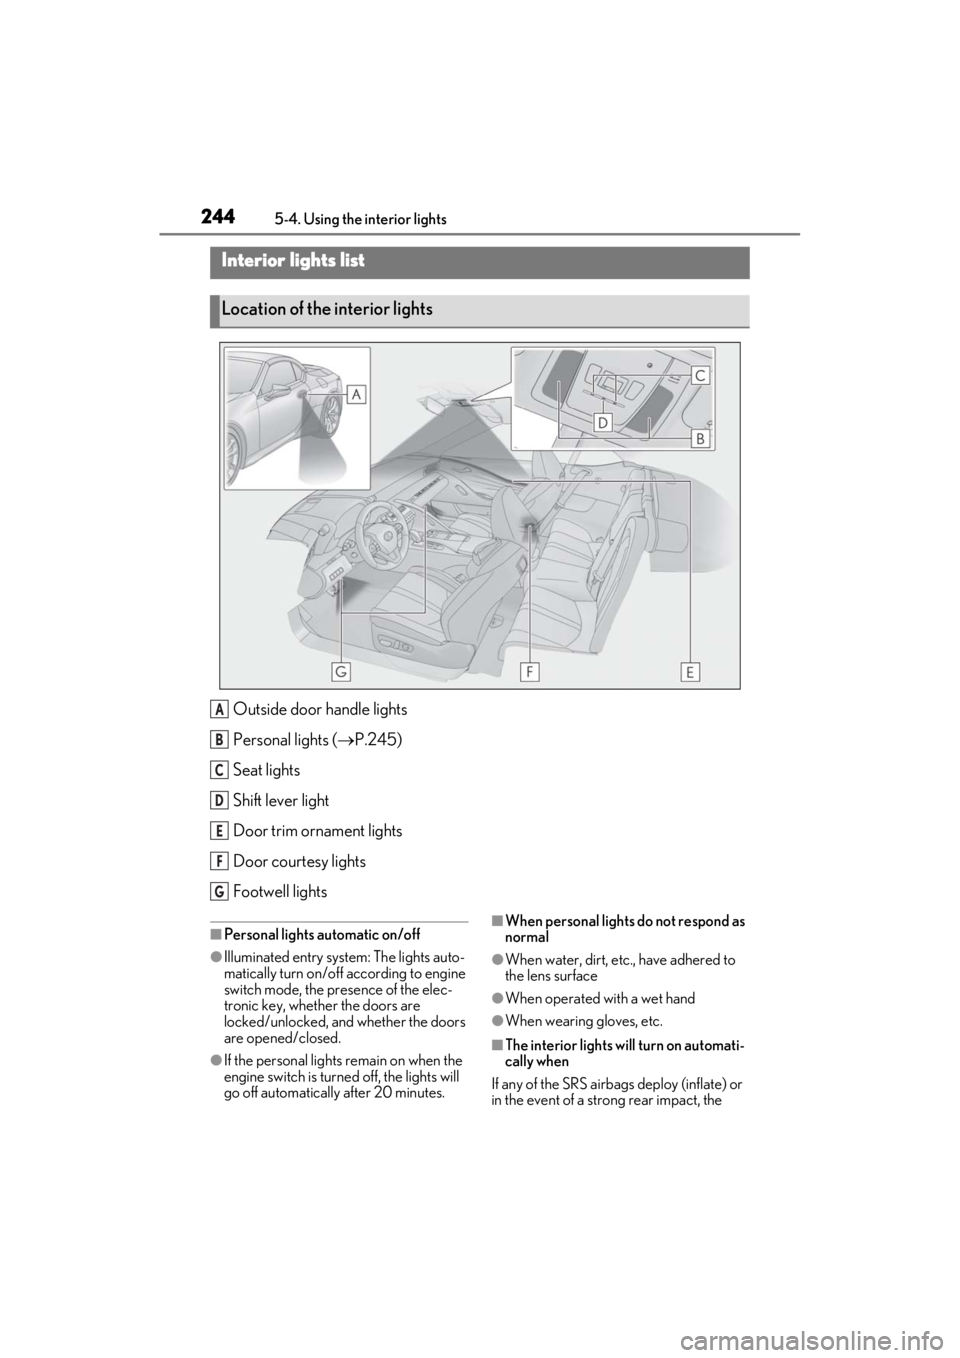
Outside door handle lights
Personal lights ( P.245)
Seat lights
Shift lever light
Door trim ornament lights
Door courtesy lights
Footwell lights
■Personal lights automatic on/off
●Illuminated entry system: The lights auto-
matically turn on/off according to engine
switch mode, the presence of the elec-
tronic key, whether the doors are
locked/unlocked, and whether the doors
are opened/closed.
●If the personal lights remain on when the
engine switch is turned off, the lights will
go off automatically after 20 minutes.
■When personal lights do not respond as
normal
●When water, dirt, etc., have adhered to
the lens surface
●When operated with a wet hand
●When wearing gloves, etc.
■The interior lights will turn on automati-
cally when
If any of the SRS airbag s deploy (inflate) or
in the event of a strong rear impact, the
Interior lights list
Location of the interior lights
A
B
C
D
E
F
G
Page 247 of 410
2455-4. Using the interior lights
5
Interior features
interior lights will turn on automatically. The
interior lights will turn off automatically after
approximately 20 minutes. The interior
lights can be turned off manually. However,
in order to help prevent further collisions, it
is recommended that they be left on until
safety can be ensured. (The interior lights
may not turn on automatically depending
on the force of the impact and conditions of
the collision.)
■Customization
Setting (e.g. the time elapsed before lights
turn off) can be changed.
(Customizable features: P.367)
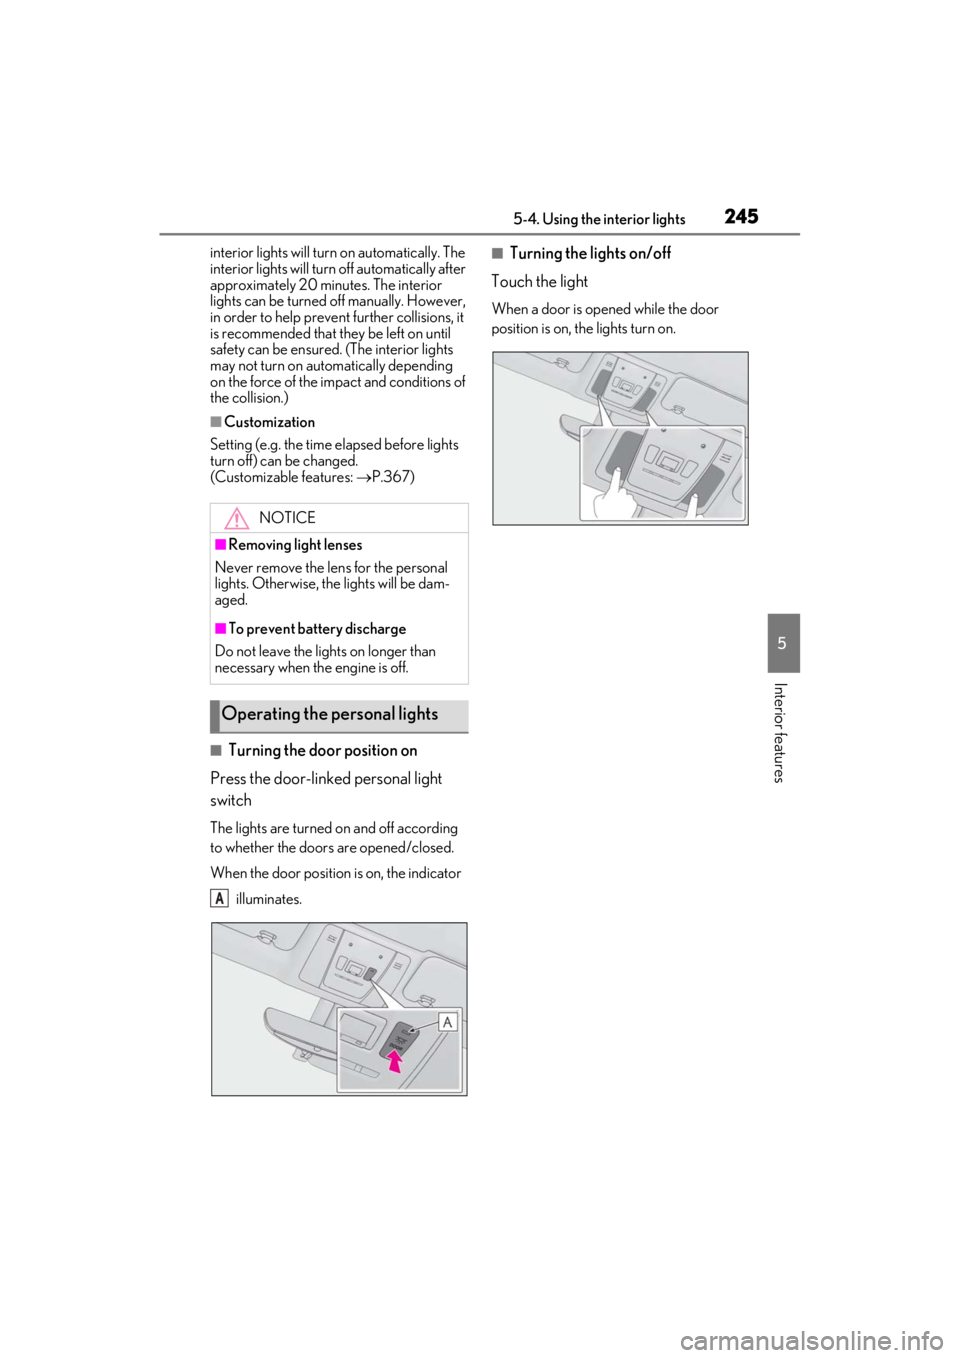
■Turning the door position on
Press the door-linked personal light
switch
The lights are turned on and off according
to whether the doors are opened/closed.
When the door position is on, the indicator
illuminates.
■Turning the lights on/off
Touch the light
When a door is opened while the door
position is on, the lights turn on.
NOTICE
■Removing light lenses
Never remove the lens for the personal
lights. Otherwise, th e lights will be dam-
aged.
■To prevent battery discharge
Do not leave the lights on longer than
necessary when the engine is off.
Operating the personal lights
A
Page 248 of 410
2465-5. Using the storage features
5-5.Using the storage features
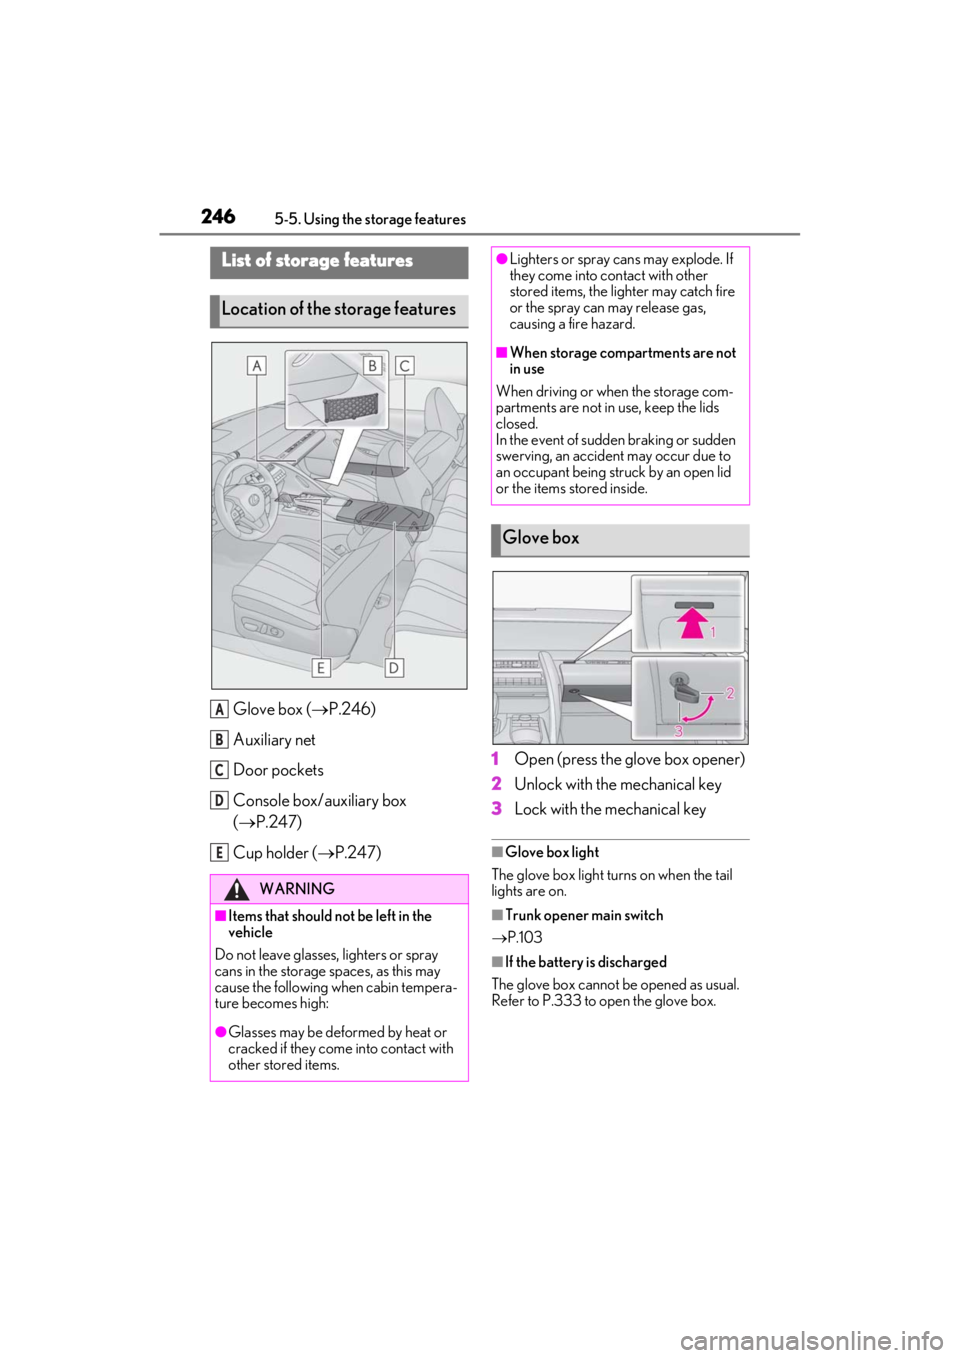
Glove box (P.246)
Auxiliary net
Door pockets
Console box/auxiliary box
( P.247)
Cup holder ( P.247) 1
Open (press the glove box opener)
2
Unlock with the mechanical key
3
Lock with the mechanical key
■Glove box light
The glove box light turns on when the tail
lights are on.
■Trunk opener main switch
P.103
■If the battery is discharged
The glove box cannot be opened as usual.
Refer to P.333 to open the glove box.
List of storage features
Location of the storage features
WARNING
■Items that should not be left in the
vehicle
Do not leave glasses, lighters or spray
cans in the storage spaces, as this may
cause the following when cabin tempera-
ture becomes high:
●Glasses may be deformed by heat or
cracked if they come into contact with
other stored items.
A
B
C
D
E
●Lighters or spray ca ns may explode. If
they come into contact with other
stored items, the lighter may catch fire
or the spray can may release gas,
causing a fire hazard.
■When storage compartments are not
in use
When driving or when the storage com-
partments are not in use, keep the lids
closed.
In the event of sudden braking or sudden
swerving, an accident may occur due to
an occupant being struck by an open lid
or the items stored inside.
Glove box
Page 249 of 410
2475-5. Using the storage features
5
Interior features
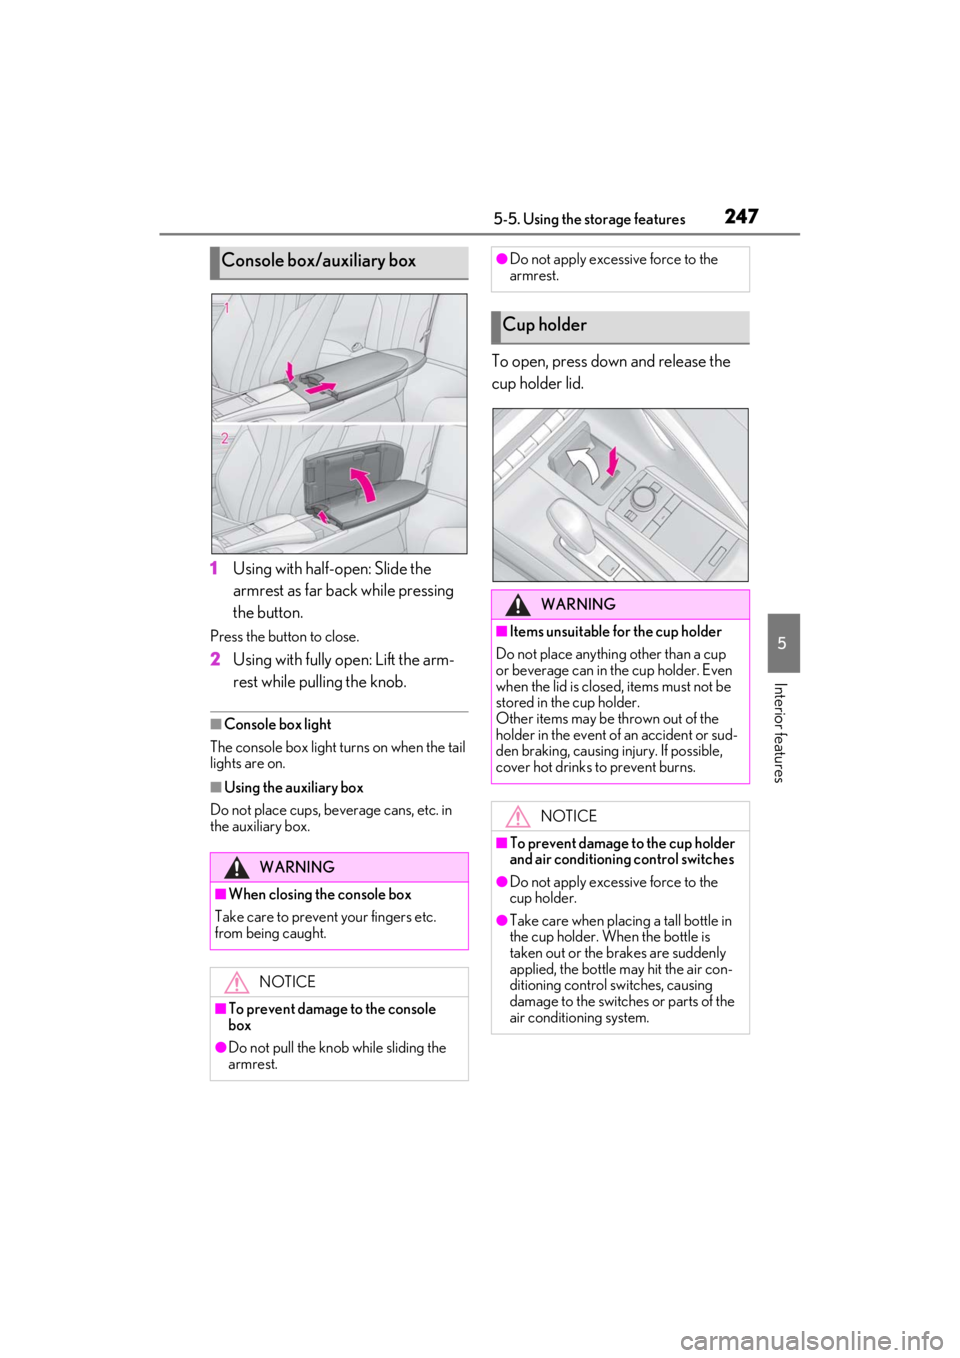
1Using with half-open: Slide the
armrest as far back while pressing
the button.
Press the button to close.
2Using with fully open: Lift the arm-
rest while pulling the knob.
■Console box light
The console box light turns on when the tail
lights are on.
■Using the auxiliary box
Do not place cups, beverage cans, etc. in
the auxiliary box.
To open, press down and release the
cup holder lid.
Console box/auxiliary box
WARNING
■When closing the console box
Take care to prevent your fingers etc.
from being caught.
NOTICE
■To prevent damage to the console
box
●Do not pull the knob while sliding the
armrest.
●Do not apply excessive force to the
armrest.
Cup holder
WARNING
■Items unsuitable for the cup holder
Do not place anything other than a cup
or beverage can in the cup holder. Even
when the lid is closed, items must not be
stored in the cup holder.
Other items may be thrown out of the
holder in the event of an accident or sud-
den braking, causing injury. If possible,
cover hot drinks to prevent burns.
NOTICE
■To prevent damage to the cup holder
and air conditioning control switches
●Do not apply excessive force to the
cup holder.
●Take care when placing a tall bottle in
the cup holder. When the bottle is
taken out or the brakes are suddenly
applied, the bottle may hit the air con-
ditioning control switches, causing
damage to the switches or parts of the
air conditioning system.
Page 251 of 410
2495-6. Using the other interior features
5
Interior features
5-6.Using the other interior features
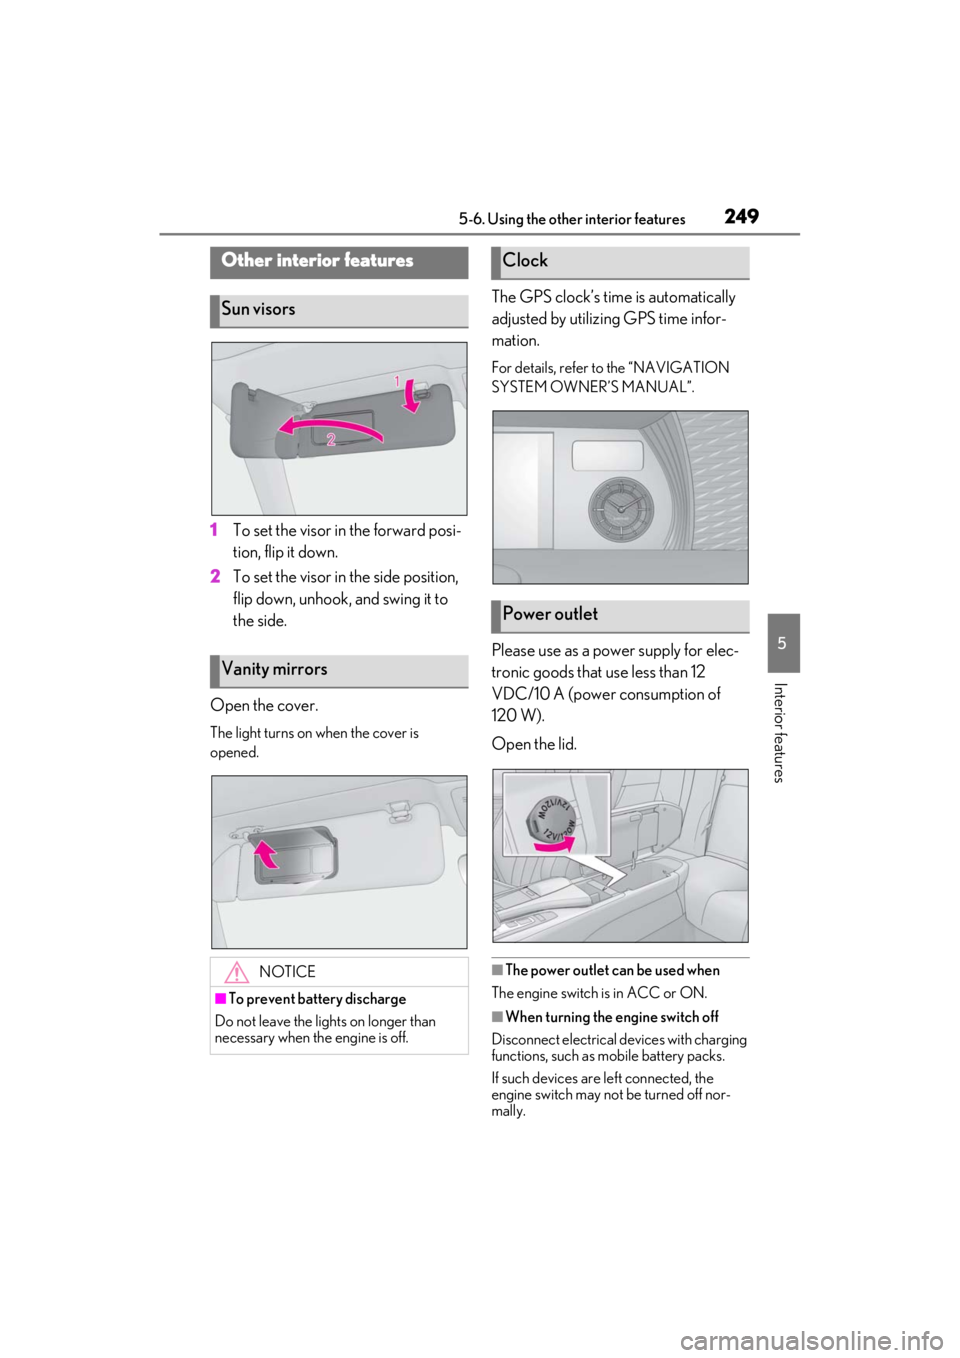
1To set the visor in the forward posi-
tion, flip it down.
2
To set the visor in the side position,
flip down, unhook, and swing it to
the side.
Open the cover.
The light turns on when the cover is
opened.
The GPS clock’s time is automatically
adjusted by utilizing GPS time infor-
mation.
For details, refer to the “NAVIGATION
SYSTEM OWNER’S MANUAL”.
Please use as a power supply for elec-
tronic goods that use less than 12
VDC/10 A (power consumption of
120 W).
Open the lid.
■The power outlet can be used when
The engine switch is in ACC or ON.
■When turning the engine switch off
Disconnect electrical devices with charging
functions, such as mobile battery packs.
If such devices are left connected, the
engine switch may not be turned off nor-
mally.
Other interior features
Sun visors
Vanity mirrors
NOTICE
■To prevent battery discharge
Do not leave the lights on longer than
necessary when the engine is off.
Clock
Power outlet
Page 252 of 410
2505-6. Using the other interior features
■Using the power outlet
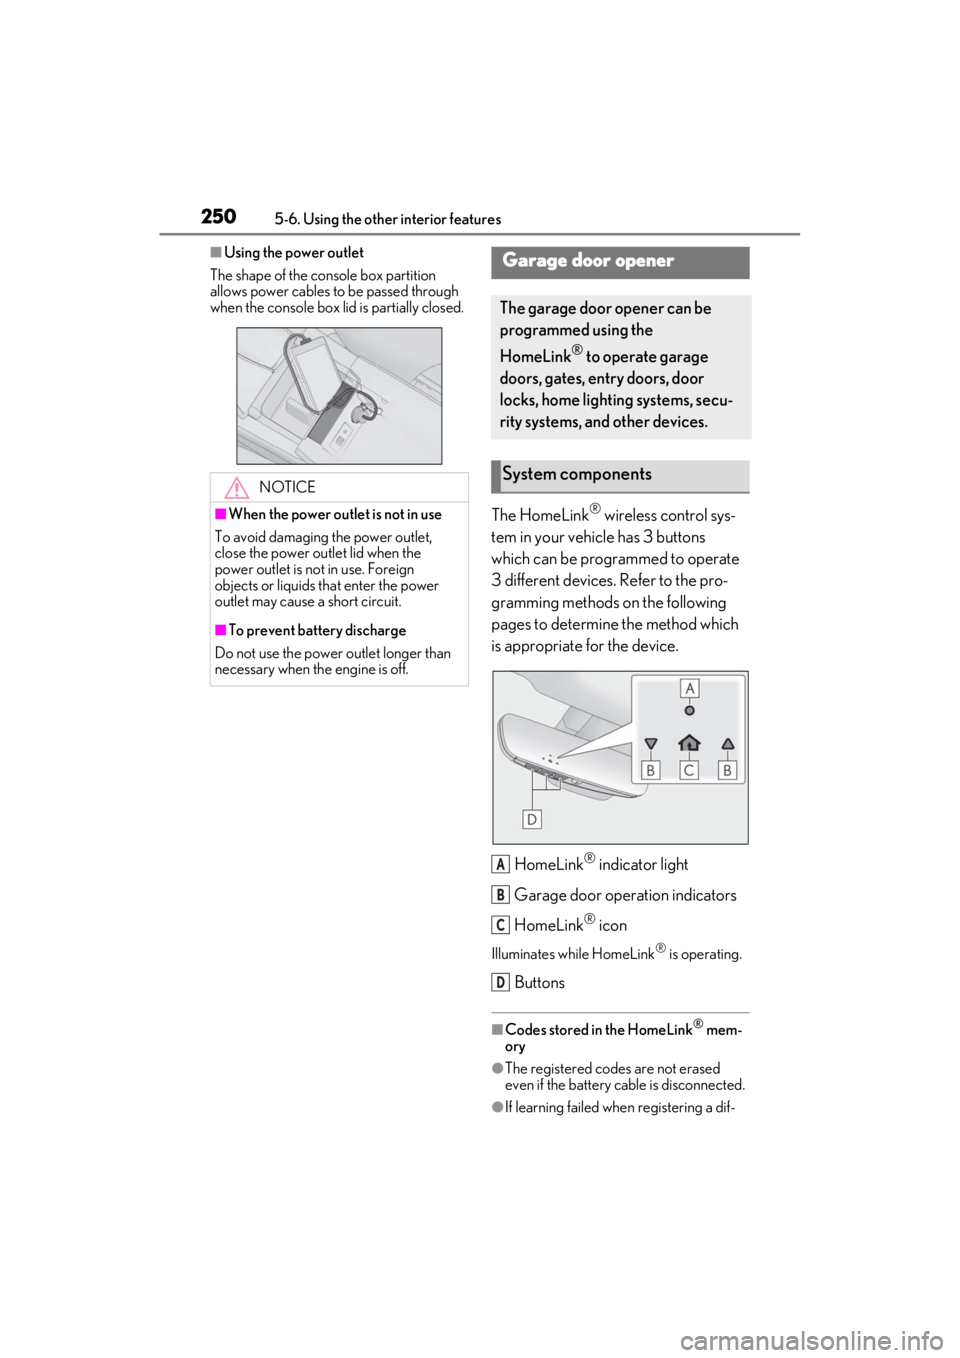
The shape of the console box partition
allows power cables to be passed through
when the console box lid is partially closed.
The HomeLink® wireless control sys-
tem in your vehicle has 3 buttons
which can be programmed to operate
3 different devices. Refer to the pro-
gramming methods on the following
pages to determine the method which
is appropriate for the device.
HomeLink
® indicator light
Garage door operation indicators
HomeLink
® icon
Illuminates while HomeLink® is operating.
Buttons
■Codes stored in the HomeLink® mem-
ory
●The registered codes are not erased
even if the battery cable is disconnected.
●If learning failed when registering a dif-
NOTICE
■When the power outlet is not in use
To avoid damaging the power outlet,
close the power outlet lid when the
power outlet is not in use. Foreign
objects or liquids that enter the power
outlet may cause a short circuit.
■To prevent battery discharge
Do not use the power outlet longer than
necessary when the engine is off.
Garage door opener
The garage door opener can be
programmed using the
HomeLink
® to operate garage
doors, gates, entry doors, door
locks, home lighting systems, secu-
rity systems, and other devices.
System components
A
B
C
D
Page 253 of 410
2515-6. Using the other interior features
5
Interior features
ferent code to a HomeLink® button that
already has a code registered to it, the already registered code will not be
erased.
■Certification for the garage door opener
For vehicles sold in the U.S.A., Hawaii, Guam and Puerto Rico
For vehicles sold in Canada
■When support is necessary
Visit on the web at
www.homelink.com/lexus
or call 1-800-355-3515.
WARNING
■When programming a garage door
or other remote control device
The garage door or other device may
operate, so ensure people and objects
are out of danger to prevent potential
harm.
■Conforming to federal safety stan-
dards
Do not use the HomeLink
® compatible
transceiver with any garage door opener
or device that lacks safety stop and
reverse features as required by federal
safety standards.
This includes any garage door that can-
not detect an interf ering object. A door
or device without these features
increases the risk of death or serious
injury.