park assist lexus LC500C 2021 Owner's Manual / LEXUS 2021 LC500 CONVERTIBLE OWNER'S MANUAL (OM11498U)
[x] Cancel search | Manufacturer: LEXUS, Model Year: 2021, Model line: LC500C, Model: Lexus LC500C 2021Pages: 410, PDF Size: 8.71 MB
Page 3 of 410

3TABLE OF CONTENTS
1
2
3
4
5
6
7
8
9
4-2. Driving proceduresEngine (ignition) switch .............. 146
Automatic transmission.............. 150
Turn signal lever............................. 156
Parking brake ................................. 157
Brake Hold....................................... 159
4-3. Operating the lights and wipers Headlight switch ............................. 161
Automatic High Beam ................ 164
Windshield wipers and washer 167
4-4. Refueling Opening the fuel tank cap.......... 171
4-5. Using the driving support systems Lexus Safety System + ................ 173
PCS (Pre-Collision System)..... 179
LKA (Lane-Keeping Assist) ..... 186
Dynamic radar crui se control with
full-speed range.......................... 194
Driving mode select switch...... 203
Intuitive parking assist ................ 204
BSM (Blind Spot Monitor) ....... 209
Driving assist systems .................. 218
4-6. Driving tips Winter driving tips ....................... 223
5-1. Remote Touch Remote Touch ............................... 226
5-2. Lexus Climate Concierge Lexus Climate Concierge ........ 230
5-3. Using the air conditioning system Automatic air conditioning system........................................................... 232Heated steering wheel/seat heat-
ers/seat ventilators/neck heaters.......................................................... 240
5-4. Using the interior lights Interior lights list ............................ 244
5-5. Using the storage features List of storage features .............. 246
Trunk features ............................... 248
5-6. Using the other interior features Other interior features .............. 249
Garage door opener ................. 250
6-1. Maintenance and care Cleaning and protecting the vehi-cle exterior................................... 258
Cleaning and protecting the vehi- cle interior ..................................... 262
6-2. Maintenance Maintenance re quirements .....265
General maintenance................ 266
Emission inspection and mainte- nance (I/M) programs ............ 269
6-3. Do-it-yourself maintenance Do-it-yourself service precautions.......................................................... 270
Hood .................................................. 272
Positioning a floor jack ............... 272
Engine compartment .................. 274
Battery .............................................. 279
Tires .................................................... 281
Replacing the tire......................... 289
Tire inflation pres
sure.................293
Wheels ............................................. 295
Air conditioning filter ................. 296
5Interior features
6Maintenance and care
Page 74 of 410
722-1. Instrument cluster
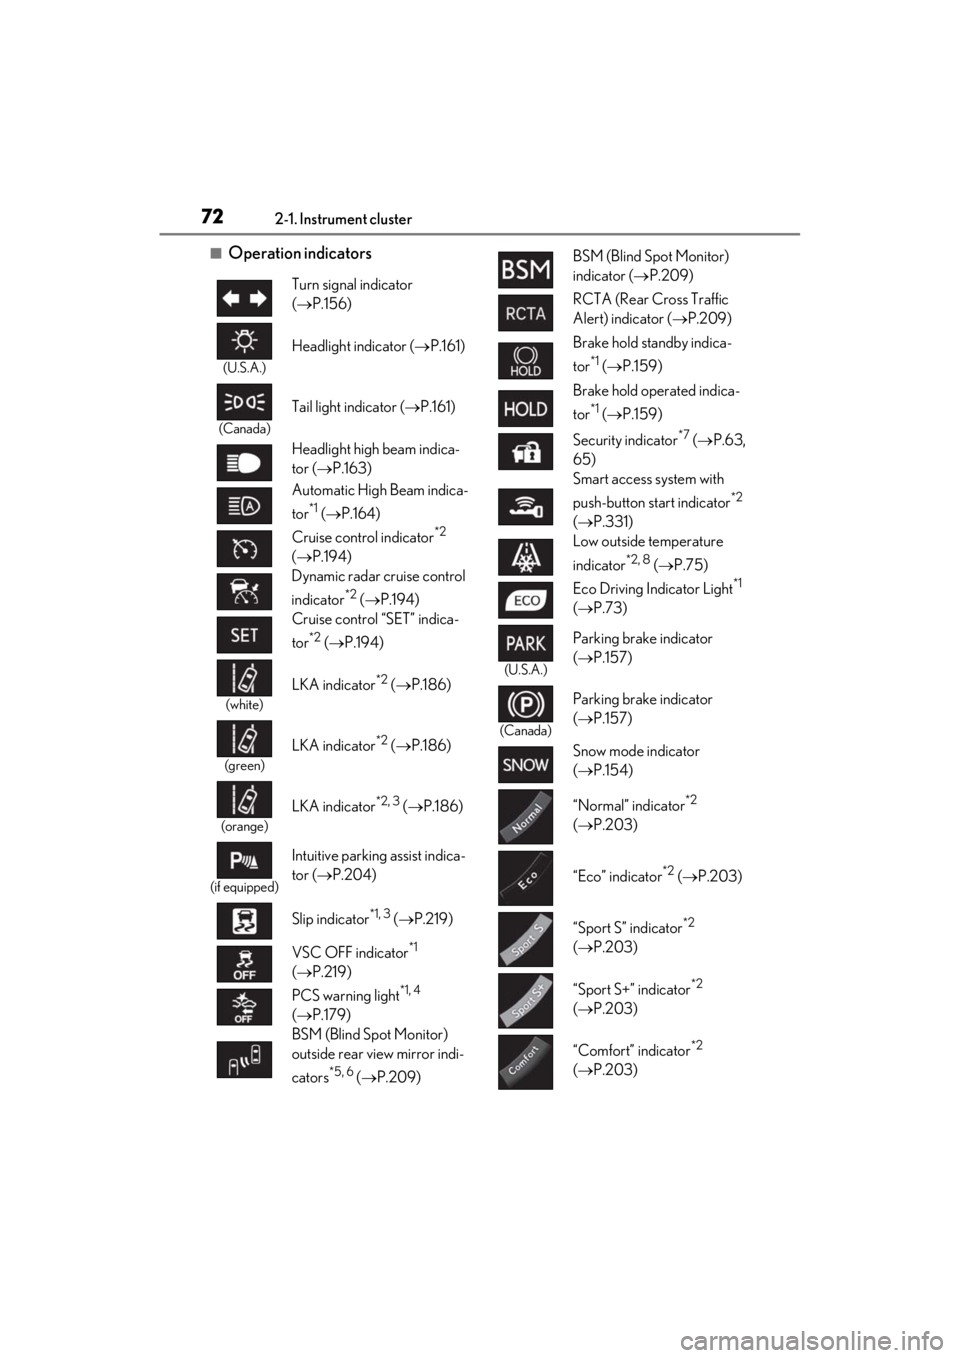
■Operation indicators
Turn signal indicator
( P.156)
(U.S.A.)
Headlight indicator ( P.161)
(Canada)
Tail light indicator ( P.161)
Headlight high beam indica-
tor ( P.163)
Automatic High Beam indica-
tor
*1 ( P.164)
Cruise control indicator
*2
( P.194)
Dynamic radar cruise control
indicator
*2 ( P.194)
Cruise control “SET” indica-
tor
*2 ( P.194)
(white)
LKA indicator*2 ( P.186)
(green)
LKA indicator*2 ( P.186)
(orange)
LKA indicator*2, 3 ( P.186)
(if equipped)
Intuitive parking assist indica-
tor ( P.204)
Slip indicator
*1, 3 ( P.219)
VSC OFF indicator
*1
( P.219)
PCS warning light
*1, 4
( P.179)
BSM (Blind Spot Monitor)
outside rear view mirror indi-
cators
*5, 6 ( P.209)
BSM (Blind Spot Monitor)
indicator ( P.209)
RCTA (Rear Cross Traffic
Alert) indicator ( P.209)
Brake hold standby indica-
tor
*1 ( P.159)
Brake hold operated indica-
tor
*1 ( P.159)
Security indicator
*7 ( P.63,
65)
Smart access system with
push-button start indicator
*2
( P.331)
Low outside temperature
indicator
*2, 8 ( P.75)
Eco Driving Indicator Light
*1
( P.73)
(U.S.A.)
Parking brake indicator
( P.157)
(Canada)
Parking brake indicator
( P.157)
Snow mode indicator
( P.154)
“Normal” indicator
*2
( P.203)
“Eco” indicator
*2 ( P.203)
“Sport S” indicator
*2
( P.203)
“Sport S+” indicator
*2
( P.203)
“Comfort” indicator
*2
( P.203)
Page 87 of 410
852-1. Instrument cluster
2
Vehicle status information and indicators
*:If equipped
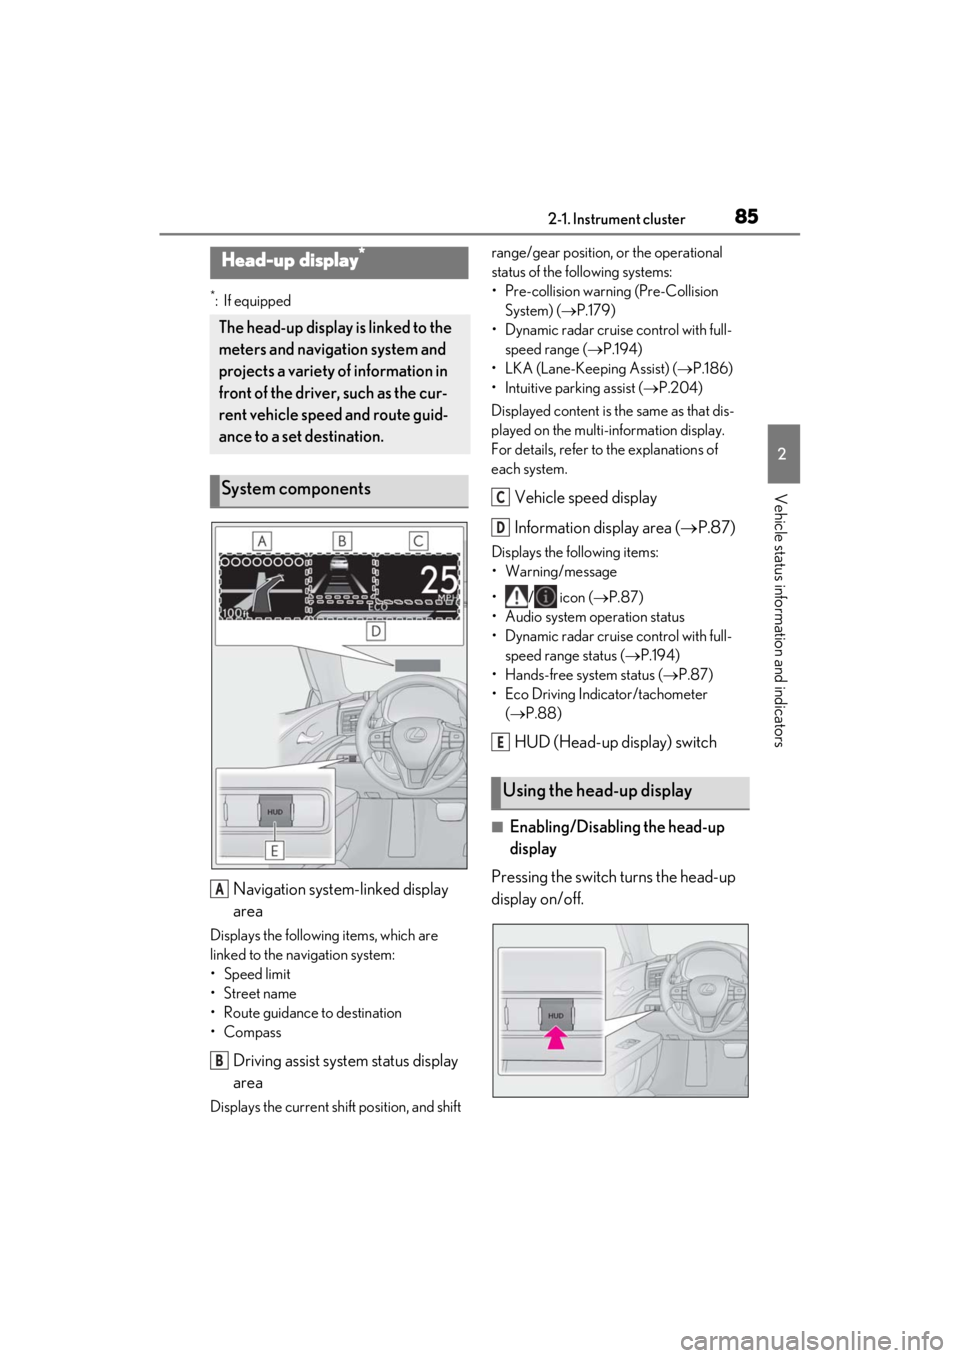
Navigation system-linked display
area
Displays the following items, which are
linked to the navigation system:
• Speed limit
•Street name
• Route guidance to destination
•Compass
Driving assist system status display
area
Displays the current shift position, and shift range/gear position, or the operational
status of the following systems:
• Pre-collision warning (Pre-Collision
System) ( P.179)
• Dynamic radar cruise control with full- speed range ( P.194)
• LKA (Lane-Keeping Assist) ( P.186)
• Intuitive parking assist ( P.204)
Displayed content is th e same as that dis-
played on the multi-information display.
For details, refer to the explanations of
each system.
Vehicle speed display
Information display area ( P.87)
Displays the following items:
• Warning/message
•/ icon ( P.87)
• Audio system operation status
• Dynamic radar cruise control with full- speed range status ( P.194)
• Hands-free system status ( P.87)
• Eco Driving Indicator/tachometer ( P.88)
HUD (Head-up display) switch
■Enabling/Disabling the head-up
display
Pressing the switch turns the head-up
display on/off.
Head-up display*
The head-up display is linked to the
meters and navigati on system and
projects a variety of information in
front of the driver, such as the cur-
rent vehicle speed and route guid-
ance to a set destination.
System components
A
B
Using the head-up display
C
D
E
Page 88 of 410
862-1. Instrument cluster
■Changing settings of the head-up
display
Select on the multi-information dis-
play ( P.79) to change the following
settings:
Display brightness/position
Select to adjust the brightness and position
of the head-up display.
Eco Driving Indicator/tachometer
Select to display Eco Driving Indicator,
tachometer or no content.
Display content
Select to enable/dis able the following
items:
• Route guidance to destination
• Driving assist system status
• Compass
• Audio system operation status
Display angle
Select to adjust the angle of the head-up
display.
■Head-up display
●The head-up display may seem dark and
hard to see when viewed through sun-
glasses, especially polarized sunglasses.
Adjust the brightness of the head-up dis-
play or remove your sunglasses.
●When the head-up displa y is turned off, it
will remain off even if the engine switch is
turned to ACC or ON after the engine
switch has been turned off.
●The startup image will be displayed on
the head-up display after the engine
switch has been turned to ON while the
head-up display switch is set to on.
■Display brightness
The brightness of the head-up display can
be adjusted on of the multi-information
display. Also, it is automatically adjusted according to the ambient brightness.
■Head-up display automatic position
adjustment
If the display position is recorded into mem-
ory, the head-up display will be automati-
cally adjusted to th e desired position.
( P.112)
■When the battery is disconnected
The customize settings of the head-up dis-
play will be reset.
■Customization
Settings (e.g. display) can be changed.
(Customizable features: P.367)
WARNING
■Before using the head-up display
●Check that the position and brightness
of the head-up display image does not
interfere with safe driving. Incorrect
adjustment of the image’s position or
brightness may obstruct the driver’s
view and lead to an accident, resulting
in death or serious injury.
●Do not continuously look at the head-
up display while driving as you may fail
to see pedestrians, objects on the
road, etc. ahead of the vehicle.
■Caution for changing settings of the
head-up display
As the engine needs to be running while
changing the settings of the head-up dis-
play, ensure that the vehicle is parked in a
place with adequate ventilation. In a
closed area such as a garage, exhaust
gases including harmful carbon monox-
ide (CO) may collect and enter the vehi-
cle. This may lead to death or a serious
health hazard.
Page 107 of 410
1053-2. Opening, closing and locking the doors and trunk
3
Before driving
charged while the vehicle is not in operation
for a long time.
●In the following situations, the smart
access system with pu sh-button start may
take some time to unlock the doors.
• The electronic key has been left within approximately 6 ft. (2 m) of the outside of
the vehicle for 10 minutes or longer.
• The smart access system with push-but- ton start has not been used for 5 days or
longer.
●If the smart access system with push-but-
ton start has not been used for 14 days or
longer, the doors cannot be unlocked at
the passenger door. In this case, push the
depression on the front edge the driver’s
door handle, or use the wireless remote
control or mechanical key, to unlock the
doors.
■Turning an electronic key to battery-
saving mode
When battery-saving mode is set, battery
depletion is minimized by stopping the
electronic key from receiving radio waves.
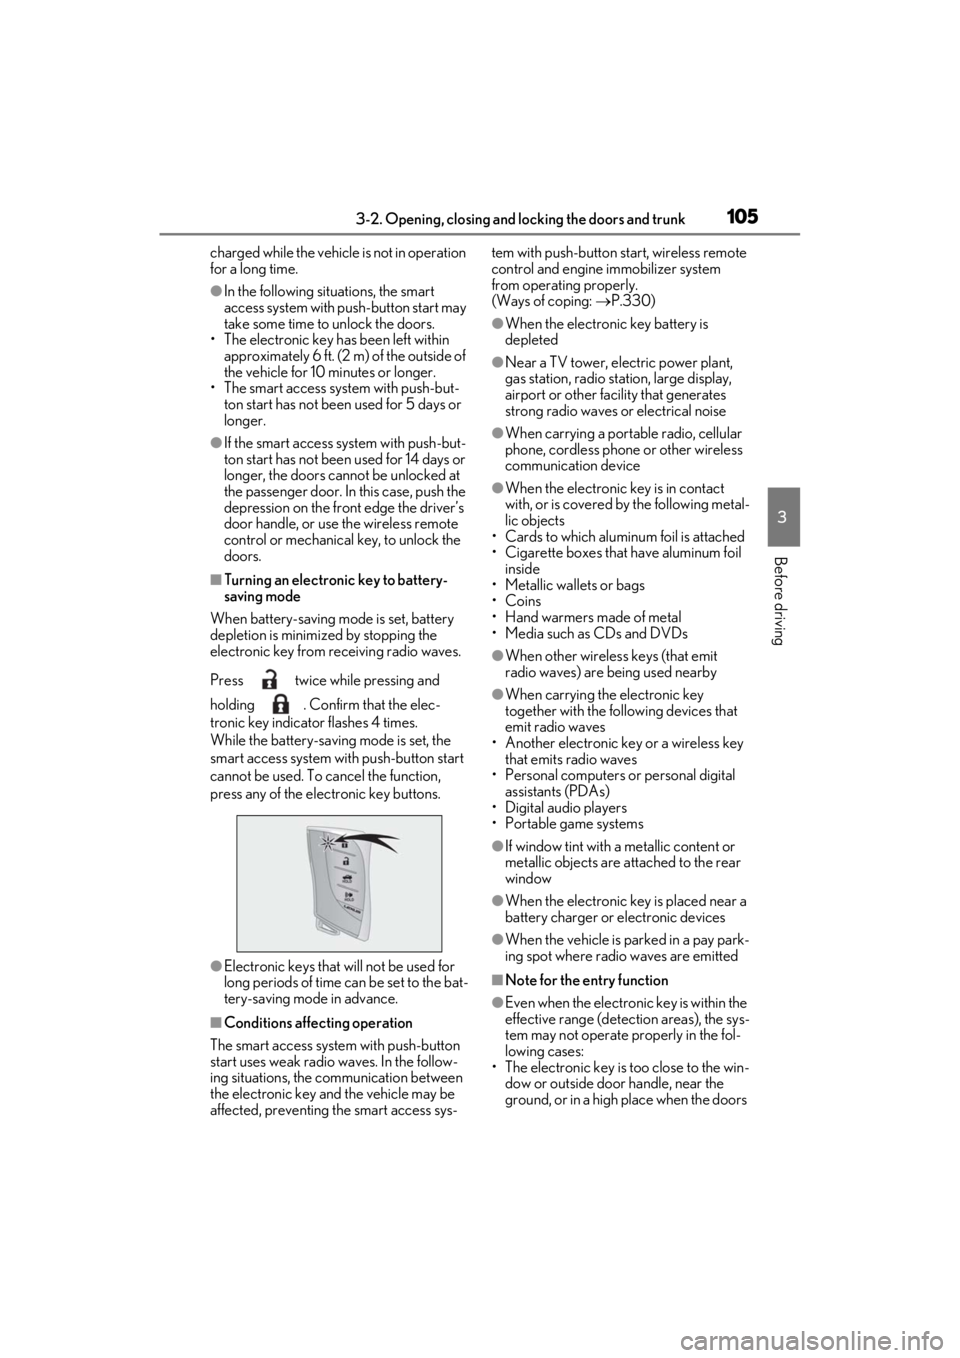
Press twice while pressing and
holding . Confirm that the elec-
tronic key indicator flashes 4 times.
While the battery-saving mode is set, the
smart access system with push-button start
cannot be used. To cancel the function,
press any of the electronic key buttons.
●Electronic keys that will not be used for
long periods of time can be set to the bat-
tery-saving mode in advance.
■Conditions affe cting operation
The smart access system with push-button
start uses weak radio waves. In the follow-
ing situations, the communication between
the electronic key and the vehicle may be
affected, preventing the smart access sys- tem with push-button start, wireless remote
control and engine immobilizer system
from operating properly.
(Ways of coping:
P.330)
●When the electronic key battery is
depleted
●Near a TV tower, electric power plant,
gas station, radio stat ion, large display,
airport or other fac ility that generates
strong radio waves or electrical noise
●When carrying a portable radio, cellular
phone, cordless phone or other wireless
communication device
●When the electronic key is in contact
with, or is covered by the following metal-
lic objects
• Cards to which aluminum foil is attached
• Cigarette boxes that have aluminum foil
inside
• Metallic wallets or bags
•Coins
• Hand warmers made of metal
• Media such as CDs and DVDs
●When other wireless keys (that emit
radio waves) are being used nearby
●When carrying the electronic key
together with the following devices that
emit radio waves
• Another electronic key or a wireless key that emits radio waves
• Personal computers or personal digital assistants (PDAs)
• Digital audio players
• Portable game systems
●If window tint with a metallic content or
metallic objects are attached to the rear
window
●When the electronic key is placed near a
battery charger or electronic devices
●When the vehicle is parked in a pay park-
ing spot where radio waves are emitted
■Note for the entry function
●Even when the electronic key is within the
effective range (detection areas), the sys-
tem may not operate properly in the fol-
lowing cases:
• The electronic key is too close to the win- dow or outside door handle, near the
ground, or in a high place when the doors
Page 137 of 410
135
4
4
Driving
Driving
4-1. Before drivingDriving the vehicle ..................... 136
Cargo and luggage ................... 142
Vehicle load limits ...................... 144
Trailer towing ............................... 144
Dinghy towing ............................. 145
4-2. Driving procedures Engine (ignition) switch ........... 146
Automatic transmission........... 150
Turn signal lever.......................... 156
Parking brake .............................. 157
Brake Hold.................................... 159
4-3. Operating the lights and wipers Headlight switch .......................... 161
Automatic High Beam ............. 164
Windshield wipers and washer ......................................................... 167
4-4. Refueling Opening the fuel tank cap....... 171
4-5. Using the driving support sys- tems
Lexus Safety System + ............. 173
PCS (Pre-Collision System).. 179
LKA (Lane-Keeping Assist) .. 186
Dynamic radar cruise control with full-speed range....................... 194
Driving mode select switch... 203
Intuitive parking assist ............. 204
BSM (Blind Spot Monitor) .... 209
Driving assist systems ............... 2184-6. Driving tips
Winter driving tips .................... 223
Page 138 of 410
1364-1. Before driving
4-1.Before driving
■Starting the engine
P.146
■Driving
1 With the brake pedal depressed,
shift the shift position to D.
(P.152)
Check that the shift position indicator
shows D.
2 If the parking brake is in manual
mode, release the parking brake.
(P.157)
3 Gradually release the brake pedal
and gently depress the accelerator
pedal to accelerate the vehicle.
■Stopping
1 With the shift position in D, depress
the brake pedal.
2 If necessary, set the parking brake.
If the vehicle is to be stopped for an
extended period of time, shift the shift posi-
tion to P. ( P.152)
■Parking the vehicle
1 Stop the vehicle completely.
2 If the parking brake is in manual
mode, set the parking brake.
(P.157)
3 Shift the shift position to P.
(P.152)
Check that the shift position indicator
shows P.
4 Press the engine switch to stop the
engine.
5 Slowly release the brake pedal.
6 Lock the door, making sure that
you have the electronic key on your
person.
If parking on a hill, block the wheels as
needed.
■Starting off on a steep uphill
1 Firmly depress the brake pedal and
shift the shift position to D.
The hill-start assist control will be activated.
( P.219)
2 Set the parking brake. ( P.157)
3 Release the brake pedal and gently
depress the accelerator pedal to
accelerate the vehicle.
4 Release the parking brake.
(P.157)
■When parking the vehicle
In order to prevent theft or effect of the
weather on the environment of the vehicle
cabin, close the soft top roof when parking
the vehicle.
■Driving in the rain
●Drive carefully when it is raining, because
visibility will be reduced, the windows
may become fogged-up, and the road
will be slippery.
●Drive carefully when it starts to rain,
because the road surface will be espe-
cially slippery.
●Refrain from high speeds when driving on
an expressway in the rain, because there
may be a layer of wa ter between the tires
and the road surface, preventing the
steering and brakes from operating
properly.
■Engine speed while driving
In the following conditions, the engine
speed may become high while driving. This
Driving the vehicle
The following procedures should be
observed to ensure safe driving:
Driving procedure
Page 150 of 410

1484-2. Driving procedures
The engine will stop, and the meter display
will be extinguished (the shift position indi-
cator will be extinguished a few seconds
after the meter display).
5Check that “ACCESSORY” or
“IGNITION ON” is not shown on
the meter.
■Automatic engine shut off feature
●The vehicle is equipped with a feature
that automatically shuts off the engine
when the shift position is in P with the
engine running for an extended period.
●The engine will automatically shut off
after approximately 1 hour if it has been
left running while the shift position is in P.
●The timer for the automatic engine shut
off feature will reset if the brake pedal is
depressed or if the shift position is in a
position other than P.
●After the vehicle is parked, if the door is
locked with the door lock switch
( P.98) from the inside or the mechani-
cal key ( P.330) from the outside, the
automatic engine shut off feature will be
disabled. The timer for the automatic
engine shut off feature will be re-enabled
if the driver’s door is opened.
■Automatic P position selection function
P.153
WARNING
■Stopping the engine in an emergency
●If you want to stop the engine in an
emergency while driving the vehicle,
press and hold the engine switch for
more than 2 seconds, or press it briefly
3 times or more in succession.
( P.306)
However, do not touch the engine
switch while driving except in an emer-
gency. Turning the engine off while
driving will not cause loss of steering
or braking control, however, power
assist to the steering will be lost. This
will make it more difficult to steer
smoothly, so you should pull over and
stop the vehicle as soon as it is safe to
do so.
●If the engine switch is operated while
the vehicle is running, a warning mes-
sage will be shown on the multi-infor-
mation display and a buzzer sounds.
●When restarting the engine after an
emergency shutdown, press the
engine switch.
■When parking
Exhaust gases include harmful carbon
monoxide (CO), which is colorless and
odorless. Observe the following precau-
tions.
Failure to do so may cause exhaust gases
to enter the vehicle and may lead to an
accident caused by light-headedness, or
may lead to death or a serious health
hazard.
●If the vehicle is in a poorly ventilated
area or a closed area, such as a
garage, stop the engine.
●Do not leave the vehicle with the
engine running for a long time. If such
a situation cannot be avoided, park the
vehicle in an open space and ensure
that exhaust fumes do not enter the
vehicle interior.
Page 206 of 410
2044-5. Using the driving support systems
erful sporty driving.
When in SPORT S mode, if the driving
mode select switch is turned backward, the
“Sport S+” indicator comes on.
■Operation of the air conditioning sys-
tem in Eco drive mode
Eco drive mode controls the heating/cool-
ing operations and fan speed of the air con-
ditioning system to enhance fuel efficiency.
To improve air condit ioning performance,
perform the following operations:
●Turn off eco air conditioning mode
( P.237)
●Adjust the fan speed ( P.235)
●Turn off Eco drive mode ( P.203)
■Automatic deactivation of sport mode
and custom mode
If the engine switch is turned off after driv-
ing in sport mode or custom mode, the
drive mode will be changed to normal
mode.
■Driving mode pop-up display
When the driving mode is changed, the
selected driving mode will be temporarily
displayed on the side display. ( P.229)
For custom mode, select “Setting” on the
display to customize the driving mode.
*: If equipped
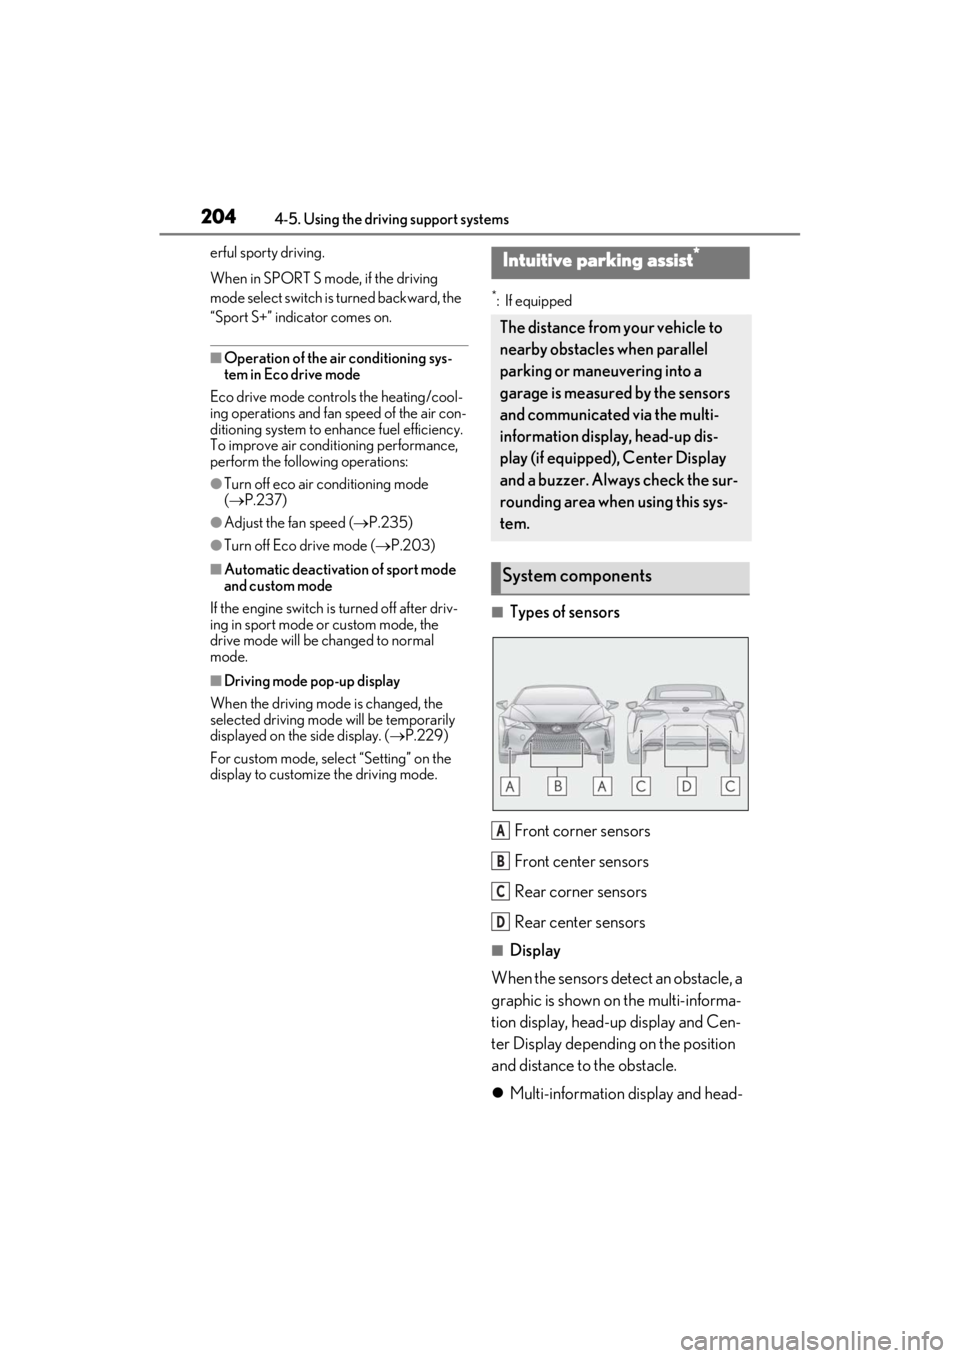
■Types of sensors
Front corner sensors
Front center sensors
Rear corner sensors
Rear center sensors
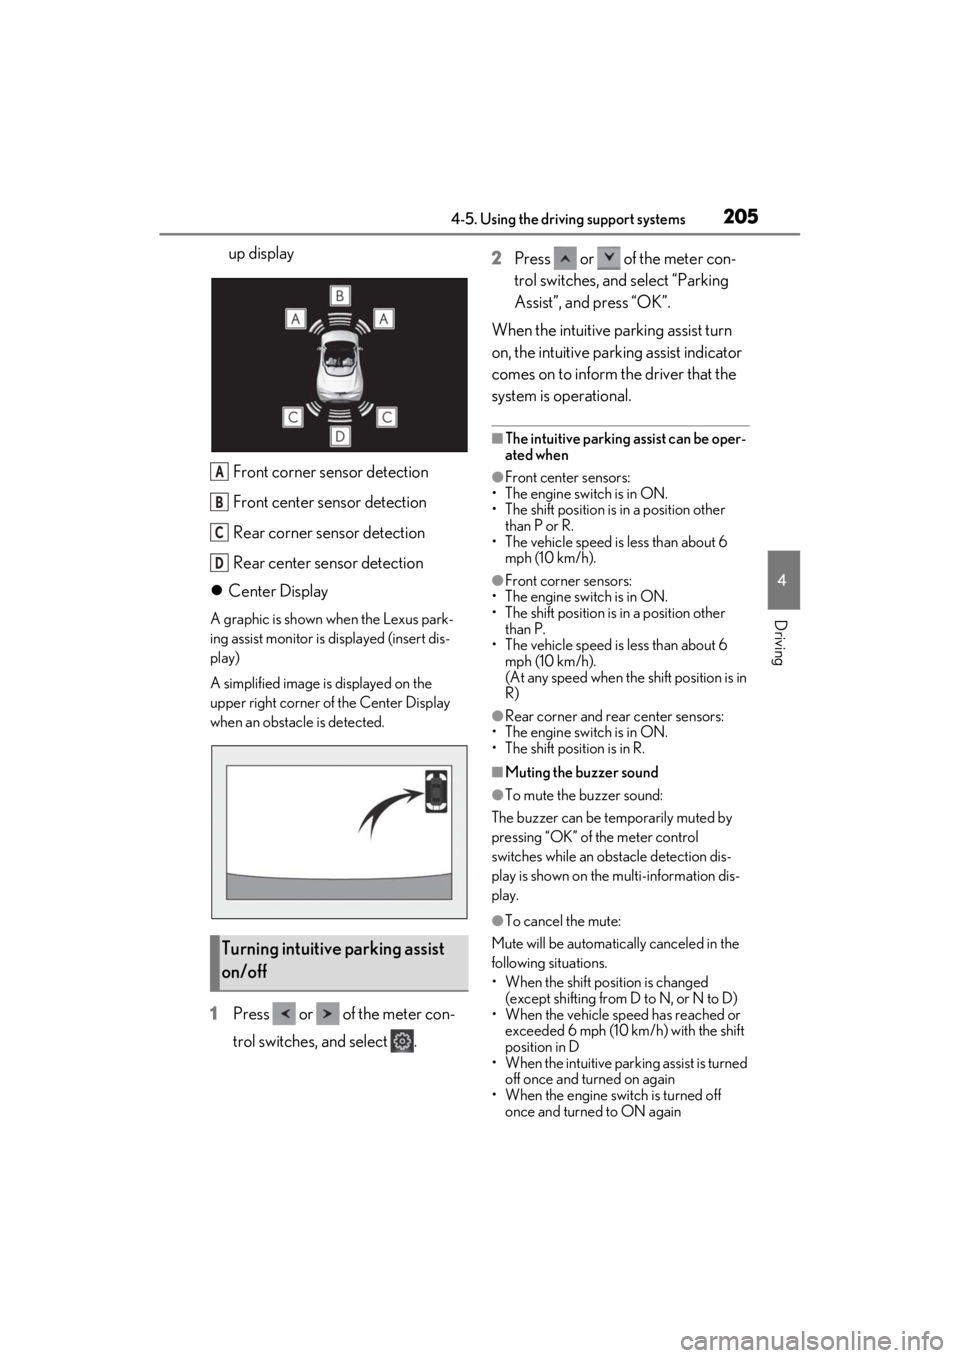
■Display
When the sensors detect an obstacle, a
graphic is shown on the multi-informa-
tion display, head-up display and Cen-
ter Display depending on the position
and distance to the obstacle.
Multi-information display and head-
Intuitive parking assist*
The distance from your vehicle to
nearby obstacles when parallel
parking or maneuvering into a
garage is measured by the sensors
and communicated via the multi-
information display, head-up dis-
play (if equipped), Center Display
and a buzzer. Always check the sur-
rounding area when using this sys-
tem.
System components
A
B
C
D
Page 207 of 410
2054-5. Using the driving support systems
4
Driving
up displayFront corner sensor detection
Front center sensor detection
Rear corner sensor detection
Rear center sensor detection
Center Display
A graphic is shown when the Lexus park-
ing assist monitor is displayed (insert dis-
play)
A simplified image is displayed on the
upper right corner of the Center Display
when an obstacle is detected.
1 Press or of the meter con-
trol switches, and select . 2
Press or of the meter con-
trol switches, and select “Parking
Assist”, and press “OK”.
When the intuitive parking assist turn
on, the intuitive parking assist indicator
comes on to inform the driver that the
system is operational.
■The intuitive parking assist can be oper-
ated when
●Front center sensors:
• The engine switch is in ON.
• The shift position is in a position other than P or R.
• The vehicle speed is less than about 6 mph (10 km/h).
●Front corner sensors:
• The engine switch is in ON.
• The shift position is in a position other than P.
• The vehicle speed is less than about 6 mph (10 km/h).
(At any speed when the shift position is in
R)
●Rear corner and rear center sensors:
• The engine switch is in ON.
• The shift position is in R.
■Muting the buzzer sound
●To mute the buzzer sound:
The buzzer can be temporarily muted by
pressing “OK” of the meter control
switches while an ob stacle detection dis-
play is shown on the multi-information dis-
play.
●To cancel the mute:
Mute will be automatically canceled in the
following situations.
• When the shift position is changed (except shifting from D to N, or N to D)
• When the vehicle speed has reached or exceeded 6 mph (10 km/h) with the shift
position in D
• When the intuitive par king assist is turned
off once and turned on again
• When the engine switch is turned off once and turned to ON again
Turning intuitive parking assist
on/off
A
B
C
D