lexus LFA 2012 Owner's Manual / LEXUS 2012 LFA OWNERS MANUAL (OM77006U)
Manufacturer: LEXUS, Model Year: 2012, Model line: LFA, Model: Lexus LFA 2012Pages: 420, PDF Size: 5.02 MB
Page 261 of 420
259
4-3. Do-it-yourself maintenance
4
Maintenance and care
CAUTION
■Used engine oil
●Used engine oil contains potentially harmful contaminants which may cause skin
disorders such as inflammation or skin cancer, so care should be taken to avoid
prolonged and repeated contact. To remove used engine oil from your skin, wash
thoroughly with soap and water.
●Dispose of used oil and filters only in a safe and acceptable manner. Do not dis-
pose of used oil and filters in househol d trash, in sewers or onto the ground.
Call your Lexus dealer, service station or auto parts store for information con-
cerning recycling or disposal.
●Do not leave used engine oil within the reach of children.
NOTICE
■To prevent serious engine damage
Check the oil level on a regular basis.
■When adding the engine oil
●Be careful not to spill engine oil on the vehicle components.
●Avoid overfilling, or the engine could be damaged.
●Check the oil level using the “Oil Level” display on the meter every time you refill
the vehicle.
●Be sure the engine oil filler cap is properly tightened.
Page 262 of 420

260
4-3. Do-it-yourself maintenance
Engine coolantThe coolant level is satisfactory if it is between the “FULL” and “LOW”
lines on the reservoir when the engine is cold.
“LOW”
If the level is on or below the
“LOW” line, add coolant up to the
“FULL” line.
“FULL”
Reservoir cap
■Coolant selection
Only use “Toyota Super Long Life Coolant” or a similar high quality ethylene glycol
based non-silicate, non-amine, non-nitrite, and non-borate coolant with long-life
hybrid organic acid technology.
“Toyota Super Long Life Coolant” is a mixture of 50% coolant and 50% deionized
water. (Minimum temperature: -31 F [-35C])
For more details about coolant, contact your Lexus dealer.
■If the coolant level drops within a short time of replenishing
Visually check the hoses and engine coolant reservoir cap.
If you cannot find a leak, have your Lexus dealer test the cap and check for leaks in
the cooling system.
Page 263 of 420
261
4-3. Do-it-yourself maintenance
4
Maintenance and care
CondenserCheck the condenser and clear any foreign objects.
If it is extremely dirty or you are not sure of its condition, have your vehicle
checked by your Lexus dealer.
CAUTION
■When the engine is hot
Do not remove the engine coolant reservoir cap.
The cooling system may be under pressure and may spray hot coolant if the cap is
removed, causing burns or other injuries.
NOTICE
■When adding engine coolant
Coolant is neither plain water nor straight antifreeze. The correct mixture of water
and antifreeze must be used to provide proper lubrication, corrosion protection
and cooling. Be sure to read the antifreeze or coolant label.
■If you spill coolant
Be sure to wash it off with water to prevent it from damaging parts or paint.
CAUTION
■When the engine is hot
Do not touch the condenser, as it may be hot and cause burns.
Page 264 of 420
262
4-3. Do-it-yourself maintenance
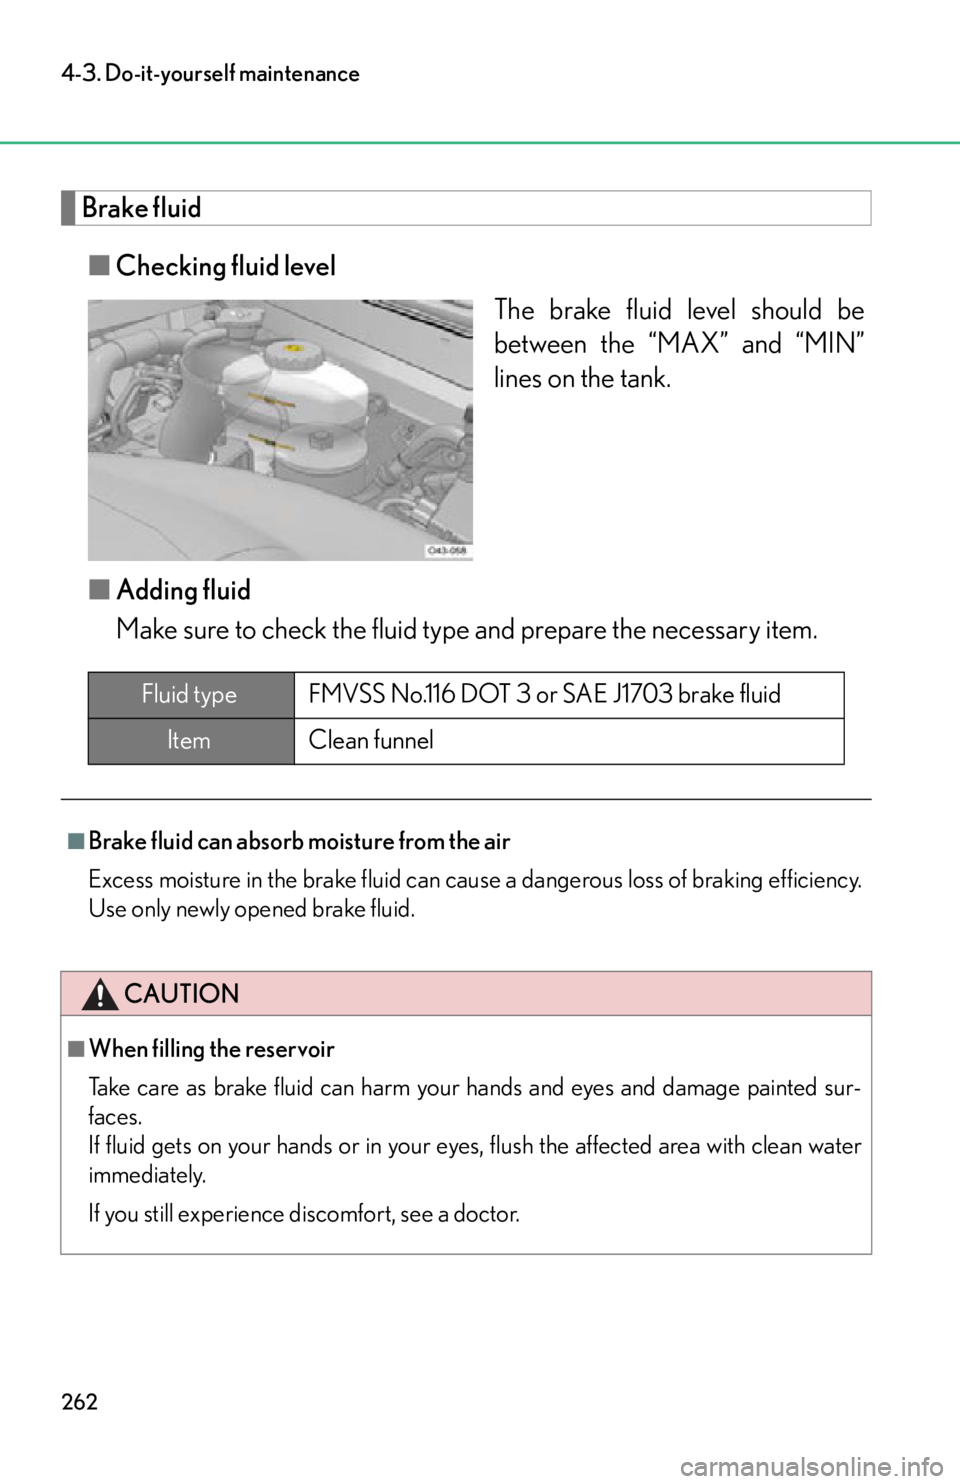
Brake fluid■ Checking fluid level
The brake fluid level should be
between the “MAX” and “MIN”
lines on the tank.
■ Adding fluid
Make sure to check the fluid type and prepare the necessary item.
Fluid type FMVSS No.116 DOT 3 or SAE J1703 brake fluid
ItemClean funnel
■Brake fluid can absorb moisture from the air
Excess moisture in the brake fluid can cause a dangerous loss of braking efficiency.
Use only newly opened brake fluid.
CAUTION
■When filling the reservoir
Take care as brake fluid can harm your hands and eyes and damage painted sur-
faces.
If fluid gets on your hands or in your eyes, flush the affected area with clean water
immediately.
If you still experience discomfort, see a doctor.
Page 265 of 420
263
4-3. Do-it-yourself maintenance
4
Maintenance and care
NOTICE
■If the fluid level is low or high
It is normal for the brake fluid level to go down slightly as the brake pads wear out or
when the fluid level in the accumulator is high.
If the reservoir needs frequent refilling, there may be a serious problem.
Page 266 of 420
264
4-3. Do-it-yourself maintenance
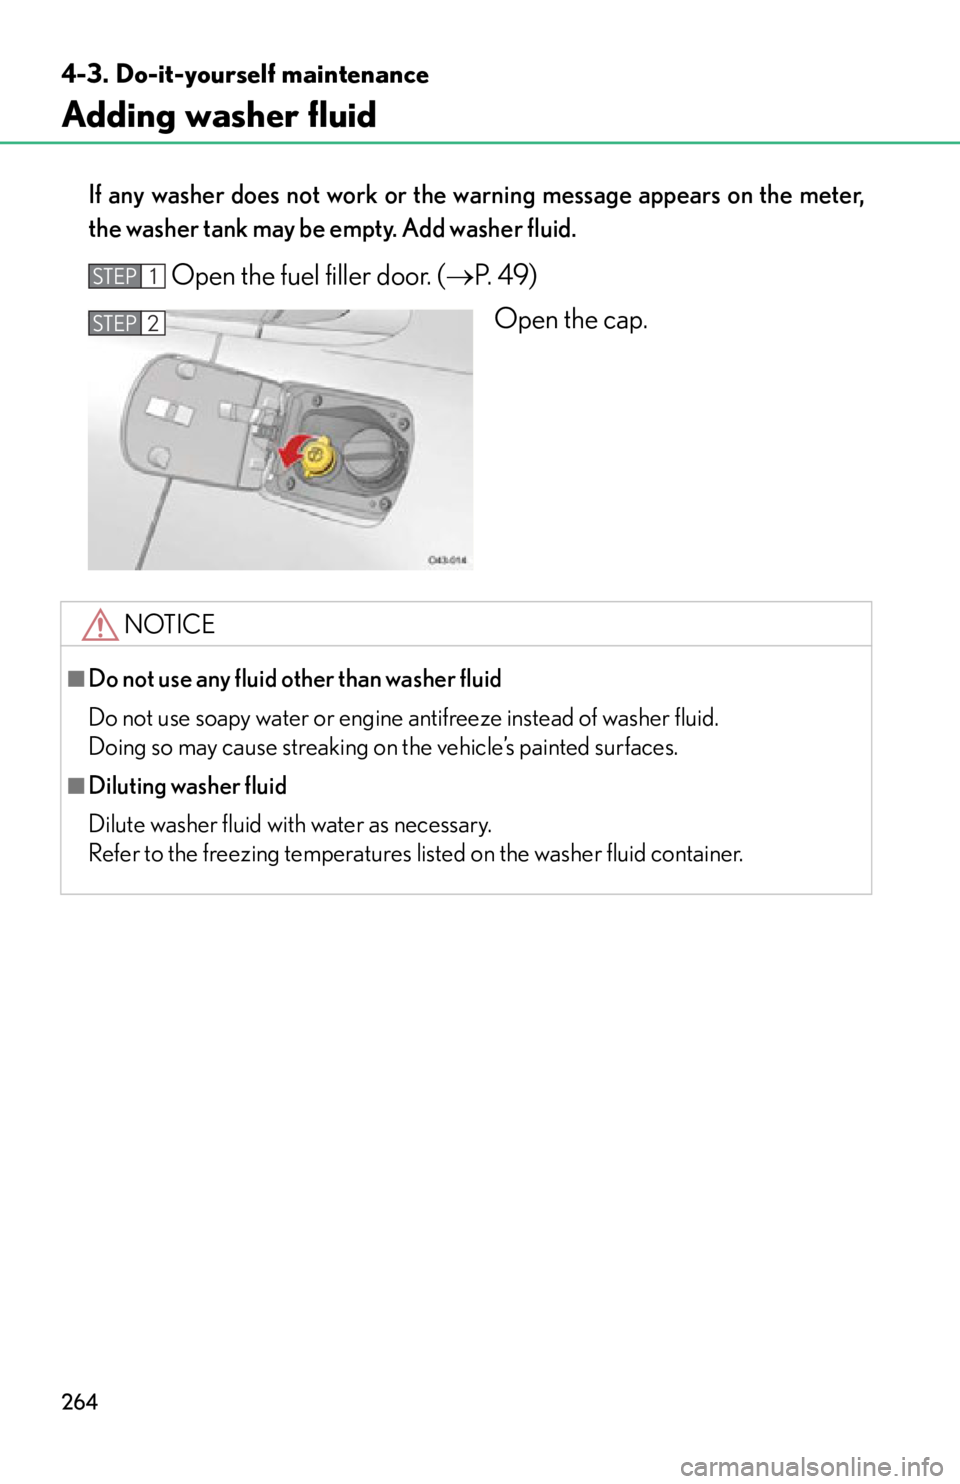
Adding washer fluid
If any washer does not work or the warning message appears on the meter,
the washer tank may be empty. Add washer fluid.
Open the fuel filler door. (P. 4 9 )
Open the cap.STEP1
STEP2
NOTICE
■Do not use any fluid other than washer fluid
Do not use soapy water or engine antifreeze instead of washer fluid.
Doing so may cause streaking on the vehicle’s painted surfaces.
■Diluting washer fluid
Dilute washer fluid with water as necessary.
Refer to the freezing temperatures listed on the washer fluid container.
Page 267 of 420
265
4-3. Do-it-yourself maintenance
4
Maintenance and care
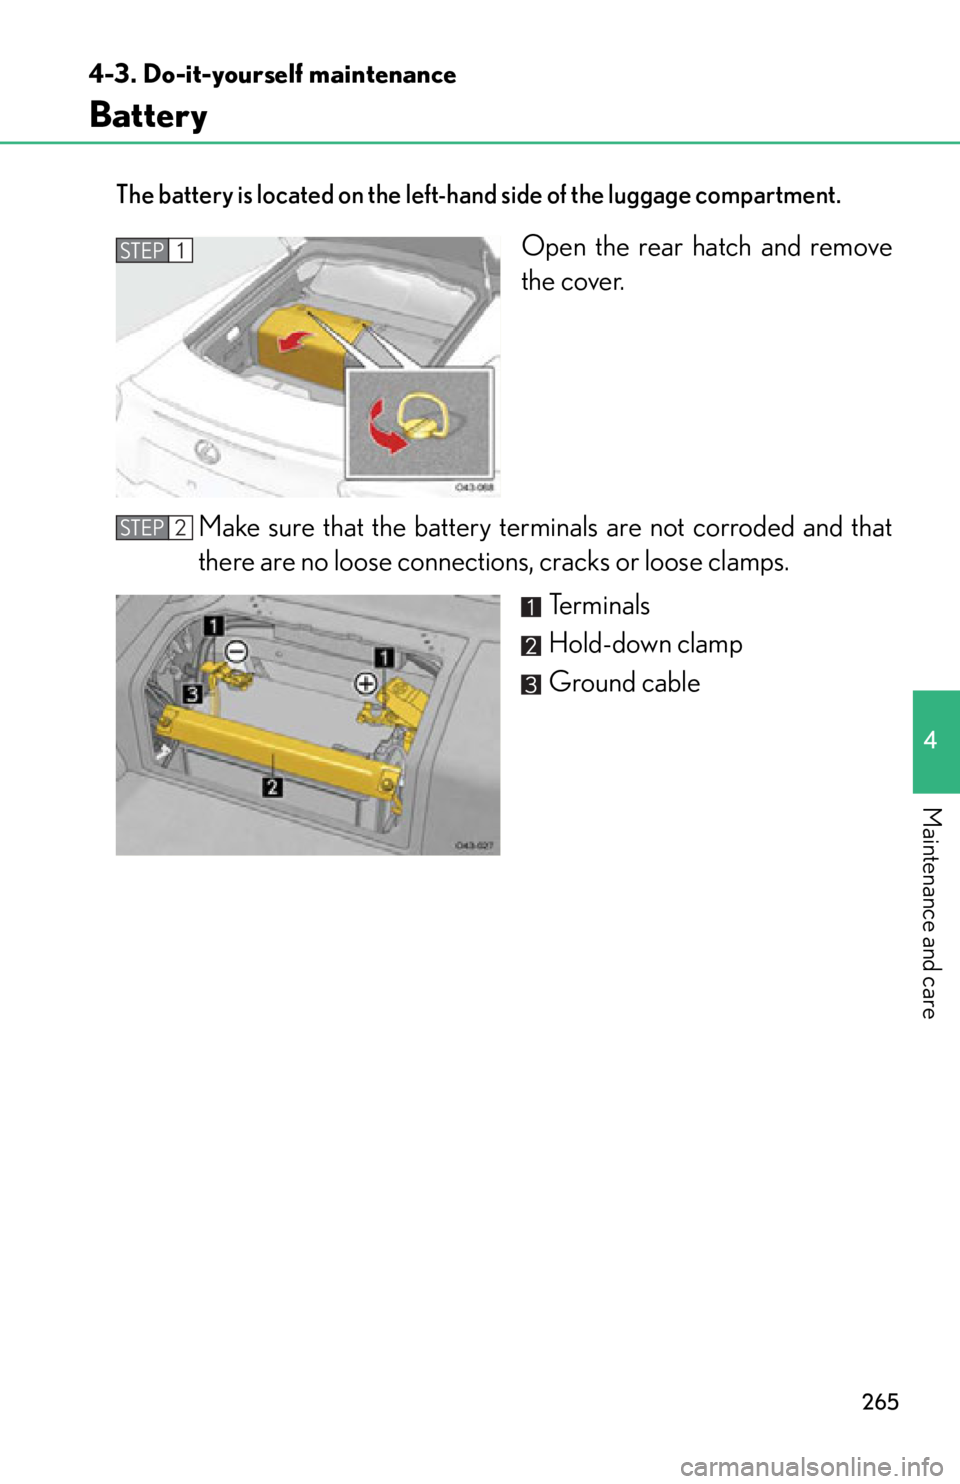
Battery
The battery is located on the left-hand side of the luggage compartment.
Open the rear hatch and remove
the cover.
Make sure that the battery term inals are not corroded and that
there are no loose connections, cracks or loose clamps.
Terminals
Hold-down clamp
Ground cableSTEP1
STEP2
Page 268 of 420
266
4-3. Do-it-yourself maintenance
■Before recharging
When recharging, the battery produces hydrogen gas which is flammable and
explosive. Therefore, observe the following precautions before recharging:
●If recharging with the battery installed on the vehicle, be sure to disconnect the
ground cable.
●Make sure the power switch on the charger is off when connecting and discon-
necting the charger cables to the battery.
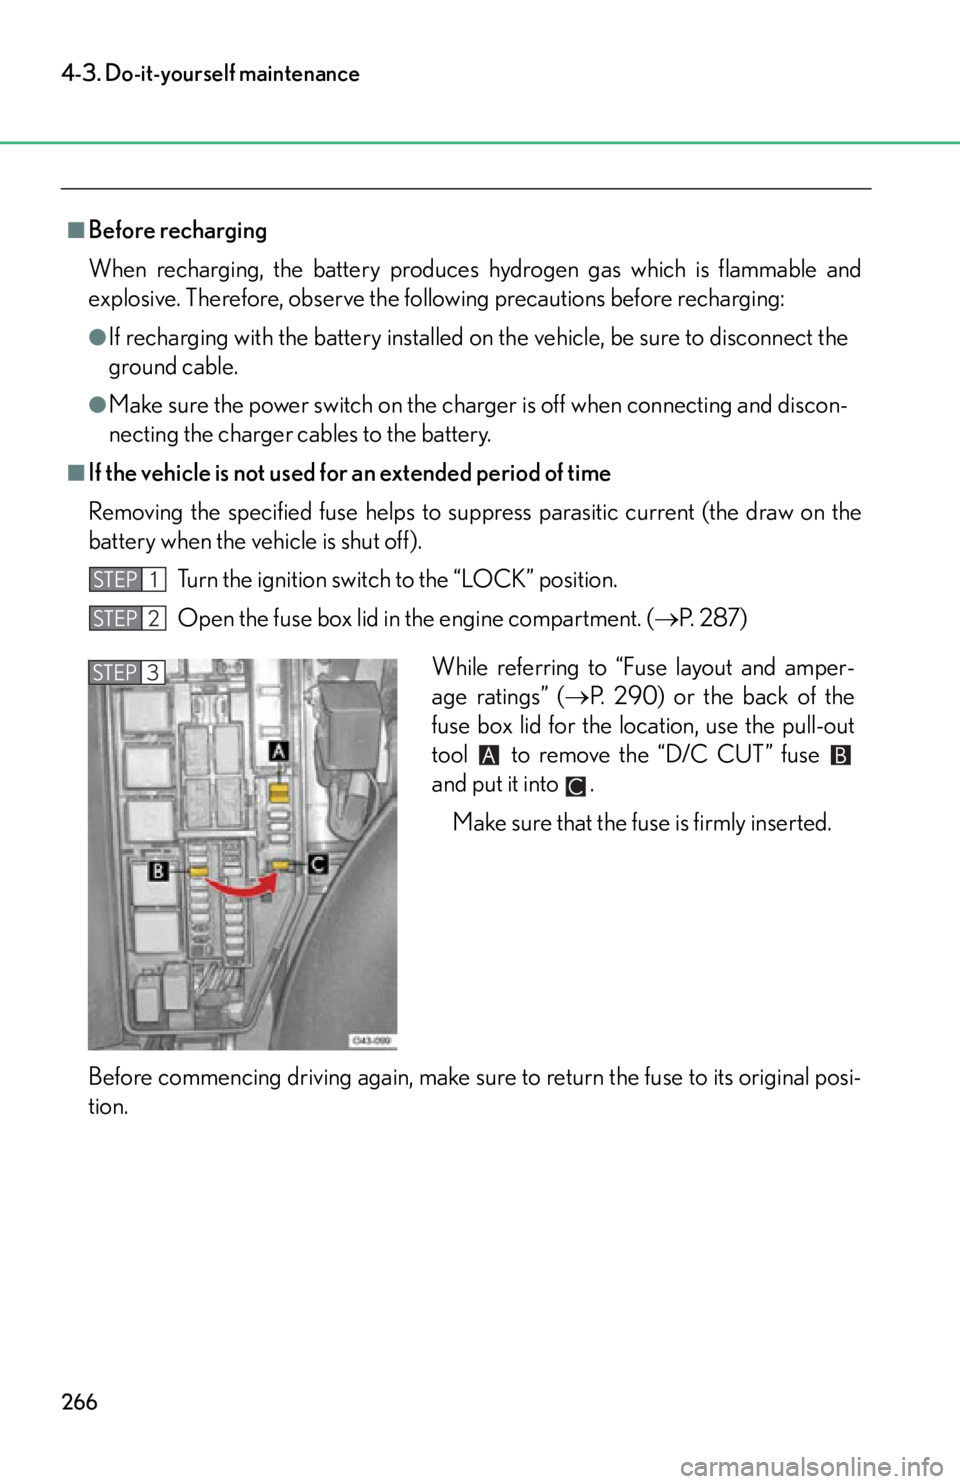
■If the vehicle is not used for an extended period of time
Removing the specified fuse helps to supp ress parasitic current (the draw on the
battery when the vehicle is shut off).
Turn the ignition switch to the “LOCK” position.
Open the fuse box lid in the engine compartment. ( P. 2 8 7 )
Before commencing driving again, make sure to return the fuse to its original posi-
tion.
STEP1
STEP2
While referring to “Fuse layout and amper-
age ratings” ( P. 290) or the back of the
fuse box lid for the location, use the pull-out
tool to remove the “D/C CUT” fuse
and put it into .
Make sure that the fuse is firmly inserted.STEP3
Page 269 of 420
267
4-3. Do-it-yourself maintenance
4
Maintenance and care
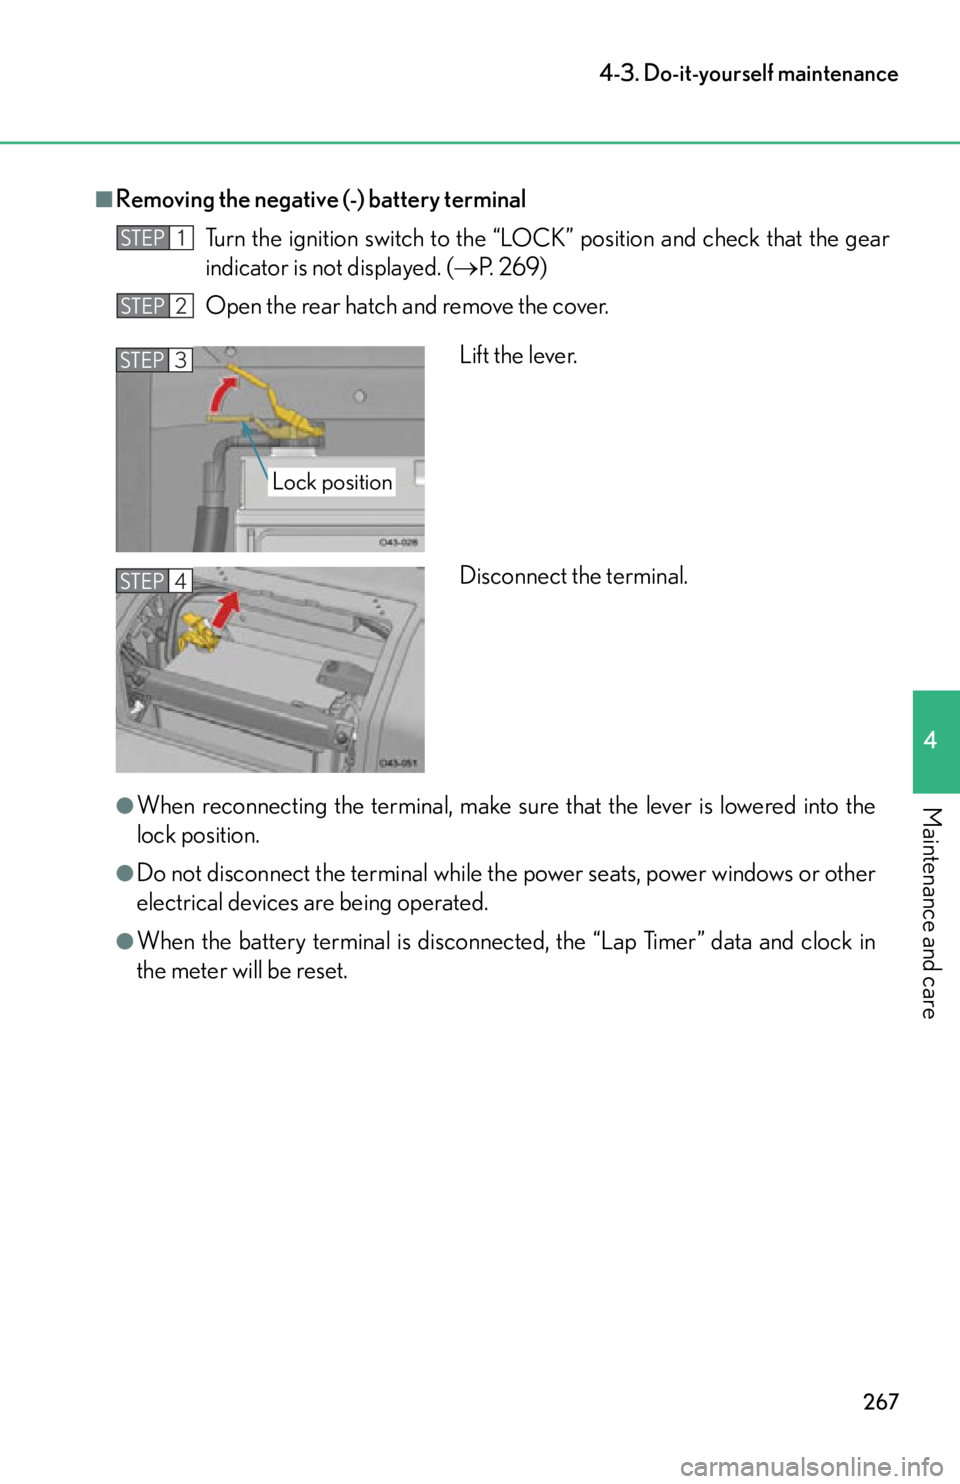
■Removing the negative (-) battery terminalTurn the ignition switch to the “LOC K” position and check that the gear
indicator is not displayed. ( P. 2 6 9 )
Open the rear hatch and remove the cover.
●When reconnecting the terminal, make sure that the lever is lowered into the
lock position.
●Do not disconnect the term inal while the power seats, power windows or other
electrical devices are being operated.
●When the battery terminal is disconnect ed, the “Lap Timer” data and clock in
the meter will be reset.
STEP1
STEP2
Lift the lever.
Disconnect the terminal.STEP3
Lock position
STEP4
Page 270 of 420

268
4-3. Do-it-yourself maintenance
CAUTION
■When connecting the battery terminal
Lower the lever into the locked position and ensure that the terminal is securely
fixed in place.
If the terminal is not securely fixed in place, it may come off while the vehicle is
being driven. This may cause the engine and electronic components to stop func-
tioning, resulting in an accident.
■Chemicals in the battery
A battery contains poisonous and corrosive sulfuric acid and may produce hydro-
gen gas which is flammable and explosive. To reduce the risk of death or serious
injury, take the following precautions while working on or near the battery:
●Do not cause sparks by touching the battery terminals with tools.
●Do not smoke or light a match near the battery.
●Avoid contact with eyes, skin and clothes.
●Never inhale or swallow electrolyte.
●Wear protective safety glasses when working near the battery.
●Keep children away from the battery.
■Where to safely charge the battery
Always charge the battery in an open area. Do not charge the battery in a garage or
closed room where there is insufficient ventilation.
■How to recharge the battery
Only perform a slow charge (5 A or less). The battery may explode if charged at a
quicker rate.