LEXUS LS500 2020 Owners Manual
Manufacturer: LEXUS, Model Year: 2020, Model line: LS500, Model: LEXUS LS500 2020Pages: 516, PDF Size: 10.38 MB
Page 401 of 516
4016-3. Do-it-yourself maintenance
6
Maintenance and care
Use only Lexus wheel nuts and
wheel nut wrenches designed for
use with your aluminum wheels.
When rotating, repairing or chang-
ing your tires, check that the wheel
nuts are still tight after driving 1000
miles (1600 km).
Be careful not to damage the alumi-
num wheels when using tire chains.
Use only Lexus genuine balance
weights or equivalent and a plastic or rubber hammer when balancing
your wheels.
WARNING
●Never use an inner tube in a leaking
wheel which is designed for a tubeless
tire.
Doing so may result in an accident,
causing death or serious injury.
■Use of defective wheels prohibited
Do not use cracked or deformed wheels.
Doing so could cause the tire to leak air
during driving, possibly causing an acci-
dent.
NOTICE
■Replacing tire pressure warning
valves and transmitters
●Because tire repair or replacement
may affect the tire pressure warning
valves and transmitters, make sure to
have tires serviced by your Lexus
dealer or other qualified service shop.
In addition, make sure to purchase
your tire pressure warning valves and
transmitters at your Lexus dealer.
●Ensure that only genuine Lexus wheels
are used on your vehicle.
Tire pressure warning valves and trans-
mitters may not work properly with
non-genuine wheels.
Aluminum wheel precautions
Page 402 of 516

4026-3. Do-it-yourself maintenance
1Turn the engine switch off.
2 Open the glove box. Remove the
partition. ( P.340)
3 Remove the panel.
4 Unlock the filter cover ( ), pull the
filter cover out of the claws ( ),
and remove the filter cover. 5
Remove the filter case.
6 Remove the air conditioning filter
from the filter case and replace it
with a new one.
The “ UP” marks shown on the filter
and the filter case sh ould be pointing up.
■Checking interval
Inspect and replace the air conditioning fil-
ter according to the maintenance schedule.
In dusty areas or areas with heavy traffic
flow, early replacement may be required.
(For scheduled maintenance information,
please refer to the “Owner’s Manual Sup-
plement” or “Scheduled Maintenance”.)
■If air flow from the vents decreases dra-
matically
The filter may be clogged. Check the filter
and replace if necessary.
■Air conditioning filt er with deodorizing
function
When fragrances are placed in your vehi-
cle, the deodorizing effect may become
significantly weakened in a short period.
When an air conditioning odor comes out
continuously, replace the air conditioning
Air conditioning filter
The air conditioning filter must be
changed regularly to maintain air
conditioning efficiency.
Removing the air conditioning
filter
A
B
Page 403 of 516
4036-3. Do-it-yourself maintenance
6
Maintenance and care
filter.
■If the electronic key battery is depleted
The following symptoms may occur:
●The smart access system with push-but-
ton start and wireless remote control will
not function properly.
●The operational range will be reduced.
■When the card key battery needs to be
replaced (if equipped)
The battery for the card key is available only
at Lexus dealers. Your Lexus dealer can
replace the battery for you.
Flathead screwdriver
Small flathead screwdriver
Lithium battery CR2032
■Use a CR2032 lithium battery
●Batteries can be purchased at your Lexus
dealer, local electrical appliance shops or
camera stores.
●Replace only with the same or equivalent
type recommended by the manufacturer.
●Dispose of used batteries according to
local laws.
NOTICE
■When using the air conditioning sys-
tem
Make sure that a filter is always installed.
Using the air conditioning system without
a filter may cause damage to the system.
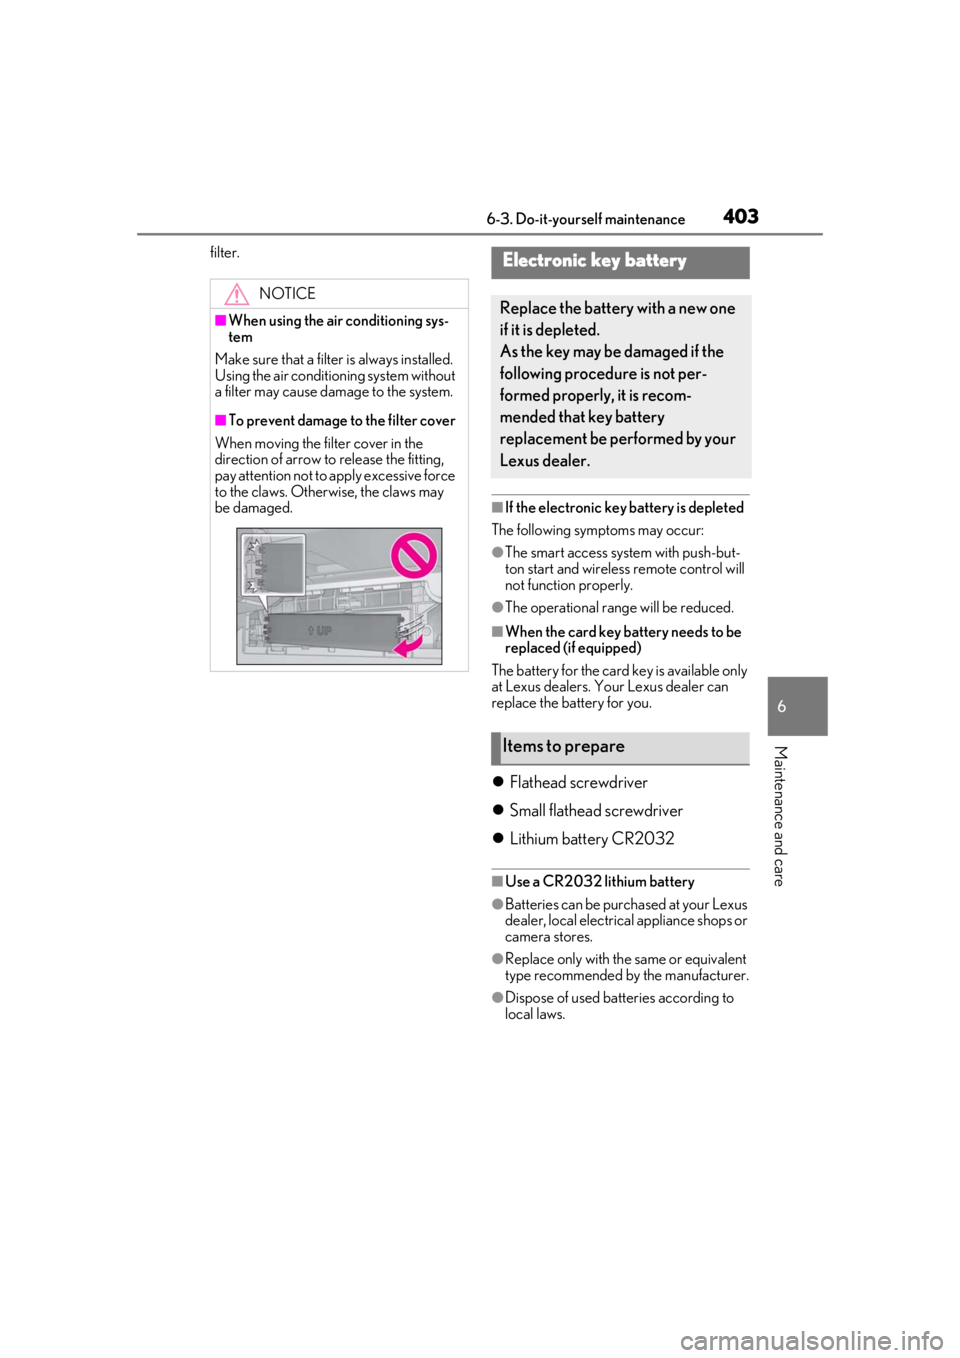
■To prevent damage to the filter cover
When moving the filter cover in the
direction of arrow to release the fitting,
pay attention not to apply excessive force
to the claws. Otherwise, the claws may
be damaged.
Electronic key battery
Replace the battery with a new one
if it is depleted.
As the key may be damaged if the
following procedure is not per-
formed properly, it is recom-
mended that key battery
replacement be performed by your
Lexus dealer.
Items to prepare
Page 404 of 516
4046-3. Do-it-yourself maintenance
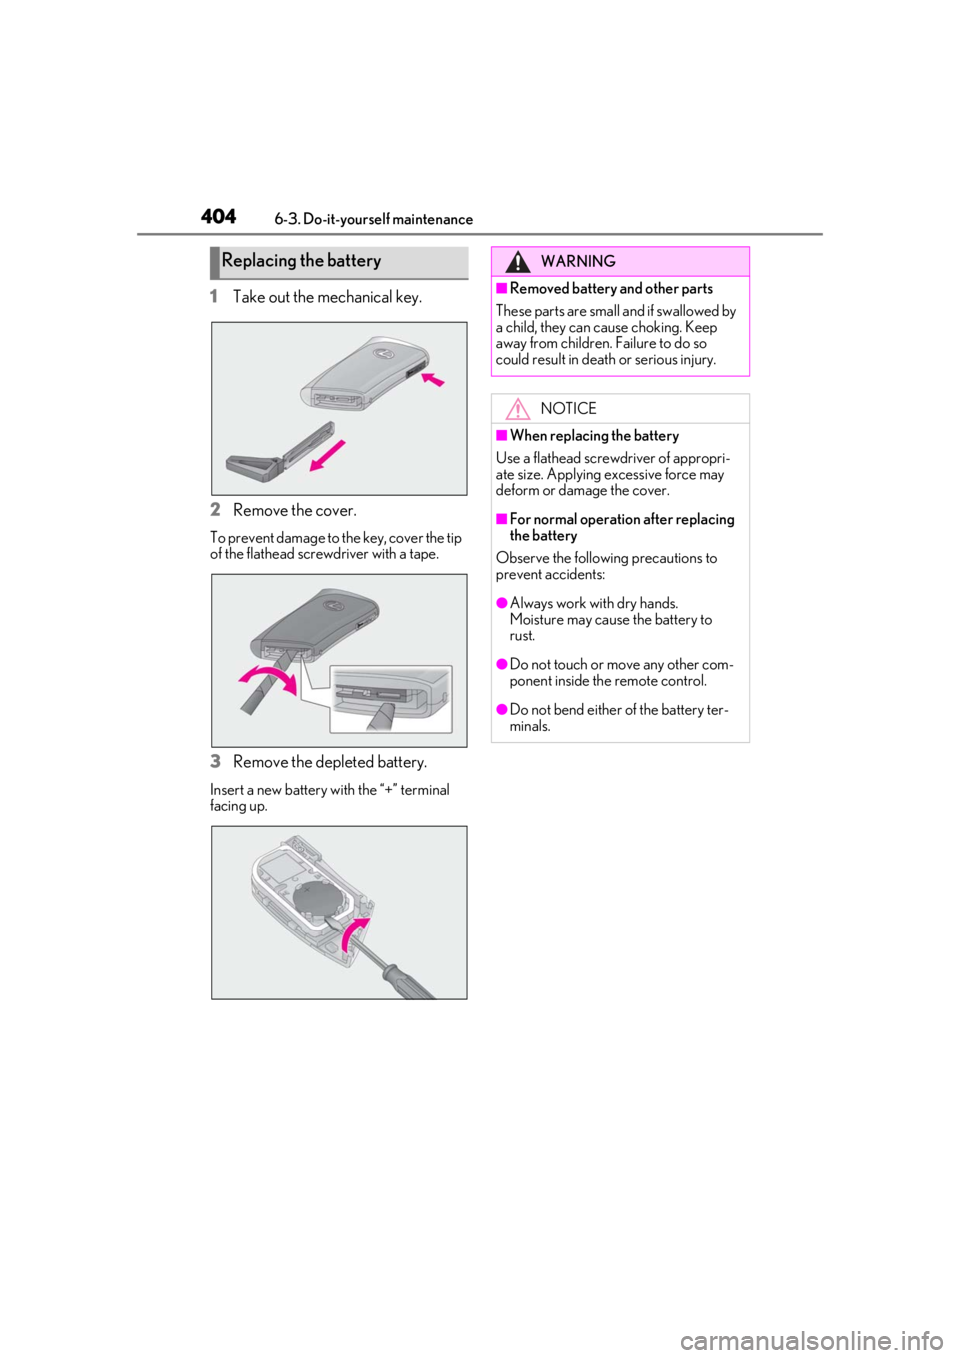
1Take out the mechanical key.
2
Remove the cover.
To prevent damage to the key, cover the tip
of the flathead screwdriver with a tape.
3Remove the depleted battery.
Insert a new battery with the “+” terminal
facing up.
Replacing the batteryWARNING
■Removed battery and other parts
These parts are small and if swallowed by
a child, they can cause choking. Keep
away from children. Failure to do so
could result in death or serious injury.
NOTICE
■When replacing the battery
Use a flathead screwdriver of appropri-
ate size. Applying excessive force may
deform or damage the cover.
■For normal operation after replacing
the battery
Observe the following precautions to
prevent accidents:
●Always work with dry hands.
Moisture may cause the battery to
rust.
●Do not touch or move any other com-
ponent inside the remote control.
●Do not bend either of the battery ter-
minals.
Page 405 of 516

4056-3. Do-it-yourself maintenance
6
Maintenance and care
1Turn the engine switch off.
2 Open the fuse box cover.
Engine compartment: type A fuse
box
Remove the service cover ( P.379) and
push the tabs in and lift the lid off.
Engine compartment: type B fuse
box
Remove the engine compartment cover
( P.378) and push the ta bs in and lift the
lid off.
Driver’s side instrument panel
Push the tab in and remove the lid.
Make sure to push the tab in during
removal or installation.
Passenger’s side instrument panel
Push the tab in and remove the lid.
Make sure to push the tab in during
removal or installation.
Trunk
Remove the luggage mat. ( P.343)
Push the tab in and lift the lid off.
Checking and replacing
fuses
If any of the electrical components
do not operate, a fuse may have
blown. If this happens, check and
replace the fuses as necessary.
Checking and replacing fuses
Page 406 of 516
4066-3. Do-it-yourself maintenance
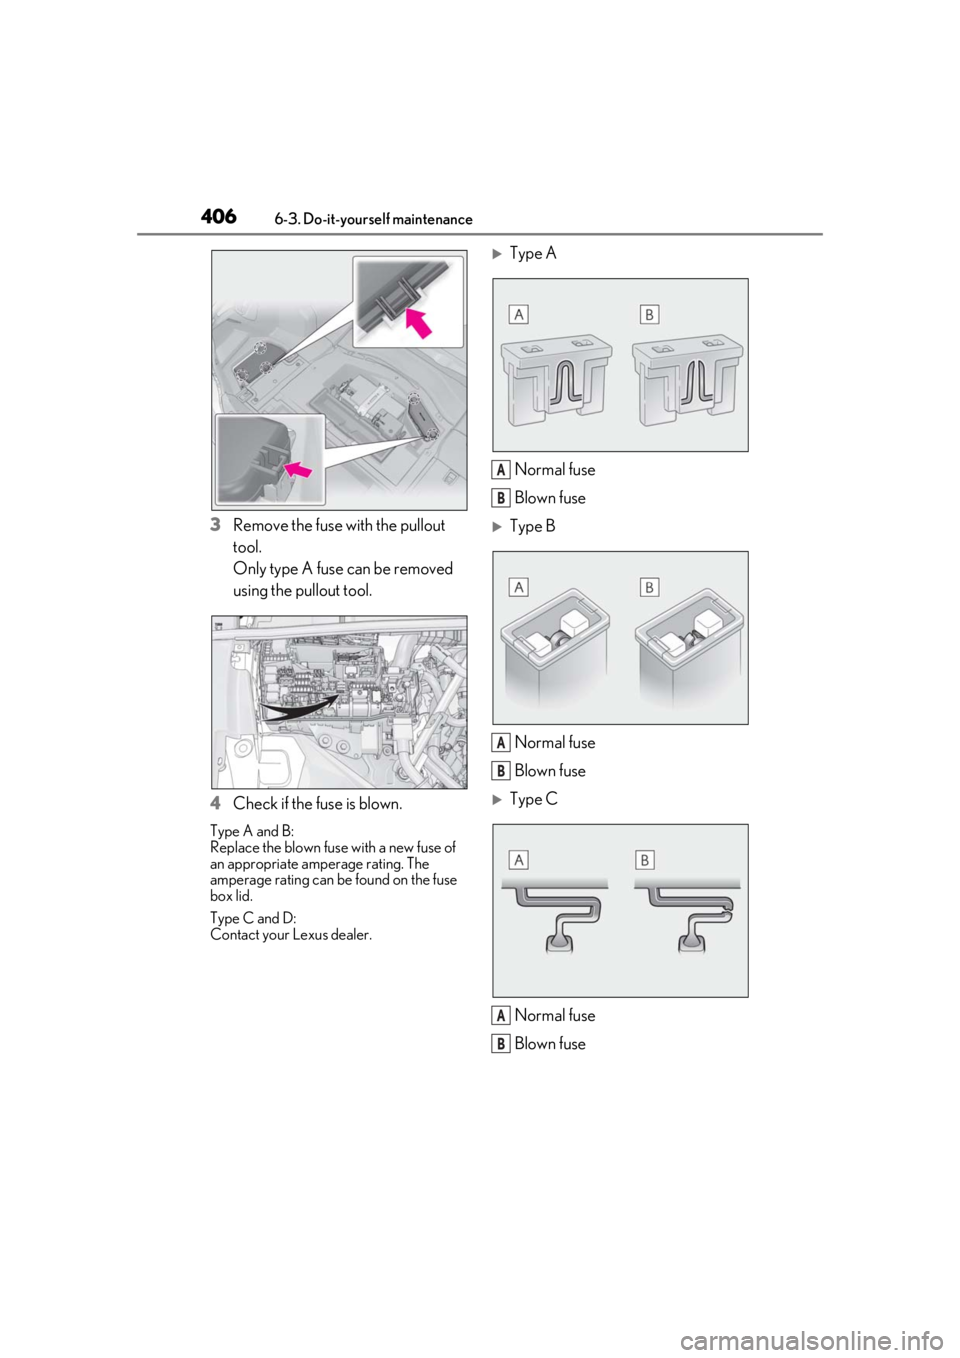
3Remove the fuse with the pullout
tool.
Only type A fuse can be removed
using the pullout tool.
4 Check if the fuse is blown.
Type A and B:
Replace the blown fuse with a new fuse of
an appropriate amperage rating. The
amperage rating can be found on the fuse
box lid.
Type C and D:
Contact your Lexus dealer.
Type A
Normal fuse
Blown fuse
Type B
Normal fuse
Blown fuse
Type CNormal fuse
Blown fuse
A
B
A
B
A
B
Page 407 of 516
4076-3. Do-it-yourself maintenance
6
Maintenance and care
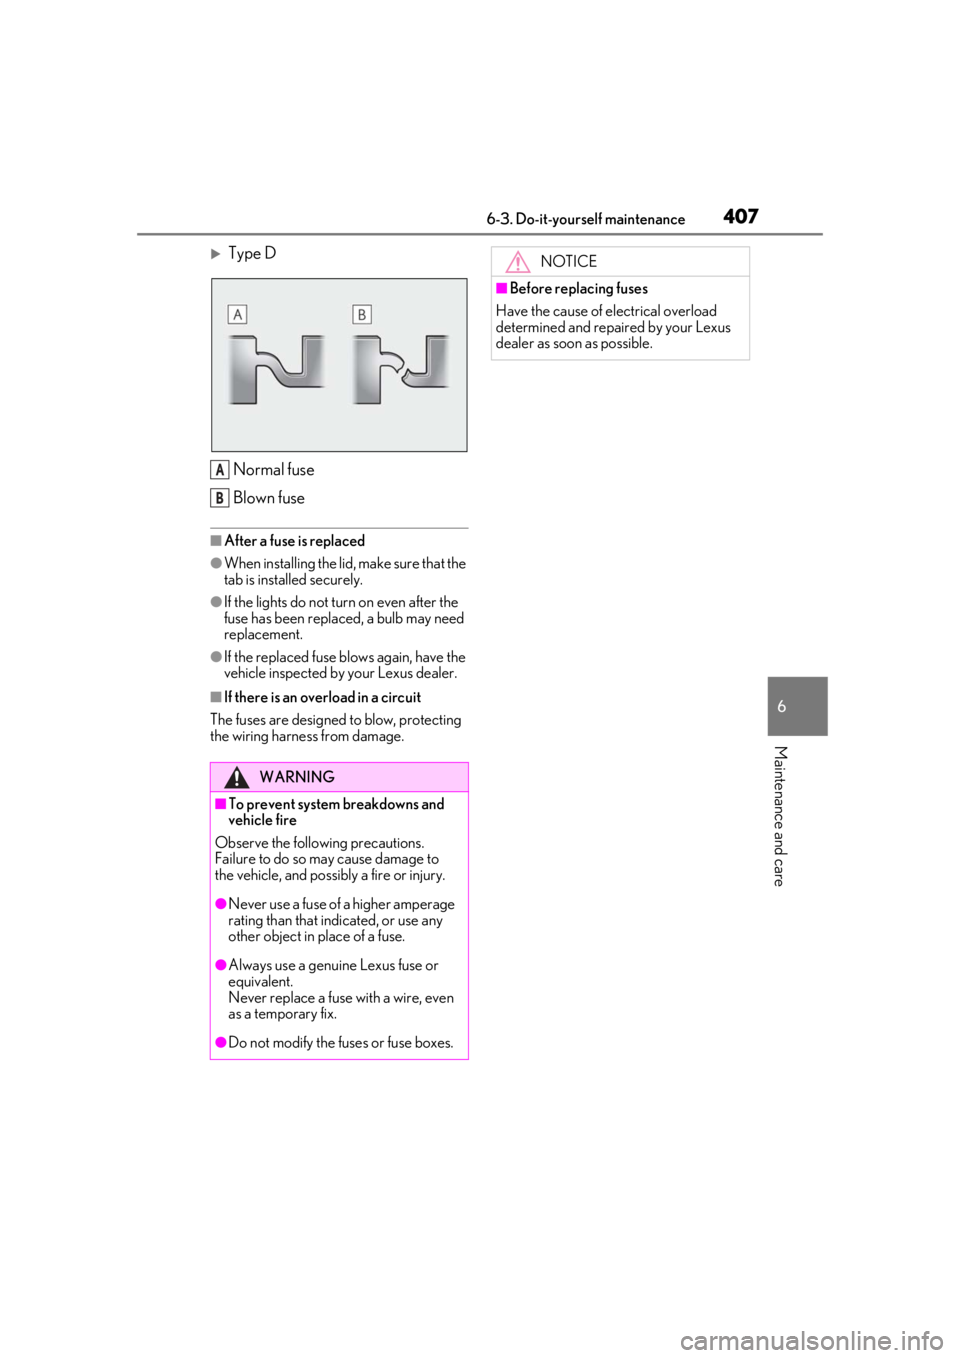
Type DNormal fuse
Blown fuse
■After a fuse is replaced
●When installing the lid, make sure that the
tab is installed securely.
●If the lights do not turn on even after the
fuse has been replaced, a bulb may need
replacement.
●If the replaced fuse blows again, have the
vehicle inspected by your Lexus dealer.
■If there is an overload in a circuit
The fuses are designed to blow, protecting
the wiring harness from damage.
WARNING
■To prevent system breakdowns and
vehicle fire
Observe the following precautions.
Failure to do so may cause damage to
the vehicle, and possibly a fire or injury.
●Never use a fuse of a higher amperage
rating than that indicated, or use any
other object in place of a fuse.
●Always use a genuine Lexus fuse or
equivalent.
Never replace a fuse with a wire, even
as a temporary fix.
●Do not modify the fuses or fuse boxes.
A
B
NOTICE
■Before replacing fuses
Have the cause of electrical overload
determined and repaired by your Lexus
dealer as soon as possible.
Page 408 of 516
4086-3. Do-it-yourself maintenance
■LED Lights
The lights consist of a number of LEDs. If
any of the LEDs burn out, take your vehicle
to your Lexus dealer to have the light
replaced.
■Condensation build-up on the inside of
the lens
Temporary condensation build-up on the
inside of the headlight lens does not indi-
cate a malfunction. Contact your Lexus
dealer for more information in the following
situations:
●Large drops of water ha ve built up on the
inside of the lens.
●Water has built up inside the headlight.
Light bulbs
If any lights burn out, have it
replaced by your Lexus dealer.
Page 409 of 516

4096-3. Do-it-yourself maintenance
1
2
3
4
5
6
7
8
9
Page 410 of 516

4106-3. Do-it-yourself maintenance