LEXUS LS500 2020 Owners Manual
Manufacturer: LEXUS, Model Year: 2020, Model line: LS500, Model: LEXUS LS500 2020Pages: 516, PDF Size: 10.38 MB
Page 441 of 516

4397-2. Steps to take in an emergency
7
When trouble arises
If you have a set of jumper (or booster)
cables and a second vehicle with a
12-volt battery, you can jump start your
vehicle by following the steps below.
Method connecting jumper (or
booster) cables to the battery
1 Confirm that the electronic key is
being carried.
When connecting the jumper (or booster)
cables, depending on the situation, the
alarm may activate and doors locked.
( P.66)
2 Open the trunk lid and remove the
luggage mat. ( P.343)
In the event that the trunk opener cannot
be used, use the mechanical key to open
the trunk. (P.437)
3 Connect a positive jumper cable clamp to on your vehicle and connect the
clamp on the other end of the positive cab le to on the second vehicle. Then,
connect a negative cable clamp to on the second vehicle and connect the
clamp at the other end of the negative cable to .
Positive (+) battery terminal (your vehicle)
Positive (+) battery terminal (second vehicle)
Negative (-) battery terminal (second vehicle)
Negative (-) battery terminal (your vehicle)
If the vehicle battery is dis-
charged
The following procedures may be
used to start the engine if the vehi-
cle’s battery is discharged.
You can also call your Lexus dealer
or a qualified repair shop.
Restarting the engine
A
B
C
D
A
B
C
D
Page 442 of 516

4407-2. Steps to take in an emergency
4Start the engine of the second vehi-
cle. Increase the engine speed
slightly and maintain at that level for
approximately 5 minutes to
recharge the battery of your vehi-
cle.
5 Open and close any of the doors of
your vehicle with the engine switch
off.
6 Maintain the engine speed of the
second vehicle and start the engine
of your vehicle by turning the
engine switch to IGNITION ON
mode.
7 Once the vehicle’s engine has
started, remove the jumper cables
in the exact reverse order from
which they were connected.
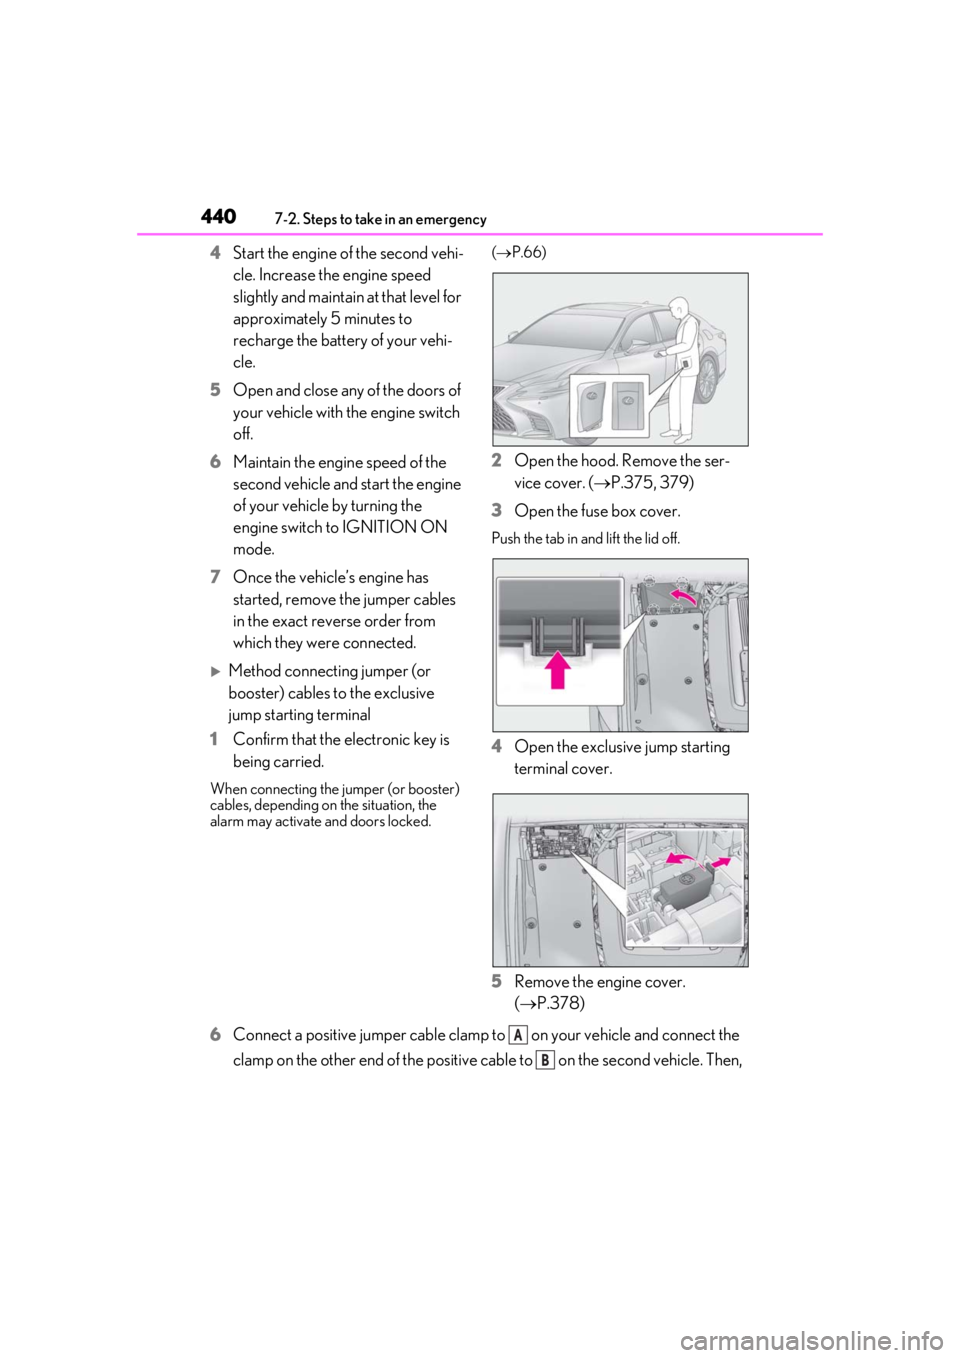
Method connecting jumper (or
booster) cables to the exclusive
jump starting terminal
1 Confirm that the electronic key is
being carried.
When connecting the jumper (or booster)
cables, depending on the situation, the
alarm may activate and doors locked. (
P.66)
2 Open the hood. Remove the ser-
vice cover. ( P.375, 379)
3 Open the fuse box cover.
Push the tab in and lift the lid off.
4Open the exclusive jump starting
terminal cover.
5 Remove the engine cover.
(P.378)
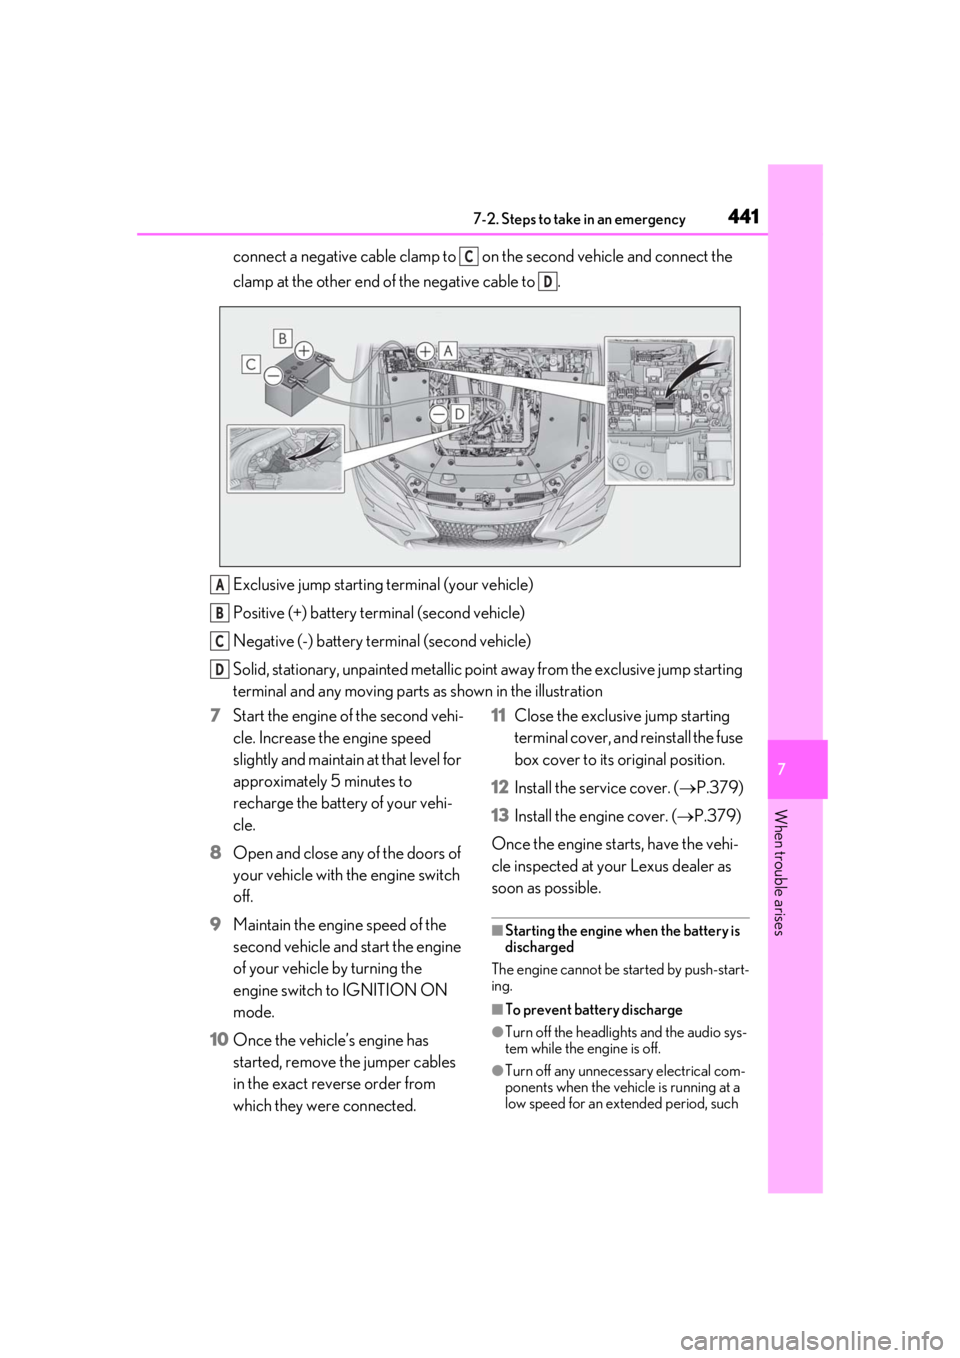
6 Connect a positive jumper cable clamp to on your vehicle and connect the
clamp on the other end of the positive cab le to on the second vehicle. Then,
A
B
Page 443 of 516

4417-2. Steps to take in an emergency
7
When trouble arises
connect a negative cable clamp to on the second vehicle and connect the
clamp at the other end of the negative cable to .
Exclusive jump starting terminal (your vehicle)
Positive (+) battery terminal (second vehicle)
Negative (-) battery terminal (second vehicle)
Solid, stationary, unpainted metallic point away from the exclusive jump starting
terminal and any mo ving parts as shown in the illustration
7 Start the engine of the second vehi-
cle. Increase the engine speed
slightly and maintain at that level for
approximately 5 minutes to
recharge the battery of your vehi-
cle.
8 Open and close any of the doors of
your vehicle with the engine switch
off.
9 Maintain the engine speed of the
second vehicle and start the engine
of your vehicle by turning the
engine switch to IGNITION ON
mode.
10 Once the vehicle’s engine has
started, remove the jumper cables
in the exact reverse order from
which they were connected. 11
Close the exclusive jump starting
terminal cover, and reinstall the fuse
box cover to its original position.
12 Install the service cover. ( P.379)
13 Install the engine cover. ( P.379)
Once the engine starts, have the vehi-
cle inspected at your Lexus dealer as
soon as possible.
■Starting the engine when the battery is
discharged
The engine cannot be started by push-start-
ing.
■To prevent battery discharge
●Turn off the headlights and the audio sys-
tem while the engine is off.
●Turn off any unnecessary electrical com-
ponents when the vehicle is running at a
low speed for an extended period, such
C
D
A
B
C
D
Page 444 of 516

4427-2. Steps to take in an emergency
as in heavy traffic.
■When the battery is removed or dis-
charged
●Information stored in the ECU is cleared.
When the battery is depleted, have the
vehicle inspected at your Lexus dealer.
●Some systems may require initialization.
( P.484)
■When removing the battery terminals
When the battery terminals are removed,
the information stored in the ECU is
cleared. Before removi ng the battery termi-
nals, contact your Lexus dealer.
■Charging the battery
The electricity stored in the battery will dis-
charge gradually even when the vehicle is
not in use, due to natural discharge and the
draining effects of certain electrical appli-
ances. If the vehicle is left for a long time,
the battery may discharge, and the engine
may be unable to start. (The battery
recharges automatically during driving.)
■When recharging or replacing the bat-
tery
●In some cases, it may not be possible to
unlock the doors using the smart access
system with push-button start when the
battery is discharged. Use the wireless
remote control or the mechanical key to
lock or unlock the doors.
●The engine may not start on the first
attempt after the battery has recharged
but will start normally after the second
attempt. This is not a malfunction.
●The engine switch mode is memorized by
the vehicle. When the battery is recon-
nected, the system will return to the
mode it was in before the battery was dis-
charged. Before di sconnecting the bat-
tery, turn the engine switch off.
If you are unsure what mode the engine
switch was in befo re the battery dis-
charged, be especially careful when
reconnecting the battery.
■When replacing the battery
●Use a Central Degassing type battery
(European Regulations).
●Use a battery with the same case size as the previous battery and an equivalent
20 hour rate capacity (20HR) or greater.
• If the sizes differ, the battery cannot be
properly secured.
• If the 20 hour rate capacity is low, even if the time period where the vehicle is not
used is a short time, the battery may dis-
charge and the engine may not be able to
start.
●Use a battery with a handle. If a battery
without a handle is used, removal is more
difficult.
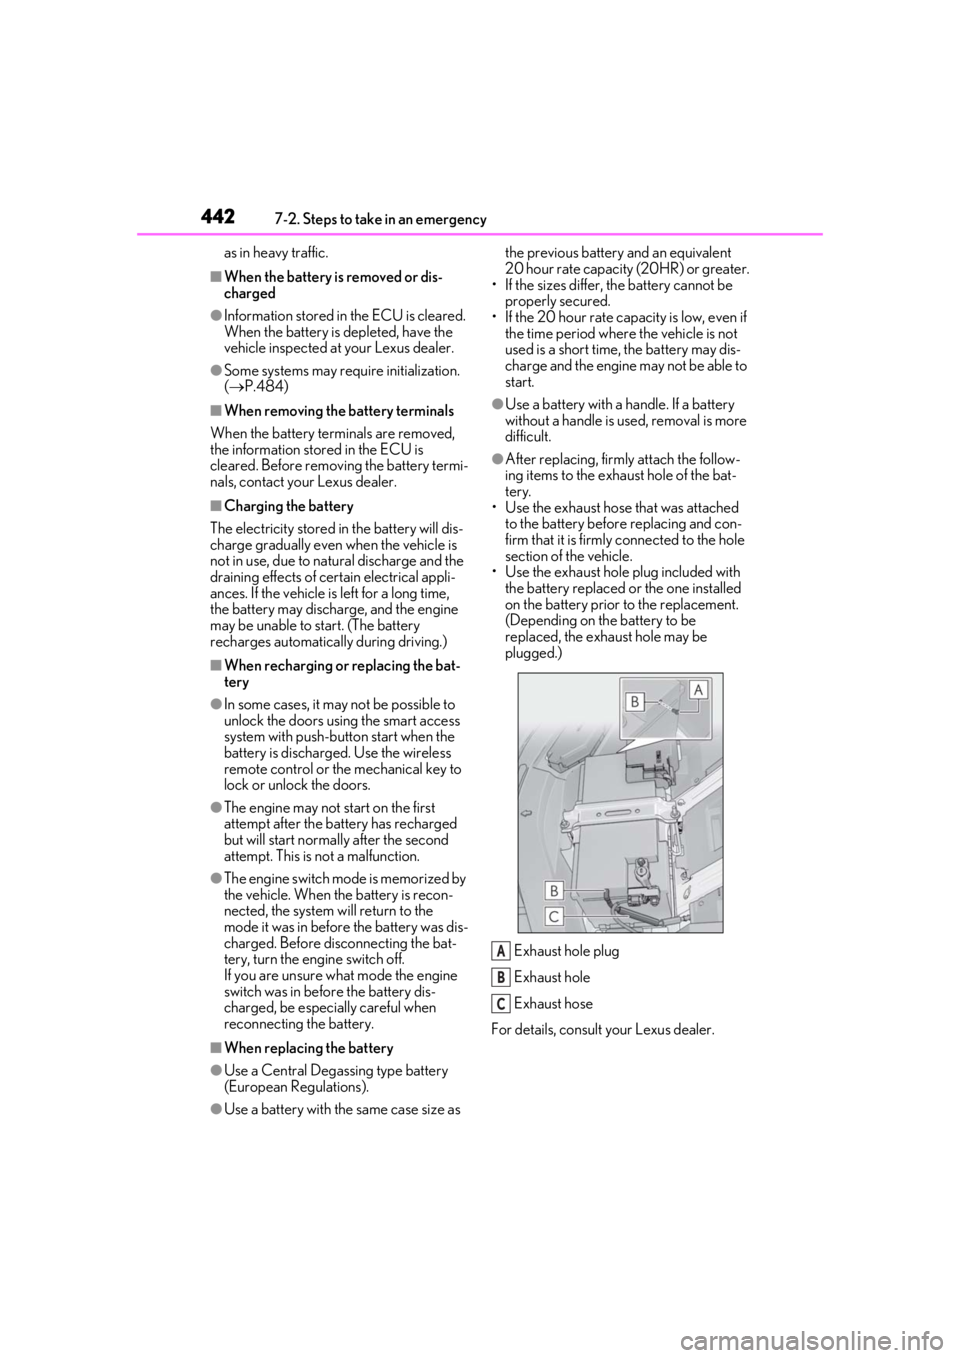
●After replacing, firm ly attach the follow-
ing items to the exhaust hole of the bat-
tery.
• Use the exhaust hose that was attached
to the battery before replacing and con-
firm that it is firmly connected to the hole
section of the vehicle.
• Use the exhaust hole plug included with the battery replaced or the one installed
on the battery prior to the replacement.
(Depending on the battery to be
replaced, the exhaust hole may be
plugged.)
Exhaust hole plug
Exhaust hole
Exhaust hose
For details, consult your Lexus dealer.
A
B
C
Page 445 of 516

4437-2. Steps to take in an emergency
7
When trouble arises
WARNING
■When removing the battery terminals
Always remove the negative (-) terminal
first. If the positive (+) terminal contacts
any metal in the surrounding area when
the positive (+) terminal is removed, a
spark may occur, leadin g to a fire in addi-
tion to electrical shocks and death or
serious injury.
■Avoiding battery fires or explosions
Observe the following precautions to
prevent accidentally igniting the flamma-
ble gas that may be emitted from the bat-
tery:
●Make sure each jumper cable is con-
nected to the correct terminal and that
it is not unintentiona lly in contact with
any other than the intended terminal.
●Do not allow the other end of the
jumper cable connected to the “+” ter-
minal to come into contact with any
other parts or metal surfaces in the
area, such as brackets or unpainted
metal.
●Do not allow the + and - clamps of the
jumper cables to come into contact
with each other.
●Do not smoke, use matches, cigarette
lighters or allow open flame near the
battery.
■Battery precautions
The battery contains poisonous and cor-
rosive acidic electrolyte, while related
parts contain lead and lead compounds.
Observe the following precautions when
handling the battery:
●When working with the battery, always
wear safety glasses and take care not
to allow any battery fluids (acid) to
come into contact with skin, clothing
or the vehicle body.
●Do not lean over the battery.
●In the event that battery fluid comes
into contact with the skin or eyes,
immediately wash the affected area
with water and seek medical attention.
Place a wet sponge or cloth over the
affected area until medical attention
can be received.
●Always wash your hands after handling
the battery support, terminals, and
other battery-related parts.
●Do not allow children near the battery.
■After recharging the battery
Have the battery inspected at your Lexus
dealer as soon as possible.
If the battery is deteriorating, continued
use may cause the battery to emit a mal-
odorous gas, which may be detrimental
to the health of passengers.
■When replacing the battery
●When the vent plug and indicator are
close to the hold down clamp, the bat-
tery fluid (sulfuric acid) may leak.
●For information regarding battery
replacement, contact your Lexus
dealer.
●After replacing, se curely attach the
exhaust hose and exhaust hole plug to
the exhaust hole of the replaced bat-
tery. If not properly installed, gases
(hydrogen) may leak into the vehicle
interior, and there is the possible dan-
ger of the gas igniting and exploding.
NOTICE
■When handling jumper cables
When connecting the jumper cables,
ensure that they do not become entan-
gled in the cooling fan or engine drive
belt.
■To prevent damaging the vehicle
The exclusive jump starting terminal is to
be used when chargi ng the battery from
another vehicle in an emergency. It can-
not be used to jump start another vehicle.
Page 446 of 516

4447-2. Steps to take in an emergency
1Stop the vehicle in a safe place and
turn off the air conditioning system,
and then stop the engine.
2 If you see steam:
Carefully lift the hood after the
steam subsides.
If you do not see steam:
Carefully lift the hood.
3 After the engine has cooled down
sufficiently, inspect the hoses and radiator core (radiator) for any
leaks.
Radiators
Cooling fan
If a large amount of coolant leaks, immedi-
ately contact your Lexus dealer.
4
The coolant level is satisfactory if it
is between the “F” and “L” lines on
the reservoir.
Engine
Reservoir
“F” line
“L” line
Coolant inlet cap
If your vehicle overheats
The following may indicate that
your vehicle is overheating.
The engine coolant temperature
gauge ( P.73, 76) is in the red
zone or a loss of engine power is
experienced. (For example, the
vehicle speed does not increase.)
“Engine Coolant Temp High Stop
in a Safe Place See Owner’s
Manual” is shown on the
multi-information display.
Steam comes out from under the
hood.
Correction procedures
A
B
A
B
C
D
Page 447 of 516

4457-2. Steps to take in an emergency
7
When trouble arises
IntercoolerReservoir
“F” line
“L” line
5 Add coolant if necessary.
Water can be used in an emergency if
coolant is unavailable.
Engine
P.445
Intercooler
Remove the engine compartment cover
and add coolant.
6 Start the engine and turn the air
conditioning system on to check
that the radiator cooling fan oper-
ates and to check for coolant leaks
from the radiator or hoses.
The fan operates when the air conditioning
system is turned on immediately after a
cold start. Confirm that the fan is operating
by checking the fan sound and air flow. If it
is difficult to check these, turn the air con-
ditioning system on and off repeatedly.
(The fan may not oper ate in freezing tem-
peratures.)
7 If the fan is not operating:
Stop the engine immediately and
contact your Lexus dealer.
If the fan is operating:
Have the vehicle inspected at the
nearest Lexus dealer.
■When adding engine coolant
Add coolant in accordance with the follow-
ing procedure.
A
B
C
Page 448 of 516

4467-2. Steps to take in an emergency
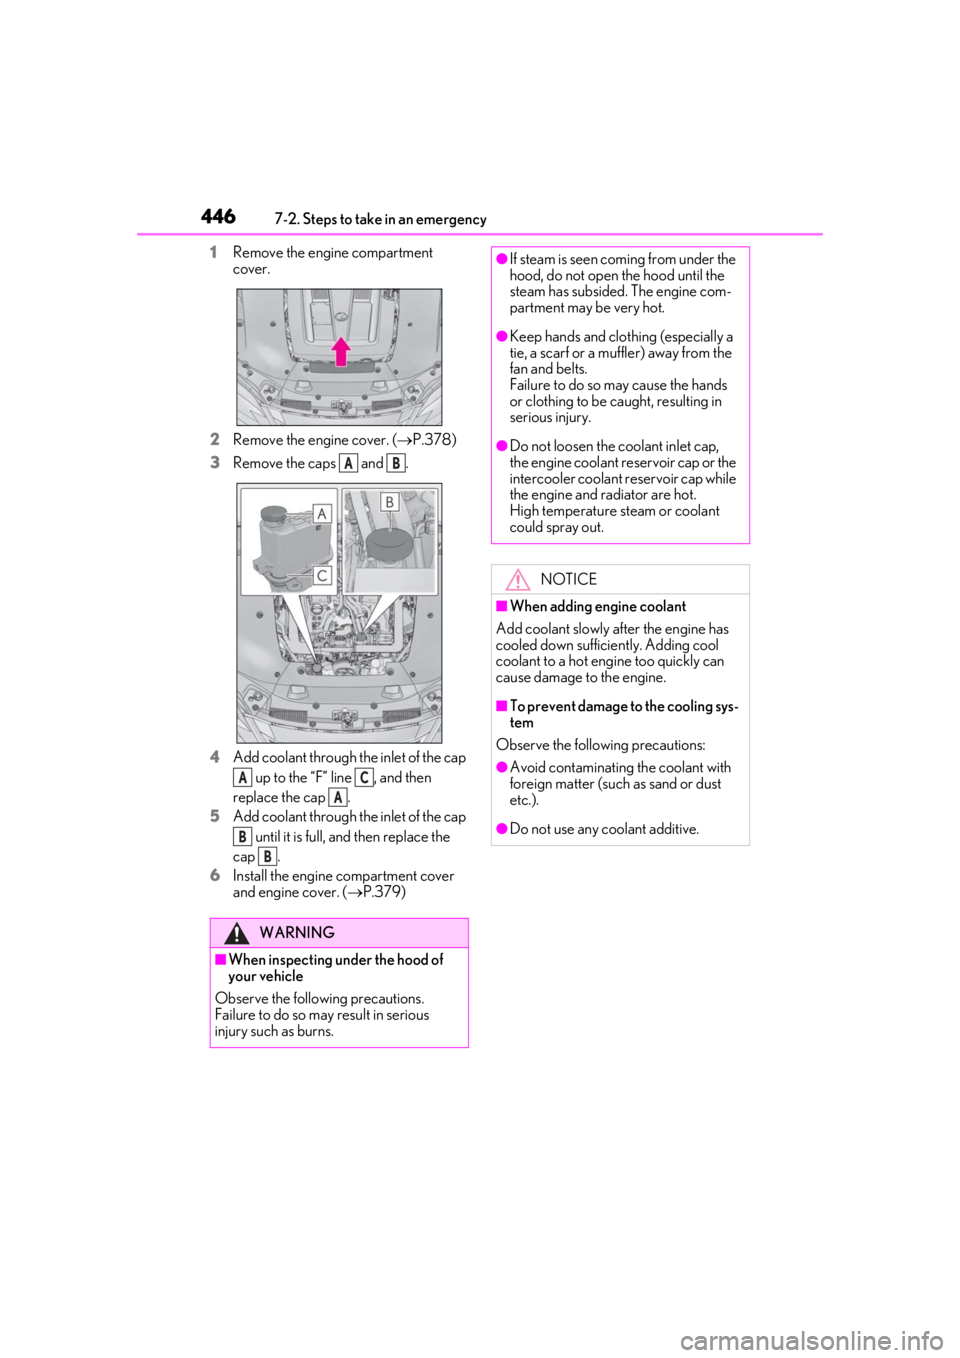
1Remove the engine compartment
cover.
2
Remove the engine cover. ( P.378)
3
Remove the caps and .
4
Add coolant through the inlet of the cap up to the “F” line , and then
replace the cap .
5
Add coolant through the inlet of the cap
until it is full, and then replace the
cap .
6
Install the engine compartment cover
and engine cover. ( P.379)
WARNING
■When inspecting under the hood of
your vehicle
Observe the following precautions.
Failure to do so may result in serious
injury such as burns.
AB
AC
A
B
B
●If steam is seen coming from under the
hood, do not open the hood until the
steam has subsided. The engine com-
partment may be very hot.
●Keep hands and clothing (especially a
tie, a scarf or a muffler) away from the
fan and belts.
Failure to do so may cause the hands
or clothing to be caught, resulting in
serious injury.
●Do not loosen the coolant inlet cap,
the engine coolant reservoir cap or the
intercooler coolant reservoir cap while
the engine and radiator are hot.
High temperature steam or coolant
could spray out.
NOTICE
■When adding engine coolant
Add coolant slowly after the engine has
cooled down sufficiently. Adding cool
coolant to a hot engine too quickly can
cause damage to the engine.
■To prevent damage to the cooling sys-
tem
Observe the following precautions:
●Avoid contaminating the coolant with
foreign matter (such as sand or dust
etc.).
●Do not use any coolant additive.
Page 449 of 516

4477-2. Steps to take in an emergency
7
When trouble arises
1Stop the engine. Set the parking
brake and shift the shift position to
P.
2
Remove the mud, snow or sand
from around the rear wheels.
3
Place wood, stones or some other
material under the rear wheels to
help provide traction.
4
Restart the engine.
5
Shift the shift position to D or R and
release the parking brake. Then,
while exercising caution, depress
the accelerator pedal.
■When it is difficult to free the vehicle
Press the switch to turn off TRAC.
If the vehicle becomes stuck
Carry out the following proce-
dures if the tires spin or the vehicle
becomes stuck in mud, dirt or snow:
Recovering procedure
WARNING
■When attempting to free a stuck vehi-
cle
If you choose to push the vehicle back
and forth to free it, make sure the sur-
rounding area is clear to avoid striking
other vehicles, objects or people. The
vehicle may also lunge forward or lunge
back suddenly as it becomes free. Use
extreme caution.
■When shifting the shift position
Be careful not to shift the shift position
with the accelerator pedal depressed.
This may lead to un expected rapid accel-
eration of the vehicle that may cause an
accident resulting in death or serious
injury.
NOTICE
■To avoid damaging the transmission
and other components
●Avoid spinning the rear wheels and
depressing the accelerator pedal
more than necessary.
●If the vehicle remains stuck even after
these procedures are performed, the
vehicle may require towing to be freed.
Page 450 of 516

4487-2. Steps to take in an emergency