ECO mode LEXUS LS500 2020 Workshop Manual
[x] Cancel search | Manufacturer: LEXUS, Model Year: 2020, Model line: LS500, Model: LEXUS LS500 2020Pages: 516, PDF Size: 10.38 MB
Page 261 of 516
2614-5. Using the driving support systems
4
Driving
■The system can be operated when
●The engine switch is in IGNITION ON
mode.
●Intuitive parking assist function is on.
●The vehicle speed is less than about 6 mph (10 km/h).
●A shift position other than P is selected.
■Setting the buzzer volume
The buzzer volume can be adjusted on the
multi-information display. ( P.258)
■If “Parking Assist Unavailable Clean
Parking Assist Sensor” is displayed on
the multi-information display
A sensor may be covered with ice, snow,
dirt, etc. Remove the ice, snow, dirt, etc.,
from the sensor to return the system to nor-
mal.
Also, due to ice forming on a sensor at low
temperatures, a warning message may be
displayed or the sensor may not be able to
detect an object. Once the ice melts, the
system will return to normal.
■If “Parking Assist Unavailable” is dis-
played on the multi-information display
●Water may be continuously flowing over
the sensor surface, such as in a heavy
rain. When the system determines that it
is normal, the system will return to nor-
mal.
●Initialization may not have been per-
formed after a battery terminal was dis-
connected and reconnected. Initialize the
system. ( P.261)
If this message continues to be displayed
even after initializati on, have the vehicle
inspected by your Lexus dealer.
■If a battery terminal has been discon-
nected and reconnected
The system needs to be initialized. To initial-
ize the system, drive the vehicle straight
ahead for 5 seconds or more at a speed of
approximately 22 mph (35 km/h) or more.
Additionally, for vehicles with the Parking
Support Brake function, turn the steering
wheel fully to the left and right with the vehi-
cle stopped.
■Sensor detection information
●The following situations may occur
during use.
• The sensors may be able to only detect objects near the fron t and rear bumpers.
• Depending on the shape of the object and other factors, the detection distance
WARNING
■When using intuitive parking assist
In the following situations, the system
may not function correctly due to a sen-
sor malfunction, etc. Have the vehicle
checked by your Lexus dealer.
●The intuitive parking assist operation
display flashes or shows continuously,
and a buzzer sounds when no objects
are detected.
●If the area around a sensor collides
with something, or is subjected to
strong impact.
●If the bumper or grille collides with
something.
●If the display flashes or is displayed
continuously and a buzzer does not
sound, except when the mute function
has been turned on.
●If a display error occurs, first check the
sensor.
If the error occurs even when there is
no ice, snow or mud on the sensor, it is
likely that the sensor is malfunctioning.
■Notes when washing the vehicle
Do not apply intensive bursts of water or
steam to the sensor area.
Doing so may result in the sensor mal-
functioning.
●When using a high pressure washer to
wash the vehicle, do not spray the sen-
sors directly, as doing so may cause a
sensor to malfunction.
●When using steam to clean the vehicle,
do not direct steam too close to the
sensors as doing so may cause a sen-
sor to malfunction.
Page 266 of 516

2664-5. Using the driving support systems
*:If equipped
Meter control switches
Turning the RCTA function on/off.
When the RCTA function is disabled, the
RCTA OFF indicator illuminates.
Outside rear view mirror indicators
When a vehicle approaching from the right
or left at the rear of the vehicle is detected,
both outside rear view mirror indicators
will flash.
Center Display
If a vehicle approaching from the right or
left at the rear of the vehicle is detected,
the RCTA icon ( P.267) for the detected
side will be displayed on the Center Dis-
play. This illustration shows an example of a
vehicle approaching from both sides of the
vehicle.
RCTA buzzer
If a vehicle approaching from the right or
left at the rear of th e vehicle is detected, a
buzzer will sound. The buzzer also sounds
for approximately 1 second immediately
after the RCTA function is turned on.
Use the meter control switches to
enable/disable the RCTA function.
( P.81)
1 Press or to select .
2 Press or to select “PKSA”
and then press .
3 Press or to select “RCTA”
and then press .
When the RCTA function is disabled, the
RCTA OFF indicator ( P.68) illuminates.
(Each time the engine switch is turned off
then changed to IGNITION ON mode,
the RCTA function will be enabled auto-
matically.)
RCTA (Rear cross traffic
alert) function*
The RCTA function uses the BSM
rear side radar sensors installed
behind the rear bumper. This func-
tion is intended to assist the driver
in checking areas that are not easily
visible when backing up.
System components
A
B
C
Turning the RCTA function
on/off
D
Page 271 of 516
2714-5. Using the driving support systems
4
Driving
2Press or to select “PKSA”
and then press .
3 Press or to select “RCD”
and then press .
When the RCD function is disabled, the
RCD OFF indicator ( P.68) illuminates.
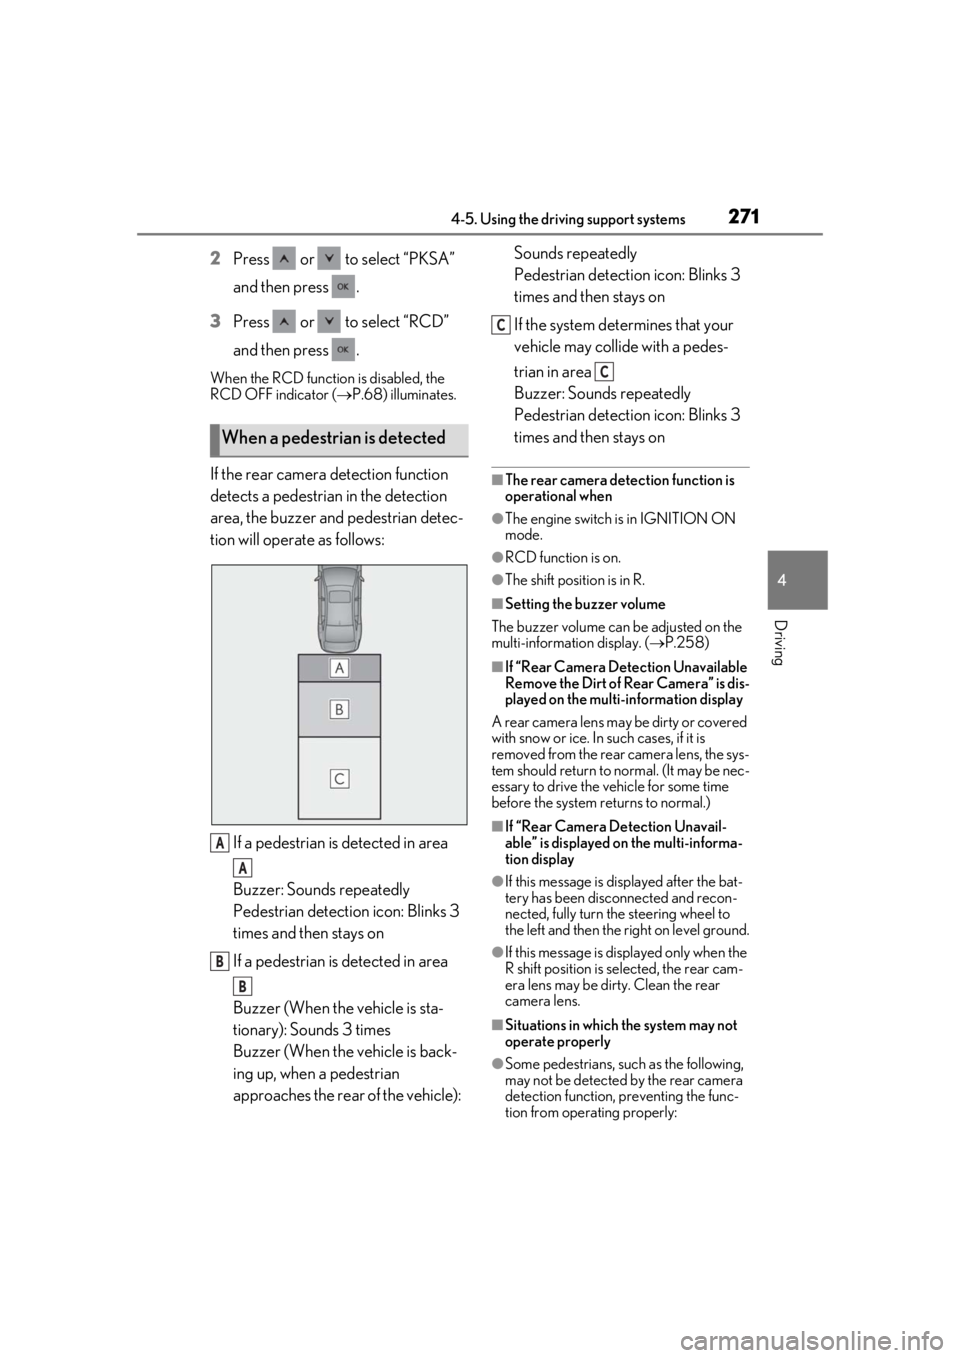
If the rear camera detection function
detects a pedestrian in the detection
area, the buzzer and pedestrian detec-
tion will operate as follows:
If a pedestrian is detected in area
Buzzer: Sounds repeatedly
Pedestrian detection icon: Blinks 3
times and then stays on
If a pedestrian is detected in area
Buzzer (When the vehicle is sta-
tionary): Sounds 3 times
Buzzer (When the vehicle is back-
ing up, when a pedestrian
approaches the rear of the vehicle): Sounds repeatedly
Pedestrian detection icon: Blinks 3
times and then stays on
If the system determines that your
vehicle may collide with a pedes-
trian in area
Buzzer: Sounds repeatedly
Pedestrian detection icon: Blinks 3
times and then stays on■The rear camera dete
ction function is
operational when
●The engine switch is in IGNITION ON
mode.
●RCD function is on.
●The shift position is in R.
■Setting the buzzer volume
The buzzer volume can be adjusted on the
multi-information display. ( P.258)
■If “Rear Camera Detection Unavailable
Remove the Dirt of Rear Camera” is dis-
played on the multi-information display
A rear camera lens ma y be dirty or covered
with snow or ice. In such cases, if it is
removed from the rear camera lens, the sys-
tem should return to normal. (It may be nec-
essary to drive the vehicle for some time
before the system returns to normal.)
■If “Rear Camera Detection Unavail-
able” is displayed on the multi-informa-
tion display
●If this message is di splayed after the bat-
tery has been disconnected and recon-
nected, fully turn the steering wheel to
the left and then the right on level ground.
●If this message is di splayed only when the
R shift position is selected, the rear cam-
era lens may be dirty. Clean the rear
camera lens.
■Situations in which the system may not
operate properly
●Some pedestrians, such as the following,
may not be detected by the rear camera
detection function, preventing the func-
tion from operating properly:
When a pedestrian is detected
A
A
B
B
C
C
Page 273 of 516
2734-5. Using the driving support systems
4
Driving
*: If equipped
■Parking Support Brake function
(static objects)
Ultrasonic sensors are used to detect
static objects, such as a wall, in the
detection area when driving at a low
speed or backing up. ( P.279)
■Parking Support Brake function
(rear-crossing vehicles)
Rear radar sensors are used to detect
approaching vehicles in the detection
area behind the vehicle when backing
up. ( P.285)
■Parking Support Brake function
(rear pedestrians) (if equipped)
A rear camera sensor is used to detect
pedestrians in the detection area
behind the vehicle when backing up.
( P.289)PKSB (Parking Support
B
rake)*
The Parking Support Brake system
consists of the following functions
that operate when driving at a low
speed or backing up, such as when
parking. When the system deter-
mines that a collision with a
detected object or pedestrian is
high, a warning operates to urge
the driver to take evasive action. If
the system determines that the pos-
sibility of a collision with a detected
object or pedestrian is extremely
high, the brakes are automatically
applied to help avoid the collision or
help reduce the impact of the colli-
sion.
PKSB (Parking Support Brake)
system
WARNING
■Limitations of the Parking Support
Brake system
Do not overly rely on the system, as
doing so may lead to an accident.
●The driver is solely responsible for safe
driving. Always drive carefully, taking
care to observe your surroundings.
The Parking Support Brake system is
designed to provide support to lessen
the severity of collisions. However, it
may not operate in some situations.
●The Parking Support Brake system is
not designed to stop the vehicle com-
pletely. Additionally, even if the system
has stopped the vehicl e, it is necessary
to depress the brake pedal immedi-
ately as brake control will be canceled
after approximately 2 seconds.
NOTICE
■If “Parking Support Brake Unavail-
able” is displayed on the multi-infor-
mation display and the PKSB OFF
indicator is flashing
If this message is displayed immediately
after the engine swit ch is changed to
IGNITION ON mode, operate the vehi-
cle carefully, paying attention to your sur-
roundings. It may be necessary to drive
the vehicle for a certain amount of time
before the system returns to normal. (If
the system is not return to normal after
driving for a while, clean the rear camera
lens.)
Page 277 of 516
2774-5. Using the driving support systems
4
Driving
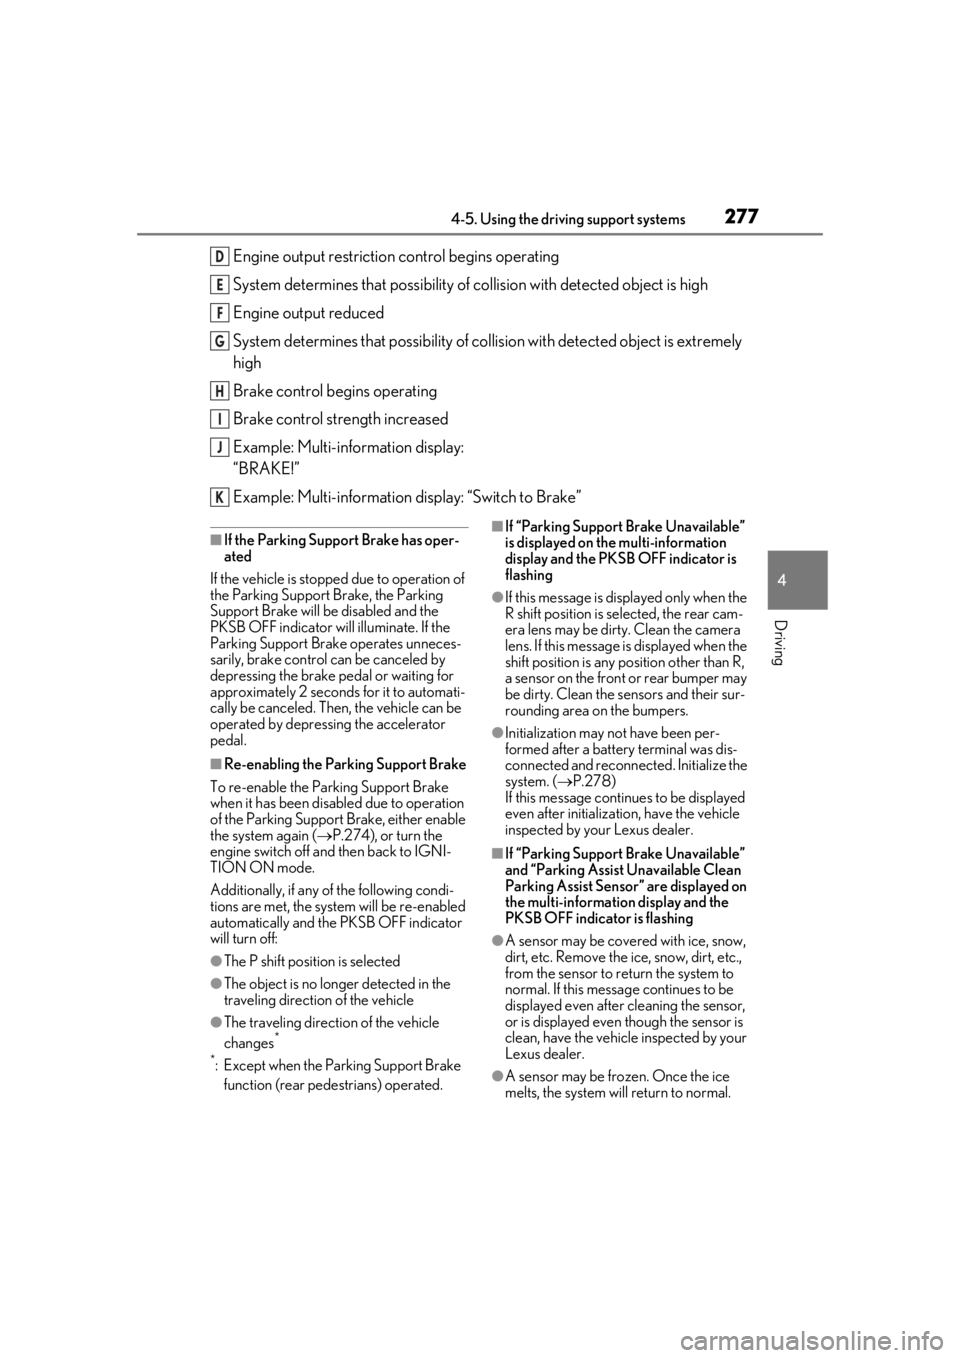
Engine output restriction control begins operating
System determines that po ssibility of collision with detected object is high
Engine output reduced
System determines that possibility of col lision with detected object is extremely
high
Brake control begins operating
Brake control strength increased
Example: Multi-information display:
“BRAKE!”
Example: Multi-information display: “Switch to Brake”
■If the Parking Support Brake has oper-
ated
If the vehicle is stopped due to operation of
the Parking Support Brake, the Parking
Support Brake will be disabled and the
PKSB OFF indicator will illuminate. If the
Parking Support Brake operates unneces-
sarily, brake control can be canceled by
depressing the brake pedal or waiting for
approximately 2 seconds for it to automati-
cally be canceled. Then, the vehicle can be
operated by depressing the accelerator
pedal.
■Re-enabling the Park ing Support Brake
To re-enable the Parking Support Brake
when it has been disabled due to operation
of the Parking Support Brake, either enable
the system again ( P.274), or turn the
engine switch off and then back to IGNI-
TION ON mode.
Additionally, if any of the following condi-
tions are met, the syst em will be re-enabled
automatically and the PKSB OFF indicator
will turn off:
●The P shift position is selected
●The object is no longer detected in the
traveling direction of the vehicle
●The traveling direction of the vehicle
changes*
*
: Except when the Parking Support Brake function (rear pedestrians) operated.
■If “Parking Support Brake Unavailable”
is displayed on th e multi-information
display and the PKSB OFF indicator is
flashing
●If this message is di splayed only when the
R shift position is selected, the rear cam-
era lens may be dirty. Clean the camera
lens. If this message is displayed when the
shift position is any position other than R,
a sensor on the front or rear bumper may
be dirty. Clean the sensors and their sur-
rounding area on the bumpers.
●Initialization may not have been per-
formed after a battery terminal was dis-
connected and reconnected. Initialize the
system. ( P.278)
If this message continues to be displayed
even after initializati on, have the vehicle
inspected by your Lexus dealer.
■If “Parking Support Brake Unavailable”
and “Parking Assist Unavailable Clean
Parking Assist Sensor” are displayed on
the multi-information display and the
PKSB OFF indicator is flashing
●A sensor may be cove red with ice, snow,
dirt, etc. Remove the ice, snow, dirt, etc.,
from the sensor to return the system to
normal. If this messa ge continues to be
displayed even after cleaning the sensor,
or is displayed even though the sensor is
clean, have the vehicle inspected by your
Lexus dealer.
●A sensor may be frozen. Once the ice
melts, the system wi ll return to normal.
D
E
F
G
H
I
J
K
Page 292 of 516
2924-5. Using the driving support systems
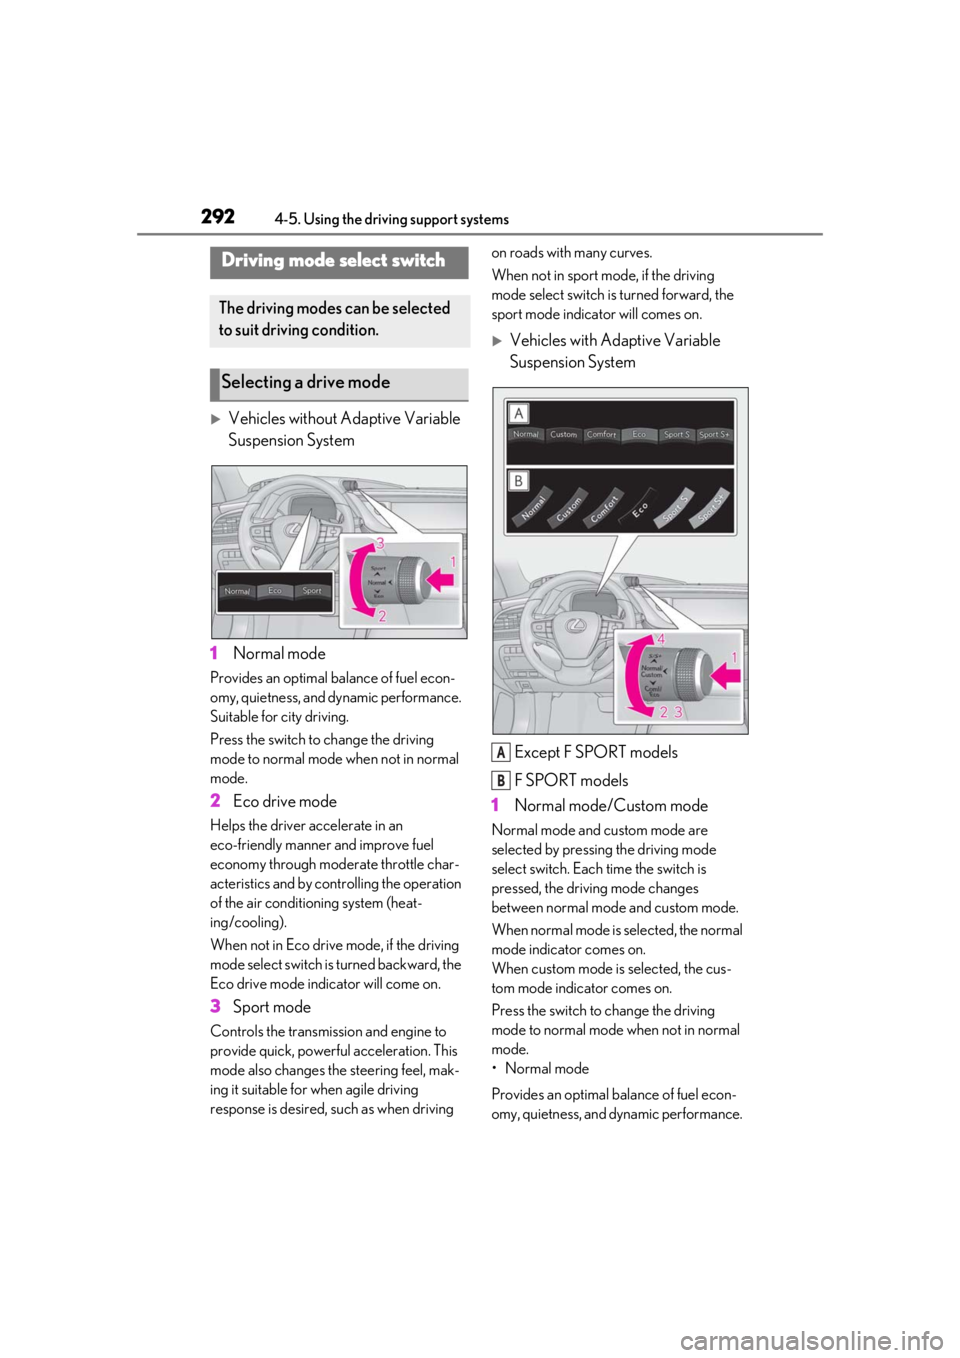
Vehicles without Adaptive Variable
Suspension System
1 Normal mode
Provides an optimal ba lance of fuel econ-
omy, quietness, and dynamic performance.
Suitable for city driving.
Press the switch to change the driving
mode to normal mode when not in normal
mode.
2 Eco drive mode
Helps the driver accelerate in an
eco-friendly manner and improve fuel
economy through moderate throttle char-
acteristics and by controlling the operation
of the air conditioning system (heat-
ing/cooling).
When not in Eco drive mode, if the driving
mode select switch is turned backward, the
Eco drive mode indicator will come on.
3Sport mode
Controls the transmission and engine to
provide quick, powerful acceleration. This
mode also changes the steering feel, mak-
ing it suitable for when agile driving
response is desired, such as when driving on roads with many curves.
When not in sport mode, if the driving
mode select switch is turned forward, the
sport mode indicator will comes on.
Vehicles with Adaptive Variable
Suspension System
Except F SPORT models
F SPORT models
1 Normal mode/Custom mode
Normal mode and custom mode are
selected by pressing the driving mode
select switch. Each time the switch is
pressed, the driving mode changes
between normal mode and custom mode.
When normal mode is selected, the normal
mode indicator comes on.
When custom mode is selected, the cus-
tom mode indicator comes on.
Press the switch to change the driving
mode to normal mode when not in normal
mode.
• Normal mode
Provides an optimal ba lance of fuel econ-
omy, quietness, and dynamic performance.
Driving mode select switch
The driving modes can be selected
to suit driving condition.
Selecting a drive mode
A
B
Page 293 of 516

2934-5. Using the driving support systems
4
Driving
Suitable for city driving.
When the shift position is in D, an appropri-
ate gear for sporty driving may automati-
cally be selected according to driver
performance and driving conditions.
•Custom mode
Allows you to drive with the powertrain,
chassis and air conditioning system func-
tions set to your preferred settings. Cus-
tom mode settings can only be changed on
the drive mode customization display of
the Center Display. ( P.310)
2 Comfort mode
By controlling the suspension, riding com-
fort is further enhanc ed. Suitable for city
driving.
When not in comfort mode and the driving
mode select switch is turned backward, the
comfort mode indicator comes on.
3 Eco drive mode
Helps the driver accelerate in an
eco-friendly manner and improve fuel
economy through moderate throttle char-
acteristics and by controlling the operation
of the air conditioning system (heat-
ing/cooling).
When in comfort mode, if the driving mode
select switch is turned backward, the Eco
drive mode indicator comes on.
4Sport mode
•Sport S mode
Controls the transmission and engine to
provide quick, powerful acceleration. This
mode is suitable for when agile driving
response is desired, such as when driving
on roads with many curves.
When not in Sport S mode, if the driving
mode select switch is turned forward, the
Sport S mode indicator comes on.
•Sport S+ mode
Helps to ensure stee ring performance and
driving stability by simultaneously con- trolling the steering and suspension in
addition to the transmission and engine.
Suitable for sportier driving.
When in Sport S mode, if the driving mode
select switch is turned forward, the Sport
S+ mode indicator comes on.
■If the driving mode select switch is oper-
ated while the opening screen is being
displayed
If the driving mode sele ct switch is operated
while the opening screen is being displayed,
the driving mode will be changed and the
meter display will chan ge accordingly after
the opening screen operation has com-
pleted.
■Operation of the air conditioning sys-
tem in Eco drive mode
Eco drive mode controls the heating/cool-
ing operations and fan speed of the air con-
ditioning system to en hance fuel efficiency.
To improve air condit ioning performance,
perform the following operations:
●Turn off eco air conditioning mode
( P.322)
●Adjust the fan speed ( P.317)
●Turn off Eco drive mode
■Automatic deactivation of sport mode
and custom mode
If the engine switch is turned off after driv-
ing in sport mode or custom mode, the
drive mode will be changed to normal
mode.
■Driving mode pop-up display
When the driving mode is changed, the
selected driving mode will be temporarily
displayed on the side display. ( P.311)
Page 297 of 516
2974-5. Using the driving support systems
4
Driving
■When the vehicle height has been
increased by a control of access mode
Press the vehicle height adjustment switch
with the engine switch in any mode to return
the vehicle to its previous vehicle height.
■Access mode operation
●Access mode will not operate if the vehi-
cle is not parked on a level road surface.
●When the P shift position is selected, if
the doors are not locked and any door is
opened from the outside, exit control will
operate.
●If the doors are locked and unlocked
repeatedly, the system may not operate
temporarily.
Vehicle height control can be tempo-
rarily disabled using the meter control
switches. ( P.81)
When to temporarily disable vehicle height
control: P.294
1 Press or to select .
2 Press or to select “Vehicle
Settings” and then press .
3 Press or to select
and then press .
4 Press or to select “Height
Control” and then press .
This setting is memorized even if the
engine switch is turned off.
Even if the vehicle height control func-
tions are disabled, they will be enabled
automatically when the vehicle speed
reaches approximately 19 mph (30
km/h).
■ECB (Electronically Controlled
Brake System) (vehicles with Lexus
Safety System + A)
The electronically controlled system
generates braking force correspond-
ing to the brake operation
■ABS (Anti-lock Brake System)
Helps to prevent wheel lock when the
brakes are applied suddenly, or if the
brakes are applied while driving on a
slippery road surface
■Brake assist
Generates an increased level of brak-
ing force after the brake pedal is
depressed when the system detects a
panic stop situation
■VSC (Vehicle Stability Control)
Helps the driver to control skidding
when swerving sudden ly or turning on
slippery road surfaces.
■Secondary Collision Brake
When the airbag sensor detects a colli-
sion, the brakes and stop lights are
Temporarily disabling vehicle
height control
Driving assist systems
To keep driving safety and perfor-
mance, the following systems oper-
ate automatically in response to
various driving situations. Be aware,
however, that these systems are
supplementary and should not be
relied upon too heavily when oper-
ating the vehicle.
Summary of the driving assist
systems
Page 298 of 516

2984-5. Using the driving support systems
automatically controlled to reduce the
vehicle speed and that helps reduce
the possibility of further damage due to
a secondary collision.
■TRAC (Traction Control)
Helps to maintain drive power and pre-
vent the drive wheels from spinning
when starting the vehicle or accelerat-
ing on slippery roads
■Hill-start assist control
Helps to reduce the backward move-
ment of the vehicle when starting on an
uphill
■VGRS (Variable Gear Ratio Steer-
ing) (if equipped)
Adjusts the front wheel turning angle in
accordance with the vehicle speed and
steering wheel movement
■DRS (Dynamic Rear Steering) (if
equipped)
Contributes to the turning characteris-
tics and responsiveness of the vehicle
by adjusting the rear wheel angle of the
vehicle in accordance with steering
wheel movement.
■EPS (Electric Power Steering)
Employs an electric motor to reduce
the amount of effort needed to turn the
steering wheel.
■Active stabilizer suspension sys-
tem (if equipped)
Reduces sway when cornering accord-
ing to steering wheel movement in
order to maintain a stable vehicle pos-
ture.
■Adaptive Variable Suspension Sys-
tem (if equipped)
By independently controlling the
damping force of th e shock absorbers
for each of the 4 wheels according to
the road and driving conditions, this
system helps riding comfort with supe-
rior vehicle stability, and helps good
vehicle posture.
Also, the damping force changes
depending on the selected driving
mode. ( P.292)
■LDH (Lexus Dynamic Handling
system) (if equipped)
Provides integrated control of the
VGRS, DRS and EPS. Contributes to
turning characteristics at low speeds,
responsiveness at medium speeds and
safety at high speeds by controlling the
steering angle of the front and rear
wheels in accordance with the steering
wheel operation and vehicle speed.
■VDIM (Vehicle Dynamics Inte-
grated Management)
Provides integrated control of the
ABS, brake assist, TRAC, VSC,
hill-start assist control, EPS, VGRS (if
equipped), DRS (if equipped), active
stabilizer suspension system (if
equipped) and Adaptive Variable Sus-
pension System (if equipped)
Helps to maintain vehicle stability when
swerving on slippery road surfaces by
controlling the brakes, engine output,
steering assist, and steering ratio
Page 313 of 516
3135-1. Remote Touch/Display
5
Interior features
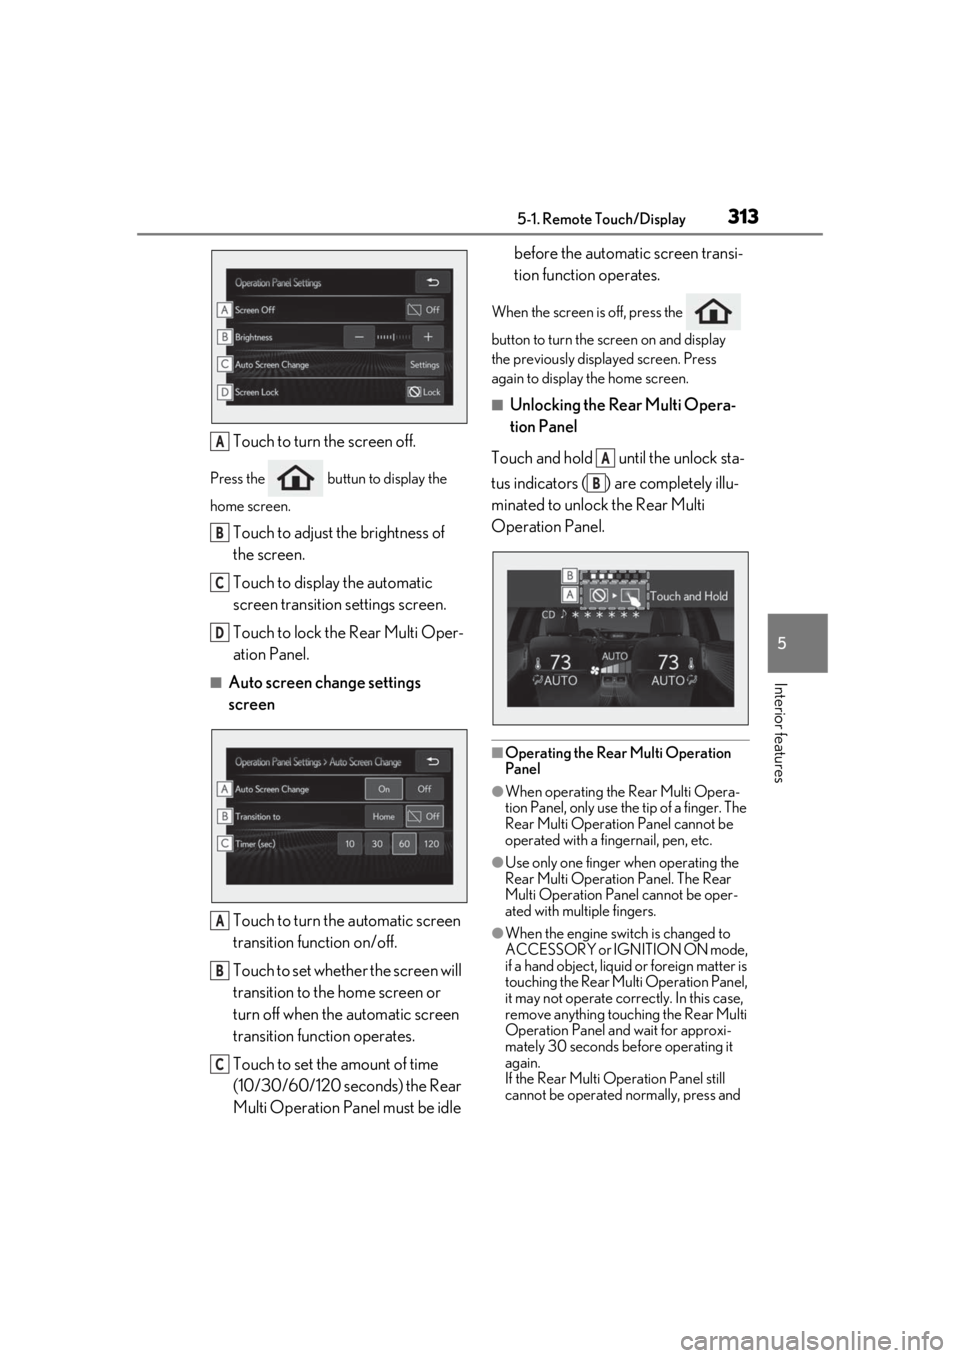
Touch to turn the screen off.
Press the buttun to display the
home screen.
Touch to adjust the brightness of
the screen.
Touch to display the automatic
screen transition settings screen.
Touch to lock the Rear Multi Oper-
ation Panel.
■Auto screen change settings
screenTouch to turn the automatic screen
transition function on/off.
Touch to set whether the screen will
transition to the home screen or
turn off when the automatic screen
transition function operates.
Touch to set the amount of time
(10/30/60/120 seconds) the Rear
Multi Operation Panel must be idle before the automatic screen transi-
tion function operates.
When the screen is off, press the
button to turn the screen on and display
the previously disp
layed screen. Press
again to display the home screen.
■Unlocking the Rear Multi Opera-
tion Panel
Touch and hold until the unlock sta-
tus indicators ( ) are completely illu-
minated to unlock the Rear Multi
Operation Panel.
■Operating the Rear Multi Operation
Panel
●When operating the Rear Multi Opera-
tion Panel, only use the tip of a finger. The
Rear Multi Operation Panel cannot be
operated with a fingernail, pen, etc.
●Use only one finger when operating the
Rear Multi Operation Panel. The Rear
Multi Operation Panel cannot be oper-
ated with multiple fingers.
●When the engine swit ch is changed to
ACCESSORY or IGNITION ON mode,
if a hand object, liquid or foreign matter is
touching the Rear Multi Operation Panel,
it may not operate correctly. In this case,
remove anything touching the Rear Multi
Operation Panel and wait for approxi-
mately 30 seconds be fore operating it
again.
If the Rear Multi Operation Panel still
cannot be operated normally, press and
A
B
C
D
A
B
C
A
B