ECO mode LEXUS LS500 2020 Manual Online
[x] Cancel search | Manufacturer: LEXUS, Model Year: 2020, Model line: LS500, Model: LEXUS LS500 2020Pages: 516, PDF Size: 10.38 MB
Page 443 of 516
4417-2. Steps to take in an emergency
7
When trouble arises
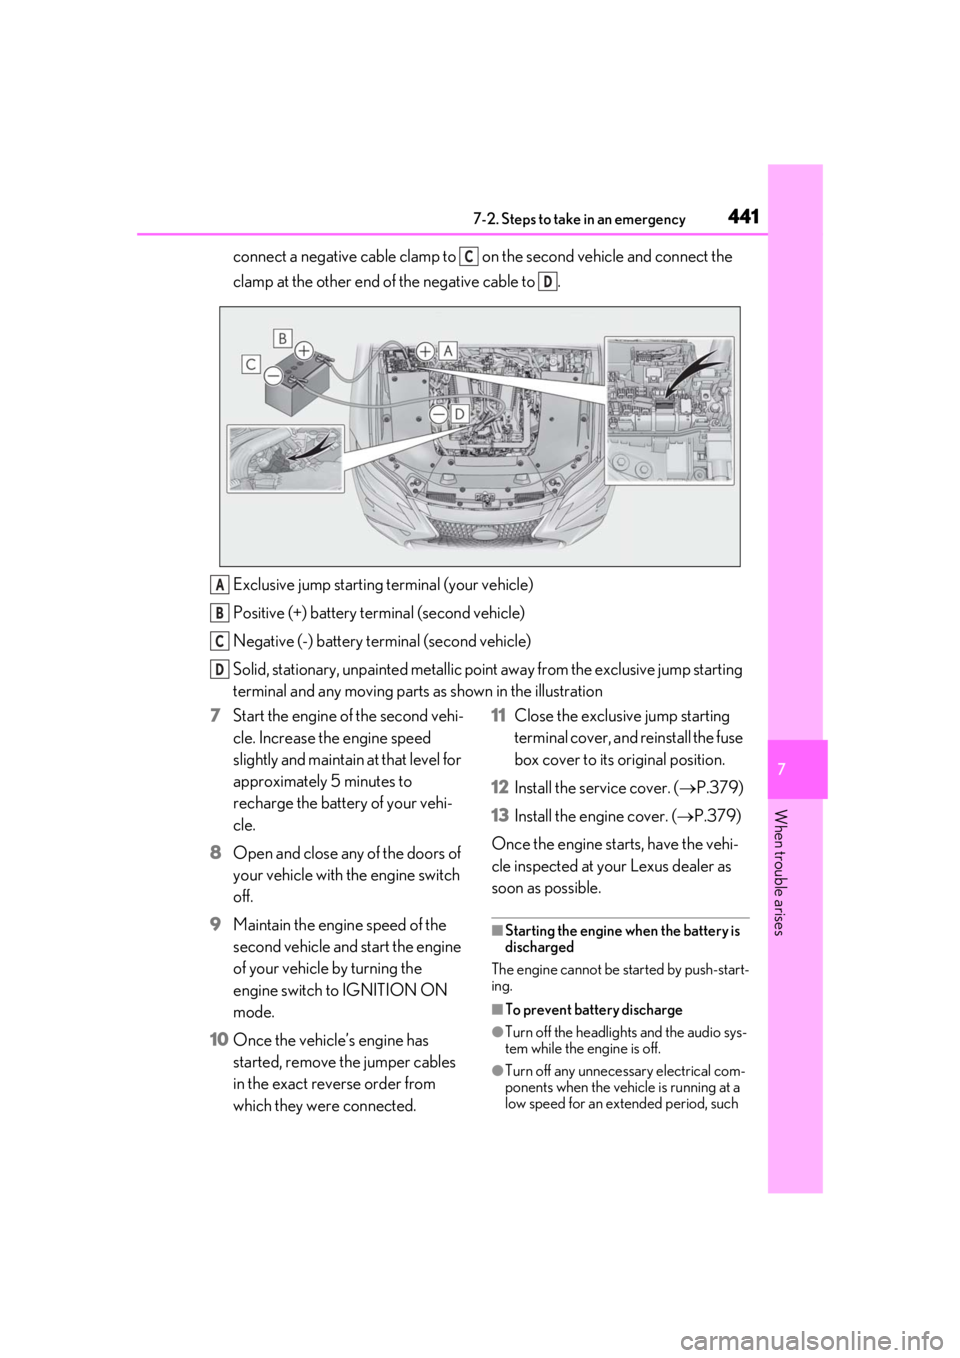
connect a negative cable clamp to on the second vehicle and connect the
clamp at the other end of the negative cable to .
Exclusive jump starting terminal (your vehicle)
Positive (+) battery terminal (second vehicle)
Negative (-) battery terminal (second vehicle)
Solid, stationary, unpainted metallic point away from the exclusive jump starting
terminal and any mo ving parts as shown in the illustration
7 Start the engine of the second vehi-
cle. Increase the engine speed
slightly and maintain at that level for
approximately 5 minutes to
recharge the battery of your vehi-
cle.
8 Open and close any of the doors of
your vehicle with the engine switch
off.
9 Maintain the engine speed of the
second vehicle and start the engine
of your vehicle by turning the
engine switch to IGNITION ON
mode.
10 Once the vehicle’s engine has
started, remove the jumper cables
in the exact reverse order from
which they were connected. 11
Close the exclusive jump starting
terminal cover, and reinstall the fuse
box cover to its original position.
12 Install the service cover. ( P.379)
13 Install the engine cover. ( P.379)
Once the engine starts, have the vehi-
cle inspected at your Lexus dealer as
soon as possible.
■Starting the engine when the battery is
discharged
The engine cannot be started by push-start-
ing.
■To prevent battery discharge
●Turn off the headlights and the audio sys-
tem while the engine is off.
●Turn off any unnecessary electrical com-
ponents when the vehicle is running at a
low speed for an extended period, such
C
D
A
B
C
D
Page 444 of 516
4427-2. Steps to take in an emergency
as in heavy traffic.
■When the battery is removed or dis-
charged
●Information stored in the ECU is cleared.
When the battery is depleted, have the
vehicle inspected at your Lexus dealer.
●Some systems may require initialization.
( P.484)
■When removing the battery terminals
When the battery terminals are removed,
the information stored in the ECU is
cleared. Before removi ng the battery termi-
nals, contact your Lexus dealer.
■Charging the battery
The electricity stored in the battery will dis-
charge gradually even when the vehicle is
not in use, due to natural discharge and the
draining effects of certain electrical appli-
ances. If the vehicle is left for a long time,
the battery may discharge, and the engine
may be unable to start. (The battery
recharges automatically during driving.)
■When recharging or replacing the bat-
tery
●In some cases, it may not be possible to
unlock the doors using the smart access
system with push-button start when the
battery is discharged. Use the wireless
remote control or the mechanical key to
lock or unlock the doors.
●The engine may not start on the first
attempt after the battery has recharged
but will start normally after the second
attempt. This is not a malfunction.
●The engine switch mode is memorized by
the vehicle. When the battery is recon-
nected, the system will return to the
mode it was in before the battery was dis-
charged. Before di sconnecting the bat-
tery, turn the engine switch off.
If you are unsure what mode the engine
switch was in befo re the battery dis-
charged, be especially careful when
reconnecting the battery.
■When replacing the battery
●Use a Central Degassing type battery
(European Regulations).
●Use a battery with the same case size as the previous battery and an equivalent
20 hour rate capacity (20HR) or greater.
• If the sizes differ, the battery cannot be
properly secured.
• If the 20 hour rate capacity is low, even if the time period where the vehicle is not
used is a short time, the battery may dis-
charge and the engine may not be able to
start.
●Use a battery with a handle. If a battery
without a handle is used, removal is more
difficult.
●After replacing, firm ly attach the follow-
ing items to the exhaust hole of the bat-
tery.
• Use the exhaust hose that was attached
to the battery before replacing and con-
firm that it is firmly connected to the hole
section of the vehicle.
• Use the exhaust hole plug included with the battery replaced or the one installed
on the battery prior to the replacement.
(Depending on the battery to be
replaced, the exhaust hole may be
plugged.)
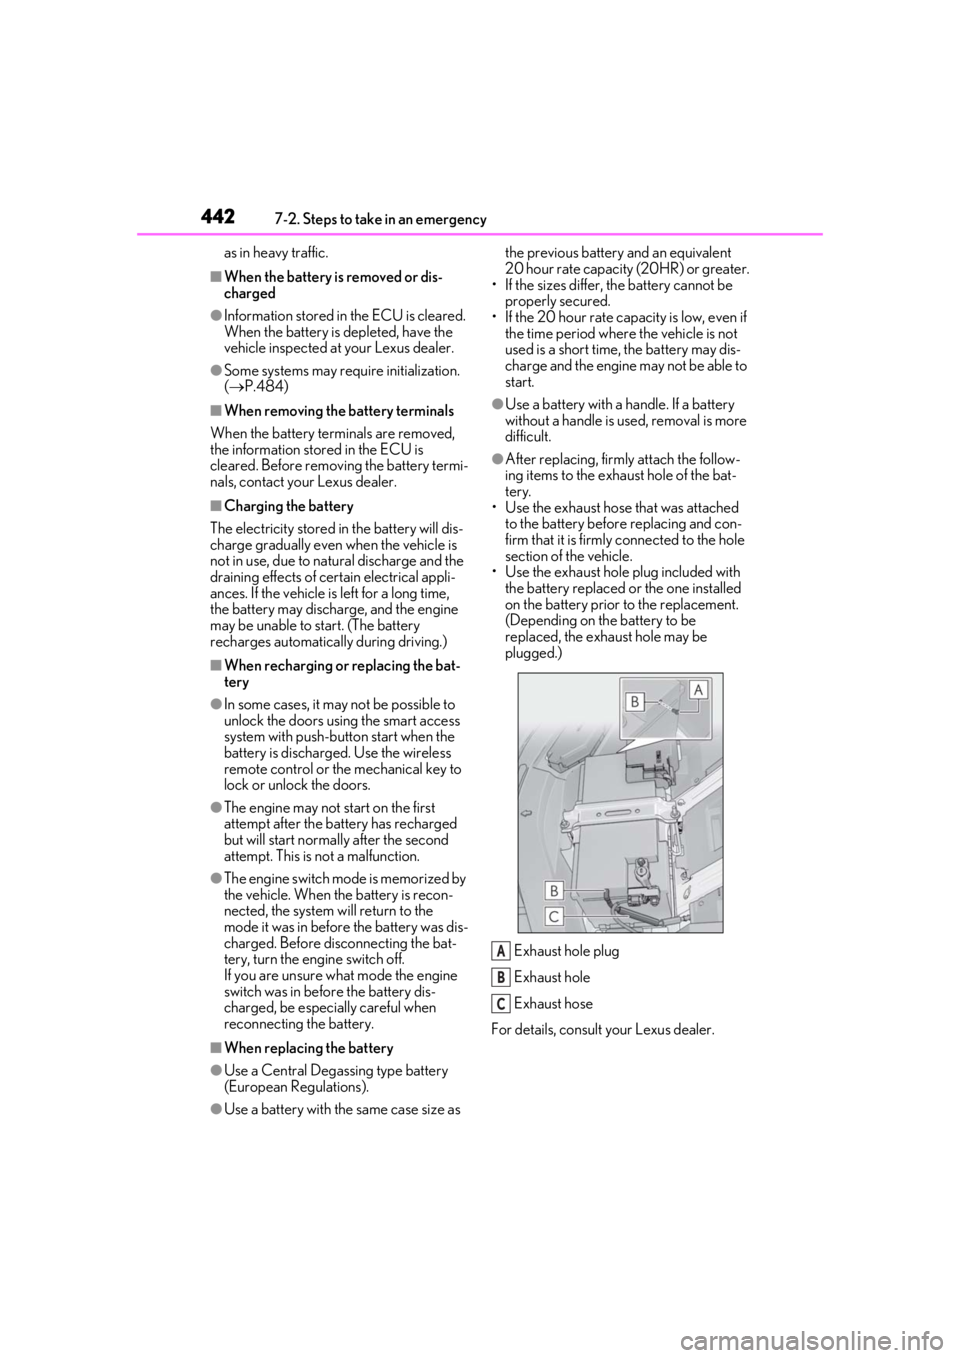
Exhaust hole plug
Exhaust hole
Exhaust hose
For details, consult your Lexus dealer.
A
B
C
Page 454 of 516
![LEXUS LS500 2020 Manual Online 4528-1. Specifications
■Oil capacity (Drain and refill [Ref-
erence
*])
*: The engine oil capacity is a reference quantity to be used when changing the
engine oil. Warm up and turn off the
engine LEXUS LS500 2020 Manual Online 4528-1. Specifications
■Oil capacity (Drain and refill [Ref-
erence
*])
*: The engine oil capacity is a reference quantity to be used when changing the
engine oil. Warm up and turn off the
engine](/img/36/57999/w960_57999-453.png)
4528-1. Specifications
■Oil capacity (Drain and refill [Ref-
erence
*])
*: The engine oil capacity is a reference quantity to be used when changing the
engine oil. Warm up and turn off the
engine, wait more than 5 minutes, and
check the oil level on the dipstick.
■Engine oil selection
“Toyota Genuine Motor Oil” is used in
your Lexus vehicle. Use Lexus
approved “Toyota Genuine Motor Oil”
or equivalent to satisfy the following
grade and viscosity.
Oil grade: ILSAC GF-5 multigrade
engine oil
Recommended viscosity: SAE 0W-20
SAE 0W-20 is the best choice for
good fuel economy and good starting
in cold weather.
If SAE 0W-20 is not available, SAE
5W-20 oil may be used. However, it
must be replaced with SAE 0W-20 at the next oil change.
Recommended viscosity (SAE):
Outside temperature
Oil viscosity (0W-20 is explained here
as an example):
• The 0W in 0W-20 indicates the characteristic of the oil which allows
cold startability. Oils with a lower
value before the W allow for easier
starting of the engine in cold
weather.
• The 20 in 0W-20 indicates the vis- cosity characteristic of the oil when
the oil is at high temperature. An oil
with a higher viscosity (one with a
higher value) may be better suited if
the vehicle is operated at high
speeds, or under extreme load con-
ditions.
How to read oil container label:
The International Lubricant Specifica-
tion Advisory Committee (ILSAC)
Certification Mark is added to some oil
Octane Rating91 (Research Octane Number 96) or higher
Fuel tank capacity
(Reference)21.7 gal. (82.0 L, 18.0 Imp. gal.)
Lubrication system
With filter
2WD models
6.7 qt. (6.3 L, 5.5 Imp. qt.)
AWD models
7.5 qt. (7.1 L, 6.2 Imp. qt.)
Without fil- ter
2WD models
6.1 qt. (5.8 L, 5.1 Imp. qt.)
AWD models
7.0 qt. (6.6 L, 5.8 Imp. qt.)
A
Page 456 of 516
4548-1. Specifications
*: The fluid capacity is a reference quantity.If replacement is necessary, contact your Lexus dealer.
*: Your Lexus vehicle is filled with Toyota genuine gear oil at the factory. Use Lexus approved Toyota genuine gear oil or an equi valent of matching quality to satisfy the
above specification. Please contact your Lexus dealer for further details.
*: Your Lexus vehicle is filled with “Toyota Genu ine Differential Gear Oil” at the factory.
Use Lexus approved “Toyota Ge nuine Differential Gear Oil” or an equivalent oil of
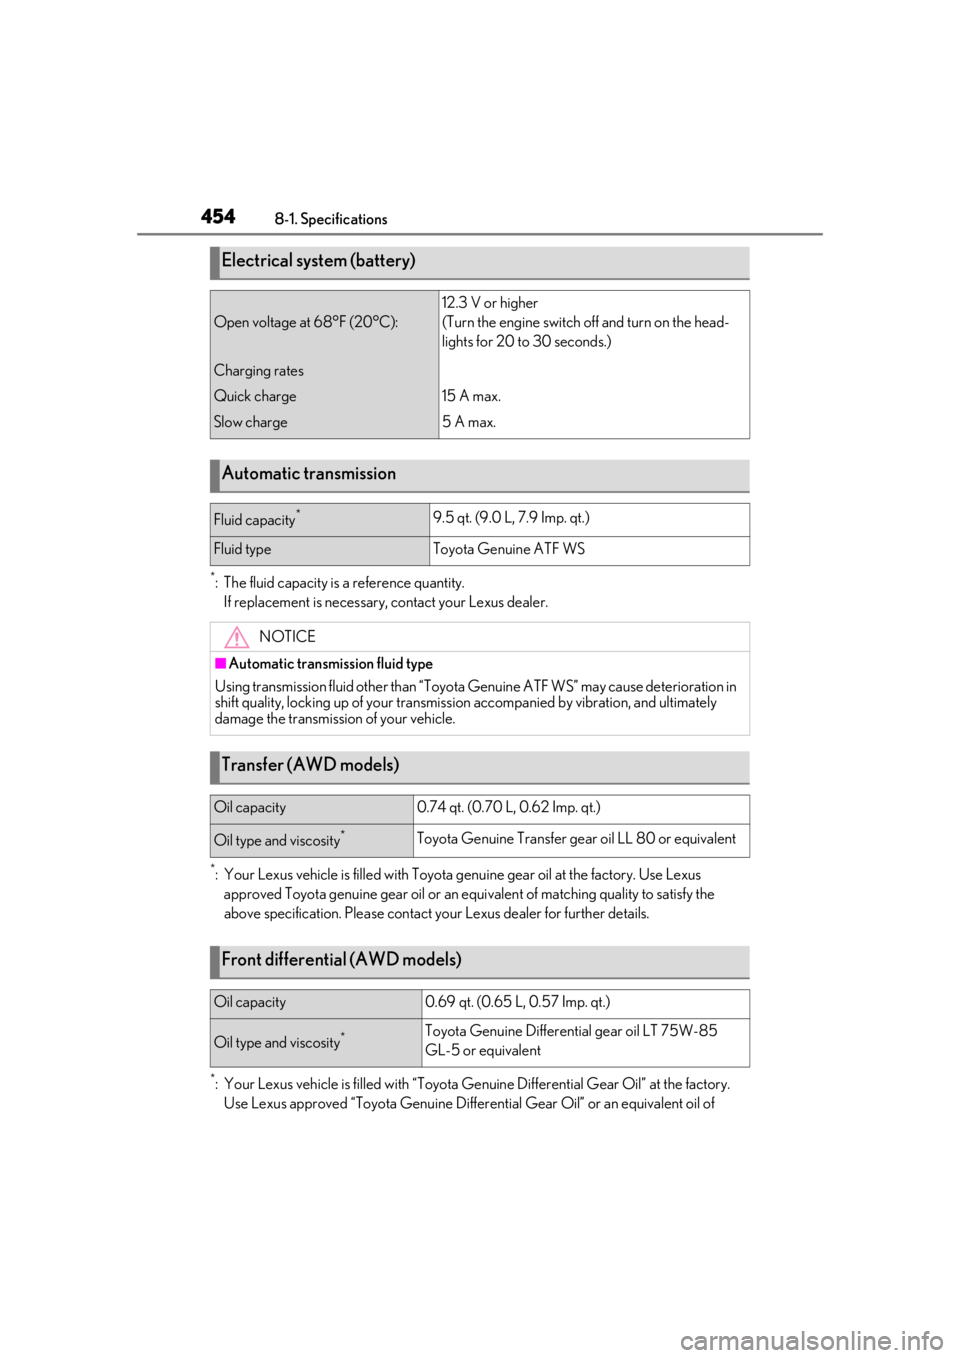
Electrical system (battery)
Open voltage at 68°F (20°C):
12.3 V or higher
(Turn the engine switch off and turn on the head-
lights for 20 to 30 seconds.)
Charging rates
Quick charge
Slow charge
15 A max.
5 A max.
Automatic transmission
Fluid capacity*9.5 qt. (9.0 L, 7.9 Imp. qt.)
Fluid typeToyota Genuine ATF WS
NOTICE
■Automatic transmission fluid type
Using transmission fluid other than “Toyota Genuine ATF WS” may ca use deterioration in
shift quality, locking up of your transmission accompanied by vibration, and ultimately
damage the transmission of your vehicle.
Transfer (AWD models)
Oil capacity0.74 qt. (0.70 L, 0.62 Imp. qt.)
Oil type and viscosity*Toyota Genuine Transfer gear oil LL 80 or equivalent
Front differential (AWD models)
Oil capacity0.69 qt. (0.65 L, 0.57 Imp. qt.)
Oil type and viscosity*Toyota Genuine Differential gear oil LT 75W-85
GL-5 or equivalent
Page 457 of 516

4558-1. Specifications
8
Vehicle specifications
matching quality to satisfy the above specification. Please contact your Lexus dealer for
further details.
2WD models
AWD models
*: Your Lexus vehicle is filled with “Toyota Genu ine Differential Gear Oil” at the factory.
Use Lexus approved “Toyota Ge nuine Differential Gear Oil” or an equivalent oil of
matching quality to satisfy th e above specification. Please contact your Lexus dealer for
further details.
*1: Minimum pedal clearance when depressed with a force of 112 lbf (500 N, 51 kgf) while
the engine is running.
When performing the brake pedal inspection, also be sure to check that the brake sys-
tem warning light is not illuminated when th e engine is running. (If the brake system
Rear differential
Oil capacity0.90 qt. (0.85 L, 0.75 Imp. qt.)
Oil type and viscosity*Toyota Genuine Differential gear oil LT 75W-85
GL-5 or equivalent
Oil capacity1.42 qt. (1.35 L, 1.19 Imp. qt.)
Oil type and viscosity*Toyota Genuine Differential gear oil LT 75W-85
GL-5 or equivalent
Brakes
Pedal clearance*14.8 in. (121 mm) Min.*3
4.8 in. (122 mm) Min.*4
Pedal free play0.04 0.24 in. (1 6 mm)
Brake pad wear limit0.04 in. (1 mm)
Parking brake lining wear limit0.04 in. (1 mm)
Parking brake indicator*2
When pushing the parking brake switch for 1 to 2
seconds: comes on
When pulling the parking brake switch for 1 to 2
seconds: turns off
Fluid typeFMVSS No.116 DOT 3 or SAE J1703
FMVSS No.116 DOT 4 or SAE J1704
Page 469 of 516
4678-1. Specifications
8
Vehicle specifications
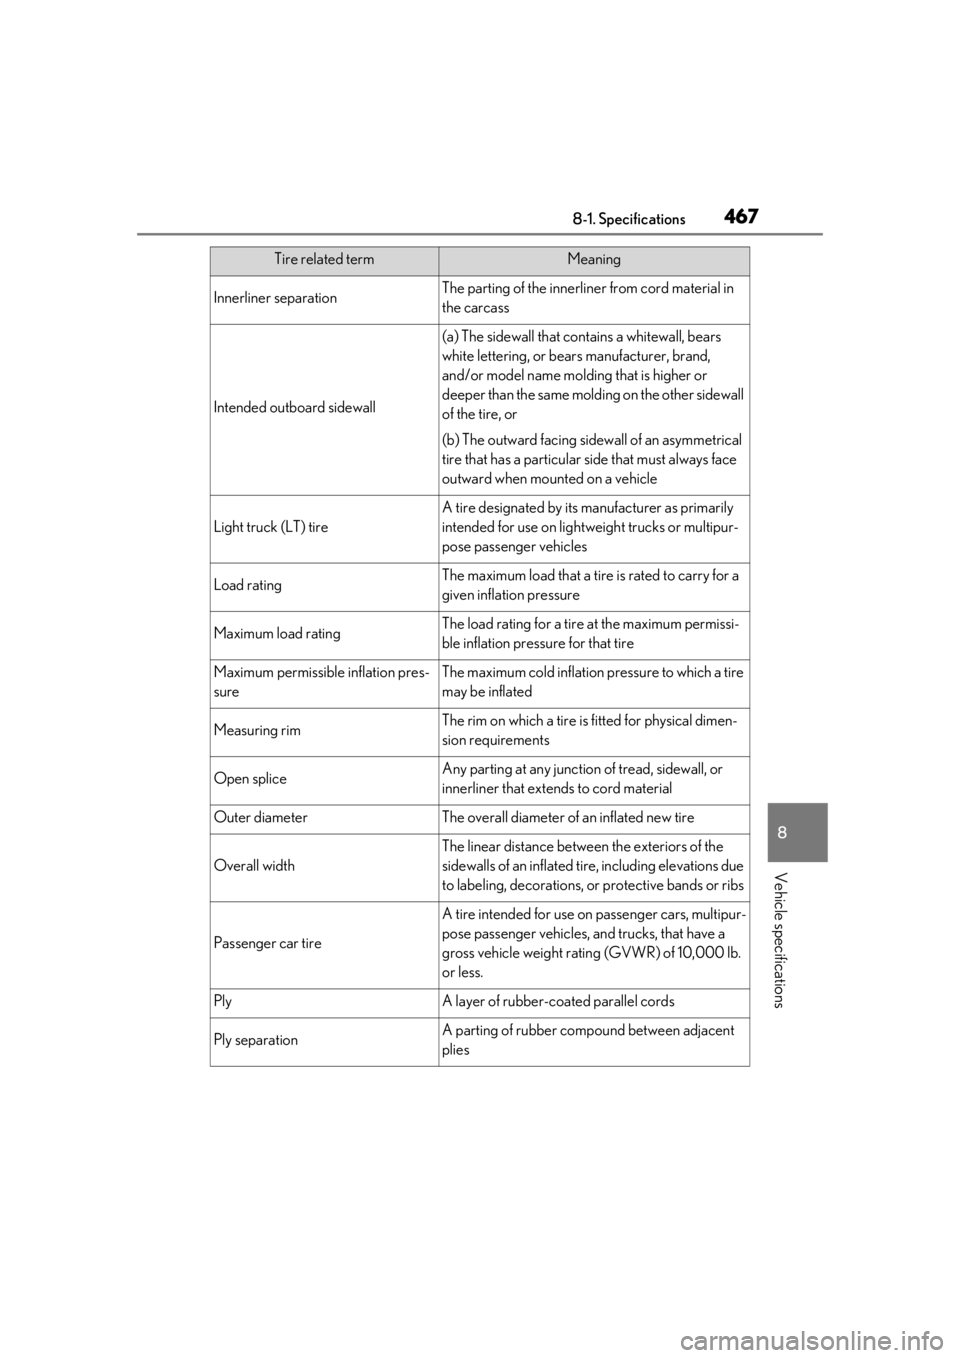
Innerliner separationThe parting of the innerliner from cord material in
the carcass
Intended outboard sidewall
(a) The sidewall that contains a whitewall, bears
white lettering, or bear s manufacturer, brand,
and/or model name molding that is higher or
deeper than the same molding on the other sidewall
of the tire, or
(b) The outward facing sidewall of an asymmetrical
tire that has a particular side that must always face
outward when mounted on a vehicle
Light truck (LT) tire
A tire designated by its manufacturer as primarily
intended for use on lightwe ight trucks or multipur-
pose passenger vehicles
Load ratingThe maximum load that a tire is rated to carry for a
given inflation pressure
Maximum load ratingThe load rating for a tire at the maximum permissi-
ble inflation pressure for that tire
Maximum permissible inflation pres-
sureThe maximum cold inflation pressure to which a tire
may be inflated
Measuring rimThe rim on which a tire is fitted for physical dimen-
sion requirements
Open spliceAny parting at any junction of tread, sidewall, or
innerliner that extends to cord material
Outer diameterThe overall diameter of an inflated new tire
Overall width
The linear distance between the exteriors of the
sidewalls of an inflated tire, including elevations due
to labeling, decorations, or protective bands or ribs
Passenger car tire
A tire intended for use on passenger cars, multipur-
pose passenger vehicles, and trucks, that have a
gross vehicle weight rating (GVWR) of 10,000 lb.
or less.
PlyA layer of rubber-c oated parallel cords
Ply separationA parting of rubber compound between adjacent
plies
Tire related termMeaning
Page 474 of 516
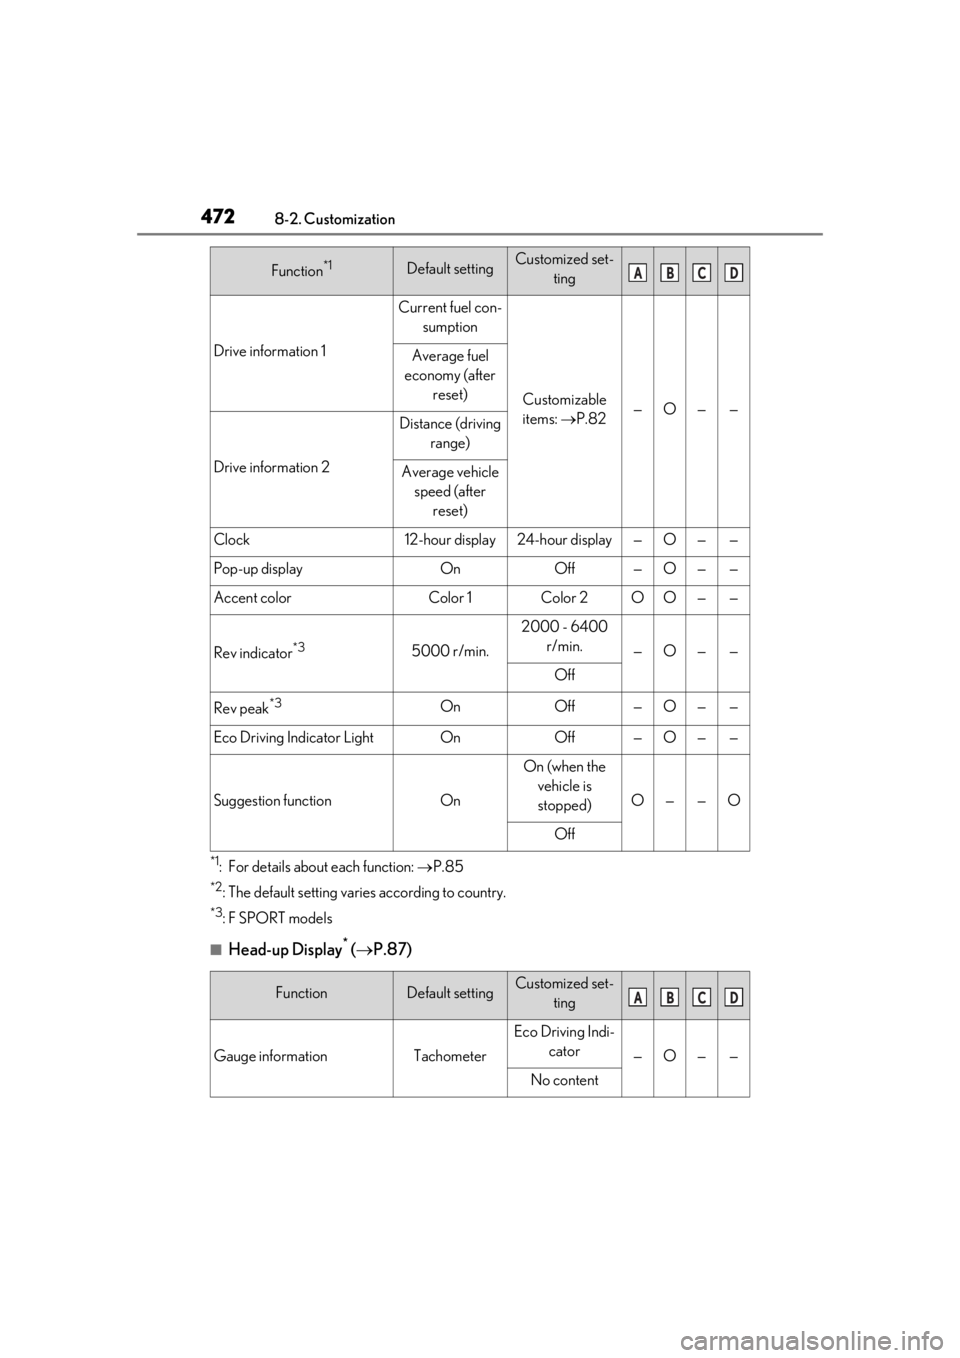
4728-2. Customization
*1: For details about each function: P.85
*2: The default setting varies according to country.
*3:F SPORT models
■Head-up Display* ( P.87)
Drive information 1
Current fuel con-
sumption
Customizable
items: P.82—O——
Average fuel
economy (after reset)
Drive information 2
Distance (driving range)
Average vehicle speed (after reset)
Clock12-hour display24-hour display—O——
Pop-up displayOnOff—O——
Accent colorColor 1Color 2OO——
Rev indicator*35000 r/min.
2000 - 6400 r/min.
—O——
Off
Rev peak*3OnOff—O——
Eco Driving Indicator LightOnOff—O——
Suggestion functionOn
On (when the vehicle is stopped)
O——O
Off
FunctionDefault settingCustomized set- ting
Gauge informationTachometer
Eco Driving Indi-cator
—O——
No content
Function*1Default settingCustomized set- tingABCD
ABCD
Page 483 of 516
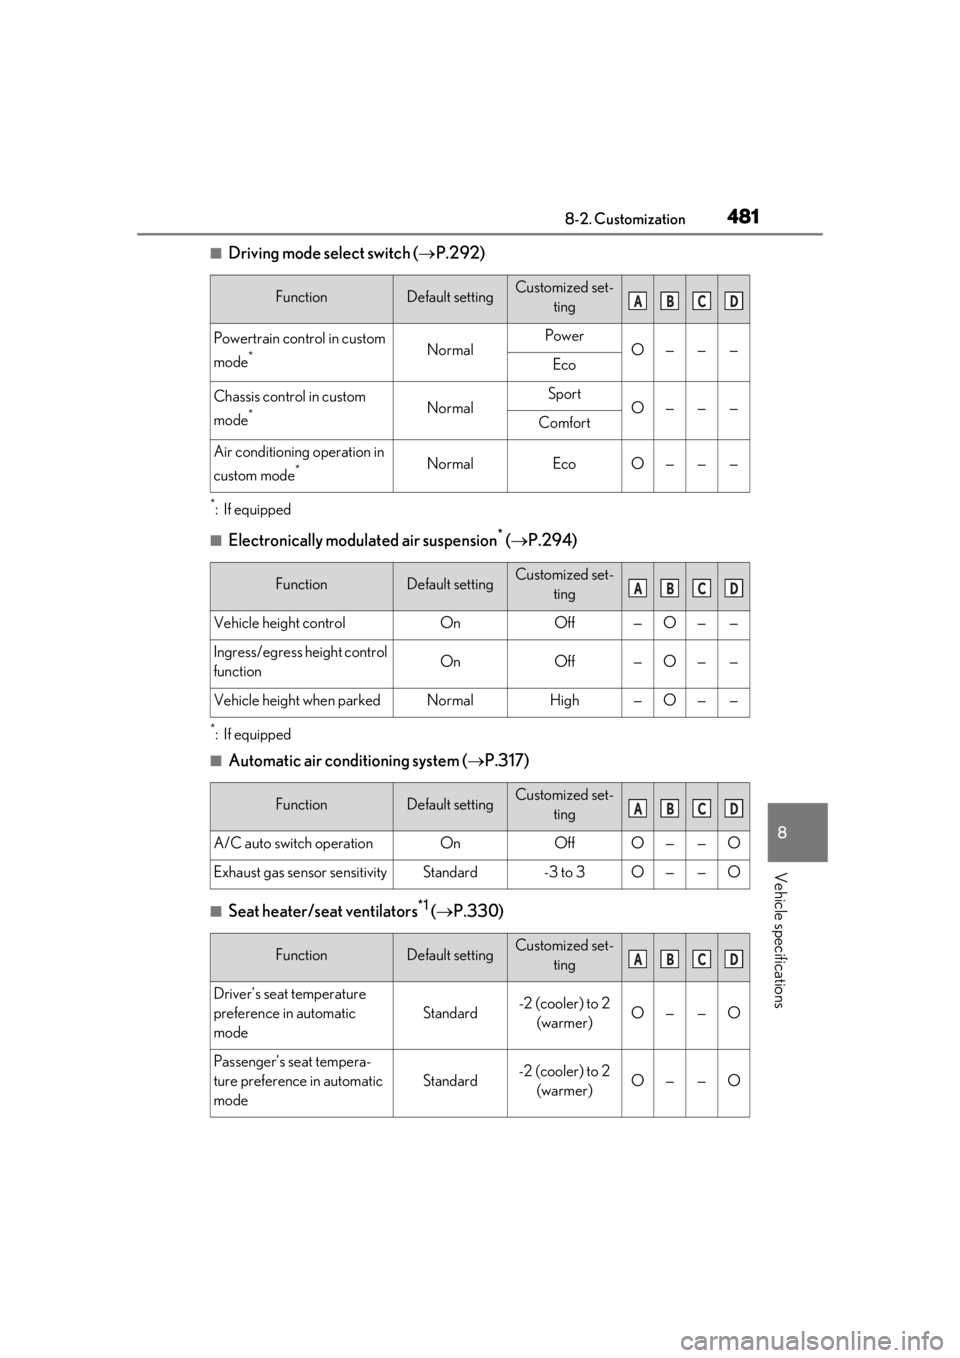
4818-2. Customization
8
Vehicle specifications
■Driving mode select switch (P.292)
*:If equipped
■Electronically modulated air suspension* ( P.294)
*:If equipped
■Automatic air conditioning system ( P.317)
■Seat heater/seat ventilators*1 ( P.330)
FunctionDefault settingCustomized set-
ting
Powertrain control in custom
mode
*NormalPowerO———Eco
Chassis control in custom
mode
*NormalSportO———Comfort
Air conditioning operation in
custom mode
*NormalEcoO———
FunctionDefault settingCustomized set-ting
Vehicle height controlOnOff—O——
Ingress/egress height control
functionOnOff—O——
Vehicle height when parkedNormalHigh—O——
FunctionDefault settingCustomized set-ting
A/C auto switch operationOnOffO——O
Exhaust gas sensor sensitivityStandard-3 to 3O——O
FunctionDefault settingCustomized set-ting
Driver’s seat temperature
preference in automatic
mode
Standard-2 (cooler) to 2 (warmer)O——O
Passenger’s seat tempera-
ture preference in automatic
mode
Standard-2 (cooler) to 2 (warmer)O——O
ABCD
ABCD
ABCD
ABCD
Page 484 of 516
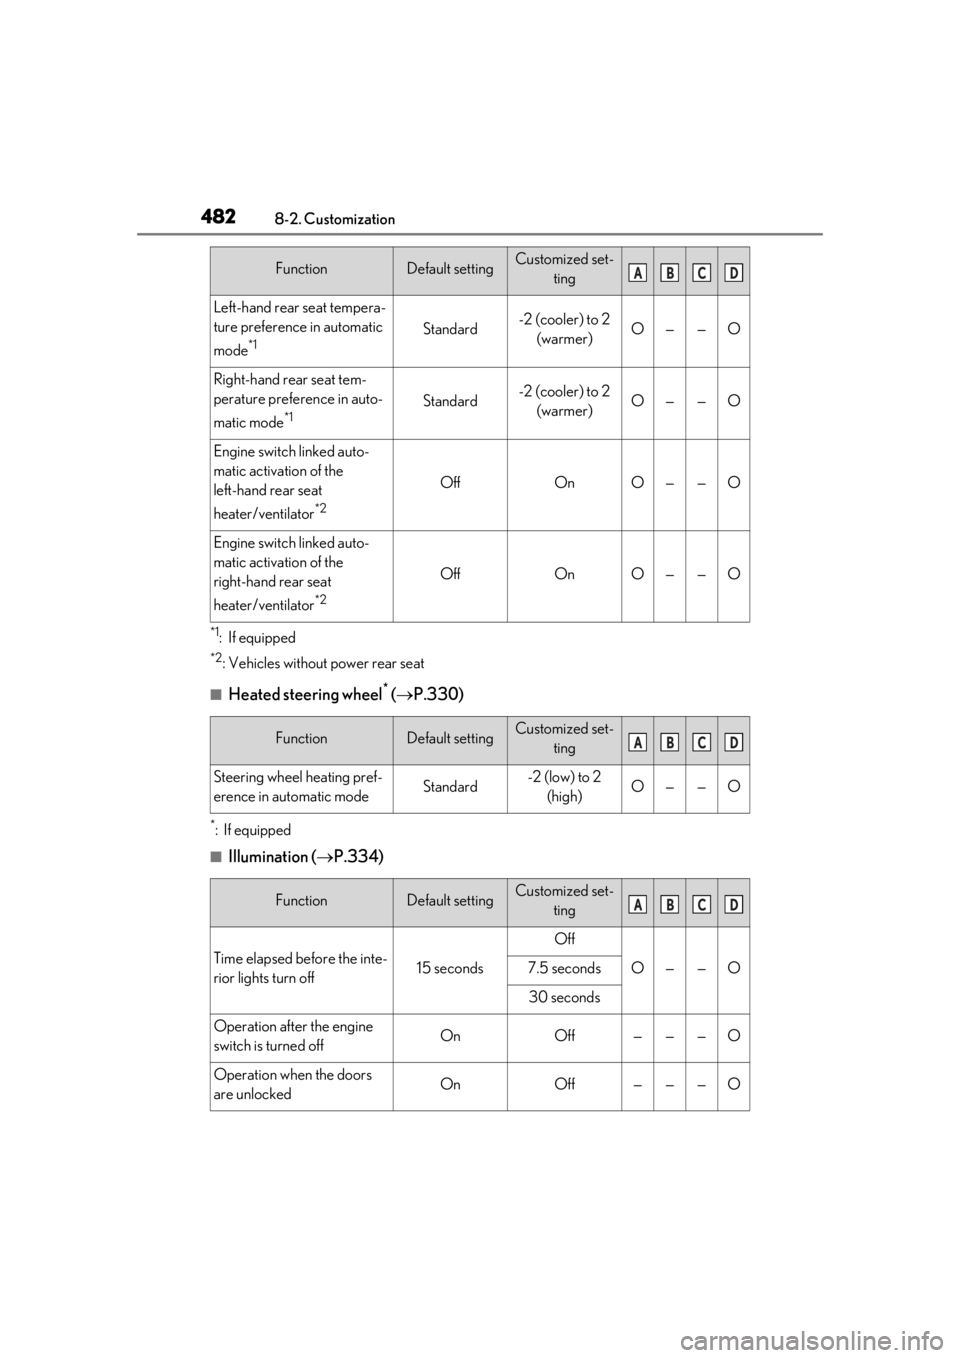
4828-2. Customization
*1: If equipped
*2: Vehicles without power rear seat
■Heated steering wheel* ( P.330)
*:If equipped
■Illumination ( P.334)
Left-hand rear seat tempera-
ture preference in automatic
mode
*1Standard-2 (cooler) to 2
(warmer)O——O
Right-hand rear seat tem-
perature preference in auto-
matic mode
*1Standard-2 (cooler) to 2 (warmer)O——O
Engine switch linked auto-
matic activation of the
left-hand rear seat
heater/ventilator
*2
OffOnO——O
Engine switch linked auto-
matic activation of the
right-hand rear seat
heater/ventilator
*2
OffOnO——O
FunctionDefault settingCustomized set- ting
Steering wheel heating pref-
erence in automatic modeStandard-2 (low) to 2 (high)O——O
FunctionDefault settingCustomized set- ting
Time elapsed before the inte-
rior lights turn off15 seconds
Off
O——O7.5 seconds
30 seconds
Operation after the engine
switch is turned offOnOff———O
Operation when the doors
are unlockedOnOff———O
FunctionDefault settingCustomized set-tingABCD
ABCD
ABCD
Page 485 of 516
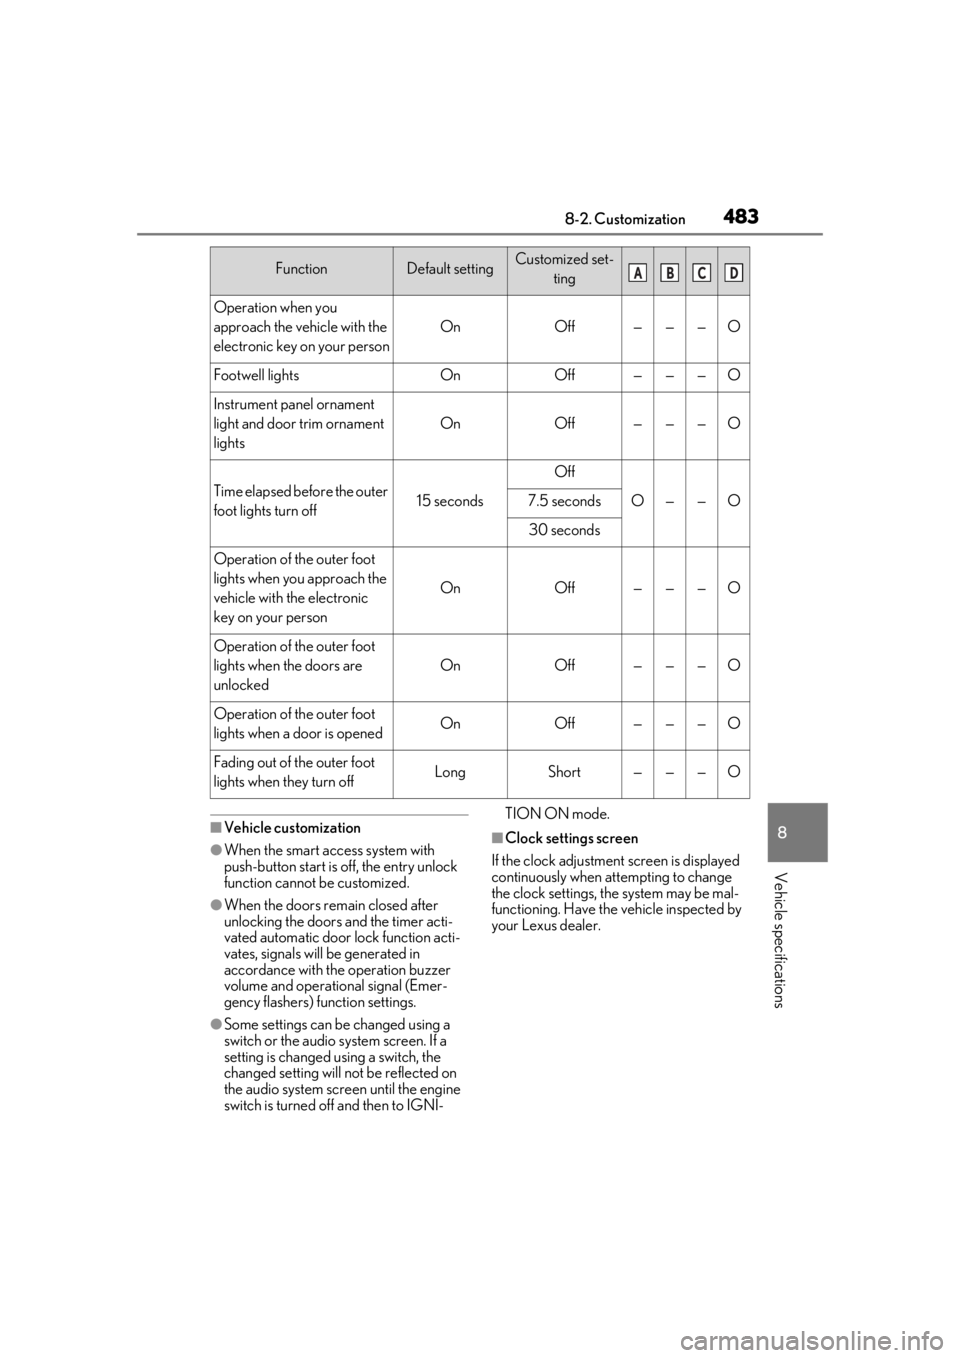
4838-2. Customization
8
Vehicle specifications
■Vehicle customization
●When the smart access system with
push-button start is off, the entry unlock
function cannot be customized.
●When the doors remain closed after
unlocking the doors and the timer acti-
vated automatic door lock function acti-
vates, signals will be generated in
accordance with the operation buzzer
volume and operational signal (Emer-
gency flashers) function settings.
●Some settings can be changed using a
switch or the audio system screen. If a
setting is changed using a switch, the
changed setting will not be reflected on
the audio system screen until the engine
switch is turned off and then to IGNI- TION ON mode.
■Clock settings screen
If the clock adjustment screen is displayed
continuously when attempting to change
the clock settings, the system may be mal-
functioning. Have the vehicle inspected by
your Lexus dealer.
Operation when you
approach the vehicle with the
electronic key on your person
OnOff———O
Footwell lightsOnOff———O
Instrument panel ornament
light and door trim ornament
lights
OnOff———O
Time elapsed before the outer
foot lights turn off15 seconds
Off
O——O7.5 seconds
30 seconds
Operation of the outer foot
lights when you approach the
vehicle with the electronic
key on your person
OnOff———O
Operation of the outer foot
lights when the doors are
unlocked
OnOff———O
Operation of the outer foot
lights when a door is openedOnOff———O
Fading out of the outer foot
lights when they turn offLongShort———O
FunctionDefault settingCustomized set-
tingABCD