engine LEXUS LS500H 2020 Owners Manual
[x] Cancel search | Manufacturer: LEXUS, Model Year: 2020, Model line: LS500H, Model: LEXUS LS500H 2020Pages: 516, PDF Size: 10.38 MB
Page 392 of 516
3926-3. Do-it-yourself maintenance
■The tire pressure warning system
must be initialized in the following
circumstances:
When the tire inflation pressure is
changed such as when changing
traveling speed or load weight.
When the tire inflation pressure is
changed such as when the tire size
is changed.
When rotating the tires.
After performing the transmitter ID
code registration procedure.
( P.393)
When the tire pressure warning system
is initialized, the cu rrent tire inflation
pressure is set as the benchmark pres-
sure.
■How to initialize the tire pressure
warning system
1 Park the vehicle in a safe place, turn
the engine switch off and wait 20
minutes or more.
The initialization procedure cannot be
started while the vehicle is moving.
2Adjust the tire inflation pressure to
the specified cold tire inflation pres-
sure level.
Make sure to adjust th e tire pressure to the
specified cold tire infl ation pressure level.
The tire pressure warning system will oper-
ate based on this pressure level.
3 Start the engine.
4 Press or of the meter con-
trol switch to select . 5
Press or to select “Vehicle
Settings” and then press .
6 Press or to select “TPWS”
and then press .
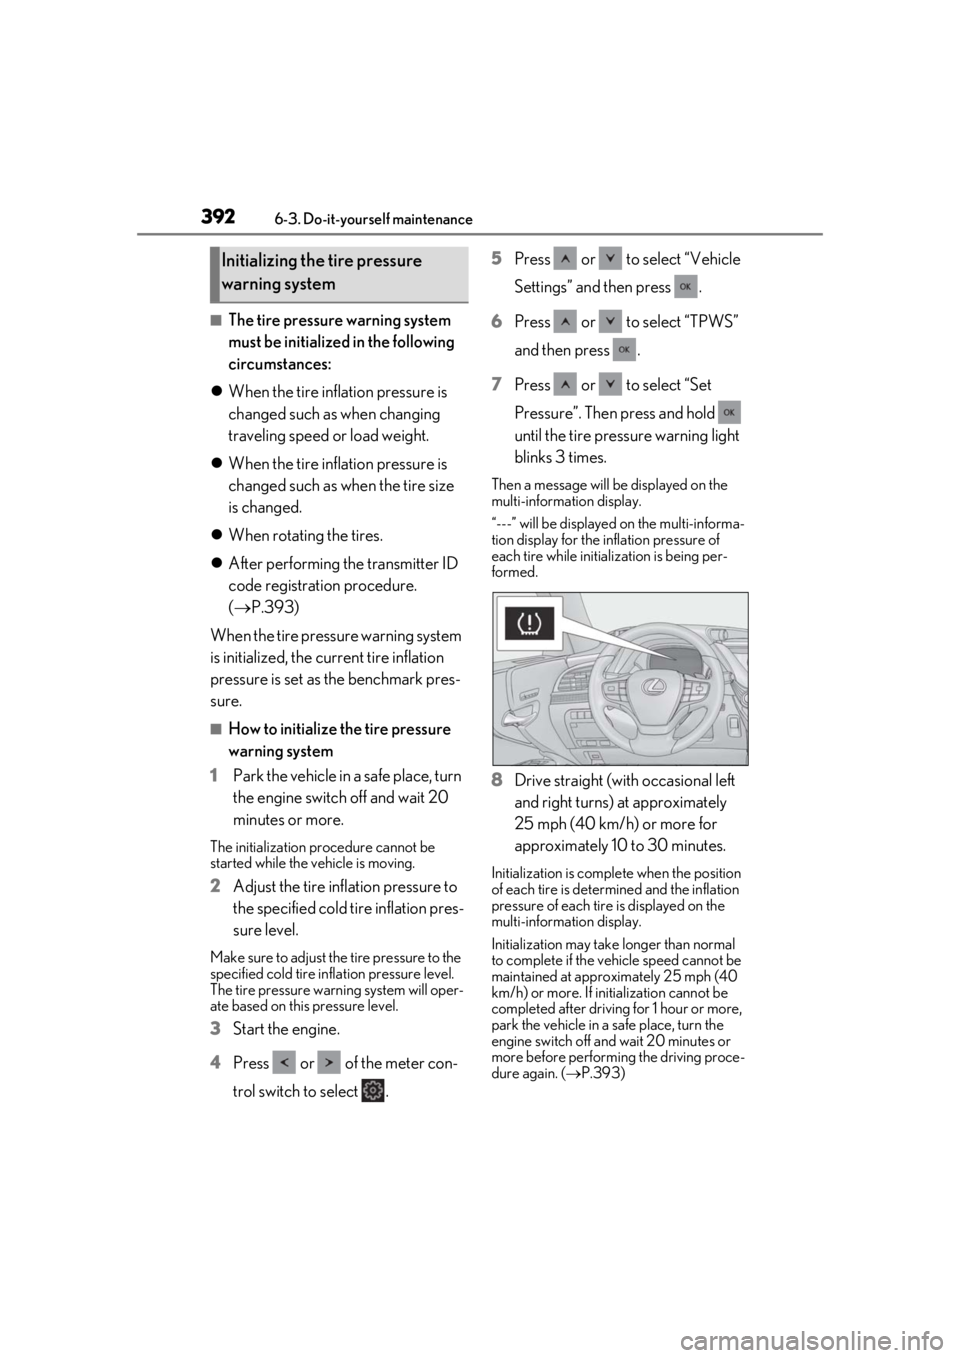
7 Press or to select “Set
Pressure”. Then press and hold
until the tire pressure warning light
blinks 3 times.
Then a message will be displayed on the
multi-information display.
“---” will be displayed on the multi-informa-
tion display for the inflation pressure of
each tire while initialization is being per-
formed.
8Drive straight (with occasional left
and right turns) at approximately
25 mph (40 km/h) or more for
approximately 10 to 30 minutes.
Initialization is comple te when the position
of each tire is determ ined and the inflation
pressure of each tire is displayed on the
multi-information display.
Initialization may take longer than normal
to complete if the vehicle speed cannot be
maintained at approx imately 25 mph (40
km/h) or more. If initialization cannot be
completed after driving for 1 hour or more,
park the vehicle in a safe place, turn the
engine switch off and wait 20 minutes or
more before performing the driving proce-
dure again. ( P.393)
Initializing the tire pressure
warning system
Page 393 of 516
3936-3. Do-it-yourself maintenance
6
Maintenance and care
■Initialization procedure
●Make sure to perform the initialization
procedure after adjusting the tire inflation
pressure.
Also, make sure the tires are cold before
performing the initialization procedure or
adjusting the tire inflation pressure.
●If the engine switch is turned off during
initialization, it is not necessary to restart
the initialization procedure from the
beginning as it will begin automatically
when the engine switch is turned back to
IGNITION ON mode.
●If initialization has accidentally been
started when it is not necessary, adjust
the tire inflation pressure to the specified
level when the tires are cold and then
perform the initia lization procedure
again.
●While the position of each tire is being
determined and the inflation pressures
are not being displayed on the
multi-information display, if the inflation
pressure of a tire drops, the tire pressure
warning light will come on.
■If the tire pressure warning system is not
initialized properly
●In the following situations, initialization
may take longer than usual to be com-
pleted or may not be possible. (Usually,
the vehicle will need to be driven for
approximately 10 to 30 minutes to com-
plete initialization.) If initialization is not
complete after drivin g approximately 30
minutes, continue driving for a while.
• If the vehicle is driven on an unpaved road, it may take longer to complete ini-
tialization.
• If the vehicle is backed up while perform- ing initialization, data collected during ini-
tialization will be cleared and it will take
longer than normal to complete.
• If the vehicle is driven in heavy traffic or another situation where other vehicles
are driven close by, it may take time for
the system to recognize the tire pressure
warning valve and tran smitters of your
vehicle over those of other vehicles.
If initialization is not complete after driving
for approximately 1 hour, park the vehicle in a safe place for approximately 20 minutes
and then drive the vehicle again.
●In the following situations, initialization
will not be started or was not completed
properly and the system will not operate
properly. Perform the initialization proce-
dure again.
• If, when attempting to start initialization,
the tire pressure warning light does not
blink 3 times.
• If, when the vehicle has been driven for
about 20 minutes after performing ini-
tialization, the tire pressure warning light
blinks for approximately 1 minute and
then illuminates.
●If initialization canno t be completed after
performing the above procedure, con-
tact your Lexus dealer.
Every tire pressure warning valve and
transmitter has a unique ID code.
When replacing a tire pressure warn-
ing valve and transmitter, it is necessary
to register the ID codes.
The ID codes can be registered on
of the multi-information display.
1
Park the vehicle in a safe place, turn
the engine switch off, wait 20 min-
utes or more, and then start the
engine.
WARNING
■When initializing the tire pressure
warning system
Do not initialize the tire pressure warning
system without first adjusting the tire
inflation pressure to the specified level.
Otherwise, the tire pressure warning
light may not come on even if the tire
inflation pressure is low, or it may come
on when the tire inflation pressure is
actually normal.
Registering ID codes
Page 394 of 516
3946-3. Do-it-yourself maintenance
2Press or of the meter con-
trol switch to select .
3 Press or to select “Vehicle
Settings” and then press .
4 Press or to select “TPWS”
and then press .
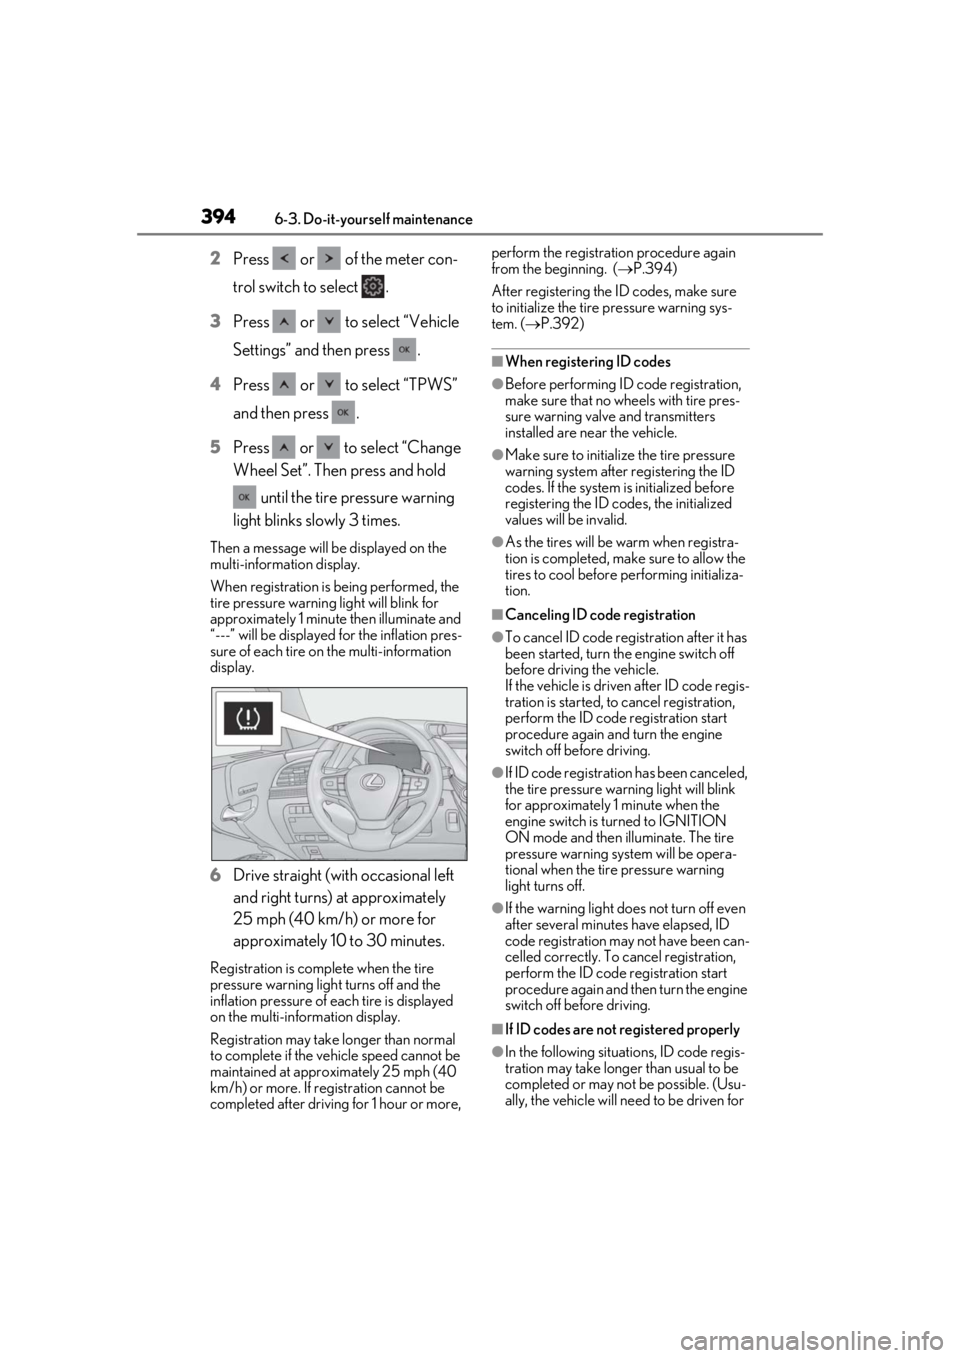
5 Press or to select “Change
Wheel Set”. Then press and hold
until the tire pressure warning
light blinks slowly 3 times.
Then a message will be displayed on the
multi-information display.
When registration is being performed, the
tire pressure warning light will blink for
approximately 1 minute then illuminate and
“---” will be displayed for the inflation pres-
sure of each tire on the multi-information
display.
6 Drive straight (with occasional left
and right turns) at approximately
25 mph (40 km/h) or more for
approximately 10 to 30 minutes.
Registration is complete when the tire
pressure warning light turns off and the
inflation pressure of each tire is displayed
on the multi-information display.
Registration may take longer than normal
to complete if the vehicle speed cannot be
maintained at approximately 25 mph (40
km/h) or more. If registration cannot be
completed after driving for 1 hour or more, perform the registration procedure again
from the beginning. (
P.394)
After registering the ID codes, make sure
to initialize the tire pressure warning sys-
tem. ( P.392)
■When registering ID codes
●Before performing ID code registration,
make sure that no wheels with tire pres-
sure warning valve and transmitters
installed are near the vehicle.
●Make sure to initializ e the tire pressure
warning system after registering the ID
codes. If the system is initialized before
registering the ID codes, the initialized
values will be invalid.
●As the tires will be warm when registra-
tion is completed, ma ke sure to allow the
tires to cool before performing initializa-
tion.
■Canceling ID code registration
●To cancel ID code regi stration after it has
been started, turn the engine switch off
before driving the vehicle.
If the vehicle is driven after ID code regis-
tration is started, to cancel registration,
perform the ID code registration start
procedure again and turn the engine
switch off before driving.
●If ID code registration has been canceled,
the tire pressure warning light will blink
for approximately 1 minute when the
engine switch is tu rned to IGNITION
ON mode and then illuminate. The tire
pressure warning system will be opera-
tional when the tire pressure warning
light turns off.
●If the warning light does not turn off even
after several minutes have elapsed, ID
code registration may not have been can-
celled correctly. To cancel registration,
perform the ID code registration start
procedure again and then turn the engine
switch off before driving.
■If ID codes are not registered properly
●In the following situations, ID code regis-
tration may take longer than usual to be
completed or may not be possible. (Usu-
ally, the vehicle will need to be driven for
Page 395 of 516
3956-3. Do-it-yourself maintenance
6
Maintenance and care
approximately 10 to 30 minutes to com-
plete ID code registration.)
If ID code registration is not complete
after driving for approximately 30 min-
utes, continue driving for a while.
• If the vehicle is driven on an unpaved
road, it may take longer than normal to
complete registration.
• If the vehicle is backed up while perform-
ing registration, data collected during
registration will be cleared, and it will take
longer than normal to complete.
• If the vehicle is driven in heavy traffic or another situation where other vehicles
are driven close by, it may take time for
the system to recognize the tire pressure
warning valve and tran smitters of your
vehicle over those of other vehicles.
• If a wheel with a tire pressure warning valve and transmitter installed is inside or
near the vehicle, registration of the ID
codes for the installed wheels may not be
possible.
If ID registration is not complete after driv-
ing for approximately 1 hour, park the vehi-
cle in a safe place for approximately 20
minutes and then perform the ID code reg-
istration procedure again.
●In the following situat ions, ID code regis-
tration will not be started or was not com-
pleted properly and the system will not
operate properly. Perform the ID code
registration procedure again.
• If, when attempting to start ID code regis-
tration, the tire pressure warning light
does not blink slowly 3 times.
• If, when the vehicle has been driven for
about 20 minutes after performing ID
code registration, the tire pressure warn-
ing light blinks for approximately 1 minute
and then illuminates.
●If ID code registration cannot be com-
pleted after performing the above proce-
dure, contact your Lexus dealer.
Stop the vehicle in a safe place on a
hard, flat surface.
Set the parking brake.
Shift the shift position to P.
Disabling the height control. (if
equipped) ( P.297)
Stop the engine.
■Jack and tools
As your vehicle is eq uipped with run-flat
tires, the following tools for replacing a tire
are not included with your vehicle. They can
be purchased at your Lexus dealer.
●Wheel nut wrench
●Jack
●Jack handle
Replacing the tire
When raising your vehicle with a
jack, position the jack correctly.
Improper placement may damage
your vehicle or cause injury.
If necessary tire replacement
seems difficult to perform, contact
your Lexus dealer.
Before jacking up the vehicle
WARNING
■Using the tire jack
Observe the following precautions.
Improper use of the tire jack may cause
the vehicle to suddenly fall off the jack,
leading to death or serious injury.
●Do not use the tire jack for any pur-
pose other than replacing tires or
installing and removing tire chains.
●Do not use other tire jacks for replac-
ing tires on this vehicle.
Page 396 of 516
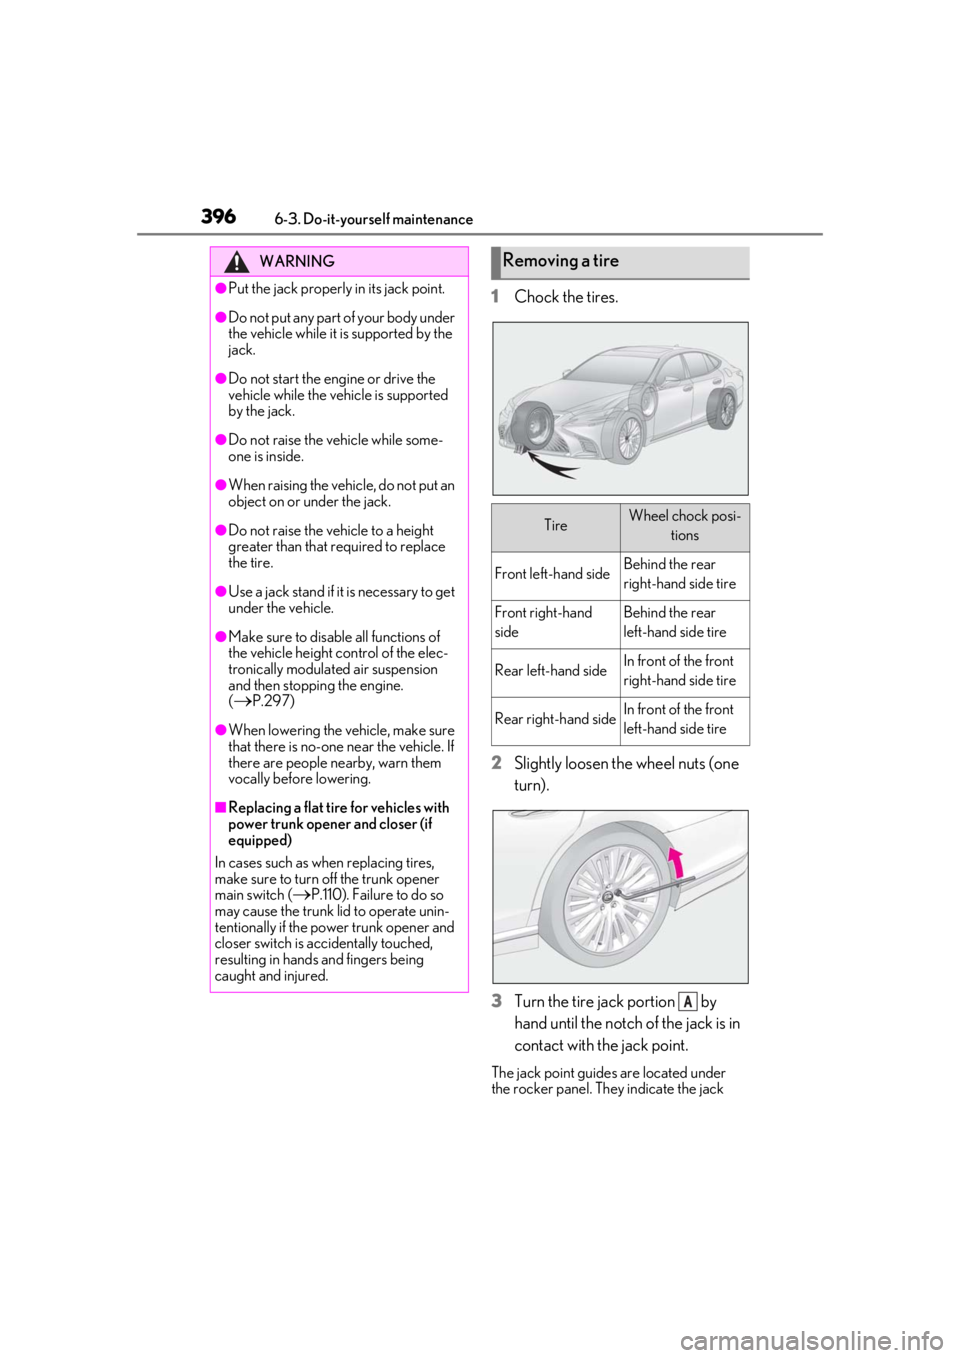
3966-3. Do-it-yourself maintenance
1Chock the tires.
2
Slightly loosen the wheel nuts (one
turn).
3
Turn the tire jack portion by
hand until the notch of the jack is in
contact with the jack point.
The jack point guides are located under
the rocker panel. They indicate the jack
WARNING
●Put the jack properly in its jack point.
●Do not put any part of your body under
the vehicle while it is supported by the
jack.
●Do not start the engine or drive the
vehicle while the vehicle is supported
by the jack.
●Do not raise the vehicle while some-
one is inside.
●When raising the vehicle, do not put an
object on or under the jack.
●Do not raise the vehicle to a height
greater than that required to replace
the tire.
●Use a jack stand if it is necessary to get
under the vehicle.
●Make sure to disable all functions of
the vehicle height control of the elec-
tronically modulate d air suspension
and then stopping the engine.
(
P.297)
●When lowering the vehicle, make sure
that there is no-one near the vehicle. If
there are people nearby, warn them
vocally before lowering.
■Replacing a flat tire for vehicles with
power trunk opener and closer (if
equipped)
In cases such as when replacing tires,
make sure to turn off the trunk opener
main switch (
P.110). Failure to do so
may cause the trunk lid to operate unin-
tentionally if the power trunk opener and
closer switch is accidentally touched,
resulting in hands and fingers being
caught and injured.
Removing a tire
TireWheel chock posi-
tions
Front left-hand sideBehind the rear
right-hand side tire
Front right-hand
sideBehind the rear
left-hand side tire
Rear left-hand sideIn front of the front
right-hand side tire
Rear right-hand sideIn front of the front
left-hand side tire
A
Page 402 of 516
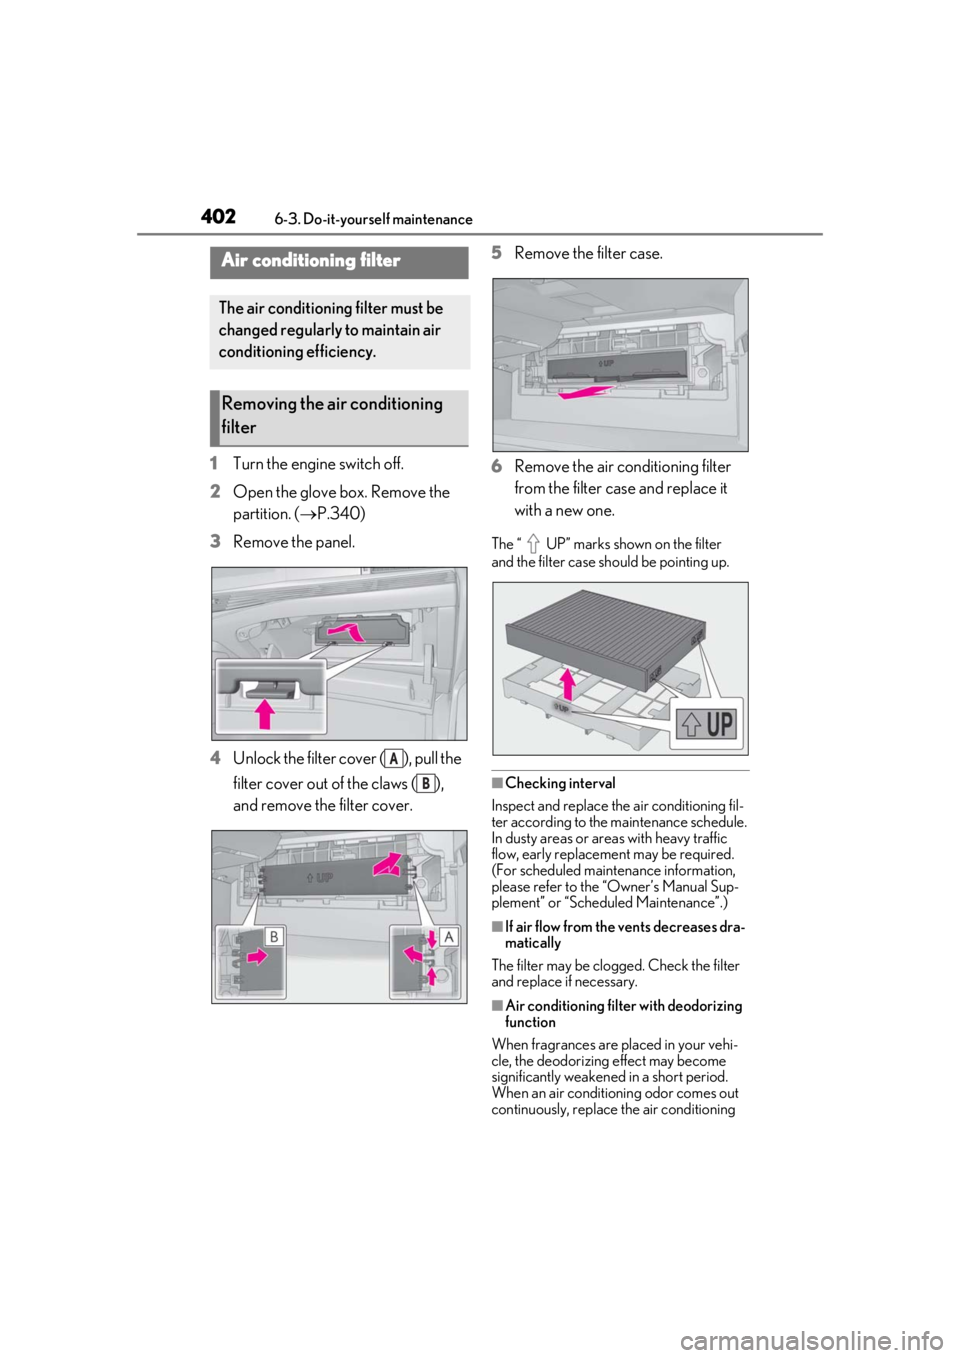
4026-3. Do-it-yourself maintenance
1Turn the engine switch off.
2 Open the glove box. Remove the
partition. ( P.340)
3 Remove the panel.
4 Unlock the filter cover ( ), pull the
filter cover out of the claws ( ),
and remove the filter cover. 5
Remove the filter case.
6 Remove the air conditioning filter
from the filter case and replace it
with a new one.
The “ UP” marks shown on the filter
and the filter case sh ould be pointing up.
■Checking interval
Inspect and replace the air conditioning fil-
ter according to the maintenance schedule.
In dusty areas or areas with heavy traffic
flow, early replacement may be required.
(For scheduled maintenance information,
please refer to the “Owner’s Manual Sup-
plement” or “Scheduled Maintenance”.)
■If air flow from the vents decreases dra-
matically
The filter may be clogged. Check the filter
and replace if necessary.
■Air conditioning filt er with deodorizing
function
When fragrances are placed in your vehi-
cle, the deodorizing effect may become
significantly weakened in a short period.
When an air conditioning odor comes out
continuously, replace the air conditioning
Air conditioning filter
The air conditioning filter must be
changed regularly to maintain air
conditioning efficiency.
Removing the air conditioning
filter
A
B
Page 405 of 516
4056-3. Do-it-yourself maintenance
6
Maintenance and care
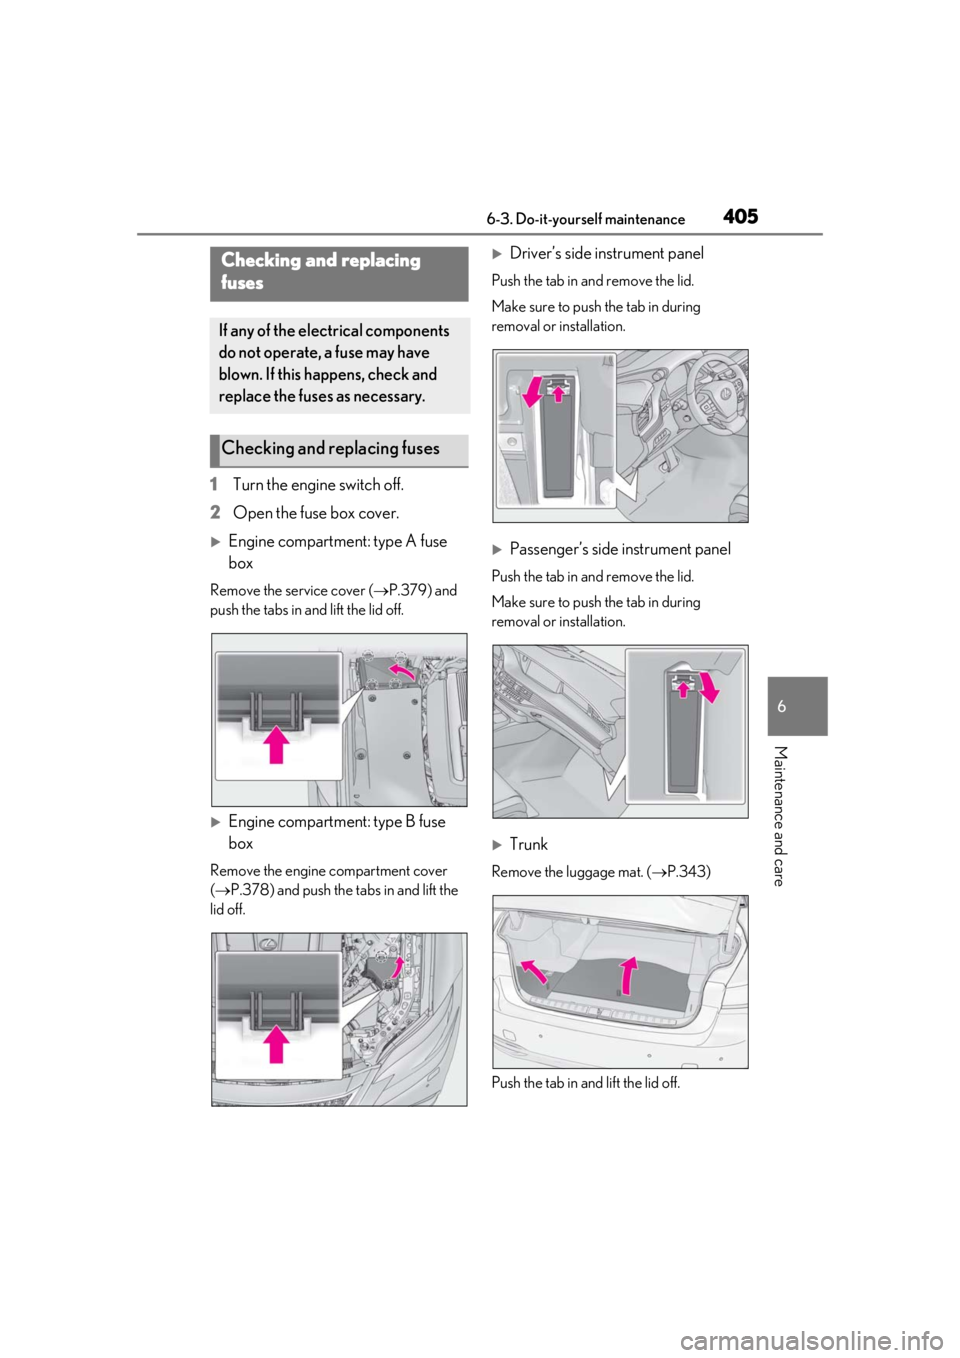
1Turn the engine switch off.
2 Open the fuse box cover.
Engine compartment: type A fuse
box
Remove the service cover ( P.379) and
push the tabs in and lift the lid off.
Engine compartment: type B fuse
box
Remove the engine compartment cover
( P.378) and push the ta bs in and lift the
lid off.
Driver’s side instrument panel
Push the tab in and remove the lid.
Make sure to push the tab in during
removal or installation.
Passenger’s side instrument panel
Push the tab in and remove the lid.
Make sure to push the tab in during
removal or installation.
Trunk
Remove the luggage mat. ( P.343)
Push the tab in and lift the lid off.
Checking and replacing
fuses
If any of the electrical components
do not operate, a fuse may have
blown. If this happens, check and
replace the fuses as necessary.
Checking and replacing fuses
Page 411 of 516

409
7
7
When trouble arises
When trouble arises
.7-1. Essential informationEmergency flashers................... 410
If your vehicle has to be stopped in an emergency ........................... 410
If the vehicle is trapped in rising water.............................................. 411
7-2. Steps to take in an emergency If your vehicle needs to be towed......................................................... 413
If you think something is wrong ......................................................... 417
Fuel pump shut off system ...... 418
If a warning light turns on or a warning buzzer sounds ........ 419
If a warning message is displayed ........................................................ 429
If you have a flat tire.................. 433
If the engine wi ll not start .......434
If you lose your keys ................. 436
If the fuel filler door cannot be opened........................................ 436
If the electronic key does not operate properly .................... 437
If the vehicle battery is discharged ........................................................ 439
If your vehicle overheats ........ 444
If the vehicle becomes stuck ........................................................ 447
Page 412 of 516
4107-1. Essential information
7-1.Essential information
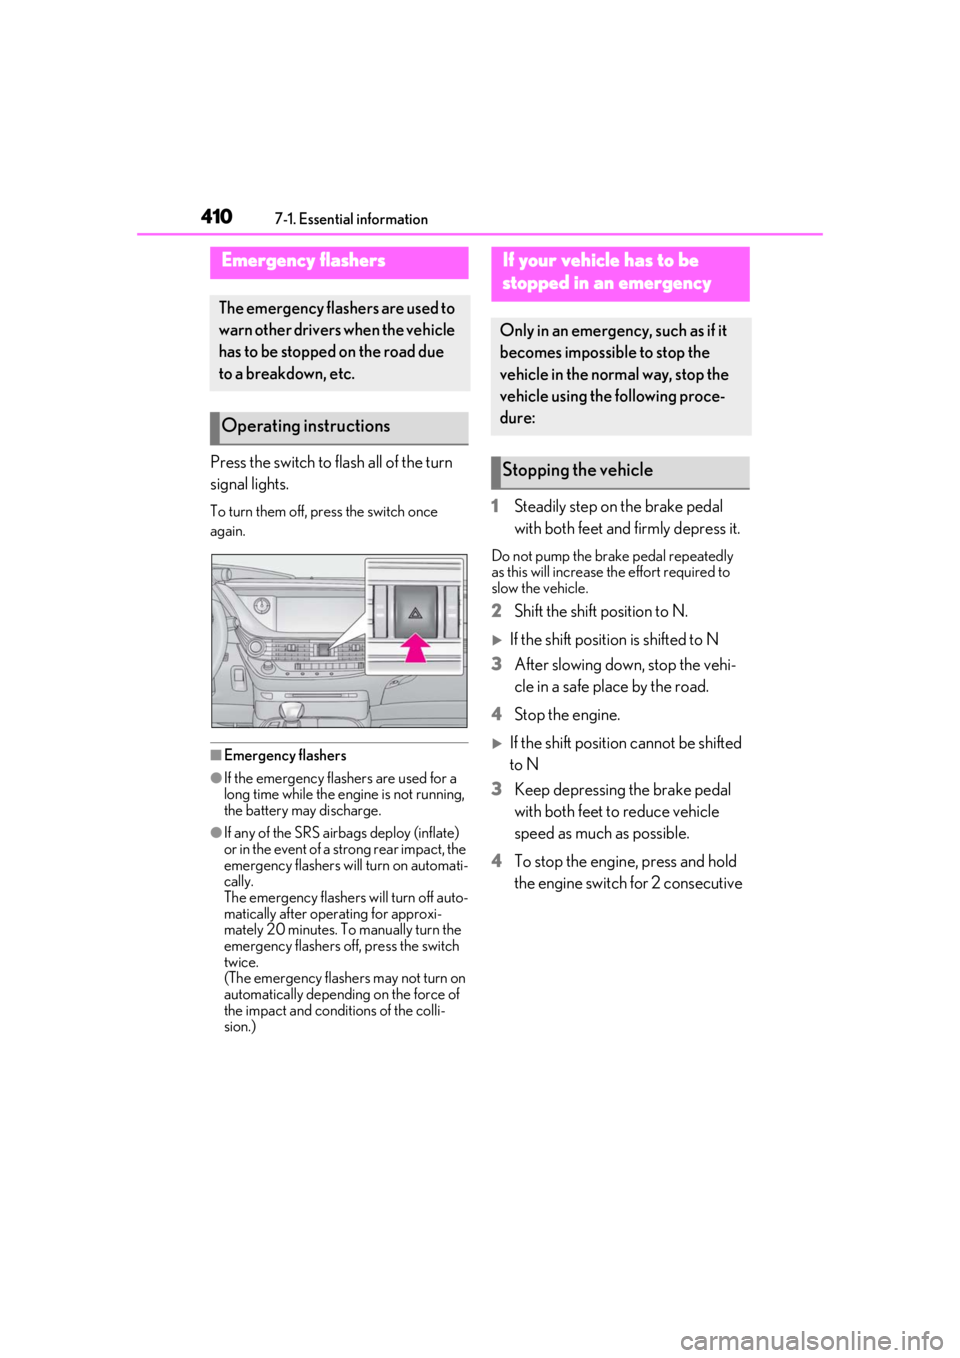
Press the switch to flash all of the turn
signal lights.
To turn them off, press the switch once
again.
■Emergency flashers
●If the emergency flashers are used for a
long time while the engine is not running,
the battery may discharge.
●If any of the SRS airbags deploy (inflate)
or in the event of a strong rear impact, the
emergency flashers will turn on automati-
cally.
The emergency flashers will turn off auto-
matically after operating for approxi-
mately 20 minutes. To manually turn the
emergency flashers off, press the switch
twice.
(The emergency flashers may not turn on
automatically depending on the force of
the impact and conditions of the colli-
sion.)
1 Steadily step on the brake pedal
with both feet and firmly depress it.
Do not pump the brake pedal repeatedly
as this will increase the effort required to
slow the vehicle.
2Shift the shift position to N.
If the shift position is shifted to N
3 After slowing down, stop the vehi-
cle in a safe place by the road.
4 Stop the engine.
If the shift position cannot be shifted
to N
3 Keep depressing the brake pedal
with both feet to reduce vehicle
speed as much as possible.
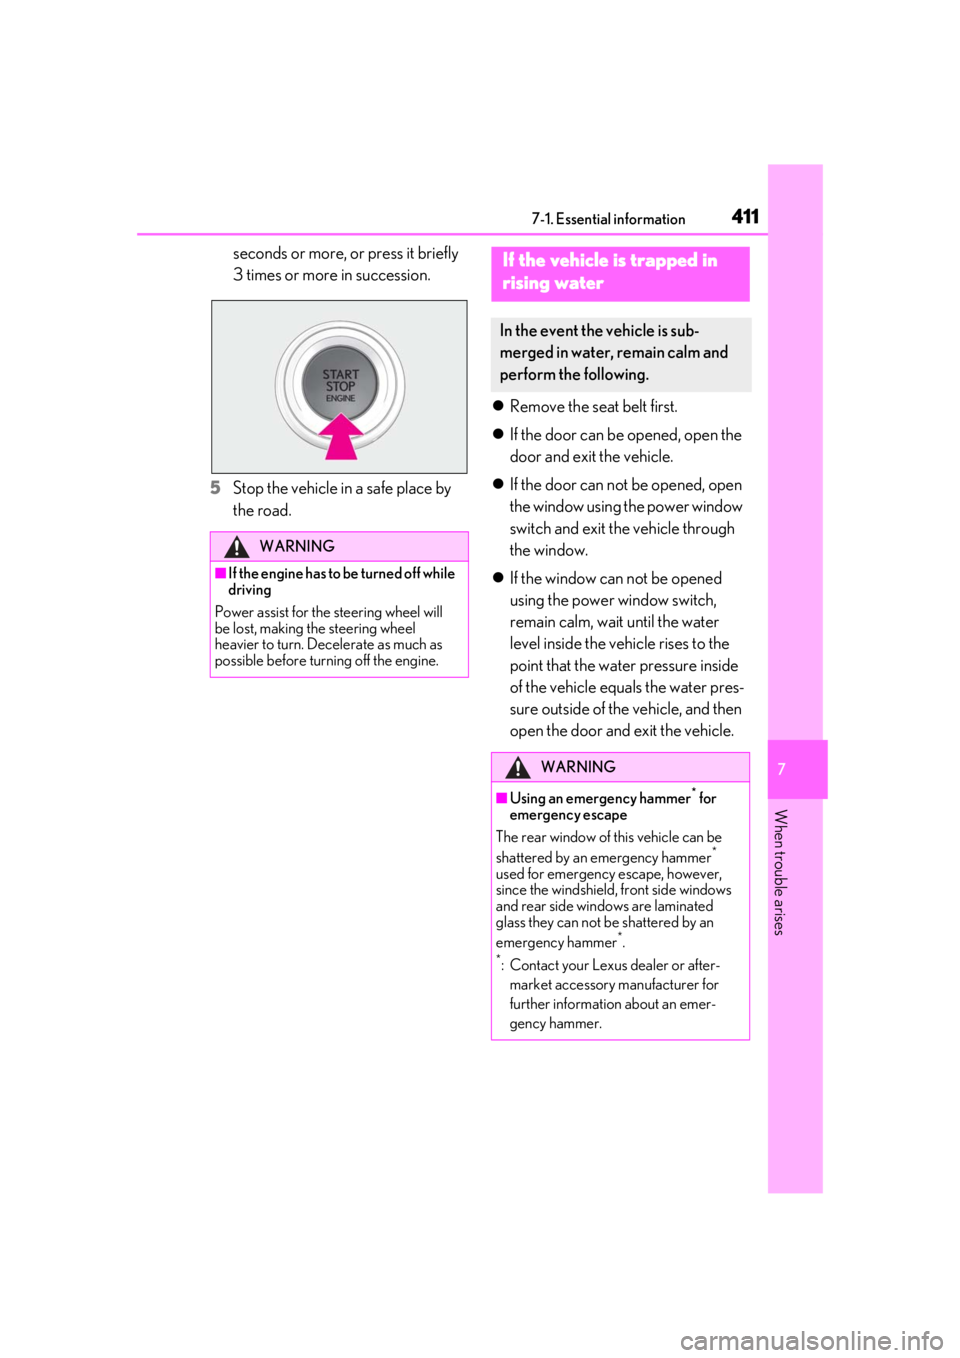
4 To stop the engine, press and hold
the engine switch for 2 consecutive
Emergency flashers
The emergency flashers are used to
warn other drivers when the vehicle
has to be stopped on the road due
to a breakdown, etc.
Operating instructions
If your vehicle has to be
stopped in an emergency
Only in an emergency, such as if it
becomes impossible to stop the
vehicle in the normal way, stop the
vehicle using the following proce-
dure:
Stopping the vehicle
Page 413 of 516
4117-1. Essential information
7
When trouble arises
seconds or more, or press it briefly
3 times or more in succession.
5
Stop the vehicle in a safe place by
the road.
Remove the seat belt first.
If the door can be opened, open the
door and exit the vehicle.
If the door can not be opened, open
the window using the power window
switch and exit the vehicle through
the window.
If the window can not be opened
using the power window switch,
remain calm, wait until the water
level inside the vehicle rises to the
point that the water pressure inside
of the vehicle equals the water pres-
sure outside of the vehicle, and then
open the door and exit the vehicle.
WARNING
■If the engine has to be turned off while
driving
Power assist for the steering wheel will
be lost, making the steering wheel
heavier to turn. Decelerate as much as
possible before turning off the engine.
If the vehicle is trapped in
r
ising water
In the event the vehicle is sub-
merged in water, remain calm and
perform the following.
WARNING
■Using an emergency hammer* for
emergency escape
The rear window of this vehicle can be
shattered by an emergency hammer
*
used for emergency escape, however,
since the windshield, front side windows
and rear side windows are laminated
glass they can not be shattered by an
emergency hammer
*.
*: Contact your Lexus dealer or after-
market accessory manufacturer for
further information about an emer-
gency hammer.