door lock LEXUS LS500H 2020 Workshop Manual
[x] Cancel search | Manufacturer: LEXUS, Model Year: 2020, Model line: LS500H, Model: LEXUS LS500H 2020Pages: 516, PDF Size: 10.38 MB
Page 295 of 516

2954-5. Using the driving support systems
4
Driving
To adjust the vehicle height to one
appropriate for road and driving con-
ditions, press the vehicle height adjust-
ment switch.Turns high mode on/off.
When high mode is enabled, the high
mode indicator on the meter will illuminate.
The vehicle height will increase by approxi-
mately 0.8 in. (20 mm) from its normal
position.
When the vehicle height is increased by a
control of access mode press the vehicle
height adjustment switch twice to
enable/disable high mode.
■The vehicle height adjustment switch
can be used to change the mode when
The engine switch is in IGNITION ON
mode.
■System protection function
If the vehicle height is repeatedly increased
and decreased using the vehicle height
adjustment switch, etc ., the system may not
operate temporarily.
In order to improve the ease of enter-
ing and exiting the vehicle, the vehicle
height will increase automatically.
Enter control
If any of the following operations are
performed, the vehicle height will
increase automatically:
WARNING
■Vehicle height co ntrol precautions
In the following situations, make sure to
check the safety of the area around the
vehicle, as the vehicle height may change
and part of someone’s body may be
caught in the vehicle, possibly causing
injury or the vehicle may be damaged.
●When opening or closing a door
●When locking or unlocking the doors
●When changing the vehicle height
using the vehicle height adjustment
switch
NOTICE
■Parking precaution
●If the vehicle is parked for a long time,
the vehicle height may change due to
changes in the ambient temperature.
When parking the vehicle, make sure
that the area above and below the
vehicle is clear, so that the vehicle will
not contact anything if its height
changes.
●Be careful when parking the vehicle in
an area with a low ceiling or near low
hanging objects, as the vehicle height
will increase when passengers exit the
vehicle and exit control of access
mode operates.
●When the doors are closed or locked,
the vehicle height may decrease.
When parking in a parking lot with a
device which raises to contact the bot-
tom of the vehicle, make sure to dis-
able the vehicle height control.
Selecting the vehicle height
Vehicle height control when
entering/exiting the vehicle
(“Access Mode”)
Page 296 of 516

2964-5. Using the driving support systems
When the doors are unlocked using
the smart access system with
push-button start
When the doors are unlocked using
the wireless remote control and
then a door is opened.
The vehicle height will increase by approxi-
mately 0.8 in. (20 mm) from its normal
position.
Depending on the current vehicle height,
the vehicle height may not increase.
If the vehicle height increased, when
any of the following conditions are met,
the vehicle will return to its previous
height:
A certain amount of time has
elapsed since the engine was
started and the doors were closed
The vehicle speed reaches approxi-
mately 3 mph (5 km/h)
The doors are locked using the
smart access system with push-but-
ton start or wireless remote control
Exit control
When “Select Parking Height” is set to
“High”, the vehicle height will automati-
cally increase when the P shift position
is selected and a door is opened.
1 Press or to select .
2 Press or to select “Vehicle
Settings” and then press .
3 Press or to select
and then press . 4
Press or to select “Select
Parking Height” and then press
.
The vehicle height will increase by approxi-
mately 0.4 in. (10 mm) from its normal
position.
Depending on the current vehicle height,
the vehicle height may not increase.
If the vehicle height increased, when
any of the following conditions are met,
the vehicle will return to its previous
height:
The vehicle speed reaches approxi-
mately 3 mph (5 km/h)
The doors are locked using the
smart access system with push-but-
ton start or wireless remote control
■Enabling/Disabling access mode
1 Press the or meter control
switch to select .
2 Press the or meter control
switch to select “Vehicle Settings”
and then press .
3 Press the or meter control
switch to select and then
press .
4 Press the or meter control
switch to select “Access Mode” and
then press .
The setting will change between
enabled/disabled each time the
meter control switch is pressed.
Page 297 of 516

2974-5. Using the driving support systems
4
Driving
■When the vehicle height has been
increased by a control of access mode
Press the vehicle height adjustment switch
with the engine switch in any mode to return
the vehicle to its previous vehicle height.
■Access mode operation
●Access mode will not operate if the vehi-
cle is not parked on a level road surface.
●When the P shift position is selected, if
the doors are not locked and any door is
opened from the outside, exit control will
operate.
●If the doors are locked and unlocked
repeatedly, the system may not operate
temporarily.
Vehicle height control can be tempo-
rarily disabled using the meter control
switches. ( P.81)
When to temporarily disable vehicle height
control: P.294
1 Press or to select .
2 Press or to select “Vehicle
Settings” and then press .
3 Press or to select
and then press .
4 Press or to select “Height
Control” and then press .
This setting is memorized even if the
engine switch is turned off.
Even if the vehicle height control func-
tions are disabled, they will be enabled
automatically when the vehicle speed
reaches approximately 19 mph (30
km/h).
■ECB (Electronically Controlled
Brake System) (vehicles with Lexus
Safety System + A)
The electronically controlled system
generates braking force correspond-
ing to the brake operation
■ABS (Anti-lock Brake System)
Helps to prevent wheel lock when the
brakes are applied suddenly, or if the
brakes are applied while driving on a
slippery road surface
■Brake assist
Generates an increased level of brak-
ing force after the brake pedal is
depressed when the system detects a
panic stop situation
■VSC (Vehicle Stability Control)
Helps the driver to control skidding
when swerving sudden ly or turning on
slippery road surfaces.
■Secondary Collision Brake
When the airbag sensor detects a colli-
sion, the brakes and stop lights are
Temporarily disabling vehicle
height control
Driving assist systems
To keep driving safety and perfor-
mance, the following systems oper-
ate automatically in response to
various driving situations. Be aware,
however, that these systems are
supplementary and should not be
relied upon too heavily when oper-
ating the vehicle.
Summary of the driving assist
systems
Page 319 of 516

3195-3. Using the air conditioning system and defogger
5
Interior features
■Registering air conditioning settings to
electronic keys
●Unlocking the vehicle using an electronic
key and turning the engine switch to
IGNITION ON mode will recall that
key’s registered air conditioning settings.
●When the engine switch is turned off, the
current air conditioning settings will auto-
matically be registered to the electronic
key that was used to unlock the vehicle.
●The system may not operate correctly if
more than one electronic key is in the
vicinity or if the smart access system with
push-button start is used to unlock a pas-
senger door.
●The doors that can recall the air condi-
tioning setting* when unlocked using the
smart access system with push-button
start can be changed. For details, contact
your Lexus dealer.
*: The doors that can recall the driving
position memory are changed at the
same time.
■Operation of the air conditioning sys-
tem in Eco drive mode
In Eco drive mode, the air conditioning sys-
tem is controlled as follows to prioritize fuel
efficiency:
●Engine speed and compressor operation
controlled to restri ct heating/cooling
capacity
●Fan speed restricted when automatic
mode is selected
To improve air conditioning performance,
perform the following operations:
●Turn off eco air conditioning mode
( P.320)
●Adjust the fan speed
●Turn off Eco drive mode ( P.292)
■When the outside temperature falls to
nearly 32°F (0°C)
The dehumidification function may not
operate even when “A/C” is selected.
■Ventilation and air conditioning odors
●To let fresh air in, set the air conditioning
system to the outside air mode.
●During use, various odors from inside and
outside the vehicle may enter into and
accumulate in the air conditioning sys-
tem. This may then cause odor to be
emitted from the vents.
●To reduce potential odors from occur-
ring:
• It is recommended that the air condition-
ing system be set to outside air mode
prior to turning the vehicle off.
• The start timing of the blower may be
delayed for a short period of time imme-
diately after the air conditioning system is
started in automatic mode or with the
micro dust and pollen filter on.
●When parking, the system automatically
switches to outside air mode to encour-
age better air circulation throughout the
vehicle, helping to reduce odors that
occur when starting the vehicle.
■Using the voice command system
Air conditioning system can be operated
using voice commands. For details, refer to
the “NAVIGATION AND MULTIMEDIA
SYSTEM OWNER’S MANUAL”.
■Air conditioning filter
P.402
■Customization
Some functions can be customized.
( P.470)
WARNING
■To prevent the windshield from fog-
ging up
Do not use the windshield defogger
switch during cool air operation in
extremely humid weather. The difference
between the temperature of the outside
air and that of the windshield can cause
the outer surface of the windshield to fog
up, blocking your vision.
■When the outside rear view mirror
defoggers are operating
Do not touch the outside rear view mir-
ror surfaces, as they can become very
hot and burn you.
Page 334 of 516

3345-4. Using the interior lights
5-4.Using the interior lights
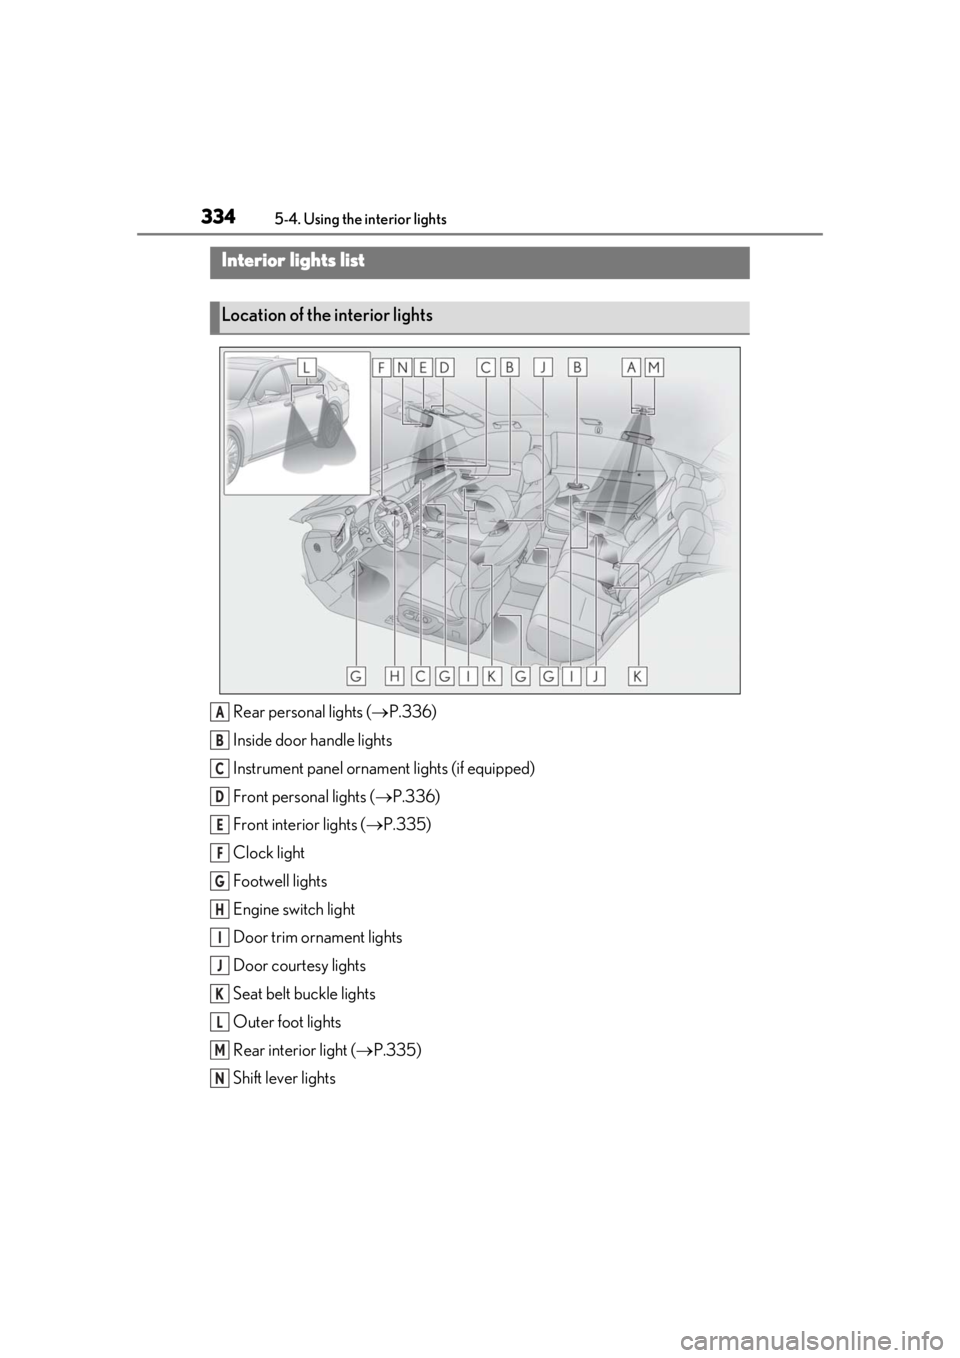
Rear personal lights ( P.336)
Inside door handle lights
Instrument panel orname nt lights (if equipped)
Front personal lights ( P.336)
Front interi or lights ( P.335)
Clock light
Footwell lights
Engine switch light
Door trim ornament lights
Door courtesy lights
Seat belt buckle lights
Outer foot lights
Rear interior light ( P.335)
Shift lever lights
Interior lights list
Location of the interior lights
A
B
C
D
E
F
G
H
I
J
K
L
M
N
Page 337 of 516

3375-4. Using the interior lights
5
Interior features
■Illuminated entry system
The lights automatically turn on/off accord-
ing to the engine switch mode, the pres-
ence of the electronic key, whether the
doors are locked/unlocked, and whether
the doors are opened/closed.
■To prevent the battery from being dis-
charged
If the interior lights remain on when the
engine switch is turned off, the lights will go
off automatically after 20 minutes.
■When front interior light or front per-
sonal lights do not respond as normal
●When water, dirt, et c., have adhered to
the lens surface
●When operated with a wet hand
●When wearing gloves, etc.
■The interior lights may turn on automati-
cally when
If any of the SRS airbags deploy (inflate) or
in the event of a strong rear impact, the inte-
rior lights will turn on automatically.
The interior lights will turn off automatically
after approximately 20minutes.
The interior lights can be turned off manu-
ally. However, in order to help prevent fur-
ther collisions, it is recommended that they
be left on until safety can be ensured.
(The interior lights may not turn on auto-
matically depending on the force of the
impact and conditions of the collision.)
■Customization
Some functions can be customized.
( P.470)
NOTICE
■To prevent battery discharge
Do not leave the lights on longer than
necessary when the engine is not run-
ning.
■Removing light lenses
Never remove th e lens for the front inte-
rior light and front personal lights. Other-
wise, the lights will be damaged. If a lens
needs to be removed, contact your Lexus
dealer.
Page 349 of 516

3495-6. Using the other interior features
5
Interior features
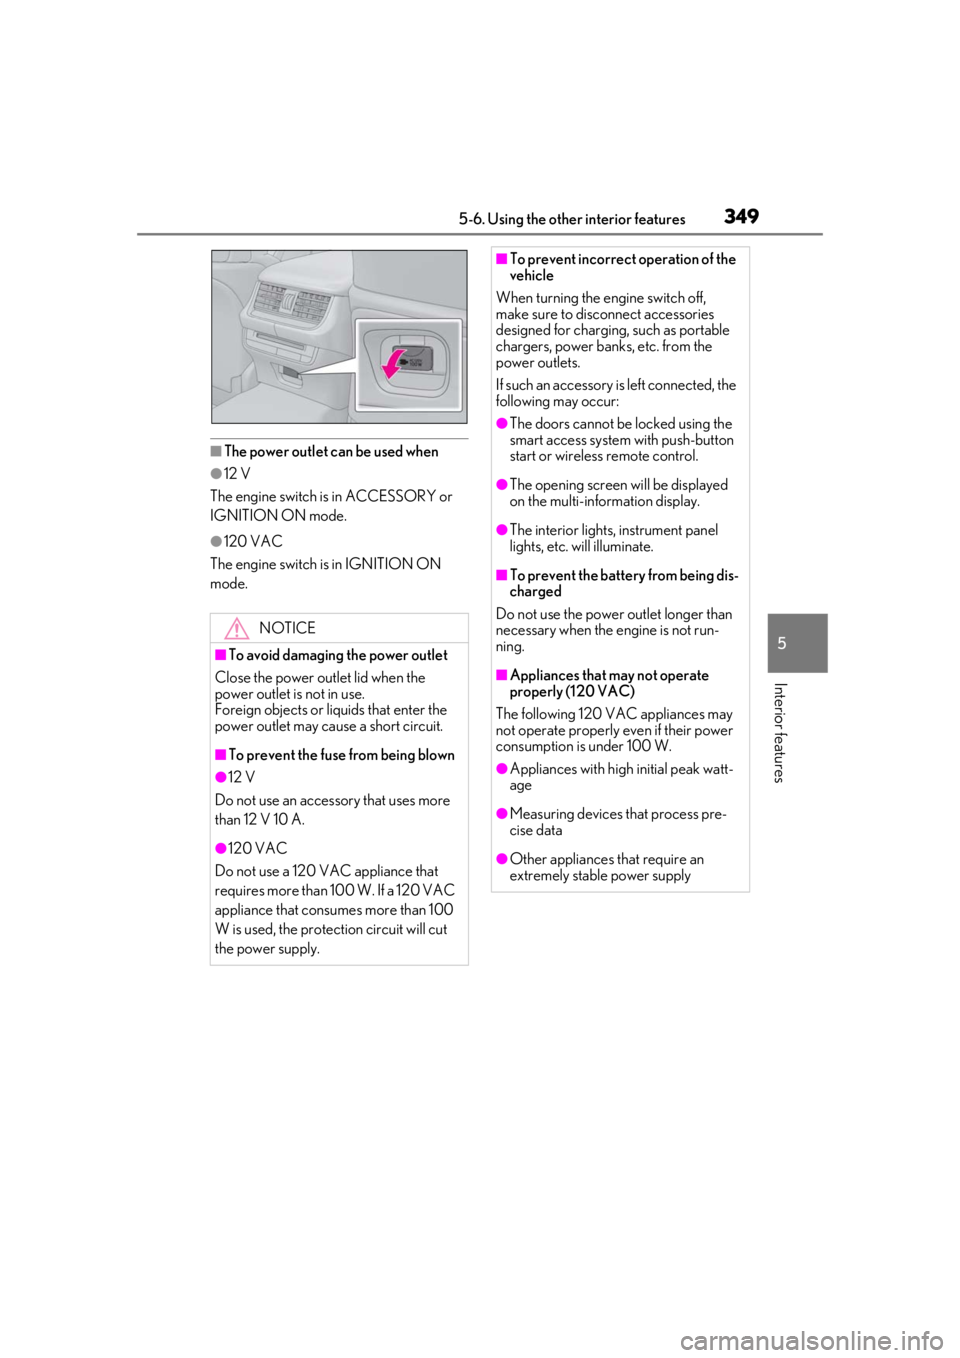
■The power outlet can be used when
●12 V
The engine switch is in ACCESSORY or
IGNITION ON mode.
●120 VAC
The engine switch is in IGNITION ON
mode.
NOTICE
■To avoid damaging the power outlet
Close the power outlet lid when the
power outlet is not in use.
Foreign objects or liquids that enter the
power outlet may cause a short circuit.
■To prevent the fuse from being blown
●12 V
Do not use an accessory that uses more
than 12 V 10 A.
●120 VAC
Do not use a 120 VAC appliance that
requires more than 100 W. If a 120 VAC
appliance that consumes more than 100
W is used, the protection circuit will cut
the power supply.
■To prevent incorrect operation of the
vehicle
When turning the engine switch off,
make sure to disc onnect accessories
designed for charging , such as portable
chargers, power banks, etc. from the
power outlets.
If such an accessory is left connected, the
following may occur:
●The doors cannot be locked using the
smart access system with push-button
start or wireless remote control.
●The opening screen will be displayed
on the multi-information display.
●The interior lights, instrument panel
lights, etc. will illuminate.
■To prevent the battery from being dis-
charged
Do not use the power outlet longer than
necessary when the engine is not run-
ning.
■Appliances that may not operate
properly (120 VAC)
The following 120 VAC appliances may
not operate properly even if their power
consumption is under 100 W.
●Appliances with high initial peak watt-
age
●Measuring devices that process pre-
cise data
●Other appliances that require an
extremely stable power supply
Page 354 of 516

3545-6. Using the other interior features
The HomeLink® wireless control sys-
tem in your vehicle has 3 buttons which
can be programmed to operate 3 dif-
ferent devices. Refer to the program-
ming methods on the following pages
to determine the method which is
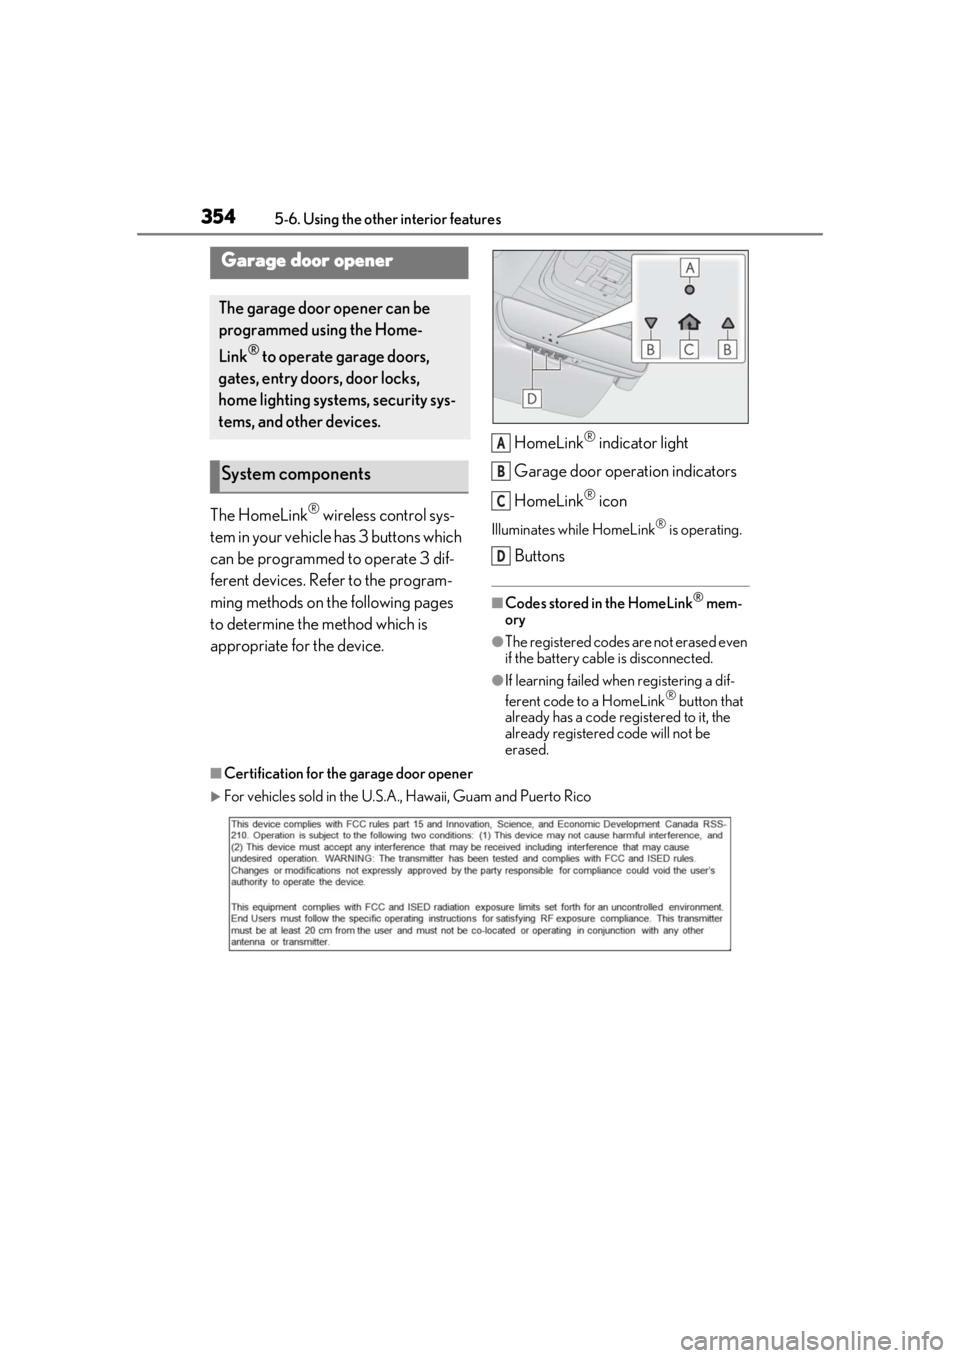
appropriate for the device. HomeLink
® indicator light
Garage door operation indicators
HomeLink
® icon
Illuminates while HomeLink® is operating.
Buttons
■Codes stored in the HomeLink® mem-
ory
●The registered codes are not erased even
if the battery cable is disconnected.
●If learning failed when registering a dif-
ferent code to a HomeLink® button that
already has a code registered to it, the
already registered code will not be
erased.
■Certification for the garage door opener
For vehicles sold in the U.S.A. , Hawaii, Guam and Puerto Rico
Garage door opener
The garage door opener can be
programmed using the Home-
Link
® to operate garage doors,
gates, entry doors, door locks,
home lighting systems, security sys-
tems, and other devices.
System components
A
B
C
D
Page 362 of 516

3626-1. Maintenance and care
6-1.Maintenance and care
Working from top to bottom, liber-
ally apply water to the vehicle body,
wheel wells and underside of the
vehicle to remove any dirt and dust.
Wash the vehicle body using a
sponge or soft cloth, such as a
chamois.
For hard-to-remove marks, use car
wash soap and rinse thoroughly with
water.
Wipe away any water.
Wax the vehicle when the water-
proof coating deteriorates.
If water does not bead on a clean surface,
apply wax when the vehicle body is cool.
■Self-restoring coat
The vehicle body has a self-restoring coat-
ing that is resistant to small surface
scratches caused in a car wash etc.
●The coating lasts for 5 to 8 years from
when the vehicle is delivered from the
plant.
●The restoration time differs depending on
the depth of the scratch and outside tem-
perature.
The restoration time may become
shorter when the coating is warmed by
applying warm water.
●Deep scratches caused by keys, coins,
etc. cannot be restored.
●Do not use wax that contains abrasives.
■Automatic car washes
●Before washing the vehicle:
• Fold the mirrors
• Turn off the power trunk opener and closer (if equipped)
Start washing from the front of the vehicle.
Extend the mirrors before driving.
●Brushes used in automatic car washes
may scratch the vehicl e surface and harm
your vehicle’s paint.
■High pressure car washes
As water may enter the cabin, do not bring
the nozzle tip near the gaps around the
doors or perimeter of the windows, or spray
these areas continuously.
■When using a car wash
If the door handle becomes wet while the
electronic key is within the effective range,
the door may lock and unlock repeatedly. In
that case, follow the following correction
procedures to wash the vehicle:
●Place the key in a position 6 ft. (2 m) or
more separate from the vehicle while the
vehicle is being wash ed. (Take care to
ensure that the key is not stolen.)
●Set the electronic key to battery-saving
mode to disable the smart access system
with push-button start. ( P.112)
■Aluminum wheels
●Remove any dirt immediately by using a
neutral detergent.
●Wash detergent off with water immedi-
ately after use.
●To protect the paint from damage, make
sure to observe the following precau-
tions.
• Do not use acidic, alkaline or abrasive detergent
• Do not use hard brushes
• Do not use detergent on the wheels when they are hot, such as after driving or park-
ing in hot weather
■Brake caliper coating (F SPORT mod-
els)
●When using detergent, use neutral deter-
gent. Do not use hard brushes or abra-
sive cleaners, as they will damage the
coating.
Cleaning and protecting the
vehicle exterior
Perform cleaning in a manner
appropriate to each component
and its material.
Cleaning instructions
Page 371 of 516

3716-2. Maintenance
6
Maintenance and care
Parking brake
• Does the parking brake operate nor-
mally?
•When parked on a slope and the park-
ing brake is on, is the
vehicle securely
stopped?
Seat belts
• Do the seat belts operate smoothly?
• The seat belts should not be damaged.
Seats• Do the seat controls operate properly?
Steering wheel
• Does the steering wheel rotate
smoothly?
• Does the steering wheel have the cor-
rect amount of free
play?
•There should not be any strange sounds
coming from the
steering wheel.
Vehicle exterior
ItemsCheck points
Doors/trunk• Do the doors/trunk operate smoothly?
Engine hood
•Does the engine hood lock system
work properly?
Fluid leaks
•There should not be any signs of fluid
leakage after the
vehicle has been
parked.
ItemsCheck points
Tires
• Is the tire inflation pressure correct?
• The tires should not be damaged or
excessively worn.
• Have the tires been rotated according to
the maintenance
schedule?
•The wheel nuts should not be loose.
Windshield wip-
ers
• The wiper blades should not show any
signs of cracking,
splitting, wear, con-
tamination or defor-
mation.
• The wiper blades should clear the
windshield without
streaking or skip-
ping.
ItemsCheck points