door lock LEXUS LS500H 2020 Repair Manual
[x] Cancel search | Manufacturer: LEXUS, Model Year: 2020, Model line: LS500H, Model: LEXUS LS500H 2020Pages: 516, PDF Size: 10.38 MB
Page 385 of 516
3856-3. Do-it-yourself maintenance
6
Maintenance and care
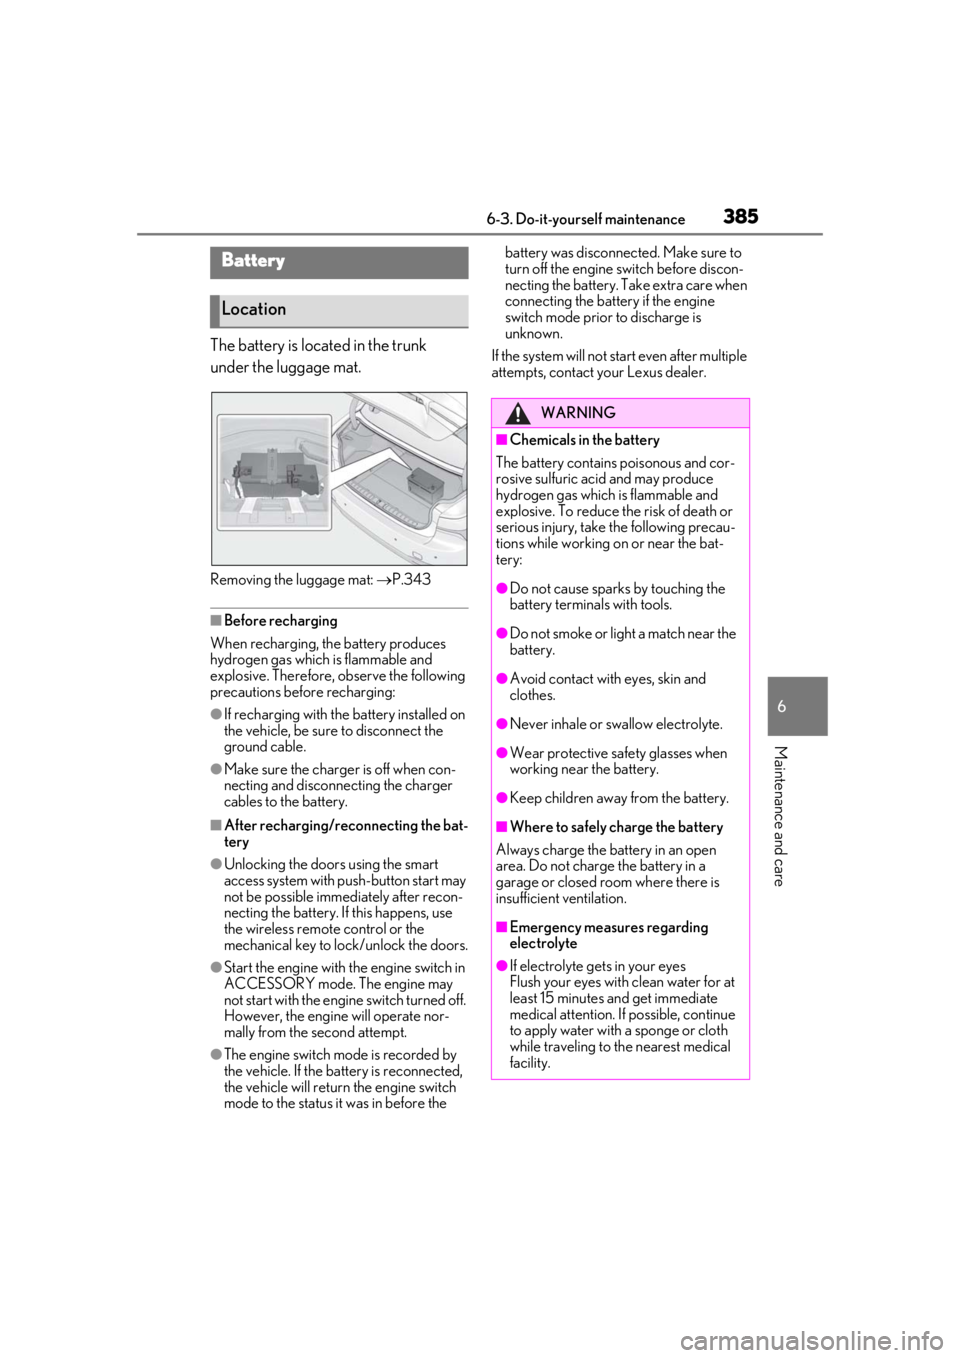
The battery is located in the trunk
under the luggage mat.
Removing the luggage mat: P.343
■Before recharging
When recharging, the battery produces
hydrogen gas which is flammable and
explosive. Therefore, observe the following
precautions before recharging:
●If recharging with the battery installed on
the vehicle, be sure to disconnect the
ground cable.
●Make sure the charger is off when con-
necting and disconnecting the charger
cables to the battery.
■After recharging/reconnecting the bat-
tery
●Unlocking the doors using the smart
access system with pu sh-button start may
not be possible immediately after recon-
necting the battery. If this happens, use
the wireless remote control or the
mechanical key to lock/unlock the doors.
●Start the engine with the engine switch in
ACCESSORY mode. The engine may
not start with the engine switch turned off.
However, the engine will operate nor-
mally from the second attempt.
●The engine switch mode is recorded by
the vehicle. If the battery is reconnected,
the vehicle will return the engine switch
mode to the status it was in before the battery was disconnected. Make sure to
turn off the engine switch before discon-
necting the battery. Take extra care when
connecting the battery if the engine
switch mode prior to discharge is
unknown.
If the system will not start even after multiple
attempts, contact your Lexus dealer.
Battery
Location
WARNING
■Chemicals in the battery
The battery contains poisonous and cor-
rosive sulfuric acid and may produce
hydrogen gas which is flammable and
explosive. To reduce the risk of death or
serious injury, take the following precau-
tions while working on or near the bat-
tery:
●Do not cause sparks by touching the
battery terminals with tools.
●Do not smoke or light a match near the
battery.
●Avoid contact with eyes, skin and
clothes.
●Never inhale or swallow electrolyte.
●Wear protective sa fety glasses when
working near the battery.
●Keep children away from the battery.
■Where to safely charge the battery
Always charge the battery in an open
area. Do not charge the battery in a
garage or closed room where there is
insufficient ventilation.
■Emergency measures regarding
electrolyte
●If electrolyte gets in your eyes
Flush your eyes with clean water for at
least 15 minutes and get immediate
medical attention. If possible, continue
to apply water with a sponge or cloth
while traveling to the nearest medical
facility.
Page 439 of 516
4377-2. Steps to take in an emergency
7
When trouble arises
■When the electronic key does not work
properly
●Make sure that the smart access system
with push-button start has not been dis-
abled at your Lexus dealer. If it has been
disabled, re-enable it.
●Check if battery-saving mode is set. If it is
set, cancel the function. (P.113)
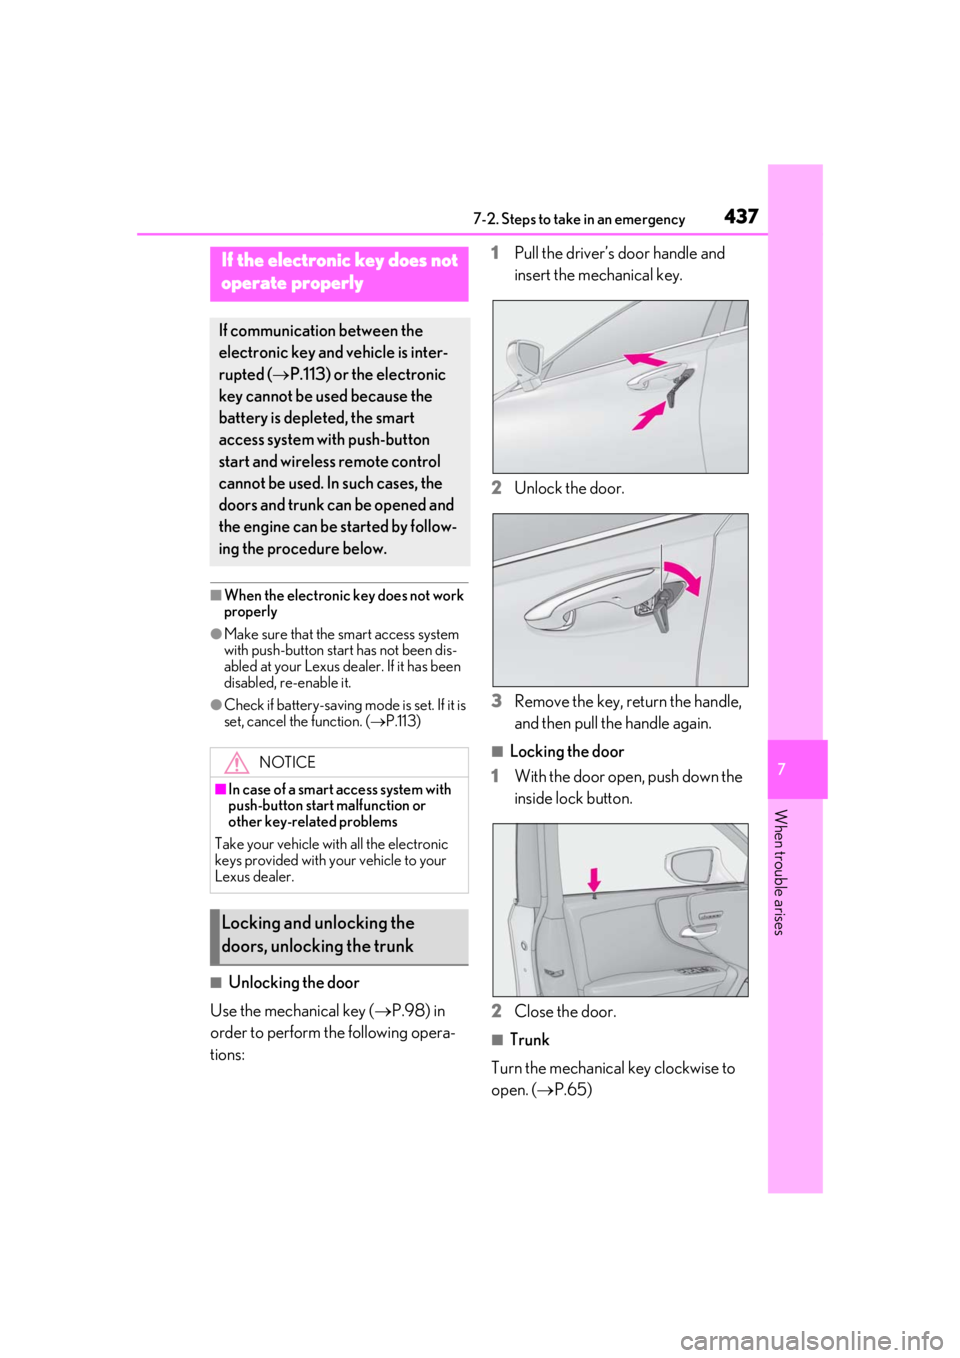
■Unlocking the door
Use the mechanical key ( P.98) in
order to perform the following opera-
tions: 1
Pull the driver’s door handle and
insert the mechanical key.
2
Unlock the door.
3
Remove the key, return the handle,
and then pull the handle again.
■Locking the door
1
With the door open, push down the
inside lock button.
2
Close the door.
■Trunk
Turn the mechanical key clockwise to
open. ( P.65)
If the electronic key does not
o
perate properly
If communication between the
electronic key and vehicle is inter-
rupted ( P.113) or the electronic
key cannot be used because the
battery is depleted, the smart
access system with push-button
start and wireless remote control
cannot be used. In such cases, the
doors and trunk can be opened and
the engine can be started by follow-
ing the procedure below.
NOTICE
■In case of a smart access system with
push-button start malfunction or
other key-related problems
Take your vehicle with all the electronic
keys provided with your vehicle to your
Lexus dealer.
Locking and unlocking the
doors, unlocking the trunk
Page 441 of 516
4397-2. Steps to take in an emergency
7
When trouble arises
If you have a set of jumper (or booster)
cables and a second vehicle with a
12-volt battery, you can jump start your
vehicle by following the steps below.
Method connecting jumper (or
booster) cables to the battery
1 Confirm that the electronic key is
being carried.
When connecting the jumper (or booster)
cables, depending on the situation, the
alarm may activate and doors locked.
( P.66)
2 Open the trunk lid and remove the
luggage mat. ( P.343)
In the event that the trunk opener cannot
be used, use the mechanical key to open
the trunk. (P.437)
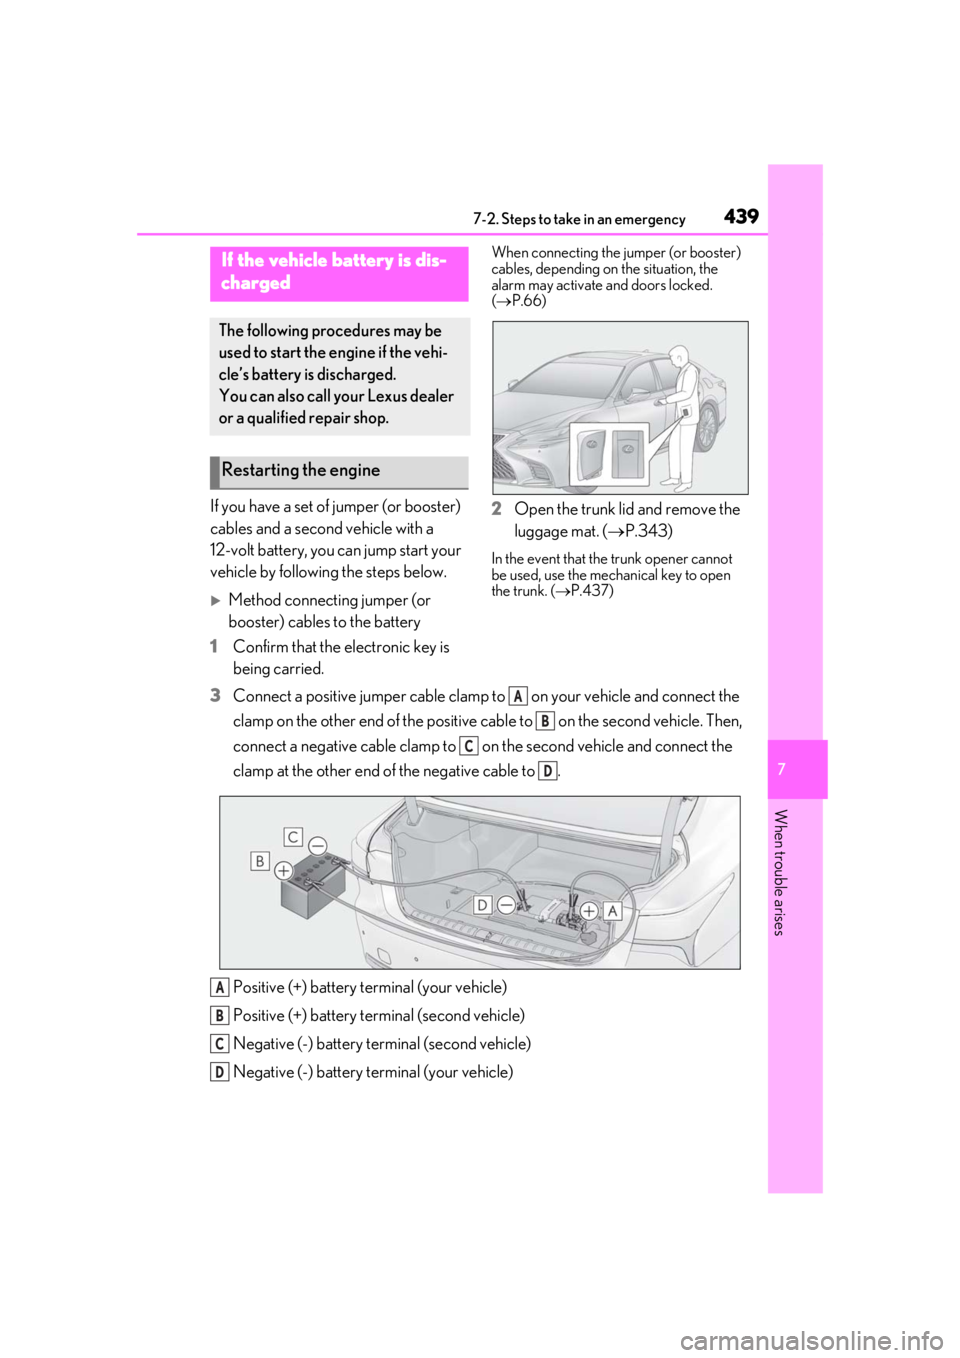
3 Connect a positive jumper cable clamp to on your vehicle and connect the
clamp on the other end of the positive cab le to on the second vehicle. Then,
connect a negative cable clamp to on the second vehicle and connect the
clamp at the other end of the negative cable to .
Positive (+) battery terminal (your vehicle)
Positive (+) battery terminal (second vehicle)
Negative (-) battery terminal (second vehicle)
Negative (-) battery terminal (your vehicle)
If the vehicle battery is dis-
charged
The following procedures may be
used to start the engine if the vehi-
cle’s battery is discharged.
You can also call your Lexus dealer
or a qualified repair shop.
Restarting the engine
A
B
C
D
A
B
C
D
Page 442 of 516
4407-2. Steps to take in an emergency
4Start the engine of the second vehi-
cle. Increase the engine speed
slightly and maintain at that level for
approximately 5 minutes to
recharge the battery of your vehi-
cle.
5 Open and close any of the doors of
your vehicle with the engine switch
off.
6 Maintain the engine speed of the
second vehicle and start the engine
of your vehicle by turning the
engine switch to IGNITION ON
mode.
7 Once the vehicle’s engine has
started, remove the jumper cables
in the exact reverse order from
which they were connected.
Method connecting jumper (or
booster) cables to the exclusive
jump starting terminal
1 Confirm that the electronic key is
being carried.
When connecting the jumper (or booster)
cables, depending on the situation, the
alarm may activate and doors locked. (
P.66)
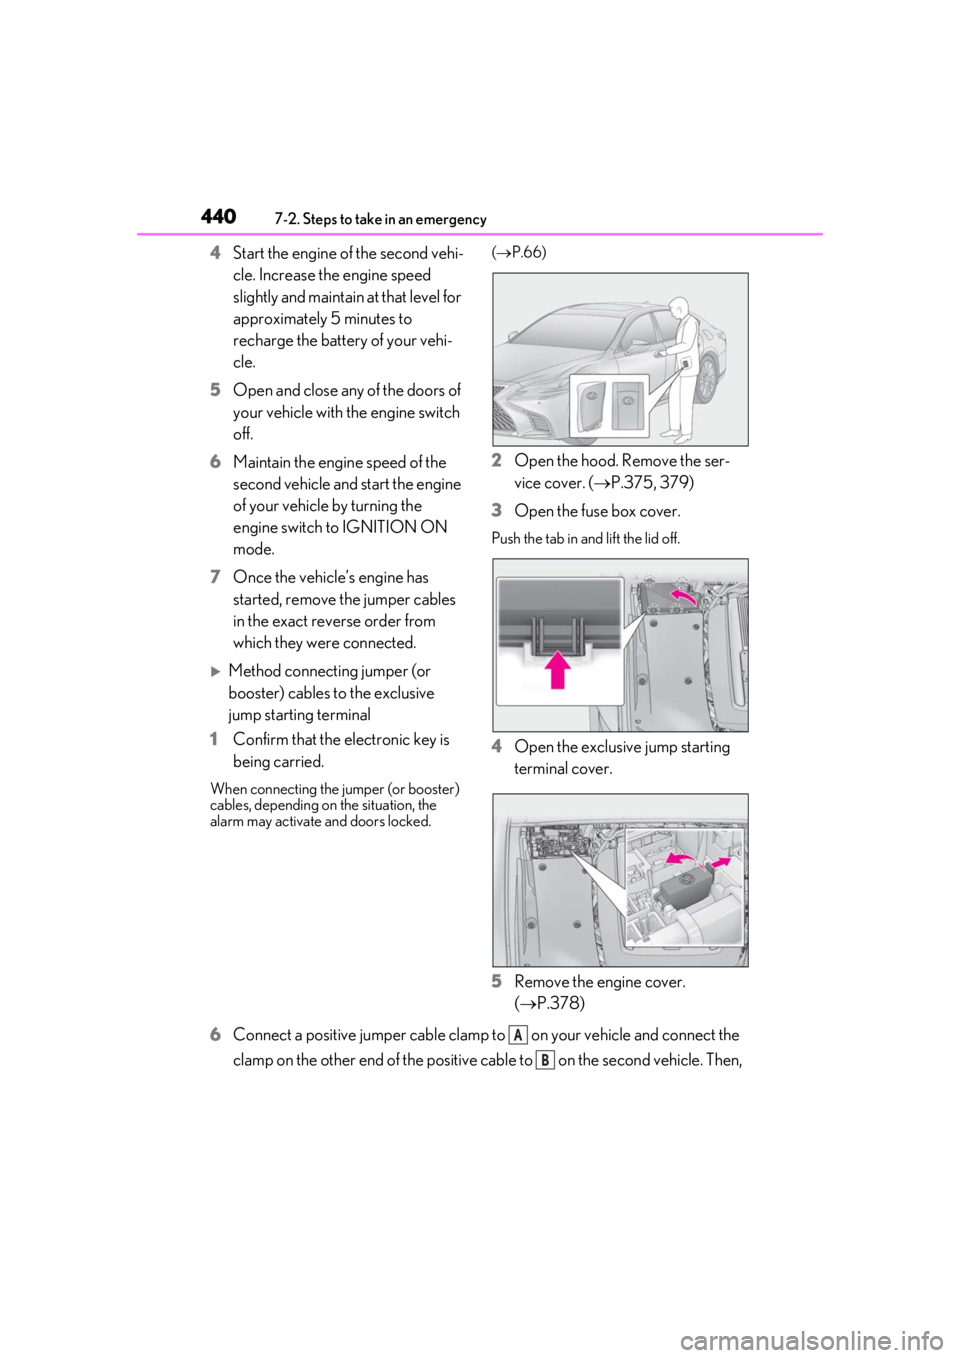
2 Open the hood. Remove the ser-
vice cover. ( P.375, 379)
3 Open the fuse box cover.
Push the tab in and lift the lid off.
4Open the exclusive jump starting
terminal cover.
5 Remove the engine cover.
(P.378)
6 Connect a positive jumper cable clamp to on your vehicle and connect the
clamp on the other end of the positive cab le to on the second vehicle. Then,
A
B
Page 444 of 516
4427-2. Steps to take in an emergency
as in heavy traffic.
■When the battery is removed or dis-
charged
●Information stored in the ECU is cleared.
When the battery is depleted, have the
vehicle inspected at your Lexus dealer.
●Some systems may require initialization.
( P.484)
■When removing the battery terminals
When the battery terminals are removed,
the information stored in the ECU is
cleared. Before removi ng the battery termi-
nals, contact your Lexus dealer.
■Charging the battery
The electricity stored in the battery will dis-
charge gradually even when the vehicle is
not in use, due to natural discharge and the
draining effects of certain electrical appli-
ances. If the vehicle is left for a long time,
the battery may discharge, and the engine
may be unable to start. (The battery
recharges automatically during driving.)
■When recharging or replacing the bat-
tery
●In some cases, it may not be possible to
unlock the doors using the smart access
system with push-button start when the
battery is discharged. Use the wireless
remote control or the mechanical key to
lock or unlock the doors.
●The engine may not start on the first
attempt after the battery has recharged
but will start normally after the second
attempt. This is not a malfunction.
●The engine switch mode is memorized by
the vehicle. When the battery is recon-
nected, the system will return to the
mode it was in before the battery was dis-
charged. Before di sconnecting the bat-
tery, turn the engine switch off.
If you are unsure what mode the engine
switch was in befo re the battery dis-
charged, be especially careful when
reconnecting the battery.
■When replacing the battery
●Use a Central Degassing type battery
(European Regulations).
●Use a battery with the same case size as the previous battery and an equivalent
20 hour rate capacity (20HR) or greater.
• If the sizes differ, the battery cannot be
properly secured.
• If the 20 hour rate capacity is low, even if the time period where the vehicle is not
used is a short time, the battery may dis-
charge and the engine may not be able to
start.
●Use a battery with a handle. If a battery
without a handle is used, removal is more
difficult.
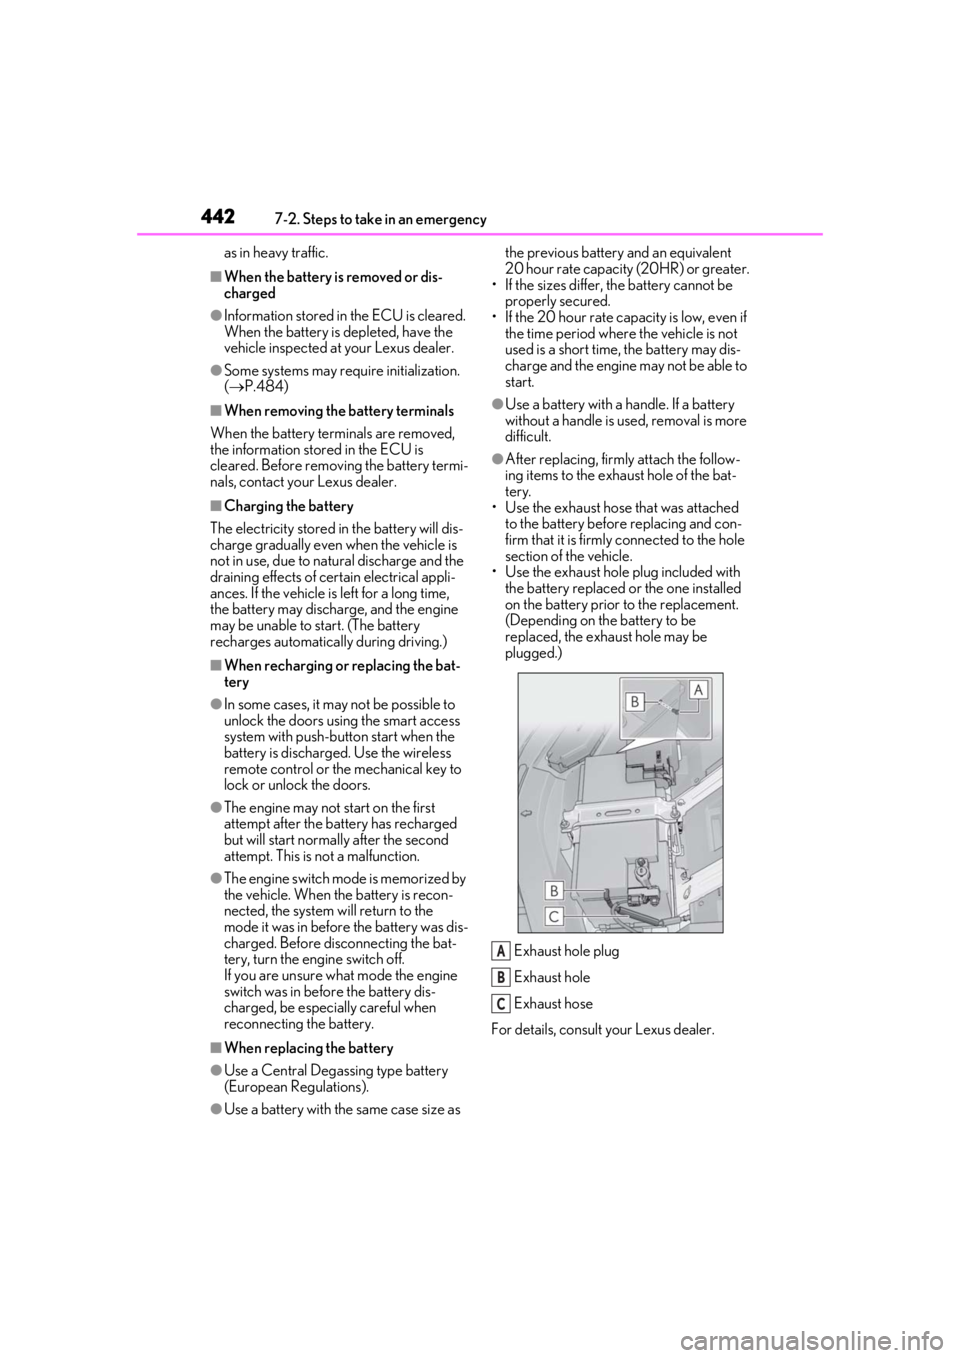
●After replacing, firm ly attach the follow-
ing items to the exhaust hole of the bat-
tery.
• Use the exhaust hose that was attached
to the battery before replacing and con-
firm that it is firmly connected to the hole
section of the vehicle.
• Use the exhaust hole plug included with the battery replaced or the one installed
on the battery prior to the replacement.
(Depending on the battery to be
replaced, the exhaust hole may be
plugged.)
Exhaust hole plug
Exhaust hole
Exhaust hose
For details, consult your Lexus dealer.
A
B
C
Page 475 of 516
4738-2. Customization
8
Vehicle specifications
*:If equipped
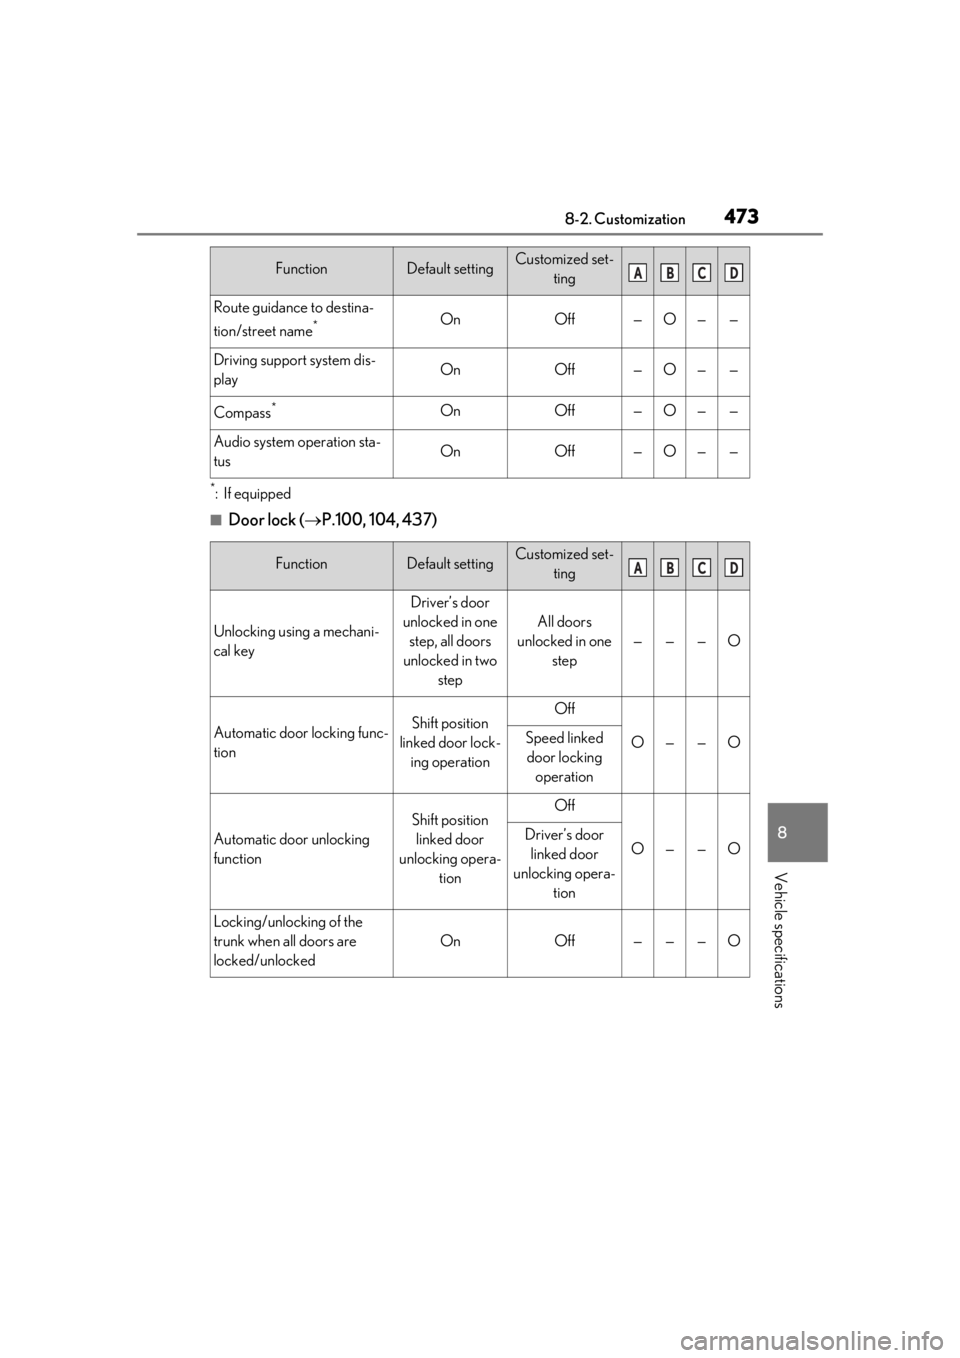
■Door lock (P.100, 104, 437)
Route guidance to destina-
tion/street name
*OnOff—O——
Driving support system dis-
playOnOff—O——
Compass*OnOff—O——
Audio system operation sta-
tusOnOff—O——
FunctionDefault settingCustomized set-
ting
Unlocking using a mechani-
cal key
Driver’s door
unlocked in one step, all doors
unlocked in two step
All doors
unlocked in one step
———O
Automatic door locking func-
tionShift position
linked door lock- ing operationOff
O——OSpeed linked door locking operation
Automatic door unlocking
function
Shift position linked door
unlocking opera- tionOff
O——ODriver’s door linked door
unlocking opera- tion
Locking/unlocking of the
trunk when all doors are
locked/unlocked
OnOff———O
FunctionDefault settingCustomized set-tingABCD
ABCD
Page 476 of 516
4748-2. Customization
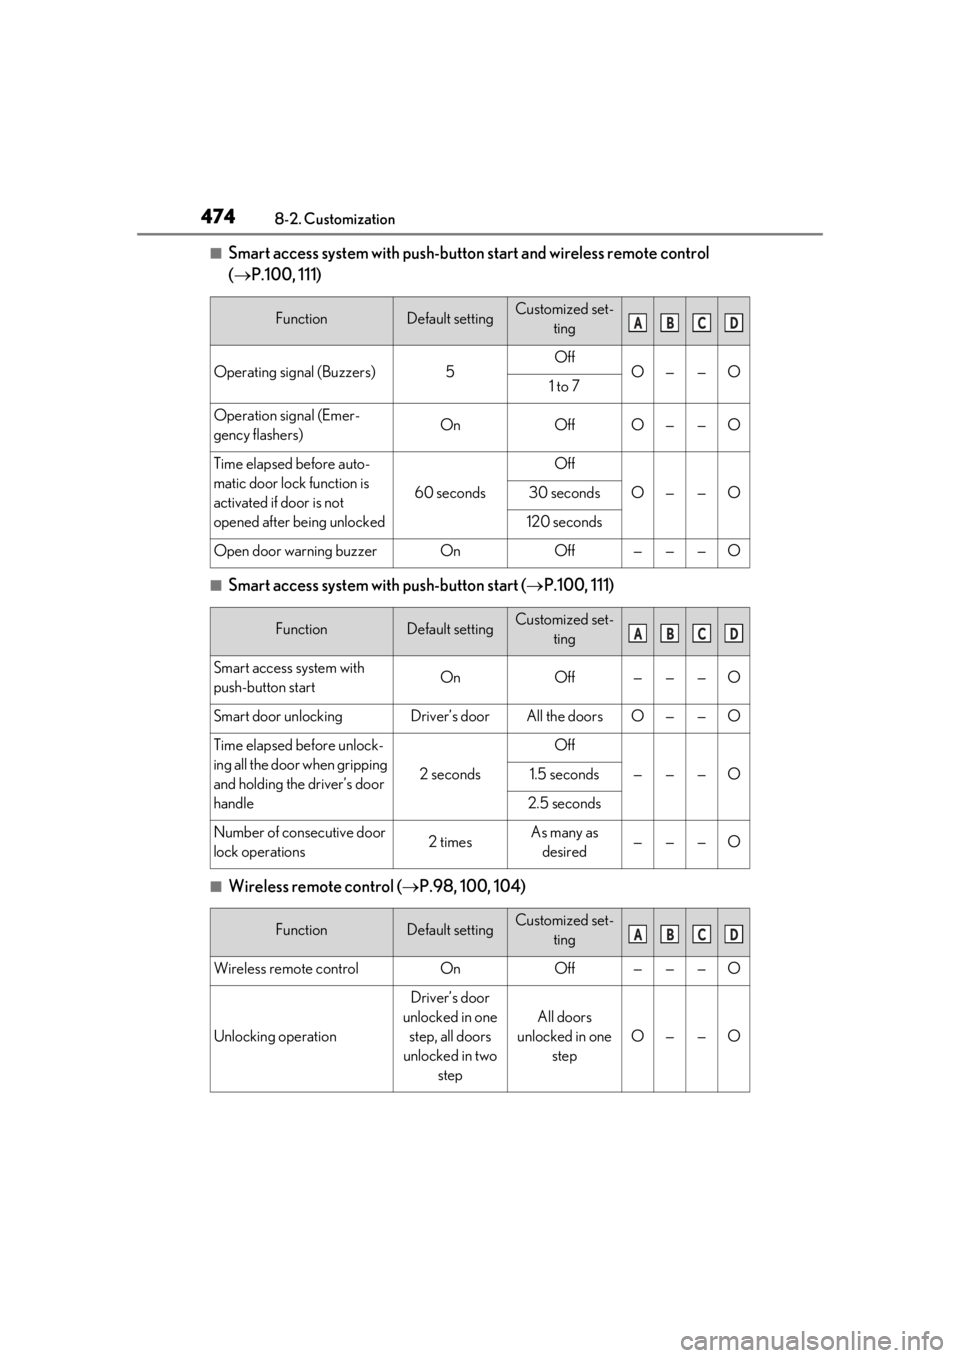
■Smart access system with push-button start and wireless remote control
( P.100, 111)
■Smart access system with push-button start ( P.100, 111)
■Wireless remote control ( P.98, 100, 104)
FunctionDefault settingCustomized set-
ting
Operating signal (Buzzers)5OffO——O1 to 7
Operation signal (Emer-
gency flashers)OnOffO——O
Time elapsed before auto-
matic door lock function is
activated if door is not
opened after being unlocked
60 seconds
Off
O——O30 seconds
120 seconds
Open door warning buzzerOnOff———O
FunctionDefault settingCustomized set-ting
Smart access system with
push-button startOnOff———O
Smart door unlockingDriver’s doorAll the doorsO——O
Time elapsed before unlock-
ing all the door when gripping
and holding the driver’s door
handle
2 seconds
Off
———O1.5 seconds
2.5 seconds
Number of consecutive door
lock operations2 timesAs many as desired———O
FunctionDefault settingCustomized set- ting
Wireless remote controlOnOff———O
Unlocking operation
Driver’s door
unlocked in one step, all doors
unlocked in two step
All doors
unlocked in one step
O——O
ABCD
ABCD
ABCD
Page 477 of 516
4758-2. Customization
8
Vehicle specifications
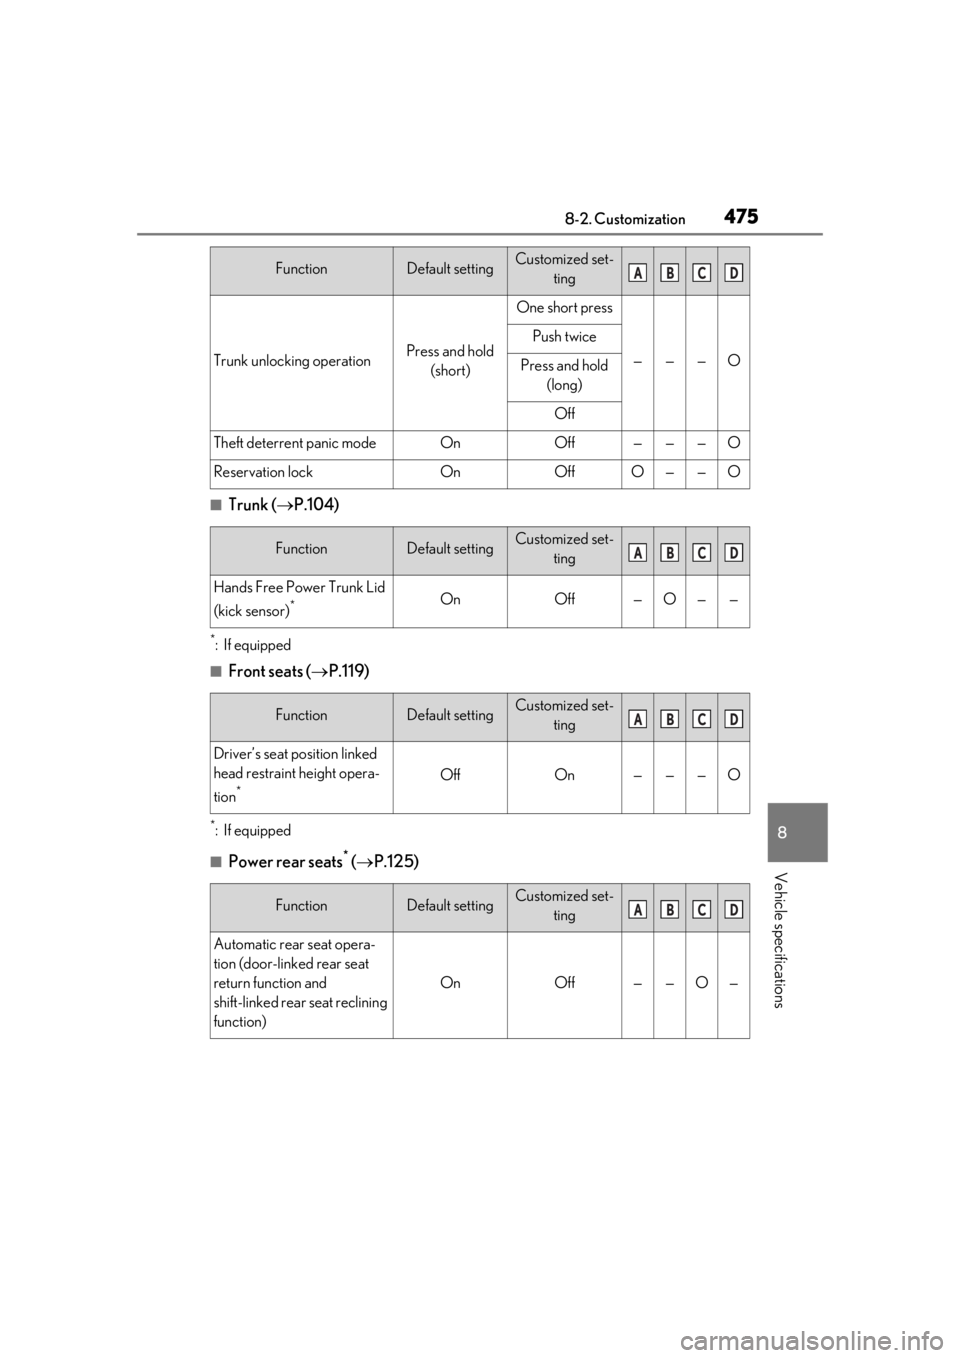
■Trunk (P.104)
*:If equipped
■Front seats ( P.119)
*:If equipped
■Power rear seats* ( P.125)
Trunk unlocking operationPress and hold
(short)
One short press
———O
Push twice
Press and hold (long)
Off
Theft deterrent panic modeOnOff———O
Reservation lockOnOffO——O
FunctionDefault settingCustomized set- ting
Hands Free Power Trunk Lid
(kick sensor)
*OnOff—O——
FunctionDefault settingCustomized set-ting
Driver’s seat position linked
head restraint height opera-
tion
*OffOn———O
FunctionDefault settingCustomized set-ting
Automatic rear seat opera-
tion (door-linked rear seat
return function and
shift-linked rear seat reclining
function)
OnOff——O—
FunctionDefault settingCustomized set- tingABCD
ABCD
ABCD
ABCD
Page 478 of 516
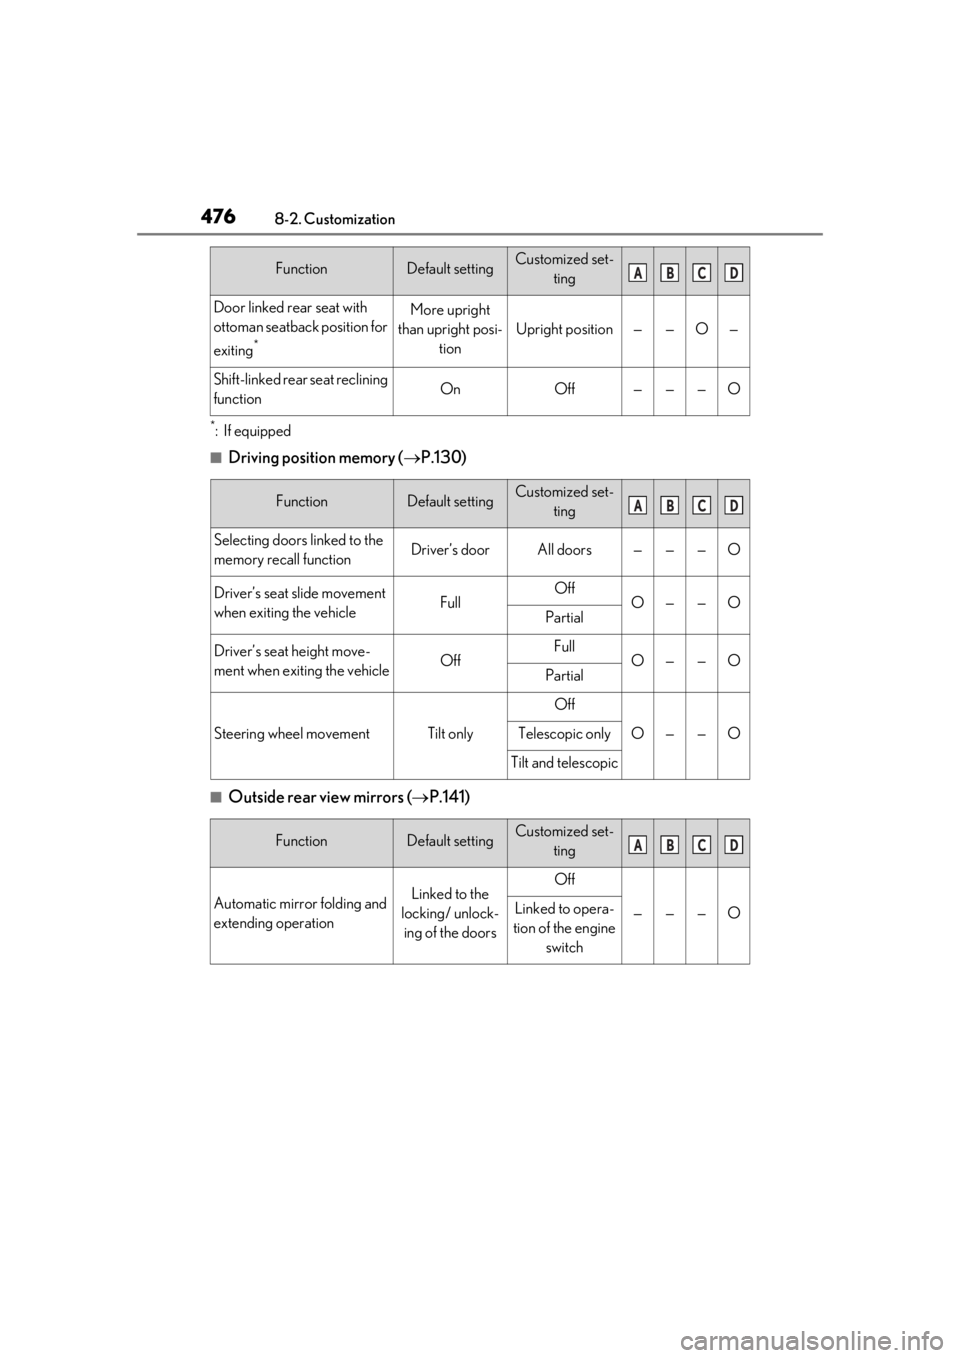
4768-2. Customization
*:If equipped
■Driving position memory (P.130)
■Outside rear view mirrors ( P.141)
Door linked rear seat with
ottoman seatback position for
exiting
*
More upright
than upright posi- tion
Upright position——O—
Shift-linked rear seat reclining
functionOnOff———O
FunctionDefault settingCustomized set-ting
Selecting doors linked to the
memory recall functionDriver’s doorAll doors———O
Driver’s seat slide movement
when exiting the vehicleFullOffO——OPartial
Driver’s seat height move-
ment when exiting the vehicleOffFullO——OPartial
Steering wheel movementTilt only
Off
O——OTelescopic only
Tilt and telescopic
FunctionDefault settingCustomized set-ting
Automatic mirror folding and
extending operationLinked to the
locking/ unlock- ing of the doorsOff
———OLinked to opera-
tion of the engine switch
FunctionDefault settingCustomized set- tingABCD
ABCD
ABCD
Page 484 of 516
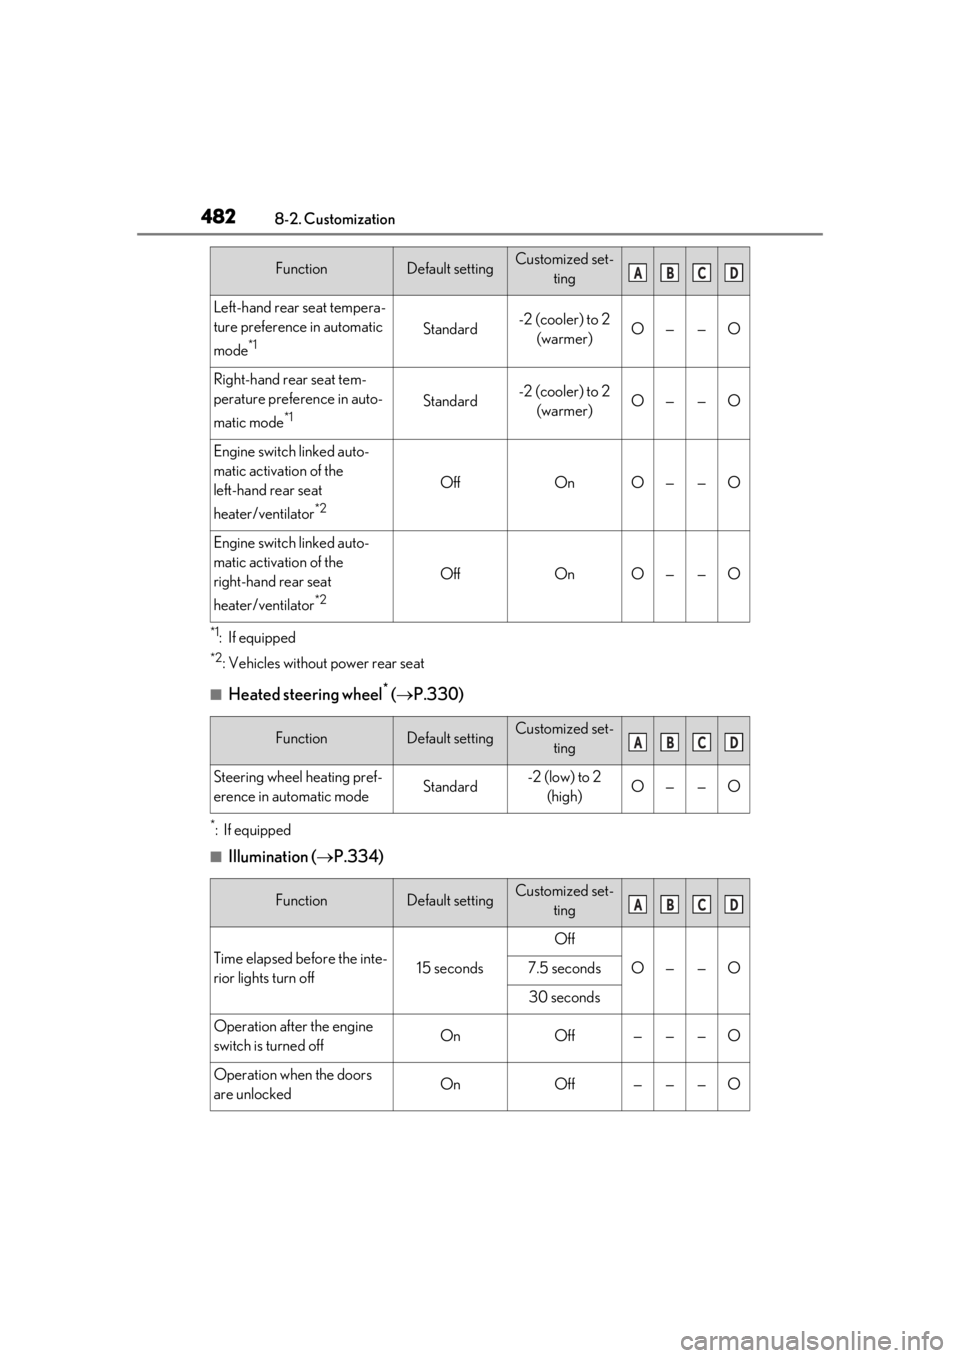
4828-2. Customization
*1: If equipped
*2: Vehicles without power rear seat
■Heated steering wheel* ( P.330)
*:If equipped
■Illumination ( P.334)
Left-hand rear seat tempera-
ture preference in automatic
mode
*1Standard-2 (cooler) to 2
(warmer)O——O
Right-hand rear seat tem-
perature preference in auto-
matic mode
*1Standard-2 (cooler) to 2 (warmer)O——O
Engine switch linked auto-
matic activation of the
left-hand rear seat
heater/ventilator
*2
OffOnO——O
Engine switch linked auto-
matic activation of the
right-hand rear seat
heater/ventilator
*2
OffOnO——O
FunctionDefault settingCustomized set- ting
Steering wheel heating pref-
erence in automatic modeStandard-2 (low) to 2 (high)O——O
FunctionDefault settingCustomized set- ting
Time elapsed before the inte-
rior lights turn off15 seconds
Off
O——O7.5 seconds
30 seconds
Operation after the engine
switch is turned offOnOff———O
Operation when the doors
are unlockedOnOff———O
FunctionDefault settingCustomized set-tingABCD
ABCD
ABCD