ECU LEXUS LX570 2015 Workshop Manual
[x] Cancel search | Manufacturer: LEXUS, Model Year: 2015, Model line: LX570, Model: LEXUS LX570 2015Pages: 960, PDF Size: 11.33 MB
Page 718 of 960

7163-8. Other interior features
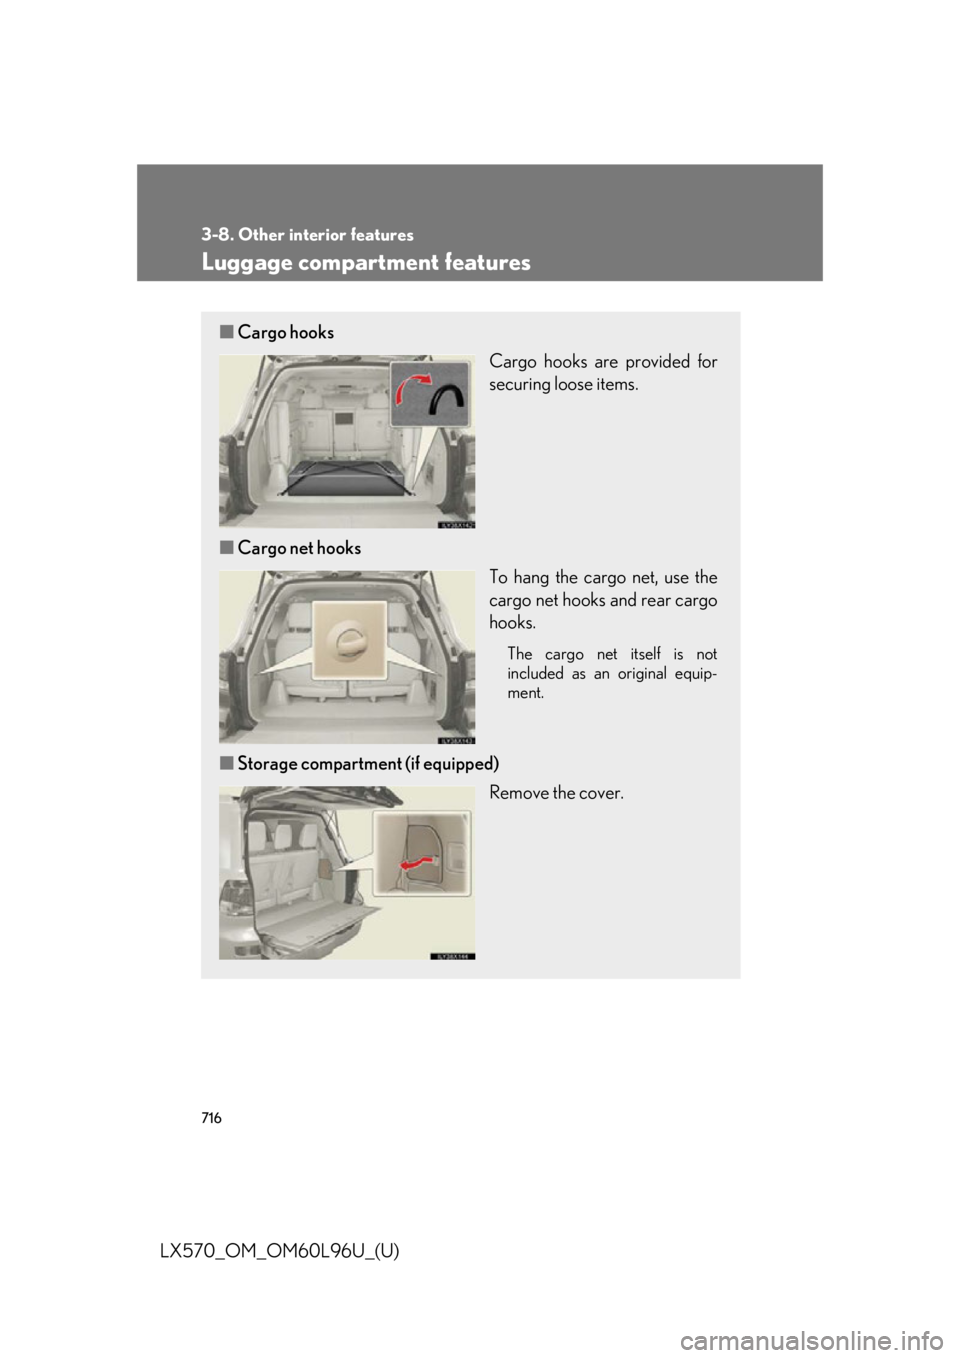
LX570_OM_OM60L96U_(U) Luggage compartment features ■ Cargo hooks
Cargo hooks are provided for
securing loose items.
■ Cargo net hooks
To hang the cargo net, use the
cargo net hooks and rear cargo
hooks. The cargo net itself is not
included as an original equip-
ment.
■ Storage compartment (if equipped)
Remove the cover.
Page 720 of 960

7183-8. Other interior features
LX570_OM_OM60L96U_(U) Garage door opener The garage door opener (HomeLink ®
Universal Transceiver) is manufactured
under license from HomeLink ®
.
Programming HomeLink ®
(for U.S.A. owners)
The HomeLink ®
compatible transceiver in your vehicle has 3 buttons
which can be programmed to operate 3 different devices. Refer to the
programming method below appropriate for the device.
Indicator
ButtonsThe garage door opener can be pr ogrammed to operate garage doors,
gates, entry doors, door locks, home lighting systems, security systems, and
other devices.
Page 724 of 960

7223-8. Other interior features
LX570_OM_OM60L96U_(U) ■ Programming an entry gate (for U .S.A. owners)/Programming all
devices in the Canadian market
Place your transmitter 1 to 3 in. (25 to 75 mm) away from the sur-
face of the HomeLink ®
.Keep the HomeLink ®
indicator light in view while programming.
Press and hold the selected HomeLink ®
button.
Repeatedly press and release (cycle) the device’s remote control
button for two seconds each until step 4 is completed.
When the indicator light on the HomeLink ®
compatible trans-
ceiver starts to flash rapidly, release the buttons.
Test the operation of the HomeLink ®
by pressing the newly pro-
grammed button. Check to see if the gate/device operates cor-
rectly.
Repeat the steps above to program another device for each of
the remaining HomeLink ®
buttons.
■ Programming other devices
To program other devices such as home security systems, home door
locks or lighting, contact yo ur Lexus dealer for assistance.
■ Reprogramming a button
The individual HomeLink ®
buttons cannot be erased but can be
reprogrammed. To reprogram a butto n, follow the “Reprogramming a
HomeLink ®
button” instructions.STEP 1
STEP 2
STEP 3
STEP 4
STEP 5
STEP 6
Page 728 of 960

7263-8. Other interior features
LX570_OM_OM60L96U_(U) Safety Connect
: If equippedSafety Connect is a subscription-based telematics service that uses Global
Positioning System (GPS) data and em bedded cellular technology to pro-
vide safety and security features to subscribers. Safety Connect is sup-
ported by Lexus’ designated response center, which operates 24 hours
per day, 7 days per week.
Safety Connect service is available by subscription on select, telematics
hardware-equipped vehicles.
By using the Safety Connect service, you are agreeing to be bound by the
Telematics Subscription Service Agreement and its Terms and Condi-
tions, as in effect and amended from time to time, a current copy of which is
available at Lexus.com. All use of th e Safety Connect service is subject to
such then-applicable Terms and Conditions.
■ System components
Microphone
LED light indicators
“SOS” button
Page 746 of 960

7444-2. Maintenance
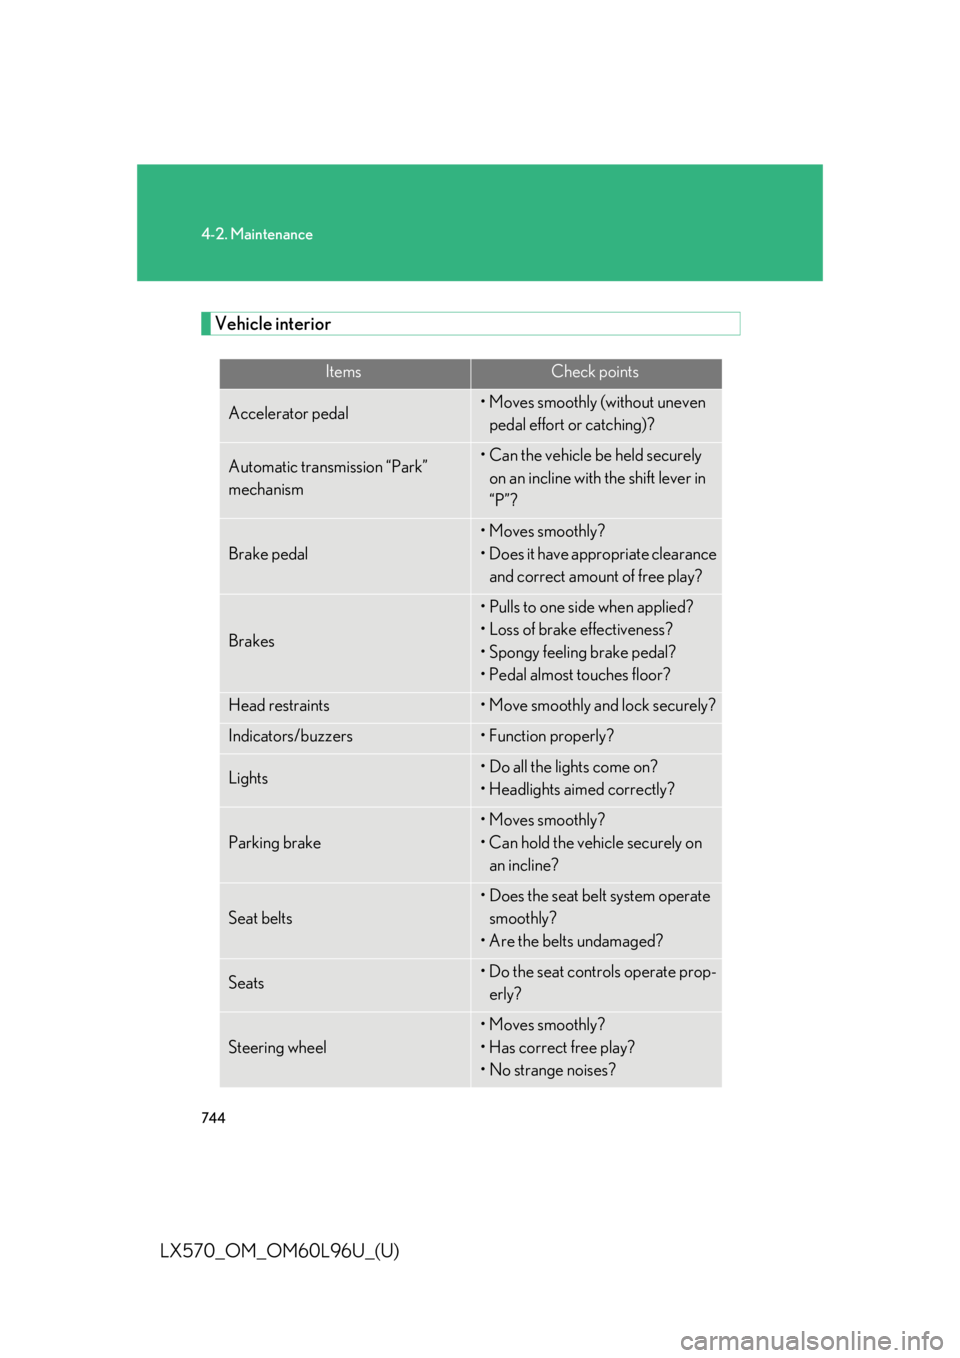
LX570_OM_OM60L96U_(U) Vehicle interior Items Check points
Accelerator pedal • Moves smoothly (without uneven
pedal effort or catching)?
Automatic transmission “Park”
mechanism • Can the vehicle be held securely
on an incline with the shift lever in
“P”?
Brake pedal • Moves smoothly?
• Does it have appropriate clearance
and correct amount of free play?
Brakes • Pulls to one side when applied?
• Loss of brake effectiveness?
• Spongy feeling brake pedal?
• Pedal almost touches floor?
Head restraints • Move smoothly and lock securely?
Indicators/buzzers • Function properly?
Lights • Do all the lights come on?
• Headlights aimed correctly?
Parking brake • Moves smoothly?
• Can hold the vehicle securely on
an incline?
Seat belts • Does the seat belt system operate
smoothly?
• Are the belts undamaged?
Seats • Do the seat controls operate prop-
erly?
Steering wheel • Moves smoothly?
• Has correct free play?
• No strange noises?
Page 755 of 960

7534-3. Do-it-yourself maintenance
4
Maintenance and care
LX570_OM_OM60L96U_(U) ■ Installing the clips
Push up center portion
Insert
Press
Engine oil
With the engine at operating tempera ture and turned off, check the oil
level on the dipstick.
■ Checking the engine oil
Park the vehicle on level grou nd. After warming up the engine
and turning it off, wait more than 5 minutes for the oil to drain
back into the bottom of the engine.
Hold a rag under the end and pull
the dipstick out.NOTICE■
After installing an engine compartment cover
Make sure that the cover is securely installed in its original position.
STEP 1
STEP 2
Page 793 of 960

7914-3. Do-it-yourself maintenance
4
Maintenance and care
LX570_OM_OM60L96U_(U) Fuse layout and amperage ratings
■ Engine compartment (fuse box on the left side)
Fuse Ampere Circuit
1 A/F 15 A A/F heater
2 HORN 10 A Horn
3 EFI MAIN 25 A Multiport fuel injection system/
sequential multiport fuel injection sys-
tem, A/F heater, fuel pump
4 IG2 MAIN 30 A INJ, IGN, MET
5 RR A/C 50 A Blower controller
6 CDS FAN 25 A Condenser fan
7 RR S/HTR 20 A Rear seat heater
8 FR FOG 15 A Front fog lights
9 STOP 15 A Stoplights, high mounted stoplight,
brake controller, ABS, VSC, main
body ECU, Multiport fuel injection
system/sequential multiport fuel injec-
tion system, trailer
Page 794 of 960

7924-3. Do-it-yourself maintenance
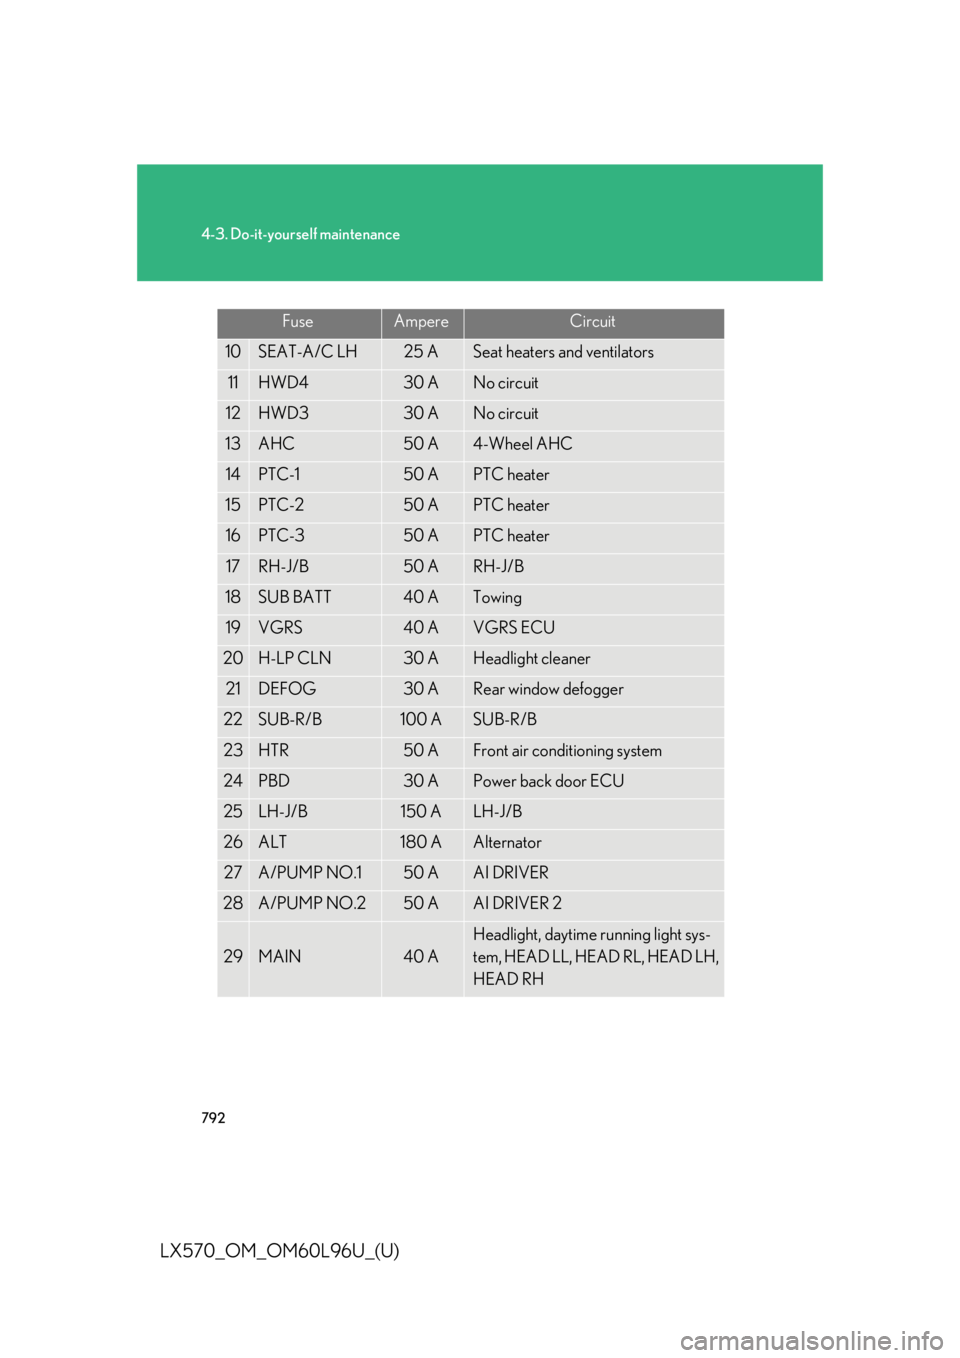
LX570_OM_OM60L96U_(U) 10 SEAT-A/C LH 25 A Seat heaters and ventilators
11 HWD4 30 A No circuit
12 HWD3 30 A No circuit
13 AHC 50 A 4-Wheel AHC
14 PTC-1 50 A PTC heater
15 PTC-2 50 A PTC heater
16 PTC-3 50 A PTC heater
17 RH-J/B 50 A RH-J/B
18 SUB BATT 40 A Towing
19 VGRS 40 A VGRS ECU
20 H-LP CLN 30 A Headlight cleaner
21 DEFOG 30 A Rear window defogger
22 SUB-R/B 100 A SUB-R/B
23 HTR 50 A Front air conditioning system
24 PBD 30 A Power back door ECU
25 LH-J/B 150 A LH-J/B
26 ALT 180 A Alternator
27 A/PUMP NO.1 50 A AI DRIVER
28 A/PUMP NO.2 50 A AI DRIVER 2
29 MAIN 40 A Headlight, daytime running light sys-
tem, HEAD LL, HEAD RL, HEAD LH,
HEAD RHFuse Ampere Circuit
Page 795 of 960

7934-3. Do-it-yourself maintenance
4
Maintenance and care
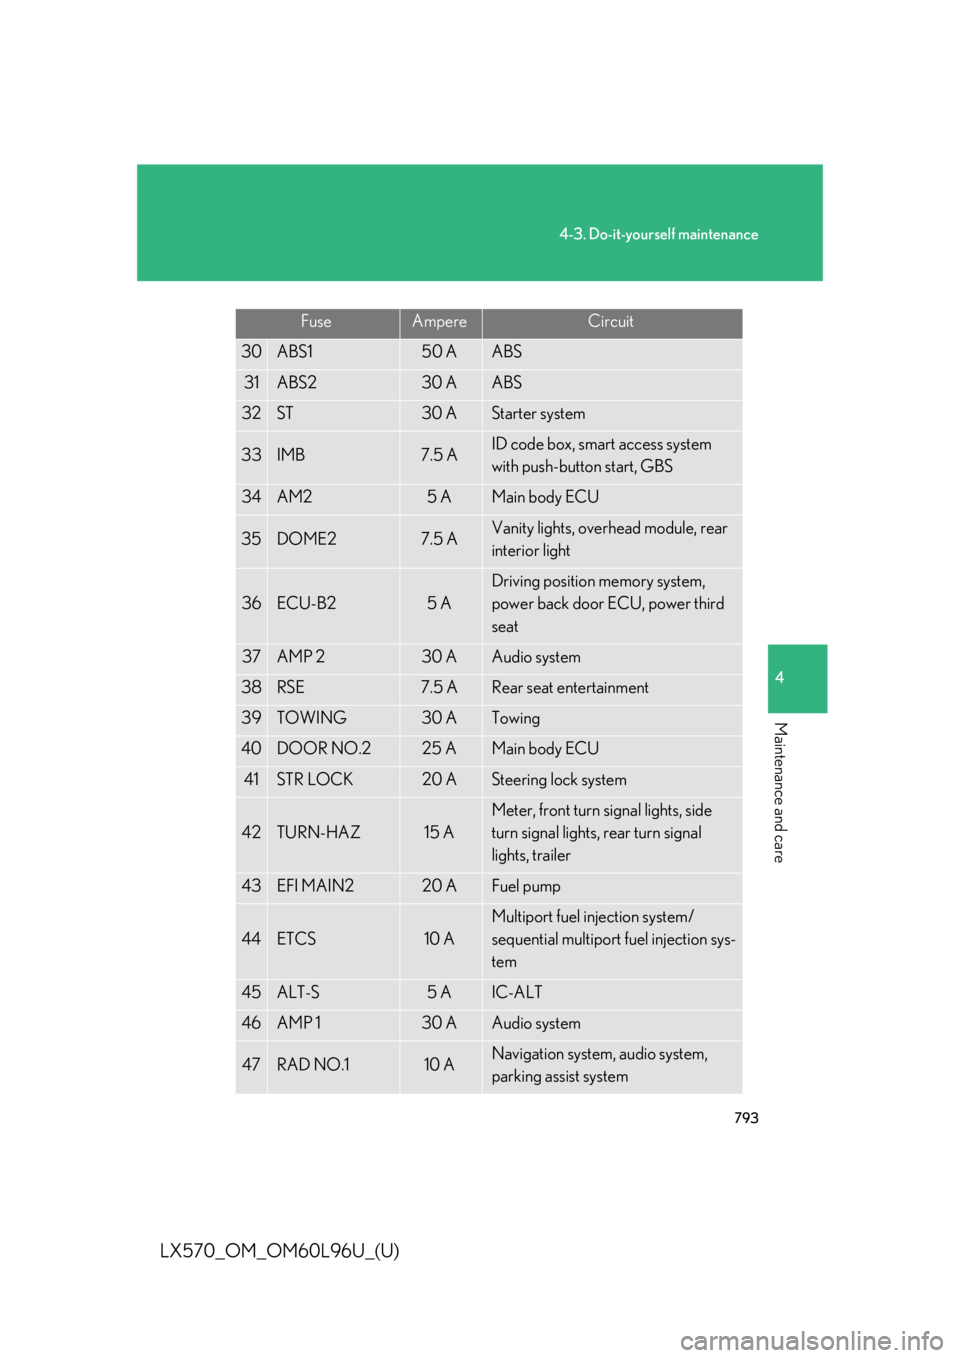
LX570_OM_OM60L96U_(U) 30 ABS1 50 A ABS
31 ABS2 30 A ABS
32 ST 30 A Starter system
33 IMB 7.5 A ID code box, smart access system
with push-button start, GBS
34 AM2 5 A Main body ECU
35 DOME2 7.5 A Vanity lights, overhead module, rear
interior light
36 ECU-B2 5 A Driving position memory system,
power back door ECU, power third
seat
37 AMP 2 30 A Audio system
38 RSE 7.5 A Rear seat entertainment
39 TOWING 30 A Towing
40 DOOR NO.2 25 A Main body ECU
41 STR LOCK 20 A Steering lock system
42 TURN-HAZ 15 A Meter, front turn signal lights, side
turn signal lights, rear turn signal
lights, trailer
43 EFI MAIN2 20 A Fuel pump
44 ETCS 10 A Multiport fuel injection system/
sequential multiport fuel injection sys-
tem
45 ALT-S 5 A IC-ALT
46 AMP 1 30 A Audio system
47 RAD NO.1 10 A Navigation system, audio system,
parking assist systemFuse Ampere Circuit
Page 796 of 960

7944-3. Do-it-yourself maintenance
LX570_OM_OM60L96U_(U) 48 ECU-B1 5 A Smart access system with push-button
start, overhead module, yaw rate & G
sensor, tilt and telescopic steering,
meter, cool box, gateway ECU, steer-
ing sensor, VGRS
49 DOME1 10 A Illuminated entry system, power third
seat switch, power back door switch,
clock
50 HEAD LH 15 A Headlight high beam (left)
51 HEAD LL 15 A Headlight low beam (left)
52 INJ 10 A Injector, ignition system
53 MET 5 A Meter
54 IGN 10 A Circuit open, SRS airbag system,
gateway ECU, smart access system
with push-button start, ABS, VSC,
steering lock system, GBS
55 DRL 5 A Daytime running lights
56 HEAD RH 15 A Headlight high beam (right)
57 HEAD RL 15 A Headlight low beam (right)
58 EFI NO.2 7.5 A Air injection system, air flow meter
59 RR A/C NO.2 7.5 A No circuit
60 DEF NO.2 5 A Outside rear view mirror defoggers
61 SPARE 5 A Spare fuse
62 SPARE 15 A Spare fuse
63 SPARE 30 A Spare fuseFuse Ampere Circuit