display LEXUS LX570 2020 Owners Manual
[x] Cancel search | Manufacturer: LEXUS, Model Year: 2020, Model line: LX570, Model: LEXUS LX570 2020Pages: 636, PDF Size: 12.73 MB
Page 403 of 636
LX570_OM_OM60R61U_(U)
4035-1. Remote Touch screen
5
Interior features
*: Refer to the “NAVIGATION SYSTEM OWNER’S MANUAL”.
■Full screen display
The following functions can be displayed full screen:
●Initial screen
●“Menu” screen (P. 402)
●Map screen*
*
: Refer to the “NAVIGATION SYSTEM OWNER’S MANUAL”.
“Display”Select to adjust the contrast and brightness of the screens, turn the
screen off, etc.*
12.3-inch display operation
SwitchFunction
Page 404 of 636
4045-1. Remote Touch screen
LX570_OM_OM60R61U_(U)
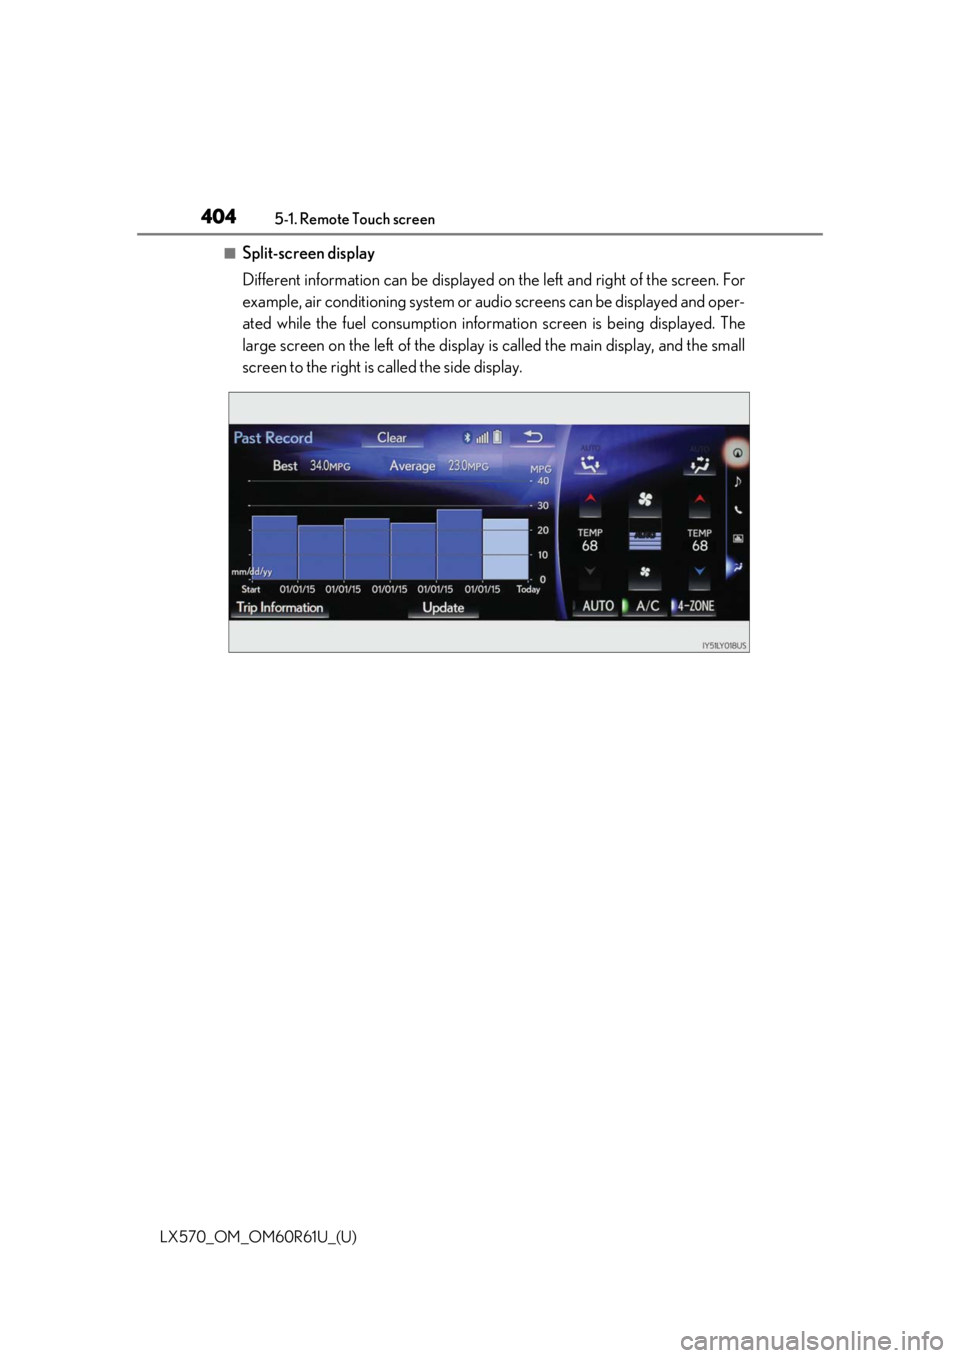
■Split-screen display
Different information can be displayed on the left and right of the screen. For
example, air conditioning system or au dio screens can be displayed and oper-
ated while the fuel consumption inform ation screen is being displayed. The
large screen on the left of the display is called the main display, and the small
screen to the right is called the side display.
Page 405 of 636
LX570_OM_OM60R61U_(U)
4055-1. Remote Touch screen
5
Interior features
■Main Display
For details about the functions and operation of the main display, refer to the
respective section and “NAVIGATION SYSTEM OWNER’S MANUAL”.
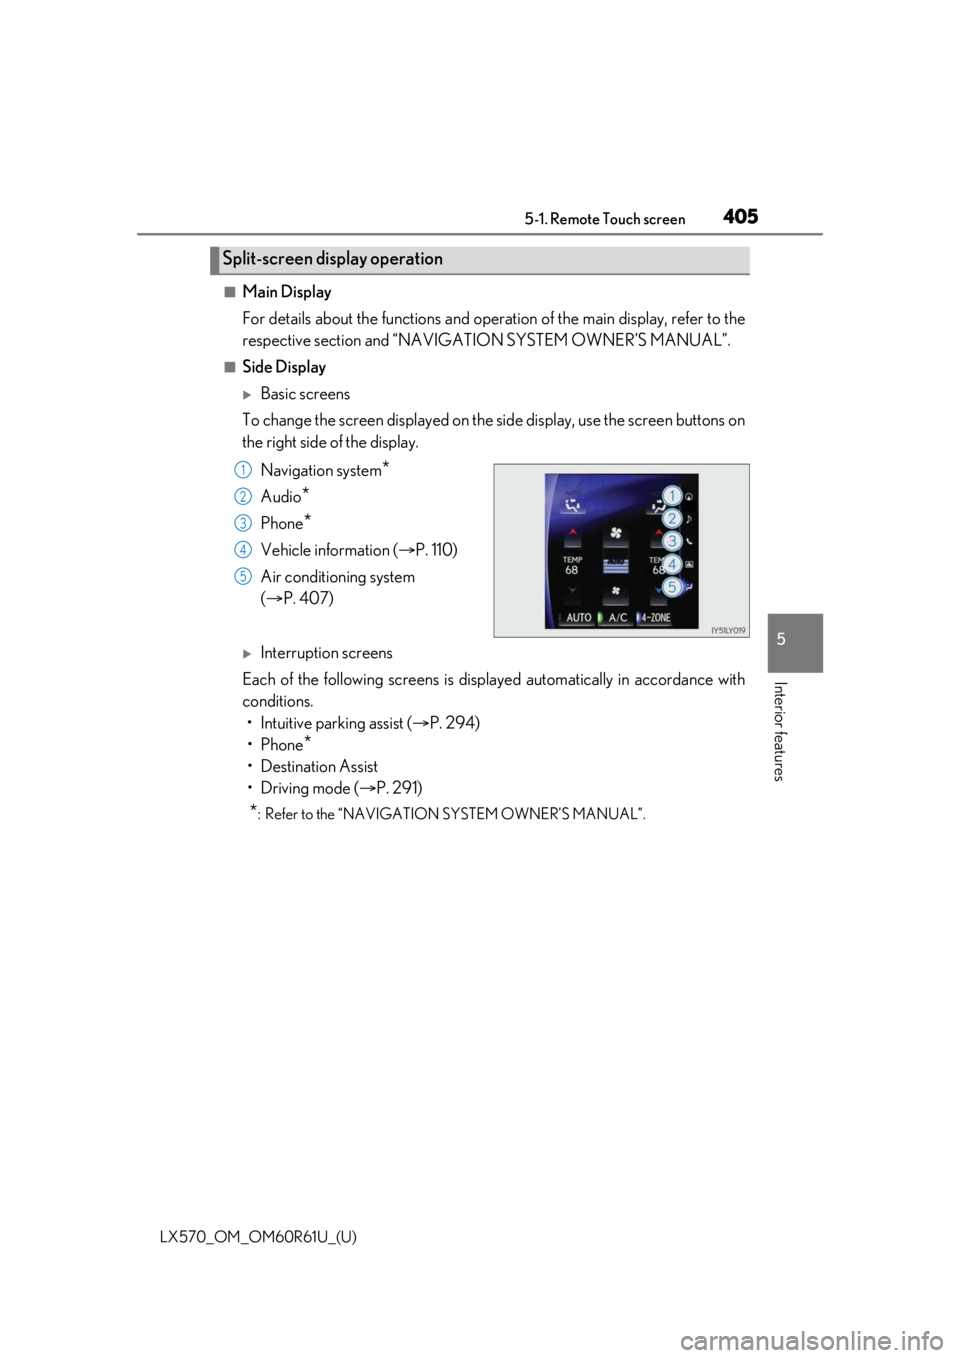
■Side Display
Basic screens
To change the screen displayed on the side display, use the screen buttons on
the right side of the display.
Navigation system
*
Audio*
Phone*
Vehicle information ( P. 110)
Air conditioning system
( P. 407)
Interruption screens
Each of the following screens is displayed automatically in accordance with
conditions. • Intuitive parking assist ( P. 294)
•Phone
*
• Destination Assist
•Driving mode ( P. 291)
*: Refer to the “NAVIGATIO N SYSTEM OWNER’S MANUAL”.
Split-screen display operation
1
2
3
4
5
Page 407 of 636
407
LX570_OM_OM60R61U_(U)5-3. Using the air conditio
ning system and defogger
5
Interior features
Front automatic air conditioning system
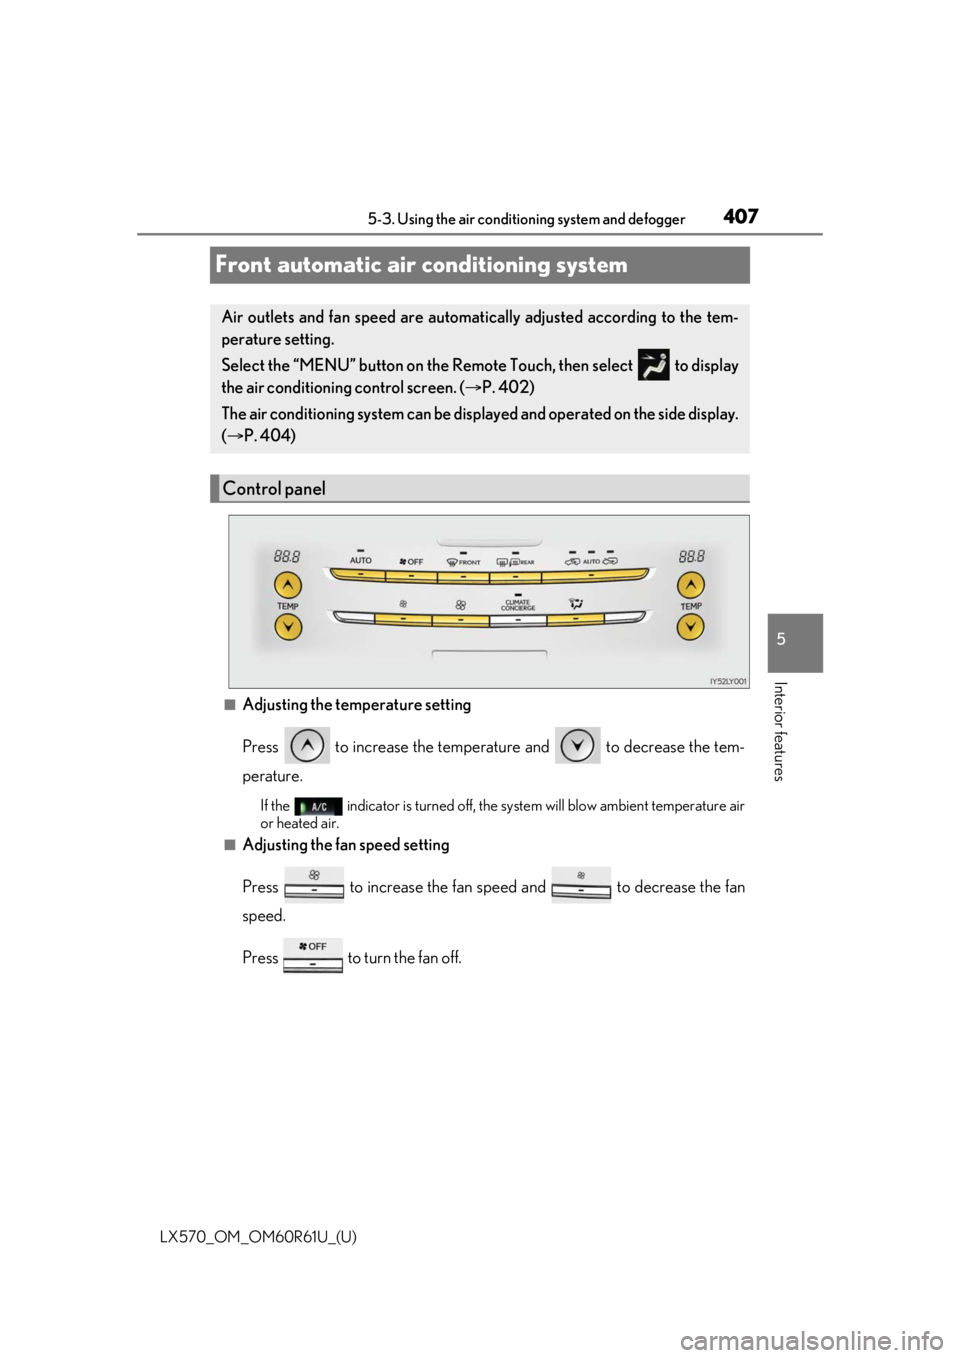
■Adjusting the temperature setting
Press to increase the temperature and to decrease the tem-
perature.
If the indicator is turned off, the sy stem will blow ambient temperature air
or heated air.
■Adjusting the fan speed setting
Press to increase the fan speed and to decrease the fan
speed.
Press to turn the fan off.
Air outlets and fan speed are automati cally adjusted according to the tem-
perature setting.
Select the “MENU” button on the Remo te Touch, then select to display
the air conditioning control screen. ( P. 402)
The air conditioning system can be disp layed and operated on the side display.
( P. 404)
Control panel
Page 409 of 636
LX570_OM_OM60R61U_(U)
4095-3. Using the air conditioning system and defogger
5
Interior features
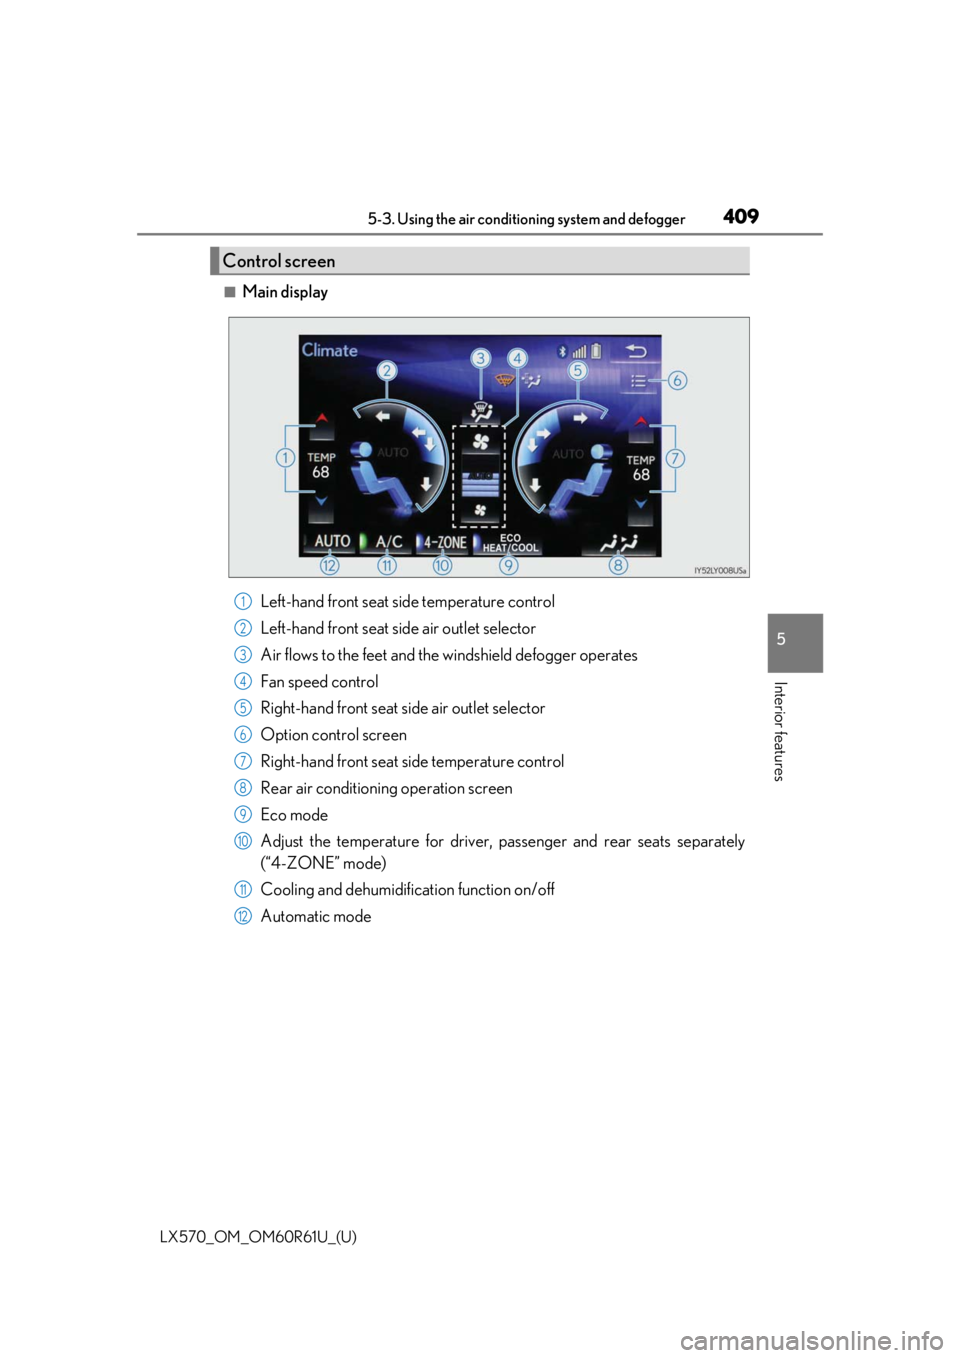
■Main display
Left-hand front seat side temperature control
Left-hand front seat side air outlet selector
Air flows to the feet and the windshield defogger operates
Fan speed control
Right-hand front seat side air outlet selector
Option control screen
Right-hand front seat si de temperature control
Rear air conditioning operation screen
Eco mode
Adjust the temperature for driver, passenger and rear seats separately
(“4-ZONE” mode)
Cooling and dehumidification function on/off
Automatic mode
Control screen
1
2
3
4
5
6
7
8
9
10
11
12
Page 410 of 636
4105-3. Using the air conditioning system and defogger
LX570_OM_OM60R61U_(U)
■Changing the air flow mode
To adjust settings, select the screen button. Air flows to the upper body.
Air flows to the upper body and feet.
Air flows to the feet.
Air flows to the feet and the windshield defogger operates.
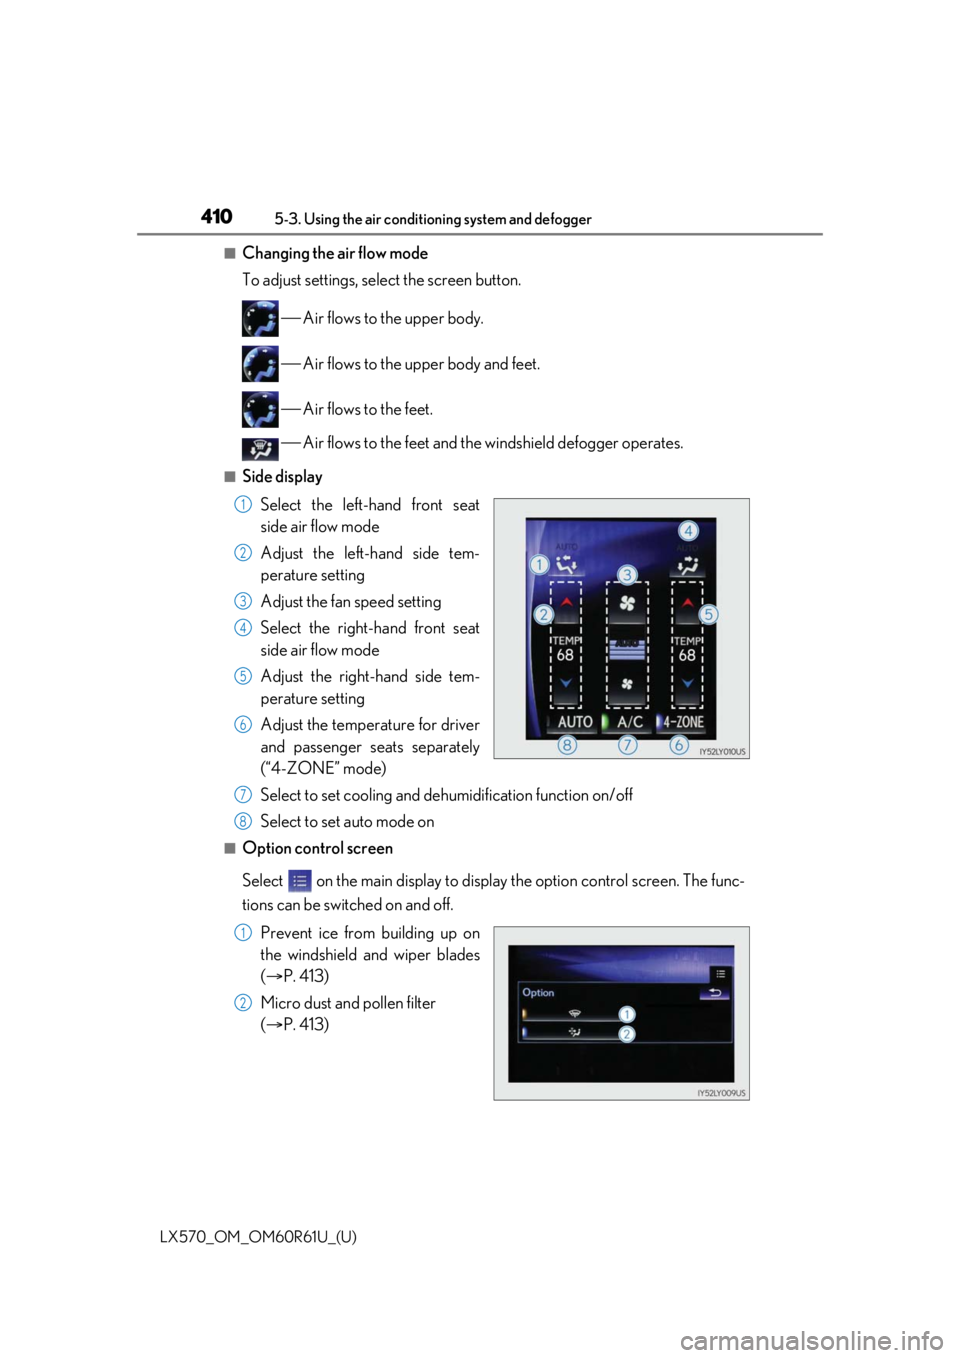
■Side displaySelect the left-hand front seat
side air flow mode
Adjust the left-hand side tem-
perature setting
Adjust the fan speed setting
Select the right-hand front seat
side air flow mode
Adjust the right-hand side tem-
perature setting
Adjust the temperature for driver
and passenger seats separately
(“4-ZONE” mode)
Select to set cooling and dehumidification function on/off
Select to set auto mode on
■Option control screen
Select on the main display to display the option contro l screen. The func-
tions can be switched on and off.
Prevent ice from building up on
the windshield and wiper blades
( P. 413)
Micro dust and pollen filter
( P. 413)
1
2
3
4
5
6
7
8
1
2
Page 412 of 636
4125-3. Using the air conditioning system and defogger
LX570_OM_OM60R61U_(U)
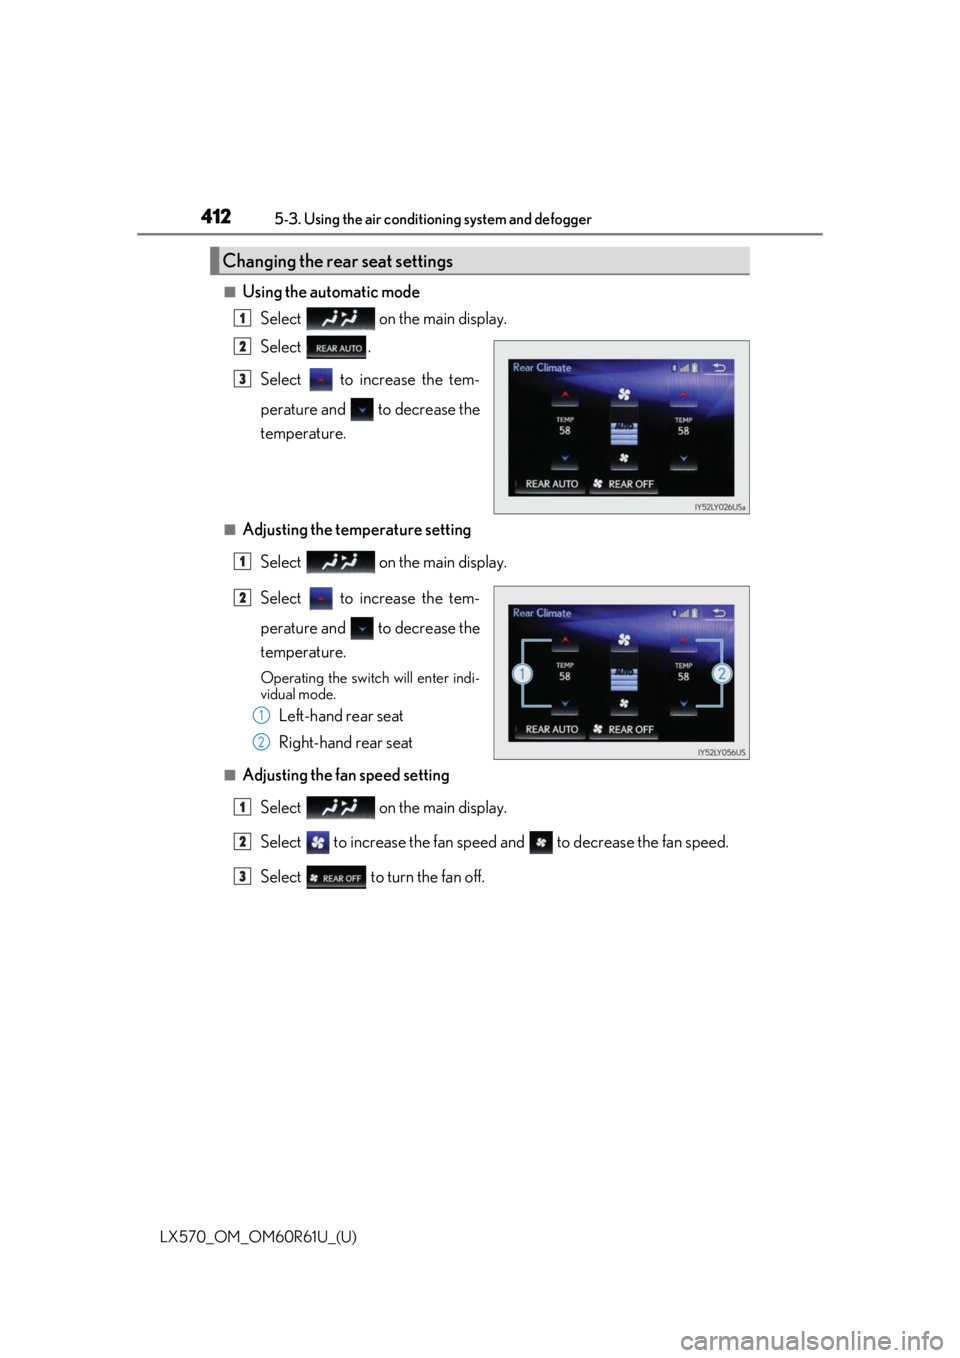
■Using the automatic mode Select on the main display.
Select .
Select to increase the tem-
perature and to decrease the
temperature.
■Adjusting the temperature setting
Select on the main display.
Select to increase the tem-
perature and to decrease the
temperature.
Operating the switch will enter indi-
vidual mode.
Left-hand rear seat
Right-hand rear seat
■Adjusting the fan speed settingSelect on the main display.
Select to increase the fan speed and to decrease the fan speed.
Select to turn the fan off.
Changing the rear seat settings
1
2
3
1
2
1
2
1
2
3
Page 423 of 636
LX570_OM_OM60R61U_(U)
4235-3. Using the air conditioning system and defogger
5
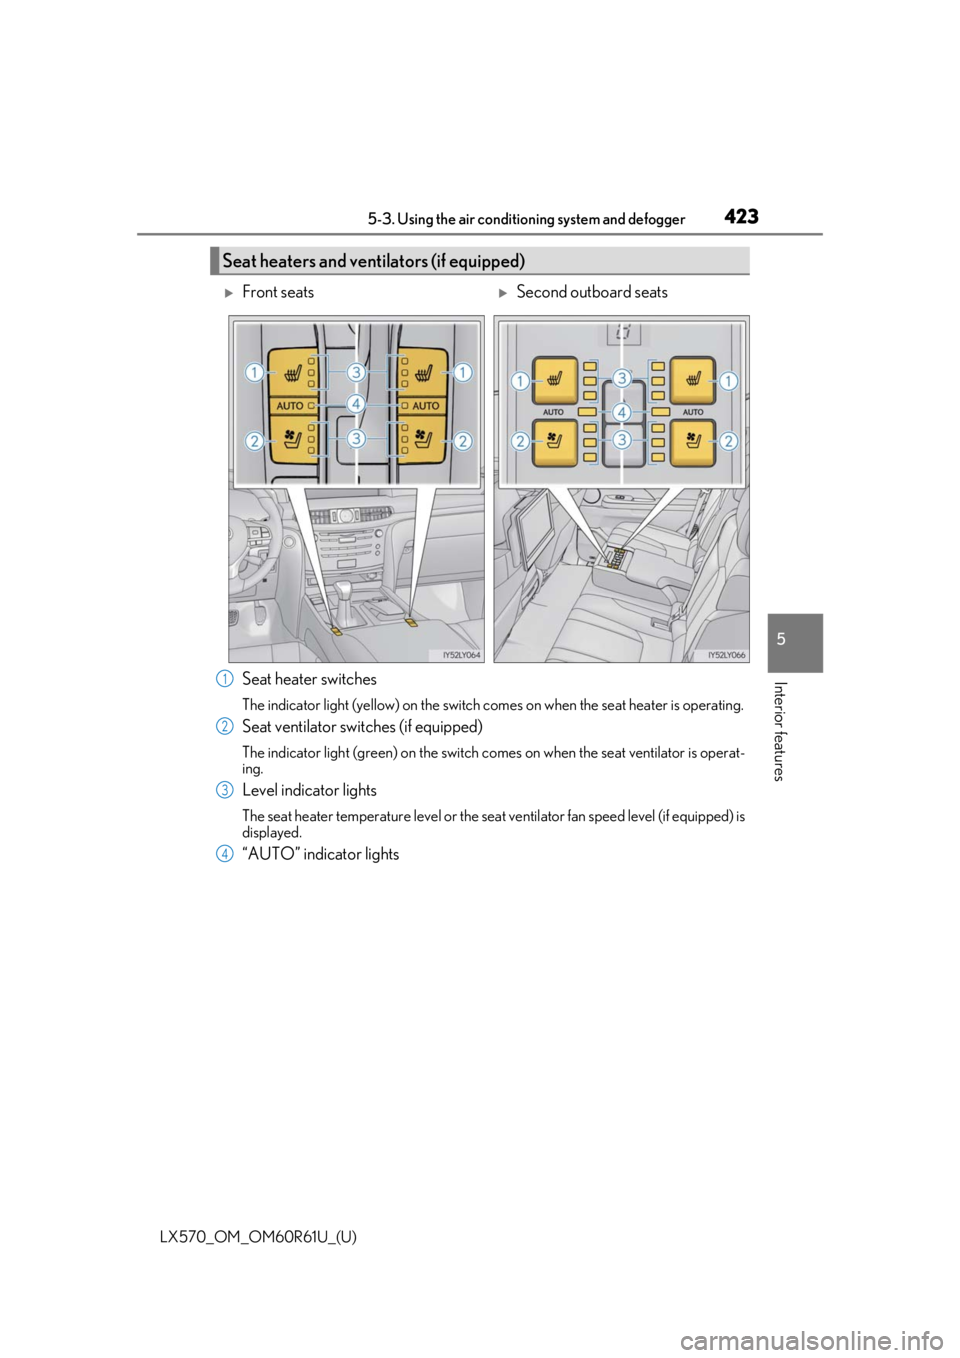
Interior featuresSeat heater switches
The indicator light (yellow) on the switch comes on when the seat heater is operating.
Seat ventilator switches (if equipped)
The indicator light (green) on the switch co mes on when the seat ventilator is operat-
ing.
Level indicator lights
The seat heater temperature level or the seat ventilator fan speed level (if equipped) is
displayed.
“AUTO” indicator lights
Seat heaters and ventilators (if equipped)
Front seatsSecond outboard seats
1
2
3
4
Page 450 of 636
450
LX570_OM_OM60R61U_(U)5-6. Using the other interior features
WARNING
■Conditions in which the func
tion may not operate correctly
In the following conditions, the wirele ss charger may not operate correctly
●The portable device is fully charged
●There is foreign matter between the charge area and portable device
●The temperature of the portable device gets higher from charging
●The charging surface of the portable device is facing up
●The placement of the portable device is out of alignment with the charge area
●Near a TV tower, electric power plant, gas station, radio station, large display, airport
or other facility that generates strong radio wa ves or electrical noise
●When the electronic key is in contact with , or is covered by the following metallic
objects
• Cards to which aluminum foil is attached
• Cigarette boxes that ha ve aluminum foil inside
• Metallic wallets or bags
•Coins
• Hand warmers made of metal
• Media such as CDs and DVDs
●When other wireless keys (that emit radio waves) are being used nearby
In addition, excluding the above-mentioned, when the charger does not perform nor-
mally or the operation indicator light is flashi ng continuously, it is considered that the
wireless charger is malfunctioni ng. Contact your Lexus dealer.
■To prevent failure or damage to data
●Do not bring magnetic cards, such as credit cards, or magnetic recording media, etc.,
close to the charger while charging, otherw ise, data may disappear under the influ-
ence of magnetism. Also, do not bring pr ecision instruments such as wrist watches,
etc., close to the charger, as such objects may break.
●Do not leave portable devices in the cab in. The temperature inside the cabin may
become high, when under the sun, and cause damage to the device.
■To prevent battery discharge
When the engine is stopped, do not use the wireless charger for a long time.
Page 458 of 636
458
LX570_OM_OM60R61U_(U)5-6. Using the other interior features
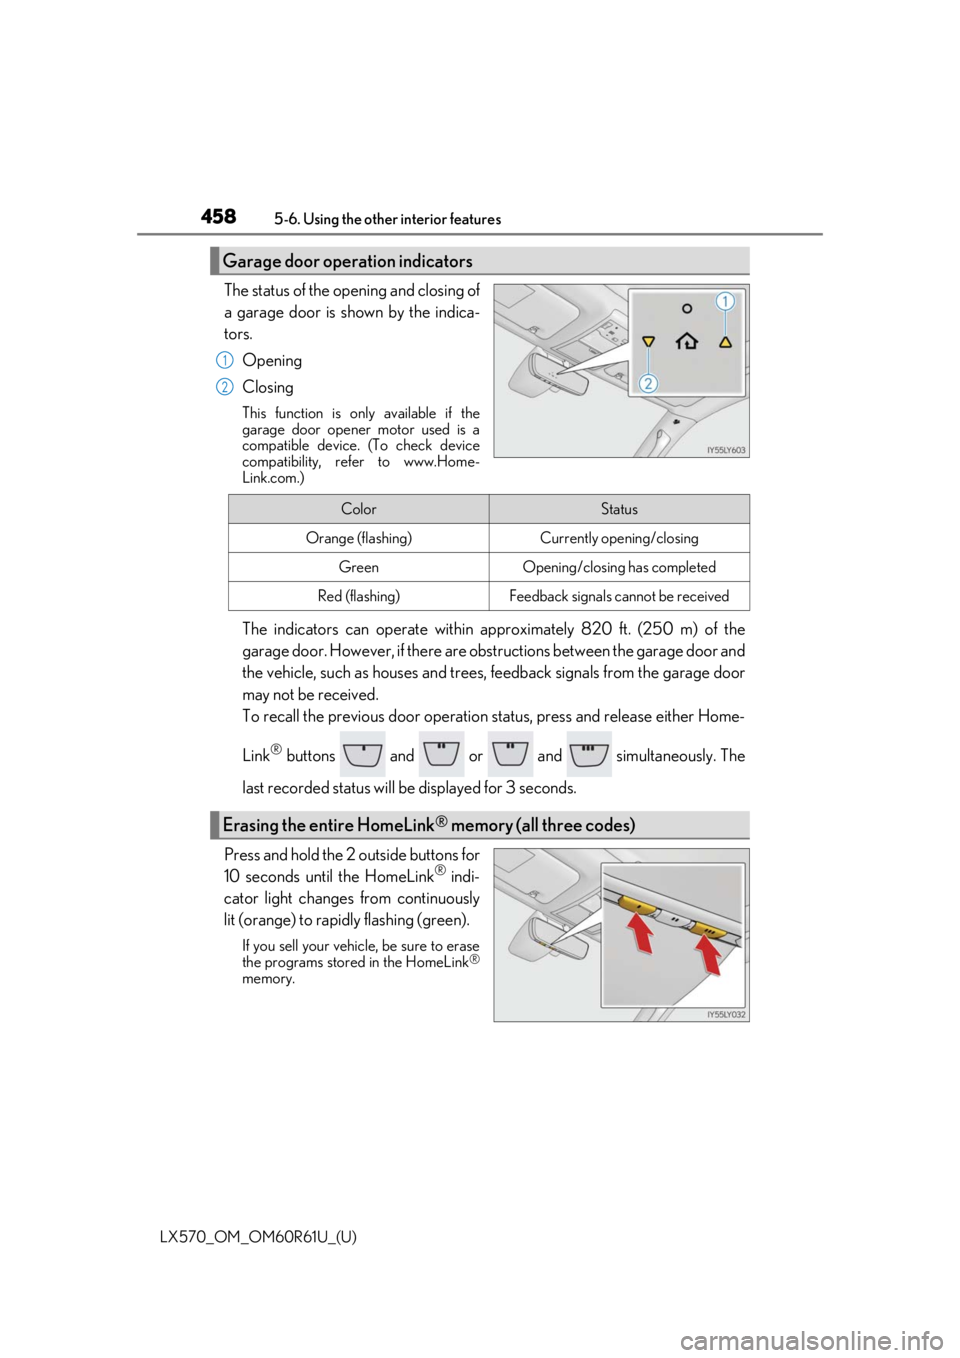
The status of the opening and closing of
a garage door is shown by the indica-
tors.
Opening
Closing
This function is only available if the
garage door opener motor used is a
compatible device. (To check device
compatibility, refer to www.Home-
Link.com.)
The indicators can operate within ap proximately 820 ft. (250 m) of the
garage door. However, if there are obst ructions between the garage door and
the vehicle, such as houses and trees, feedback signals from the garage door
may not be received.
To recall the previous door operation status, press and release either Home-
Link
® buttons and or and simultaneously. The
last recorded status will be displayed for 3 seconds.
Press and hold the 2 outside buttons for
10 seconds until the HomeLink
® indi-
cator light changes from continuously
lit (orange) to rapidly flashing (green).
If you sell your vehicle, be sure to erase
the programs stored in the HomeLink®
memory.
Garage door operation indicators
1
2
ColorStatus
Orange (flashing)Currently opening/closing
GreenOpening/closing has completed
Red (flashing)Feedback signals cannot be received
Erasing the entire HomeLink® memory (all three codes)