remove seats LEXUS NX300h 2015 Owners Manual
[x] Cancel search | Manufacturer: LEXUS, Model Year: 2015, Model line: NX300h, Model: LEXUS NX300h 2015Pages: 681, PDF Size: 9.14 MB
Page 58 of 681
58 1-1. For safe use
NX300h_U_OM78007U WA R N I N G ■
Front passenger occupant classification system precautions ●
Do not recline the front passenger seatback so far that it touches a rear seat. This may
cause the “AIR BAG OFF” indicator light to be illuminated, whic h indicates that the
SRS airbags for the front passenger will not activate in the event of a severe accident.
If the seatback touches the rear seat, return the seatback to a position where it does
not touch the rear seat. Keep the front pa ssenger seatback as upright as possible
when the vehicle is moving. Reclining the seatback excessively may lessen the effec-
tiveness of the seat belt system. ●
If an adult sits in the front passenger seat , the “AIR BAG ON” indicator light is illumi-
nated. If the “AIR BAG OFF” indicator is illuminated, ask the passenger to sit up
straight, well back in the seat, feet on the floor, and with the seat belt worn correctly. If
the “AIR BAG OFF” indicator still remains illuminated, either ask the passenger to
move to the rear seat, or if that is not possible, move the front passenger seat fully
rearward. ●
When it is unavoidable to install a forward- facing child restraint system on the front
passenger seat, install the child restraint sy stem on the front passenger seat in the
proper order. ( P. 6 3 )●
Do not modify or remove the front seats. ●
Do not kick the front passenger seat or subj ect it to severe impact. Otherwise, the
SRS warning light may come on to indicat e a malfunction of the front passenger
occupant classification system. In this ca se, contact your Lexus dealer immediately.●
Child restraint systems installed on the rear seat should not contact the front seat-
backs. ●
Do not use a seat accessory, such as a cu shion and seat cover, that covers the seat
cushion surface. ●
Do not modify or replace the upholstery of the front seat.
Page 63 of 681
631-1. For safe use
1
For safety and security
NX300h_U_OM78007U ■
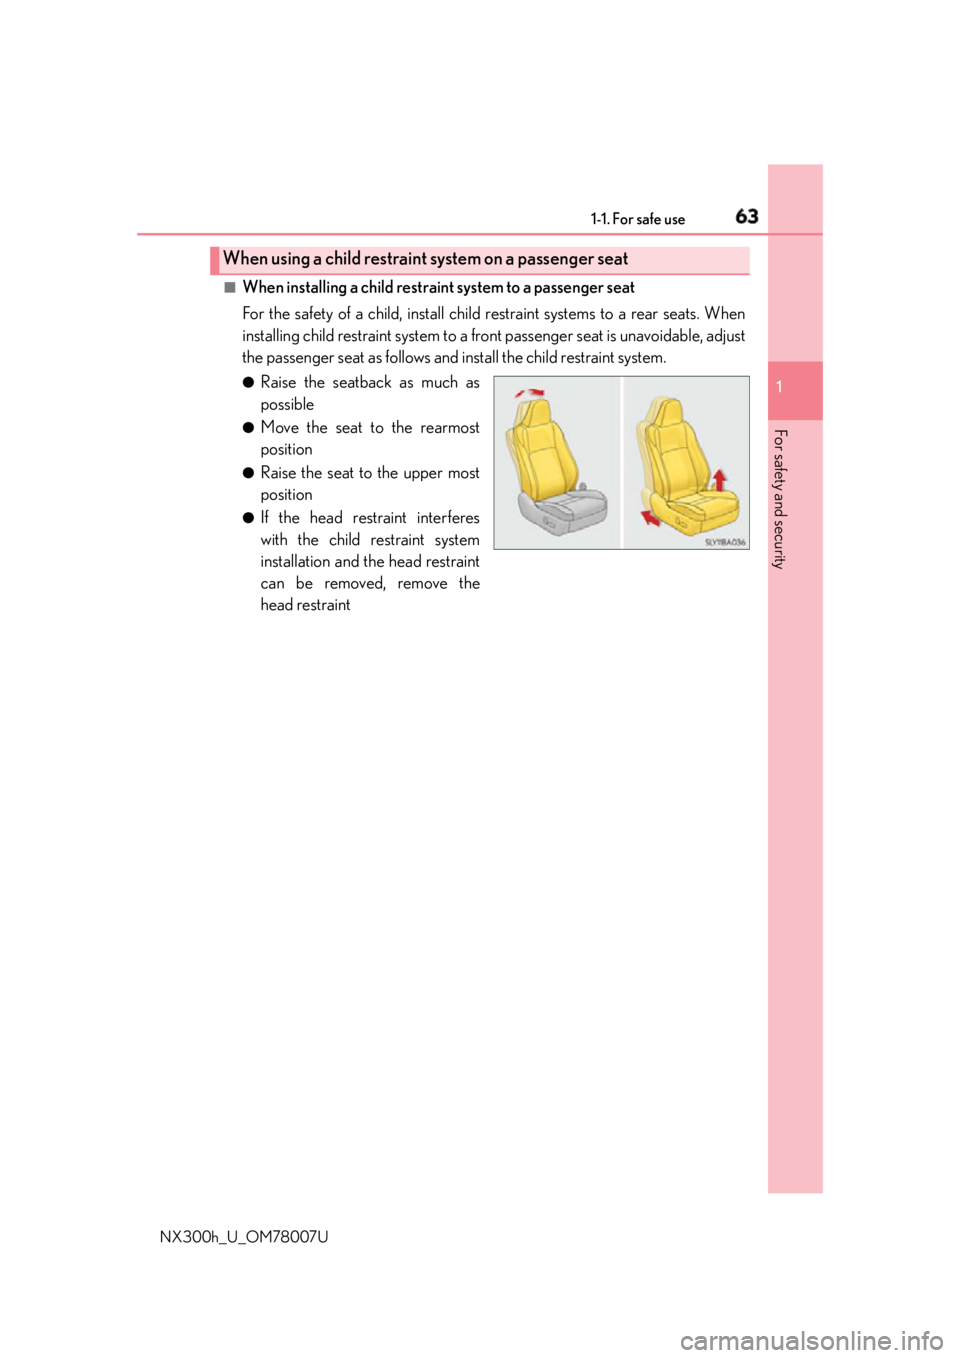
When installing a child restraint system to a passenger seat
For the safety of a child, install child restraint systems to a rear seats. When
installing child restraint system to a fron t passenger seat is unavoidable, adjust
the passenger seat as follows and install the child restraint system.●
Raise the seatback as much as
possible ●
Move the seat to the rearmost
position ●
Raise the seat to the upper most
position ●
If the head restraint interferes
with the child restraint system
installation and the head restraint
can be removed, remove the
head restraintWhen using a child restraint system on a passenger seat
Page 71 of 681
711-1. For safe use
1
For safety and security
NX300h_U_OM78007U ■
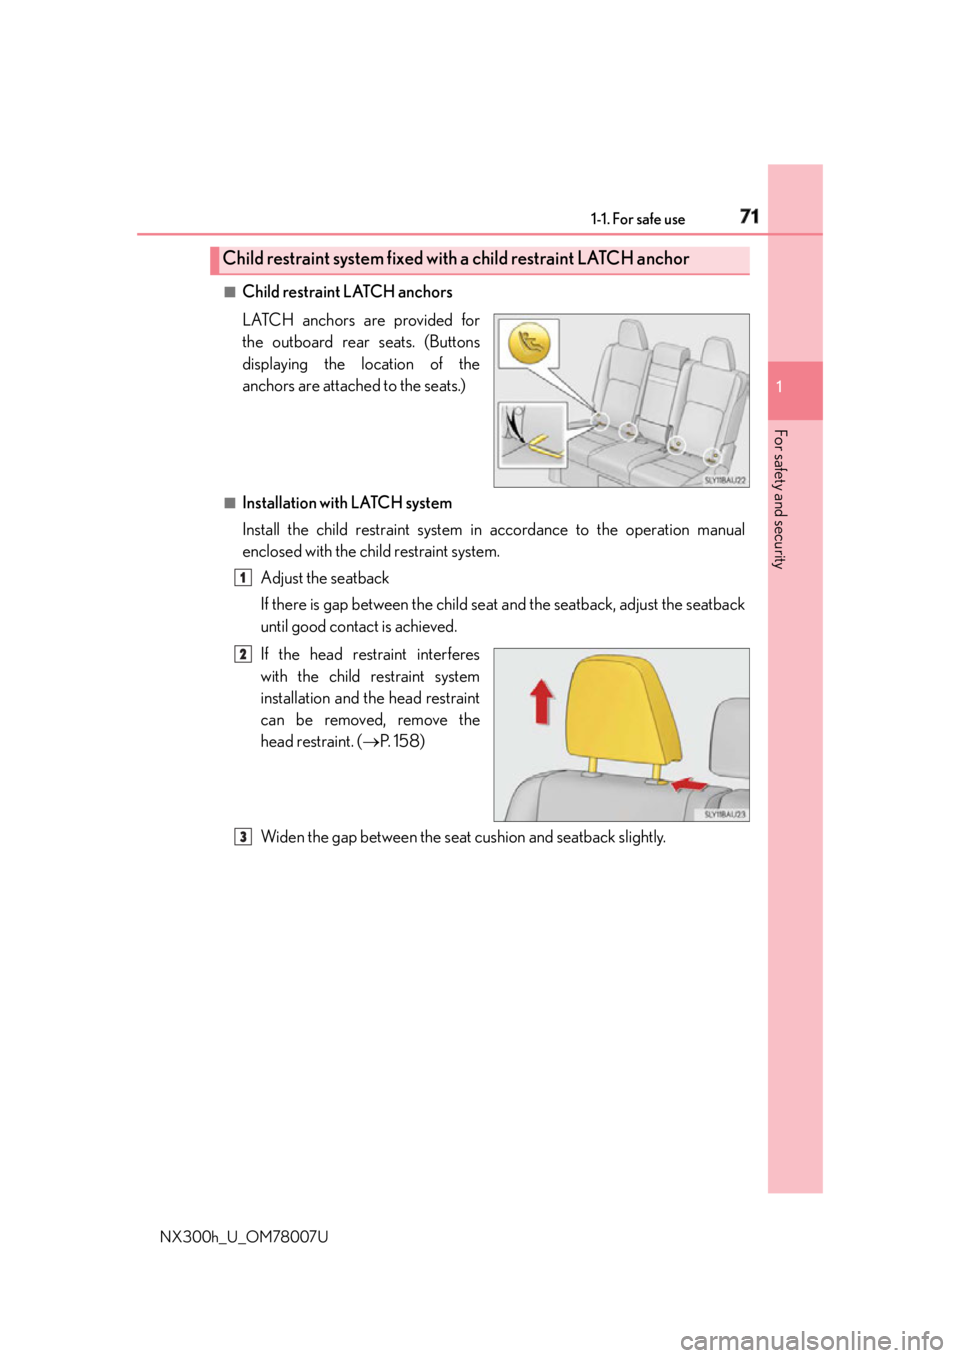
Child restraint LATCH anchors
LATCH anchors are provided for
the outboard rear seats. (Buttons
displaying the location of the
anchors are attached to the seats.) ■
Installation with LATCH system
Install the child restraint system in accordance to the operation manual
enclosed with the child restraint system.
Adjust the seatback
If there is gap between the child seat and the seatback, adjust the seatback
until good contact is achieved.
If the head restraint interferes
with the child restraint system
installation and the head restraint
can be removed, remove the
head restraint. ( P. 1 5 8 )
Widen the gap between the seat cushion and seatback slightly.Child restraint system fixed with a child restraint LATCH anchor
1
2
3
Page 74 of 681
74 1-1. For safe use
NX300h_U_OM78007U ■
Fixing the top tether strap to the anchor bracket
Install the child restraint system in accordance to the operation manual
enclosed with the child restraint system.
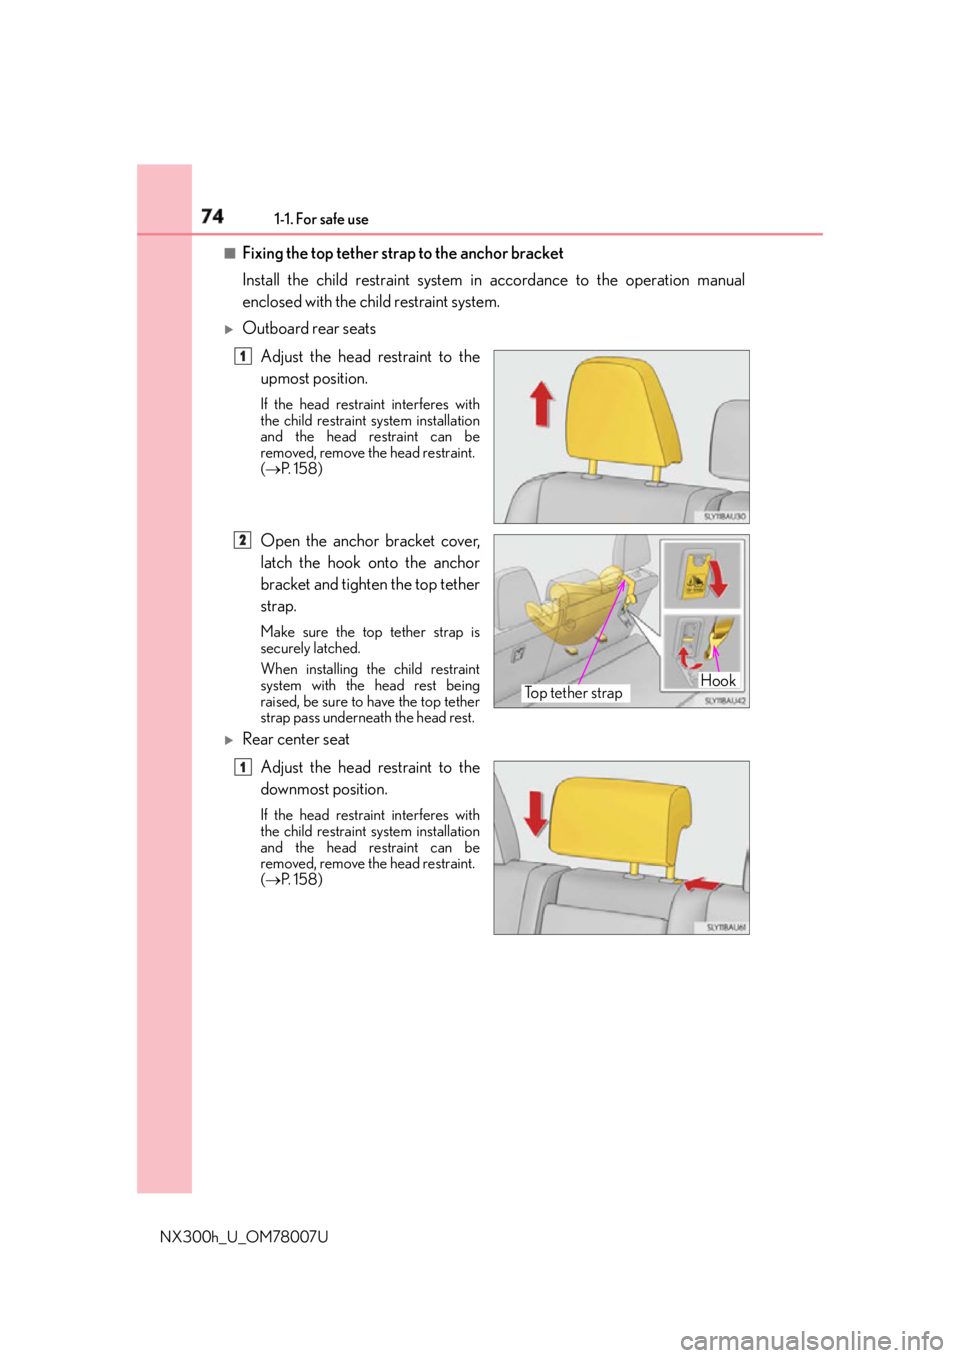
Outboard rear seats
Adjust the head restraint to the
upmost position. If the head restraint interferes with
the child restraint system installation
and the head restraint can be
removed, remove the head restraint.
( P. 1 5 8 )
Open the anchor bracket cover,
latch the hook onto the anchor
bracket and tighten the top tether
strap. Make sure the top tether strap is
securely latched.
When installing the child restraint
system with the head rest being
raised, be sure to have the top tether
strap pass underneath the head rest.
Rear center seat
Adjust the head restraint to the
downmost position. If the head restraint interferes with
the child restraint system installation
and the head restraint can be
removed, remove the head restraint.
( P. 1 5 8 ) 1
Hook
Top tether strap2
1
Page 83 of 681

831-2. Hybrid system
1
For safety and security
NX300h_U_OM78007U ■
If a warning light comes on, a warning message is displayed, or the 12-volt battery is dis-
connected
The hybrid system may not start. In this case, try to start the system again. If the “READY”
indicator does not come on, contact your Lexus dealer. ■
Running out of fuel
When the vehicle has run out of fuel and the hybrid system cannot be started, refuel the
vehicle with at least enough gasoline to make the low fuel level warning light ( P. 5 6 7 )
go off. If there is only a small amount of fu el, the hybrid system may not be able to start.
(The standard amount of fuel is about 2.7 gal. [10.1 L, 2.2 Imp.gal.], when the vehicle is on
a level surface. This value may vary when the vehicle is on a slope. Add extra fuel when
the vehicle is inclined.) ■
Electromagnetic waves ●
High voltage parts and cables on hybrid ve hicles incorporate electromagnetic shield-
ing, and therefore emit approximately the same amount of electromagnetic waves as
conventional gasoline powered vehicl es or home electronic appliances.●
Your vehicle may cause sound interference in some third party-produced radio parts. ■
Hybrid battery (traction battery)
The hybrid battery (traction battery) has a limited service life. The lifespan of the hybrid
battery (traction battery) can change in accordance with driving style and driving condi-
tions.
WA R N I N G ■
High voltage precautions
This vehicle has high voltage DC and AC systems as well as a 12-volt system. DC and
AC high voltage is very dangerous and can cause severe burns and electric shock that
may result in death or serious injury. ●
Never touch, disassemble, remove or replace the high voltage parts, cables or their
connectors. ●
The hybrid system will become hot after star ting as the system uses high voltage. Be
careful of both the high voltage and the hi gh temperature, and always obey the warn-
ing labels attached to the vehicle. ●
Never try to open the service plug access
hole located underneath the rear seats. The
service plug is used only when the vehicle is
serviced and is subject to high voltage.
Page 159 of 681
1593-3. Adjusting the seats
3
Operation of each component
NX300h_U_OM78007U ■
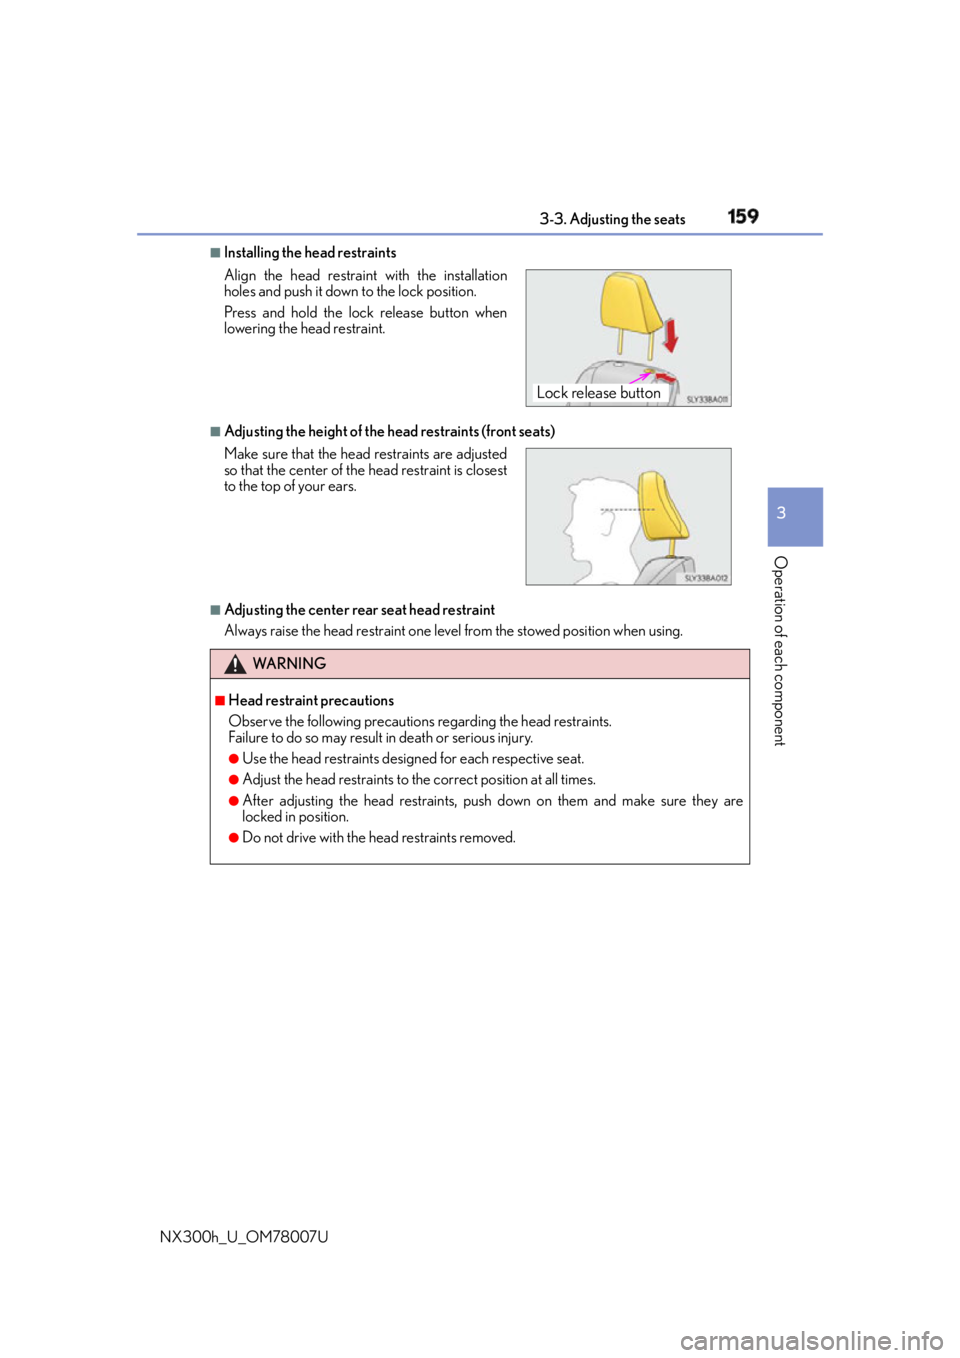
Installing the head restraints
■
Adjusting the height of the he ad restraints (front seats)
■
Adjusting the center rear seat head restraint
Always raise the head restraint one level from the stowed position when using.Align the head restrain t with the installation
holes and push it down to the lock position.
Press and hold the lock release button when
lowering the head restraint.
Make sure that the head restraints are adjusted
so that the center of the head restraint is closest
to the top of your ears.
WA R N I N G ■
Head restraint precautions
Observe the following precautions regarding the head restraints.
Failure to do so may result in death or serious injury.●
Use the head restraints design ed for each respective seat.●
Adjust the head restraints to the correct position at all times. ●
After adjusting the head restraints, push down on them and make sure they are
locked in position. ●
Do not drive with the head restraints removed. Lock release button
Page 434 of 681
434 6-1. Using the air conditioning system and defogger
NX300h_U_OM78007U ■
Option control screen
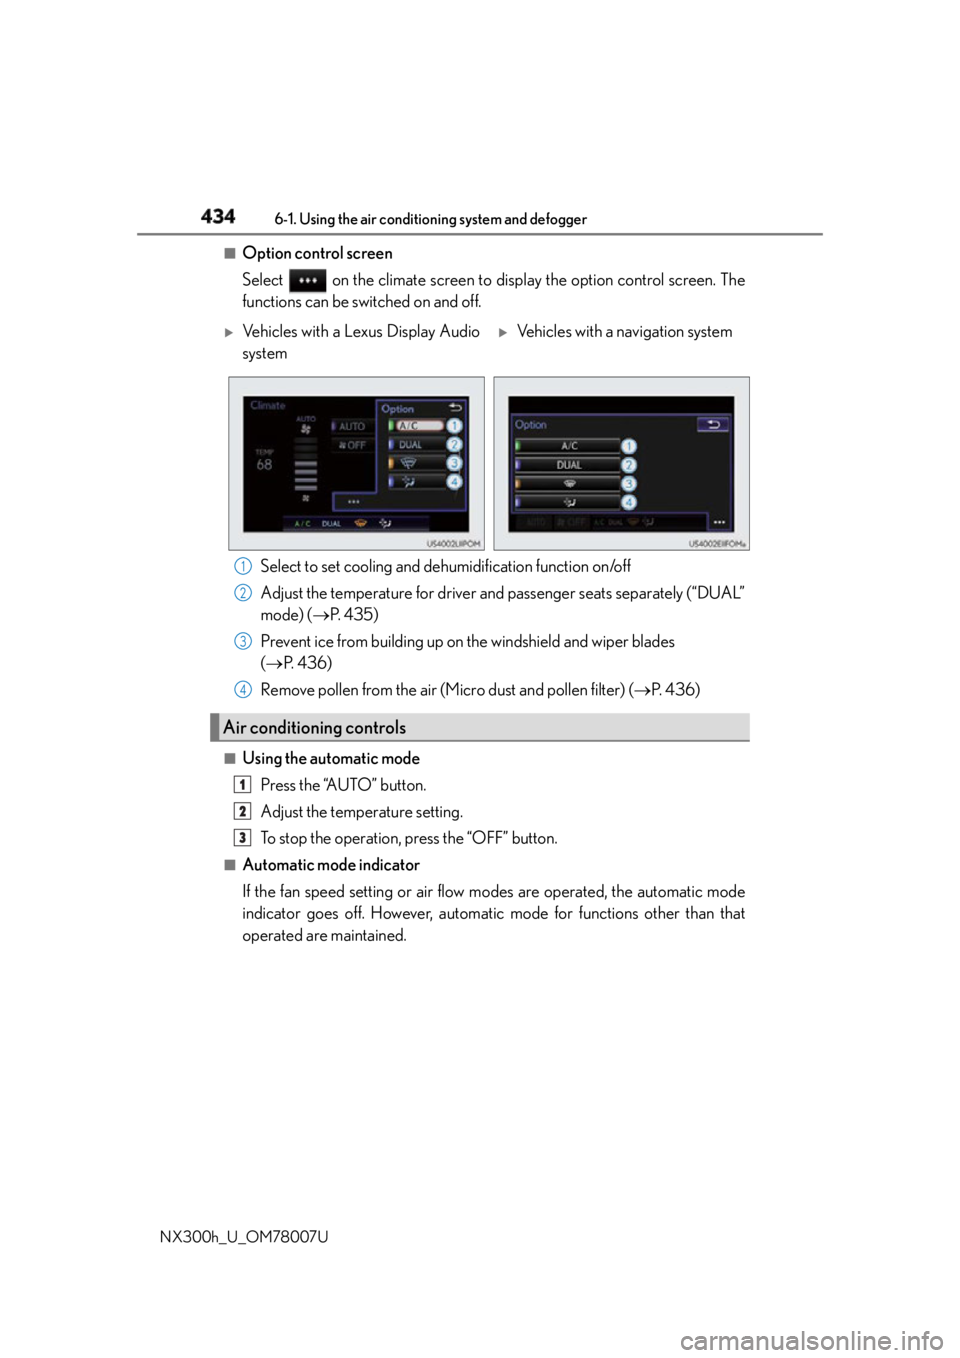
Select on the climate screen to display the option control screen. The
functions can be switched on and off.
Select to set cooling and de humidification function on/off
Adjust the temperature for driver and passenger seats separately (“DUAL”
mode) ( P. 4 3 5 )
Prevent ice from building up on the windshield and wiper blades
( P. 4 3 6 )
Remove pollen from the air (Micro dust and pollen filter) ( P. 4 3 6 )■
Using the automatic mode
Press the “AUTO” button.
Adjust the temperature setting.
To stop the operation, press the “OFF” button.■
Automatic mode indicator
If the fan speed setting or air flow modes are operated, the automatic mode
indicator goes off. However, automati c mode for functions other than that
operated are maintained.
Vehicles with a Lexus Display Audio
system
Vehicles with a navigation system
Air conditioning controls 1
2
3
4
1
2
3
Page 435 of 681
4356-1. Using the air conditio ning system and defogger
6
Interior features
NX300h_U_OM78007U ■
Adjusting the temperature for driver and passenger seats separately
(“DUAL” mode)
To turn on the “DUAL” mode, perform any of the following procedures: ●
Press the “DUAL” button. ●
Select “DUAL” on the option control screen. ●
Adjust the temperature setting of the passenger side with the passenger
side temperature adjustment button. The indicator comes on when the “DUAL” mode is on.
■
Switching between outside air and recirculated air modes
Press . The mode switches between (recirculated air mode) and (outside
air mode) modes each time the button is pressed.■
Defogging the windshield
Defoggers are used to defog the windshield and front side windows.
Press . Set to outside air mode if the recirculated air mode is used. (It may
switch automatically.)
To defog the windshield and the side windows early, turn the air flow and tempera-
ture up.
To return to the previous mode, press again when the windshield is
defogged.■
Defogging the rear window and outside rear view mirrors
Defoggers are used to defog the rear window and to remove raindrops, dew
and frost from the outside rear view mirrors.
Press .
The defoggers will automatically turn off after a period of time.Other functions
Page 490 of 681
490 7-1. Maintenance and care
NX300h_U_OM78007U NOTICE ■
Cleaning detergents ●
Do not use the following types of detergent, as they may discolor the vehicle interior
or cause streaks or damage to painted surfaces:
• Non-seat portions: Organic substances su ch as benzene or gasoline, alkaline or
acidic solutions, dye, and bleach
• Seats: Alkaline or acidic solutions, such as thinner, benzene, and alcohol ●
Do not use polish wax or polish cleaner. The instrument panel’s or other interior part’s
painted surface may be damaged. ■
Preventing damage to leather surfaces
Observe the following precautions to avoid damage to and deterioration of leather
surfaces: ●
Remove any dust or dirt from leather surfaces immediately. ●
Do not expose the vehicle to direct sunlight for extended periods of time. Park the
vehicle in the shade, especially during summer. ●
Do not place items made of vinyl, plastic, or containing wax on the upholstery, as they
may stick to the leather su rface if the vehicle interior heats up significantly.■
Water on the floor
Do not wash the vehicle floor with water.
Vehicle systems such as the audio system ma y be damaged if water comes into contact
with electrical components such as the au dio system above or under the floor of the
vehicle. Water may also cause the body to rust. ■
When cleaning the inside of the windshield (vehicles with LDA [Lane Departure
Alert] or Automatic High Beam)
Be careful not to touch the camera sensor ( P. 2 7 0 ) .
If the camera is accidentally scratched or hit, LDA and Automatic High Beam may not
operate properly or may cause a malfunction. ■
Cleaning the inside of the rear window ●
Do not use glass cleaner to clean the rear window, as this may cause damage to the
rear window defogger heater wires or antenna. Use a cloth dampened with luke-
warm water to gently wipe the window cl ean. Wipe the window in strokes running
parallel to the heater wires or antenna. ●
Be careful not to scratch or damage the heater wires or antenna. ■
Cleaning the front side windows
Do not use any compound or abrasive product (e.g., glass cleaner, detergent, wax) to
clean the windows. It may damage the coating.
Page 665 of 681

664 Alphabetical index
NX300h_U_OM78007U Card key ..................................................... 118
Care
Aluminum wheels ............................. 485
Exterior................................................... 484
Interior .................................................... 488
Seat belts ............................................... 489
Cargo capacity........................... 182, 608
Cargo hooks .......................................... 450
Cargo net hooks ................................... 450
CD player ................................................ 367
Chains ....................................................... 327
Child-protectors.....................................126
Child restraint system............................ 60
Booster seats installation...................68
Convertible seats
installation .............................................. 67
Front passenger occupant
classification system ......................... 53
Infant seats definition ........................... 62
Infant seats installation ........................66
Installing CRS with LATCH
anchors ..................................................... 71
Installing CRS with seat
belts ..........................................................66
Installing CRS with top tether
strap.......................................................... 73
LATCH anchors ..................................... 71 Child safety ................................................ 59
12-volt battery
precautions ............................ 514, 599
Airbag precautions.............................. 43
Back door precautions.....................135
Child restraint system......................... 60
How your child should
wear the seat belt .............................. 36
Installing child restraints .................... 60
Moon roof precautions .................... 172
Power window lock switch.............166
Power window precautions .......... 168
Rear door child-p rotectors ............ 126
Removed key battery
precautions ....................................... 533
Seat belt extender
precautions .......................................... 39
Seat belt precautions .......................... 38
Seat heater precautions ................. 440
Cleaning ...................................... 484, 488
Aluminum wheels ..............................485
Exterior ................................................... 484
Interior .................................................... 488
Seat belts................................................489
Clock......................................................... 456C