display LEXUS RC F 2017 Service Manual
[x] Cancel search | Manufacturer: LEXUS, Model Year: 2017, Model line: RC F, Model: LEXUS RC F 2017Pages: 724, PDF Size: 15.76 MB
Page 126 of 724
1262. Instrument cluster
■Language
Select to change the language on the display.
■Units
Select to change the unit of measure for fuel consumption.
■Maintenance system (U.S.A. only)
Select to reset the maintenance data after the required maintenance is per-
formed. (
→ P. 489)
■Eco Driving Indicator Light
Select to activate/deactivate th e Eco Driving Indicator Light.
■ switch settings
Displays a procedure to register a desired screen to .
You can register 1 screen as a shortcut, which can be displayed by pressing . (→ P. 118)
■Drive information 1/Drive information 2
Select to select up to 2 items that will be displayed on the “Drive Info 1” screen
and “Drive Info 2” screen respectively.
( → P. 119)
■Pop-up display
Select to set the following pop-up disp lays, which may appear in some situa-
tions, on/off. • Route guidance display of the navigation system-linked system (if equipped)
• Incoming call display of the hands-free phone system
• Dynamic radar cruise control operation display (if equipped)
• Instrument panel bright ness adjustment display
• TVD control mode change display (if equipped)
• Drive mode change display
■Rev indicator
Select to set the rev indicator on/off.
When set to on, proceed to select the engine speed at which the rev indicator
will be displayed.
■Rev peak
Select to set the rev peak on/off.
Settings display
Page 127 of 724
1272. Instrument cluster
2
Instrument cluster
■Speed indicator
Select to set the speed indicator on/off.
When set to on, proceed to set the vehicle speed at which the speed indicator
will be displayed.
Selectable speed range:
30 mph to 100 mph (50 km/h to 160 km/h)
*
*
: Always observe the legal speed limi t when driving on public roads.
■Rear wing
Select to enable/disable the active rear wing.
■SPORT gauges
The SPORT S or SPORT S+ mode meter display can be selected and set as
the customized display for either SPORT S or SPORT S+ mode.
■Initialization
Select to reset the meter display settings. ( →P. 674)
■Start-up display
When the engine is started, the name of the vehicle is displayed on the multi-information
display.
While the start-up display is being displaye d, the meter display cannot be changed even
if the drive mode is changed. When the start- up display is finished, the meter display for
the currently selected mode will be displayed.
■Torque distribution display (if equipped)
Torque distribution may not be displayed correctly in some cases, such as when the vehi-
cle passes over road expansion joints.
■G-force display
●The G-force values may not be zero even when the vehicle is parked, such as when it is
parked on an incline.
●The steering amount, accelerator pedal input, and brake fluid pressure displays are dis-
abled until the engine has warmed up (the variable red zone of the tachometer has
retracted to 7300 rpm).
After the engine has warmed up, these displays will be enabled.
●Depending on the vehicle usage conditions, the brake fluid pressure display may not
reach its maximum reading even though the brake pedal is fully depressed.
●If a battery terminal is disconnected and reconnected, the steering amount display may
be disabled temporarily. Afte r driving the vehicle for a while , the display will be enabled.
Page 128 of 724
1282. Instrument cluster
■Suspension of the settings display
In the following situations, operation of the settings display will be temporarily sus-
pended.
●When a warning message appears on the multi-information display
●When the vehicle begins to move
■Tire pressure
●It may take a few minutes to display the tire inflation pressure after the engine switch is
turned to IGNITION ON mode. It may also take a few minutes to display the tire infla-
tion pressure after inflation pressure has been adjusted.
●“---” may be displayed if the tire position information cannot be determined due to
unfavorable radio wave conditions.
●Tire inflation pressure changes with temperat ure. The displayed values may also be dif-
ferent from the values measured using a tire pressure gauge.
■When disconnecting and reconnecting battery terminals
The following information data will be reset:
●Drive information
●Lap timer: Measured lap times, history
●G-force: Record of the maximum G-forces
■Using the lap timer
If the engine is stopped while a lap is being timed, the lap timer will stop and the lap time
up to that point will be recorded.
■Liquid crystal display
→ P. 108
WARNING
■Caution for use while driving
●When operating the multi-information display while driving, pay extra attention to the
safety of the area around the vehicle.
●Do not look continuously at the multi-info rmation display while driving as you may fail
to see pedestrians, objects on the road, etc. ahead of the vehicle.
■The information display at low temperatures
Allow the interior of the vehicle to warm up before using the liquid crystal information
display. At extremely low temperatures, th e information display monitor may respond
slowly, and display changes may be delayed.
For example, there is a lag between the dr iver’s shifting and the new gear number
appearing on the display. This lag could ca use the driver to downshift again, causing
rapid and excessive engine braking and possibly an accident resulting in death or
injury.
■Cautions during setting up the display
As the engine needs to be running during sett ing up the display, ensure that the vehicle
is parked in a place with adequate ventilation. In a closed area such as a garage,
exhaust gases including harmful carbon mo noxide (CO) may collect and enter the
vehicle. This may lead to death or a serious health hazard.
Page 129 of 724

1292. Instrument cluster
2
Instrument cluster
NOTICE
■While setting up the display
To prevent battery discharge, ensure that the engine is running while setting up the dis-
play features.
Page 130 of 724
1302. Instrument cluster
Fuel consumption information
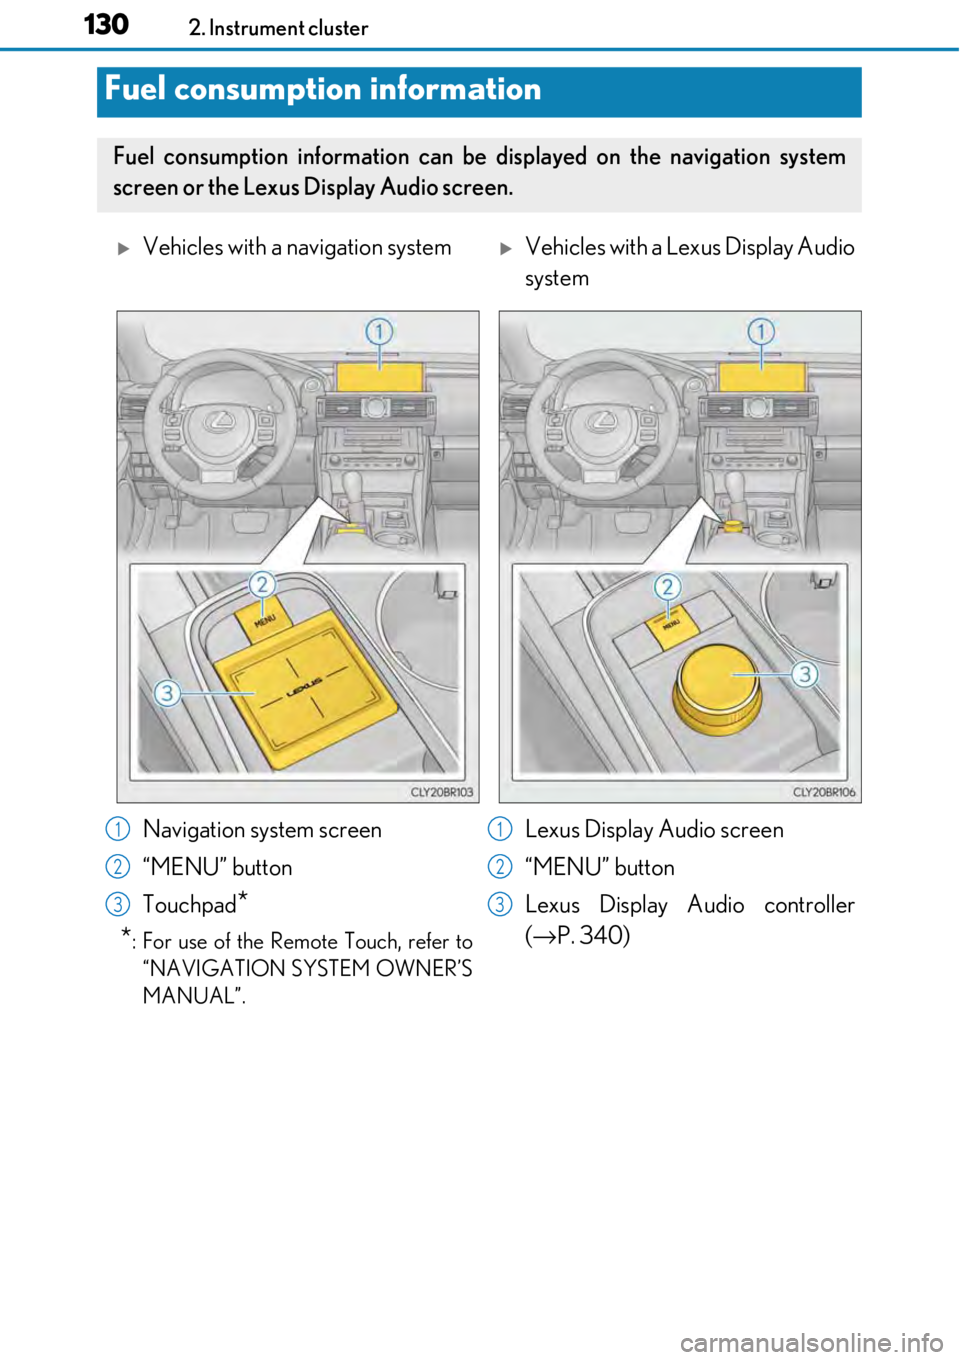
Fuel consumption information can be displayed on the navigation system
screen or the Lexus Display Audio screen.
Vehicles with a navigation systemVehicles with a Lexus Display Audio
system
Navigation system screen
“MENU” button
Touchpad
*
*
: For use of the Remote Touch, refer to “NAVIGATION SYSTEM OWNER’S
MANUAL”.
Lexus Display Audio screen
“MENU” button
Lexus Display Audio controller
(→ P. 340)1
2
3
1
2
3
Page 131 of 724
1312. Instrument cluster
2
Instrument cluster
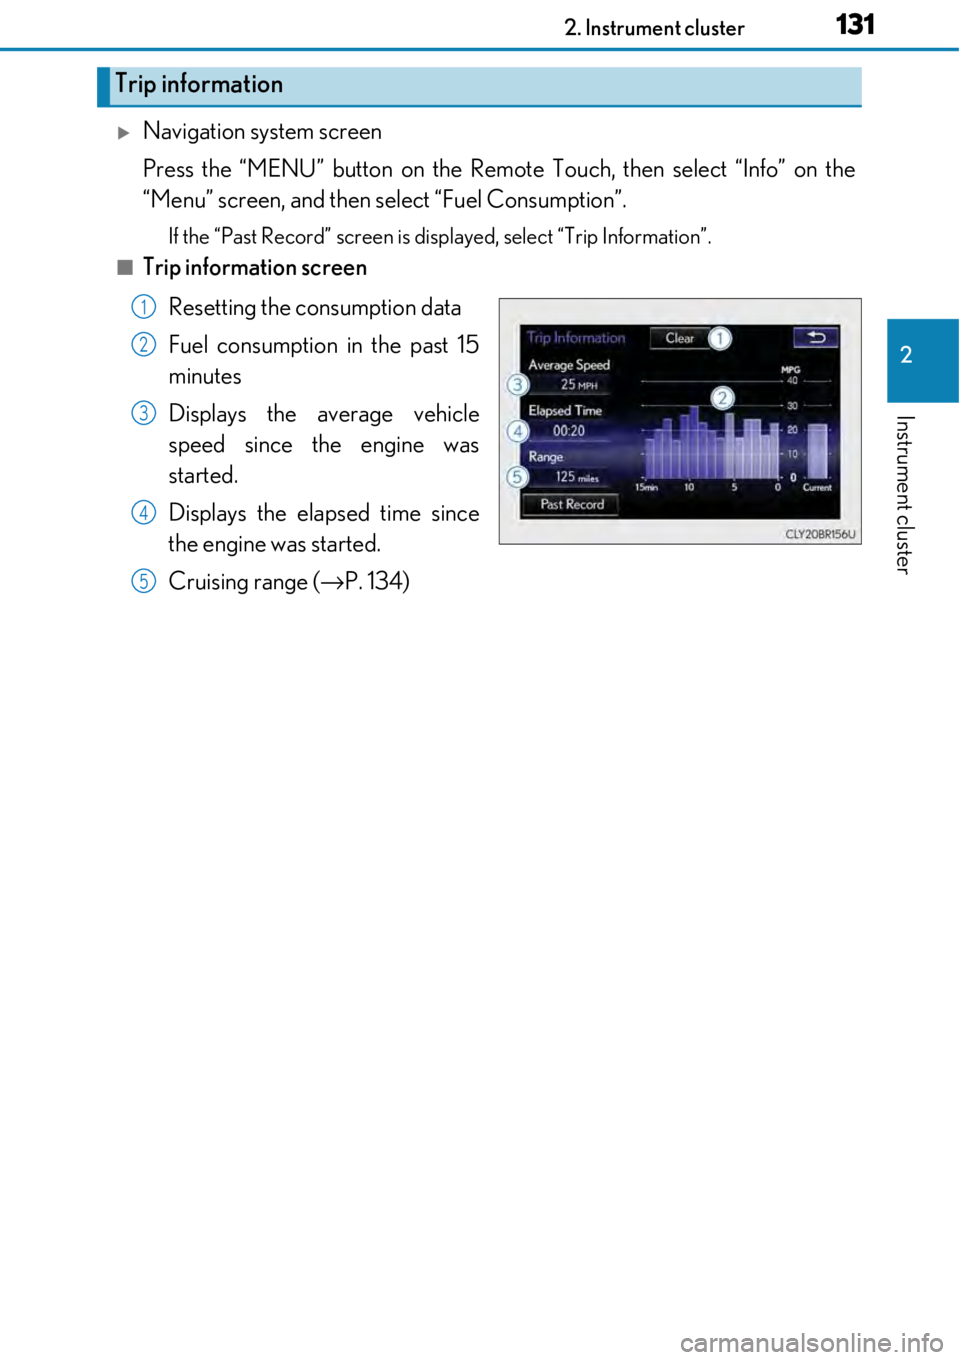
Navigation system screen
Press the “MENU” button on the Remote Touch, then select “Info” on the
“Menu” screen, and then select “Fuel Consumption”.
If the “Past Record” screen is disp layed, select “Trip Information”.
■Trip information screen
Resetting the consumption data
Fuel consumption in the past 15
minutes
Displays the average vehicle
speed since the engine was
started.
Displays the elapsed time since
the engine was started.
Cruising range ( →P. 134)
Trip information
1
2
3
4
5
Page 132 of 724
1322. Instrument cluster
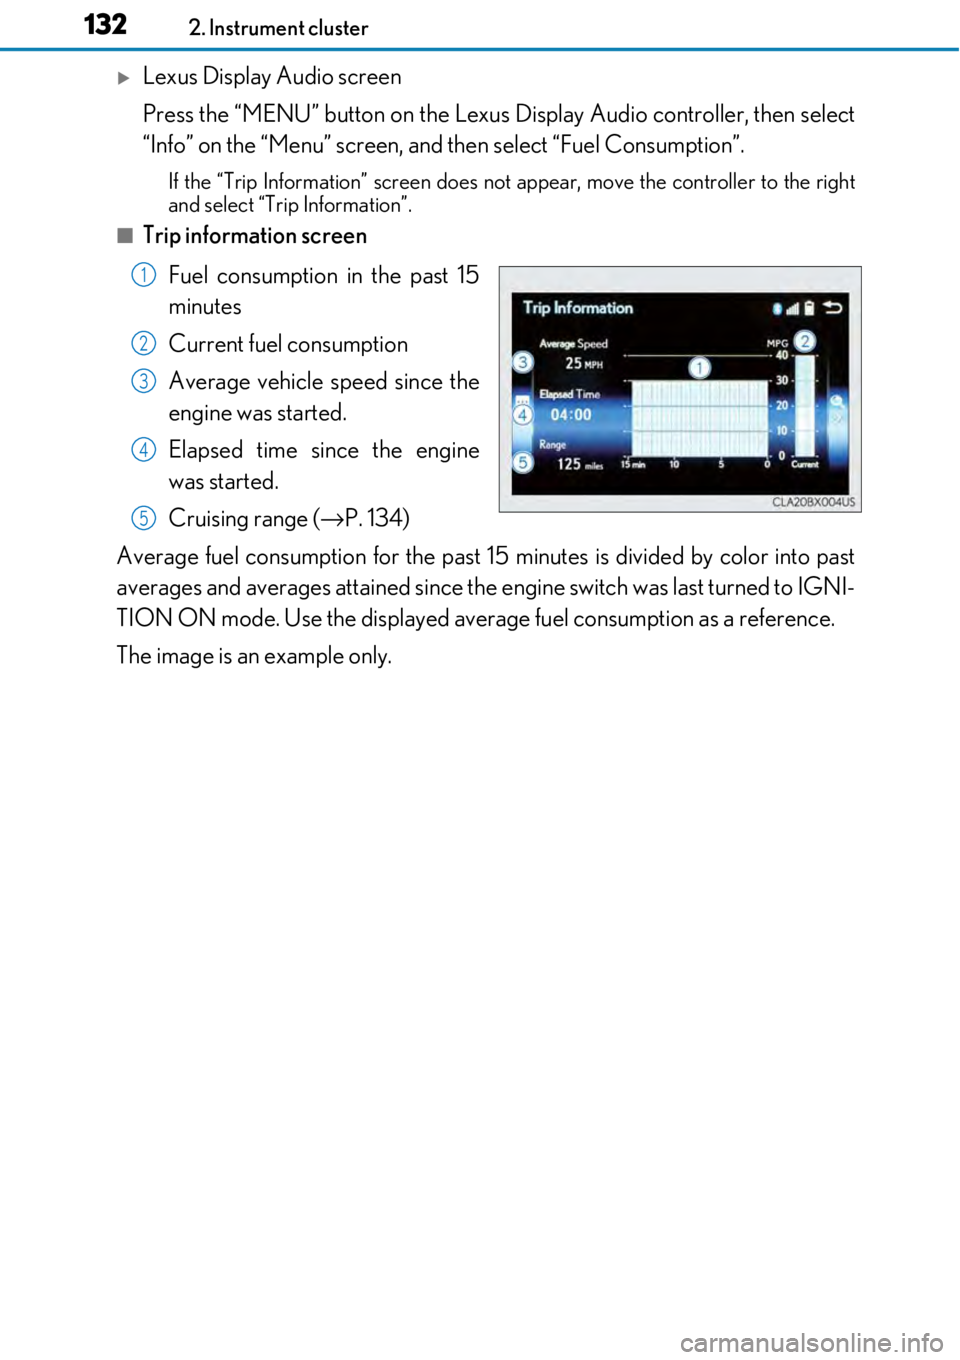
Lexus Display Audio screen
Press the “MENU” button on the Lexus Display Audio controller, then select
“Info” on the “Menu” screen, and then select “Fuel Consumption”.
If the “Trip Information” screen does no t appear, move the controller to the right
and select “Trip Information”.
■Trip information screen
Fuel consumption in the past 15
minutes
Current fuel consumption
Average vehicle speed since the
engine was started.
Elapsed time since the engine
was started.
Cruising range ( →P. 134)
Average fuel consumption for the past 15 minutes is divided by color into past
averages and averages attained since the engine switch was last turned to IGNI-
TION ON mode. Use the displayed average fuel consumption as a reference.
The image is an example only.
1
2
3
4
5
Page 133 of 724
1332. Instrument cluster
2
Instrument cluster
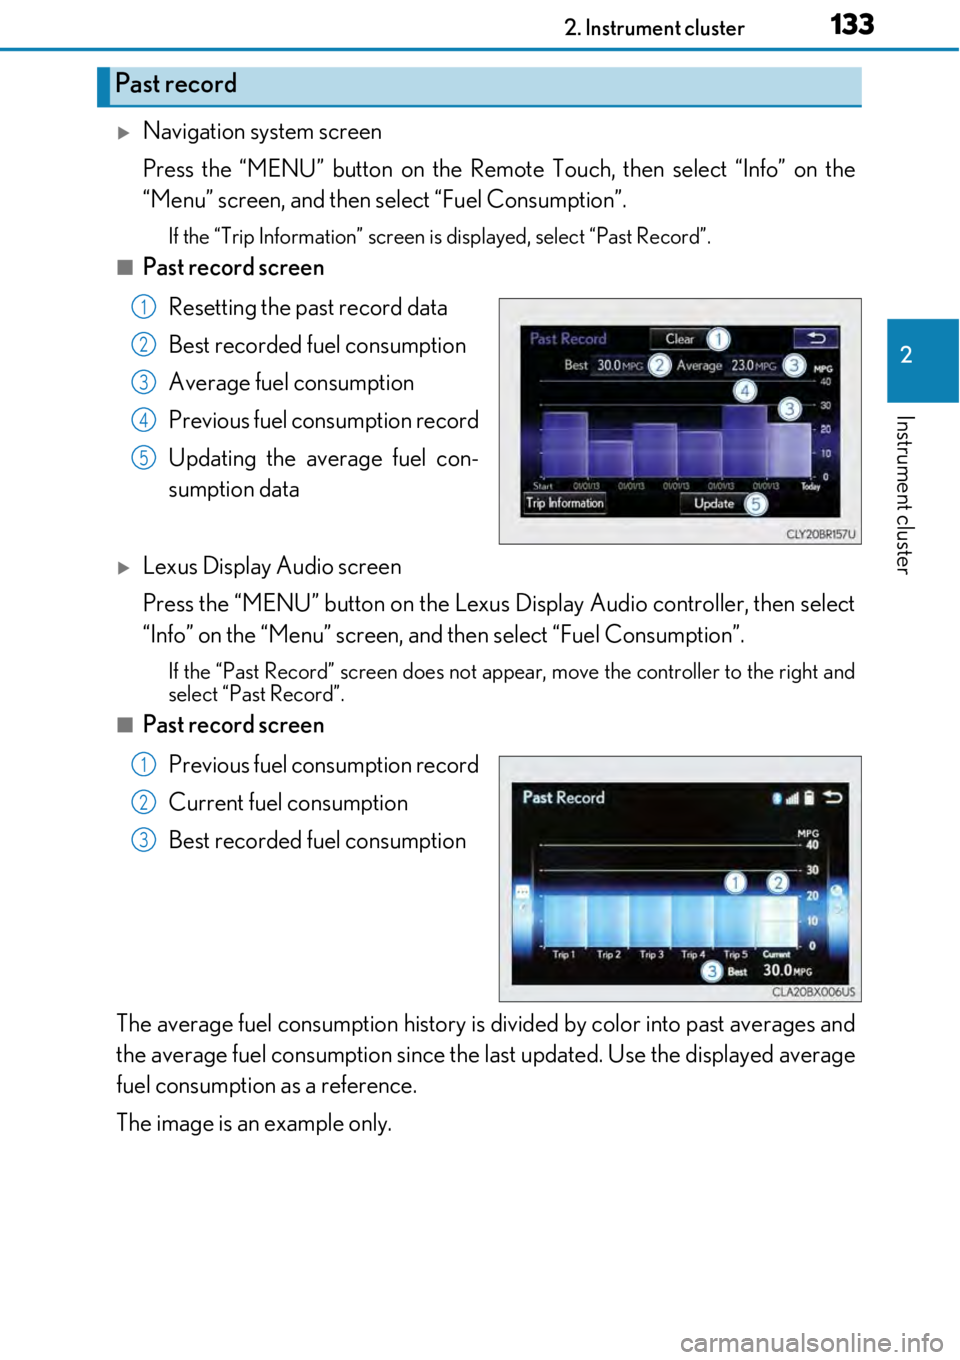
Navigation system screen
Press the “MENU” button on the Remote Touch, then select “Info” on the
“Menu” screen, and then select “Fuel Consumption”.
If the “Trip Information” screen is displayed, select “Past Record”.
■Past record screen
Resetting the past record data
Best recorded fuel consumption
Average fuel consumption
Previous fuel consumption record
Updating the average fuel con-
sumption data
Lexus Display Audio screen
Press the “MENU” button on the Lexus Display Audio controller, then select
“Info” on the “Menu” screen, and then select “Fuel Consumption”.
If the “Past Record” screen does not appear, move the controller to the right and
select “Past Record”.
■Past record screen
Previous fuel consumption record
Current fuel consumption
Best recorded fuel consumption
The average fuel consumption history is di vided by color into past averages and
the average fuel consumption since the last updated. Use the displayed average
fuel consumption as a reference.
The image is an example only.
Past record
1
2
3
4
5
1
2
3
Page 134 of 724

1342. Instrument cluster
■Updating the past record data
Navigation system
Update the average fuel cons umption by selecting “Update” to measure the current fuel
consumption again.
Lexus Display Audio system
Update the average fuel consumption by mo ving the controller to the left and select
“Update” to measure the curre nt fuel consumption again.
■Resetting the data
Navigation system
The fuel consumption data can be deleted by selecting “Clear”.
Lexus Display Audio system
The fuel consumption data can be deleted by moving the controller to the left and select
“Clear”.
■Cruising range
Displays the estimated maximum distance that can be driven with the quantity of fuel
remaining.
This distance is computed based on your average fuel consumption.
As a result, the actual distance that can be driven may differ from that displayed.
Page 145 of 724
1453-2. Opening, closing and locking the doors and trunk
3
Operation of each component
■Side window open/close function linked to door operation
When a door is opened, its window opens slightly. When a door is closed, its window
closes completely.
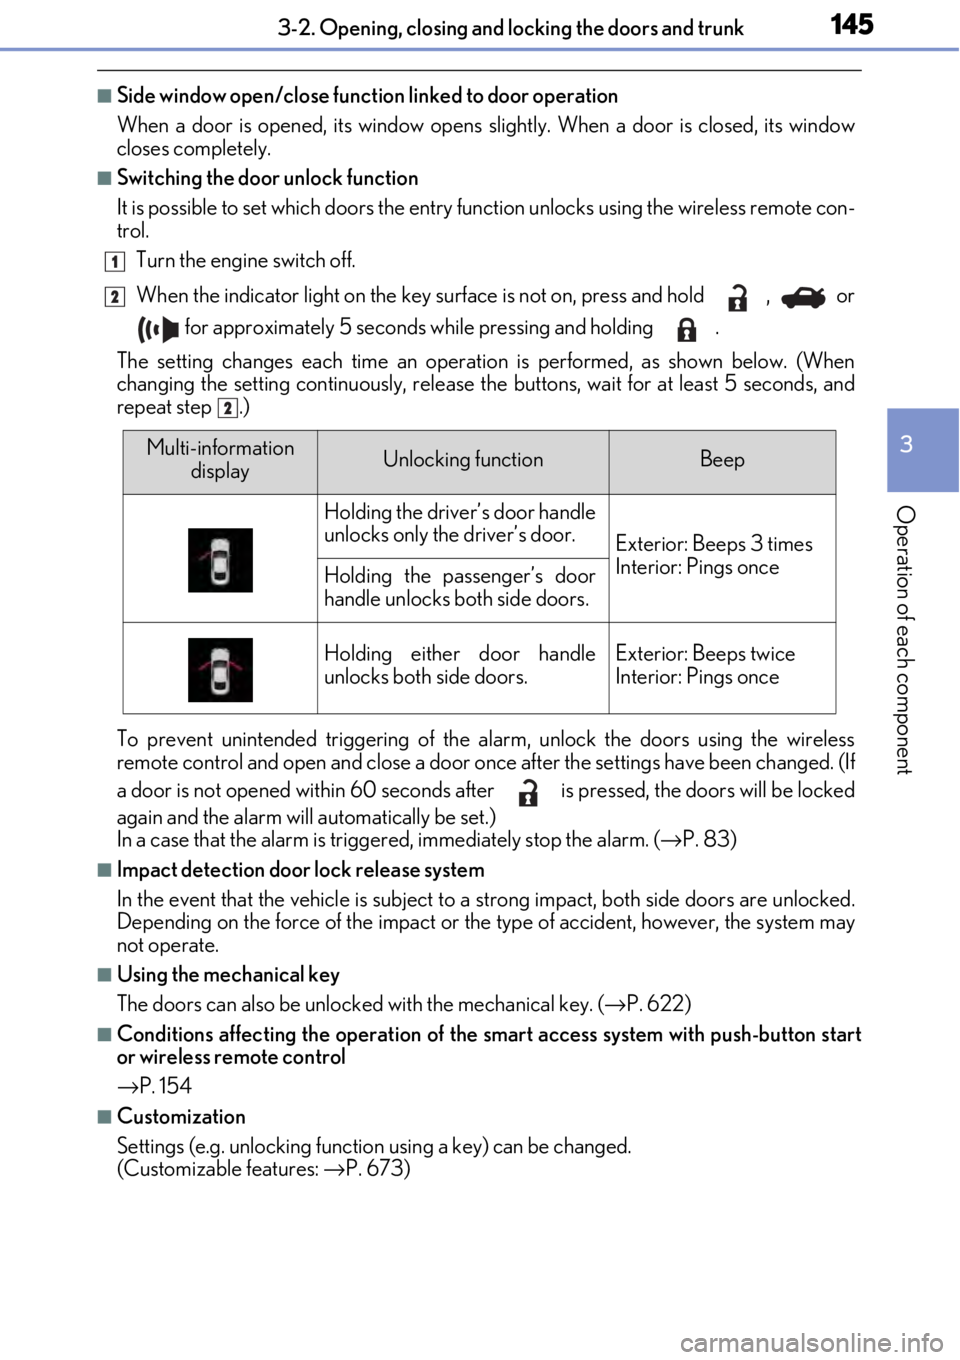
■Switching the door unlock function
It is possible to set which doors the entry function unlock s using the wireless remote con-
trol.
Turn the engine switch off.
When the indicator light on the key surface is not on, press and hold , or
for approximately 5 seconds while pressing and holding .
The setting changes each time an operation is performed, as shown below. (When
changing the setting continuously, release the buttons, wait for at least 5 seconds, and
repeat step .)
To prevent unintended triggering of the alarm, unlock the doors using the wireless
remote control and open and close a door once after the settings have been changed. (If
a door is not opened within 60 seconds af ter is pressed, the doors will be locked
again and the alarm will automatically be set.)
In a case that the alarm is triggered, immediately stop the alarm. ( →P. 83)
■Impact detection door lock release system
In the event that the vehicle is subject to a strong impact, both side doors are unlocked.
Depending on the force of the impact or the type of accident, however, the system may
not operate.
■Using the mechanical key
The doors can also be unlocked with the mechanical key. ( →P. 622)
■Conditions affecting the oper ation of the smart access system with push-button start
or wireless remote control
→ P. 154
■Customization
Settings (e.g. unlocking function using a key) can be changed.
(Customizable features: →P. 673)
1
2
2
Multi-information
displayUnlocking functionBeep
Holding the driver’s door handle
unlocks only the driver’s door.
Exterior: Beeps 3 times
Interior: Pings once
Holding the passenger’s door
handle unlocks both side doors.
Holding either door handle
unlocks both side doors.Exterior: Beeps twice
Interior: Pings once