air conditioning LEXUS RC300 2017 Owners Manual
[x] Cancel search | Manufacturer: LEXUS, Model Year: 2017, Model line: RC300, Model: LEXUS RC300 2017Pages: 724, PDF Size: 15.76 MB
Page 5 of 724

5
1
9 8
7 5 4
3
2
10
6
5-7. Connecting Bluetooth®
Steps for using Bluetooth®
devices ........................................385
Registering a Bluetooth
®
device .......................................... 387
Selecting a Bluetooth
®
device ..........................................388
Connecting a Bluetooth
®
audio player .............................. 389
Connecting a Bluetooth
®
phone ........................................... 390
Displaying a Bluetooth
®
device details ..............................391
Detailed Bluetooth
®
settings ........................................ 392
5-8. Bluetooth
® Audio
Listening to Bluetooth
®
Audio ........................................... 395
5-9. Bluetooth
® Phone
Using a Bluetooth
®
Phone........................................... 397
Making a call................................ 399
Receiving a call ........................... 402
Speaking on th e phone ........... 403
Using a Bluetooth
®
phone message ....................... 405
Using the steering wheel switches ...................................... 407
Bluetooth
® phone
settings ........................................408
5-10. Phonebook Contact settings .......................... 410
Messaging setting .......................413 5-11. Bluetooth
®
What to do if...
(Troubleshooting).....................414
Bluetooth
®.................................... 418
5-12. Other function “Information” screen ................ 423
USB photo .................................... 425
Weather information.................427
Voice command system ......... 428
6-1. Using the air conditioning system
Automatic air conditioning system.......................................... 434
Heated steering wheel/ seat heaters/
seat ventilators ......................... 445
6-2. Using the interior lights Interior lights list ......................... 448• Interior lights.......................... 449
• Personal lights....................... 450
6-3. Using the storage features List of storage features ..............451
• Glove box ............................... 452
• Console box .......................... 452
• Cup holders ........................... 453
Trunk features ............................. 454
6Interior features
Page 19 of 724

19Pictorial index
Multi-information display . . . . . . . . . . . . . . . . . . . . . . . . . . . . . . . . . . . . . . .P. 109, 117
Display . . . . . . . . . . . . . . . . . . . . . . . . . . . . . . . . . . . . . . . . . . . . . . . . . . . . . . . . . . . . .P. 109, 117
When the warning messages are displayed . . . . . . . . . . . . . . . . . . . . . . . . . . . . . P. 571
Parking brake . . . . . . . . . . . . . . . . . . . . . . . . . . . . . . . . . . . . . . . . . . . . . . . . . . . . . . . P. 221
Applying/releasing . . . . . . . . . . . . . . . . . . . . . . . . . . . . . . . . . . . . . . . . . . . . . . . . . . . . . P. 221
Precautions against winter season . . . . . . . . . . . . . . . . . . . . . . . . . . . . . . . . . . . . . P. 332
Warning buzzer/message . . . . . . . . . . . . . . . . . . . . . . . . . . . . . . . . . . . . . . . . . . . . . . P. 571
Turn signal lever . . . . . . . . . . . . . . . . . . . . . . . . . . . . . . . . . . . . . . . . . . . . . . . . . . . . P. 22 0
Headlight switch . . . . . . . . . . . . . . . . . . . . . . . . . . . . . . . . . . . . . . . . . . . . . . . . . . . . . . . . P. 224
Headlights/parking lights/tail lights/daytime running lights . . . . . . . . . . . . P. 224
Front fog lights
*1. . . . . . . . . . . . . . . . . . . . . . . . . . . . . . . . . . . . . . . . . . . . . . . . . . . . . . . P. 232
Windshield wiper and washer switch . . . . . . . . . . . . . . . . . . . . . . . . . . . . . . P. 233
Usage . . . . . . . . . . . . . . . . . . . . . . . . . . . . . . . . . . . . . . . . . . . . . . . . . . . . . . . . . . . . . . . . . P. 233
Adding washer fluid . . . . . . . . . . . . . . . . . . . . . . . . . . . . . . . . . . . . . . . . . . . . . . . . . . . . P. 5 16
Warning messages . . . . . . . . . . . . . . . . . . . . . . . . . . . . . . . . . . . . . . . . . . . . . . . . . . . . P. 584
Headlight cleaners
*1 . . . . . . . . . . . . . . . . . . . . . . . . . . . . . . . . . . . . . . . . . . . . . . . . . . P. 233
Emergency flasher switch . . . . . . . . . . . . . . . . . . . . . . . . . . . . . . . . . . . . . . . . . . .P. 554
Trunk opener . . . . . . . . . . . . . . . . . . . . . . . . . . . . . . . . . . . . . . . . . . . . . . . . . . . . . . . . P. 147
Hood lock release lever . . . . . . . . . . . . . . . . . . . . . . . . . . . . . . . . . . . . . . . . . . . . . P. 497
Tilt and telescopic steering control switch
*1 . . . . . . . . . . . . . . . . . . . . . . . P. 176
Adjustment . . . . . . . . . . . . . . . . . . . . . . . . . . . . . . . . . . . . . . . . . . . . . . . . . . . . . . . . . . . . . P. 176
Driving position memory
*1 . . . . . . . . . . . . . . . . . . . . . . . . . . . . . . . . . . . . . . . . . . . . . P. 169
Tilt and telescopic steering lock release lever*1 . . . . . . . . . . . . . . . . . . . P. 176
Adjustment . . . . . . . . . . . . . . . . . . . . . . . . . . . . . . . . . . . . . . . . . . . . . . . . . . . . . . . . . . . . . P. 176
Air conditioning system . . . . . . . . . . . . . . . . . . . . . . . . . . . . . . . . . . . . . . . . . . . . .P. 434
Usage . . . . . . . . . . . . . . . . . . . . . . . . . . . . . . . . . . . . . . . . . . . . . . . . . . . . . . . . . . . . . . . . . P. 434
Rear window defogger . . . . . . . . . . . . . . . . . . . . . . . . . . . . . . . . . . . . . . . . . . . . . . . . P. 439
Audio system*2. . . . . . . . . . . . . . . . . . . . . . . . . . . . . . . . . . . . . . . . . . . . . . . . . . . . . P. 338
Audio system . . . . . . . . . . . . . . . . . . . . . . . . . . . . . . . . . . . . . . . . . . . . . . . . . . . . . . . . . . P. 338
Hands-free system. . . . . . . . . . . . . . . . . . . . . . . . . . . . . . . . . . . . . . . . . . . . . . . . . . . . . P. 3 97
Trunk opener main switch . . . . . . . . . . . . . . . . . . . . . . . . . . . . . . . . . . . . . . . . . . . P. 148
*1: If equipped
*2: For vehicles with a navigation system, refer to “NAVIGATION
SYSTEM OWNER’S MANUAL”.
4
5
6
7
8
9
10
11
12
13
14
15
Page 266 of 724

2664-5. Using the driving support systems
■Temporary cancelation of the LDA system functions
If any of the following occurs, the LDA system functions will be temporarily canceled. The
functions will resume after the necessar y operating conditions have returned.
●The turn signal lever is operated.
●The vehicle speed deviates from the operating range of the LDA system functions.
●When the lane lines cannot be recognized while driving.
●When the lane departure warning sounds.
The lane departure warning function will not operate again for a se veral seconds after it
has been activated, even if the vehicle leaves the lane again.
■The lane departure warning
Depending on the audio system sound level or air conditioning fan noise while the audio
system or air conditioning system is in use, it may be difficult to hear the warning sound.
■After the vehicle has been parked in the sun
The LDA system may not be available and a warning message ( →P. 577) will be dis-
played for a while after driving has started. When the temperature in the cabin decreases
and the temperature around the camera sensor ( →P. 249) becomes suitable for its
operation, the functions will begin to operate.
■If there are lane markers on only one side of the vehicle
The lane departure warning will not operate for the side on which lane markers could not
be recognized.
■Conditions in which the func tion may not operate correctly
In the following situations, the camera sensor may be unable to recognize lane markers
causing the lane departure wa rning function to operate incorrectly. However, this does
not indicate a malfunction.
●When driving through an area with no lane markers, such as a tollbooth, a crossing or
before a ticket checkpoint
●When driving on a sharp curve
●When lane markers are extremely narrow or extremely wide
●When the vehicle leans to one side an unus ual amount due to a heavy load or improper
tire inflation pressure
●When the following distance between your vehicle and the vehicle ahead is extremely
short
●When the lane markers are yellow (These may be more difficult for the system to rec-
ognize compared to white markers.)
●When the lane markers are broken, Botts’ dots (raised pavement markers) or stones
●When the lane markers are on a curb etc.
●When lane markers are obscured or partially obscured by sand, dirt, etc.
●When there are shadows on the road running parallel with lane markers, or if a shadow
covers the lane markers
●When driving on a particularly bright road surface, such as concrete
●When driving on a road surface that is bright due to reflected light
●When driving in a location where the light level changes rapidly, such as the entrance to
or exit from a tunnel
Page 294 of 724
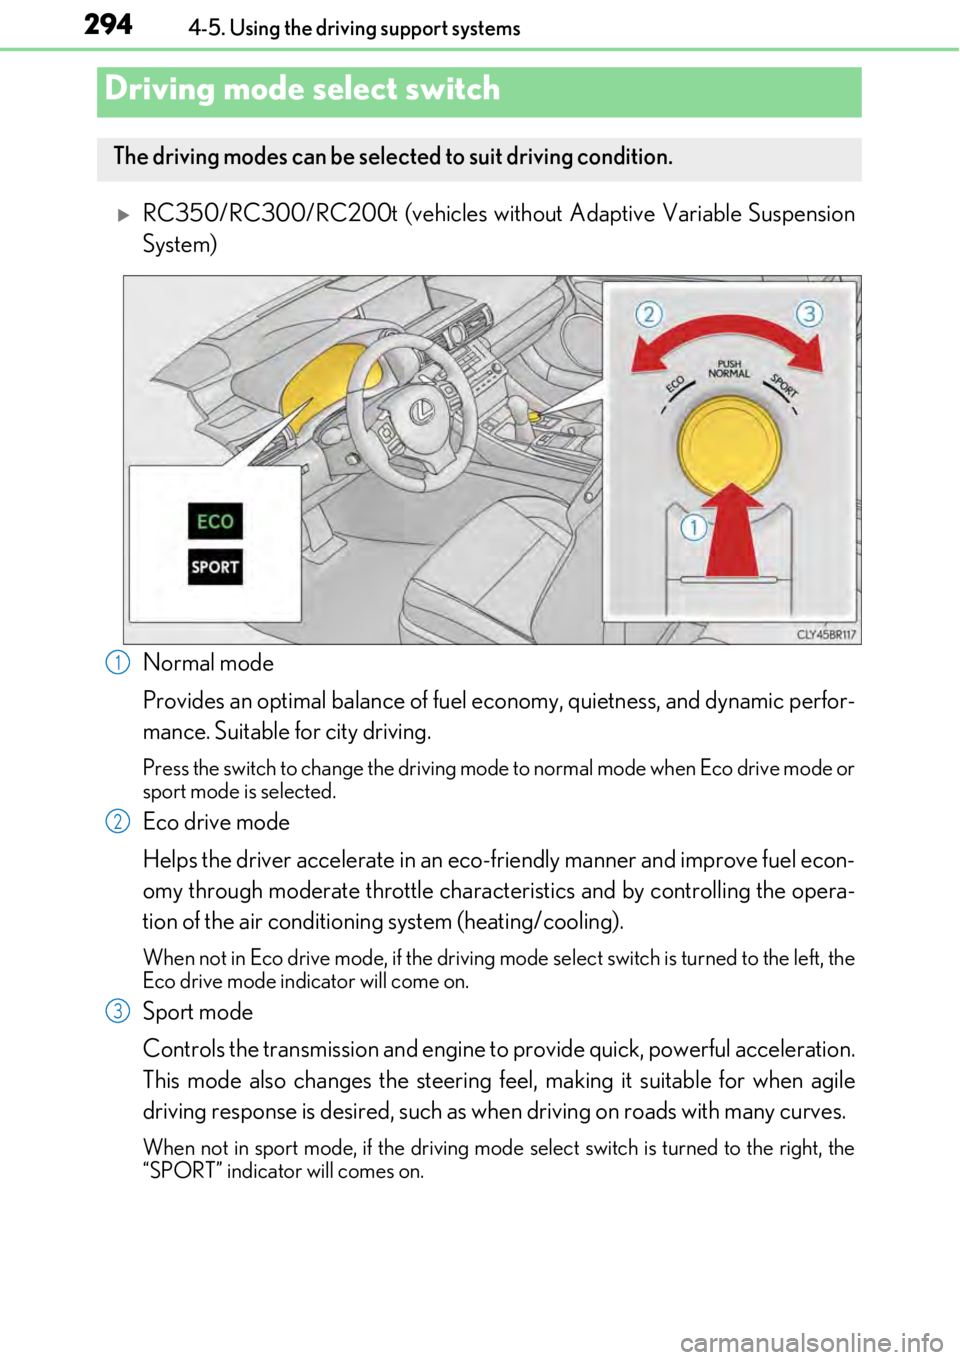
2944-5. Using the driving support systems
RC350/RC300/RC200t (vehicles without Adaptive Variable Suspension
System)
Normal mode
Provides an optimal balance of fuel ec onomy, quietness, and dynamic perfor-
mance. Suitable for city driving.
Press the switch to change the driving mode to normal mode when Eco drive mode or
sport mode is selected.
Eco drive mode
Helps the driver accelerate in an eco-fr iendly manner and improve fuel econ-
omy through moderate throttle charact eristics and by controlling the opera-
tion of the air conditioning system (heating/cooling).
When not in Eco drive mode, if the driving mode select switch is turned to the left, the
Eco drive mode indicator will come on.
Sport mode
Controls the transmission and engine to provide quick, powerful acceleration.
This mode also changes the steering feel, making it suitable for when agile
driving response is desired, such as wh en driving on roads with many curves.
When not in sport mode, if the driving mode select switch is turned to the right, the
“SPORT” indicator will comes on.
Driving mode select switch
The driving modes can be selected to suit driving condition.
1
2
3
Page 295 of 724
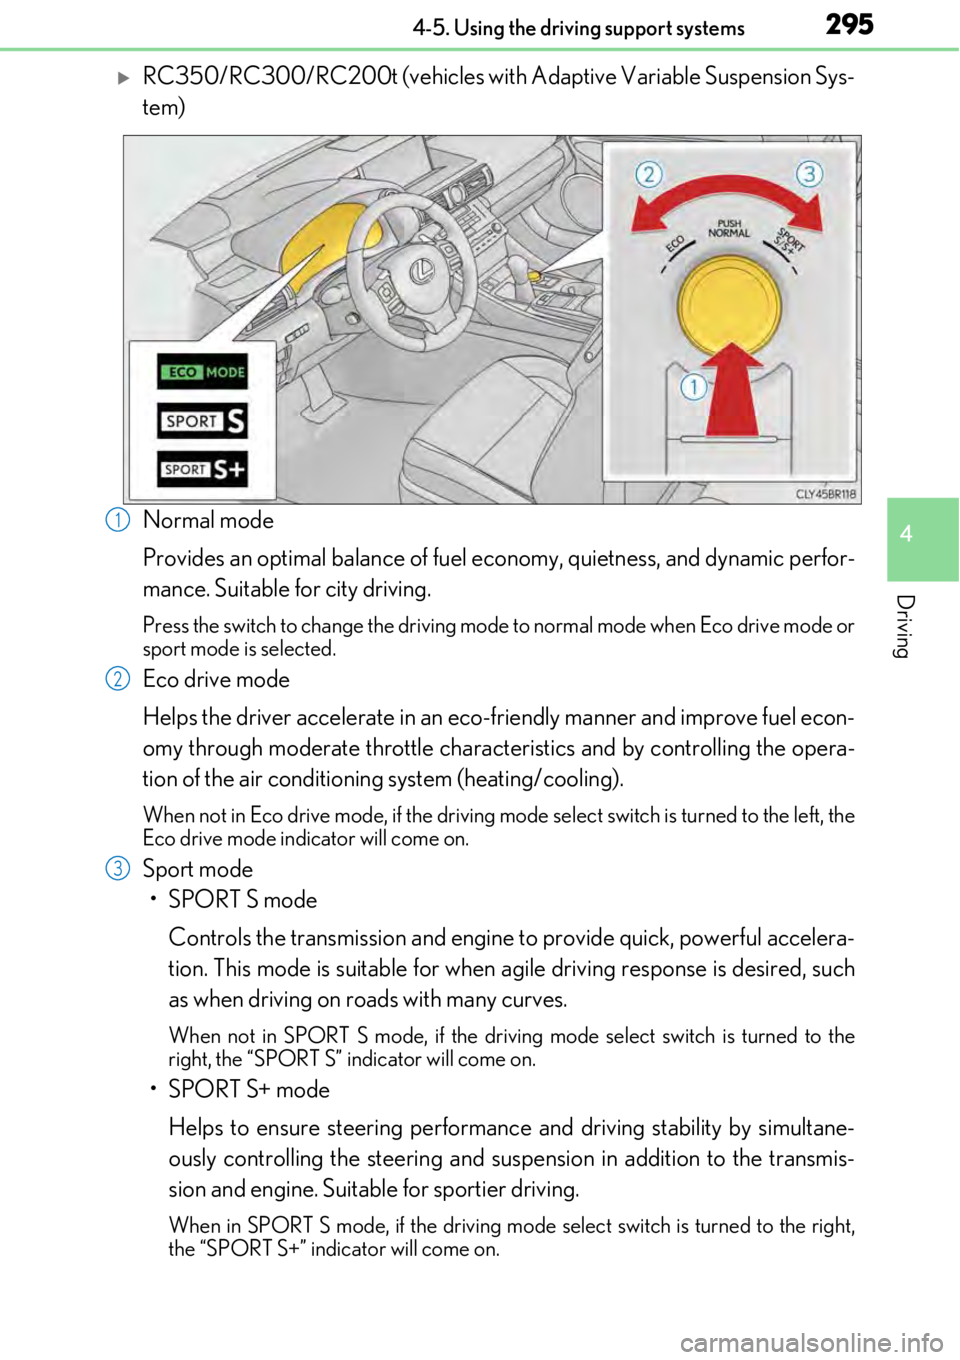
2954-5. Using the driving support systems
4
Driving
RC350/RC300/RC200t (vehicles with Adaptive Variable Suspension Sys-
tem)
Normal mode
Provides an optimal balance of fuel economy, quietness, and dynamic perfor-
mance. Suitable for city driving.
Press the switch to change the driving mode to normal mode when Eco drive mode or
sport mode is selected.
Eco drive mode
Helps the driver accelerate in an eco-fr iendly manner and improve fuel econ-
omy through moderate throttle charact eristics and by controlling the opera-
tion of the air conditioning system (heating/cooling).
When not in Eco drive mode, if the driving mode select switch is turned to the left, the
Eco drive mode indicator will come on.
Sport mode
•SPORT S mode
Controls the transmission and engine to provide quick, powerful accelera-
tion. This mode is suitable for when agile driving response is desired, such
as when driving on roads with many curves.
When not in SPORT S mode, if the driving mode select switch is turned to the
right, the “SPORT S” indicator will come on.
•SPORT S+ mode
Helps to ensure steering performanc e and driving stability by simultane-
ously controlling the steeri ng and suspension in addition to the transmis-
sion and engine. Suitable for sportier driving.
When in SPORT S mode, if the driving mode select switch is turned to the right,
the “SPORT S+” indicator will come on.
1
2
3
Page 296 of 724
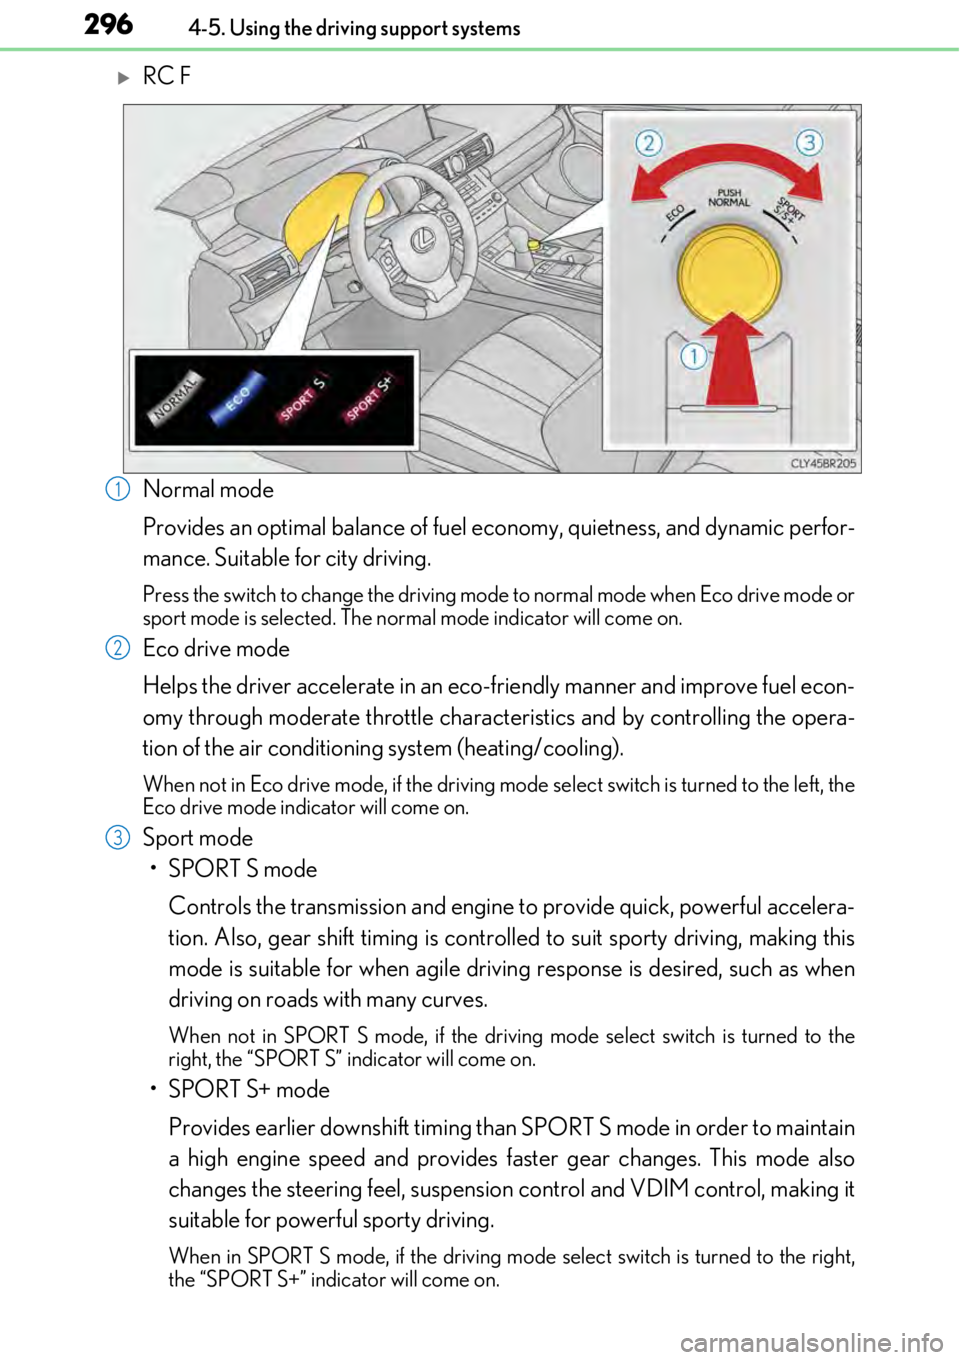
2964-5. Using the driving support systems
RC F
Normal mode
Provides an optimal balance of fuel economy, quietness, and dynamic perfor-
mance. Suitable for city driving.
Press the switch to change the driving mode to normal mode when Eco drive mode or
sport mode is selected. The normal mode indicator will come on.
Eco drive mode
Helps the driver accelerate in an eco-fr iendly manner and improve fuel econ-
omy through moderate throttle charact eristics and by controlling the opera-
tion of the air conditioning system (heating/cooling).
When not in Eco drive mode, if the driving mode select switch is turned to the left, the
Eco drive mode indicator will come on.
Sport mode
•SPORT S mode
Controls the transmission and engine to provide quick, powerful accelera-
tion. Also, gear shift timing is controlled to suit sporty driving, making this
mode is suitable for when agile drivin g response is desired, such as when
driving on roads with many curves.
When not in SPORT S mode, if the driving mode select switch is turned to the
right, the “SPORT S” indicator will come on.
•SPORT S+ mode
Provides earlier downshift timing than SPORT S mode in order to maintain
a high engine speed and provides faster gear changes. This mode also
changes the steering feel, suspension control and VDIM control, making it
suitable for powerful sporty driving.
When in SPORT S mode, if the driving mode select switch is turned to the right,
the “SPORT S+” indicator will come on.
1
2
3
Page 297 of 724

2974-5. Using the driving support systems
4
Driving
■Operation of the air conditioning system in Eco drive mode
Eco drive mode controls the heating/cooling operations and fan speed of the air condi-
tioning system to enhance fuel efficiency (→P. 434). To improve air conditioning perfor-
mance, adjust the fan speed or turn off Eco drive mode.
■Sport mode automatic deactivation
Sport mode is automatically deactivated if the engine switch is turned off after driving in
sport mode.
Page 339 of 724
3395-1. Basic Operations
5
Lexus Display Audio system
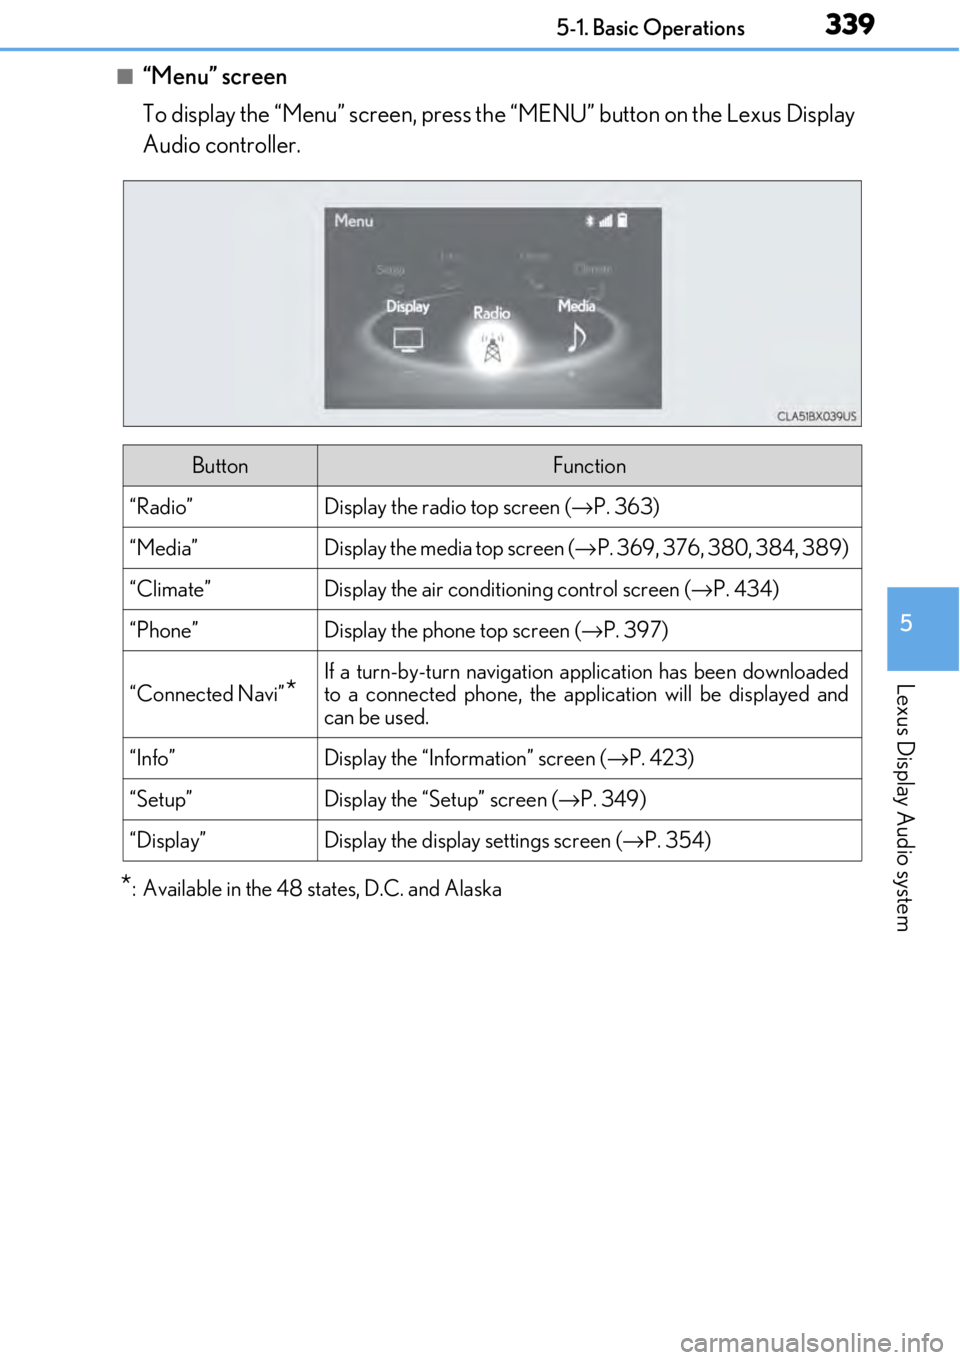
■“Menu” screen
To display the “Menu” screen, press the “MENU” button on the Lexus Display
Audio controller.
*: Available in the 48 states, D.C. and Alaska
ButtonFunction
“Radio”Display the radio top screen ( →P. 363)
“Media”Display the media top screen ( →P. 369, 376, 380, 384, 389)
“Climate”Display the air conditioning control screen ( →P. 434)
“Phone”Display the phone top screen ( →P. 397)
“Connected Navi”*
If a turn-by-turn navigation application has been downloaded
to a connected phone, the appl ication will be displayed and
can be used.
“Info”Display the “Information” screen ( →P. 423)
“Setup”Display the “Setup” screen ( →P. 349)
“Display”Display the display settings screen ( →P. 354)
Page 346 of 724

3465-1. Basic Operations
■Adjusting the volume
The volume of the Mobile Assistant can be adjusted using the
“PWR·VOL” knob or
steering wheel volume switch es. The Mobile Assistant and phone call volumes are syn-
chronized.
■Microphone
It is not necessary to speak directly into the microphone when using the Mobile Assis-
tant.
●Wait for the listening beeps before using the Mobile Assistant.
●The Mobile Assistant may not recognize commands in the following situations:
• When spoken too quickly.
• When spoken at a low or high volume.
• When the roof or windows are open.
• When passengers are talking while th e Mobile Assistant is being used.
• When the air conditioning syst em’s fan speed is set high.
• When the air conditioning vents are turned toward the microphone.
■Mobile Assistant precautions
●The available features and functions may vary based on the iOS version installed on the
connected device.
●Some Siri features are limited in Eyes Free mode. If you attempt to use an unavailable
function, Siri will inform you that the function is not available.
●If Siri is not enabled on the ce llular phone connected via Bluetooth, an error message
will be displayed on the screen.
●While a phone call is active, the Mobile Assistant cannot be used.
●If using the navigation feature of the cellular phone, ensure the active audio source is
Bluetooth audio or iPod in order to hear turn by turn direction prompts.
Page 418 of 724
4185-11. Bluetooth®
■When using the Bluetooth® audio system
●In the following situations, the system may not function.
• If the portable audio player is turned off
• If the portable audio player is not connected
• If the portable audio player’s battery is low
●There may be a delay if a cellular phone connection is made during Bluetooth® audio
play.
●Depending on the type of portable audio play er that is connected to the system, opera-
tion may differ slight ly and certain functions may not be available.
■When using the hands-free system
●The audio system is mu ted when making a call.
●If both parties speak at the same time, it may be difficult to hear.
●If the received call volume is over ly loud, an echo may be heard.
If the Bluetooth® phone is too close to the system, quality of the sound may deteriorate
and connection status may deteriorate.
●In the following situations, it may be difficult to hear the other party:
• When driving on unpaved roads
• When driving at high speeds
• If a window is open
• If the air conditioning is blow ing directly on the microphone
• If there is interference from the network of the cellular phone
●Depending on the type phone, certain functions may not be available.
■Conditions under which the system will not operate
●If using a cellular phone that does not support Bluetooth®
●If the cellular phone is turned off
●If you are outside of cellular phone service coverage
●If the cellular phone is not connected
●If the cellular phone’s battery is low
●When outgoing calls are controlled, due to heavy traffic on phone lines, etc.
●When the cellular phone itself cannot be used
●When transferring phonebook da ta from the cellular phone
Bluetooth®