check engine LEXUS RC350 2021 Owner's Manual
[x] Cancel search | Manufacturer: LEXUS, Model Year: 2021, Model line: RC350, Model: LEXUS RC350 2021Pages: 400, PDF Size: 7.9 MB
Page 123 of 400
1234-1. Before driving
4
Driving
Cargo capacity depends on the total
weight of the occupants.
(Cargo capacity) = (Total load capac-
ity) — (Total weight of occupants)
Steps for Determining Correct Load
Limit —
(1) Locate the statement “The com-
bined weight of occupants and cargo
should never exceed XXX kg or XXX
lbs.” on your vehicle’s placard.
(2) Determine the combined weight of
the driver and passengers that will be
riding in your vehicle.
(3) Subtract the combined weight of
the driver and passengers from XXX
kg or XXX lbs.
(4) The resulting figure equals the
available amount of cargo and luggage
load capacity.
For example, if the “XXX” amount
equals 1400 lbs. and there will be five
150 lb passengers in your vehicle, the
amount of available cargo and luggage
load capacity is 650 lbs. (1400 - 750
(5 150) = 650 lbs.)
(5) Determine the combined weight of
luggage and cargo being loaded on
the vehicle. That weight may not safely
exceed the available cargo and lug-
NOTICE
●RC300: Make sure to idle the engine
immediately after high-load driving.
Stop the engine only after the turbo-
charger has cooled down.
Failure to do so may cause damage to
the turbocharger.
■If you get a flat tire while driving
A flat or damaged ti re may cause the fol-
lowing situations. Hold the steering
wheel firmly and gradually depress the
brake pedal to slow down the vehicle.
●It may be difficult to control your vehi-
cle.
●The vehicle will make abnormal
sounds or vibrations.
●The vehicle will lean abnormally.
Information on what to do in case of a flat
tire (
P.307)
■When encountering flooded roads
Do not drive on a road that has flooded
after heavy rain etc. Doing so may cause
the following serious damage to the vehi-
cle:
●Engine stalling
●Short in electrical components
●Engine damage caused by water
immersion
In the event that you drive on a flooded
road and the vehicle is flooded, be sure
to have your Lexus dealer check the fol-
lowing:
●Brake function
●Changes in quantity and quality of oil
and fluid used for the engine, transmis-
sion, transfer (AWD models), differen-
tial, etc.
●Lubricant condition for the propeller
shaft, bearings and suspension joints
(where possible), and the function of
all joints, bearings, etc.
Cargo and luggage
Take notice of the following infor-
mation about storage precautions,
cargo capacity and load:
Capacity and distribution
Page 127 of 400
1274-2. Driving procedures
4
Driving
4-2.Driving procedures
1Check that the parking brake is set.
2 Check that the shift lever is in P.
3 Firmly depress the brake pedal.
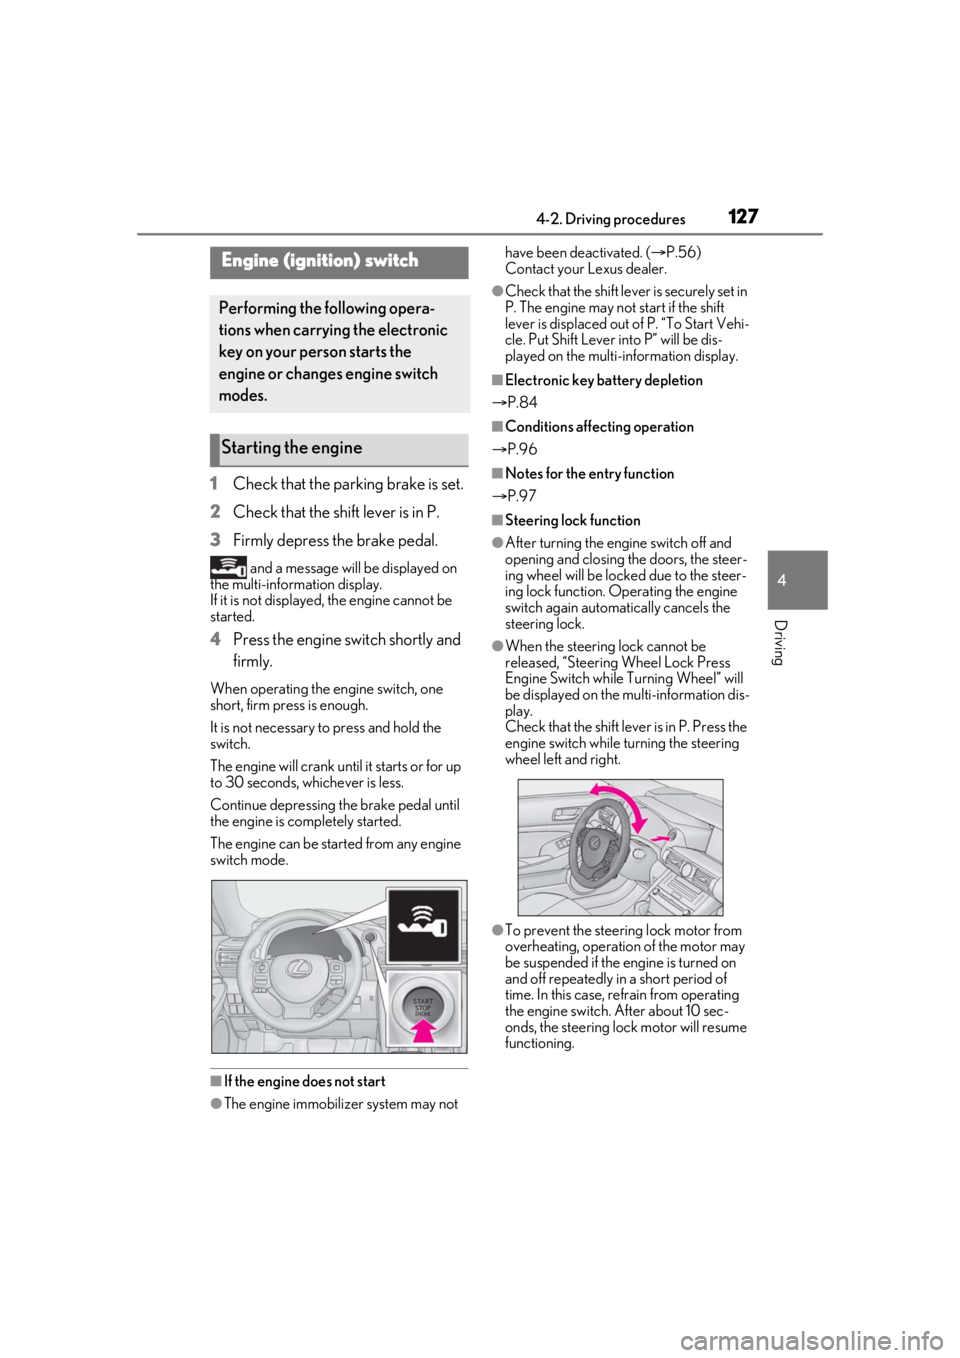
and a message will be displayed on
the multi-information display.
If it is not displayed, the engine cannot be
started.
4 Press the engine switch shortly and
firmly.
When operating the engine switch, one
short, firm press is enough.
It is not necessary to press and hold the
switch.
The engine will crank until it starts or for up
to 30 seconds, whichever is less.
Continue depressing the brake pedal until
the engine is completely started.
The engine can be started from any engine
switch mode.
■If the engine does not start
●The engine immobilizer system may not have been deactivated. (
P.56)
Contact your Lexus dealer.
●Check that the shift leve r is securely set in
P. The engine may not start if the shift
lever is displaced out of P. “To Start Vehi-
cle. Put Shift Lever into P” will be dis-
played on the multi-information display.
■Electronic key battery depletion
P.84
■Conditions affecting operation
P.96
■Notes for the entry function
P.97
■Steering lock function
●After turning the engine switch off and
opening and closing the doors, the steer-
ing wheel will be lock ed due to the steer-
ing lock function. Operating the engine
switch again automatically cancels the
steering lock.
●When the steering lock cannot be
released, “Steering Wheel Lock Press
Engine Switch while Turning Wheel” will
be displayed on the multi-information dis-
play.
Check that the shift lever is in P. Press the
engine switch while turning the steering
wheel left and right.
●To prevent the steering lock motor from
overheating, operation of the motor may
be suspended if the engine is turned on
and off repeatedly in a short period of
time. In this case, refrain from operating
the engine switch. After about 10 sec-
onds, the steering lock motor will resume
functioning.
Engine (ignition) switch
Performing the following opera-
tions when carryin g the electronic
key on your person starts the
engine or changes engine switch
modes.
Starting the engine
Page 128 of 400

1284-2. Driving procedures
■When “Access System with Elec. Key
Malfunction See Owner’s Manual” is
displayed on the multi-information dis-
play
The system may be malfunctioning. Have
the vehicle inspected by your Lexus dealer
immediately.
■Electronic key battery
P.277
■Operation of the engine switch
●If the switch is not pressed shortly and
firmly, the engine switch mode may not
change or the engine may not start.
●If attempting to restart the engine imme-
diately after turning the engine switch off,
the engine may not start in some cases.
After turning the engine switch off, please
wait a few seconds before restarting the
engine.
■Customization
If the smart access sy stem with push-button
start has been deactivated in a customized
setting, refer to P.317.
1 Stop the vehicle.
2 Set the parking brake ( P.137),
and shift the shift lever to P.
3 Press the engine switch.
4 Release the brake pedal and check
that the display on the meters is off.
■Automatic engine shut off feature
●The vehicle is equipped with a feature
that automatically shuts off the engine
when the shift lever is in P with the engine
running for an extended period.
●The engine will automatically shut off
after approximately 1 hour if it has been
left running while the shift lever is in P.
●The timer for the automatic engine shut
off feature will reset if the brake pedal is
depressed or if the shift lever is in a posi-
tion other than P.
●After the vehicle is parked, if the door is
locked with the door lock switch ( P.90)
from the inside or the mechanical key
( P.317) from the outside, the automatic
engine shut off feature will be disabled.
The timer for the automatic engine shut
off feature will be re-enabled if the
driver’s door is opened.
WARNING
■When starting the engine
Always start the engine while sitting in
the driver’s seat. Do not depress the
accelerator pedal while starting the
engine under any circumstances.
Doing so may cause an accident result-
ing in death or serious injury.
■Caution while driving
If engine failure occurs while the vehicle
is moving, do not lock or open the doors
until the vehicle reaches a safe and com-
plete stop. Activation of the steering lock
in this circumstance may lead to an acci-
dent, resulting in death or serious injury.
NOTICE
■When starting the engine
●Do not race a cold engine.
●If the engine becomes difficult to start
or stalls frequently, have your vehicle
checked by your Lexus dealer immedi-
ately.
■Symptoms indicating a malfunction
with the engine switch
If the engine switch seems to be operat-
ing somewhat differently than usual, such
as the switch sticking slightly, there may
be a malfunction. Contact your Lexus
dealer immediately.
Stopping the engine
Page 130 of 400
1304-2. Driving procedures
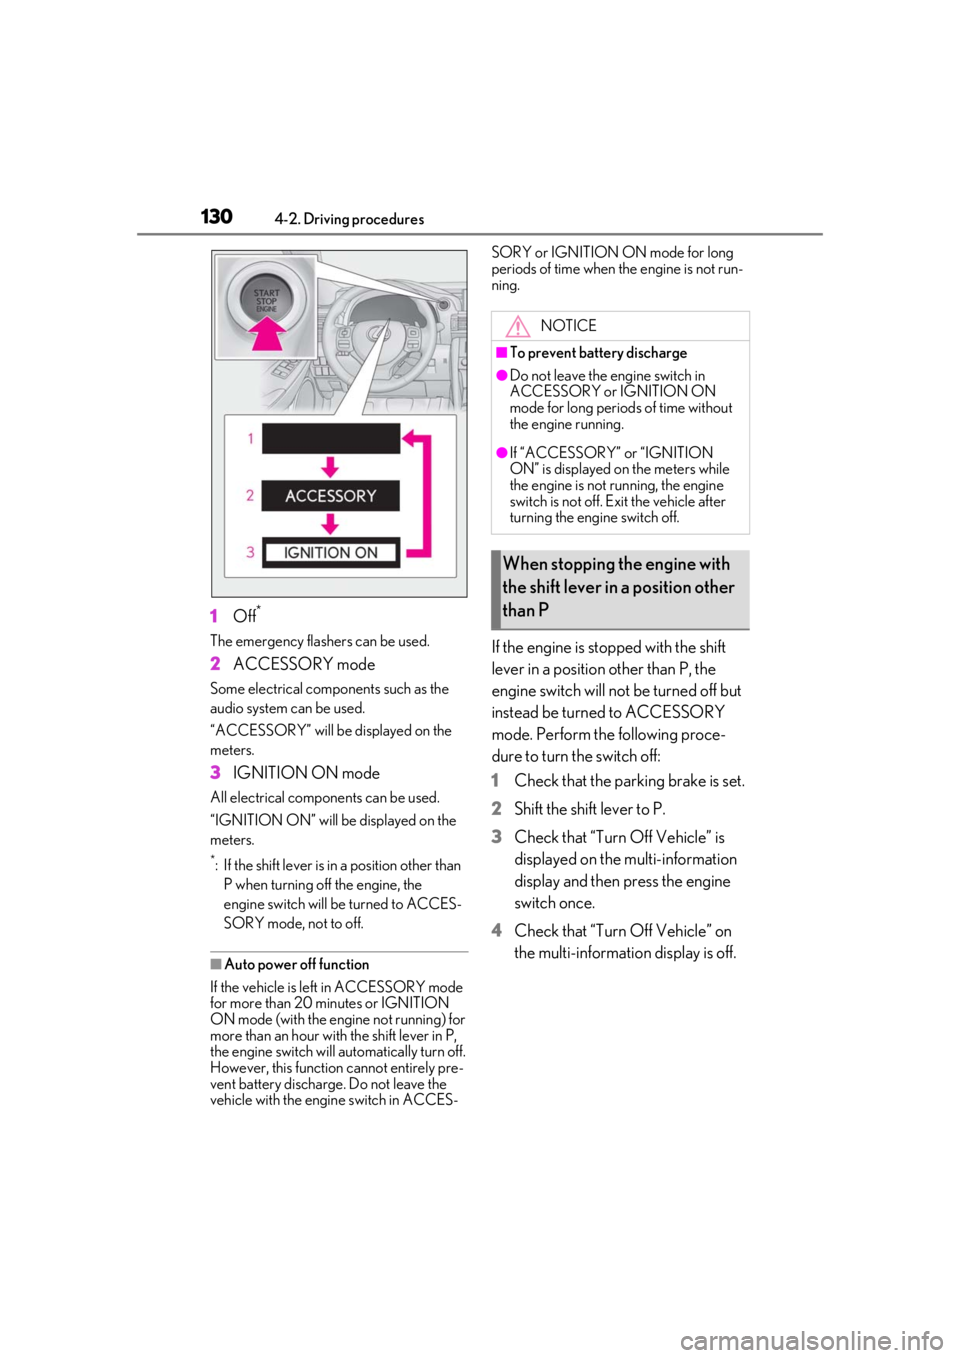
1Off*
The emergency flashers can be used.
2ACCESSORY mode
Some electrical components such as the
audio system can be used.
“ACCESSORY” will be displayed on the
meters.
3IGNITION ON mode
All electrical components can be used.
“IGNITION ON” will be displayed on the
meters.
*: If the shift lever is in a position other than
P when turning off the engine, the
engine switch will be turned to ACCES-
SORY mode, not to off.
■Auto power off function
If the vehicle is left in ACCESSORY mode
for more than 20 minutes or IGNITION
ON mode (with the engine not running) for
more than an hour with the shift lever in P,
the engine switch will automatically turn off.
However, this function cannot entirely pre-
vent battery discharge. Do not leave the
vehicle with the engine switch in ACCES- SORY or IGNITION ON mode for long
periods of time when the engine is not run-
ning.
If the engine is stopped with the shift
lever in a position other than P, the
engine switch will not be turned off but
instead be turned
to ACCESSORY
mode. Perform the following proce-
dure to turn the switch off:
1 Check that the parking brake is set.
2 Shift the shift lever to P.
3 Check that “Turn Off Vehicle” is
displayed on the multi-information
display and then press the engine
switch once.
4 Check that “Turn Off Vehicle” on
the multi-information display is off.
NOTICE
■To prevent battery discharge
●Do not leave the engine switch in
ACCESSORY or IGNITION ON
mode for long periods of time without
the engine running.
●If “ACCESSORY” or “IGNITION
ON” is displayed on the meters while
the engine is not running, the engine
switch is not off. Exit the vehicle after
turning the engine switch off.
When stopping the engine with
the shift lever in a position other
than P
Page 132 of 400

1324-2. Driving procedures
position, downshifting to 5 or 4.
( P.133)
●8-speed models: While driving in the D
position, downshifting to 7, 6, 5 or 4.
( P.133)
●When switching the driving mode to
sport mode while driving in the D posi-
tion. ( P.199)
■Restraining sudden start (Drive-Start
Control)
P.119
■AI-SHIFT
The AI-SHIFT automatica lly selects the suit-
able gear according to driver performance
and driving conditions.
The AI-SHIFT automatically operates when
the shift lever is in D. (Shifting the shift lever
to the M position cancels the function.)
While the engine switch is in
IGNITION ON mode, move the shift
lever with the brake pedal depressed.
When shifting the shift lever between P
and D, make sure that the vehicle is com-
pletely stopped.
■Shift lock system
The shift lock system is a system to prevent
accidental operation of the shift lever in
starting.
The shift lever can be shifted from P only
when the engine swit ch is in IGNITION
ON mode and the brake pedal is being
depressed.
■If the shift lever cannot be shifted from P
First, check whether the brake pedal is
being depressed.
If the shift lever cannot be shifted with your
foot on the brake pedal, there may be a
problem with the shift lock system. Have the
vehicle inspected by your Lexus dealer
immediately.
The following steps may be used as an
WARNING
■When driving on slippery road sur-
faces
Be careful of downshifting and sudden
acceleration, as this could result in the
vehicle skidding to th e side or spinning.
Shifting the shift lever
Page 133 of 400
1334-2. Driving procedures
4
Driving
emergency measure to ensure that the shift
lever can be shifted.
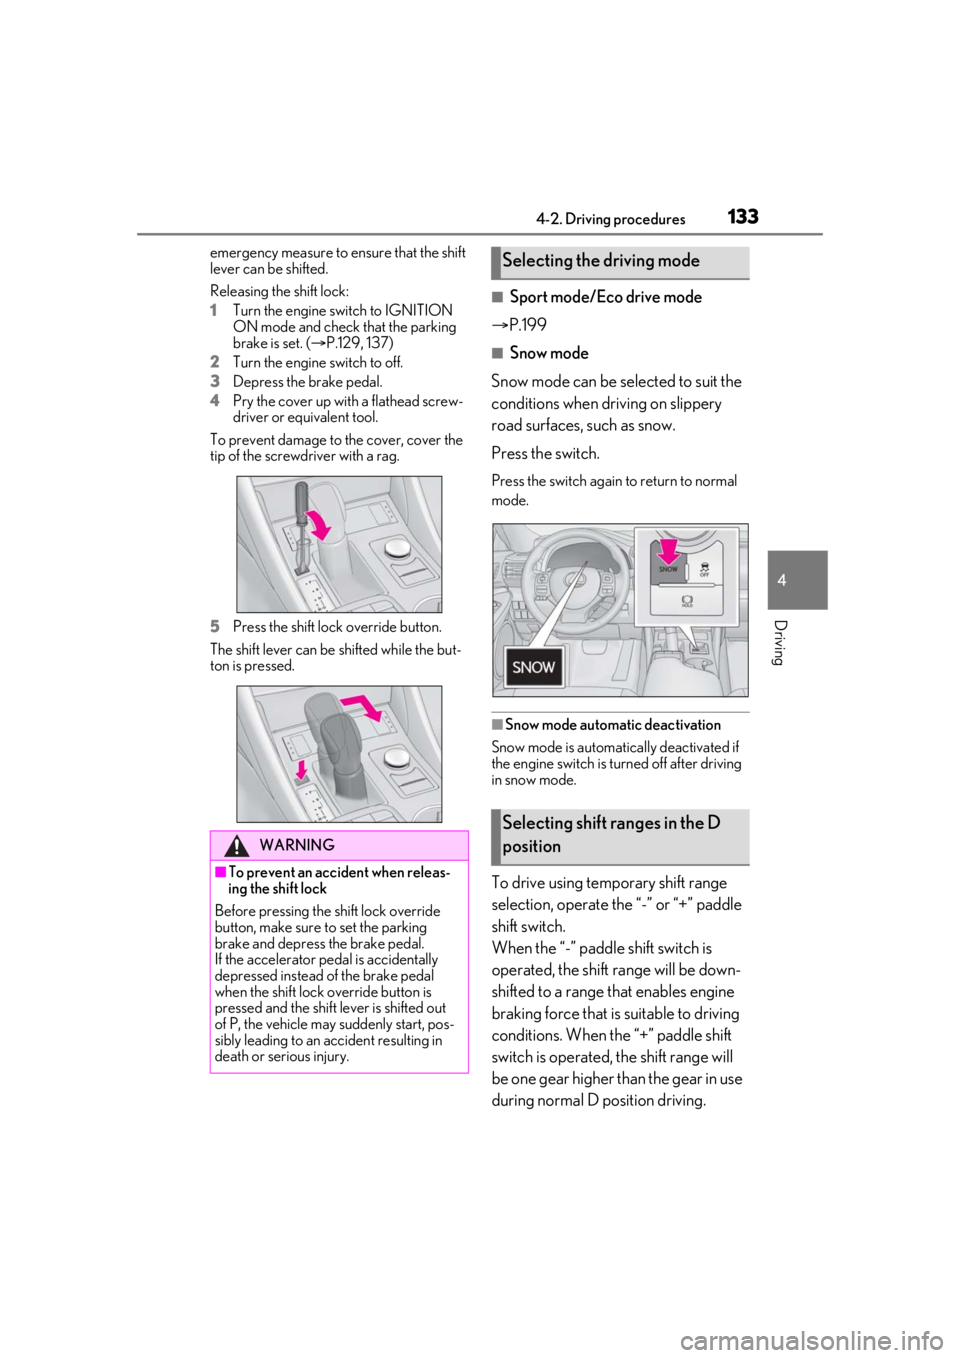
Releasing the shift lock:
1Turn the engine switch to IGNITION
ON mode and check that the parking
brake is set. ( P.129, 137)
2 Turn the engine switch to off.
3 Depress the brake pedal.
4 Pry the cover up with a flathead screw-
driver or equivalent tool.
To prevent damage to the cover, cover the
tip of the screwd river with a rag.
5 Press the shift lock override button.
The shift lever can be shifted while the but-
ton is pressed.
■Sport mode/Eco drive mode
P.199
■Snow mode
Snow mode can be se lected to suit the
conditions when driving on slippery
road surfaces, such as snow.
Press the switch.
Press the switch again to return to normal
mode.
■Snow mode automatic deactivation
Snow mode is automatically deactivated if
the engine switch is turned off after driving
in snow mode.
To drive using temporary shift range
selection, operate the “-” or “+” paddle
shift switch.
When the “-” paddle shift switch is
operated, the shift range will be down-
shifted to a range that enables engine
braking force that is suitable to driving
conditions. When the “+” paddle shift
switch is operated, the shift range will
be one gear higher than the gear in use
during normal D position driving.
WARNING
■To prevent an accident when releas-
ing the shift lock
Before pressing the shift lock override
button, make sure to set the parking
brake and depress the brake pedal.
If the accelerator pe dal is accidentally
depressed instead of the brake pedal
when the shift lock override button is
pressed and the shift lever is shifted out
of P, the vehicle may suddenly start, pos-
sibly leading to an accident resulting in
death or serious injury.
Selecting the driving mode
Selecting shift ranges in the D
position
Page 136 of 400
1364-2. Driving procedures
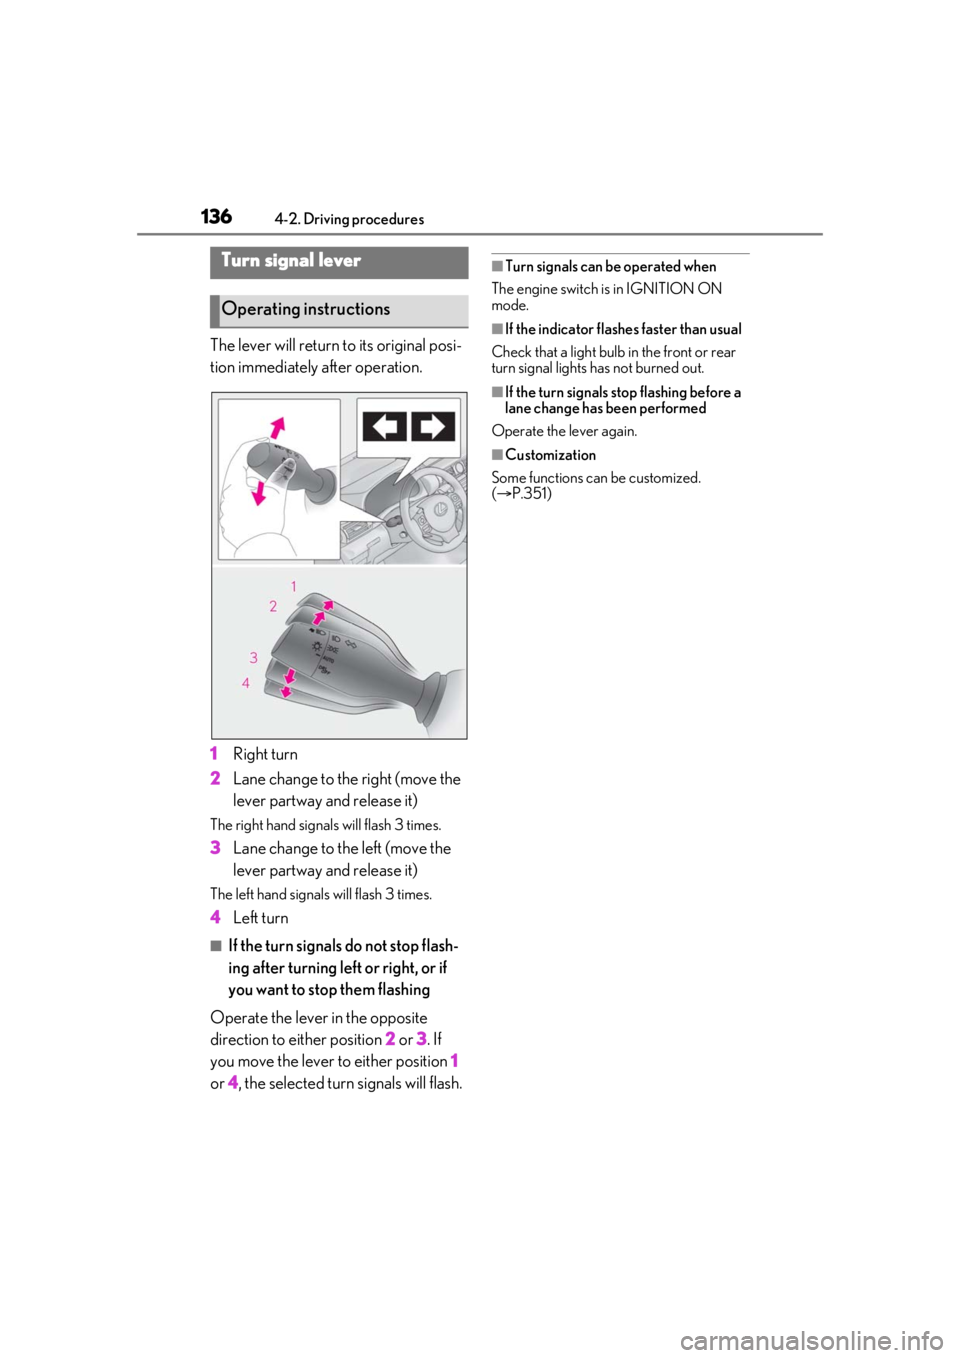
The lever will return to its original posi-
tion immediately after operation.
1Right turn
2 Lane change to the right (move the
lever partway and release it)
The right hand signals will flash 3 times.
3Lane change to the left (move the
lever partway and release it)
The left hand signals will flash 3 times.
4Left turn
■If the turn signals do not stop flash-
ing after turning left or right, or if
you want to stop them flashing
Operate the lever in the opposite
direction to either position 2 or 3 . If
you move the lever to either position 1
or 4, the selected turn signals will flash.
■Turn signals can be operated when
The engine switch is in IGNITION ON
mode.
■If the indicator flashes faster than usual
Check that a light bulb in the front or rear
turn signal lights has not burned out.
■If the turn signals stop flashing before a
lane change has been performed
Operate the lever again.
■Customization
Some functions can be customized.
( P.351)
Turn signal lever
Operating instructions
Page 153 of 400

1534-3. Operating the lights and wipers
4
Driving
once. After this, the headlight cleaners will
operate every 5th time the lever is pulled.
■The windshield wiper and washer can be
operated when
The engine switch is in IGNITION ON
mode.
■Dripping prevention wiper sweep
After performing a washing and wiping
operation several times, the wipers operate
one more time after a short delay to prevent
dripping.
However, this final wiper operation will not
be performed while driving.
■Effects of vehicle speed on wiper opera-
tion (vehicles with rain-sensing wind-
shield wipers)
Vehicle speed affects the following even
when the wipers are not in AUTO mode.
●Intermittent wiper interval
●Wiper operation when the washer is
being used (delay until drip prevention
wiper sweep occurs)
With low speed windshield wiper opera-
tion selected, wiper operation will be
switched from low speed to intermittent
wiper operation only when the vehicle is
stationary.
■Raindrop sensor (vehicles with
rain-sensing windshield wipers)
●The raindrop sensor judges the amount
of raindrops.
An optical sensor is adopted. It may not
operate properly when sunlight from the
rising or setting of the sun intermittently
strikes the windshield, or if bugs etc. are
present on the windshield.
●If the wiper is turned to AUTO mode
while the engine switch is in IGNITION ON mode, the wipers will operate once
to show that AUTO mode is activated.
●If the temperature of the raindrop sensor
is 185°F (85°C) or higher, or -22°F
(-30°C) or lower, automatic operation
may not occur. In this case, operate the
wipers in any mode other than AUTO
mode.
■When the windshield wipers are in tem-
porary operation (vehicles with
rain-sensing wind
shield wipers)
AUTO mode cannot be activated even if is pressed.
■If no windshield washer fluid sprays
Check that the washer nozzles are not
blocked if there is washer fluid in the wind-
shield washer fluid reservoir.
WARNING
■Caution regarding the use of wind-
shield wipers in AUTO mode
The windshield wipers may operate
unexpectedly if the sensor is touched or
the windshield is subj ect to vibration in
AUTO mode. Take care that your fingers
or anything else do not become caught
in the windshield wipers.
■Caution regarding the use of washer
fluid
When it is cold, do not use the washer
fluid until the windshield becomes warm.
The fluid may freeze on the windshield
and cause low visibility. This may lead to
an accident, resulting in death or serious
injury.
NOTICE
■When there is no washer fluid spray
from the nozzle
Damage to the washer fluid pump may
be caused if the lever is pulled toward
you and held continually.
Page 241 of 400

241
6
6
Maintenance and care
Maintenance and care
.6-1. Maintenance and careCleaning and protecting the vehi-cle exterior ................................ 242
Cleaning and protecting the vehi- cle interior ................................. 245
6-2. Maintenance Maintenance requirements........................................................ 248
General maintenance ............. 249
Emission inspection and mainte- nance (I/M) programs ......... 252
6-3. Do-it-yourself maintenance Do-it-yourself service precautions........................................................ 253
Hood............................................... 255
Positioning a floor jack............ 255
Engine compartment............... 257
Tires ................................................ 265
Tire inflation pressure .............. 273
Wheels........................................... 274
Air conditioning filter...............275
Electronic key battery ............. 277
Checking and replacing fuses ........................................................ 278
Headlight aim.............................. 280
Light bulbs ..................................... 281
Page 248 of 400
2486-2. Maintenance
6-2.Maintenance
■Repair and replacement
It is recommended that genuine Lexus parts
be used for repairs to ensure performance
of each system. If non-Lexus parts are used
in replacement or if a repair shop other than
a Lexus dealer perfor ms repairs, confirm
the warranty coverage.
■Allow inspection and repairs to be per-
formed by a Lexus dealer
●Lexus technicians are well-trained spe-
cialists and are kept up to date with the
latest service information. They are well
informed about the operations of all sys-
tems on your vehicle.
●Keep a copy of the repa ir order. It proves
that the maintenance that has been per-
formed is under warra nty coverage. If any
problem should arise while your vehicle is
under warranty, your Lexus dealer will
promptly take care of it.
General maintenance should be per-
formed on a daily basis. This can be
done by yourself or by a Lexus dealer.
Scheduled maintenance should be
performed at specified intervals
according to the maintenance sched-
ule.
For details about ma intenance items and
schedules, refer to the “Warranty and Ser-
vice Guide”, “Owner’s Manual Supple-
ment” or “Scheduled Maintenance”.
■Resetting the message indicating main-
tenance is required
After the required maintenance is pre-
formed according to the maintenance
schedule, please reset the message.
To reset the message, follow the procedures
described below:
1 Select on the multi-information dis-
play. ( P.76)
2 Press the or meter control
switch on the steeri ng wheel to select
“Vehicle Settings” then “Scheduled
Maintenance requirements
To ensure safe and economical driv-
ing, day-to-day care and regular
maintenance are essential. It is the
owner’s responsibility to perform
regular checks. Lexus recommends
the maintenance below.
WARNING
■If your vehicle is not properly main-
tained
Improper maintenanc e could result in
serious damage to the vehicle and possi-
ble death or serious injury.
■Handling of the battery
●Engine exhaust, some of its constitu-
ents, and a wide variety of automobile
components contain or emit chemicals
known to the State of California to
cause cancer and birth defects and
other reproductive harm. Work in a
well ventilated area.
●Oils, fuels and fluids contained in vehi-
cles as well as waste produced by
component wear contain or emit
chemicals known to the State of Cali-
fornia to cause cancer and birth
defects or other re productive harm.
Avoid exposure and wash any affected
area immediately.
●Battery posts, terminals and related
accessories contai n lead and lead
compounds which are known to cause
brain damage. Wash your hands after
handling. ( P.263)
General maintenance
Scheduled maintenance