remove seats LEXUS RC350 2021 Owners Manual
[x] Cancel search | Manufacturer: LEXUS, Model Year: 2021, Model line: RC350, Model: LEXUS RC350 2021Pages: 400, PDF Size: 7.9 MB
Page 35 of 400

351-1. For safe use
1
For safety and security
WARNING
●If a vinyl cover is put on the area where
the SRS knee airbag will deploy, be
sure to remove it.
●Do not use seat accessories which
cover the parts where the SRS side air-
bags inflate as they may interfere with
inflation of the airbags. Such accesso-
ries may prevent the side airbags from
activating correctly, disable the system
or cause the side airbags to inflate
accidentally, resulting in death or seri-
ous injury.
●Do not strike or appl y significant levels
of force to the area of the SRS airbag
components.
Doing so can cause the SRS airbags to
malfunction.
●Do not touch any of the component
parts immediately after the SRS air-
bags have deployed (inflated) as they
may be hot.
●If breathing becomes difficult after the
SRS airbags have deployed, open a
door or window to allow fresh air in, or
leave the vehicle if it is safe to do so.
Wash off any residue as soon as possi-
ble to prevent skin irritation.
●If the areas where the SRS airbags are
stored, such as the steering wheel pad
and front and rear pillar garnishes, are
damaged or cracked, have them
replaced by your Lexus dealer.
●Do not place anything, such as a cush-
ion, on the front passenger’s seat.
Doing so will disperse the passenger’s
weight, which prevents the sensor
from detecting the passenger’s weight
properly. As a result, the SRS front air-
bags for the front passenger may not
deploy in the event of a collision.
■Modification and disposal of SRS air-
bag system components
Do not dispose of your vehicle or per-
form any of the following modifications
without consulting your Lexus dealer.
The SRS airbags may malfunction or
deploy (inflate) accidentally, causing
death or serious injury.
●Installation, remova l, disassembly and
repair of the SRS airbags
●Repairs, modifications, removal or
replacement of the steering wheel,
instrument panel, dashboard, seats or
seat upholstery, front, side and rear pil-
lars or roof side rails
●Repairs or modifications of the front
fender, front bumper, or side of the
occupant compartment
●Installation of a grille guard (bull bars,
kangaroo bar, etc. ), snow plows,
winches or roof luggage carrier
●Modifications to the vehicle’s suspen-
sion system
●Installation of elec tronic devices such
as mobile two-way radios and CD
players
●Modifications to your vehicle for a per-
son with a physical disability
Page 37 of 400

371-1. For safe use
1
For safety and security
WARNING
●Make sure the “AIR BAG OFF” indica-
tor light is not illuminated when using
the seat belt extender for the front pas-
senger seat. If the “AIR BAG OFF”
indicator light is illuminated, discon-
nect the extender tongue from the seat
belt buckle, and reconnect the seat
belt. Reconnect the seat belt extender
after making sure the “AIR BAG ON”
indicator light is illu minated. If you use
the seat belt extender while the “AIR
BAG OFF” indicator light is illumi-
nated, the SRS airbags for the front
passenger may not activate, which
could cause death or serious injury in
the event of a collision.
●Do not apply a heavy load to the front
passenger seat or equipment (e.g.
seatback pocket).
●Do not put weight on the front passen-
ger seat by putting your hands or feet
on the front passenger seat seatback
from the rear passenger seat.
●Do not let a rear passenger lift the
front passenger seat with their feet or
press on the seatback with their legs.
●Do not put objects under the front pas-
senger seat.
●Do not recline the front passenger
seatback so far that it touches a rear
seat. This may cause the “AIR BAG
OFF” indicator light to be illuminated,
which indicates that the SRS airbags
for the front passenger will not activate
in the event of a severe accident. If the
seatback touches the rear seat, return
the seatback to a position where it
does not touch the rear seat. Keep the
front passenger seatback as upright as
possible when the vehicle is moving.
Reclining the seatback excessively
may lessen the effectiveness of the
seat belt system.
●If an adult sits in the front passenger
seat, the “AIR BAG ON” indicator light
is illuminated. If the “AIR BAG OFF”
indicator is illuminated, ask the passen-
ger to sit up straight, well back in the
seat, feet on the floor, and with the seat
belt worn correctly. If the “AIR BAG
OFF” indicator still remains illumi-
nated, either ask the passenger to
move to the rear seat, or if that is not
possible, move the front passenger
seat fully rearward.
●When it is unavoidable to install a for-
ward-facing child re straint system on
the front passenger seat, install the
child restraint system on the front pas-
senger seat in the proper order.
(
P.41)
●Do not modify or remove the front
seats.
●Do not kick the front passenger seat or
subject it to severe impact. Otherwise,
the SRS warning light may come on to
indicate a malfunction of the front pas-
senger occupant clas sification system.
In this case, contact your Lexus dealer
immediately.
●Child restraint systems installed on the
rear seat should not contact the front
seatbacks.
●Do not use a seat accessory, such as a
cushion and seat cover, that covers the
seat cushion surface.
●Do not modify or replace the uphol-
stery of the front seat.
●Do not place anything between the
console box and front passenger seat.
Otherwise, the system may not detect
the front passenger properly, leading
to improper operation of the airbags.
●Adjust the front passe nger seat so that
the head restraint does not touch the
ceiling. If the head re straint is left in
contact with the ceiling, the system
may not detect the front passenger
properly, leading to improper opera-
tion of the airbags.
Page 100 of 400

1003-3. Adjusting the seats
■Before entering/exiting the rear
seats
Remove the seat belt from the seat belt
guide. ( P.26)
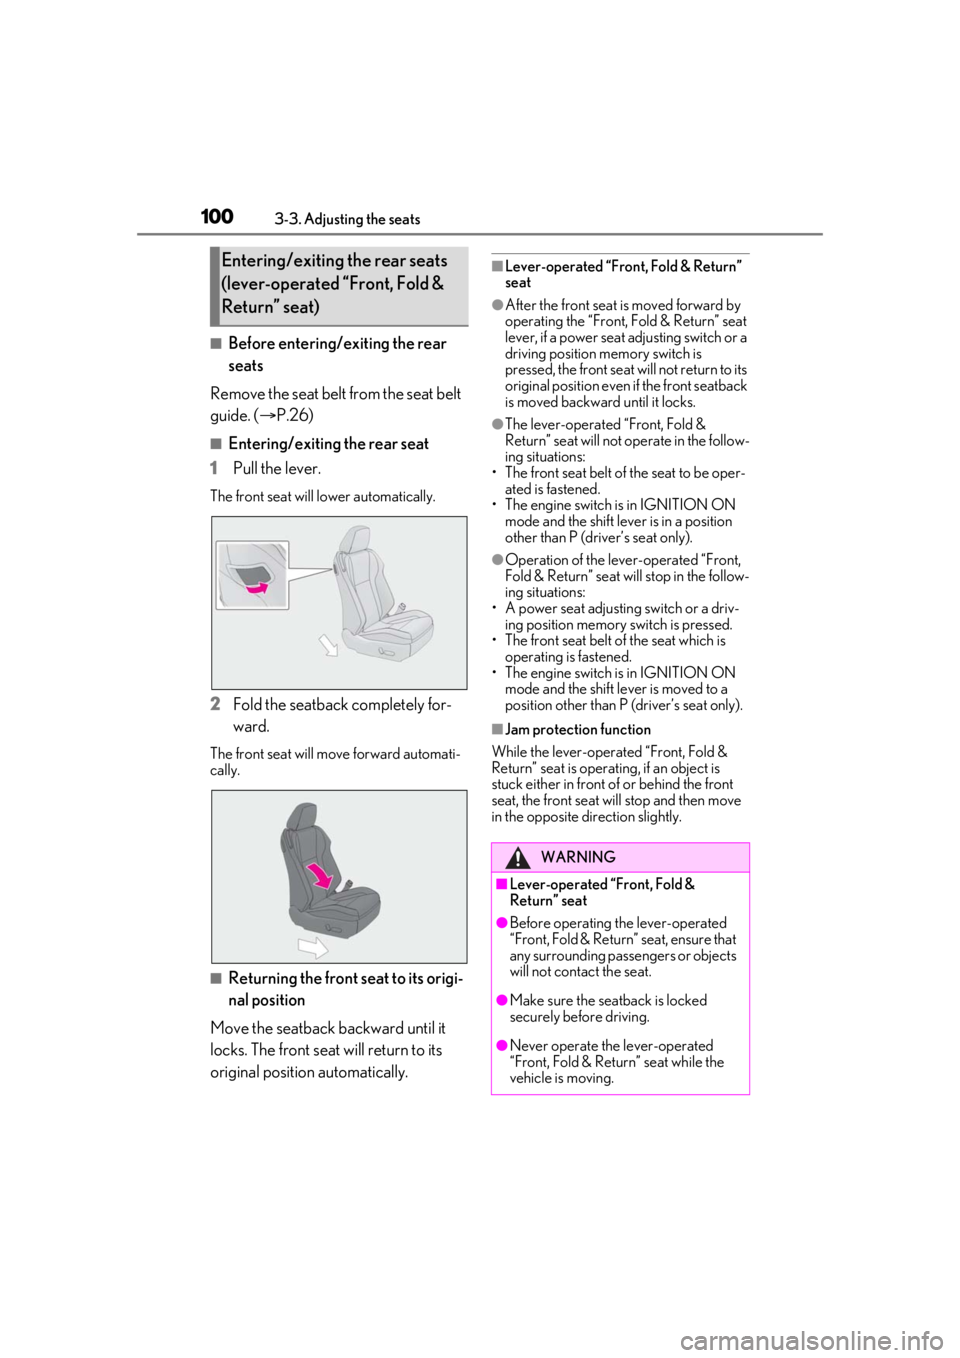
■Entering/exiting the rear seat
1 Pull the lever.
The front seat will lower automatically.
2Fold the seatback completely for-
ward.
The front seat will move forward automati-
cally.
■Returning the front seat to its origi-
nal position
Move the seatback backward until it
locks. The front seat will return to its
original position automatically.
■Lever-operated “Front, Fold & Return”
seat
●After the front seat is moved forward by
operating the “Front, Fold & Return” seat
lever, if a power seat adjusting switch or a
driving position memory switch is
pressed, the front seat will not return to its
original position even if the front seatback
is moved backward until it locks.
●The lever-operated “Front, Fold &
Return” seat will not operate in the follow-
ing situations:
• The front seat belt of the seat to be oper- ated is fastened.
• The engine switch is in IGNITION ON
mode and the shift lever is in a position
other than P (driver’s seat only).
●Operation of the lever-operated “Front,
Fold & Return” seat will stop in the follow-
ing situations:
• A power seat adjusting switch or a driv- ing position memory switch is pressed.
• The front seat belt of the seat which is
operating is fastened.
• The engine switch is in IGNITION ON mode and the shift lever is moved to a
position other than P (driver’s seat only).
■Jam protection function
While the lever-operat ed “Front, Fold &
Return” seat is operatin g, if an object is
stuck either in front of or behind the front
seat, the front seat will stop and then move
in the opposite direction slightly.
Entering/exiting the rear seats
(lever-operated “Front, Fold &
Return” seat)
WARNING
■Lever-operated “Front, Fold &
Return” seat
●Before operating th e lever-operated
“Front, Fold & Return” seat, ensure that
any surrounding passengers or objects
will not contact the seat.
●Make sure the seat back is locked
securely before driving.
●Never operate the lever-operated
“Front, Fold & Return” seat while the
vehicle is moving.
Page 105 of 400

1053-3. Adjusting the seats
3
Before driving
that has been registered to the driv-
ing position, and then unlock and
open the driver’s door using the
smart access system with push-but-
ton start or wireless remote control.
The driving position will move to the
recorded position (not including the steer-
ing wheel). However, the seat will move to
a position slightly behind the recorded
position in order to make entering the vehi-
cle easier.
If the driving position is in a position that
has already been recorded, the seat and
outside rear view mirrors will not move.
2 Turn the engine switch to ACCES-
SORY mode or IGNITION ON
mode, or fasten a seat belt.
The seat and steering wheel will move to
the recorded position.
■Recalling the driving position using the
memory recall function
●Different driving positions can be regis-
tered for each electronic key. Therefore,
the driving position that is recalled may
be different depending on the key being
carried.
●If a door other than the driver’s door is
unlocked with the smart access system
with push-button start, the driving posi-
tion cannot be recalled. In this case, press
the driving position button which has
been set.
■Customization
Some functions can be customized.
( P.351)
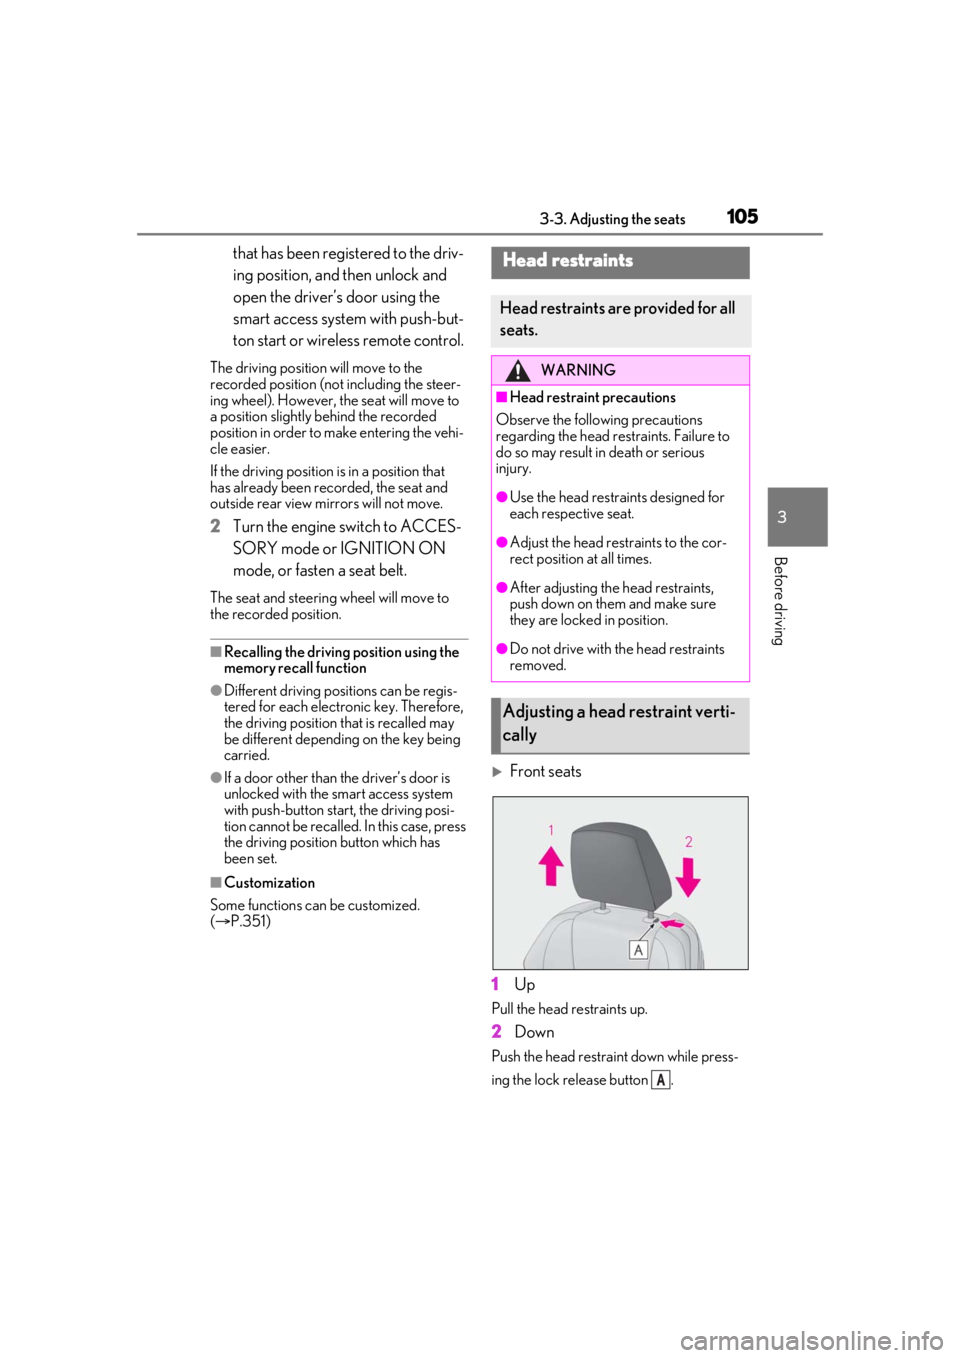
Front seats
1 Up
Pull the head restraints up.
2Down
Push the head restra int down while press-
ing the lock release button .
Head restraints
Head restraints are provided for all
seats.
WARNING
■Head restraint precautions
Observe the following precautions
regarding the head re straints. Failure to
do so may result in death or serious
injury.
●Use the head restraints designed for
each respective seat.
●Adjust the head restraints to the cor-
rect position at all times.
●After adjusting the head restraints,
push down on them and make sure
they are locked in position.
●Do not drive with the head restraints
removed.
Adjusting a head restraint verti-
cally
A
Page 246 of 400

2466-1. Maintenance and care
Remove dirt and dust using a vac-
WARNING
■Water in the vehicle
●Do not splash or spill liquid in the vehi-
cle.
Doing so may cause electrical compo-
nents, etc. to malfunction or catch fire.
●Do not get any of the SRS components
or wiring in the vehicle interior wet.
( P.28)
An electrical malfunction may cause the
airbags to deploy or not function prop-
erly, resulting in death or serious injury.
■Cleaning the interior (especially
instrument panel)
Do not use polish wax or polish cleaner.
The instrument panel may reflect off the
windshield, obstructing the driver’s view
and leading to an accident, resulting in
death or serious injury.
NOTICE
■Cleaning detergents
●Do not use the following liquids, as
they may discolor the vehicle interior
or cause streaks or damage to painted
surfaces:
• Center Display: Organic substances such as benzine or gasoline, alkaline
solutions, and alcohol
• Seats: Alkaline solutions, organic sub- stances such as thinner or benzine,
and alcohol
• Other parts: Organic substances such as benzine or gasoline, alkaline or
acidic solutions, dye, and bleach
●Do not use polish wax or polish
cleaner. The instrument panel’s or
other interior part’s painted surface
may be damaged.
■Preventing damage to leather sur-
faces
Observe the following precautions to
avoid damage to and deterioration of
leather surfaces:
●Remove any dust or dirt from leather
surfaces immediately.
●Do not expose the vehicle to direct
sunlight for extended periods of time.
Park the vehicle in the shade, espe-
cially during summer.
●Do not place items made of vinyl, plas-
tic, or containing wax on the uphol-
stery, as they may stick to the leather
surface if the vehicle interior heats up
significantly.
■Water on the floor
Do not wash the vehicle floor with water.
Vehicle systems such as the audio system
may be damaged if water comes into
contact with electrical components such
as the audio system above or under the
floor of the vehicle. Water may also
cause the body to rust.
■When cleaning the inside of the wind-
shield
Do not allow glass cleaner to contact the
lens. Also, do not touch the lens.
( P.158)
■Cleaning the inside of the rear win-
dow
●Do not use glass cleaner to clean the
rear window, as this may cause dam-
age to the rear window defogger
heater wires or antenna. Use a cloth
dampened with lukewarm water to
gently wipe the window clean. Wipe
the window in strokes running parallel
to the heater wires or antenna.
●Be careful not to scratch or damage
the heater wires or antenna.
Cleaning the leather areas